seats JEEP COMPASS 2019 Owner handbook (in English)
[x] Cancel search | Manufacturer: JEEP, Model Year: 2019, Model line: COMPASS, Model: JEEP COMPASS 2019Pages: 362, PDF Size: 6.23 MB
Page 8 of 362
WELCOME FROM FCA
HOW TO FIND YOUR OWNER’S MANUAL ONLINE.... 1
HOW TO USE THIS MANUAL
HOW TO USE THIS MANUAL............... 2Essential Information................ 2
Symbols........................ 2
ROLLOVER WARNING................... 2
IMPORTANT NOTICE................... 3
WARNINGS AND CAUTIONS............... 4
VEHICLE CHANGES/ALTERATIONS............ 4
GRAPHICAL TABLE OF CONTENTS
INSTRUMENT PANEL.................. 11
INTERIOR......................... 12
GETTING TO KNOW YOUR VEHICLE
KEYS........................... 13Key Fobs...................... 13
IGNITION SWITCH.................... 15Keyless Enter-N-Go — Ignition —
If Equipped..................... 15
Integrated/Manual Ignition — If Equipped . . 16
Electronic Steering Wheel Lock —
If Equipped..................... 16
Mechanical Steering Wheel Lock —
If Equipped..................... 16
REMOTE STARTING SYSTEM — IF EQUIPPED.... 17How To Use Remote Start — If Equipped . . . 17
To Enter Remote Start Mode........... 18
VEHICLE SECURITY ALARM — IF EQUIPPED..... 18To Arm The System................ 18
To Disarm The System.............. 19
Security System Manual Override........ 19
PREMIUM VEHICLE SECURITY ALARM —
IF EQUIPPED...................... 19
To Arm The System................ 20
To Disarm The System.............. 20
Security System Manual Override........ 21
DOORS.......................... 21Keyless Enter-N-Go — Passive Entry...... 21
Child-Protection Door Lock System —
Rear Doors..................... 23
SEATS .......................... 24Manual Adjustment (Rear Seats)........ 24
Driver Memory Seat — If Equipped....... 26
Front Heated Seats — If Equipped....... 28
Front Ventilated Seats — If Equipped..... 29
40/20/40 Rear Seat Armrest— If Equipped . 29
HEAD RESTRAINTS................... 29Front Head Restraint Adjustment........ 30
Rear Head Restraints............... 31
STEERING WHEEL................... 32Tilt/Telescoping Steering Column........ 32
Heated Steering Wheel — If Equipped..... 32
EXTERIOR LIGHTS.................... 33Multifunction Lever................ 33
Headlight Switch.................. 33
Daytime Running Lights (DRL) —
If Equipped..................... 34
High/Low Beam Switch.............. 34
Automatic High Beam Headlamp Control —
If Equipped..................... 34
Flash-To-Pass................... 34
Automatic Headlights — If Equipped..... 34
Headlight Time Delay............... 35
Lights-On Reminder — If Equipped...... 35
Front And Rear Fog Lights — If Equipped . . . 35
Turn Signals.................... 36Headlight Leveling System — If Equipped . . 36
Battery Saver Feature............... 36
WINDSHIELD WIPERS AND WASHERS......... 37Windshield Wiper Operation........... 37
Rain Sensing Wipers — If Equipped...... 38
Rear Window Wiper/Washer........... 39
CLIMATE CONTROLS................... 39Automatic Climate Controls Overview..... 39
Automatic Temperature Control (ATC)..... 47
Operating Tips................... 47
WINDOWS........................ 48Power Window Controls.............. 48
Auto-Down Feature................ 49
Auto-Up Feature With Anti-Pinch Protection . 49
Window Lockout Switch............. 49
Wind Buffeting.................. 50
POWER SUNROOF WITH POWER SHADE —
IF EQUIPPED....................... 50
Opening Sunroof.................. 51
Opening Sunroof — Vent............. 51
Closing Sunroof.................. 51
Opening Power Shade............... 51
Closing Power Shade............... 52
Pinch Protect Feature............... 52
Sunroof Maintenance............... 52
Ignition Off Operation............... 53
HOOD.......................... 53Opening The Hood................. 53
Closing The Hood................. 53
LIFTGATE......................... 54Opening....................... 54
Closing........................ 54
Power Liftgate — If Equipped.......... 54
INTERNAL EQUIPMENT................. 56Power Outlets.................... 56
TABLE OF CONTENTS
6
Page 10 of 362
Enabling And Disabling The ParkSense
Active Park Assist System........... 173
Exiting The Parking Space........... 174
LANESENSE — IF EQUIPPED............. 176LaneSense Operation.............. 176
Turning LaneSense On Or Off......... 177
LaneSense Warning Message.......... 177
Changing LaneSense Status.......... 179
PARKVIEW REAR BACK UP CAMERA —
IF EQUIPPED...................... 179
REFUELING THE VEHICLE............... 180
Emergency Fuel Filler Door Release..... 181
REFUELING THE VEHICLE — DIESEL ENGINE.... 183Adblue (UREA) — If Equipped........ 184
TRAILER TOWING................... 187Common Towing Definitions.......... 187
Trailer Towing Weights (Maximum
Trailer Weight Ratings)............. 189
Towing Requirements.............. 189
RECREATIONAL TOWING (BEHIND MOTORHOME,
ETC.).......................... 191
Towing This Vehicle Behind Another
Vehicle....................... 191
Recreational Towing — Front-Wheel Drive (FWD)
Models....................... 191
Recreational Towing — 4X4 Models..... 192
IN CASE OF EMERGENCY
HAZARD WARNING FLASHERS............ 193
BULB REPLACEMENT................. 193
Replacement Bulbs............... 193
Replacing Exterior Bulbs............ 195
FUSES......................... 199General Information............... 200Fuse Location................... 200
Engine Compartment Fuses/Distribution
Unit........................ 200
Engine Compartment Fuses/Auxiliary Unit . . 204
Interior Fuses................... 205
Rear Cargo Fuse/Relay Distribution Unit . . . 206
JACKING AND TIRE CHANGING............ 208Jack Location/Spare Tire Stowage....... 208
Preparations For Jacking............ 209
Jacking Instructions............... 210
Road Tire Installation.............. 213
EC Declaration Of Conformance........ 213
Jack Usage Precautions............ 214
TIRE SERVICE KIT — IF EQUIPPED.......... 215
JUMP STARTING.................... 220
Preparations For Jump Start.......... 221
Jump Starting Procedure............ 222
REFUELING IN EMERGENCY.............. 223
IF YOUR ENGINE OVERHEATS............. 223
GEAR SELECTOR OVERRIDE.............. 224
FREEING A STUCK VEHICLE.............. 225
TOWING A DISABLED VEHICLE............ 226
Without The Key Fob.............. 227
Front-Wheel Drive (FWD) Models —
WithKeyFob ................... 227
4x4 Models.................... 227
Emergency Tow Hooks.............. 228
Tow Eye Usage — If Equipped......... 229
ENHANCED ACCIDENT RESPONSE SYSTEM (EARS) . 230
EVENT DATA RECORDER (EDR)............ 230
SERVICING AND MAINTENANCE
SCHEDULED SERVICING................ 2311.4L Gasoline Engine.............. 231Diesel Engines.................. 235
ENGINE COMPARTMENT............... 2401.4L Engine.................... 240
2.0L Diesel Engine............... 241
1.6L Diesel Engine............... 242
Checking Oil Level................ 243
Adding Washer Fluid.............. 243
Maintenance-Free Battery........... 244
DEALER SERVICE................... 245Air Conditioner Maintenance.......... 245
Wiper Blades................... 245
Exhaust System................. 246
Cooling System.................. 247
Brake System.................. 248
Manual Transmission — If Equipped..... 249
Automatic Transmission............. 249
RAISING THE VEHICLE................. 250
TIRES.......................... 250
Tires — General Information......... 250
Tire Types..................... 255
Spare Tires — If Equipped.......... 256
Tire Chains (Traction Devices)......... 257
Tire Rotation Recommendations........ 258
STORING THE VEHICLE................ 259
BODYWORK....................... 260
Preserving The Bodywork............ 260
INTERIORS....................... 261Seats And Fabric Parts............. 261
Plastic And Coated Parts............ 262
Leather Parts................... 262
Glass Surfaces.................. 262
TECHNICAL SPECIFICATIONS
IDENTIFICATION DATA................. 263Vehicle Identification Number......... 263
TABLE OF CONTENTS
8
Page 14 of 362
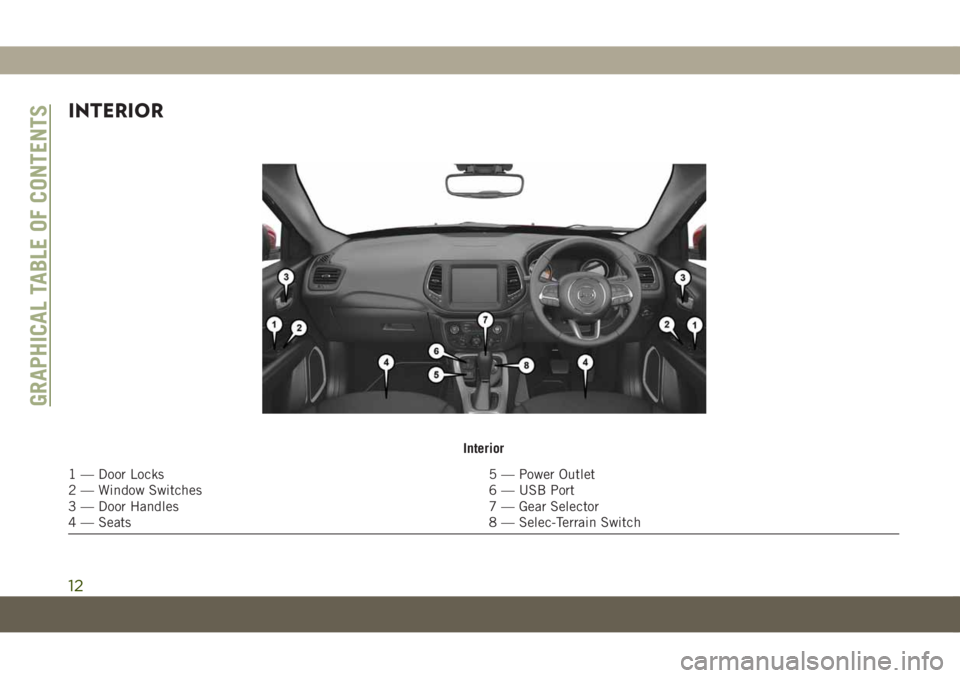
INTERIOR
Interior
1 — Door Locks 5 — Power Outlet
2 — Window Switches 6 — USB Port
3 — Door Handles 7 — Gear Selector
4 — Seats 8 — Selec-Terrain Switch
GRAPHICAL TABLE OF CONTENTS
12
Page 25 of 362
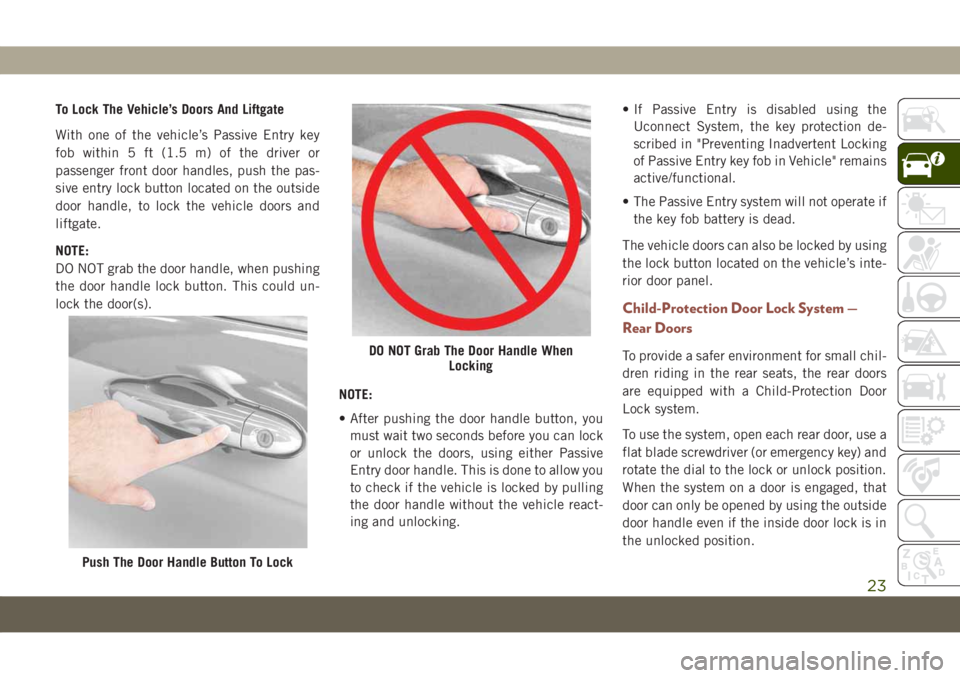
To Lock The Vehicle’s Doors And Liftgate
With one of the vehicle’s Passive Entry key
fob within 5 ft (1.5 m) of the driver or
passenger front door handles, push the pas-
sive entry lock button located on the outside
door handle, to lock the vehicle doors and
liftgate.
NOTE:
DO NOT grab the door handle, when pushing
the door handle lock button. This could un-
lock the door(s).
NOTE:
• After pushing the door handle button, you
must wait two seconds before you can lock
or unlock the doors, using either Passive
Entry door handle. This is done to allow you
to check if the vehicle is locked by pulling
the door handle without the vehicle react-
ing and unlocking.• If Passive Entry is disabled using the
Uconnect System, the key protection de-
scribed in "Preventing Inadvertent Locking
of Passive Entry key fob in Vehicle" remains
active/functional.
• The Passive Entry system will not operate if
the key fob battery is dead.
The vehicle doors can also be locked by using
the lock button located on the vehicle’s inte-
rior door panel.
Child-Protection Door Lock System —
Rear Doors
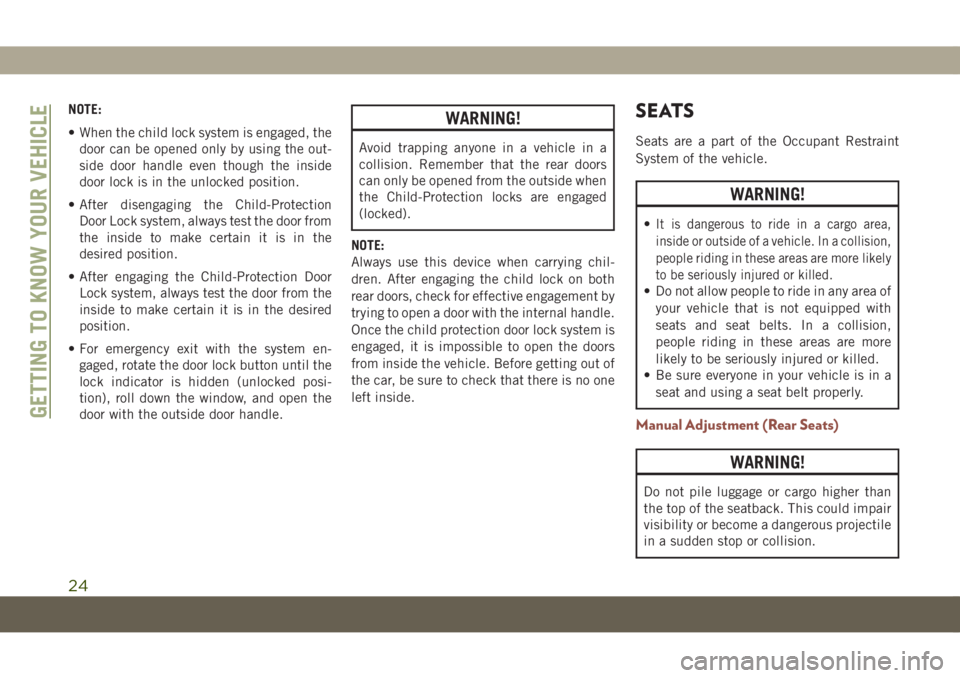
To provide a safer environment for small chil-
dren riding in the rear seats, the rear doors
are equipped with a Child-Protection Door
Lock system.
To use the system, open each rear door, use a
flat blade screwdriver (or emergency key) and
rotate the dial to the lock or unlock position.
When the system on a door is engaged, that
door can only be opened by using the outside
door handle even if the inside door lock is in
the unlocked position.
Push The Door Handle Button To Lock
DO NOT Grab The Door Handle When
Locking
23
Page 26 of 362
NOTE:
• When the child lock system is engaged, the
door can be opened only by using the out-
side door handle even though the inside
door lock is in the unlocked position.
• After disengaging the Child-Protection
Door Lock system, always test the door from
the inside to make certain it is in the
desired position.
• After engaging the Child-Protection Door
Lock system, always test the door from the
inside to make certain it is in the desired
position.
• For emergency exit with the system en-
gaged, rotate the door lock button until the
lock indicator is hidden (unlocked posi-
tion), roll down the window, and open the
door with the outside door handle.WARNING!
Avoid trapping anyone in a vehicle in a
collision. Remember that the rear doors
can only be opened from the outside when
the Child-Protection locks are engaged
(locked).
NOTE:
Always use this device when carrying chil-
dren. After engaging the child lock on both
rear doors, check for effective engagement by
trying to open a door with the internal handle.
Once the child protection door lock system is
engaged, it is impossible to open the doors
from inside the vehicle. Before getting out of
the car, be sure to check that there is no one
left inside.
SEATS
Seats are a part of the Occupant Restraint
System of the vehicle.
WARNING!
•It is dangerous to ride in a cargo area,
inside or outside of a vehicle. In a collision,
people riding in these areas are more likely
to be seriously injured or killed.
• Do not allow people to ride in any area of
your vehicle that is not equipped with
seats and seat belts. In a collision,
people riding in these areas are more
likely to be seriously injured or killed.
• Be sure everyone in your vehicle is in a
seat and using a seat belt properly.
Manual Adjustment (Rear Seats)
WARNING!
Do not pile luggage or cargo higher than
the top of the seatback. This could impair
visibility or become a dangerous projectile
in a sudden stop or collision.
GETTING TO KNOW YOUR VEHICLE
24
Page 27 of 362
60/40 Split Folding Rear Seat With
Fold-Flat Feature
To provide additional storage area, each rear
seat can be folded flat. This allows for ex-
tended cargo space and still maintains some
rear seating room.NOTE:
Prior to folding the rear seat, it may be
necessary to position the front seat to its
mid-track position. Also, be sure that the
front seats are fully upright and positioned
forward. This will allow the rear seat to fold
down easily.
WARNING!
• It is extremely dangerous to ride in a
cargo area, inside or outside of a vehicle.
In a collision, people riding in these
areas are more likely to be seriously
injured or killed.
• Do not allow people to ride in any area of
your vehicle that is not equipped with
seats and seat belts.
• Be sure everyone in your vehicle is in a
seat and using a seat belt properly.
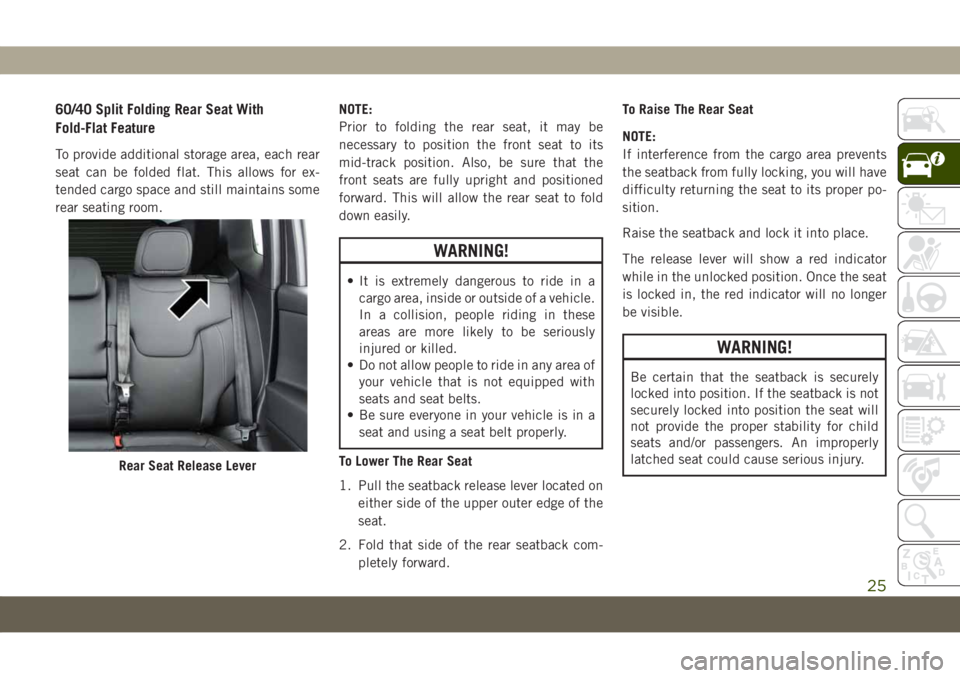
To Lower The Rear Seat
1. Pull the seatback release lever located on
either side of the upper outer edge of the
seat.
2. Fold that side of the rear seatback com-
pletely forward.To Raise The Rear Seat
NOTE:
If interference from the cargo area prevents
the seatback from fully locking, you will have
difficulty returning the seat to its proper po-
sition.
Raise the seatback and lock it into place.
The release lever will show a red indicator
while in the unlocked position. Once the seat
is locked in, the red indicator will no longer
be visible.
WARNING!
Be certain that the seatback is securely
locked into position. If the seatback is not
securely locked into position the seat will
not provide the proper stability for child
seats and/or passengers. An improperly
latched seat could cause serious injury.
Rear Seat Release Lever
25
Page 30 of 362
NOTE:
The Easy Entry/Exit feature is not enabled
when the vehicle is delivered from the fac-
tory. The Easy Entry/Exit feature is enabled
(or later disabled) through the programmable
features in the Uconnect system.
Refer to “Uconnect Settings/Customer Pro-
grammable Features” in “Multimedia” in the
Owner’s Manual for further information.
Front Heated Seats — If Equipped
The front heated seats control buttons are
located within the Uconnect system. You can
gain access to the control buttons through
the climate screen or the controls screen.
• Press the heated seat button
once to
turn the HI setting on.
• Press the heated seat button
a second
time to turn the LO setting on.
• Press the heated seat button
a third
time to turn the heating elements off.If your vehicle is equipped with automatic
temperature controls with an integrated cen-
ter stack, or manual temperature controls,
you’ll find the heated seat switches on the
switch bank below the radio screen.
If the HI level setting is selected, the system
will automatically switch to LO level after
approximately 60 minutes of continuous op-
eration. At that time, the display will change
from HI to LO, indicating the change. The LO
level setting will turn off automatically after
approximately 45 minutes.
NOTE:
The engine must be running for the heated
seats to operate.
Vehicles With Remote Start — If Equipped
On models that are equipped with remote
start, the heated seats can be programmed to
come on during a remote start.This feature can be programmed through the
Uconnect system. Refer to “Uconnect Set-
tings” in “Multimedia” in the Owner’s
Manual for further information.
WARNING!
• Persons who are unable to feel pain to
the skin because of advanced age,
chronic illness, diabetes, spinal cord in-
jury, medication, alcohol use, exhaus-
tion or other physical condition must
exercise care when using the seat
heater. It may cause burns even at low
temperatures, especially if used for long
periods of time.
• Do not place anything on the seat or
seatback that insulates against heat,
such as a blanket or cushion. This may
cause the seat heater to overheat. Sit-
ting in a seat that has been overheated
could cause serious burns due to the
increased surface temperature of the
seat.
GETTING TO KNOW YOUR VEHICLE
28
Page 31 of 362
Front Ventilated Seats — If Equipped
If your vehicle is equipped with ventilated
seats, the seat cushion and seat back will
have fans that draw the air from the passen-
ger compartment and move air through fine
perforations in the seat cover to help keep the
driver and front passenger cooler in higher
ambient temperatures. The fans operate at
two speeds, HI and LO.
The front ventilated seats control buttons are
located within the Uconnect system. You can
gain access to the control buttons through
the climate screen or the controls screen.
• Press the ventilated seat button
once
to choose HI.
• Press the ventilated seat button
a
second time to choose LO.
• Press the ventilated seat button
a third
time to turn the ventilated seat OFF.
NOTE:
The engine must be running for the ventilated
seats to operate.Vehicles With Remote Start — If Equipped
On models that are equipped with remote
start, the ventilated seats can be pro-
grammed to come on during a remote start.
This feature can be programmed through the
Uconnect system. Refer to your Owner's
Manual for further details.
40/20/40 Rear Seat Armrest— If Equipped
The center part of the rear seat can also be
used as a rear armrest with cup holders, pull
the rear armrest tab to release it from the seat
and pull forward.
WARNING!
Be certain that the seatback is securely
locked into position. If the seatback is not
securely locked into position the seat will
not provide the proper stability for child
seats and/or passengers. An improperly
latched seat could cause serious injury.
HEAD RESTRAINTS
Head restraints are designed to reduce the
risk of injury by restricting head movement in
the event of a rear impact. Head restraints
should be adjusted so that the top of the head
restraint is located above the top of your ear.
WARNING!
• All occupants, including the driver,
should not operate a vehicle or sit in a
vehicle’s seat until the head restraints
are placed in their proper positions in
order to minimize the risk of neck injury
in the event of a crash.
• Head restraints should never be ad-
justed while the vehicle is in motion.
Driving a vehicle with the head restraints
improperly adjusted or removed could
cause serious injury or death in the event
of a collision.
NOTE:
Do not reverse the head restraints (making
the rear of the head restraint face forward) in
an attempt to gain additional clearance to the
back of your head.
29
Page 100 of 362
OCCUPANT RESTRAINT
SYSTEMS
Some of the most important safety features in
your vehicle are the restraint systems:
Occupant Restraint Systems Features
• Seat Belt Systems
• Supplemental Restraint Systems (SRS) Air
Bags
• Child Restraints
Some of the safety features described in this
section may be standard equipment on some
models, or may be optional equipment on
others. If you are not sure, ask an authorized
dealer.
Important Safety Precautions
Please pay close attention to the information
in this section. It tells you how to use your
restraint system properly, to keep you and
your passengers as safe as possible.Here are some simple steps you can take to
minimize the risk of harm from a deploying
air bag:
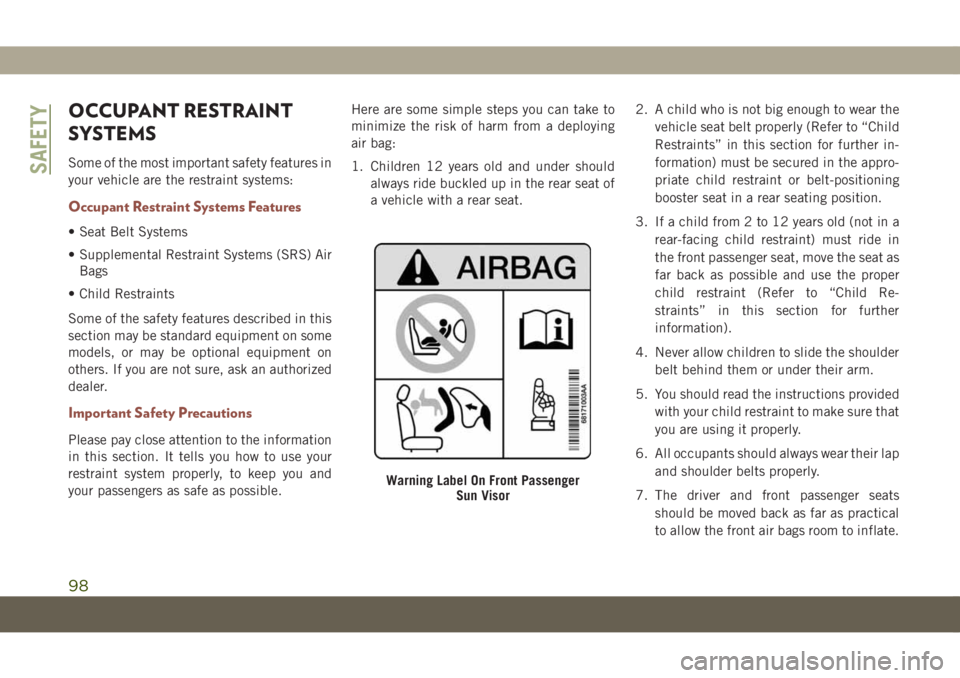
1. Children 12 years old and under should
always ride buckled up in the rear seat of
a vehicle with a rear seat.2. A child who is not big enough to wear the
vehicle seat belt properly (Refer to “Child
Restraints” in this section for further in-
formation) must be secured in the appro-
priate child restraint or belt-positioning
booster seat in a rear seating position.
3. If a child from 2 to 12 years old (not in a
rear-facing child restraint) must ride in
the front passenger seat, move the seat as
far back as possible and use the proper
child restraint (Refer to “Child Re-
straints” in this section for further
information).
4. Never allow children to slide the shoulder
belt behind them or under their arm.
5. You should read the instructions provided
with your child restraint to make sure that
you are using it properly.
6. All occupants should always wear their lap
and shoulder belts properly.
7. The driver and front passenger seats
should be moved back as far as practical
to allow the front air bags room to inflate.
Warning Label On Front Passenger
Sun Visor
SAFETY
98
Page 103 of 362
WARNING!
the vehicle. Always be sure you and
others in your vehicle are buckled up
properly.
• It is dangerous to ride in a cargo area,
inside or outside of a vehicle. In a colli-
sion, people riding in these areas are
more likely to be seriously injured or
killed.
• Do not allow people to ride in any area of
your vehicle that is not equipped with
seats and seat belts.
• Be sure everyone in your vehicle is in a
seat and using a seat belt properly. Oc-
cupants, including the driver, should al-
ways wear their seat belts whether or not
an air bag is also provided at their seat-
ing position to minimize the risk of se-
vere injury or death in the event of a
crash.
• Wearing your seat belt incorrectly could
make your injuries in a collision much
worse. You might suffer internal injuries,
or you could even slide out of the seat
belt. Follow these instructions to wear
WARNING!
your seat belt safely and to keep your
passengers safe, too.
• Two people should never be belted into a
single seat belt. People belted together
can crash into one another in a collision,
hurting one another badly. Never use a
lap/shoulder belt or a lap belt for more
than one person, no matter what their
size.
WARNING!
• A lap belt worn too high can increase the
risk of injury in a collision. The seat belt
forces won’t be at the strong hip and
pelvic bones, but across your abdomen.
Always wear the lap part of your seat belt
as low as possible and keep it snug.
• A twisted seat belt may not protect you
properly. In a collision, it could even cut
into you. Be sure the seat belt is flat
against your body, without twists. If you
can’t straighten a seat belt in your ve-
hicle, take it to an authorized dealer
immediately and have it fixed.
WARNING!
• A seat belt that is buckled into the wrong
buckle will not protect you properly. The
lap portion could ride too high on your
body, possibly causing internal injuries.
Always buckle your seat belt into the
buckle nearest you.
• A seat belt that is too loose will not
protect you properly. In a sudden stop,
you could move too far forward, increas-
ing the possibility of injury. Wear your
seat belt snugly.
• A seat belt that is worn under your arm is
dangerous. Your body could strike the
inside surfaces of the vehicle in a colli-
sion, increasing head and neck injury. A
seat belt worn under the arm can cause
internal injuries. Ribs aren’t as strong as
shoulder bones. Wear the seat belt over
your shoulder so that your strongest
bones will take the force in a collision.
• A shoulder belt placed behind you will
not protect you from injury during a
collision. You are more likely to hit your
head in a collision if you do not wear your
101