ECO mode JEEP COMPASS 2020 Owner handbook (in English)
[x] Cancel search | Manufacturer: JEEP, Model Year: 2020, Model line: COMPASS, Model: JEEP COMPASS 2020Pages: 328, PDF Size: 8.85 MB
Page 11 of 328
9
LANESENSE — IF EQUIPPED ................ 162
LaneSense Operation .................... 162
Turning LaneSense On Or Off ........ 162
LaneSense Warning Message ......... 162
Changing LaneSense Status........... 164
PARKVIEW REAR BACK UP CAMERA — IF
EQUIPPED ........................................... 164
REFUELING THE VEHICLE ...................... 165
Emergency Fuel Filler Door
Release ....................................... 166
REFUELING THE VEHICLE — DIESEL
ENGINE ............................................... 167
Adblue (UREA) — If Equipped....... 169
VEHICLE LOADING ............................... 171
Certification Label ........................ 171
TRAILER TOWING ................................. 171
Common Towing Definitions .......... 171
Trailer Towing Weights (Maximum Trailer
Weight Ratings) ........................... 173 Towing Requirements ................... 173
RECREATIONAL TOWING (BEHIND
MOTORHOME, ETC.) ............................ 175
Towing This Vehicle Behind Another
Vehicle ........................................ 175 Recreational Towing — Front-Wheel
Drive (FWD) Models ...................... 175 Recreational Towing — 4X4
Models ........................................ 176
IN CASE OF EMERGENCY
HAZARD WARNING FLASHERS...............177
BULB REPLACEMENT............................177
Replacement Bulbs ...................... 177
High Intensity Discharge (HID)
Headlamps — If Equipped ............ 179 Replacing Exterior Bulbs ............... 179
FUSES.................................................182
General Information...................... 182
Fuse Location .............................. 182
Engine Compartment Fuses/Distribution
Unit ............................................ 182 Engine Compartment Fuses/Auxiliary
Unit ............................................ 185 Interior Fuses............................... 186
Rear Cargo Fuse/Relay Distribution
Unit ............................................ 187
JACKING AND TIRE CHANGING ..............189
Jack Location/Spare Tire Stowage .. 189
Preparations For Jacking .............. 190
Jacking Instructions .................... 190
Road Tire Installation ................... 193
EC Declaration Of Conformance ..... 194
Jack Usage Precautions ................ 195
TIRE SERVICE KIT — IF EQUIPPED ........196
JUMP STARTING .................................202
Preparations For Jump Start .......... 202
Jump Starting Procedure............... 203
REFUELING IN EMERGENCY — IF
EQUIPPED............................................204 IF YOUR ENGINE OVERHEATS ...............204
GEAR SELECTOR OVERRIDE ...................205
FREEING A STUCK VEHICLE...................206
TOWING A DISABLED VEHICLE ..............207
Without The Key Fob .....................208
Front-Wheel Drive (FWD) Models — With
Key Fob .......................................208 4x4 Models ..................................208
Emergency Tow Hooks ..................209
Tow Eye Usage — If Equipped ......209
ENHANCED ACCIDENT RESPONSE SYSTEM
(EARS) ...............................................211 EVENT DATA RECORDER (EDR) ..............211
SERVICING AND MAINTENANCE
SCHEDULED SERVICING ........................212
1.4L Gasoline Engine ...................212
Diesel Engines ..............................217
ENGINE COMPARTMENT .......................222
1.4L Engine .................................222
2.0L Diesel Engine .......................223
1.6L Diesel Engine .......................224
Checking Oil Level ........................225
Adding Washer Fluid ....................225
Maintenance-Free Battery .............226
Pressure Washing..........................227
2020_JEEP_M6_UG_UK.book Page 9
Page 13 of 328
11
UCONNECT 4C/4C NAV WITH 8.4–INCH
DISPLAY ............................................. 274
Uconnect 4C/4C NAV At A
Glance ........................................ 274 Drag & Drop Menu Bar .................. 275
Radio .......................................... 275
Media Hub — USB/Audio Jack (AUX) —
If Equipped.................................. 276 Android Auto™ — If Equipped ...... 278
Apple CarPlay® Integration — If
Equipped ..................................... 282 Apps — If Equipped ..................... 284
UCONNECT SETTINGS .......................... 284STEERING WHEEL AUDIO CONTROLS ..... 285
Radio Operation ........................... 285
Media Mode ................................. 285
NAVIGATION — IF EQUIPPED ................ 285
Changing The Navigation Voice Prompt
Volume ........................................ 285 Finding Points Of Interest.............. 286
Finding A Place By Spelling The
Name .......................................... 286 One-Step Voice Destination Entry ... 286
Setting Your Home Location .......... 286
Home .......................................... 287
Adding A Stop .............................. 287
Taking A Detour ........................... 287
Map Update ................................. 287
UCONNECT PHONE ...............................288
Uconnect Phone (Bluetooth Hands Free
Calling) ....................................... 288 Pairing (Wirelessly Connecting) Your
Mobile Phone To The Uconnect
System ........................................ 289 Common Phone Commands
(Examples) ................................. 292 Mute (Or Unmute) Microphone During
Call............................................. 293 Transfer Ongoing Call Between Handset
And Vehicle ................................. 293 Phonebook ................................. 293
Voice Command Tips .................... 293
Changing The Volume ................... 293
Using Do Not Disturb ................... 293
Incoming Text Messages .............. 294
Helpful Tips And Common Questions To
Improve Bluetooth® Performance With
Your Uconnect System.................. 295
UCONNECT VOICE RECOGNITION QUICK
TIPS ...................................................296
Introducing Uconnect ................... 296
Get Started .................................. 297
Basic Voice Commands ................. 297
Radio .......................................... 297
Media ......................................... 298
Phone ......................................... 299 Voice Text Reply — If Equipped .....300
Climate ........................................301
Navigation (4C NAV) — If
Equipped .....................................301 Siri® Eyes Free — If Equipped .....302
Using Do Not Disturb ...................302
Android Auto™ — If Equipped ......302
Apple CarPlay® — If Equipped .....303
Additional Information...................304
CUSTOMER ASSISTANCE
IF YOU NEED ASSISTANCE ...................305
ARGENTINA .................................305
AUSTRALIA .................................305
AUSTRIA .....................................305
BALANCE OF THE CARIBBEAN .....306
BELGIUM ....................................306
BOLIVIA.......................................306
BRAZIL ........................................306
BULGARIA ...................................306
CHILE .........................................306
CHINA .........................................307
COLOMBIA...................................307
COSTA RICA ................................307
CROATIA .....................................307
CZECH REPUBLIC ........................307
2020_JEEP_M6_UG_UK.book Page 11
Page 16 of 328
GETTING TO KNOW YOUR VEHICLE
14
The emergency key allows for entry into the
vehicle should the battery in the vehicle or
the key fob become depleted. The emer-
gency key is also for locking the glove
compartment. You can keep the emergency
key with you when valet parking.
To remove the emergency key from the
keyless ignition key fob, slide the mechan -
ical latch at the top of the key fob sideways
with your thumb and then pull the key out
with your other hand.
To Unlock The Doors And Liftgate
Push and release the unlock button on the
key fob once to unlock the driver's door or
twice within five seconds to unlock all doors
and the liftgate.
All doors can be programmed to unlock on
the first push of the unlock button. Refer to
“Uconnect Settings” in “Multimedia” in the
Owner’s Manual for further information.
To Lock The Doors And Liftgate
Push and release the lock button on the key
fob to lock all doors and liftgate.
Request For Additional Key Fobs
NOTE:
Only key fobs that are programmed to the
vehicle electronics can be used to start and
operate the vehicle. Once a key fob is
programmed to a vehicle, it cannot be
programmed to any other vehicle.
NOTE:
Used batteries may be harmful to the envi -
ronment if not disposed of correctly. Always
dispose of used batteries by specialized
battery disposal container, or by taking used
batteries to an authorized dealer. Duplication of key fobs may be performed at
an authorized dealer. This procedure
consists of programming a blank key fob to
the vehicle electronics. A blank key fob is
one that has never been programmed.
NOTE:
When having the Sentry Key Immobilizer
System serviced, bring all vehicle keys with
you to an authorized dealer.
IGNITION SWITCH
Keyless Enter-N-Go — Ignition (If
Equipped)
This feature allows the driver to operate the
ignition with the push of a button as long as
the key fob is in the passenger compartment.
The START/STOP push button ignition has
three operating modes. The three modes are
OFF, ON/RUN, and START.
NOTE:
If the ignition state/mode does not change
with the push of a button, the key fob may
have a low or depleted battery. In this situa
-
tion, a back up method can be used to
operate the ignition switch. Put the nose side
WARNING!
Push the Mechanical Key Release Button
only with the key fob facing away from
your body, especially your eyes and objects
that may be damaged, such as clothing. WARNING!
Always remove the key fobs from the
vehicle and lock all doors when leaving
the vehicle unattended.
For vehicles equipped with Keyless
Enter-N-Go — Ignition, always
remember to place the ignition in the
OFF mode.
2020_JEEP_M6_UG_UK.book Page 14
Page 18 of 328
GETTING TO KNOW YOUR VEHICLE
16
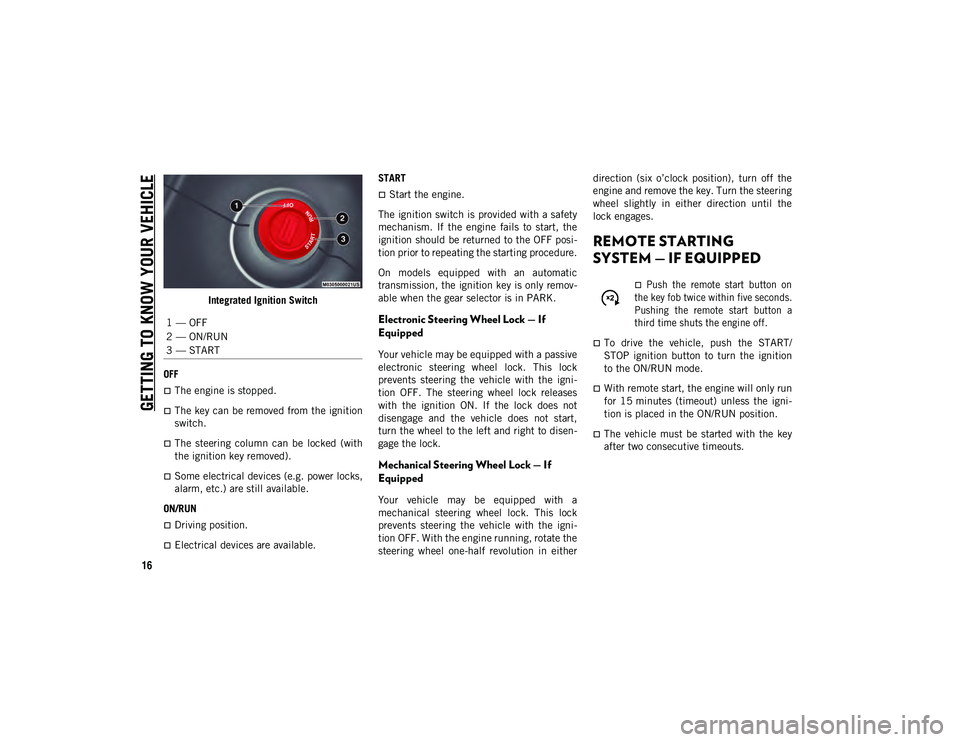
Integrated Ignition Switch
OFF
The engine is stopped.
The key can be removed from the ignition
switch.
The steering column can be locked (with
the ignition key removed).
Some electrical devices (e.g. power locks,
alarm, etc.) are still available.
ON/RUN
Driving position.
Electrical devices are available. START
Start the engine.
The ignition switch is provided with a safety
mechanism. If the engine fails to start, the
ignition should be returned to the OFF posi -
tion prior to repeating the starting procedure.
On models equipped with an automatic
transmission, the ignition key is only remov -
able when the gear selector is in PARK.
Electronic Steering Wheel Lock — If
Equipped
Your vehicle may be equipped with a passive
electronic steering wheel lock. This lock
prevents steering the vehicle with the igni -
tion OFF. The steering wheel lock releases
with the ignition ON. If the lock does not
disengage and the vehicle does not start,
turn the wheel to the left and right to disen -
gage the lock.
Mechanical Steering Wheel Lock — If
Equipped
Your vehicle may be equipped with a
mechanical steering wheel lock. This lock
prevents steering the vehicle with the igni -
tion OFF. With the engine running, rotate the
steering wheel one-half revolution in either direction (six o’clock position), turn off the
engine and remove the key. Turn the steering
wheel slightly in either direction until the
lock engages.
REMOTE STARTING
SYSTEM — IF EQUIPPED
Push the remote start button on
the key fob twice within five seconds.
Pushing the remote start button a
third time shuts the engine off.
To drive the vehicle, push the START/
STOP ignition button to turn the ignition
to the ON/RUN mode.
With remote start, the engine will only run
for 15 minutes (timeout) unless the igni -
tion is placed in the ON/RUN position.
The vehicle must be started with the key
after two consecutive timeouts.
1 — OFF
2 — ON/RUN
3 — START
2020_JEEP_M6_UG_UK.book Page 16
Page 19 of 328
17
How To Use Remote Start — If Equipped
Push the remote start button on the key fob
twice within five seconds. Pushing the
remote start button a third time shuts the
engine off.
To drive the vehicle, push the unlock button,
insert the key in the ignition and turn to the
ON/RUN position.
NOTE:
With remote start, the engine will only run
for 15 minutes (timeout) unless the igni-
tion key is placed in the ON/RUN position.
The vehicle must be started with the key
after two consecutive timeouts. All of the following conditions must be met
before the engine will remote start:
Gear selector in PARK
Doors closed
Hood closed
Liftgate closed
Hazard switch off
Brake switch inactive (brake pedal not
pushed)
Battery at an acceptable charge level
Check engine light shall not be present
System not disabled from previous remote
start event
Vehicle alarm system indicator flashing
Ignition in STOP/OFF position
Fuel level meets minimum requirement
Vehicle security alarm is not signaling an
intrusion
To Enter Remote Start Mode
Push and release the remote start button on
the key fob twice within five seconds. The
vehicle doors will lock, the parking lights will
flash, and the horn will chirp twice (if
programmed). Then, the engine will start,
and the vehicle will remain in the Remote
Start mode for a 15 minute cycle.
WARNING!
Do not start or run an engine in a closed
garage or confined area. Exhaust gas
contains Carbon Monoxide (CO) which is
odorless and colorless. Carbon Monoxide
is poisonous and can cause serious
injury or death when inhaled.
Keep key fobs away from children. Oper
-
ation of the Remote Start System,
windows, door locks or other controls
could cause serious injury or death.
WARNING!
Do not start or run an engine in a closed
garage or confined area. Exhaust gas
contains Carbon Monoxide (CO) which is
odorless and colorless. Carbon Monoxide
is poisonous and can cause serious
injury or death when inhaled.
Keep key fobs away from children. Oper -
ation of the Remote Start System,
windows, door locks or other controls
could cause serious injury or death.
2020_JEEP_M6_UG_UK.book Page 17
Page 20 of 328
GETTING TO KNOW YOUR VEHICLE
18
NOTE:
If an engine fault is present or fuel level is
low, the vehicle will start and then shut
down in 10 seconds.
The park lamps will turn on and remain on
during Remote Start mode.
For security, power window and power
sunroof operations (if equipped) are
disabled when the vehicle is in the
Remote Start mode.
The engine can be started two consecutive
times with the key fob. However, the igni-
tion must be cycled by pushing the
START/STOP ignition button twice (or the
ignition switch must be placed in the ON/
RUN position) before you can repeat the
start sequence for a third cycle.
VEHICLE SECURITY ALARM
— IF EQUIPPED
The vehicle security alarm monitors the
vehicle doors, hood, liftgate, and the Keyless
Enter-N-Go — Ignition for unauthorized
operation. While the vehicle security alarm is
armed, interior switches for door locks and
liftgate release are disabled. If something
triggers the alarm, the vehicle security alarm will provide the following audible and visible
signals:
The horn will pulse
The turn signals will flash
The vehicle security light in the instru
-
ment cluster display will flash
To Arm The System
Follow these steps to arm the vehicle secu -
rity alarm:
1. Make sure the vehicle’s ignition is placed in the OFF position.
For vehicles equipped with KeylessEntry, make sure the vehicle’s keyless
ignition system is OFF.
2. Perform one of the following methods to lock the vehicle:
Push the lock button on the interiorpower door lock switch with the driverand/or passenger door open.
Push the lock button on the exterior Passive Entry Door Handle with a valid
key fob available in the same exterior
zone. Refer to "Doors" in this chapter for further information.
Push the lock button on the exterior Passive Entry Door Handle with a valid
key fob available in the same exterior
zone.
Push the lock button on the key fob.
3. If any doors are open, close them.
To Disarm The System
The vehicle security alarm can be disarmed
using any of the following methods:
Push the unlock button on the key fob.
Grasp the passive entry door handle to
unlock the door, refer to "Doors" in this
chapter for further information.
Cycle the ignition out of the OFF position
to disarm the system.
NOTE:
The driver's door key cylinder and the lift -
gate button on the key fob cannot arm or
disarm the vehicle security alarm.
The vehicle security alarm remains armed
during power liftgate entry. Pushing the
liftgate button will not disarm the vehicle
2020_JEEP_M6_UG_UK.book Page 18
Page 29 of 328
27
4. Push and release the lock button on thekey fob within 10 seconds.
NOTE:
Your key fob can be unlinked to your memory
settings by pushing the set (S) button,
followed by pushing the unlock button on the
key fob within 10 seconds.
Memory Position Recall
NOTE:
The vehicle must be in PARK to recall
memory positions. If a recall is attempted
when the vehicle is not in PARK, a message
will display in the instrument cluster display.
To recall the memory settings for driver
one, push memory button (1) or the unlock
button on the key fob linked to memory
position 1.
To recall the memory settings for driver
two, push memory button (2) or the unlock
button on the key fob linked to memory
position 2.
A recall can be canceled by pushing any of
the memory buttons (S, 1, or 2) during a
recall. When a recall is canceled, the driver
seat will stop moving. A delay of one second
will occur before another recall can be
selected.
Front Heated Seats — If Equipped
The front heated seats control buttons are
located within the Uconnect system. You can
gain access to the control buttons through
the climate screen or the controls screen.
Press the heated seat button once to
turn the HI setting on.
Press the heated seat button a second
time to turn the LO setting on.
Press the heated seat button a third
time to turn the heating elements off.
If your vehicle is equipped with automatic
temperature controls with an integrated
center stack, or manual temperature
controls, you’ll find the heated seat switches
on the switch bank below the radio screen.
If the HI level setting is selected, the system
will automatically switch to LO level after
approximately 60 minutes of continuous
operation. At that time, the display will
change from HI to LO, indicating the change.
The LO level setting will turn off automati -
cally after approximately 45 minutes.
NOTE:
The engine must be running for the heated
seats to operate. Vehicles With Remote Start — If Equipped
On models that are equipped with remote
start, the heated seats can be programmed to
come on during a remote start.
This feature can be programmed through the
Uconnect system. Refer to “Uconnect
Settings” in “Multimedia” in the Owner’s
Manual for further information.
WARNING!
Persons who are unable to feel pain to
the skin because of advanced age,
chronic illness, diabetes, spinal cord
injury, medication, alcohol use, exhaus-
tion or other physical condition must
exercise care when using the seat heater.
It may cause burns even at low tempera-
tures, especially if used for long periods
of time.
Do not place anything on the seat or
seatback that insulates against heat,
such as a blanket or cushion. This may
cause the seat heater to overheat. Sitting
in a seat that has been overheated could
cause serious burns due to the increased
surface temperature of the seat.
2020_JEEP_M6_UG_UK.book Page 27
Page 30 of 328
GETTING TO KNOW YOUR VEHICLE
28
Front Ventilated Seats — If Equipped
If your vehicle is equipped with ventilated
seats, the seat cushion and seat back will
have fans that draw the air from the
passenger compartment and move air
through fine perforations in the seat cover to
help keep the driver and front passenger
cooler in higher ambient temperatures. The
fans operate at two speeds, HI and LO.
The front ventilated seats control buttons are
located within the Uconnect system. You can
gain access to the control buttons through
the climate screen or the controls screen.
Press the ventilated seat button once to
choose HI.
Press the ventilated seat button a
second time to choose LO.
Press the ventilated seat button a third
time to turn the ventilated seat off.
NOTE:
The engine must be running for the venti -
lated seats to operate.
Vehicles With Remote Start — If Equipped
On models that are equipped with remote start,
the ventilated seats can be programmed to
come on during a remote start.
This feature can be programmed through the
Uconnect system. Refer to “Uconnect
Settings” in “Multimedia” in the Owner's
Manual for further details.
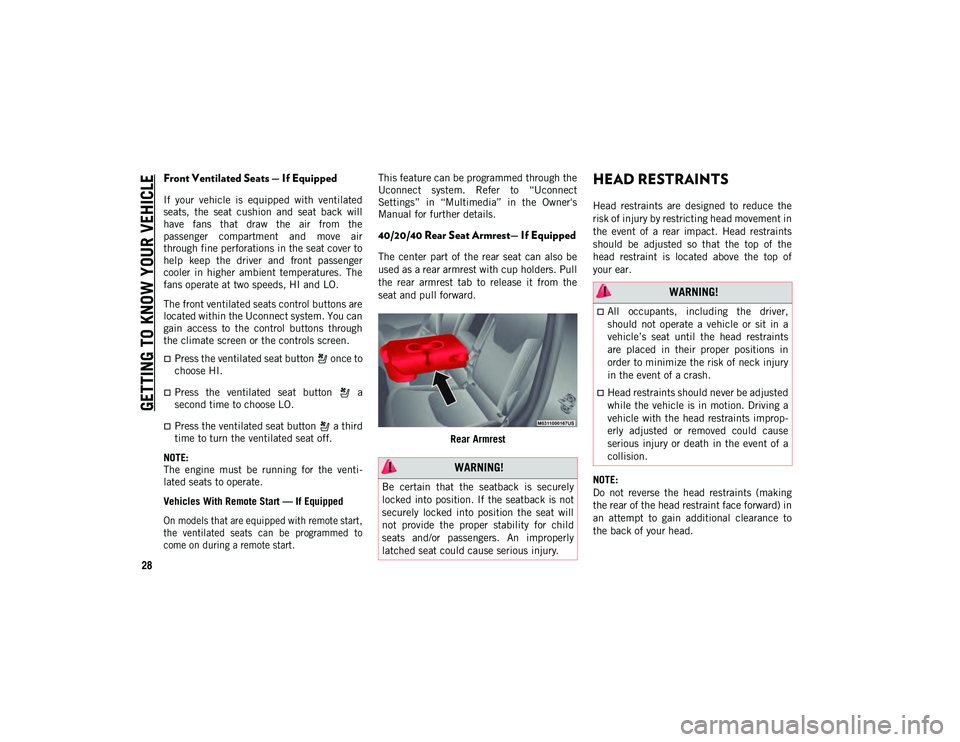
40/20/40 Rear Seat Armrest— If Equipped
The center part of the rear seat can also be
used as a rear armrest with cup holders. Pull
the rear armrest tab to release it from the
seat and pull forward.
Rear Armrest
HEAD RESTRAINTS
Head restraints are designed to reduce the
risk of injury by restricting head movement in
the event of a rear impact. Head restraints
should be adjusted so that the top of the
head restraint is located above the top of
your ear.
NOTE:
Do not reverse the head restraints (making
the rear of the head restraint face forward) in
an attempt to gain additional clearance to
the back of your head.
WARNING!
Be certain that the seatback is securely
locked into position. If the seatback is not
securely locked into position the seat will
not provide the proper stability for child
seats and/or passengers. An improperly
latched seat could cause serious injury.
WARNING!
All occupants, including the driver,
should not operate a vehicle or sit in a
vehicle’s seat until the head restraints
are placed in their proper positions in
order to minimize the risk of neck injury
in the event of a crash.
Head restraints should never be adjusted
while the vehicle is in motion. Driving a
vehicle with the head restraints improp -
erly adjusted or removed could cause
serious injury or death in the event of a
collision.
2020_JEEP_M6_UG_UK.book Page 28
Page 32 of 328
GETTING TO KNOW YOUR VEHICLE
30
NOTE:
The head restraints should only be removed
by qualified technicians, for service
purposes only. If either of the head restraints
require removal, see an authorized dealer.
STEERING WHEEL
Tilt/Telescoping Steering Column
This feature allows you to tilt the steering
column upward or downward. It also allows
you to lengthen or shorten the steering
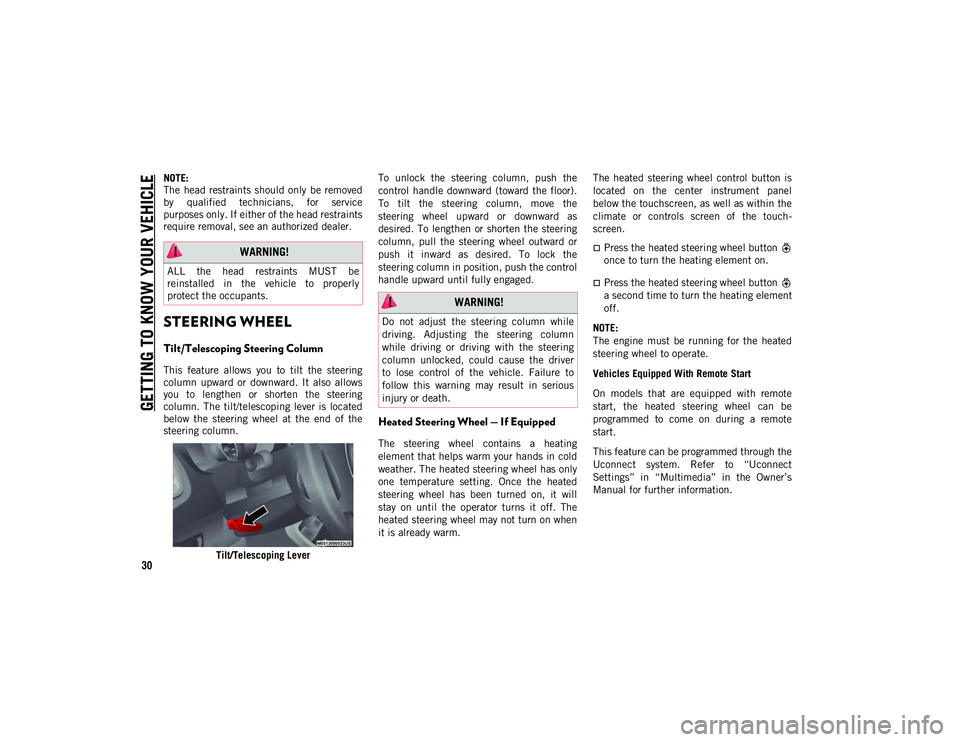
column. The tilt/telescoping lever is located
below the steering wheel at the end of the
steering column.Tilt/Telescoping Lever To unlock the steering column, push the
control handle downward (toward the floor).
To tilt the steering column, move the
steering wheel upward or downward as
desired. To lengthen or shorten the steering
column, pull the steering wheel outward or
push it inward as desired. To lock the
steering column in position, push the control
handle upward until fully engaged.
Heated Steering Wheel — If Equipped
The steering wheel contains a heating
element that helps warm your hands in cold
weather. The heated steering wheel has only
one temperature setting. Once the heated
steering wheel has been turned on, it will
stay on until the operator turns it off. The
heated steering wheel may not turn on when
it is already warm.
The heated steering wheel control button is
located on the center instrument panel
below the touchscreen, as well as within the
climate or controls screen of the touch
-
screen.
Press the heated steering wheel button
once to turn the heating element on.
Press the heated steering wheel button
a second time to turn the heating element
off.
NOTE:
The engine must be running for the heated
steering wheel to operate.
Vehicles Equipped With Remote Start
On models that are equipped with remote
start, the heated steering wheel can be
programmed to come on during a remote
start.
This feature can be programmed through the
Uconnect system. Refer to “Uconnect
Settings” in “Multimedia” in the Owner’s
Manual for further information.
WARNING!
ALL the head restraints MUST be
reinstalled in the vehicle to properly
protect the occupants.
WARNING!
Do not adjust the steering column while
driving. Adjusting the steering column
while driving or driving with the steering
column unlocked, could cause the driver
to lose control of the vehicle. Failure to
follow this warning may result in serious
injury or death.
2020_JEEP_M6_UG_UK.book Page 30
Page 34 of 328
GETTING TO KNOW YOUR VEHICLE
32
Daytime Running Lights (DRL) — If
Equipped
The Daytime Running Lights will turn on
when the engine is started and remain on
unless the headlamps are turned on or the
ignition is in the OFF position.
NOTE:
If allowed by law in the country in which the
vehicle was purchased the Daytime Running
Lights can be turned on and off using the
Uconnect System. Refer to “Uconnect
Settings” in “Multimedia” in the Owner’s
Manual for further details.
High/Low Beam Switch
Push the multifunction lever toward the
instrument panel to switch the headlights to
high beams. Pulling the multifunction lever
back toward the steering wheel will return
the lights to low beams.
Automatic High Beam Headlamp Control
— If Equipped
The Automatic High Beam Headlamp Control
system provides increased forward lighting at
night by automating high beam control
through the use of a digital camera mounted
on the inside rearview mirror. This cameradetects vehicle specific light and automati
-
cally switches from high beams to low beams
until the approaching vehicle is out of view.
NOTE:
The Automatic High Beam Headlamp
Control can be turned on or off using the
Uconnect System. Refer to “Uconnect
Settings” in “Multimedia” in the Owner’s
Manual for further information.
Broken, muddy, or obstructed headlights
and taillights of vehicles in the field of
view will cause headlights to remain on
longer (closer to the vehicle). Also, dirt,
film, and other obstructions on the wind -
shield or camera lens will cause the
system to function improperly.
Flash-To-Pass
You can signal another vehicle with your
headlights by lightly pulling the multifunc -
tion lever toward you. This will cause the
high beam headlights to turn on, and remain
on, until the lever is released.
Automatic Headlights — If Equipped
This system automatically turns the head -
lights on or off according to ambient light
levels. To turn the system on, rotate the headlight switch clockwise to the last detent
for automatic headlight operation. When the
system is on, the headlight time delay
feature is also on. This means the headlights
will stay on for up to 90 seconds after you
place the ignition into the OFF position. To
turn the automatic system off, move the
headlight switch out of the AUTO position.
NOTE:
The engine must be running before the head
-
lights will come on in the automatic mode.
Headlight Time Delay
This feature provides the safety of headlight
illumination for up to 90 seconds (program -
mable) when leaving your vehicle in an unlit
area.
To activate the delay feature, place the igni -
tion in the OFF position while the headlights
are still on. Then, turn off the headlights
within 45 seconds. The delay interval begins
when the headlight switch is turned off.
If you turn the headlights or parking lights
on, or place the ignition in ACC or RUN, the
system will cancel the delay.
If you turn the headlights off before the igni -
tion, they will turn off in the normal manner.
2020_JEEP_M6_UG_UK.book Page 32