Front JEEP COMPASS 2023 User Guide
[x] Cancel search | Manufacturer: JEEP, Model Year: 2023, Model line: COMPASS, Model: JEEP COMPASS 2023Pages: 344, PDF Size: 18.8 MB
Page 32 of 344
30GETTING TO KNOW YOUR VEHICLE
Manual Front Seat Recline Adjustment
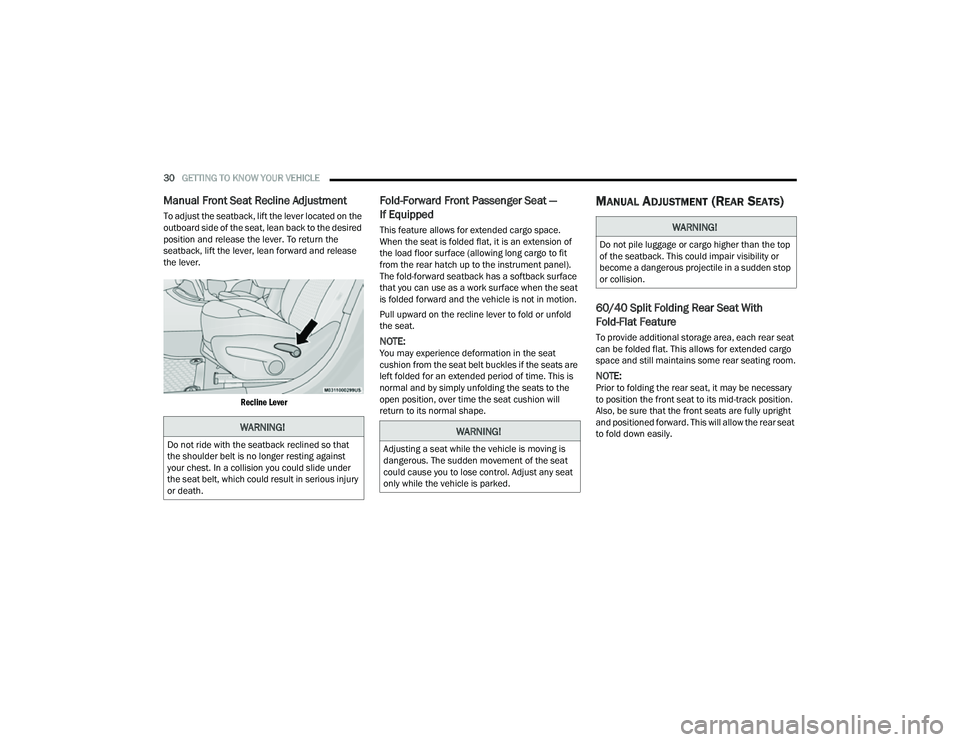
To adjust the seatback, lift the lever located on the
outboard side of the seat, lean back to the desired
position and release the lever. To return the
seatback, lift the lever, lean forward and release
the lever.
Recline Lever
Fold-Forward Front Passenger Seat —
If Equipped
This feature allows for extended cargo space.
When the seat is folded flat, it is an extension of
the load floor surface (allowing long cargo to fit
from the rear hatch up to the instrument panel).
The fold-forward seatback has a softback surface
that you can use as a work surface when the seat
is folded forward and the vehicle is not in motion.
Pull upward on the recline lever to fold or unfold
the seat.
NOTE:You may experience deformation in the seat
cushion from the seat belt buckles if the seats are
left folded for an extended period of time. This is
normal and by simply unfolding the seats to the
open position, over time the seat cushion will
return to its normal shape.
MANUAL ADJUSTMENT (REAR SEATS)
60/40 Split Folding Rear Seat With
Fold-Flat Feature
To provide additional storage area, each rear seat
can be folded flat. This allows for extended cargo
space and still maintains some rear seating room.
NOTE:Prior to folding the rear seat, it may be necessary
to position the front seat to its mid-track position.
Also, be sure that the front seats are fully upright
and positioned forward. This will allow the rear seat
to fold down easily.
WARNING!
Do not ride with the seatback reclined so that
the shoulder belt is no longer resting against
your chest. In a collision you could slide under
the seat belt, which could result in serious injury
or death.
WARNING!
Adjusting a seat while the vehicle is moving is
dangerous. The sudden movement of the seat
could cause you to lose control. Adjust any seat
only while the vehicle is parked.
WARNING!
Do not pile luggage or cargo higher than the top
of the seatback. This could impair visibility or
become a dangerous projectile in a sudden stop
or collision.
22_MP_OM_EN_USC_t.book Page 30
Page 34 of 344
32GETTING TO KNOW YOUR VEHICLE
POWER ADJUSTMENT (FRONT SEATS) —
I
F EQUIPPED
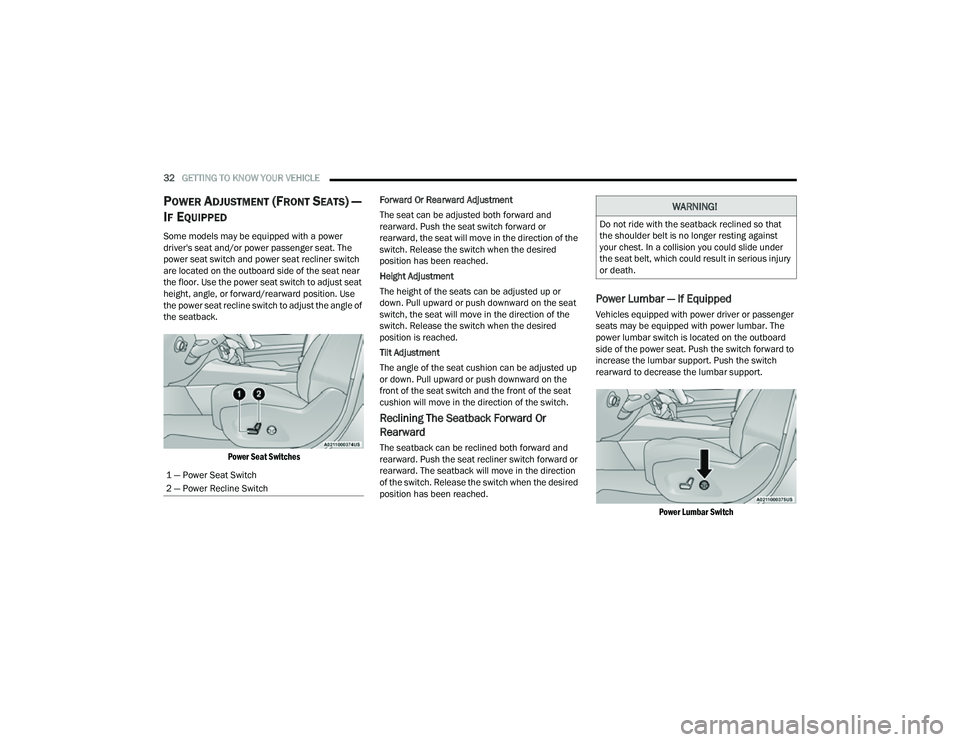
Some models may be equipped with a power
driver's seat and/or power passenger seat. The
power seat switch and power seat recliner switch
are located on the outboard side of the seat near
the floor. Use the power seat switch to adjust seat
height, angle, or forward/rearward position. Use
the power seat recline switch to adjust the angle of
the seatback.
Power Seat Switches
Forward Or Rearward Adjustment
The seat can be adjusted both forward and
rearward. Push the seat switch forward or
rearward, the seat will move in the direction of the
switch. Release the switch when the desired
position has been reached.
Height Adjustment
The height of the seats can be adjusted up or
down. Pull upward or push downward on the seat
switch, the seat will move in the direction of the
switch. Release the switch when the desired
position is reached.
Tilt Adjustment
The angle of the seat cushion can be adjusted up
or down. Pull upward or push downward on the
front of the seat switch and the front of the seat
cushion will move in the direction of the switch.
Reclining The Seatback Forward Or
Rearward
The seatback can be reclined both forward and
rearward. Push the seat recliner switch forward or
rearward. The seatback will move in the direction
of the switch. Release the switch when the desired
position has been reached.
Power Lumbar — If Equipped
Vehicles equipped with power driver or passenger
seats may be equipped with power lumbar. The
power lumbar switch is located on the outboard
side of the power seat. Push the switch forward to
increase the lumbar support. Push the switch
rearward to decrease the lumbar support.
Power Lumbar Switch
1 — Power Seat Switch
2 — Power Recline Switch
WARNING!
Do not ride with the seatback reclined so that
the shoulder belt is no longer resting against
your chest. In a collision you could slide under
the seat belt, which could result in serious injury
or death.
22_MP_OM_EN_USC_t.book Page 32
Page 35 of 344
GETTING TO KNOW YOUR VEHICLE33
Easy Entry/Exit Seat — If Equipped
This feature provides automatic driver seat
positioning to enhance driver mobility when
entering and exiting the vehicle.
The distance the driver seat moves depends on
where you have the driver seat positioned when
you place the vehicle’s ignition in the OFF position.
When you place the vehicle’s ignition in the OFF
position, the driver seat will move about
2.4 inches (60 mm) rearward if the driver seat
position is greater than or equal to 2.7 inches
(67.7 mm) forward of the rear stop. The seat will
return to its previously set position when you
place the vehicle’s ignition in the RUN position.
The Easy Entry/Easy Exit feature is disabled
when the driver seat position is less than 0.9 of
an inch (22.7 mm) forward of the rear stop. At
this position, there is no benefit to the driver by
moving the seat for Easy Exit or Easy Entry.
When enabled in Uconnect Settings, Easy Entry
and Easy Exit positions are stored in each memory
setting profile of the Driver Memory Settings
Ú page 27.
NOTE:The Easy Entry/Exit feature is not enabled when
the vehicle is delivered from the factory. The Easy
Entry/Exit feature is enabled (or later disabled)
through the programmable features in the
Uconnect Settings Ú page 165.
HEATED SEATS — IF EQUIPPED
Front Heated Seats — If Equipped
The front heated seats control buttons
are located within the Uconnect system.
You can gain access to the control
buttons through the climate screen or the
controls screen.
Press the heated seat button once to turn the
HI setting on.
Press the heated seat button a second time to
turn the LO setting on.
Press the heated seat button a third time to turn
the heating elements off.
If the HI level setting is selected, the system will
automatically switch to LO level after
approximately 60 minutes of continuous
operation. At that time, the display will change
from HI to LO, indicating the change. The LO level
setting will turn off automatically after
approximately 45 minutes.
NOTE:The engine must be running for the heated seats to
operate.
For information on use with the Remote Start
system, see Ú page 20.
WARNING!
Persons who are unable to feel pain to the
skin because of advanced age, chronic illness,
diabetes, spinal cord injury, medication,
alcohol use, exhaustion or other physical
condition must exercise care when using the
seat heater. It may cause burns even at low
temperatures, especially if used for long
periods of time.
Do not place anything on the seat or seatback
that insulates against heat, such as a blanket
or cushion. This may cause the seat heater to
overheat. Sitting in a seat that has been over -
heated could cause serious burns due to the
increased surface temperature of the seat.
2
22_MP_OM_EN_USC_t.book Page 33
Page 36 of 344
34GETTING TO KNOW YOUR VEHICLE
Rear Heated Seats
On some models, the two outboard
rear seats are equipped with heated
seats. The heated seat switches for these
seats are located on the rear of the
center console.
There are two heated seat switches that allow
the rear passengers to operate the seats
independently. Indicator lights in each switch
indicate the level of heat in use. Two indicator
lights will illuminate for HI, one for LO and none
for off.
Push the heated seat button once to turn the
HI setting on.
Push the heated seat button a second time to
turn the LO setting on.
Push the heated seat button a third time to turn
the heating elements off.
NOTE:The level of heat selected will stay on until the
operator changes it.
FRONT VENTILATED SEATS —
I
F EQUIPPED
Located in the seat cushion and seat
back are fans that draw the air from the
passenger compartment and move air
through fine perforations in the seat
cover to help keep the driver and front passenger
cooler in higher ambient temperatures. The fans
operate at two speeds, HI and LO.
The front ventilated seats control buttons are
located within the Uconnect system. You can gain
access to the control buttons through the climate
screen or the controls screen.
Press the ventilated seat button once to
choose HI.
Press the ventilated seat button a second time
to choose LO.
Press the ventilated seat button a third time to
turn the ventilated seat off.
NOTE:The engine must be running for the ventilated
seats to operate.
For information on use with the Remote Start
system, see Ú page 20.
HEAD RESTRAINTS
Head restraints are designed to reduce the risk of
injury by restricting head movement in the event of
a rear impact. Head restraints should be adjusted
so that the top of the head restraint is located
above the top of your ear.
NOTE:Do not reverse the head restraints (making the
rear of the head restraint face forward) in an
attempt to gain additional clearance to the back of
your head.
WARNING!
All occupants, including the driver, should not
operate a vehicle or sit in a vehicle’s seat until
the head restraints are placed in their proper
positions in order to minimize the risk of neck
injury in the event of a crash.
Head restraints should never be adjusted
while the vehicle is in motion. Driving a vehicle
with the head restraints improperly adjusted
or removed could cause serious injury or
death in the event of a collision.
22_MP_OM_EN_USC_t.book Page 34
Page 37 of 344
GETTING TO KNOW YOUR VEHICLE35
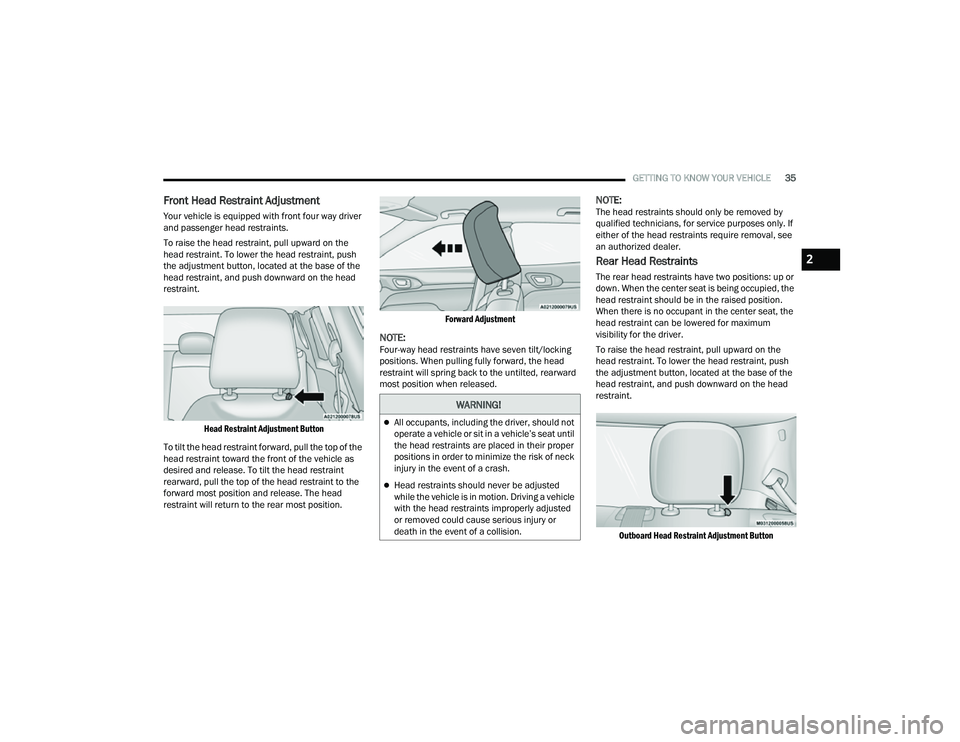
Front Head Restraint Adjustment
Your vehicle is equipped with front four way driver
and passenger head restraints.
To raise the head restraint, pull upward on the
head restraint. To lower the head restraint, push
the adjustment button, located at the base of the
head restraint, and push downward on the head
restraint.
Head Restraint Adjustment Button
To tilt the head restraint forward, pull the top of the
head restraint toward the front of the vehicle as
desired and release. To tilt the head restraint
rearward, pull the top of the head restraint to the
forward most position and release. The head
restraint will return to the rear most position.
Forward Adjustment
NOTE:Four-way head restraints have seven tilt/locking
positions. When pulling fully forward, the head
restraint will spring back to the untilted, rearward
most position when released.
NOTE:The head restraints should only be removed by
qualified technicians, for service purposes only. If
either of the head restraints require removal, see
an authorized dealer.
Rear Head Restraints
The rear head restraints have two positions: up or
down. When the center seat is being occupied, the
head restraint should be in the raised position.
When there is no occupant in the center seat, the
head restraint can be lowered for maximum
visibility for the driver.
To raise the head restraint, pull upward on the
head restraint. To lower the head restraint, push
the adjustment button, located at the base of the
head restraint, and push downward on the head
restraint.
Outboard Head Restraint Adjustment Button
WARNING!
All occupants, including the driver, should not
operate a vehicle or sit in a vehicle’s seat until
the head restraints are placed in their proper
positions in order to minimize the risk of neck
injury in the event of a crash.
Head restraints should never be adjusted
while the vehicle is in motion. Driving a vehicle
with the head restraints improperly adjusted
or removed could cause serious injury or
death in the event of a collision.
2
22_MP_OM_EN_USC_t.book Page 35
Page 40 of 344
38GETTING TO KNOW YOUR VEHICLE
NOTE:The Automatic Dimming Mirror feature is disabled
when the vehicle is in REVERSE to improve the
driver’s rear view. If your vehicle is equipped with
an on/off button on the mirror, the mirror will
default to on and can be turned on/off through the
touchscreen.
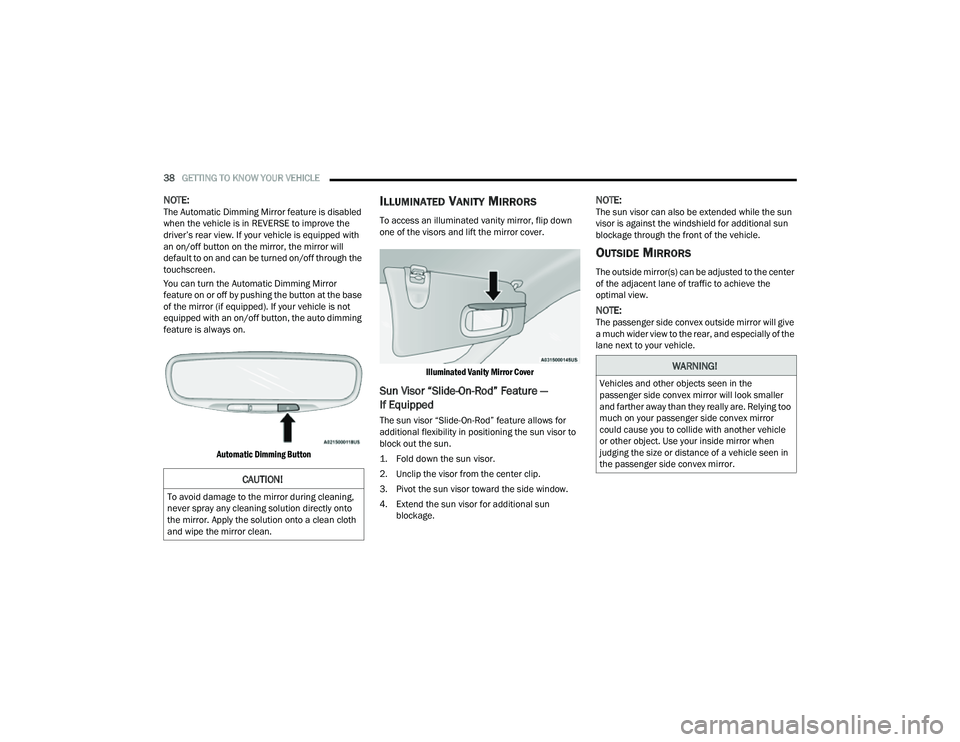
You can turn the Automatic Dimming Mirror
feature on or off by pushing the button at the base
of the mirror (if equipped). If your vehicle is not
equipped with an on/off button, the auto dimming
feature is always on.
Automatic Dimming Button
ILLUMINATED VANITY MIRRORS
To access an illuminated vanity mirror, flip down
one of the visors and lift the mirror cover.
Illuminated Vanity Mirror Cover
Sun Visor “Slide-On-Rod” Feature —
If Equipped
The sun visor “Slide-On-Rod” feature allows for
additional flexibility in positioning the sun visor to
block out the sun.
1. Fold down the sun visor.
2. Unclip the visor from the center clip.
3. Pivot the sun visor toward the side window.
4. Extend the sun visor for additional sun blockage.
NOTE:The sun visor can also be extended while the sun
visor is against the windshield for additional sun
blockage through the front of the vehicle.
OUTSIDE MIRRORS
The outside mirror(s) can be adjusted to the center
of the adjacent lane of traffic to achieve the
optimal view.
NOTE:The passenger side convex outside mirror will give
a much wider view to the rear, and especially of the
lane next to your vehicle.
CAUTION!
To avoid damage to the mirror during cleaning,
never spray any cleaning solution directly onto
the mirror. Apply the solution onto a clean cloth
and wipe the mirror clean.
WARNING!
Vehicles and other objects seen in the
passenger side convex mirror will look smaller
and farther away than they really are. Relying too
much on your passenger side convex mirror
could cause you to collide with another vehicle
or other object. Use your inside mirror when
judging the size or distance of a vehicle seen in
the passenger side convex mirror.
22_MP_OM_EN_USC_t.book Page 38
Page 46 of 344
44GETTING TO KNOW YOUR VEHICLE
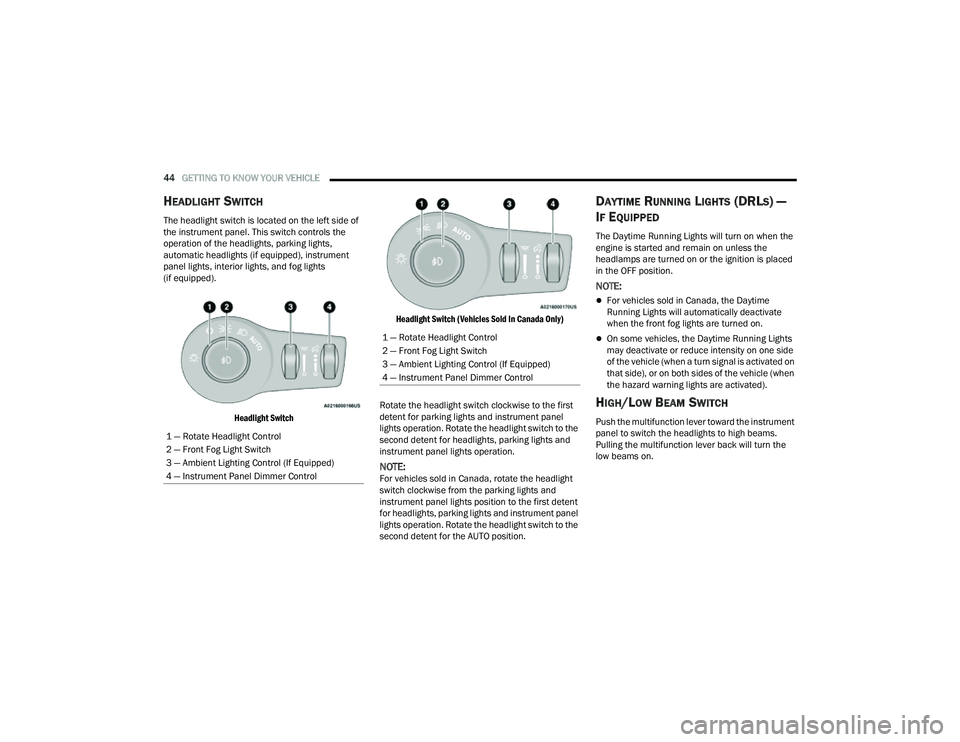
HEADLIGHT SWITCH
The headlight switch is located on the left side of
the instrument panel. This switch controls the
operation of the headlights, parking lights,
automatic headlights (if equipped), instrument
panel lights, interior lights, and fog lights
(if equipped).
Headlight Switch Headlight Switch (Vehicles Sold In Canada Only)
Rotate the headlight switch clockwise to the first
detent for parking lights and instrument panel
lights operation. Rotate the headlight switch to the
second detent for headlights, parking lights and
instrument panel lights operation.
NOTE:For vehicles sold in Canada, rotate the headlight
switch clockwise from the parking lights and
instrument panel lights position to the first detent
for headlights, parking lights and instrument panel
lights operation. Rotate the headlight switch to the
second detent for the AUTO position.
DAYTIME RUNNING LIGHTS (DRLS) —
I
F EQUIPPED
The Daytime Running Lights will turn on when the
engine is started and remain on unless the
headlamps are turned on or the ignition is placed
in the OFF position.
NOTE:
For vehicles sold in Canada, the Daytime
Running Lights will automatically deactivate
when the front fog lights are turned on.
On some vehicles, the Daytime Running Lights
may deactivate or reduce intensity on one side
of the vehicle (when a turn signal is activated on
that side), or on both sides of the vehicle (when
the hazard warning lights are activated).
HIGH/LOW BEAM SWITCH
Push the multifunction lever toward the instrument
panel to switch the headlights to high beams.
Pulling the multifunction lever back will turn the
low beams on.
1 — Rotate Headlight Control
2 — Front Fog Light Switch
3 — Ambient Lighting Control (If Equipped)
4 — Instrument Panel Dimmer Control
1 — Rotate Headlight Control
2 — Front Fog Light Switch
3 — Ambient Lighting Control (If Equipped)
4 — Instrument Panel Dimmer Control
22_MP_OM_EN_USC_t.book Page 44
Page 48 of 344
46GETTING TO KNOW YOUR VEHICLE
FOG LIGHTS — IF EQUIPPED
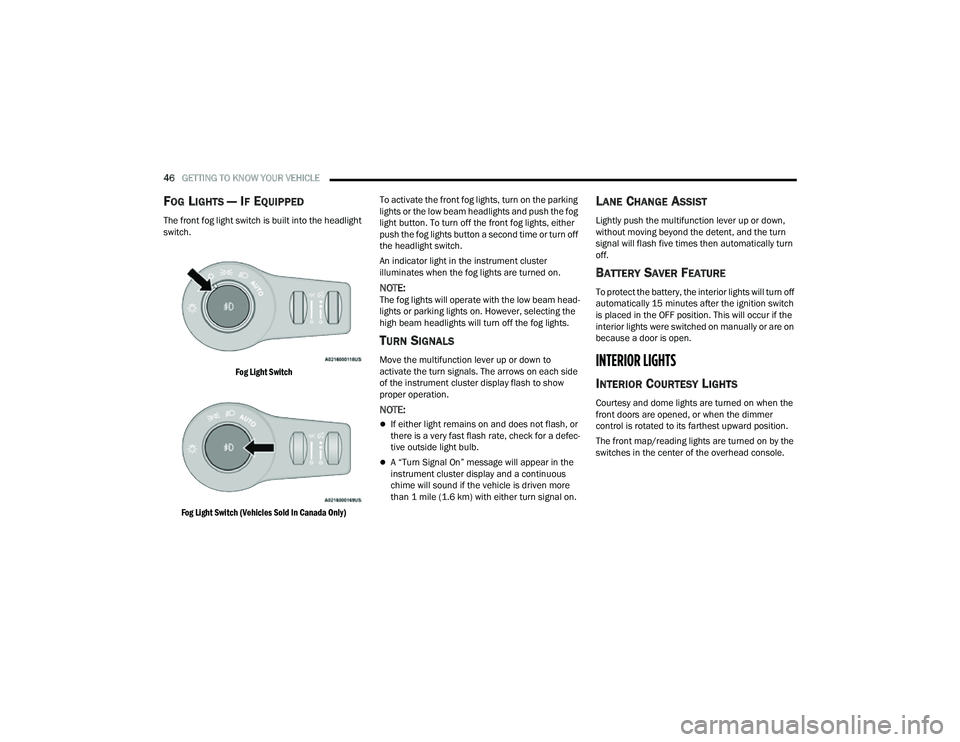
The front fog light switch is built into the headlight
switch.
Fog Light Switch
Fog Light Switch (Vehicles Sold In Canada Only)
To activate the front fog lights, turn on the parking
lights or the low beam headlights and push the fog
light button. To turn off the front fog lights, either
push the fog lights button a second time or turn off
the headlight switch.
An indicator light in the instrument cluster
illuminates when the fog lights are turned on.
NOTE:The fog lights will operate with the low beam head
-
lights or parking lights on. However, selecting the
high beam headlights will turn off the fog lights.
TURN SIGNALS
Move the multifunction lever up or down to
activate the turn signals. The arrows on each side
of the instrument cluster display flash to show
proper operation.
NOTE:
If either light remains on and does not flash, or
there is a very fast flash rate, check for a defec -
tive outside light bulb.
A “Turn Signal On” message will appear in the
instrument cluster display and a continuous
chime will sound if the vehicle is driven more
than 1 mile (1.6 km) with either turn signal on.
LANE CHANGE ASSIST
Lightly push the multifunction lever up or down,
without moving beyond the detent, and the turn
signal will flash five times then automatically turn
off.
BATTERY SAVER FEATURE
To protect the battery, the interior lights will turn off
automatically 15 minutes after the ignition switch
is placed in the OFF position. This will occur if the
interior lights were switched on manually or are on
because a door is open.
INTERIOR LIGHTS
INTERIOR COURTESY LIGHTS
Courtesy and dome lights are turned on when the
front doors are opened, or when the dimmer
control is rotated to its farthest upward position.
The front map/reading lights are turned on by the
switches in the center of the overhead console.
22_MP_OM_EN_USC_t.book Page 46
Page 50 of 344
48GETTING TO KNOW YOUR VEHICLE
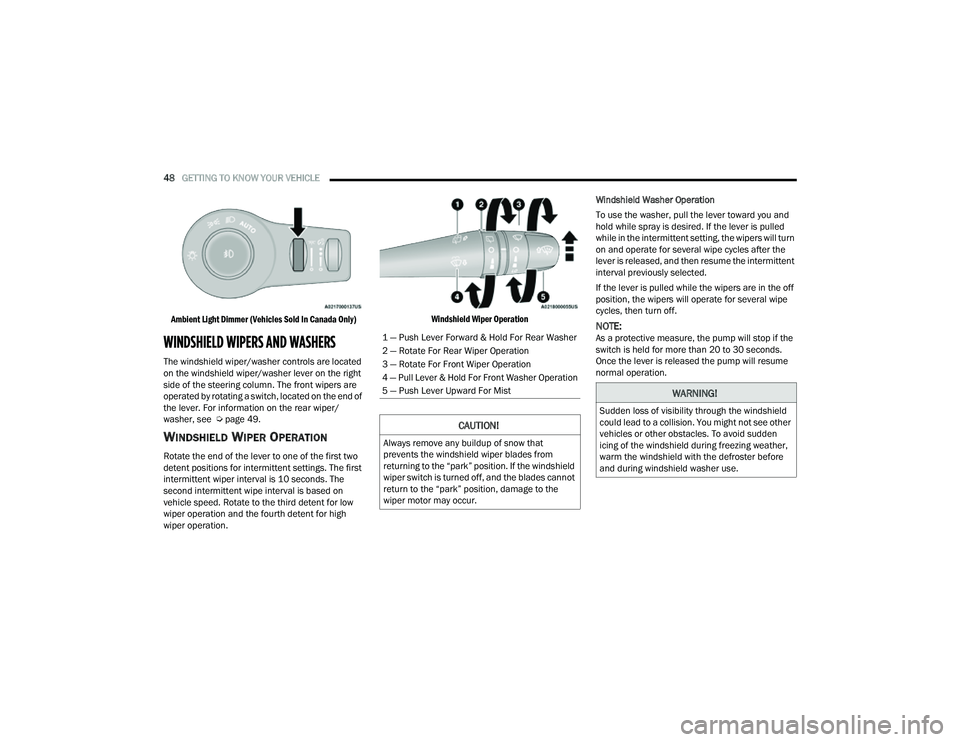
Ambient Light Dimmer (Vehicles Sold In Canada Only)
WINDSHIELD WIPERS AND WASHERS
The windshield wiper/washer controls are located
on the windshield wiper/washer lever on the right
side of the steering column. The front wipers are
operated by rotating a switch, located on the end of
the lever. For information on the rear wiper/
washer, see Ú page 49.
WINDSHIELD WIPER OPERATION
Rotate the end of the lever to one of the first two
detent positions for intermittent settings. The first
intermittent wiper interval is 10 seconds. The
second intermittent wipe interval is based on
vehicle speed. Rotate to the third detent for low
wiper operation and the fourth detent for high
wiper operation.
Windshield Wiper Operation
Windshield Washer Operation
To use the washer, pull the lever toward you and
hold while spray is desired. If the lever is pulled
while in the intermittent setting, the wipers will turn
on and operate for several wipe cycles after the
lever is released, and then resume the intermittent
interval previously selected.
If the lever is pulled while the wipers are in the off
position, the wipers will operate for several wipe
cycles, then turn off.
NOTE:As a protective measure, the pump will stop if the
switch is held for more than 20 to 30 seconds.
Once the lever is released the pump will resume
normal operation.1 — Push Lever Forward & Hold For Rear Washer
2 — Rotate For Rear Wiper Operation
3 — Rotate For Front Wiper Operation
4 — Pull Lever & Hold For Front Washer Operation
5 — Push Lever Upward For Mist
CAUTION!
Always remove any buildup of snow that
prevents the windshield wiper blades from
returning to the “park” position. If the windshield
wiper switch is turned off, and the blades cannot
return to the “park” position, damage to the
wiper motor may occur.
WARNING!
Sudden loss of visibility through the windshield
could lead to a collision. You might not see other
vehicles or other obstacles. To avoid sudden
icing of the windshield during freezing weather,
warm the windshield with the defroster before
and during windshield washer use.
22_MP_OM_EN_USC_t.book Page 48
Page 51 of 344
GETTING TO KNOW YOUR VEHICLE49
Mist
Push the lever upward to the MIST position and
release for a single wiping cycle.
NOTE:The mist feature does not activate the washer
pump; therefore, no washer fluid will be sprayed on
the windshield. The wash function must be used in
order to spray the windshield with washer fluid.
For information on wiper care and replacement,
see Ú page 275.
RAIN SENSING WIPERS — IF EQUIPPED
This feature senses rain or snow fall on the
windshield and automatically activates the wipers.
Rotate the end of the multifunction lever to one of
two detent positions to activate this feature.
The sensitivity of the system can be adjusted with
the multifunction lever. Wiper delay position one is
the least sensitive, and wiper delay position two is
the most sensitive. Place the wiper switch in the
O (off) position when not using the system.
NOTE:
The Rain Sensing feature will not operate when
the wiper switch is in the low or high-speed posi -
tion.
The Rain Sensing feature may not function prop -
erly when ice, or dried salt water is present on
the windshield.
Use of Rain-X or products containing wax or sili-
cone may reduce Rain Sensing performance.
The Rain Sensing feature can be turned on and
off through Uconnect Settings Ú page 165.
The Rain Sensing system has protection features
for the wiper blades and arms, and will not operate
under the following conditions:
Change In Ignition Position — If the vehicle is in
Rain Sensing mode and the ignition is cycled
from OFF to ON, the auto wiper will be
suppressed until vehicle speed is greater than
3 mph (5 km/h), or the wiper switch is moved
out of and back into the Intermittent wipe posi -
tion.
Transmission In NEUTRAL Position — The Rain
Sensing system will not operate if the NEUTRAL
gear is selected at speeds of 3 mph (5 km/h) or
less unless the wiper switch is moved or the
gear selector is moved out of NEUTRAL.
Remote Start Mode Inhibit — On vehicles
equipped with the Remote Start system, Rain
Sensing wipers are not operational when the
vehicle is in Remote Start mode. Once the oper -
ator is in the vehicle and has placed the ignition
switch in the ON/RUN position, Rain Sensing
wiper operation can resume, if it has been
selected, and no other inhibit conditions
(mentioned previously) exist.
REAR WINDOW WIPER/WASHER
The rear wiper/washer controls are located on the
windshield wiper/washer lever on the right side of
the steering column. The rear wiper/washer is
operated by rotating a switch, located at the
middle of the lever.
The rear wiper/washer controls are located on the
windshield wiper/washer lever on the right side of
the steering column. The rear wiper has different
operation modes:
Intermittent mode
Synchronous mode (at half speed of the front
window wiper) when the front window wiper is
operating
Continuous mode
Vehicle in REVERSE: If the front wiper is active
and the REVERSE gear is selected, the wiper will
turn on for one wipe
Rotate the center portion of the lever
upward to the first detent for intermittent
operation and to the second detent for
continuous rear wiper operation.
To use the washer, push the lever
forward and hold while spray is desired.
If the lever is pushed while the wiper is in
the off position, the wiper will operate for
several wipe cycles, then turn off.
2
22_MP_OM_EN_USC_t.book Page 49