Front JEEP COMPASS 2023 Manual PDF
[x] Cancel search | Manufacturer: JEEP, Model Year: 2023, Model line: COMPASS, Model: JEEP COMPASS 2023Pages: 344, PDF Size: 18.8 MB
Page 163 of 344
STARTING AND OPERATING161
RECREATIONAL TOWING — 4X4
M
ODELS
Recreational towing (with all four wheels on the
ground, or using a towing dolly) is NOT ALLOWED.
This vehicle may be towed on flatbed or vehicle
trailer provided all four wheels are OFF the ground.
DRIVING TIPS
ON-ROAD DRIVING TIPS
Utility vehicles have higher ground clearance and a
narrower track to make them capable of
performing in a wide variety of off-road
applications. Specific design characteristics give
them a higher center of gravity than conventional
passenger cars.
An advantage of the higher ground clearance is a
better view of the road, allowing you to anticipate
problems. They are not designed for cornering at
the same speeds as conventional passenger cars
any more than low-slung sports cars are designed
to perform satisfactorily in off-road conditions.
Avoid sharp turns or abrupt maneuvers. As with
other vehicles of this type, failure to operate this
vehicle correctly may result in loss of control or
vehicle rollover.
OFF-ROAD DRIVING TIPS
When To Use 4WD LOW Range
When off-road driving, shift to 4WD LOW for
additional traction and control on slippery or
difficult terrain, ascending or descending steep
hills, and to increase low-speed pulling power
Ú page 112. This range should be limited to extreme situations such as deep snow, mud, or
sand where additional low speed pulling power is
needed. Vehicle speeds in excess of 25 mph
(40 km/h) should be avoided when in 4WD LOW
range.
Driving Through Water
Although your vehicle is capable of driving through
water, there are a number of precautions that
must be considered before entering the water:
Driving through water more than a few inches/
centimeters deep will require extra caution to
ensure safety and prevent damage to your vehicle.
If you must drive through water, try to determine
the depth and the bottom condition (and location
of any obstacles) prior to entering. Proceed with
caution and maintain a steady controlled speed
less than 5 mph (8 km/h) in deep water to
minimize wave effects.
CAUTION!
Towing with the front wheels on the ground
will cause severe transmission damage.
Damage from improper towing is not covered
under the New Vehicle Limited Warranty.
Ensure that the Electric Park Brake is
released, and remains released, while being
towed.
Do not use a bumper mounted clamp-on tow
bar on your vehicle. The fascia/bumper face
will be damaged.
CAUTION!
Towing this vehicle with ANY of its wheels on the
ground can cause severe transmission and/or
power transfer unit damage. Damage from
improper towing is not covered under the
New Vehicle Limited Warranty.
CAUTION!
When driving through water, do not exceed
5 mph (8 km/h). Always check water depth
before entering as a precaution, and check all
fluids afterward. Driving through water may
cause damage that may not be covered by the
New Vehicle Limited Warranty.
4
22_MP_OM_EN_USC_t.book Page 161
Page 164 of 344
162STARTING AND OPERATING
Flowing Water
If the water is swift flowing and rising (as in storm
run-off) avoid crossing until the water level recedes
and/or the flow rate is reduced. If you must cross
flowing-water, avoid depths in excess of 9 inches
(22 cm). The flowing water can erode the
streambed causing your vehicle to sink into deeper
water. Determine exit point(s) that are downstream
of your entry point to allow for drifting.
Standing Water
Avoid driving in standing water deeper than
16 inches (40.5 cm), and reduce speed
appropriately to minimize wave effects. Maximum
speed in 16 inches (40.5 cm) of water is less than
5 mph (8 km/h).
(Trailhawk only): Avoid driving in standing water
deeper than 19 inches (48 cm), and reduce speed
appropriately to minimize wave effects. Maximum
speed in 19 inches (48 cm) of water is less than
5 mph (8 km/h).
Maintenance
After driving through deep water, inspect your
vehicle fluids and lubricants (engine, transmission,
Power Transfer Unit, and Rear Drive Module) to
ensure they have not been contaminated.
Contaminated fluids and lubricants (milky, foamy
in appearance) should be flushed/changed as
soon as possible to prevent component damage.
Driving In Snow, Mud And Sand
In heavy snow, when pulling a load, or for
additional control at slower speeds, shift the
transmission to a low gear and shift the 4WD
system to the appropriate terrain mode, using
4WD LOW if necessary Úpage 112. Do not shift to
a lower gear than necessary to maintain headway.
Over-revving the engine can spin the wheels and
traction will be lost.
Avoid abrupt downshifts on icy or slippery roads
because engine braking may cause skidding and
loss of control.
Hill Climbing
NOTE:Before attempting to climb a hill, determine the
conditions at the crest and/or on the other side.
Before climbing a steep hill, shift the transmission
to a lower gear and shift the 4WD System to 4WD
LOW. Use FIRST gear and 4WD LOW for very steep
hills.
NOTE:Brakes should be applied at increased slippage,
but before coming to a stop to avoid digging into
the loose surface and rendering the operator of the
vehicle stuck/immobile. If you stall or begin to lose headway
while climbing
a steep hill, allow your vehicle to come to a stop
and immediately apply the brakes. Once stopped,
shift to REVERSE. Back slowly down the hill
allowing the compression braking of the engine to
help regulate your speed. If the brakes are
required to control vehicle speed, apply them
lightly and avoid locking or skidding the tires.
NOTE:Remember, never drive diagonally across a hill -
drive straight up or down.
If the wheels start to slip as you approach the crest
of a hill, ease off the accelerator and maintain
headway by turning the front wheels slowly left and
right. This may provide a fresh “bite” into the
surface and may provide traction to complete the
climb.
WARNING!
If the engine stalls or you lose headway or
cannot make it to the top of a steep hill or grade,
never attempt to turn around. To do so may
result in tipping and rolling the vehicle. Always
back straight down a hill in REVERSE gear
carefully. Never back down a hill in NEUTRAL
using only the brake.
22_MP_OM_EN_USC_t.book Page 162
Page 173 of 344
MULTIMEDIA171
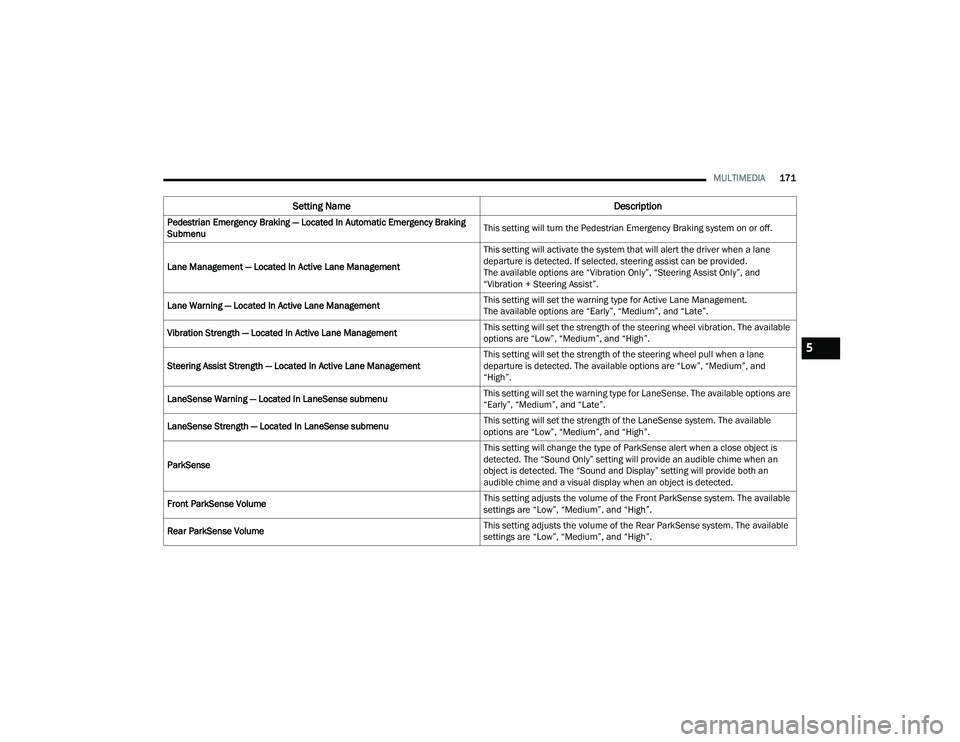
Pedestrian Emergency Braking — Located In Automatic Emergency Braking
Submenu This setting will turn the Pedestrian Emergency Braking system on or off.
Lane Management — Located In Active Lane Management This setting will activate the system that will alert the driver when a lane
departure is detected. If selected, steering assist can be provided.
The available options are “Vibration Only”, “Steering Assist Only”, and
“Vibration + Steering Assist”.
Lane Warning — Located In Active Lane Management This setting will set the warning type for Active Lane Management.
The available options are “Early”, “Medium”, and “Late”.
Vibration Strength — Located In Active Lane Management This setting will set the strength of the steering wheel vibration. The available
options are “Low”, “Medium”, and “High”.
Steering Assist Strength — Located In Active Lane Management This setting will set the strength of the steering wheel pull when a lane
departure is detected. The available options are “Low”, “Medium”, and
“High”.
LaneSense Warning — Located In LaneSense submenu This setting will set the warning type for LaneSense. The available options are
“Early”, “Medium”, and “Late”.
LaneSense Strength — Located In LaneSense submenu This setting will set the strength of the LaneSense system. The available
options are “Low”, “Medium”, and “High”.
ParkSense This setting will change the type of ParkSense alert when a close object is
detected. The “Sound Only” setting will provide an audible chime when an
object is detected. The “Sound and Display” setting will provide both an
audible chime and a visual display when an object is detected.
Front ParkSense Volume This setting adjusts the volume of the Front ParkSense system. The available
settings are “Low”, “Medium”, and “High”.
Rear ParkSense Volume This setting adjusts the volume of the Rear ParkSense system. The available
settings are “Low”, “Medium”, and “High”.
Setting Name
Description
5
22_MP_OM_EN_USC_t.book Page 171
Page 183 of 344
MULTIMEDIA181
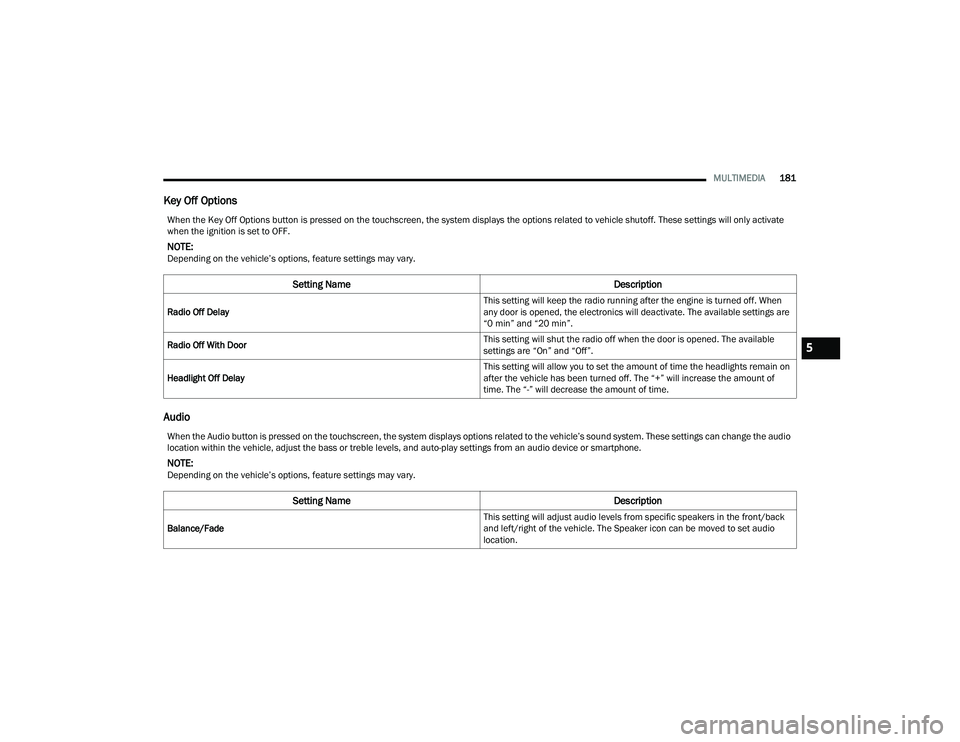
Key Off Options
Audio
When the Key Off Options button is pressed on the touchscreen, the system displays the options related to vehicle shutoff. These settings will only activate
when the ignition is set to OFF.
NOTE:Depending on the vehicle’s options, feature settings may vary.
Setting Name Description
Radio Off Delay This setting will keep the radio running after the engine is turned off. When
any door is opened, the electronics will deactivate. The available settings are
“0 min” and “20 min”.
Radio Off With Door This setting will shut the radio off when the door is opened. The available
settings are “On” and “Off”.
Headlight Off Delay This setting will allow you to set the amount of time the headlights remain on
after the vehicle has been turned off. The “+” will increase the amount of
time. The “-” will decrease the amount of time.
When the Audio button is pressed on the touchscreen, the system displays options related to the vehicle’s sound system. These settings can change the audio
location within the vehicle, adjust the bass or treble levels, and auto-play settings from an audio device or smartphone.
NOTE:Depending on the vehicle’s options, feature settings may vary.
Setting Name
Description
Balance/Fade This setting will adjust audio levels from specific speakers in the front/back
and left/right of the vehicle. The Speaker icon can be moved to set audio
location.
5
22_MP_OM_EN_USC_t.book Page 181
Page 190 of 344
188SAFETY
Light does not come on when the ignition is placed
in the ON/RUN mode, have the light repaired as
soon as possible.
ELECTRONIC BRAKE CONTROL (EBC)
S
YSTEM
Your vehicle is equipped with an advanced
Electronic Brake Control (EBC) system. This system
includes Anti-Lock Brake System (ABS), Brake Assist
System (BAS), Electronic Brake Force Distribution
(EBD), Electronic Roll Mitigation (ERM), Electronic
Stability Control (ESC), Hill Start Assist (HSA), and
Traction Control System (TCS). These systems work
together to enhance both vehicle stability and
control in various driving conditions.
Your vehicle may also be equipped with Dynamic
Steering Torque (DST), Hill Descent Control (HDC),
Rain Brake Support (RBS), Ready Alert Braking
(RAB), and Trailer Sway Control (TSC).
Brake Assist System (BAS)
The BAS is designed to optimize the vehicle’s
braking capability during emergency braking
maneuvers. The system detects an emergency
braking situation by sensing the rate and amount
of brake application and then applies optimum
pressure to the brakes. This can help reduce
braking distances. The BAS complements the
Anti-Lock Brake System (ABS). Applying the brakes
very quickly results in the best BAS assistance. To receive the benefit of the system, you must
apply continuous braking pressure during the
stopping sequence (do not “pump” the brakes). Do
not reduce brake pedal pressure unless braking is
no longer desired. Once the brake pedal is
released, the BAS is deactivated.
Brake System Warning Light
The red Brake System Warning Light will turn on
when the ignition is placed in the ON/RUN mode
and may stay on for as long as four seconds.
If the Brake System Warning Light remains on or
comes on while driving, it indicates that the brake
system is not functioning properly and that
immediate service is required. If the Brake System
Warning Light does not come on when the ignition
is placed in the ON/RUN mode, have the light
repaired as soon as possible.
Dynamic Steering Torque (DST)
DST is a feature of the Electronic Stability Control
(ESC) and Electric Power Steering (EPS) modules
that provides torque at the steering wheel for
certain driving conditions in which the ESC module
is detecting vehicle instability. The torque that the
steering wheel receives is only meant to help the
driver realize optimal steering behavior in order to
reach/maintain vehicle stability. The only
notification the driver receives that the feature is
active is the torque applied to the steering wheel.
NOTE:The DST feature is only meant to help the driver
realize the correct course of action through small
torques on the steering wheel, which means the
effectiveness of the DST feature is highly
dependent on the driver’s sensitivity and overall
reaction to the applied torque. It is very important
to realize that this feature will not steer the vehicle,
meaning the driver is still responsible for steering
the vehicle.
Electronic Brake Force Distribution (EBD)
EBD manages the distribution of the braking
torque between the front and rear axles by limiting
braking pressure to the rear axle. This is done to
prevent overslip of the rear wheels to avoid vehicle
instability, and to prevent the rear axle from
entering ABS before the front axle.
WARNING!
The Brake Assist System (BAS) cannot prevent the
natural laws of physics from acting on the vehicle,
nor can it increase the traction afforded by
prevailing road conditions. BAS cannot prevent
collisions, including those resulting from excessive
speed in turns, driving on very slippery surfaces, or
hydroplaning. The capabilities of a BAS-equipped
vehicle must never be exploited in a reckless or
dangerous manner, which could jeopardize the
user's safety or the safety of others.
22_MP_OM_EN_USC_t.book Page 188
Page 194 of 344
192SAFETY
HDC has three states:
1. Off (feature is not enabled and will not activate).
2. Enabled (feature is enabled and ready but activation conditions are not met, or driver is
actively overriding with brake or throttle
application).
3. Active (feature is enabled and actively controlling vehicle speed).
Enabling HDC
HDC is enabled by pushing the HDC switch, located
in front of the gear selector. The following
conditions must also be met to enable HDC:
The driveline is in 4WD Low.
The vehicle speed is below 20 mph (32 km/h).
The Electric Park Brake (EPB) is released.
The driver’s door is closed.
Activating HDC
Once HDC is enabled, it will activate automatically
if driven down a grade of sufficient magnitude
(greater than approximately 8%). The set speed for
HDC is selectable by the driver and can be
adjusted within the thresholds by using throttle or
brake application. Driver Override:
The driver may override HDC activation speed with
throttle or brake application at any time.
Deactivating HDC
HDC will be deactivated but remain available if any
of the following conditions occur:
Driver overrides HDC set speed with a speed
exceeding 20 mph (32 km/h) but remains
below 25 mph (40 km/h).
Vehicle is on a downhill grade of insufficient
magnitude (less than approximately 8%), is on
level ground, or is on an uphill grade.
Vehicle is shifted to PARK.
Disabling HDC
HDC will be deactivated and disabled if any of the
following conditions occur:
The driver pushes the HDC switch.
The driveline is shifted out of 4WD Low.
The driver’s door opens.
The vehicle is driven greater than 25 mph
(40 km/h) (HDC exits immediately.) Feedback To The Driver:
The instrument cluster has an HDC icon and the
HDC switch has an LED, which offers feedback to
the driver about the state HDC is in.
The cluster icon and switch lamp will illuminate
and remain solid when HDC is enabled or acti
-
vated. This is the normal operating condition for
HDC.
The switch lamp will flash for several seconds
then extinguish when the driver pushes the HDC
switch when enable conditions have not been
met.
The HDC switch is located within the Selec-Terrain
knob in the upper right position.
WARNING!
HDC is only intended to assist the driver in
controlling vehicle speed when descending hills.
The driver must remain attentive to the driving
conditions and is responsible for maintaining a
safe vehicle speed.
22_MP_OM_EN_USC_t.book Page 192
Page 195 of 344
SAFETY193
Hill Start Assist (HSA)
HSA is designed to mitigate roll back from a
complete stop while on an incline. If the driver
releases the brake while stopped on an incline,
HSA will continue to hold the brake pressure for a
short period. If the driver does not apply the
throttle before this time expires, the system will
release brake pressure and the vehicle will roll
down the hill as normal.
The following conditions must be met in order for
HSA to activate:
The feature must be enabled.
The vehicle must be stopped.
The parking brake must be off.
The driver’s door must be closed.
The vehicle must be on a sufficient grade.
The gear selection must match vehicle uphill
direction (i.e., vehicle facing uphill is in forward
gear; vehicle backing uphill is in REVERSE gear).
HSA will work in REVERSE gear and all forward
gears. The system will not activate if the trans -
mission is in PARK or NEUTRAL.
Disabling And Enabling HSA
This feature can be turned on or turned off. To
change the current setting, proceed as follows:
If disabling HSA using Uconnect settings see
Ú page 77.
Towing With HSA
Hill Start Assist (HSA) will also provide assistance
to mitigate roll back while towing a trailer.
Rain Brake Support (RBS)
RBS may improve braking performance in wet
conditions. It will periodically apply a small amount
of brake pressure to remove any water buildup on
the front brake rotors. It functions when the
windshield wipers are in LO or HI speed. When Rain
Brake Support is active, there is no notification to
the driver and no driver interaction is required.
WARNING!
There may be situations where the Hill Start
Assist (HSA) will not activate and slight rolling
may occur, such as on minor hills or with a
loaded vehicle, or while pulling a trailer. HSA is
not a substitute for active driving involvement.
It is always the driver’s responsibility to be
attentive to distance to other vehicles, people,
and objects, and most importantly brake
operation to ensure safe operation of the vehicle
under all road conditions. Your complete
attention is always required while driving to
maintain safe control of your vehicle. Failure to
follow these warnings can result in a collision or
serious personal injury.
WARNING!
If you use a trailer brake controller with your
trailer, the trailer brakes may be activated and
deactivated with the brake switch. If so, there
may not be enough brake pressure to hold
both the vehicle and the trailer on a hill when
the brake pedal is released. In order to avoid
rolling down an incline while resuming accel -
eration, manually activate the trailer brake or
apply more vehicle brake pressure prior to
releasing the brake pedal.
HSA is not a parking brake. Always apply the
parking brake fully when exiting your vehicle.
Also, be certain to place the transmission
in PARK.
Failure to follow these warnings can result in a
collision or serious personal injury.
6
22_MP_OM_EN_USC_t.book Page 193
Page 196 of 344
194SAFETY
Ready Alert Braking (RAB)
RAB may reduce the time required to reach full
braking during emergency braking situations. It
anticipates when an emergency braking situation
may occur by monitoring how fast the throttle is
released by the driver. The Electronic Brake
Controller (EBC) system will prepare the brake
system for a panic stop.
Traction Control System (TCS)
The TCS monitors the amount of wheel spin for
each of the driven wheels. If wheel spin is
detected, the TCS may apply brake pressure to the
spinning wheel(s) and/or reduce vehicle power to
provide enhanced acceleration and stability. A
feature of the TCS, Brake Limited Differential (BLD)
functions similarly to a limited slip differential and
controls the wheel spin across a driven axle. If one
wheel on a driven axle is spinning faster than the
other, the system will apply the brake of the
spinning wheel. This will allow more vehicle torque
to be applied to the wheel that is not spinning.
BLD may remain enabled even if TCS and ESC are
in reduced modes.
Trailer Sway Control (TSC)
TSC uses sensors in the vehicle to recognize an
excessively swaying trailer and will take the
appropriate actions to attempt to stop the sway.
TSC will become active automatically once an
excessively swaying trailer is recognized.
NOTE:TSC cannot stop all trailers from swaying. Always
use caution when towing a trailer and follow the
trailer tongue weight recommendations
Úpage 154.
When TSC is functioning, the ESC Activation/
Malfunction Indicator Light will flash, the engine
power may be reduced and you may feel the
brakes being applied to individual wheels to
attempt to stop the trailer from swaying. TSC is
disabled when the ESC system is in the “Partial
Off” or “Full Off” modes.
AUXILIARY DRIVING SYSTEMS
BLIND SPOT MONITORING (BSM) —
I
F EQUIPPED
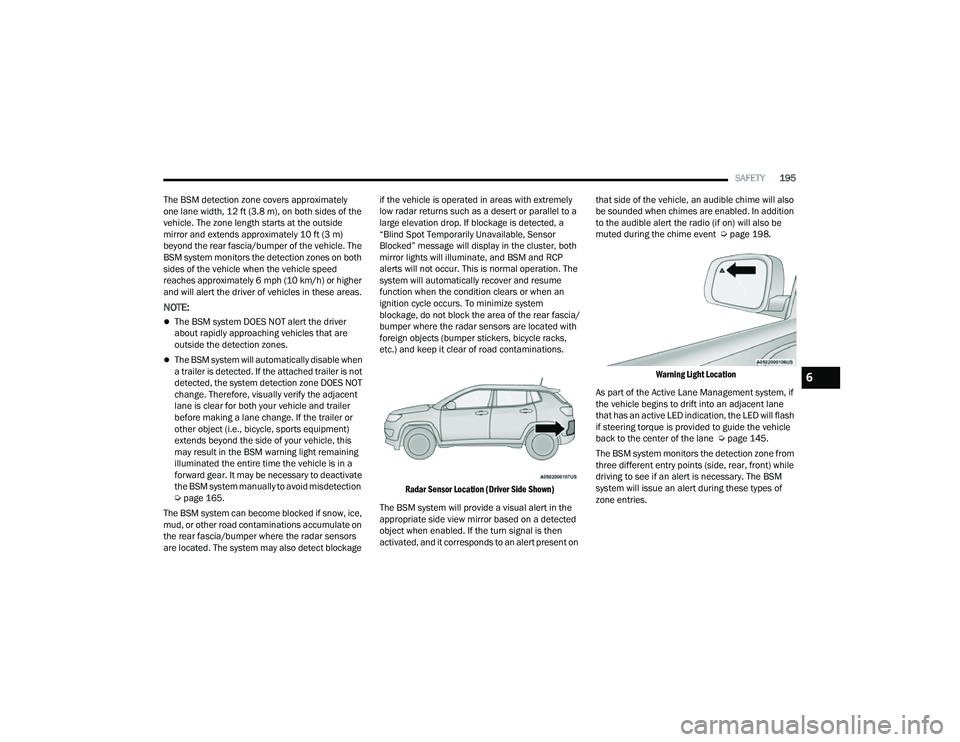
The BSM system uses two radar sensors, located
inside the rear fascia/bumper, to detect highway
licensable vehicles (automobiles, trucks,
motorcycles, etc.) that enter the blind spot zones
from the rear/front/side of the vehicle.
Rear Detection Zones
When the vehicle is started, the BSM Warning Light
will momentarily illuminate in both outside
rearview mirrors to let the driver know that the
system is operational. The BSM system sensors
operate when the vehicle is in any forward gear
and enters standby mode when the vehicle is
in PARK.
WARNING!
If TSC activates while driving, slow the vehicle
down, stop at the nearest safe location, and
adjust the trailer load to eliminate trailer sway.
22_MP_OM_EN_USC_t.book Page 194
Page 197 of 344
SAFETY195
The BSM detection zone covers approximately
one lane width, 12 ft (3.8 m), on both sides of the
vehicle. The zone length starts at the outside
mirror and extends approximately 10 ft (3 m)
beyond the rear fascia/bumper of the vehicle. The
BSM system monitors the detection zones on both
sides of the vehicle when the vehicle speed
reaches approximately 6 mph (10 km/h) or higher
and will alert the driver of vehicles in these areas.
NOTE:
The BSM system DOES NOT alert the driver
about rapidly approaching vehicles that are
outside the detection zones.
The BSM system will automatically disable when
a trailer is detected. If the attached trailer is not
detected, the system detection zone DOES NOT
change. Therefore, visually verify the adjacent
lane is clear for both your vehicle and trailer
before making a lane change. If the trailer or
other object (i.e., bicycle, sports equipment)
extends beyond the side of your vehicle, this
may result in the BSM warning light remaining
illuminated the entire time the vehicle is in a
forward gear. It may be necessary to deactivate
the BSM system manually to avoid misdetection
Ú page 165.
The BSM system can become blocked if snow, ice,
mud, or other road contaminations accumulate on
the rear fascia/bumper where the radar sensors
are located. The system may also detect blockage if the vehicle is operated in areas with extremely
low radar returns such as a desert or parallel to a
large elevation drop. If blockage is detected, a
“Blind Spot Temporarily Unavailable, Sensor
Blocked” message will display in the cluster, both
mirror lights will illuminate, and BSM and RCP
alerts will not occur. This is normal operation. The
system will automatically recover and resume
function when the condition clears or when an
ignition cycle occurs. To minimize system
blockage, do not block the area of the rear fascia/
bumper where the radar sensors are located with
foreign objects (bumper stickers, bicycle racks,
etc.) and keep it clear of road contaminations.
Radar Sensor Location (Driver Side Shown)
The BSM system will provide a visual alert in the
appropriate side view mirror based on a detected
object when enabled. If the turn signal is then
activated, and it corresponds to an alert present on that side of the vehicle, an audible chime will also
be sounded when chimes are enabled. In addition
to the audible alert the radio (if on) will also be
muted during the chime event Ú
page 198.
Warning Light Location
As part of the Active Lane Management system, if
the vehicle begins to drift into an adjacent lane
that has an active LED indication, the LED will flash
if steering torque is provided to guide the vehicle
back to the center of the lane Ú page 145.
The BSM system monitors the detection zone from
three different entry points (side, rear, front) while
driving to see if an alert is necessary. The BSM
system will issue an alert during these types of
zone entries.
6
22_MP_OM_EN_USC_t.book Page 195
Page 200 of 344
198SAFETY
Blind Spot Modes
Blind Spot Alert has three selectable modes of
operation that are available in the Uconnect
system.
Blind Spot Alert Lights Only (Default Setting)
When operating in Lights Only mode, the BSM
system will provide a visual alert in the appropriate
side view mirror based on a detected object.
However, when the system is operating in Rear
Cross Path (RCP) mode, the system will respond
with both visual and audible alerts when a
detected object is present. Whenever an audible
alert is requested, the radio is muted for the
duration of the chime.
Blind Spot Alert Lights/Chime
When operating in Blind Spot Alert Lights/Chime
mode, the BSM system will provide a visual alert in
the appropriate side view mirror based on a
detected object. If the turn signal is then activated,
and it corresponds to an alert present on that side
of the vehicle, an audible chime will also be
sounded. Whenever a turn signal and detected
object are present on the same side at the same
time, both the visual and audible alerts will be
issued. In addition to the audible alert the radio
(if on) will also be muted. When the system is in RCP, the system shall
respond with both visual and audible alerts when a
detected object is present. Whenever an audible
alert is requested, the radio volume is reduced.
Turn/hazard signal status is ignored; the RCP state
always requests the chime.
Blind Spot Alert Off
When the BSM system is turned off, there will be
no visual or audible alerts from either the BSM or
RCP systems.
NOTE:The BSM system will store the current operating
mode when the vehicle is shut off. Each time the
vehicle is started the previously stored mode will
be recalled and used.
Blocked Sensor
If the system detects degraded performance due
to contamination or foreign objects, a message will
warn you of a blocked sensor and the warning
indicators in side view mirrors will be illuminated.
The warning indicators will remain illuminated until
blockage clearing conditions are met. First clear
the fascia/bumper area around the sensors of the
blockage. After removing the blockage, reset the
system by cycling the ignition from ON to OFF and
then back ON.
FORWARD COLLISION WARNING (FCW)
W
ITH MITIGATION — IF EQUIPPED
FCW with Mitigation provides the driver with
audible warnings, visual warnings (within the
instrument cluster display), and may apply a brake
jerk to warn the driver when it detects a potential
frontal collision. The warnings and limited braking
are intended to provide the driver with enough time
to react, avoid or mitigate the potential collision.
NOTE:FCW monitors the information from the forward
looking sensors as well as the Electronic Brake
Controller (EBC), to calculate the probability of a
forward collision. When the system determines
that a forward collision is probable, the driver will
be provided with audible and visual warnings and
may provide a brake jerk warning.
If the driver does not take action based upon these
progressive warnings, then the system will provide
a limited level of active braking to help slow the
vehicle and mitigate the potential forward collision.
If the driver reacts to the warnings by braking and
the system determines that the driver intends to
avoid the collision by braking but has not applied
sufficient brake force, the system will compensate
and provide additional brake force as required.
22_MP_OM_EN_USC_t.book Page 198