clock JEEP GLADIATOR 2023 Owners Manual
[x] Cancel search | Manufacturer: JEEP, Model Year: 2023, Model line: GLADIATOR, Model: JEEP GLADIATOR 2023Pages: 448, PDF Size: 17.37 MB
Page 18 of 448
16GETTING TO KNOW YOUR VEHICLE
To Lock/Unlock The Doors And Tailgate
Push and release the unlock button on the key fob
once to unlock the driver’s door, or twice to unlock
all the doors. To lock all the doors, push the lock
button once.
When the doors are unlocked, the turn signals will
flash and the illuminated entry system will be
activated. When the doors are locked, the turn
signals will flash and the horn will chirp.
NOTE:
All doors can be programmed to unlock on the
first push of the unlock button through
Uconnect Settings Úpage 215.
The mechanical flip key can be used to lock or
unlock the doors, tailgate, glove compartment,
storage compartments (if equipped), and rear
seatbacks.
Key Left Vehicle Feature
If a valid key fob is no longer detected inside the
vehicle while the vehicle’s ignition system is in the
ON/RUN or START position, the message “Key Fob
Has Left The Vehicle” will be shown in the
instrument cluster display along with an interior
chime. An exterior audible and visual alert will also
be activated to warn the driver. The vehicle’s horn will rapidly chirp three times
along with a single flash of the vehicle’s exterior
lights.
NOTE:
The doors have to be open and then closed in
order for the vehicle to check for the presence of
a key fob; the Key Left Vehicle feature will not
activate until all of the doors are closed.
These alerts will not be activated in situations
where the vehicle’s engine is left running with
the key fob inside.
Replacing The Battery In The Key Fob
The recommended replacement battery is
CR2450.
NOTE:
Customers are recommended to use a battery
obtained from Mopar®. Aftermarket coin
battery dimensions may not meet the original
OEM coin battery dimensions.
Perchlorate material — special handling may
apply. See www.dtsc.ca.gov/hazardouswaste/
perchlorate for further information.
Do not touch the battery terminals that are on
the back housing or the printed circuit board.
When a key fob battery is low, a warning will be
indicated on the vehicle’s instrument cluster,
and the fob LED will no longer illuminate with a
button push.
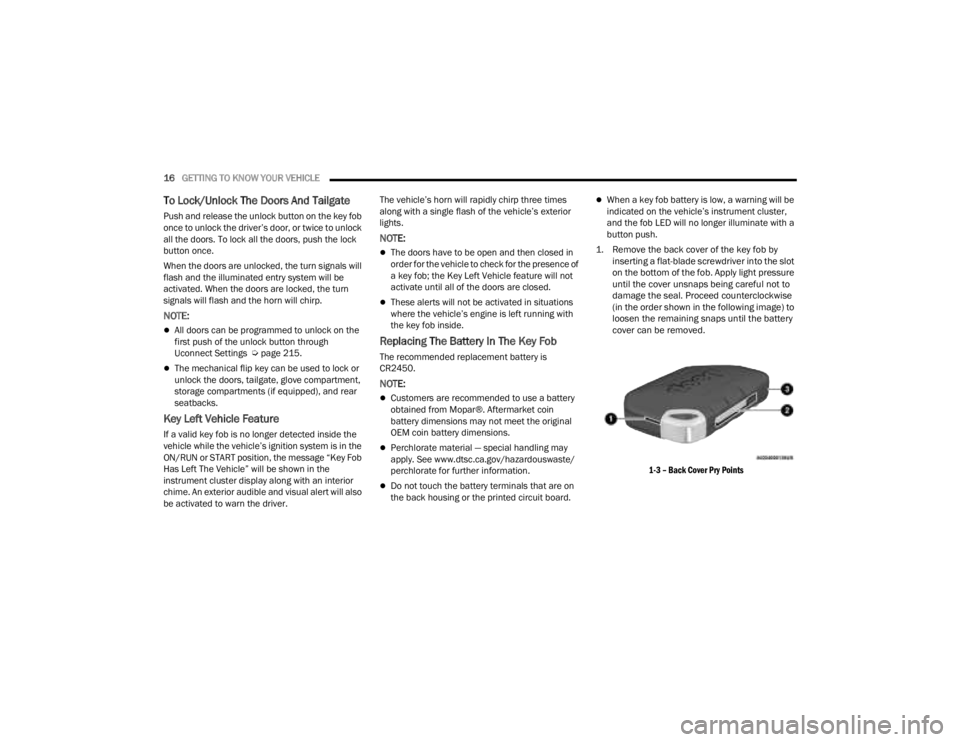
1. Remove the back cover of the key fob by inserting a flat-blade screwdriver into the slot
on the bottom of the fob. Apply light pressure
until the cover unsnaps being careful not to
damage the seal. Proceed counterclockwise
(in the order shown in the following image) to
loosen the remaining snaps until the battery
cover can be removed.
1-3 – Back Cover Pry Points
23_JT_OM_EN_USC_t.book Page 16
Page 32 of 448
30GETTING TO KNOW YOUR VEHICLE
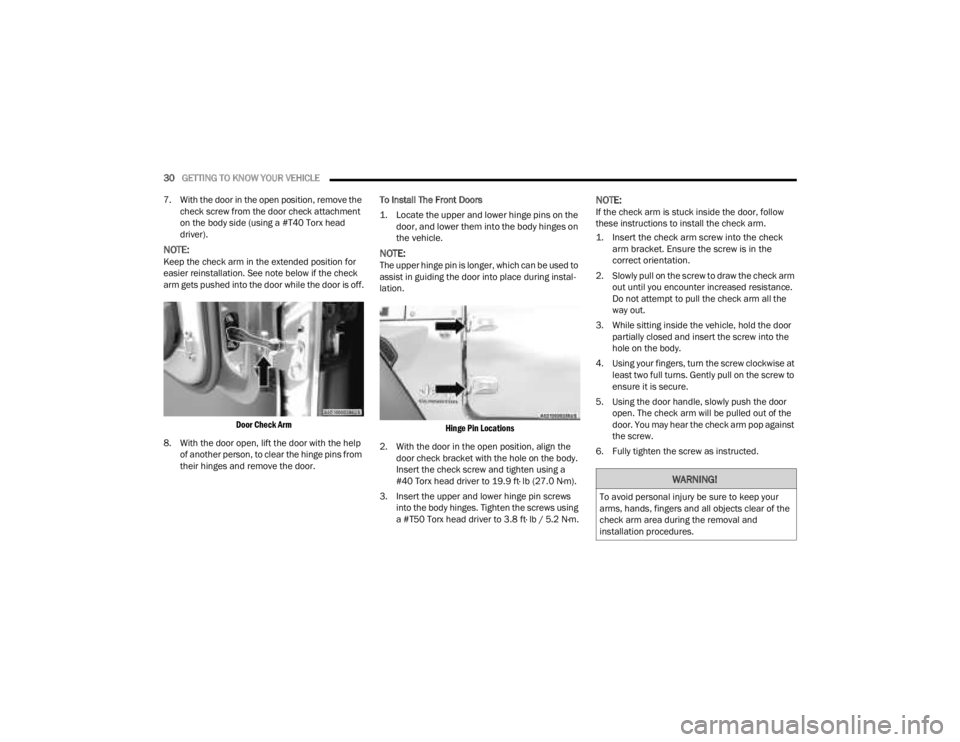
7. With the door in the open position, remove the check screw from the door check attachment
on the body side (using a #T40 Torx head
driver).
NOTE:Keep the check arm in the extended position for
easier reinstallation. See note below if the check
arm gets pushed into the door while the door is off.
Door Check Arm
8. With the door open, lift the door with the help of another person, to clear the hinge pins from
their hinges and remove the door. To Install The Front Doors
1. Locate the upper and lower hinge pins on the
door, and lower them into the body hinges on
the vehicle.
NOTE:The upper hinge pin is longer, which can be used to
assist in guiding the door into place during instal -
lation.
Hinge Pin Locations
2. With the door in the open position, align the door check bracket with the hole on the body.
Insert the check screw and tighten using a
#40 Torx head driver to 19.9 ft· lb (27.0 N·m).
3. Insert the upper and lower hinge pin screws into the body hinges. Tighten the screws using
a #T50 Torx head driver to 3.8 ft· lb / 5.2 N·m.
NOTE:If the check arm is stuck inside the door, follow
these instructions to install the check arm.
1. Insert the check arm screw into the check arm bracket. Ensure the screw is in the
correct orientation.
2. Slowly pull on the screw to draw the check arm out until you encounter increased resistance.
Do not attempt to pull the check arm all the
way out.
3. While sitting inside the vehicle, hold the door partially closed and insert the screw into the
hole on the body.
4. Using your fingers, turn the screw clockwise at least two full turns. Gently pull on the screw to
ensure it is secure.
5. Using the door handle, slowly push the door open. The check arm will be pulled out of the
door. You may hear the check arm pop against
the screw.
6. Fully tighten the screw as instructed.
WARNING!
To avoid personal injury be sure to keep your
arms, hands, fingers and all objects clear of the
check arm area during the removal and
installation procedures.
23_JT_OM_EN_USC_t.book Page 30
Page 42 of 448
40GETTING TO KNOW YOUR VEHICLE
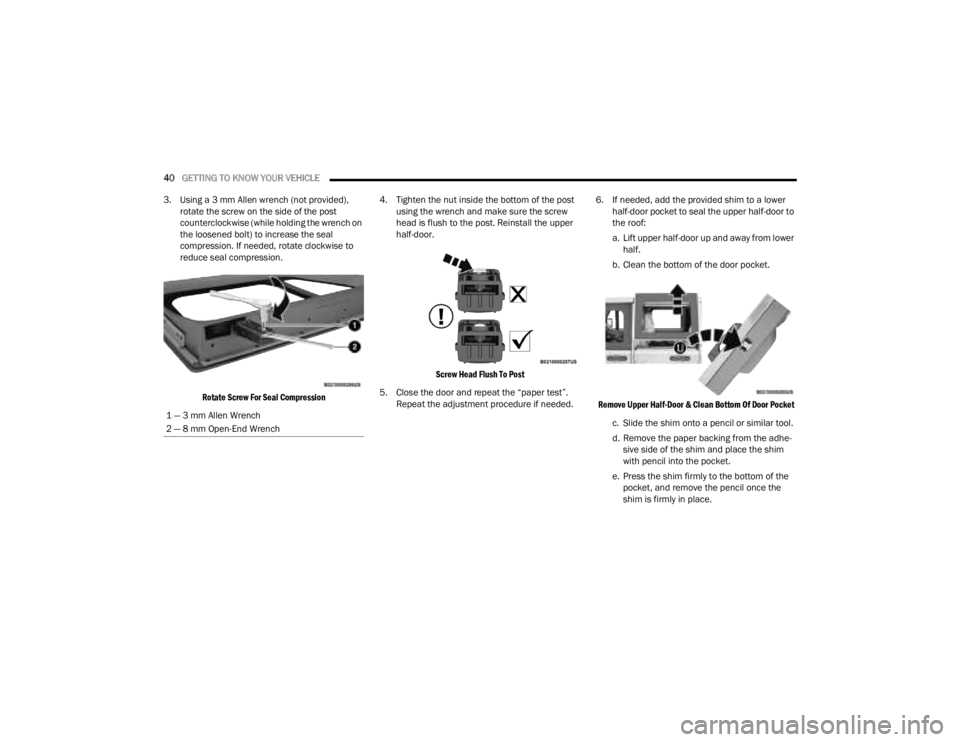
3. Using a 3 mm Allen wrench (not provided), rotate the screw on the side of the post
counterclockwise (while holding the wrench on
the loosened bolt) to increase the seal
compression. If needed, rotate clockwise to
reduce seal compression.
Rotate Screw For Seal Compression
4. Tighten the nut inside the bottom of the post
using the wrench and make sure the screw
head is flush to the post. Reinstall the upper
half-door.
Screw Head Flush To Post
5. Close the door and repeat the “paper test”. Repeat the adjustment procedure if needed. 6. If needed, add the provided shim to a lower
half-door pocket to seal the upper half-door to
the roof:
a. Lift upper half-door up and away from lower half.
b. Clean the bottom of the door pocket.
Remove Upper Half-Door & Clean Bottom Of Door Pocket
c. Slide the shim onto a pencil or similar tool.
d. Remove the paper backing from the adhe -
sive side of the shim and place the shim
with pencil into the pocket.
e. Press the shim firmly to the bottom of the pocket, and remove the pencil once the
shim is firmly in place.
1 — 3 mm Allen Wrench
2 — 8 mm Open-End Wrench
23_JT_OM_EN_USC_t.book Page 40
Page 59 of 448
GETTING TO KNOW YOUR VEHICLE57
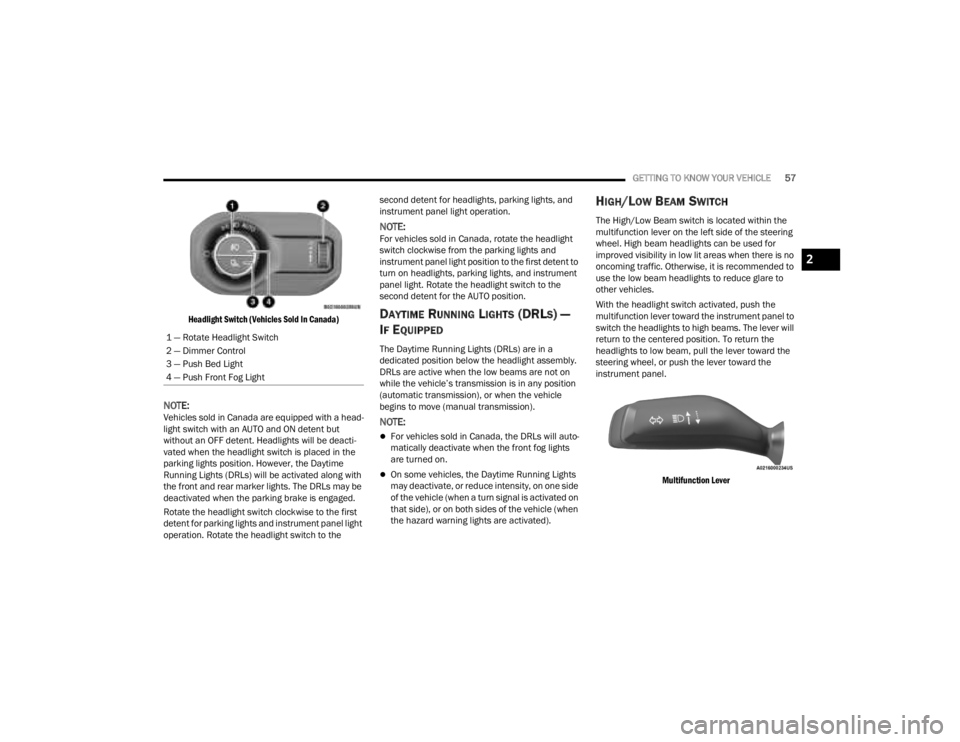
Headlight Switch (Vehicles Sold In Canada)
NOTE:Vehicles sold in Canada are equipped with a head -
light switch with an AUTO and ON detent but
without an OFF detent. Headlights will be deacti -
vated when the headlight switch is placed in the
parking lights position. However, the Daytime
Running Lights (DRLs) will be activated along with
the front and rear marker lights. The DRLs may be
deactivated when the parking brake is engaged.
Rotate the headlight switch clockwise to the first
detent for parking lights and instrument panel light
operation. Rotate the headlight switch to the second detent for headlights, parking lights, and
instrument panel light operation.
NOTE:For vehicles sold in Canada, rotate the headlight
switch clockwise from the parking lights and
instrument panel light position to the first detent to
turn on headlights, parking lights, and instrument
panel light. Rotate the headlight switch to the
second detent for the AUTO position.
DAYTIME RUNNING LIGHTS (DRLS) —
I
F EQUIPPED
The Daytime Running Lights (DRLs) are in a
dedicated position below the headlight assembly.
DRLs are active when the low beams are not on
while the vehicle’s transmission is in any position
(automatic transmission), or when the vehicle
begins to move (manual transmission).
NOTE:
For vehicles sold in Canada, the DRLs will auto -
matically deactivate when the front fog lights
are turned on.
On some vehicles, the Daytime Running Lights
may deactivate, or reduce intensity, on one side
of the vehicle (when a turn signal is activated on
that side), or on both sides of the vehicle (when
the hazard warning lights are activated).
HIGH/LOW BEAM SWITCH
The High/Low Beam switch is located within the
multifunction lever on the left side of the steering
wheel. High beam headlights can be used for
improved visibility in low lit areas when there is no
oncoming traffic. Otherwise, it is recommended to
use the low beam headlights to reduce glare to
other vehicles.
With the headlight switch activated, push the
multifunction lever toward the instrument panel to
switch the headlights to high beams. The lever will
return to the centered position. To return the
headlights to low beam, pull the lever toward the
steering wheel, or push the lever toward the
instrument panel.
Multifunction Lever
1 — Rotate Headlight Switch
2 — Dimmer Control
3 — Push Bed Light
4 — Push Front Fog Light
2
23_JT_OM_EN_USC_t.book Page 57
Page 60 of 448
58GETTING TO KNOW YOUR VEHICLE
AUTOMATIC HIGH BEAM HEADLAMP
C
ONTROL — IF EQUIPPED
The Automatic High Beam Headlamp Control
system provides increased forward lighting at night
by automatically controlling the high beams
through the use of a camera mounted on the
vehicle’s header. This camera detects vehicle
specific light and automatically switches from high
beams to low beams until the approaching vehicle
is out of view.
NOTE:
The Automatic High Beam Headlamp Control
can be turned on or off by selecting “ON” under
“Auto Dim High Beams” within your Uconnect
Settings Ú page 215, as well as turning the
headlight switch to the AUTO position and
placing the multifunction lever in the high beam
position.
Broken, muddy, or obstructed headlights and
taillights of vehicles in the field of view will
cause headlights to remain on longer (closer to
the vehicle). Also, dirt, film, and other obstruc -
tions on the windshield or camera lens will
cause the system to function improperly.
FLASH-TO-PASS
The Flash-To-Pass feature will illuminate the high
beam headlights temporarily to signal another
vehicle of a passing occurrence. Pull and hold the
Multifunction Lever to activate the Flash-To-Pass
feature. When the lever is released, the
Flash-To-Pass feature will deactivate.
AUTOMATIC HEADLIGHTS — IF EQUIPPED
The Automatic Headlight System will turn the
headlights on or off according to ambient light
levels. To turn the system on, rotate the headlight
switch clockwise to the last detent for automatic
headlight operation. When the system is on, the
headlight time delay feature is also on. This means
the headlights will stay on for up to 90 seconds
(programmable through the Uconnect Settings
Ú
page 215) after you place the ignition into the
OFF position. To turn the automatic system off,
move the headlight switch out of the AUTO position.
NOTE:The engine must be running before the headlights
will come on in the automatic mode.
LIGHTS-ON REMINDER
If the headlights or parking lights are left on after
the ignition is placed in the OFF position, the vehicle
will chime when the driver’s door is opened.
FRONT FOG LIGHTS — IF EQUIPPED
The Front Fog Lights are located on the front of the
vehicle below the headlights. When activated,
these lights add illumination directed at the driving
surface to aid in poor visibility conditions.
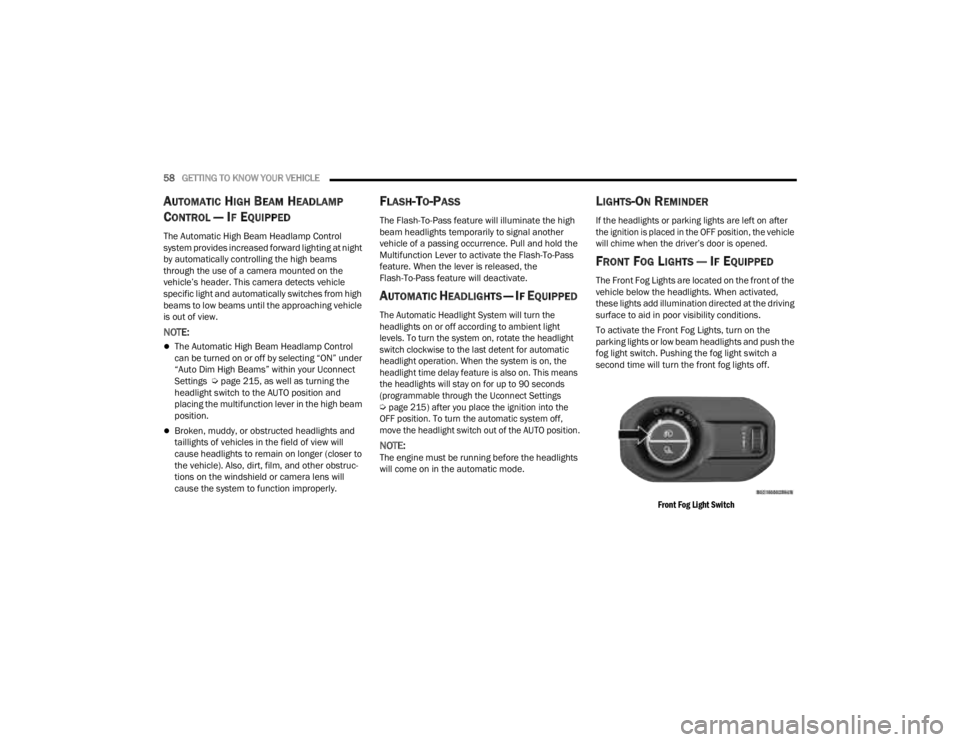
To activate the Front Fog Lights, turn on the
parking lights or low beam headlights and push the
fog light switch. Pushing the fog light switch a
second time will turn the front fog lights off.
Front Fog Light Switch
23_JT_OM_EN_USC_t.book Page 58
Page 66 of 448
64GETTING TO KNOW YOUR VEHICLE
Blower Control
Blower Control regulates the amount of
air forced through the Climate Control
system. There are seven blower speeds
available. Adjusting the blower will cause
automatic mode to switch to manual operation.
The speeds can be selected using either the
blower control knob on the faceplate or the
buttons on the touchscreen.
Faceplate
The blower speed increases as you turn the blower
control knob clockwise from the lowest blower
setting. The blower speed decreases as you turn
the blower control knob counterclockwise.
Touchscreen
Use the small blower icon to reduce the blower
setting and the large blower icon to increase the
blower setting. Blower can also be selected by
pressing the blower bar area between the icons.
Mode Control
Turn the mode control knob or press one
of the Mode buttons on the touchscreen
to adjust airflow distribution. The airflow
distribution mode can be adjusted so air
comes from the instrument panel outlets, floor
outlets, defrost outlets and demist outlets.
Panel Mode
Air comes from the outlets in the
instrument panel. Each of these outlets
can be individually adjusted to direct the
flow of air. The air vanes of the center
outlets and outboard outlets can be moved up and
down or side to side to regulate airflow direction.
There is a shut-off wheel located below the air
vanes to shut off or adjust the amount of airflow
from these outlets.
Bi-Level Mode
Air comes from the instrument panel
outlets and floor outlets. A slight amount
of air is directed through the defrost and
side window demister outlets.
NOTE:Bi-Level mode is designed under comfort condi -
tions to provide cooler air out of the panel outlets
and warmer air from the floor outlets.
Floor Mode
Air comes from the floor outlets. A slight
amount of air is directed through the
defrost and side window demister
outlets.
Mix Mode
Air is directed through the floor, defrost,
and side window demister outlets. This
setting works best in cold or snowy
conditions that require extra heat to the
windshield. This setting is good for maintaining
comfort while reducing moisture on the
windshield.
Climate Control OFF Button
Press and release this button on the
touchscreen, or push and release the
button on the blower knob to turn the
Climate Control ON/OFF.
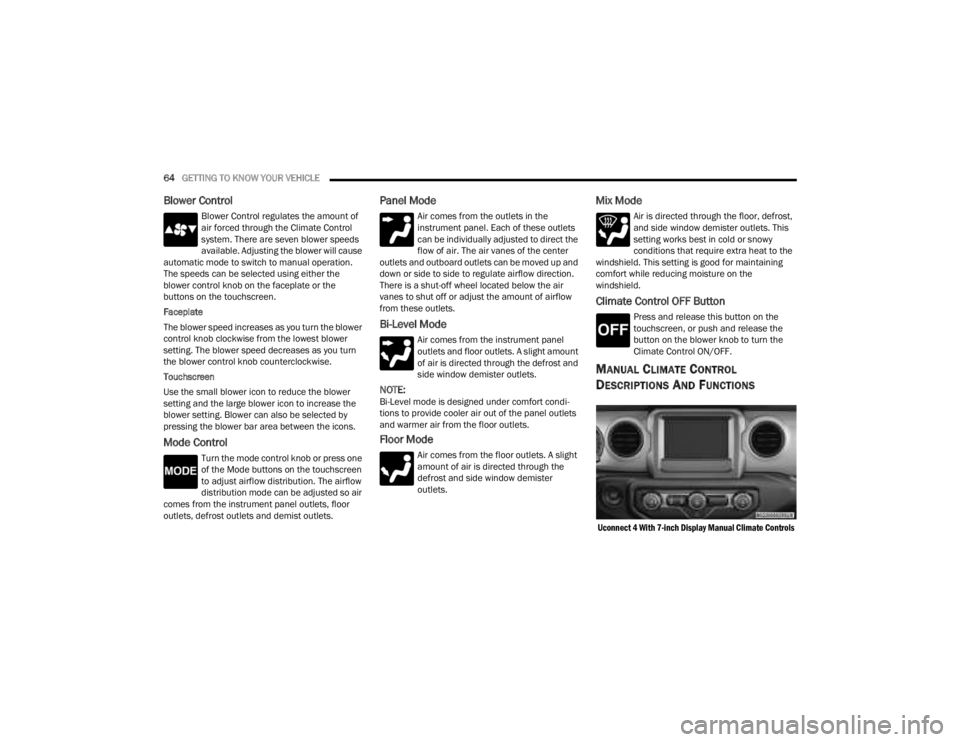
MANUAL CLIMATE CONTROL
D
ESCRIPTIONS AND FUNCTIONS
Uconnect 4 With 7-inch Display Manual Climate Controls
23_JT_OM_EN_USC_t.book Page 64
Page 68 of 448
66GETTING TO KNOW YOUR VEHICLE
Temperature Control
Temperature Control regulates the
temperature of the air forced through the
climate system. The temperature
increases as you turn the temperature
control knob clockwise.
The temperature decreases as you turn
the temperature control knob
counterclockwise. Heater Only
Turning the temperature control knob clockwise
increases the heating temperature and turning the
temperature control knob counterclockwise
decreases the heating temperature.
Blower Control
Blower Control regulates the amount of
air forced through the climate system.
There are seven blower speeds available.
The blower speeds increase as you turn
the blower control knob clockwise from the lowest
blower setting. The blower speed decreases as you
turn the blower control knob counterclockwise.
Mode Control
Turn the mode control knob or press one
of the Mode buttons on the touchscreen
to adjust airflow distribution. The airflow
distribution mode can be adjusted so air
comes from the instrument panel outlets, floor
outlets, defrost outlets and demist outlets.
Panel Mode
Air comes from the outlets in the
instrument panel. Each of these outlets
can be individually adjusted to direct the
flow of air. The air vanes of the center
outlets and outboard outlets can be moved up and
down or side to side to regulate airflow direction.
There is a shut-off wheel located below the air vanes to shut off or adjust the amount of airflow
from these outlets.
Bi-Level Mode
Air comes from the instrument panel
outlets and floor outlets. A slight amount
of air is directed through the defrost and
side window demister outlets.
NOTE:Bi-Level mode is designed under comfort condi
-
tions to provide cooler air out of the panel outlets
and warmer air from the floor outlets.
Floor Mode
Air comes from the floor outlets. A slight
amount of air is directed through the
defrost and side window demister outlets.
Mix Mode
Air is directed through the floor, defrost,
and side window demister outlets. This
setting works best in cold or snowy
conditions that require extra heat to the
windshield. This setting is good for maintaining
comfort while reducing moisture on the
windshield.
Climate Control OFF Button
Press and release this button to turn the
Climate Control ON/OFF.
CAUTION!
Failure to follow these cautions can cause
damage to the heating elements:
Use care when washing the inside of the rear
window. Do not use abrasive window cleaners
on the interior surface of the window. Use a
soft cloth and a mild washing solution, wiping
parallel to the heating elements. Labels can
be peeled off after soaking with warm water.
Do not use scrapers, sharp instruments, or
abrasive window cleaners on the interior
surface of the window.
Keep all objects a safe distance from the
window.
23_JT_OM_EN_USC_t.book Page 66
Page 96 of 448
94GETTING TO KNOW YOUR VEHICLE
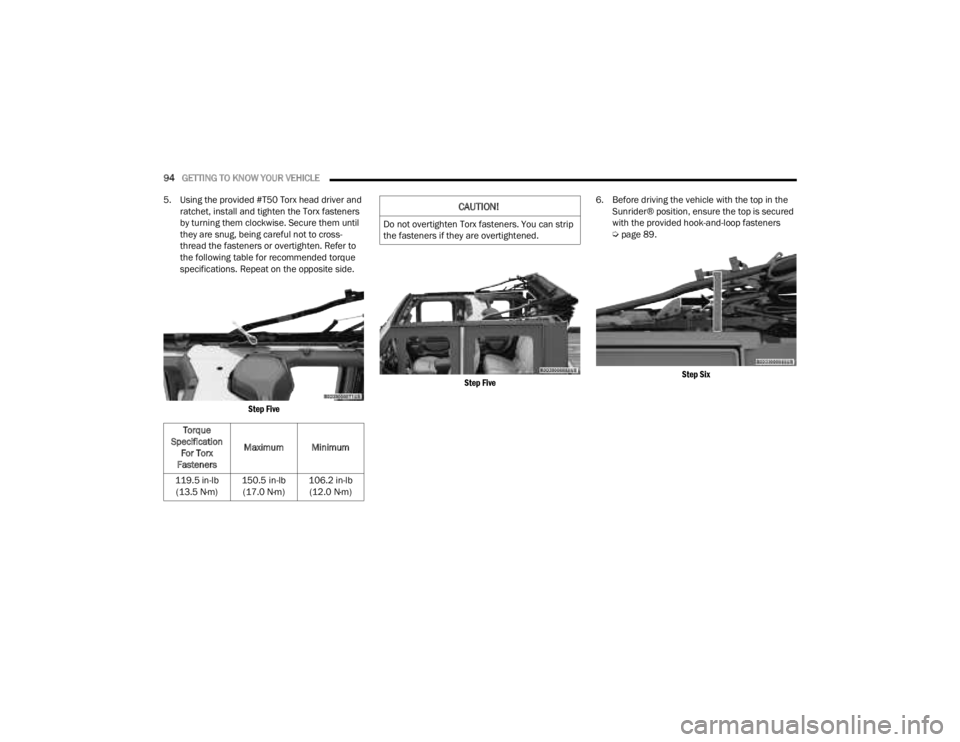
5. Using the provided #T50 Torx head driver and ratchet, install and tighten the Torx fasteners
by turning them clockwise. Secure them until
they are snug, being careful not to cross-
thread the fasteners or overtighten. Refer to
the following table for recommended torque
specifications. Repeat on the opposite side.
Step Five Step Five
6. Before driving the vehicle with the top in the
Sunrider® position, ensure the top is secured
with the provided hook-and-loop fasteners
Úpage 89.
Step Six
Torque
Specification For Torx
Fasteners Maximum Minimum
119.5 in-lb (13.5 N·m) 150.5 in-lb
(17.0 N·m) 106.2 in-lb
(12.0 N·m)
CAUTION!
Do not overtighten Torx fasteners. You can strip
the fasteners if they are overtightened.
23_JT_OM_EN_USC_t.book Page 94
Page 114 of 448

112GETTING TO KNOW YOUR VEHICLE
There are two adjustable utility rail cleats on each
side of the bed that can be used to assist in
securing cargo.
Adjustable Cleat Assembly
Each utility rail cleat must be tightened down in
one of the detents along either utility rail in order to
keep cargo properly secured.
To move the utility rail cleat to any position on the
utility rail, turn the cleat retainer nut counter-
clockwise several times. Then, pull out on the
utility rail cleat and slide it to the detent nearest
the desired location. Make sure the utility rail cleat
is seated in the detent, and tighten the nut. To remove the utility rail cleats from the side utility
rails, slide the cleat to the rectangular cutout
located at the end of the rail toward the front of the
vehicle.
To remove the utility rail cleat from the front utility
rail, slide the cleat to the rectangular cutout
located on the left side of the rail.
TONNEAU COVER — IF EQUIPPED
The Tonneau Cover can be installed on the truck
bed to keep cargo out of view, and protect from
inclement weather.
The Tonneau Cover consists of the following
features:
Easy roll up cover
Tonneau fore/aft locator
Crossbar inside bed locator
Rear latches
Stowage straps
NOTE:The Tonneau Cover can be rolled up and secured
at the front of the truck bed without removing it
completely.
TONNEAU COVER INSTALLATION
To install the Tonneau Cover, proceed as follows:
1. Position the rolled up Tonneau Cover on the
truck bed and align it to the two fastener
locations at the front of the bed.
Fastener Locations
2. Using a #T50 Torx head driver, secure the fasteners to the bed.
3. Lower the tailgate to the fully open position before unrolling the Tonneau Cover.
1 — Utility Rail Detent
2 — Cleat Retainer Nut
3 — Utility Rail Cleat
23_JT_OM_EN_USC_t.book Page 112
Page 193 of 448
STARTING AND OPERATING191
The TrailCam view can also be activated by
pressing the icon on the Back Up Camera view.
The Back Up Camera view can also be activated by
pressing the icon on the TrailCam view.
When the vehicle is shifted out of REVERSE with
Camera Delay turned off and TrailCam view is
active, the TrailCam mode is exited and the
previous screen appears again.
When the vehicle is shifted out of REVERSE with
Camera Delay turned on and the TrailCam view is
active, the TrailCam image will be displayed for up
to 10 seconds unless the vehicle speed exceeds
8 mph (13 km/h), the transmission is shifted into
PARK, the ignition is placed in the OFF position, or
the touchscreen X button to disable display of the
TrailCam view is pressed.
Whenever the TrailCam image is activated through
the Manual Activation Methods, and the vehicle
speed is greater than or equal to 8 mph (13 km/h),
a display timer for the image is initiated. The image
will continue to be displayed until the display timer
exceeds 10 seconds.
NOTE:
If the vehicle speed remains below 8 mph
(13 km/h) while in 2WD or 4WD High, the
TrailCam image will be displayed continuously
until deactivated via the touchscreen X button,
the transmission is shifted into PARK, or the
ignition is placed in the OFF position.
The touchscreen X button to disable the display
of the camera image is made available ONLY
when the vehicle is not in REVERSE.
The TrailCam view will stay active regardless of
the vehicle speed and time while in 4WD Low.
Cleaning The TrailCam
Press and hold the Clean Camera button located
on the TrailCam view to wash the TrailCam. Washer
fluid will stop when the button is released.
The camera can be washed up to 20 seconds at
a time while holding the button.
The Clean Camera system is not available when
windshield washing is in process.
When enabled, active dynamic Tire Lines are
projected on the ground plane of the TrailCam view
based on the steering wheel position.
REFUELING THE VEHICLE — GASOLINE
ENGINE (IF EQUIPPED)
FUEL FILLER CAP
The fuel filler cap is located on the left side of the
vehicle. To access the fuel filler cap, push on the
fuel filler door to unlatch it. To close the fuel filler
door, push on it a second time. If the fuel filler cap
is lost or damaged, be sure the replacement cap is
the correct one for this vehicle.
1. Open the fuel filler door.
Fuel Filler Door
2. Remove the fuel cap by rotating it counter -
clockwise.
Fuel Filler Cap
4
23_JT_OM_EN_USC_t.book Page 191