start stop button JEEP GLADIATOR 2023 Owners Manual
[x] Cancel search | Manufacturer: JEEP, Model Year: 2023, Model line: GLADIATOR, Model: JEEP GLADIATOR 2023Pages: 448, PDF Size: 17.37 MB
Page 20 of 448
18GETTING TO KNOW YOUR VEHICLE
The system uses a key fob, keyless push button
ignition and a Radio Frequency (RF) receiver to
prevent unauthorized vehicle operation. Therefore,
only key fobs that are programmed to the vehicle
can be used to start and operate the vehicle. The
system cannot reprogram a key fob obtained from
another vehicle.
After placing the ignition switch in the ON/RUN
position, the Vehicle Security Light will turn on for
three seconds for a bulb check. If the light remains
on after the bulb check, it indicates that there is a
problem with the electronics. In addition, if the light
begins to flash after the bulb check, it indicates
that someone attempted to start the engine with
an invalid key fob. In the event that a valid key fob
is used to start the engine but there is an issue
with the vehicle electronics, the engine will start
and shut off after two seconds.
If the Vehicle Security Light turns on during normal
vehicle operation (vehicle running for longer than
ten seconds), it indicates that there is a fault in the
electronics. Should this occur, have the vehicle
serviced as soon as possible by an authorized
dealer. All of the key fobs provided with your new vehicle
have been programmed to the vehicle electronics
Ú
page 432.
NOTE:A key fob that has not been programmed is also
considered an invalid key.
IGNITION SWITCH
KEYLESS ENTER ‘N GO™ IGNITION
This feature allows the driver to operate the
ignition switch with the push of a START/STOP
ignition button as long as the key fob is in the
passenger compartment.
The START/STOP ignition button has several
operating modes that are labeled and will
illuminate when in position. These modes are OFF,
ACC, RUN, and START.
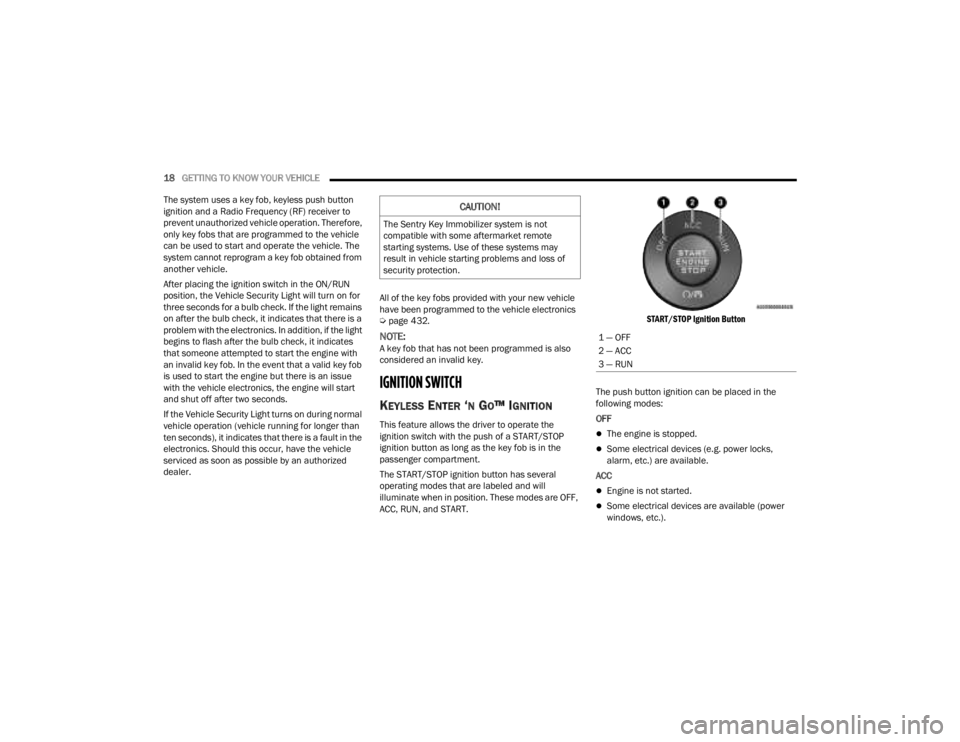
START/STOP Ignition Button
The push button ignition can be placed in the
following modes:
OFF The engine is stopped.
Some electrical devices (e.g. power locks,
alarm, etc.) are available.
ACC
Engine is not started.
Some electrical devices are available (power
windows, etc.).
CAUTION!
The Sentry Key Immobilizer system is not
compatible with some aftermarket remote
starting systems. Use of these systems may
result in vehicle starting problems and loss of
security protection.
1 — OFF
2 — ACC
3 — RUN
23_JT_OM_EN_USC_t.book Page 18
Page 21 of 448
GETTING TO KNOW YOUR VEHICLE19
RUN
Driving position.
All electrical devices are available.
START
The engine will start.
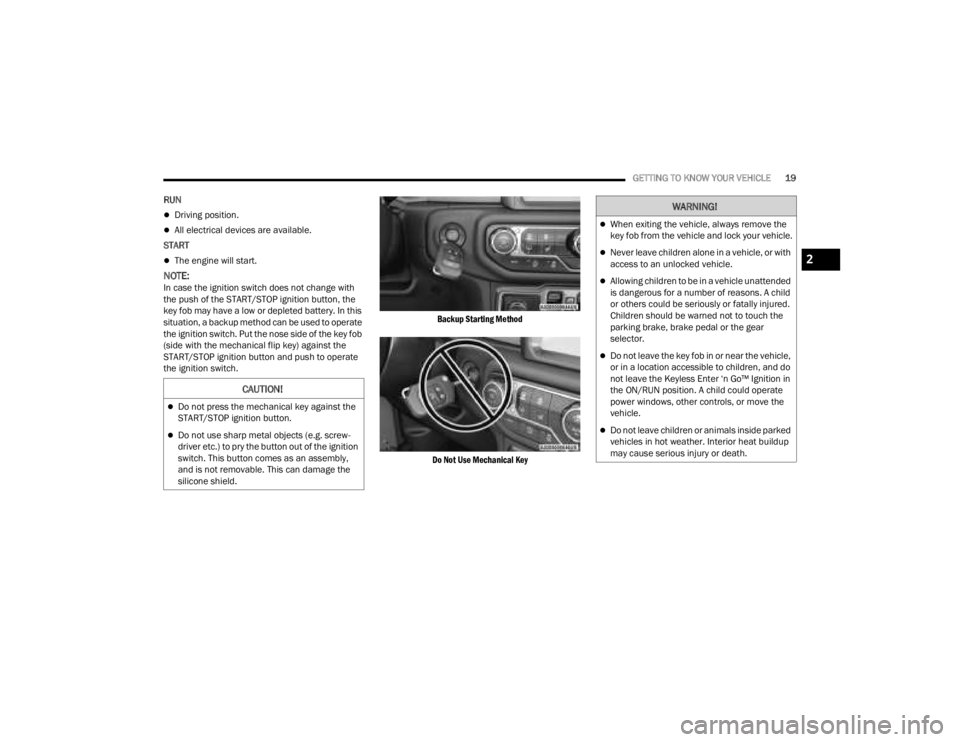
NOTE:In case the ignition switch does not change with
the push of the START/STOP ignition button, the
key fob may have a low or depleted battery. In this
situation, a backup method can be used to operate
the ignition switch. Put the nose side of the key fob
(side with the mechanical flip key) against the
START/STOP ignition button and push to operate
the ignition switch.
Backup Starting Method
Do Not Use Mechanical Key
CAUTION!
Do not press the mechanical key against the
START/STOP ignition button.
Do not use sharp metal objects (e.g. screw -
driver etc.) to pry the button out of the ignition
switch. This button comes as an assembly,
and is not removable. This can damage the
silicone shield.
WARNING!
When exiting the vehicle, always remove the
key fob from the vehicle and lock your vehicle.
Never leave children alone in a vehicle, or with
access to an unlocked vehicle.
Allowing children to be in a vehicle unattended
is dangerous for a number of reasons. A child
or others could be seriously or fatally injured.
Children should be warned not to touch the
parking brake, brake pedal or the gear
selector.
Do not leave the key fob in or near the vehicle,
or in a location accessible to children, and do
not leave the Keyless Enter ‘n Go™ Ignition in
the ON/RUN position. A child could operate
power windows, other controls, or move the
vehicle.
Do not leave children or animals inside parked
vehicles in hot weather. Interior heat buildup
may cause serious injury or death.
2
23_JT_OM_EN_USC_t.book Page 19
Page 23 of 448

GETTING TO KNOW YOUR VEHICLE21
Vehicle Security system indicator flashing
Ignition in OFF position
Fuel level meets minimum requirement
All removable doors must not be removed
Malfunction Indicator Light not illuminated
TO EXIT REMOTE START MODE
To drive the vehicle after starting the Remote Start
system, either push and release the unlock button
on the key fob to unlock the doors, or unlock the
vehicle using Keyless Enter ‘n Go™ — Passive Entry
via the door handles, and disarm the Vehicle
Security system (if equipped). Then, prior to the
end of the 15 minute cycle, push and release the
START/STOP ignition button.
The Remote Start system will turn the engine off if
the Remote Start button on the key fob is pushed
again, or if the engine is allowed to run for the
entire 15 minute cycle. Once the ignition is placed
in the ON/RUN position, the climate controls will
resume previously set operations (temperature,
blower control, etc.).
NOTE:
To avoid unintentional shutdowns, the system
will disable for two seconds after receiving a
valid Remote Start request.
For vehicles equipped with the Keyless
Enter ‘n Go™ — Passive Entry feature, the message “Remote Start Active — Push Start
Button” will display in the instrument cluster
display until you push the START/STOP ignition
button.
REMOTE START FRONT DEFROST
A
CTIVATION — IF EQUIPPED
When Remote Start is active, and the outside
ambient temperature is 40°F (4.5°C) or below, the
system will automatically activate front defrost for
15 minutes or less. The time is dependent on the
ambient temperature. Once the timer expires, the
system will automatically adjust the settings
depending on ambient conditions. See “Remote
Start Comfort Systems — If Equipped” in the next
section for detailed operation.
REMOTE START COMFORT SYSTEMS —
I
F EQUIPPED
When Remote Start is activated, the front and rear
defrost will automatically turn on in cold weather.
The heated steering wheel and driver heated seat
feature will also turn on if programmed in the
Comfort menu screen within Uconnect Settings
Ú page 215.
Automatic Temperature Control (ATC) —
If Equipped
The climate controls automatically adjust to an
optimal temperature and mode, dependent upon
the outside ambient temperature. When the
ignition is placed in the ON/RUN position, the
climate controls will resume their previous
settings.
Manual Temperature Control (MTC) — If Equipped
In ambient temperatures of 40°F (4.5°C) or
below, the climate settings will default to
maximum heat, with fresh air entering the
cabin. If the front defrost timer expires, the
vehicle will enter Mix Mode.
In ambient temperatures from 40°F (4.5°C) to
78°F (26°C), the climate settings will be based
on the last settings selected by the driver.
In ambient temperatures of 78°F (26°C) or
above, the climate settings will default to MAX
A/C, Bi-Level mode, and Recirculation on.
WARNING!
Do not start or run an engine in a closed
garage or confined area. Exhaust gas contains
carbon monoxide (CO) which is odorless and
colorless. Carbon monoxide is poisonous and
can cause serious injury or death when
inhaled.
Keep key fobs away from children. Operation
of the Remote Start system, windows, door
locks or other controls could cause serious
injury or death.
2
23_JT_OM_EN_USC_t.book Page 21
Page 51 of 448
GETTING TO KNOW YOUR VEHICLE49
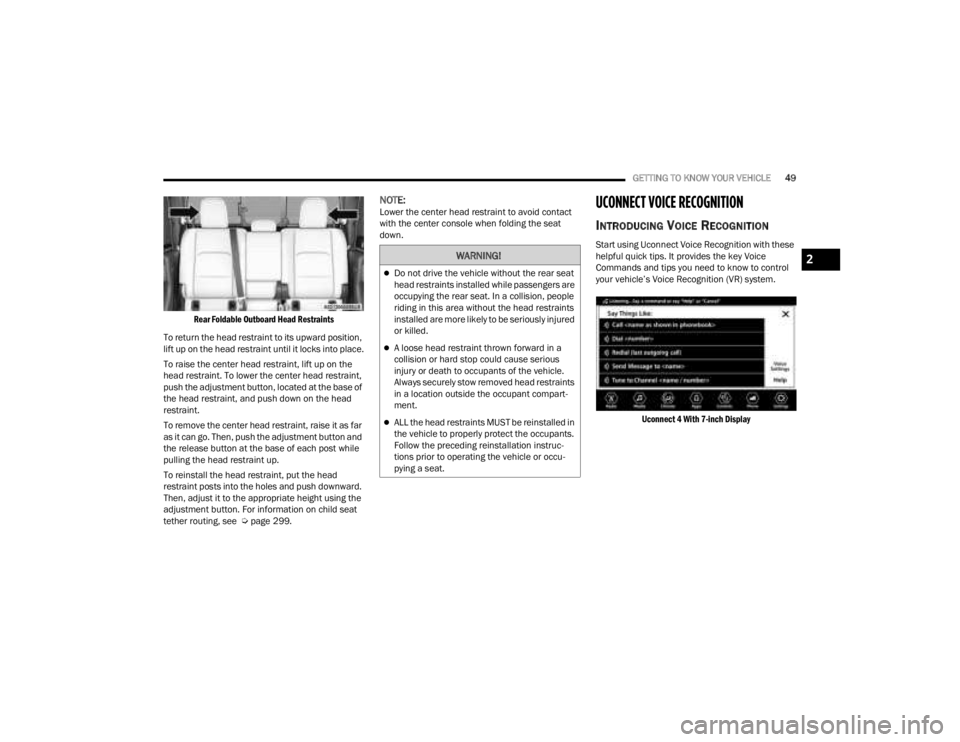
Rear Foldable Outboard Head Restraints
To return the head restraint to its upward position,
lift up on the head restraint until it locks into place.
To raise the center head restraint, lift up on the
head restraint. To lower the center head restraint,
push the adjustment button, located at the base of
the head restraint, and push down on the head
restraint.
To remove the center head restraint, raise it as far
as it can go. Then, push the adjustment button and
the release button at the base of each post while
pulling the head restraint up.
To reinstall the head restraint, put the head
restraint posts into the holes and push downward.
Then, adjust it to the appropriate height using the
adjustment button. For information on child seat
tether routing, see Ú page 299.
NOTE:Lower the center head restraint to avoid contact
with the center console when folding the seat
down.UCONNECT VOICE RECOGNITION
INTRODUCING VOICE RECOGNITION
Start using Uconnect Voice Recognition with these
helpful quick tips. It provides the key Voice
Commands and tips you need to know to control
your vehicle’s Voice Recognition (VR) system.
Uconnect 4 With 7-inch Display
WARNING!
Do not drive the vehicle without the rear seat
head restraints installed while passengers are
occupying the rear seat. In a collision, people
riding in this area without the head restraints
installed are more likely to be seriously injured
or killed.
A loose head restraint thrown forward in a
collision or hard stop could cause serious
injury or death to occupants of the vehicle.
Always securely stow removed head restraints
in a location outside the occupant compart -
ment.
ALL the head restraints MUST be reinstalled in
the vehicle to properly protect the occupants.
Follow the preceding reinstallation instruc -
tions prior to operating the vehicle or occu -
pying a seat.
2
23_JT_OM_EN_USC_t.book Page 49
Page 52 of 448
50GETTING TO KNOW YOUR VEHICLE
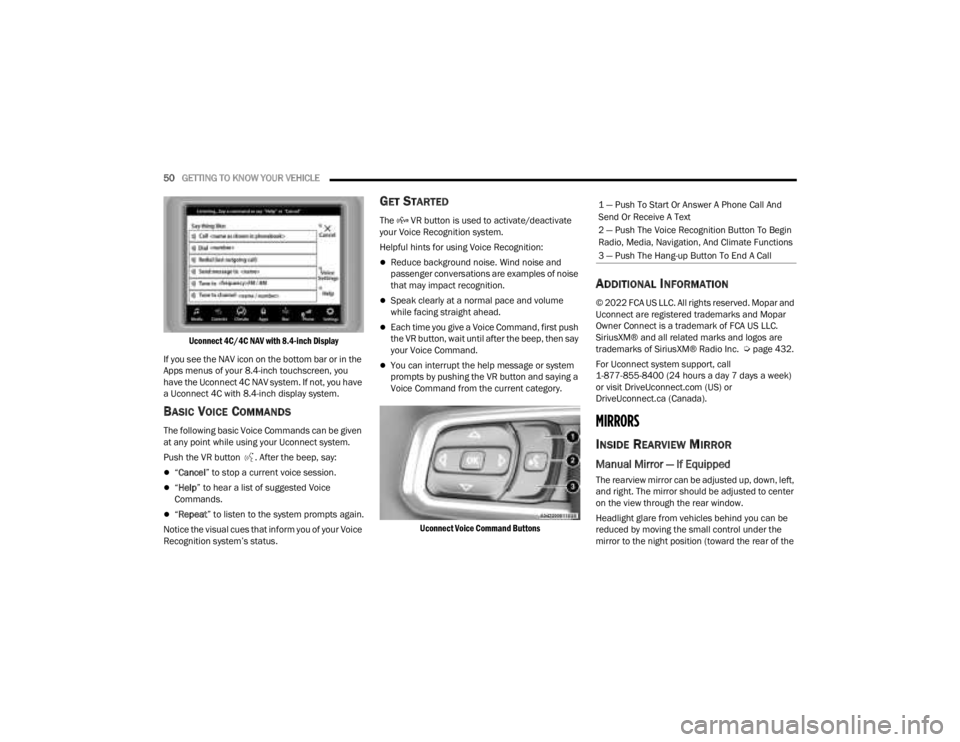
Uconnect 4C/4C NAV with 8.4-inch Display
If you see the NAV icon on the bottom bar or in the
Apps menus of your 8.4-inch touchscreen, you
have the Uconnect 4C NAV system. If not, you have
a Uconnect 4C with 8.4-inch display system.
BASIC VOICE COMMANDS
The following basic Voice Commands can be given
at any point while using your Uconnect system.
Push the VR button . After the beep, say:
“ Cancel ” to stop a current voice session.
“Help ” to hear a list of suggested Voice
Commands.
“ Repeat ” to listen to the system prompts again.
Notice the visual cues that inform you of your Voice
Recognition system’s status.
GET STARTED
The VR button is used to activate/deactivate
your Voice Recognition system.
Helpful hints for using Voice Recognition:
Reduce background noise. Wind noise and
passenger conversations are examples of noise
that may impact recognition.
Speak clearly at a normal pace and volume
while facing straight ahead.
Each time you give a Voice Command, first push
the VR button, wait until after the beep, then say
your Voice Command.
You can interrupt the help message or system
prompts by pushing the VR button and saying a
Voice Command from the current category.
Uconnect Voice Command Buttons
ADDITIONAL INFORMATION
© 2022 FCA US LLC. All rights reserved. Mopar and
Uconnect are registered trademarks and Mopar
Owner Connect is a trademark of FCA US LLC.
SiriusXM® and all related marks and logos are
trademarks of SiriusXM® Radio Inc. Ú page 432.
For Uconnect system support, call
1-877-855-8400 (24 hours a day 7 days a week)
or visit DriveUconnect.com (US) or
DriveUconnect.ca (Canada).
MIRRORS
INSIDE REARVIEW MIRROR
Manual Mirror — If Equipped
The rearview mirror can be adjusted up, down, left,
and right. The mirror should be adjusted to center
on the view through the rear window.
Headlight glare from vehicles behind you can be
reduced by moving the small control under the
mirror to the night position (toward the rear of the
1 — Push To Start Or Answer A Phone Call And
Send Or Receive A Text
2 — Push The Voice Recognition Button To Begin
Radio, Media, Navigation, And Climate Functions
3 — Push The Hang-up Button To End A Call
23_JT_OM_EN_USC_t.book Page 50
Page 125 of 448

GETTING TO KNOW YOUR INSTRUMENT PANEL123
and release the OK button. To reset the oil change
indicator system (after performing the scheduled
maintenance), refer to the following procedure.
Oil Life Reset
1. Without pushing the brake pedal, place the ignition in the ON/RUN mode (do not start the
engine).
2. Navigate to "Oil Life" submenu in "Vehicle Info" in the instrument cluster display.
3. Push and hold the OK button until the gauge
resets to 100%.
Secondary Method For Oil Change Reset
Procedure
1. Without pushing the brake pedal, place the ignition in the ON/RUN position (do not start
the engine).
2. Fully press the accelerator pedal, slowly, three times within ten seconds.
3. Without pushing the brake pedal, place the ignition in the OFF position.
NOTE:If the indicator message illuminates when you start
the vehicle, the oil change indicator system did not
reset. If necessary, repeat this procedure.
OFF ROAD+ DISPLAY — IF EQUIPPED
When the Off Road+ button is pushed in the switch
bank, the Instrument Cluster Display will begin to
show messages related to the feature. Depending
on the Four Wheel Drive mode in use, the
messages will differ, and after five seconds, all
messages will clear from the display. The
messages are as follows:
2H: Off Road+ Unavailable, Shift to 4WD
4H: 4WD High Off Road+ Active
4L: 4WD Low Off Road+ Active
Adaptive Cruise Control (ACC) and Cruise Control
are not available when using Off Road+. If either
option is selected, a dedicated message will
display indicating that the features are not usable
concurrently. Messages are as follows:
4H: Cruise Control — Cruise Control Unavailable
in Off Road+
4H: Adaptive Cruise Control — Adaptive Cruise
Control (ACC) Unavailable in Off Road+
4L: Cruise Control — Cruise Control Unavailable
in 4WD Low
4L: Adaptive Cruise Control — Adaptive Cruise
Control (ACC) Unavailable in 4WD Low
NOTE:The behavior of Electronic Stability Control while in
Off Road+ varies depending on the 4WD status. If
the vehicle is in 4WD High, Traction Control is auto -
matically turned off. Also, holding the ESC OFF
button for five seconds will turn off ESC. In 4WD
Low, Electronic Stability Control automatically
shuts off regardless of the Off Road Status.
INSTRUMENT CLUSTER DISPLAY
S
ELECTABLE ITEMS
The instrument cluster display can be used to view
the following main menu items:
NOTE:Depending on the vehicles options, feature
settings may vary.
Speedometer Driver Assist —
If EquippedMessages
Vehicle Info Trip Info Screen Setup
Fuel Economy Stop/Start Audio
Off Road —
If Equipped
3
23_JT_OM_EN_USC_t.book Page 123
Page 127 of 448
GETTING TO KNOW YOUR INSTRUMENT PANEL125
ACC SET
When ACC is set, the set speed will display in the
instrument cluster.
The ACC screen may display once again if any ACC
activity occurs, which may include any of the
following:
System Cancel
Driver Override
System Off
ACC Proximity Warning
ACC Unavailable Warning
NOTE:The instrument cluster display will return to the last
display selected after five seconds of no ACC
display activity Ú page 175.
Fuel Economy
Push and release the up or down arrow
button until the Fuel Economy icon is highlighted in
the instrument cluster display. Push and hold the
OK button to reset average fuel economy feature.
Toggle left or right to select a display with or
without Current Fuel Economy Information.
Range – The display shows the estimated
distance (mi or km) that can be traveled with the
fuel remaining in the tank. When the Range
value is less than 10 miles (16 km), the Range
display will change to a “LOW” message. Adding a significant amount of fuel to the vehicle will
turn off the “LOW” message and a new Range
value will display. Range cannot be reset
through the
OK button.
NOTE:Significant changes in driving style or vehicle
loading will greatly affect the actual drivable
distance of the vehicle, regardless of the Range
displayed value.
Average – The display shows the average fuel
economy (MPG, L/100km, or km/L) since the
last reset.
Current – The display shows the current fuel
economy (MPG, L/100km, or km/L) while
driving.
Trip
Push and release the up or down arrow
button until the Trip icon/title is highlighted in the
instrument cluster display, then push and release
the left or right arrow button to select Trip A
or Trip B.
The Trip A and Trip B information will display the
following:
Distance
Average Fuel Economy
Elapsed Time
Hold the OK button to reset all the information.
Stop/Start — If Equipped
Push and release the up or down arrow
button until the Stop/Start icon/title is highlighted
in the instrument cluster display. The screen will
display the Stop/Start status.
Audio
Push and release the up or down arrow
button until the Stop/Start icon/title is highlighted
in the instrument cluster display. The screen will
display the Stop/Start status.
Phone Call Status
When a call is incoming, a Phone Call Status
pop-up will display on the screen. The pop-up will
remain until the phone is answered or ignored.
NOTE:The call status will temporarily replace the
previous media source information displayed on
the screen. When the pop-up is no longer
displayed, the display will return to the last used
screen.
Stored Messages
Push and release the up or down arrow
button until the Messages Menu item is
highlighted. This feature shows the number of
stored warning messages. Pushing the right
arrow button will allow you to see what the stored
messages are.
3
23_JT_OM_EN_USC_t.book Page 125
Page 128 of 448

126GETTING TO KNOW YOUR INSTRUMENT PANEL
When no messages are present, main menu icon
will be a closed envelope, and “No Stored
Messages” will display.
Screen Setup
NOTE:The Screen Setup feature can only be used while
the vehicle is not in motion.
Push and release the up or down arrow
button until the Screen Setup Menu Icon/Title is
highlighted in the instrument cluster display. Push
and release the OK button to enter the submenus
and follow the prompts on the screen as needed.
The Screen Setup feature allows you to change
what information is displayed in the instrument
cluster as well as the location in which that
information is displayed.
Screen Setup Driver Selectable Items Gear Display — If Equipped
Full
Single
Current Gear
Off
On
Odometer
Show
Hide
Defaults
Cancel
Restore
Upper Left
None Time Current Econ
Compass Range to
EmptyTrip A Distance
Outside Temp Average Econ Trip B Distance
Upper Right
None Time Current Econ
Compass Range to
EmptyTrip A Distance
Outside Temp Average Econ Trip B Distance
Upper Center
None Time Current Econ
Compass Range to
EmptyTrip A Distance
Audio Average Econ Trip B Distance
Outside Temp Menu Title Speedometer
Favorite Menus
Speedometer Vehicle Info Off Road —
If Equipped
(show/hide)
Driver Assist —
If Equipped
(show/hide) Fuel Economy
(show/hide)
Trip Info
(show/hide)
Stop / Start —
If EquippedAudio
(show/hide)
Messages
Screen Setup Vehicle
Settings —
If Equipped
Favorite Menus
23_JT_OM_EN_USC_t.book Page 126
Page 146 of 448
144
STARTING AND OPERATING
STARTING THE ENGINE — GASOLINE
ENGINE (IF EQUIPPED)
Before starting your vehicle, adjust your seat,
adjust both inside and outside mirrors, and fasten
your seat belts.
MANUAL TRANSMISSION — IF EQUIPPED
Apply the parking brake, place the gear selector in
NEUTRAL, and press the clutch pedal before
starting the vehicle. This vehicle is equipped with a
clutch interlocking ignition system. It will not start
unless the clutch pedal is pressed to the floor.
Four-Wheel Drive Models Only
In 4L mode, if the vehicle is stalled, the engine will
start regardless of whether or not the clutch pedal
is pressed to the floor. This feature enhances
off-road performance by allowing the vehicle to
start when in 4L without having to press the clutch
pedal. The 4WD LOW Indicator Light will illuminate
when the transfer case has been shifted into this
mode.
AUTOMATIC TRANSMISSION —
I
F EQUIPPED
Start the vehicle with the gear selector in the PARK
position (vehicle can also be started in NEUTRAL).
Apply the brake before shifting to any driving
range.
NORMAL STARTING
To Turn On The Engine Using The ENGINE START/
STOP Button
1. The transmission must be in PARK or NEUTRAL.
2. Press and hold the brake pedal while pushing
the ENGINE START/STOP button once.
3. The system starts the vehicle. If the vehicle fails to start, the starter will disengage
automatically after 10 seconds.
4. If you wish to stop the cranking of the engine prior to the engine starting, push the ENGINE
START/STOP button again.
To Turn Off The Engine Using The ENGINE START/
STOP Button
1. Place the gear selector in PARK, then push and release the ENGINE START/STOP button.
The ignition will return to the OFF position.
2. If the gear selector is not in PARK (with vehicle stopped) and the ENGINE START/STOP button
is pushed once, the transmission will automat -
ically select PARK and the engine will turn off,
WARNING!
When exiting the vehicle, always remove the
key fob from the ignition and lock your vehicle.
Never leave children alone in a vehicle, or with
access to an unlocked vehicle.
Allowing children to be in a vehicle unattended
is dangerous for a number of reasons. A child
or others could be seriously or fatally injured.
Children should be warned not to touch the
parking brake, brake pedal or the gear
selector.
Do not leave the key fob in or near the vehicle,
or in a location accessible to children. A child
could operate power windows, other controls,
or move the vehicle.
Do not leave children or animals inside parked
vehicles in hot weather. Interior heat build-up
may cause serious injury or death.
23_JT_OM_EN_USC_t.book Page 144
Page 147 of 448

STARTING AND OPERATING145
however the ignition will remain in the ACC
position (NOT the OFF position). Never leave a
vehicle out of the PARK position, or it could roll.
3. If the gear selector is in NEUTRAL, and the vehicle speed is below 5 mph (8 km/h),
pushing the ENGINE START/STOP button once
will turn the engine off. The ignition will remain
in the ACC position.
4. If the vehicle speed is above 5 mph (8 km/h), the ENGINE START/STOP button must be held
for two seconds (or three short pushes in a
row) to turn the engine off. The ignition will
remain in the ACC position (NOT the OFF
position) if the engine is turned off when the
transmission is not in PARK.
NOTE:The system will automatically time out and the
ignition will cycle to the OFF position after
30 minutes of inactivity if the ignition is left in the
ACC or RUN (engine not running) position and the
transmission is in PARK.
ENGINE START/STOP Button Functions — With
Driver’s Foot Off The Brake Pedal (In PARK Or
NEUTRAL Position)
The ENGINE START/STOP button operates similar
to an ignition switch. It has three modes: OFF, ACC,
and RUN. To change the ignition modes without
starting the vehicle and use the accessories, follow
these steps:
1. Starting with the ignition in the OFF position.
2. Push the ENGINE START/STOP button once to
place the ignition to the ACC position
(instrument cluster will display “ACC”).
3. Push the ENGINE START/STOP button a second time to place the ignition to the RUN
position (instrument cluster will display “ON/
RUN”).
4. Push the ENGINE START/STOP button a third time to return the ignition to the OFF position
(instrument cluster will display “OFF”).
AUTOPARK
AutoPark is a supplemental feature to assist in
placing the vehicle in PARK should the situations
on the following pages occur. It is a back-up system
and should not be relied upon as the primary
method by which the driver shifts the vehicle into
PARK.
The conditions under which AutoPark will engage
are outlined on the following pages. If the vehicle is not in PARK and the driver turns off
the engine, the vehicle may AutoPark.
AutoPark will engage when all of these conditions
are met:
Vehicle is equipped with an 8-speed transmis
-
sion
Driver door is ajar or if the driver door is
removed and the driver is not on the seat (seat
pad sensor detects driver missing)
WARNING!
Driver inattention could lead to failure to place
the vehicle in PARK. ALWAYS DO A VISUAL
CHECK that your vehicle is in PARK by verifying
that a solid (not blinking) “P” is indicated in
the instrument cluster display and on the gear
selector. If the "P" indicator is blinking, your
vehicle is not in PARK. As an added precau -
tion, always apply the parking brake when
exiting the vehicle.
AutoPark is a supplemental feature. It is not
designed to replace the need to shift your
vehicle into PARK. It is a back-up system and
should not be relied upon as the primary
method by which the driver shifts the vehicle
into PARK.
4
23_JT_OM_EN_USC_t.book Page 145