warning lights JEEP GLADIATOR 2023 Owners Manual
[x] Cancel search | Manufacturer: JEEP, Model Year: 2023, Model line: GLADIATOR, Model: JEEP GLADIATOR 2023Pages: 448, PDF Size: 17.37 MB
Page 6 of 448

4
INSTRUMENT CLUSTER DISPLAY ...................... 121 Instrument Cluster Display Location And
Controls .......................................................... 122
Oil Life Reset — If Equipped
S
................... 122
Off Road+ Display — If Equipped .................. 123
Instrument Cluster Display Selectable
Items .............................................................. 123
Instrument Cluster Display Menu Items ...... 124
Battery Saver On, Battery Saver Mode
Message, And Electrical Load Reduction
Actions
(If Equipped) .................................................. 127
Diesel Displays .............................................. 128 Diesel Particulate Filter (DPF) Messages .... 128Fuel System Messages ................................. 130
WARNING LIGHTS AND MESSAGES ................. 132
Red Warning Lights ....................................... 132
Yellow Warning Lights ................................... 135Yellow Indicator Lights .................................. 138
Green Indicator Lights................................... 139White Indicator Lights ................................... 140Blue Indicator Lights ..................................... 141
ONBOARD DIAGNOSTIC SYSTEM — OBD II ...... 141
Onboard Diagnostic System
(OBD II) Cybersecurity ................................... 142
EMISSIONS INSPECTION AND MAINTENANCE
PROGRAMS .......................................................... 142
STARTING AND OPERATING
STARTING THE ENGINE — GASOLINE ENGINE
(IF EQUIPPED) ...................................................... 144
Manual Transmission — If Equipped ........... 144Automatic Transmission —
If Equipped .................................................... 144
Normal Starting ............................................ 144
AutoPark ........................................................ 145Extreme Cold Weather
(Below –22°F Or −30°C) ............................ 146
Extended Park Starting ................................. 146
If Engine Fails To Start ................................. 147
After Starting ................................................. 147
STARTING THE ENGINE — DIESEL ENGINE
(IF EQUIPPED) ...................................................... 147
Automatic Transmission ............................... 148
Extreme Cold Weather .................................. 148
Normal Starting ............................................. 148Starting Fluids ............................................... 149
NORMAL OPERATION — DIESEL ENGINE ......... 149
Cold Weather Precautions ............................ 149
Engine Idling .................................................. 150
Stopping The Engine ..................................... 150
Cooling System Tips — Automatic
Transmission ................................................. 151
ENGINE BREAK-IN RECOMMENDATIONS —
GASOLINE ENGINE (IF EQUIPPED) ................... 151 ENGINE BREAK-IN RECOMMENDATIONS —
DIESEL ENGINE (IF EQUIPPED) .......................... 152
PARKING BRAKE ................................................. 152
MANUAL TRANSMISSION — IF EQUIPPED ....... 153
Shifting........................................................... 154
Downshifting.................................................. 155
AUTOMATIC TRANSMISSION —
IF EQUIPPED ......................................................... 155
Ignition Park Interlock................................... 156
Brake/Transmission Shift Interlock (BTSI)
System .......................................................... 1578–Speed Automatic Transmission .............. 157
Gear Ranges .................................................. 157
FOUR–WHEEL DRIVE OPERATION ................... 161
Four-Position Transfer Case —
If Equipped .................................................... 161
Five-Position Transfer Case —
If Equipped .................................................... 163
Trac-Lok Rear Axle — If Equipped ................ 165Axle Lock (Tru-Lok) Front And Rear —
If Equipped ................................................... 165
Axle Lock (Tru-Lok) Rear Only —
If Equipped ................................................... 166
Electronic Sway Bar Disconnect —
If Equipped ................................................... 166
OFF ROAD+ — If Equipped ............................ 168
ELECTRO-HYDRAULIC POWER STEERING ....... 168
23_JT_OM_EN_USC_t.book Page 4
Page 8 of 448
6
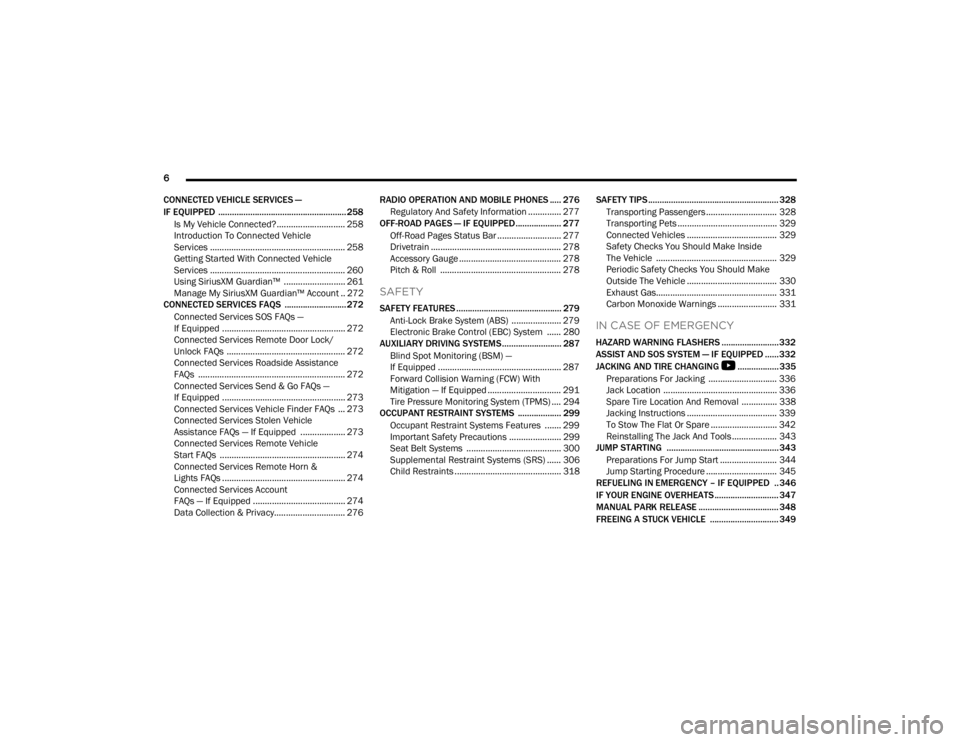
CONNECTED VEHICLE SERVICES —
IF EQUIPPED ........................................................ 258 Is My Vehicle Connected?............................. 258
Introduction To Connected Vehicle
Services ......................................................... 258
Getting Started With Connected Vehicle
Services ......................................................... 260
Using SiriusXM Guardian™ .......................... 261
Manage My SiriusXM Guardian™ Account .. 272
CONNECTED SERVICES FAQS ........................... 272
Connected Services SOS FAQs —
If Equipped .................................................... 272
Connected Services Remote Door Lock/
Unlock FAQs .................................................. 272
Connected Services Roadside Assistance
FAQs .............................................................. 272
Connected Services Send & Go FAQs —
If Equipped .................................................... 273
Connected Services Vehicle Finder FAQs ... 273
Connected Services Stolen Vehicle
Assistance FAQs — If Equipped ................... 273
Connected Services Remote Vehicle
Start FAQs ..................................................... 274
Connected Services Remote Horn &
Lights FAQs .................................................... 274
Connected Services Account
FAQs — If Equipped ....................................... 274
Data Collection & Privacy.............................. 276 RADIO OPERATION AND MOBILE PHONES ..... 276
Regulatory And Safety Information .............. 277
OFF-ROAD PAGES — IF EQUIPPED.................... 277
Off-Road Pages Status Bar ........................... 277Drivetrain ....................................................... 278
Accessory Gauge ........................................... 278Pitch & Roll ................................................... 278
SAFETY
SAFETY FEATURES .............................................. 279
Anti-Lock Brake System (ABS) ..................... 279
Electronic Brake Control (EBC) System ...... 280
AUXILIARY DRIVING SYSTEMS.......................... 287
Blind Spot Monitoring (BSM) —
If Equipped .................................................... 287
Forward Collision Warning (FCW) With
Mitigation — If Equipped ............................... 291
Tire Pressure Monitoring System (TPMS) .... 294
OCCUPANT RESTRAINT SYSTEMS ................... 299
Occupant Restraint Systems Features ....... 299
Important Safety Precautions ...................... 299Seat Belt Systems ........................................ 300Supplemental Restraint Systems (SRS) ...... 306Child Restraints ............................................. 318 SAFETY TIPS ......................................................... 328
Transporting Passengers.............................. 328
Transporting Pets .......................................... 329Connected Vehicles ...................................... 329
Safety Checks You Should Make Inside
The Vehicle ................................................... 329
Periodic Safety Checks You Should Make
Outside The Vehicle ...................................... 330
Exhaust Gas................................................... 331
Carbon Monoxide Warnings ......................... 331
IN CASE OF EMERGENCY
HAZARD WARNING FLASHERS ......................... 332
ASSIST AND SOS SYSTEM — IF EQUIPPED ...... 332
JACKING AND TIRE CHANGING
S
.................. 335
Preparations For Jacking ............................. 336 Jack Location ................................................ 336
Spare Tire Location And Removal ............... 338
Jacking Instructions ...................................... 339
To Stow The Flat Or Spare ............................ 342
Reinstalling The Jack And Tools ................... 343
JUMP STARTING ................................................. 343
Preparations For Jump Start ........................ 344Jump Starting Procedure .............................. 345
REFUELING IN EMERGENCY – IF EQUIPPED .. 346
IF YOUR ENGINE OVERHEATS ............................ 347
MANUAL PARK RELEASE ................................... 348
FREEING A STUCK VEHICLE .............................. 349
23_JT_OM_EN_USC_t.book Page 6
Page 13 of 448
11
CAMPERS
This vehicle is NOT recommended for slide-in camper applications.
VEHICLE MODIFICATIONS/ALTERATIONS
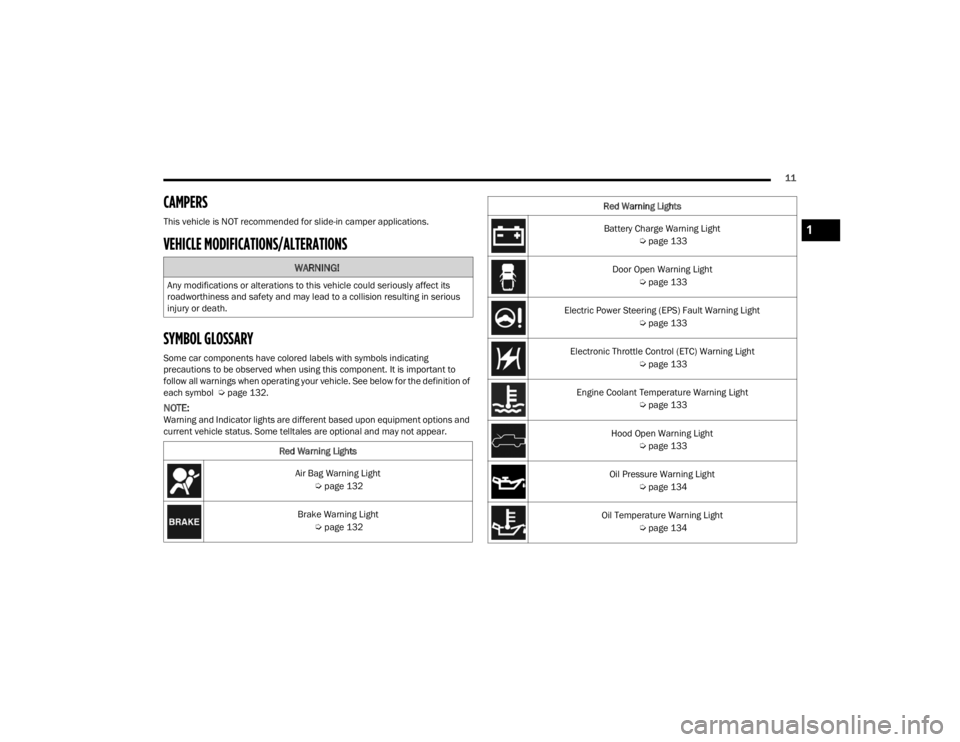
SYMBOL GLOSSARY
Some car components have colored labels with symbols indicating
precautions to be observed when using this component. It is important to
follow all warnings when operating your vehicle. See below for the definition of
each symbol Úpage 132.
NOTE:Warning and Indicator lights are different based upon equipment options and
current vehicle status. Some telltales are optional and may not appear.
WARNING!
Any modifications or alterations to this vehicle could seriously affect its
roadworthiness and safety and may lead to a collision resulting in serious
injury or death.
Red Warning LightsAir Bag Warning Light Úpage 132
Brake Warning Light Úpage 132
Battery Charge Warning Light
Úpage 133
Door Open Warning Light Úpage 133
Electric Power Steering (EPS) Fault Warning Light Úpage 133
Electronic Throttle Control (ETC) Warning Light Úpage 133
Engine Coolant Temperature Warning Light Úpage 133
Hood Open Warning Light Úpage 133
Oil Pressure Warning Light Úpage 134
Oil Temperature Warning Light Úpage 134
Red Warning Lights1
23_JT_OM_EN_USC_t.book Page 11
Page 14 of 448
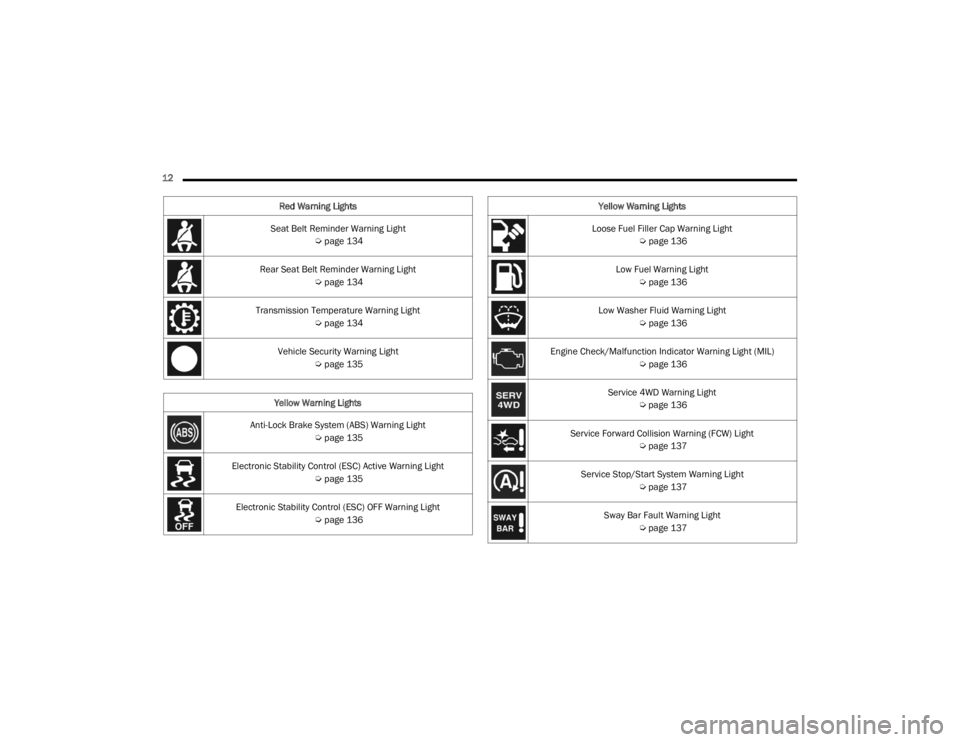
12 Seat Belt Reminder Warning Light Úpage 134
Rear Seat Belt Reminder Warning Light Úpage 134
Transmission Temperature Warning Light Úpage 134
Vehicle Security Warning Light Úpage 135
Yellow Warning Lights
Anti-Lock Brake System (ABS) Warning Light Úpage 135
Electronic Stability Control (ESC) Active Warning Light Úpage 135
Electronic Stability Control (ESC) OFF Warning Light Úpage 136
Red Warning Lights
Loose Fuel Filler Cap Warning Light
Úpage 136
Low Fuel Warning Light Úpage 136
Low Washer Fluid Warning Light Úpage 136
Engine Check/Malfunction Indicator Warning Light (MIL) Úpage 136
Service 4WD Warning Light Úpage 136
Service Forward Collision Warning (FCW) Light Úpage 137
Service Stop/Start System Warning Light Úpage 137
Sway Bar Fault Warning Light Úpage 137
Yellow Warning Lights
23_JT_OM_EN_USC_t.book Page 12
Page 15 of 448
13
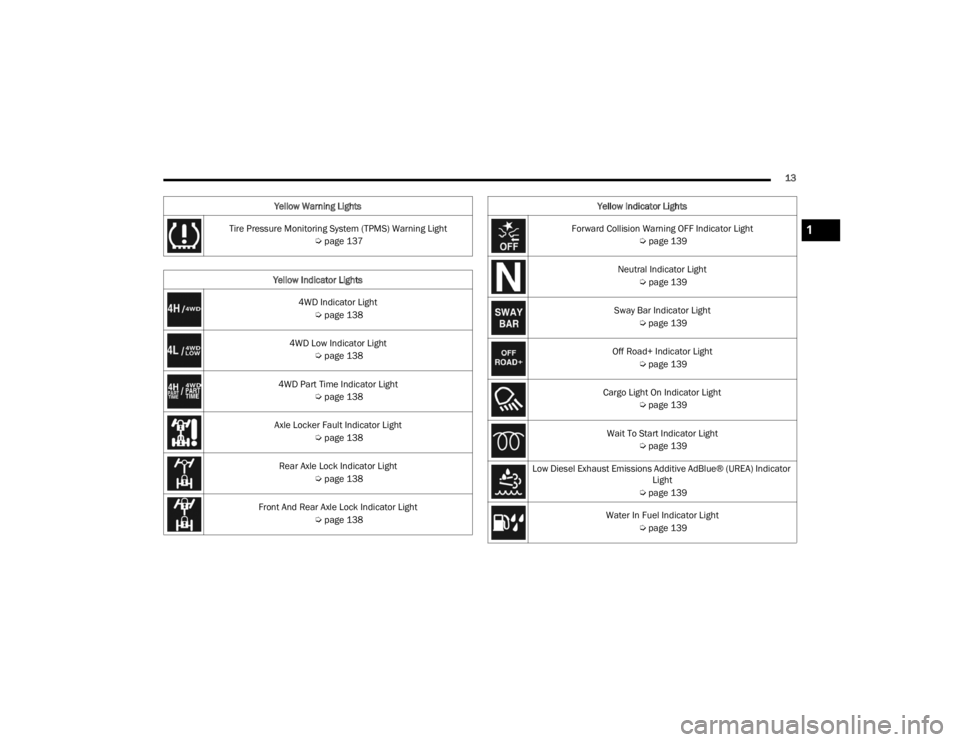
Tire Pressure Monitoring System (TPMS) Warning Light Úpage 137
Yellow Indicator Lights 4WD Indicator Light Úpage 138
4WD Low Indicator Light Úpage 138
4WD Part Time Indicator Light Úpage 138
Axle Locker Fault Indicator Light Úpage 138
Rear Axle Lock Indicator Light Úpage 138
Front And Rear Axle Lock Indicator Light Úpage 138
Yellow Warning Lights
Forward Collision Warning OFF Indicator Light
Úpage 139
Neutral Indicator Light Úpage 139
Sway Bar Indicator Light Úpage 139
Off Road+ Indicator Light Úpage 139
Cargo Light On Indicator Light Úpage 139
Wait To Start Indicator Light Úpage 139
Low Diesel Exhaust Emissions Additive AdBlue® (UREA) Indicator Light
Ú page 139
Water In Fuel Indicator Light Úpage 139
Yellow Indicator Lights1
23_JT_OM_EN_USC_t.book Page 13
Page 18 of 448
16GETTING TO KNOW YOUR VEHICLE
To Lock/Unlock The Doors And Tailgate
Push and release the unlock button on the key fob
once to unlock the driver’s door, or twice to unlock
all the doors. To lock all the doors, push the lock
button once.
When the doors are unlocked, the turn signals will
flash and the illuminated entry system will be
activated. When the doors are locked, the turn
signals will flash and the horn will chirp.
NOTE:
All doors can be programmed to unlock on the
first push of the unlock button through
Uconnect Settings Úpage 215.
The mechanical flip key can be used to lock or
unlock the doors, tailgate, glove compartment,
storage compartments (if equipped), and rear
seatbacks.
Key Left Vehicle Feature
If a valid key fob is no longer detected inside the
vehicle while the vehicle’s ignition system is in the
ON/RUN or START position, the message “Key Fob
Has Left The Vehicle” will be shown in the
instrument cluster display along with an interior
chime. An exterior audible and visual alert will also
be activated to warn the driver. The vehicle’s horn will rapidly chirp three times
along with a single flash of the vehicle’s exterior
lights.
NOTE:
The doors have to be open and then closed in
order for the vehicle to check for the presence of
a key fob; the Key Left Vehicle feature will not
activate until all of the doors are closed.
These alerts will not be activated in situations
where the vehicle’s engine is left running with
the key fob inside.
Replacing The Battery In The Key Fob
The recommended replacement battery is
CR2450.
NOTE:
Customers are recommended to use a battery
obtained from Mopar®. Aftermarket coin
battery dimensions may not meet the original
OEM coin battery dimensions.
Perchlorate material — special handling may
apply. See www.dtsc.ca.gov/hazardouswaste/
perchlorate for further information.
Do not touch the battery terminals that are on
the back housing or the printed circuit board.
When a key fob battery is low, a warning will be
indicated on the vehicle’s instrument cluster,
and the fob LED will no longer illuminate with a
button push.
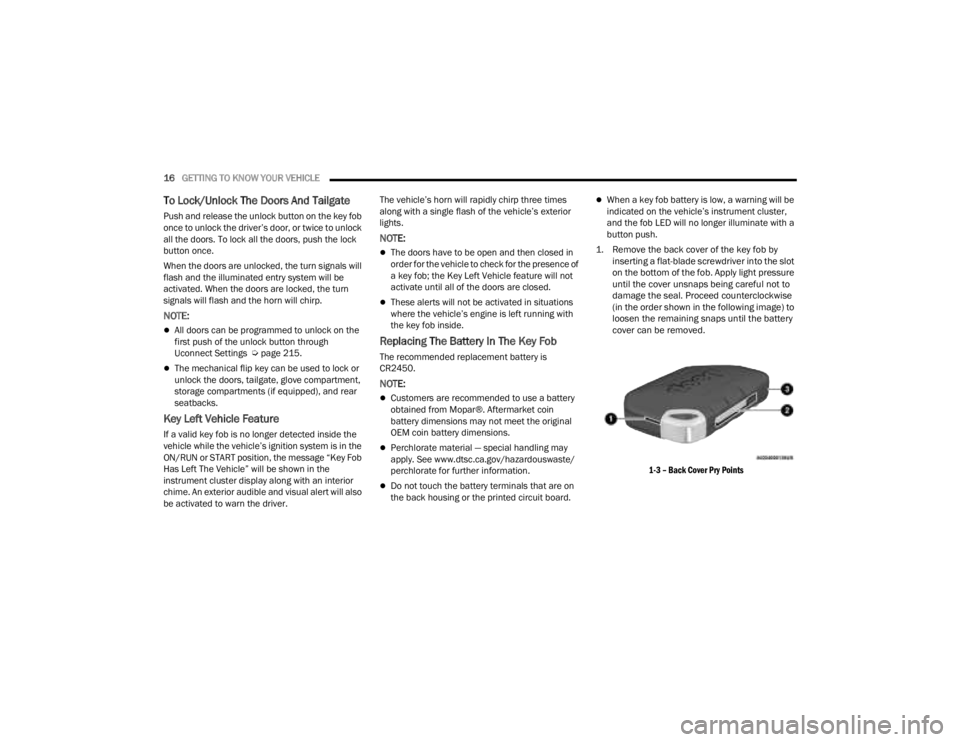
1. Remove the back cover of the key fob by inserting a flat-blade screwdriver into the slot
on the bottom of the fob. Apply light pressure
until the cover unsnaps being careful not to
damage the seal. Proceed counterclockwise
(in the order shown in the following image) to
loosen the remaining snaps until the battery
cover can be removed.
1-3 – Back Cover Pry Points
23_JT_OM_EN_USC_t.book Page 16
Page 22 of 448
20GETTING TO KNOW YOUR VEHICLE
NOTE:When opening the driver's door with the ignition in
the ON/RUN (engine not running) position, a chime
will sound to remind you to place the ignition in the
OFF position. In addition to the chime, the
message will display “Ignition Or Accessory On” in
the cluster.
REMOTE START — IF EQUIPPED
(GASOLINE)
This system uses the key fob to start the
engine conveniently from outside the
vehicle while still maintaining security.
The system has a range of 328 ft (100 m).
Remote Start is used to defrost windows in cold
weather, and to reach a comfortable climate in all
ambient conditions before the driver enters the
vehicle.
NOTE:
The vehicle must be equipped with an auto -
matic transmission to be equipped with Remote
Start.
Obstructions between the vehicle and key fob
may reduce this range Ú page 432.
HOW TO USE REMOTE START
Push and release the Remote Start button on the
key fob twice within five seconds. The vehicle
doors and tailgate will lock, the turn signals will
flash twice, and the horn will chirp twice (if
equipped). Pushing the Remote Start button again
will shut the engine off.
NOTE:
With Remote Start, the engine will only run for
15 minutes.
Remote Start can only be used twice.
If an engine fault is present or fuel level is low,
the vehicle will start and then shut down in
10 seconds.
The parking lights will turn on and remain on
during Remote Start mode.
For security, power window operation is
disabled when the vehicle is in the Remote Start
mode.
The ignition must be placed in the ON/RUN posi -
tion before the Remote Start sequence can be
repeated for a third cycle.
All of the following conditions must be met before
the engine will remote start:
Gear selector in PARK
Doors closed
Hood closed
Hazard switch off
Brake switch inactive (brake pedal not pressed)
Battery at an acceptable charge level
Panic button not pushed
System not disabled from previous Remote
Start event
CAUTION!
An unlocked vehicle is an invitation for thieves.
Always remove key fob from the vehicle and lock
all doors when leaving the vehicle unattended.
WARNING!
Do not start or run an engine in a closed
garage or confined area. Exhaust gas contains
carbon monoxide (CO) which is odorless and
colorless. Carbon monoxide is poisonous and
can cause serious injury or death when
inhaled.
Keep key fobs away from children. Operation
of the Remote Start system, windows, door
locks or other controls could cause serious
injury or death.
23_JT_OM_EN_USC_t.book Page 20
Page 26 of 448
24GETTING TO KNOW YOUR VEHICLE
occurred, the Vehicle Security system will arm
regardless of whether you are in the vehicle or not.
If you remain in the vehicle and open a door, the
alarm will sound. If this occurs, disarm the Vehicle
Security system.
If the Vehicle Security system is armed and the
battery becomes disconnected, the Vehicle
Security system will remain armed when the
battery is reconnected; the exterior lights will flash,
and the horn will sound. If this occurs, disarm the
Vehicle Security system.
REARMING OF THE SYSTEM
If something triggers the alarm and no action is
taken to disarm it, the Vehicle Security system will
turn the horn off after a 29 second cycle (with five
seconds between cycles and up to eight cycles if
the trigger remains active) and then rearm itself.
DOORS
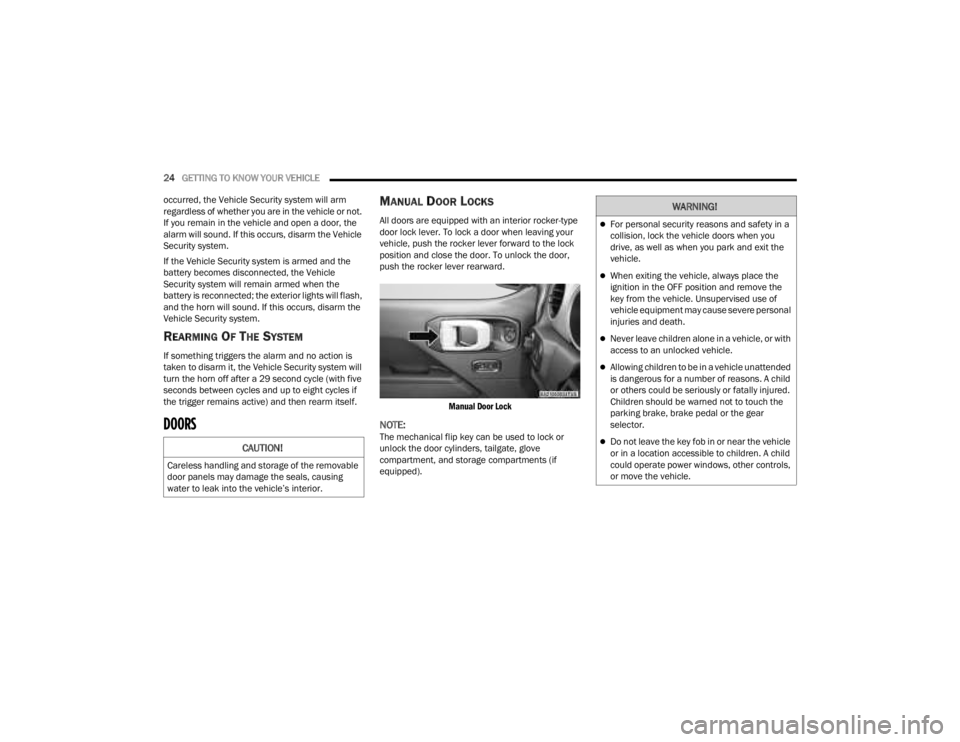
MANUAL DOOR LOCKS
All doors are equipped with an interior rocker-type
door lock lever. To lock a door when leaving your
vehicle, push the rocker lever forward to the lock
position and close the door. To unlock the door,
push the rocker lever rearward.
Manual Door Lock
NOTE:The mechanical flip key can be used to lock or
unlock the door cylinders, tailgate, glove
compartment, and storage compartments (if
equipped).CAUTION!
Careless handling and storage of the removable
door panels may damage the seals, causing
water to leak into the vehicle’s interior.
WARNING!
For personal security reasons and safety in a
collision, lock the vehicle doors when you
drive, as well as when you park and exit the
vehicle.
When exiting the vehicle, always place the
ignition in the OFF position and remove the
key from the vehicle. Unsupervised use of
vehicle equipment may cause severe personal
injuries and death.
Never leave children alone in a vehicle, or with
access to an unlocked vehicle.
Allowing children to be in a vehicle unattended
is dangerous for a number of reasons. A child
or others could be seriously or fatally injured.
Children should be warned not to touch the
parking brake, brake pedal or the gear
selector.
Do not leave the key fob in or near the vehicle
or in a location accessible to children. A child
could operate power windows, other controls,
or move the vehicle.
23_JT_OM_EN_USC_t.book Page 24
Page 27 of 448
GETTING TO KNOW YOUR VEHICLE25
(Continued)
POWER DOOR LOCKS — IF EQUIPPED
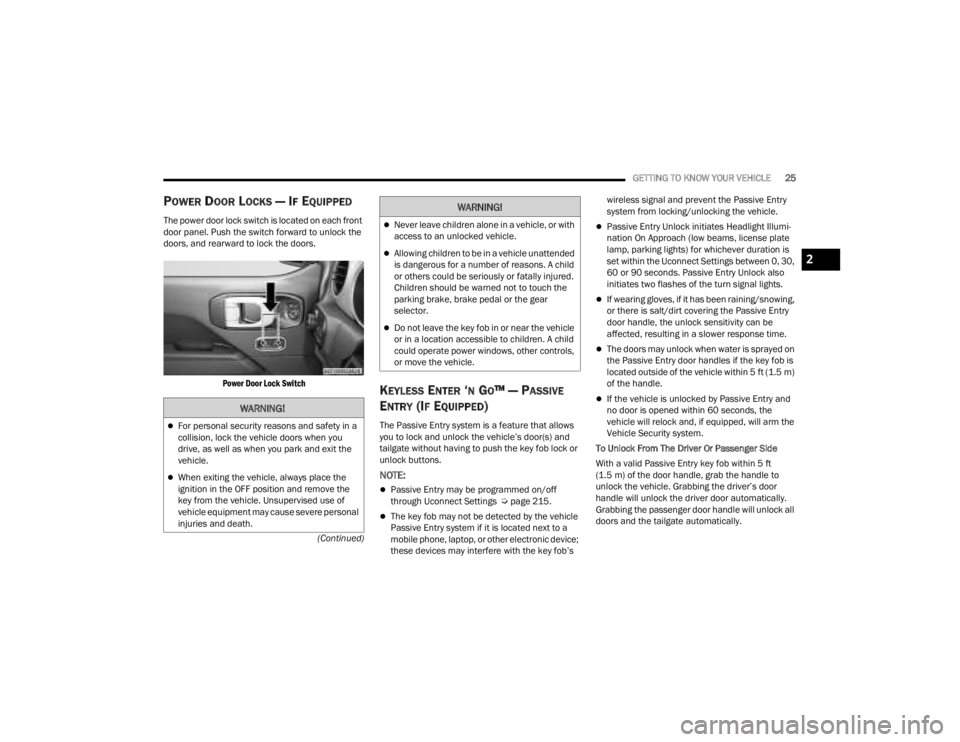
The power door lock switch is located on each front
door panel. Push the switch forward to unlock the
doors, and rearward to lock the doors.
Power Door Lock Switch
KEYLESS ENTER ‘N GO™ — PASSIVE
E
NTRY (IF EQUIPPED)
The Passive Entry system is a feature that allows
you to lock and unlock the vehicle’s door(s) and
tailgate without having to push the key fob lock or
unlock buttons.
NOTE:
Passive Entry may be programmed on/off
through Uconnect Settings Ú page 215.
The key fob may not be detected by the vehicle
Passive Entry system if it is located next to a
mobile phone, laptop, or other electronic device;
these devices may interfere with the key fob’s wireless signal and prevent the Passive Entry
system from locking/unlocking the vehicle.
Passive Entry Unlock initiates Headlight Illumi
-
nation On Approach (low beams, license plate
lamp, parking lights) for whichever duration is
set within the Uconnect Settings between 0, 30,
60 or 90 seconds. Passive Entry Unlock also
initiates two flashes of the turn signal lights.
If wearing gloves, if it has been raining/snowing,
or there is salt/dirt covering the Passive Entry
door handle, the unlock sensitivity can be
affected, resulting in a slower response time.
The doors may unlock when water is sprayed on
the Passive Entry door handles if the key fob is
located outside of the vehicle within 5 ft (1.5 m)
of the handle.
If the vehicle is unlocked by Passive Entry and
no door is opened within 60 seconds, the
vehicle will relock and, if equipped, will arm the
Vehicle Security system.
To Unlock From The Driver Or Passenger Side
With a valid Passive Entry key fob within 5 ft
(1.5 m) of the door handle, grab the handle to
unlock the vehicle. Grabbing the driver’s door
handle will unlock the driver door automatically.
Grabbing the passenger door handle will unlock all
doors and the tailgate automatically.WARNING!
For personal security reasons and safety in a
collision, lock the vehicle doors when you
drive, as well as when you park and exit the
vehicle.
When exiting the vehicle, always place the
ignition in the OFF position and remove the
key from the vehicle. Unsupervised use of
vehicle equipment may cause severe personal
injuries and death.
Never leave children alone in a vehicle, or with
access to an unlocked vehicle.
Allowing children to be in a vehicle unattended
is dangerous for a number of reasons. A child
or others could be seriously or fatally injured.
Children should be warned not to touch the
parking brake, brake pedal or the gear
selector.
Do not leave the key fob in or near the vehicle
or in a location accessible to children. A child
could operate power windows, other controls,
or move the vehicle.
WARNING!
2
23_JT_OM_EN_USC_t.book Page 25
Page 54 of 448
52GETTING TO KNOW YOUR VEHICLE
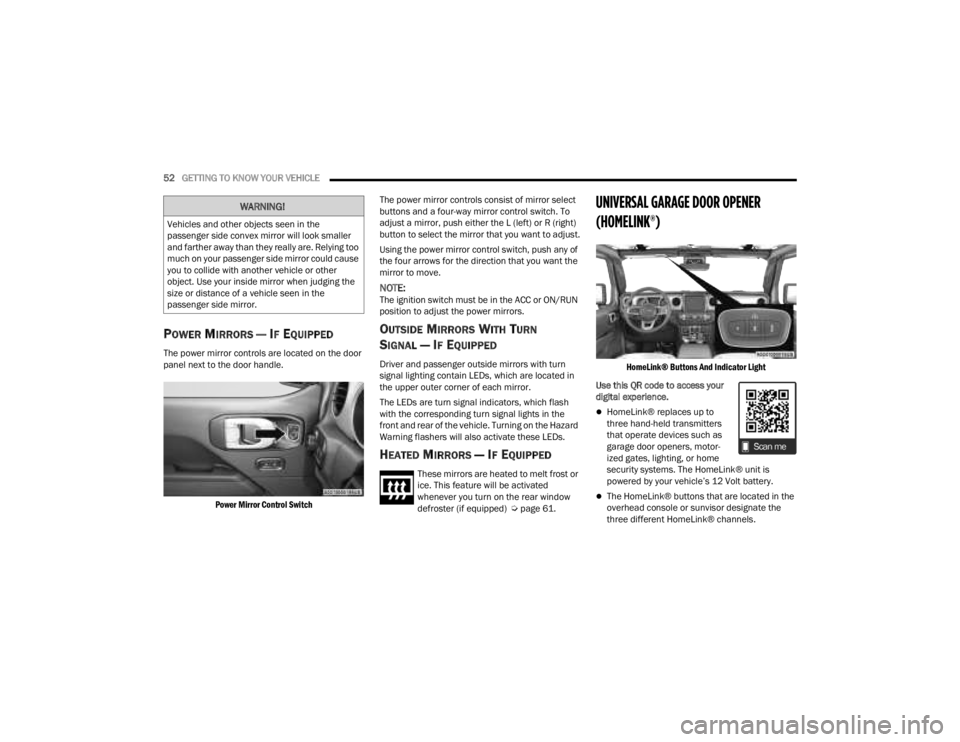
POWER MIRRORS — IF EQUIPPED
The power mirror controls are located on the door
panel next to the door handle.
Power Mirror Control Switch
The power mirror controls consist of mirror select
buttons and a four-way mirror control switch. To
adjust a mirror, push either the L (left) or R (right)
button to select the mirror that you want to adjust.
Using the power mirror control switch, push any of
the four arrows for the direction that you want the
mirror to move.
NOTE:The ignition switch must be in the ACC or ON/RUN
position to adjust the power mirrors.
OUTSIDE MIRRORS WITH TURN
SIGNAL — IF EQUIPPED
Driver and passenger outside mirrors with turn
signal lighting contain LEDs, which are located in
the upper outer corner of each mirror.
The LEDs are turn signal indicators, which flash
with the corresponding turn signal lights in the
front and rear of the vehicle. Turning on the Hazard
Warning flashers will also activate these LEDs.
HEATED MIRRORS — IF EQUIPPED
These mirrors are heated to melt frost or
ice. This feature will be activated
whenever you turn on the rear window
defroster (if equipped) Ú
page 61.
UNIVERSAL GARAGE DOOR OPENER
(HOMELINK®)
HomeLink® Buttons And Indicator Light
Use this QR code to access your
digital experience.
HomeLink® replaces up to
three hand-held transmitters
that operate devices such as
garage door openers, motor -
ized gates, lighting, or home
security systems. The HomeLink® unit is
powered by your vehicle’s 12 Volt battery.
The HomeLink® buttons that are located in the
overhead console or sunvisor designate the
three different HomeLink® channels.
WARNING!
Vehicles and other objects seen in the
passenger side convex mirror will look smaller
and farther away than they really are. Relying too
much on your passenger side mirror could cause
you to collide with another vehicle or other
object. Use your inside mirror when judging the
size or distance of a vehicle seen in the
passenger side mirror.
23_JT_OM_EN_USC_t.book Page 52