Panel JEEP GRAND CHEROKEE 2003 WJ / 2.G Workshop Manual
[x] Cancel search | Manufacturer: JEEP, Model Year: 2003, Model line: GRAND CHEROKEE, Model: JEEP GRAND CHEROKEE 2003 WJ / 2.GPages: 2199, PDF Size: 76.01 MB
Page 1977 of 2199

(6) Push sunshade down until the sunshade clears
the glass then move sunshade rearward behind the
glass panel.
HOUSING ASSEMBLY
REMOVAL
(1) Move glass panel to the fully closed position.
(2) Disconnect battery negative cable.
(3) Recline both front seats.
(4) Remove headliner. (Refer to 23 - BODY/INTE-
RIOR/HEADLINER - REMOVAL)
(5) Disconnect the drain tubes from sunroof hous-
ing (Fig. 7).
(6) Loosen fasteners attaching sunroof housing
assembly.
(7) With the aid of a helper, remove fasteners
attaching sunroof housing assembly to roof panel.
INSTALLATION
(1) Raise the sunroof housing assembly and guide
into position and start fasteners (Fig. 7).
(2) Tighten the fasteners, front to rear, attaching
the sunroof module to roof panel. Tighten the fasten-
ers, front to rear, to 11 N´m (97 in. lbs.) torque.
(3) Connect the drain tubes to the sunroof housing.
(4) Set headliner into position.
(5) Connect express module, drive motor, and con-
trol switch wire connectors.
(6) Test sunroof operation, adjust as necessary.
(7) Finish installing the headliner. (Refer to 23 -
BODY/INTERIOR/HEADLINER - INSTALLATION)
(8) Connect battery negative cable.
Fig. 7 SUNROOF ASSEMBLY
1 - ROOF
2 - DRAIN HOSE
3 - CLAMP
4 - SUNROOF ASSEMBLY
5 - CLAMP
6 - DRAIN HOSE
23 - 104 SUNROOFWJ
SUNSHADE (Continued)
Page 1979 of 2199
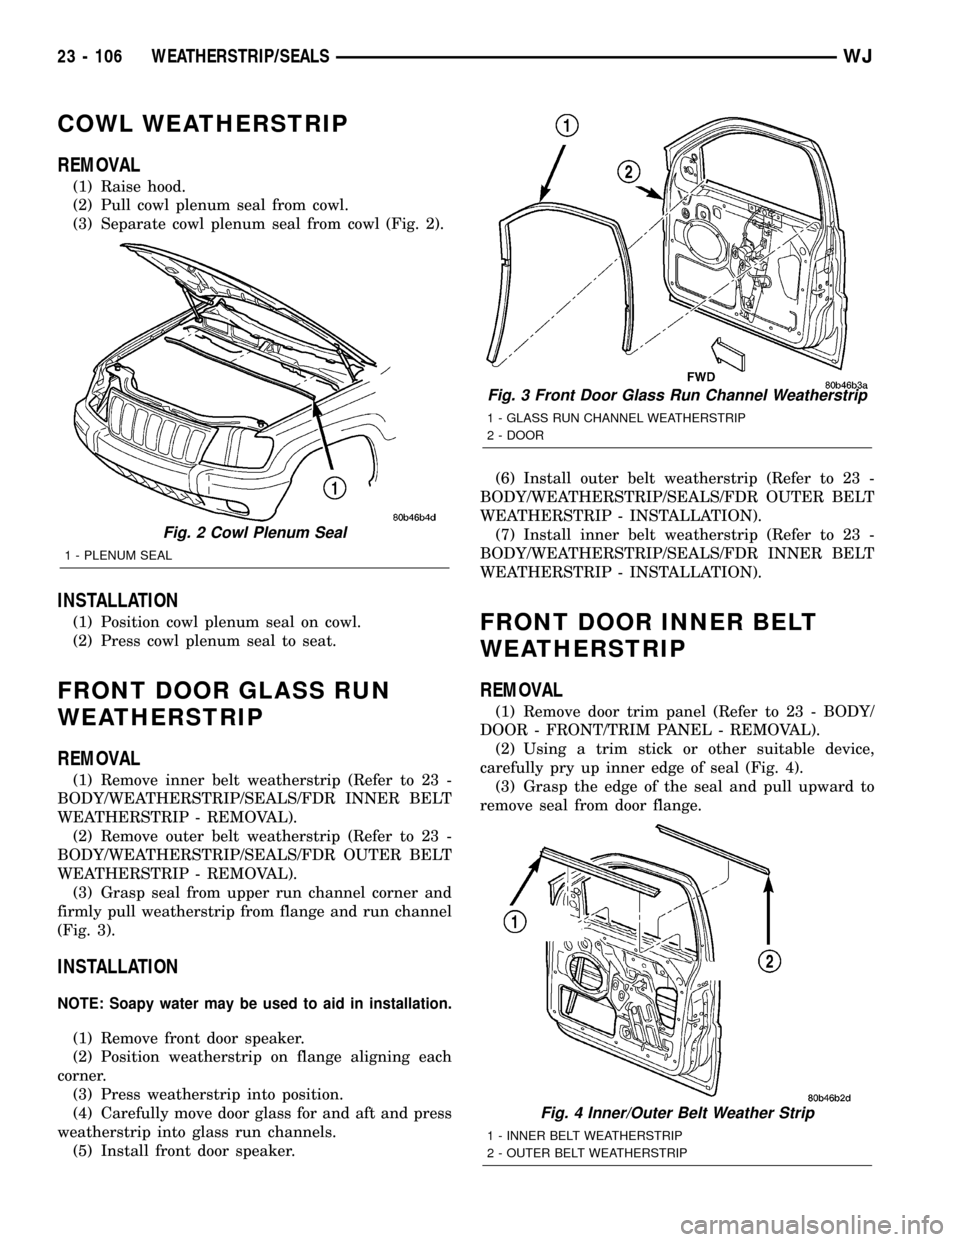
COWL WEATHERSTRIP
REMOVAL
(1) Raise hood.
(2) Pull cowl plenum seal from cowl.
(3) Separate cowl plenum seal from cowl (Fig. 2).
INSTALLATION
(1) Position cowl plenum seal on cowl.
(2) Press cowl plenum seal to seat.
FRONT DOOR GLASS RUN
WEATHERSTRIP
REMOVAL
(1) Remove inner belt weatherstrip (Refer to 23 -
BODY/WEATHERSTRIP/SEALS/FDR INNER BELT
WEATHERSTRIP - REMOVAL).
(2) Remove outer belt weatherstrip (Refer to 23 -
BODY/WEATHERSTRIP/SEALS/FDR OUTER BELT
WEATHERSTRIP - REMOVAL).
(3) Grasp seal from upper run channel corner and
firmly pull weatherstrip from flange and run channel
(Fig. 3).
INSTALLATION
NOTE: Soapy water may be used to aid in installation.
(1) Remove front door speaker.
(2) Position weatherstrip on flange aligning each
corner.
(3) Press weatherstrip into position.
(4) Carefully move door glass for and aft and press
weatherstrip into glass run channels.
(5) Install front door speaker.(6) Install outer belt weatherstrip (Refer to 23 -
BODY/WEATHERSTRIP/SEALS/FDR OUTER BELT
WEATHERSTRIP - INSTALLATION).
(7) Install inner belt weatherstrip (Refer to 23 -
BODY/WEATHERSTRIP/SEALS/FDR INNER BELT
WEATHERSTRIP - INSTALLATION).
FRONT DOOR INNER BELT
WEATHERSTRIP
REMOVAL
(1) Remove door trim panel (Refer to 23 - BODY/
DOOR - FRONT/TRIM PANEL - REMOVAL).
(2) Using a trim stick or other suitable device,
carefully pry up inner edge of seal (Fig. 4).
(3) Grasp the edge of the seal and pull upward to
remove seal from door flange.
Fig. 2 Cowl Plenum Seal
1 - PLENUM SEAL
Fig. 3 Front Door Glass Run Channel Weatherstrip
1 - GLASS RUN CHANNEL WEATHERSTRIP
2 - DOOR
Fig. 4 Inner/Outer Belt Weather Strip
1 - INNER BELT WEATHERSTRIP
2 - OUTER BELT WEATHERSTRIP
23 - 106 WEATHERSTRIP/SEALSWJ
Page 1980 of 2199
INSTALLATION
(1) Position the seal on the door flange.
(2) Firmly press downward to seat seal on the door
flange.
(3)
Install the door trim panel (Refer to 23 - BODY/
DOOR - FRONT/TRIM PANEL - INSTALLATION).
FDR OUTER BELT
WEATHERSTRIP
REMOVAL
(1) Lower the door glass.
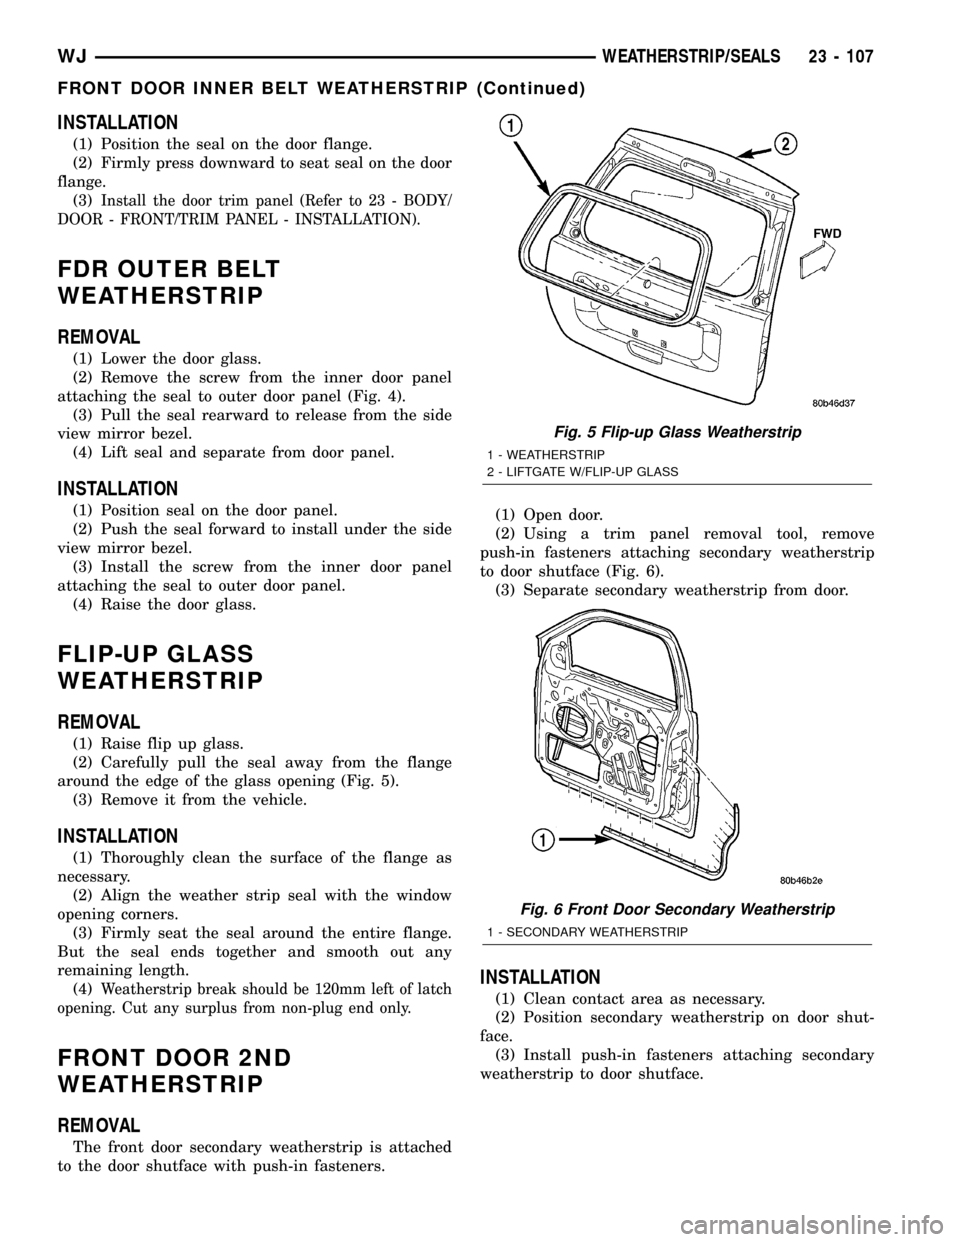
(2) Remove the screw from the inner door panel
attaching the seal to outer door panel (Fig. 4).
(3) Pull the seal rearward to release from the side
view mirror bezel.
(4) Lift seal and separate from door panel.
INSTALLATION
(1) Position seal on the door panel.
(2) Push the seal forward to install under the side
view mirror bezel.
(3) Install the screw from the inner door panel
attaching the seal to outer door panel.
(4) Raise the door glass.
FLIP-UP GLASS
WEATHERSTRIP
REMOVAL
(1) Raise flip up glass.
(2) Carefully pull the seal away from the flange
around the edge of the glass opening (Fig. 5).
(3) Remove it from the vehicle.
INSTALLATION
(1) Thoroughly clean the surface of the flange as
necessary.
(2) Align the weather strip seal with the window
opening corners.
(3) Firmly seat the seal around the entire flange.
But the seal ends together and smooth out any
remaining length.
(4)
Weatherstrip break should be 120mm left of latch
opening. Cut any surplus from non-plug end only.
FRONT DOOR 2ND
WEATHERSTRIP
REMOVAL
The front door secondary weatherstrip is attached
to the door shutface with push-in fasteners.(1) Open door.
(2) Using a trim panel removal tool, remove
push-in fasteners attaching secondary weatherstrip
to door shutface (Fig. 6).
(3) Separate secondary weatherstrip from door.
INSTALLATION
(1) Clean contact area as necessary.
(2) Position secondary weatherstrip on door shut-
face.
(3) Install push-in fasteners attaching secondary
weatherstrip to door shutface.
Fig. 5 Flip-up Glass Weatherstrip
1 - WEATHERSTRIP
2 - LIFTGATE W/FLIP-UP GLASS
Fig. 6 Front Door Secondary Weatherstrip
1 - SECONDARY WEATHERSTRIP
WJWEATHERSTRIP/SEALS 23 - 107
FRONT DOOR INNER BELT WEATHERSTRIP (Continued)
Page 1982 of 2199
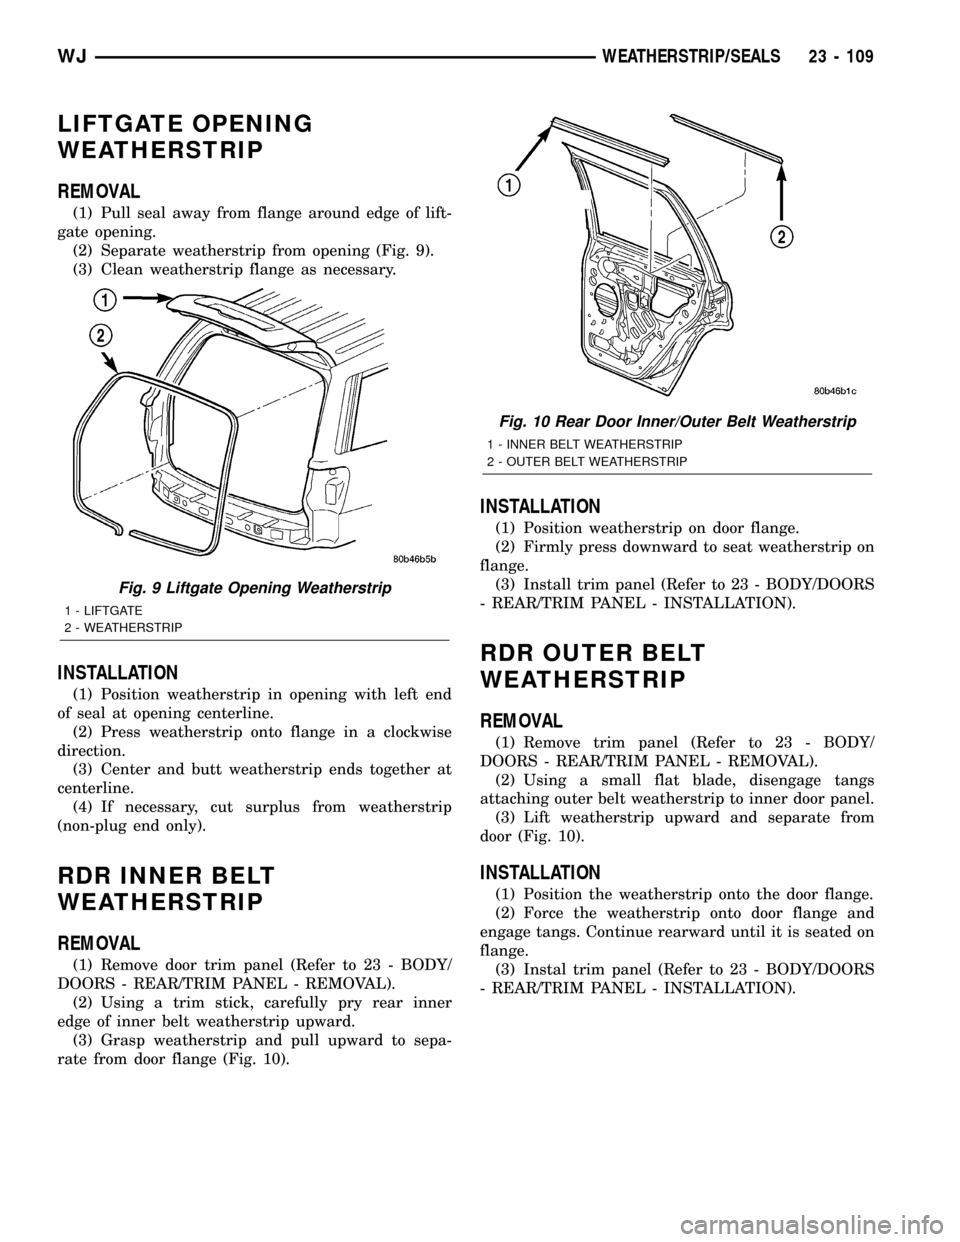
LIFTGATE OPENING
WEATHERSTRIP
REMOVAL
(1) Pull seal away from flange around edge of lift-
gate opening.
(2) Separate weatherstrip from opening (Fig. 9).
(3) Clean weatherstrip flange as necessary.
INSTALLATION
(1) Position weatherstrip in opening with left end
of seal at opening centerline.
(2) Press weatherstrip onto flange in a clockwise
direction.
(3) Center and butt weatherstrip ends together at
centerline.
(4) If necessary, cut surplus from weatherstrip
(non-plug end only).
RDR INNER BELT
WEATHERSTRIP
REMOVAL
(1) Remove door trim panel (Refer to 23 - BODY/
DOORS - REAR/TRIM PANEL - REMOVAL).
(2) Using a trim stick, carefully pry rear inner
edge of inner belt weatherstrip upward.
(3) Grasp weatherstrip and pull upward to sepa-
rate from door flange (Fig. 10).
INSTALLATION
(1) Position weatherstrip on door flange.
(2) Firmly press downward to seat weatherstrip on
flange.
(3) Install trim panel (Refer to 23 - BODY/DOORS
- REAR/TRIM PANEL - INSTALLATION).
RDR OUTER BELT
WEATHERSTRIP
REMOVAL
(1) Remove trim panel (Refer to 23 - BODY/
DOORS - REAR/TRIM PANEL - REMOVAL).
(2) Using a small flat blade, disengage tangs
attaching outer belt weatherstrip to inner door panel.
(3) Lift weatherstrip upward and separate from
door (Fig. 10).
INSTALLATION
(1) Position the weatherstrip onto the door flange.
(2) Force the weatherstrip onto door flange and
engage tangs. Continue rearward until it is seated on
flange.
(3) Instal trim panel (Refer to 23 - BODY/DOORS
- REAR/TRIM PANEL - INSTALLATION).
Fig. 9 Liftgate Opening Weatherstrip
1 - LIFTGATE
2 - WEATHERSTRIP
Fig. 10 Rear Door Inner/Outer Belt Weatherstrip
1 - INNER BELT WEATHERSTRIP
2 - OUTER BELT WEATHERSTRIP
WJWEATHERSTRIP/SEALS 23 - 109
Page 1983 of 2199

RDR SECONDARY
WEATHERSTRIP
REMOVAL
The rear door secondary weatherstrip is attached
to the door shutface with push-in fasteners.
(1) Open door.
(2) Using a trim panel removal tool, remove
push-in fasteners attaching secondary weatherstrip
to door shutface.
(3) Separate secondary weatherstrip from door
(Fig. 11).
INSTALLATION
(1) Clean contact area as necessary.
(2)
Position secondary weatherstrip on door shutface.
(3) Install push-in fasteners attaching secondary
weatherstrip to door shutface.
REAR DOOR WEATHERSTRIP
REMOVAL
(1) Remove C-pillar trim (Refer to 23 - BODY/IN-
TERIOR/C-PILLAR TRIM - REMOVAL).
(2) Remove B-pillar upper trim (Refer to 23 -
BODY/INTERIOR/B-PILLAR UPPER TRIM -
REMOVAL).
(3) Remove B-pillar lower trim(Refer to 23 -
BODY/INTERIOR/B-PILLAR LOWER TRIM -
REMOVAL).
(4) Remove screws at front of quarter trim panel.
(5) Pull weatherstrip from door opening flange.
INSTALLATION
(1) Position weatherstrip at corners.
(2) Move upward and around edge of door opening
seating weatherstrip onto flange (Fig. 7).(3) Engage connector plug with each end of weath-
erstrip at bottom of door opening.
(4) Install screws at front of quarter trim panel.
(5)
Install B-pillar lower trim (Refer to 23 - BODY/IN-
TERIOR/B-PILLAR LOWER TRIM - INSTALLATION).
(6) Install B-pillar upper trim (Refer to 23 -
BODY/INTERIOR/B-PILLAR UPPER TRIM -
INSTALLATION).
(7) Install C-pillar trim (Refer to 23 - BODY/INTE-
RIOR/C-PILLAR TRIM - INSTALLATION).
ROOF RAIL WEATHERSTRIP /
RETAINR
REMOVAL
(1) Open front and rear doors.
(2) Remove secondary seal from retainer to access
the screws holding the retainer to the A pillar and
roof panel.
(3) Remove the screws holding the retainer in
place (Fig. 12).
(4) Remove the retainer.
INSTALLATION
(1) Position the retainer on the A pillar and roof
panel.
(2) Align the screw holes and install the screws.
(3) Install secondary seal.
Fig. 11 Rear Door Secondary Weatherstrip
1 - SECONDARY WEATHERSTRIP
Fig. 12 Upper Body Seal With Retainer
1 - ROOF RAIL WEATHERSTRIP
2 - RETAINER
3 - SCREW
4 - BLOCKER
23 - 110 WEATHERSTRIP/SEALSWJ
Page 1986 of 2199
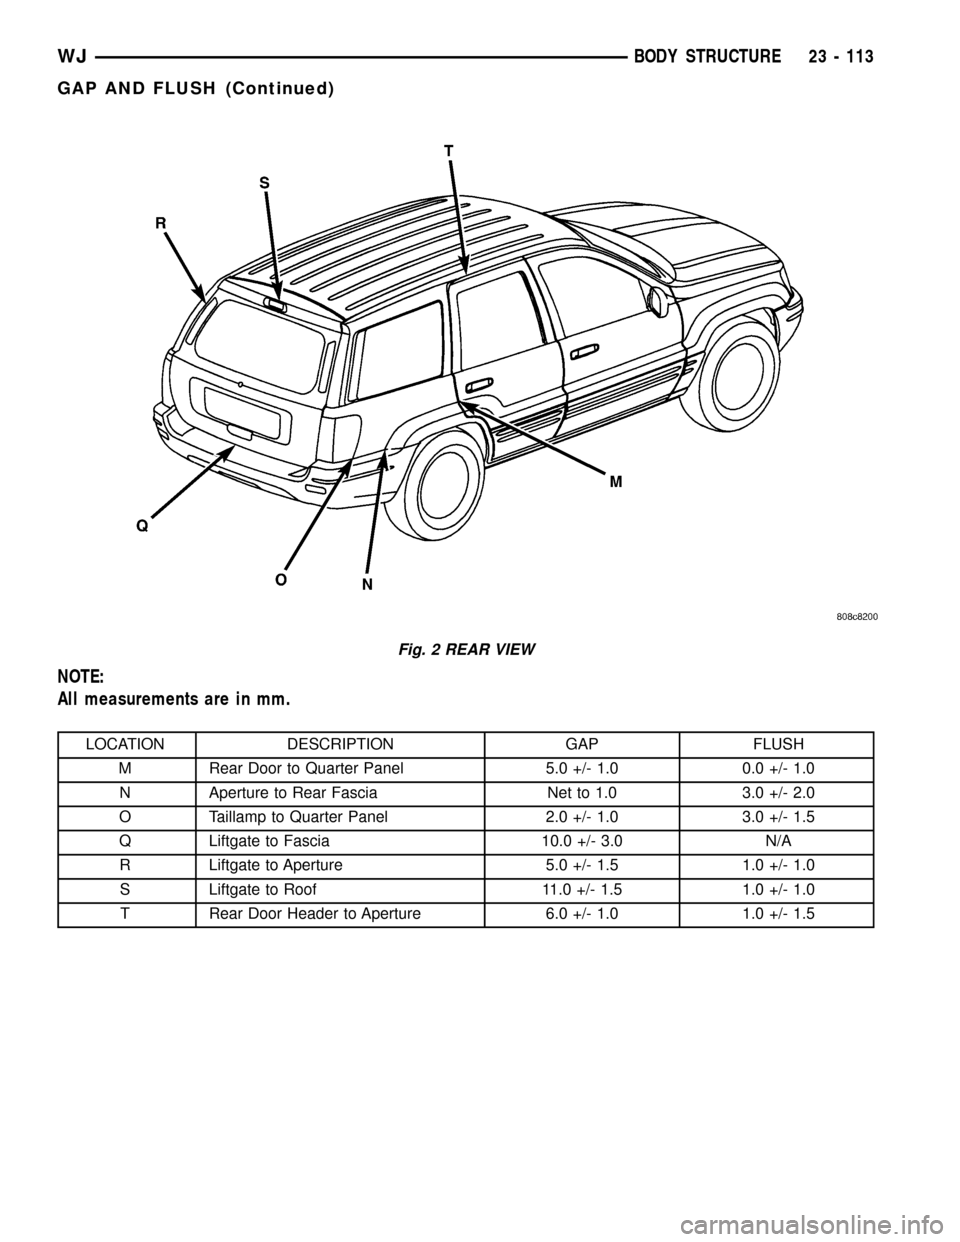
NOTE:
All measurements are in mm.
LOCATION DESCRIPTION GAP FLUSH
M Rear Door to Quarter Panel 5.0 +/- 1.0 0.0 +/- 1.0
N Aperture to Rear Fascia Net to 1.0 3.0 +/- 2.0
O Taillamp to Quarter Panel 2.0 +/- 1.0 3.0 +/- 1.5
Q Liftgate to Fascia 10.0 +/- 3.0 N/A
R Liftgate to Aperture 5.0 +/- 1.5 1.0 +/- 1.0
S Liftgate to Roof 11.0 +/- 1.5 1.0 +/- 1.0
T Rear Door Header to Aperture 6.0 +/- 1.0 1.0 +/- 1.5
Fig. 2 REAR VIEW
WJBODY STRUCTURE 23 - 113
GAP AND FLUSH (Continued)
Page 1991 of 2199
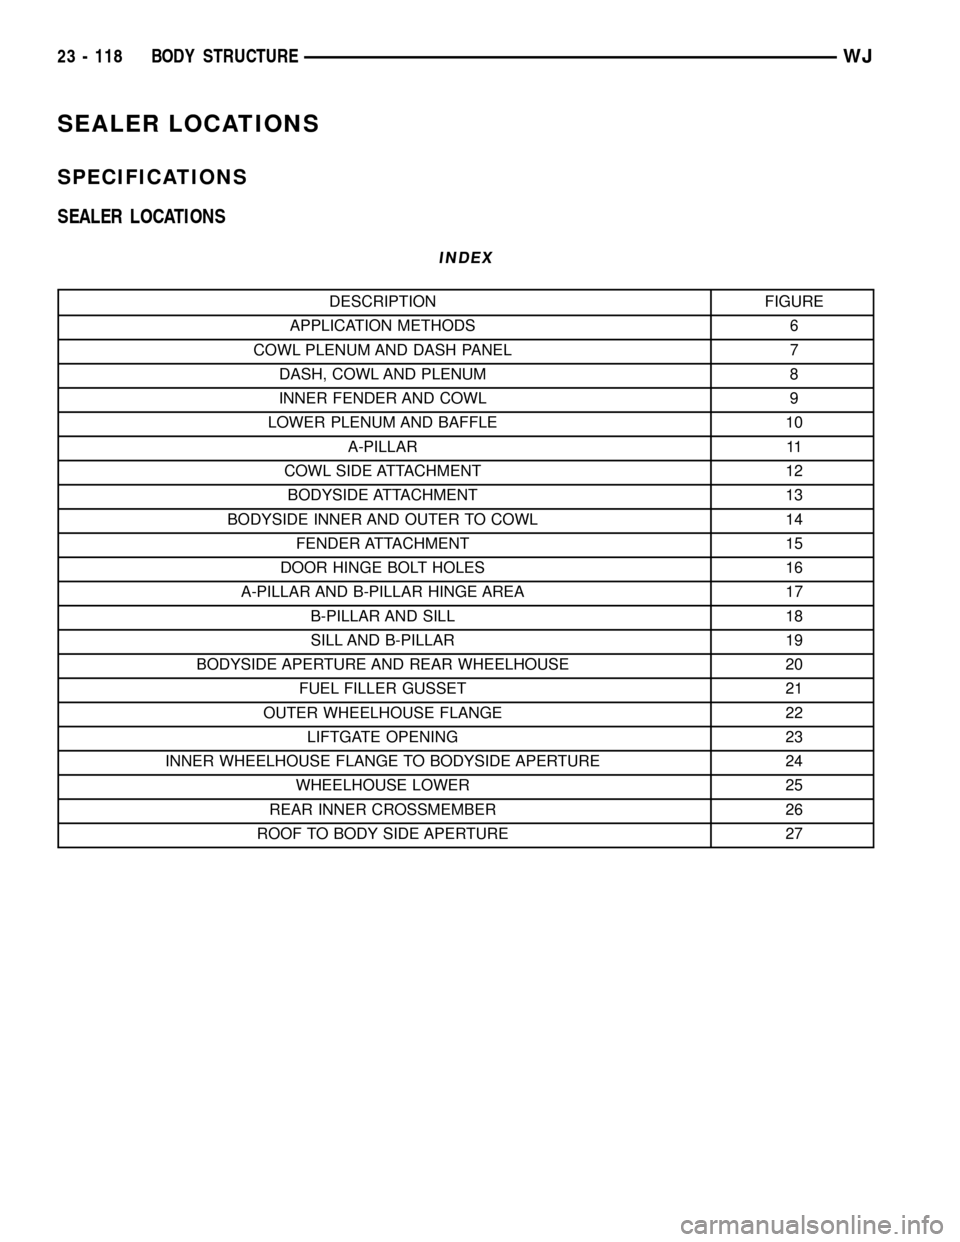
SEALER LOCATIONS
SPECIFICATIONS
SEALER LOCATIONS
INDEX
DESCRIPTION FIGURE
APPLICATION METHODS 6
COWL PLENUM AND DASH PANEL 7
DASH, COWL AND PLENUM 8
INNER FENDER AND COWL 9
LOWER PLENUM AND BAFFLE 10
A-PILLAR 11
COWL SIDE ATTACHMENT 12
BODYSIDE ATTACHMENT 13
BODYSIDE INNER AND OUTER TO COWL 14
FENDER ATTACHMENT 15
DOOR HINGE BOLT HOLES 16
A-PILLAR AND B-PILLAR HINGE AREA 17
B-PILLAR AND SILL 18
SILL AND B-PILLAR 19
BODYSIDE APERTURE AND REAR WHEELHOUSE 20
FUEL FILLER GUSSET 21
OUTER WHEELHOUSE FLANGE 22
LIFTGATE OPENING 23
INNER WHEELHOUSE FLANGE TO BODYSIDE APERTURE 24
WHEELHOUSE LOWER 25
REAR INNER CROSSMEMBER 26
ROOF TO BODY SIDE APERTURE 27
23 - 118 BODY STRUCTUREWJ
Page 1993 of 2199

Fig. 7 COWL PLENUM AND DASH PANEL
23 - 120 BODY STRUCTUREWJ
SEALER LOCATIONS (Continued)
Page 2010 of 2199
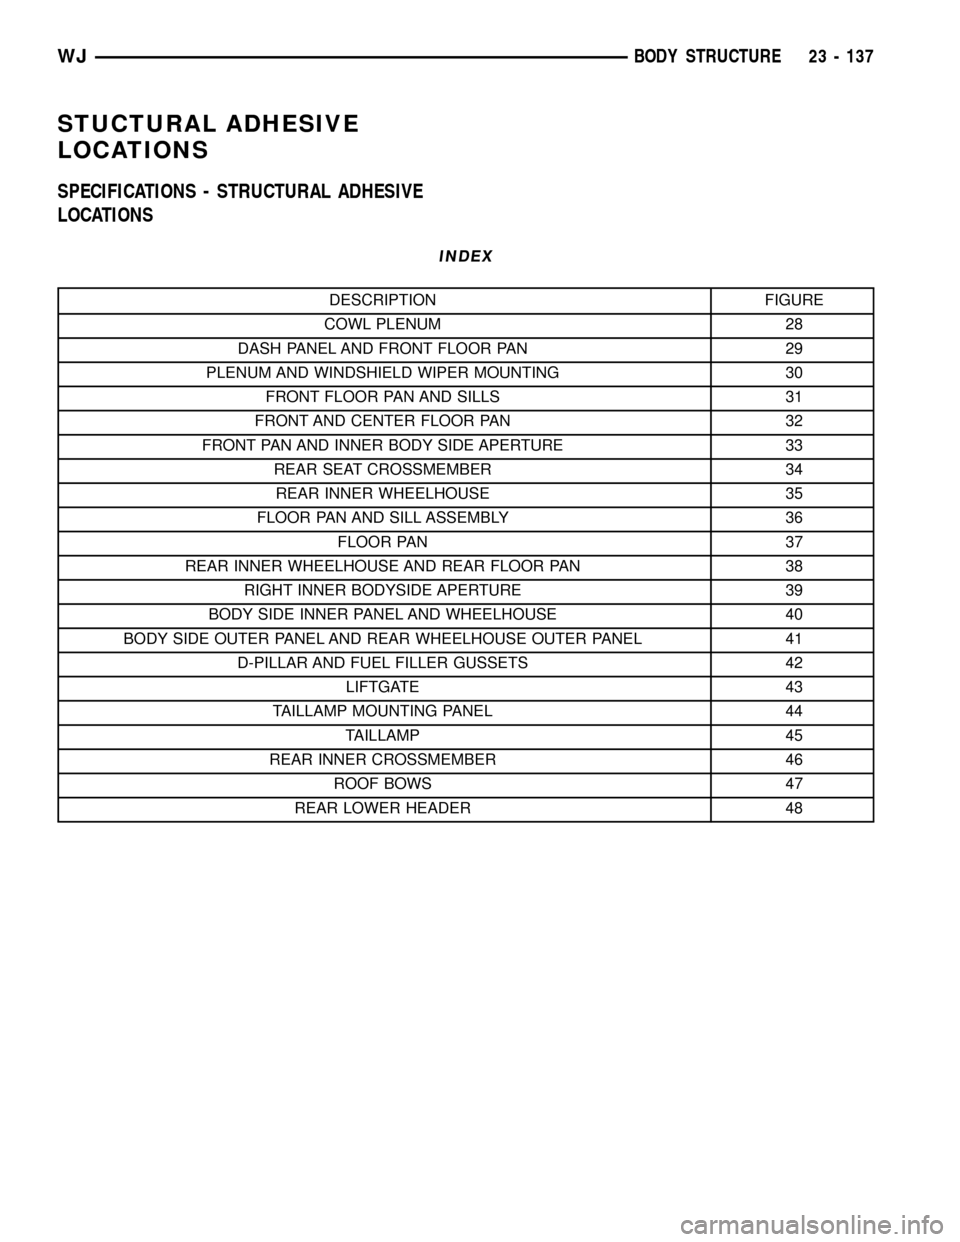
STUCTURAL ADHESIVE
LOCATIONS
SPECIFICATIONS - STRUCTURAL ADHESIVE
LOCATIONS
INDEX
DESCRIPTION FIGURE
COWL PLENUM 28
DASH PANEL AND FRONT FLOOR PAN 29
PLENUM AND WINDSHIELD WIPER MOUNTING 30
FRONT FLOOR PAN AND SILLS 31
FRONT AND CENTER FLOOR PAN 32
FRONT PAN AND INNER BODY SIDE APERTURE 33
REAR SEAT CROSSMEMBER 34
REAR INNER WHEELHOUSE 35
FLOOR PAN AND SILL ASSEMBLY 36
FLOOR PAN 37
REAR INNER WHEELHOUSE AND REAR FLOOR PAN 38
RIGHT INNER BODYSIDE APERTURE 39
BODY SIDE INNER PANEL AND WHEELHOUSE 40
BODY SIDE OUTER PANEL AND REAR WHEELHOUSE OUTER PANEL 41
D-PILLAR AND FUEL FILLER GUSSETS 42
LIFTGATE 43
TAILLAMP MOUNTING PANEL 44
TAILLAMP 45
REAR INNER CROSSMEMBER 46
ROOF BOWS 47
REAR LOWER HEADER 48
WJBODY STRUCTURE 23 - 137
Page 2011 of 2199

Fig. 28 COWL PLENUM
Fig. 29 DASH PANEL AND FRONT FLOOR PAN
23 - 138 BODY STRUCTUREWJ
STUCTURAL ADHESIVE LOCATIONS (Continued)