Table of contents JEEP GRAND CHEROKEE 2003 WJ / 2.G Repair Manual
[x] Cancel search | Manufacturer: JEEP, Model Year: 2003, Model line: GRAND CHEROKEE, Model: JEEP GRAND CHEROKEE 2003 WJ / 2.GPages: 2199, PDF Size: 76.01 MB
Page 1834 of 2199
TRANSFER CASE - NV247
TABLE OF CONTENTS
page page
TRANSFER CASE - NV247
DESCRIPTION........................315
OPERATION..........................316
DIAGNOSIS AND TESTING - TRANSFER
CASE - NV247.......................316
REMOVAL............................317
DISASSEMBLY........................317
CLEANING...........................324
INSPECTION.........................324
ASSEMBLY...........................326
INSTALLATION........................335
SPECIFICATIONS
TRANSFER CASE - NV247.............336
SPECIAL TOOLS
TRANSFER CASE - NV247.............337FLUID
STANDARD PROCEDURE - FLUID DRAIN/
REFILL............................338
FRONT OUTPUT SHAFT SEAL
REMOVAL............................338
INSTALLATION........................338
REAR RETAINER BUSHING AND SEAL
REMOVAL............................339
INSTALLATION........................339
SHIFT CABLE
REMOVAL............................340
INSTALLATION........................340
TRANSFER CASE - NV247
DESCRIPTION
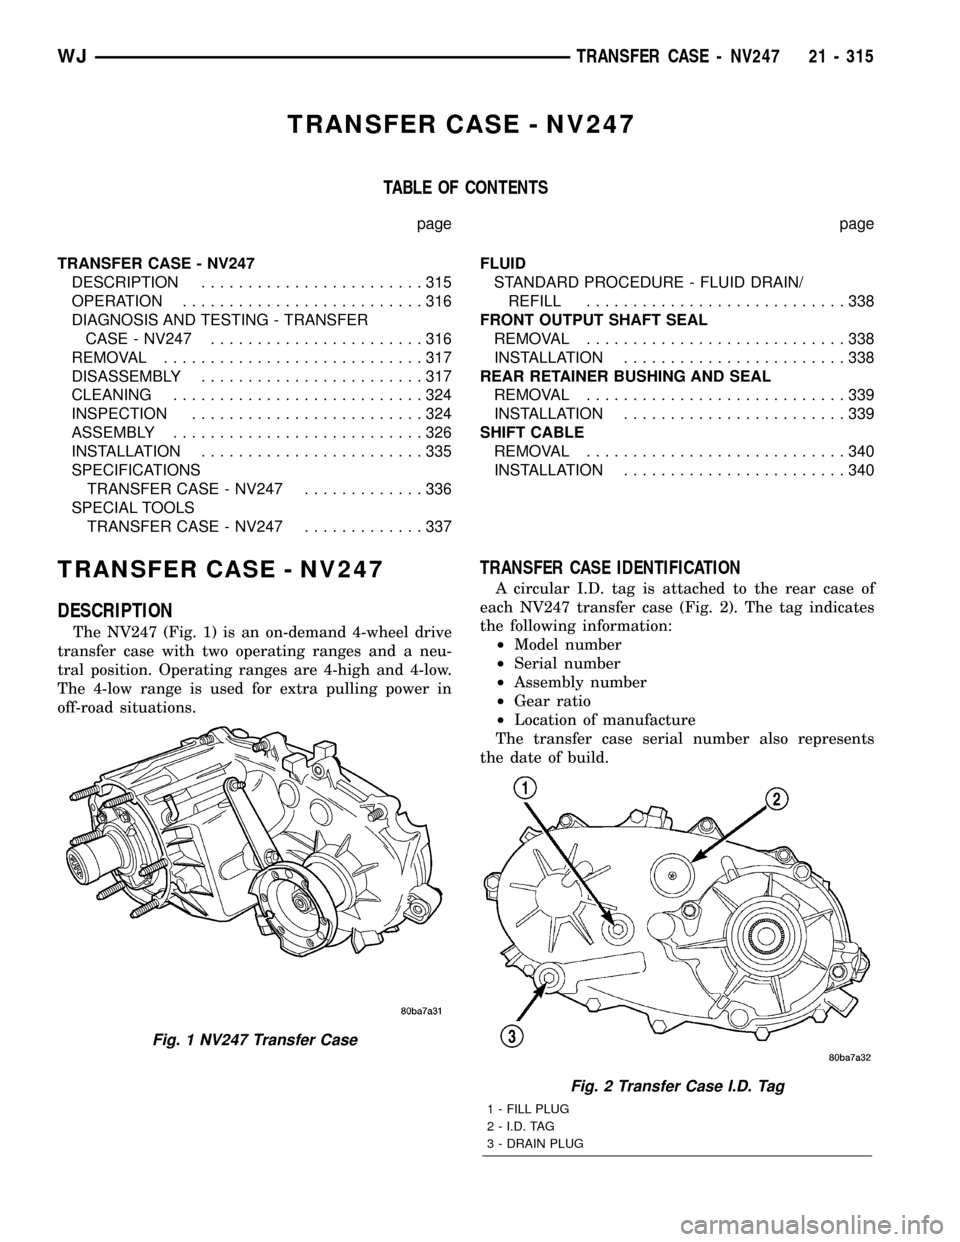
The NV247 (Fig. 1) is an on-demand 4-wheel drive
transfer case with two operating ranges and a neu-
tral position. Operating ranges are 4-high and 4-low.
The 4-low range is used for extra pulling power in
off-road situations.
TRANSFER CASE IDENTIFICATION
A circular I.D. tag is attached to the rear case of
each NV247 transfer case (Fig. 2). The tag indicates
the following information:
²Model number
²Serial number
²Assembly number
²Gear ratio
²Location of manufacture
The transfer case serial number also represents
the date of build.
Fig. 1 NV247 Transfer Case
Fig. 2 Transfer Case I.D. Tag
1 - FILL PLUG
2 - I.D. TAG
3 - DRAIN PLUG
WJTRANSFER CASE - NV247 21 - 315
Page 1860 of 2199
TIRES/WHEELS
TABLE OF CONTENTS
page page
TIRES/WHEELS
DIAGNOSIS AND TESTING - TIRE AND
WHEEL RUNOUT......................1
STANDARD PROCEDURE
STANDARD PROCEDURE - TIRE AND
WHEEL BALANCE......................2
STANDARD PROCEDURE - MATCH
MOUNTING...........................4
STANDARD PROCEDURE - TIRE ROTATION . 5
STANDARD PROCEDURE - WHEEL
INSTALLATION........................5
TIRES
DESCRIPTION
DESCRIPTION - TIRES..................6
DESCRIPTION - RADIAL±PLY TIRES.......6
DESCRIPTION - TIRE INFLATION
PRESSURES..........................6
DESCRIPTION - TIRE PRESSURE FOR
HIGH SPEED..........................7
DESCRIPTION - REPLACEMENT TIRES.....7
DIAGNOSIS AND TESTING
DIAGNOSIS AND TESTING - PRESSURE
GAUGES.............................8
DIAGNOSIS AND TESTING - TREAD WEAR
INDICATORS..........................8
DIAGNOSIS AND TESTING - TIRE WEAR
PATTERNS...........................8
DIAGNOSIS AND TESTING - TIRE NOISE
OR VIBRATION........................8STANDARD PROCEDURE - REPAIRING
LEAKS...............................8
CLEANING.............................9
SPECIFICATIONS
TIRES...............................9
SPECIFICATIONS -.....................9
SPARE TIRE
DESCRIPTION - SPARE / TEMPORARY TIRE . . 10
WHEELS
DESCRIPTION.........................10
DIAGNOSIS AND TESTING - WHEEL
INSPECTION.........................10
STANDARD PROCEDURE - WHEEL
REPLACEMENT.......................10
SPECIFICATIONS
TORQUE CHART......................11
STUDS
REMOVAL.............................11
INSTALLATION.........................11
TIRE PRESSURE MONITORING
DESCRIPTION.........................12
OPERATION...........................12
DIAGNOSIS AND TESTING - TIRE PRESSURE
MONITORING SYSTEM.................12
SENSOR
REMOVAL - TIRE PRESSURE SENSOR/
TRANSMITTER.......................12
INSTALLATION - TIRE PRESSURE SENSOR/
TRANSMITTER.......................13
TIRES/WHEELS
DIAGNOSIS AND TESTING - TIRE AND WHEEL
RUNOUT
Radial runout is the difference between the high
and low points on the tire or wheel (Fig. 1).
Lateral runout is thewobbleof the tire or wheel.
Radial runout of more than 1.5 mm (.060 inch)
measured at the center line of the tread may cause
the vehicle to shake.
Lateral runout of more than 2.0 mm (.080 inch)
measured near the shoulder of the tire may cause the
vehicle to shake.
Sometimes radial runout can be reduced. Relocate
the wheel and tire assembly on the mounting studs
(See Method 1). If this does not reduce runout to an
acceptable level, the tire can be rotated on the wheel.
(See Method 2).
METHOD 1 (RELOCATE WHEEL ON HUB)
(1) Drive vehicle a short distance to eliminate tire
flat spotting from a parked position.
(2) Check wheel bearings and adjust if adjustable
or replace if necessary.
(3) Check the wheel mounting surface.
(4) Relocate wheel on the mounting, two studs
over from the original position.
(5) Tighten wheel nuts until all are properly
torqued, to eliminate brake distortion.
(6) Check radial runout. If still excessive, mark
tire sidewall, wheel, and stud at point of maximum
runout and proceed to Method 2.
METHOD 2 (RELOCATE TIRE ON WHEEL)
NOTE: Rotating the tire on wheel is particularly
effective when there is runout in both tire and
wheel.
WJTIRES/WHEELS 22 - 1
Page 1874 of 2199

BODY
TABLE OF CONTENTS
page page
BODY
DIAGNOSIS AND TESTING
WATER LEAKS........................1
WIND NOISE..........................2
STANDARD PROCEDURE
STANDARD PROCEDURE - BODY
LUBRICATION.........................2
STANDARD PROCEDURE - DRILLING AND
WELDING............................3
SPECIFICATIONS
BODY LUBRICANTS....................3
SPECIFICATIONS - TORQUE.............4
SPECIAL TOOLS
BODY...............................4DECKLID/HATCH/LIFTGATE/TAILGATE........5
DOOR - FRONT.........................11
DOORS - REAR.........................19
EXTERIOR.............................25
HOOD.................................33
INSTRUMENT PANEL SYSTEM.............36
INTERIOR..............................69
PAINT.................................81
SEATS................................83
STATIONARY GLASS.....................93
SUNROOF.............................96
WEATHERSTRIP/SEALS..................105
BODY STRUCTURE.....................112
BODY
DIAGNOSIS AND TESTING
WATER LEAKS
Water leaks can be caused by poor sealing,
improper body component alignment, body seam
porosity, missing plugs, or blocked drain holes. Cen-
trifugal and gravitational force can cause water to
drip from a location away from the actual leak point,
making leak detection difficult. All body sealing
points should be water tight in normal wet-driving
conditions. Water flowing downward from the front of
the vehicle should not enter the passenger or luggage
compartment. Moving sealing surfaces will not
always seal water tight under all conditions. At
times, side glass or door seals will allow water to
enter the passenger compartment during high pres-
sure washing or hard driving rain (severe) condi-
tions. Overcompensating on door or glass
adjustments to stop a water leak that occurs under
severe conditions can cause premature seal wear and
excessive closing or latching effort. After completing
a repair, water test vehicle to verify leak has stopped
before returning vehicle to use.
VISUAL INSPECTION BEFORE WATER LEAK TESTS
Verify that floor and body plugs are in place, body
drains are clear, and body components are properly
aligned and sealed. If component alignment or seal-
ing is necessary, refer to the appropriate section of
this group for proper procedures.
WATER LEAK TESTS
WARNING: DO NOT USE ELECTRIC SHOP LIGHTS
OR TOOLS IN WATER TEST AREA. PERSONAL
INJURY CAN RESULT.
When the conditions causing a water leak have
been determined, simulate the conditions as closely
as possible.
²If a leak occurs with the vehicle parked in a
steady light rain, flood the leak area with an open-
ended garden hose.
²If a leak occurs while driving at highway speeds
in a steady rain, test the leak area with a reasonable
velocity stream or fan spray of water. Direct the
spray in a direction comparable to actual conditions.
²If a leak occurs when the vehicle is parked on an
incline, hoist the end or side of the vehicle to simu-
late this condition. This method can be used when
the leak occurs when the vehicle accelerates, stops or
turns. If the leak occurs on acceleration, hoist the
front of the vehicle. If the leak occurs when braking,
hoist the back of the vehicle. If the leak occurs on left
turns, hoist the left side of the vehicle. If the leak
occurs on right turns, hoist the right side of the vehi-
cle. For hoisting recommendations refer to Group 0,
Lubrication and Maintenance, General Information
section.
WATER LEAK DETECTION
To detect a water leak point-of-entry, do a water
test and watch for water tracks or droplets forming
on the inside of the vehicle. If necessary, remove inte-
rior trim covers or panels to gain visual access to the
WJBODY 23 - 1
Page 1878 of 2199
DECKLID/HATCH/LIFTGATE/TAILGATE
TABLE OF CONTENTS
page page
EXTERIOR HANDLE
REMOVAL.............................5
INSTALLATION..........................5
FLIP-UP GLASS
REMOVAL.............................5
INSTALLATION..........................6
FLIP-UP GLASS LATCH
REMOVAL.............................6
INSTALLATION..........................6
FLIP-UP GLASS LATCH STRIKER
REMOVAL.............................7
INSTALLATION..........................7
FLIP-UP GLASS SWITCH
REMOVAL.............................7
INSTALLATION..........................7
HINGE
REMOVAL.............................7
INSTALLATION..........................7
LATCH
REMOVAL.............................8
INSTALLATION..........................8LATCH STRIKER
REMOVAL.............................8
INSTALLATION..........................8
LIFTGATE
REMOVAL.............................9
INSTALLATION..........................9
ADJUSTMENTS
LIFTGATE ADJUSTMENT................9
TRIM PANEL
REMOVAL
REMOVAL - LIFTGATE TRIM PANEL........9
REMOVAL - LOWER LIFTGATE OPENING
TRIM PANEL.........................10
INSTALLATION
INSTALLATION - LIFTGATE TRIM PANEL . . . 10
INSTALLATION - LOWER LIFTGATE
OPENING TRIM PANEL.................10
LIFTGATE INSULATOR
REMOVAL.............................10
INSTALLATION.........................10
EXTERIOR HANDLE
REMOVAL
(1) Remove the liftgate trim panel refer to (Refer
to 23 - BODY/DECKLID/HATCH/LIFTGATE/TAIL-
GATE/TRIM PANEL - REMOVAL).
(2) Remove the latch, outside handle linkage, and
power lock connector.
(3) Remove the fasteners attaching the outside
handle to the liftgate.
(4) Remove the outside handle from the liftgate.
INSTALLATION
(1) Position the outside handle on the liftgate.
(2) Install the fasteners attaching outside handle
to liftgate.
(3) Connect outside handle link and power lock
connector.
(4) Install liftgate trim panel, refer to (Refer to 23
- BODY/DECKLID/HATCH/LIFTGATE/TAILGATE/
TRIM PANEL - INSTALLATION).
FLIP-UP GLASS
REMOVAL
CAUTION: DO NOT DISCONNECT THE PROP ROD
CYLINDERS WITH THE LIFTGATE FLIP UP GLASS
CLOSED. THE PROP ROD PISTONS ARE OPER-
ATED BY HIGH PRESSURE GAS. THIS PRESSURE
COULD CAUSE DAMAGE AND/OR PERSONAL
INJURY IF THEY ARE REMOVED WHILE THE PIS-
TONS ARE COMPRESSED.
(1) Using a trim stick or other suitable device, sep-
arate the flip up glass hinge cover from the hinge on
the liftgate (Fig. 1).
(2) Open liftgate flip up glass. Support the glass
for ease of repair.
(3) Using a small flat blade or equivalent tool, gen-
tly pry open the locking caps on the end of the prop
rods.
(4) Remove prop rod cylinders from ball studs.
(5) Lower the flip up glass.
(6) Remove hinge fasteners from liftgate.
(7) Separate flip up glass from liftgate.
WJDECKLID/HATCH/LIFTGATE/TAILGATE 23 - 5
Page 1884 of 2199
DOOR - FRONT
TABLE OF CONTENTS
page page
CHECK STRAP
REMOVAL.............................11
INSTALLATION.........................11
DOOR
REMOVAL.............................12
INSTALLATION.........................12
ADJUSTMENTS
DOOR ADJUSTMENT..................12
DOOR GLASS
REMOVAL.............................12
INSTALLATION.........................12
EXTERIOR HANDLE
REMOVAL.............................13
INSTALLATION.........................13
GLASS RUN CHANNEL
REMOVAL.............................13
INSTALLATION.........................14
HINGE
REMOVAL.............................14
INSTALLATION.........................15
INSIDE HANDLE ACTUATOR
REMOVAL.............................15INSTALLATION.........................15
LATCH
REMOVAL.............................15
INSTALLATION.........................15
ADJUSTMENTS
DOOR LATCH........................16
LATCH STRIKER
REMOVAL.............................16
INSTALLATION.........................16
LOCK CYLINDER
REMOVAL.............................16
INSTALLATION.........................17
TRIM PANEL
REMOVAL.............................17
INSTALLATION.........................17
WATERDAM
REMOVAL.............................17
INSTALLATION.........................17
WINDOW REGULATOR
REMOVAL.............................18
INSTALLATION.........................18
CHECK STRAP
REMOVAL
(1) Remove the waterdam, refer to (Refer to 23 -
BODY/DOOR - FRONT/WATERDAM - REMOVAL).
(2) Remove speaker.
(3) Remove screws attaching door check to A-pillar.
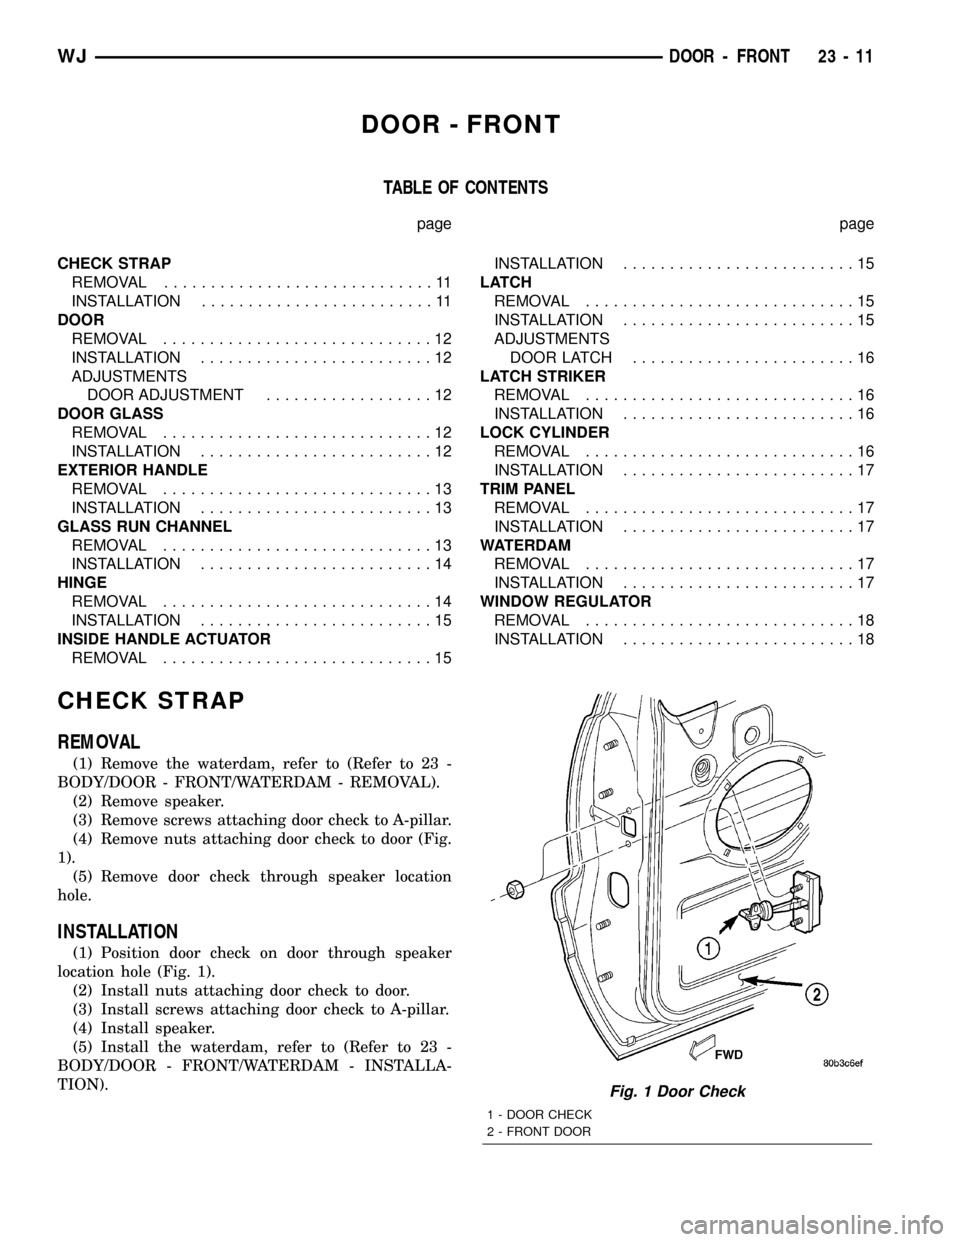
(4) Remove nuts attaching door check to door (Fig.
1).
(5) Remove door check through speaker location
hole.
INSTALLATION
(1) Position door check on door through speaker
location hole (Fig. 1).
(2) Install nuts attaching door check to door.
(3) Install screws attaching door check to A-pillar.
(4) Install speaker.
(5) Install the waterdam, refer to (Refer to 23 -
BODY/DOOR - FRONT/WATERDAM - INSTALLA-
TION).
Fig. 1 Door Check
1 - DOOR CHECK
2 - FRONT DOOR
WJDOOR - FRONT 23 - 11
Page 1892 of 2199
DOORS - REAR
TABLE OF CONTENTS
page page
CHECK STRAP
REMOVAL.............................19
INSTALLATION.........................19
DOOR
REMOVAL.............................20
INSTALLATION.........................20
DOOR GLASS
REMOVAL.............................20
INSTALLATION.........................20
EXTERIOR HANDLE
REMOVAL.............................20
INSTALLATION.........................21
HINGE
REMOVAL.............................21
INSTALLATION.........................21
INSIDE HANDLE ACTUATOR
REMOVAL.............................22INSTALLATION.........................22
LATCH
REMOVAL.............................22
INSTALLATION.........................22
LATCH STRIKER
REMOVAL.............................23
INSTALLATION.........................23
TRIM PANEL
REMOVAL.............................23
INSTALLATION.........................23
WATERDAM
REMOVAL.............................23
INSTALLATION.........................24
WINDOW REGULATOR
REMOVAL.............................24
INSTALLATION.........................24
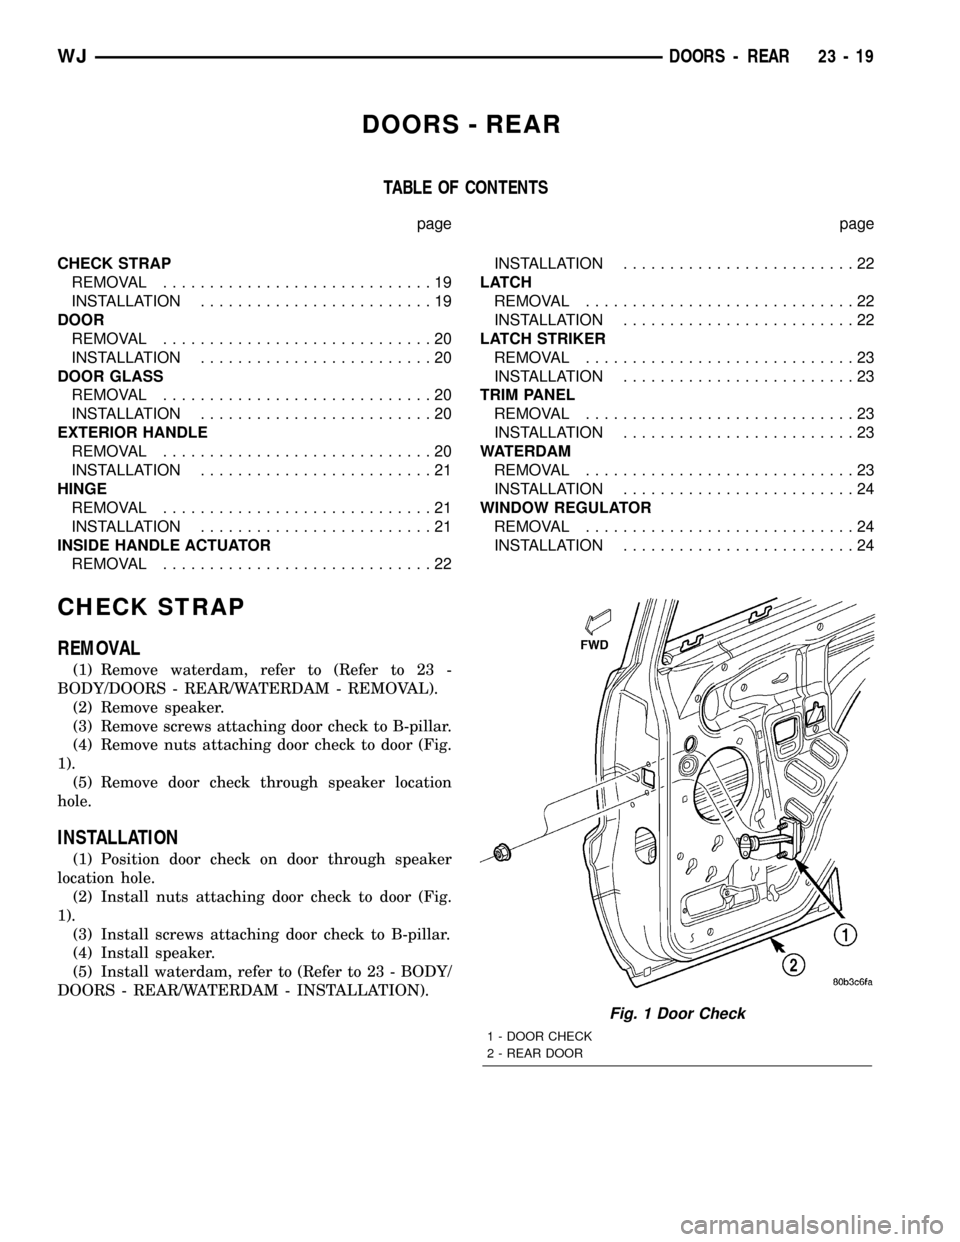
CHECK STRAP
REMOVAL
(1) Remove waterdam, refer to (Refer to 23 -
BODY/DOORS - REAR/WATERDAM - REMOVAL).
(2) Remove speaker.
(3) Remove screws attaching door check to B-pillar.
(4) Remove nuts attaching door check to door (Fig.
1).
(5) Remove door check through speaker location
hole.
INSTALLATION
(1) Position door check on door through speaker
location hole.
(2) Install nuts attaching door check to door (Fig.
1).
(3) Install screws attaching door check to B-pillar.
(4) Install speaker.
(5) Install waterdam, refer to (Refer to 23 - BODY/
DOORS - REAR/WATERDAM - INSTALLATION).
Fig. 1 Door Check
1 - DOOR CHECK
2 - REAR DOOR
WJDOORS - REAR 23 - 19
Page 1898 of 2199
EXTERIOR
TABLE OF CONTENTS
page page
BODY SIDE MOLDINGS
REMOVAL
REMOVAL±FRONT DOOR...............25
REMOVAL±REAR DOOR................26
REMOVAL±FENDER/QUARTER PANEL.....26
INSTALLATION
INSTALLATION±FRONT DOOR...........26
INSTALLATION±REAR DOOR............26
INSTALLATION±FENDER/QUARTER PANEL . 26
COWL GRILLE
REMOVAL.............................27
INSTALLATION.........................27
D-PILLAR APPLIQUE
REMOVAL.............................27
INSTALLATION.........................27
D-PILLAR AIR EXHAUSTER
REMOVAL.............................27
INSTALLATION.........................27
AIR EXHAUSTER
REMOVAL.............................27
INSTALLATION.........................27
EXTERIOR NAME PLATES
REMOVAL.............................28
INSTALLATION.........................28FRONT FENDER
REMOVAL.............................28
INSTALLATION.........................29
FUEL FILL DOOR
REMOVAL.............................29
INSTALLATION.........................29
GRILLE
REMOVAL.............................29
INSTALLATION.........................29
HEADLAMP MOUNTING MODULE
REMOVAL.............................30
INSTALLATION.........................30
LUGGAGE RACK
REMOVAL.............................30
INSTALLATION.........................31
SIDE VIEW MIRROR GLASS
REMOVAL.............................31
INSTALLATION.........................31
SIDE VIEW MIRROR
REMOVAL.............................31
INSTALLATION.........................31
ROCK RAIL
REMOVAL.............................32
INSTALLATION.........................32
BODY SIDE MOLDINGS
REMOVAL
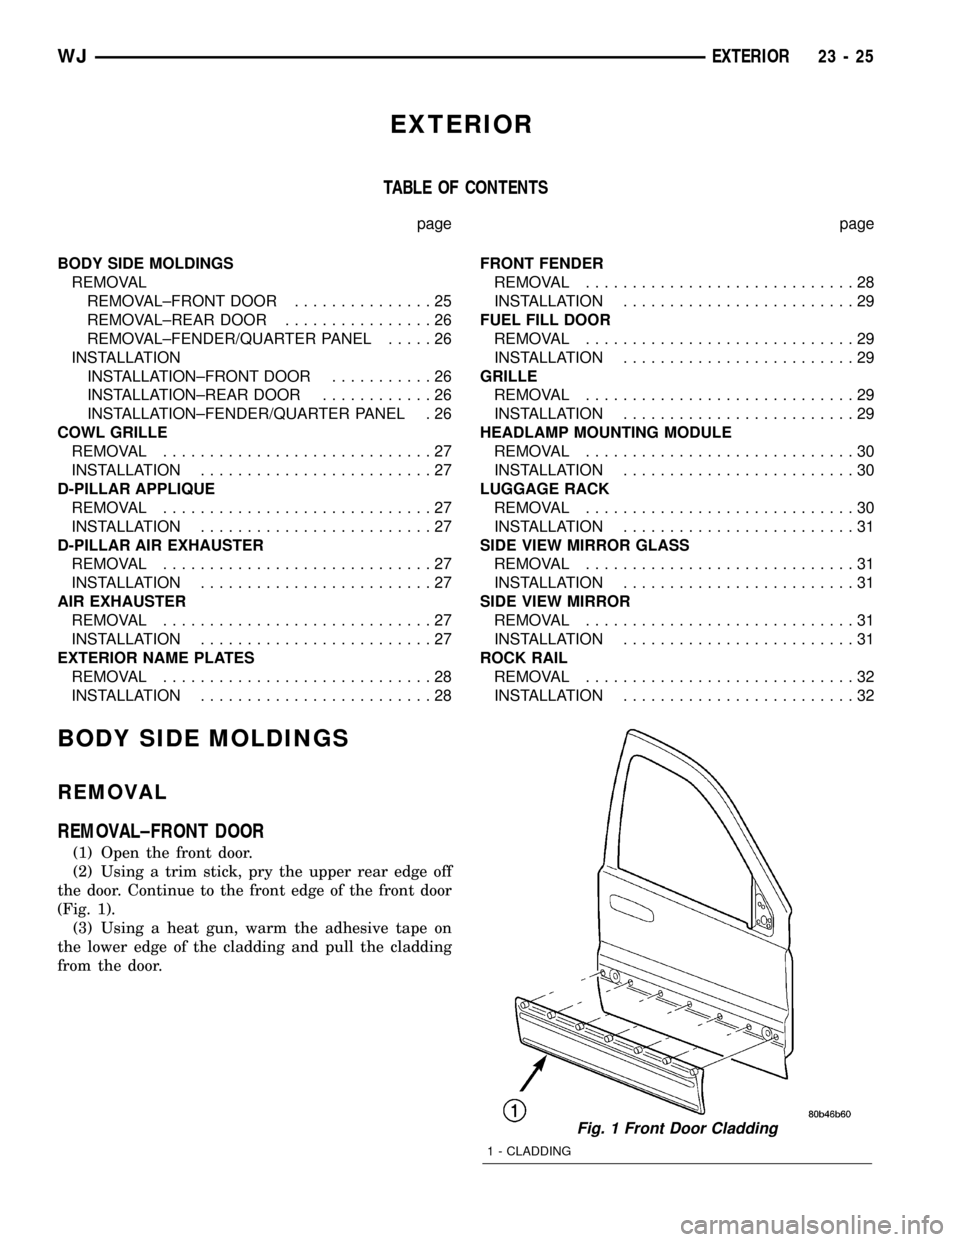
REMOVAL±FRONT DOOR
(1) Open the front door.
(2) Using a trim stick, pry the upper rear edge off
the door. Continue to the front edge of the front door
(Fig. 1).
(3) Using a heat gun, warm the adhesive tape on
the lower edge of the cladding and pull the cladding
from the door.
Fig. 1 Front Door Cladding
1 - CLADDING
WJEXTERIOR 23 - 25
Page 1906 of 2199
HOOD
TABLE OF CONTENTS
page page
GAS PROP
REMOVAL.............................33
INSTALLATION.........................33
HINGE
REMOVAL.............................33
INSTALLATION.........................33
HOOD
REMOVAL.............................33
INSTALLATION.........................34
ADJUSTMENTS
HOOD ADJUSTMENT..................34INSULATION
REMOVAL.............................34
INSTALLATION.........................34
LATCH
REMOVAL.............................34
INSTALLATION.........................34
LATCH RELEASE CABLE
REMOVAL.............................35
INSTALLATION.........................35
GAS PROP
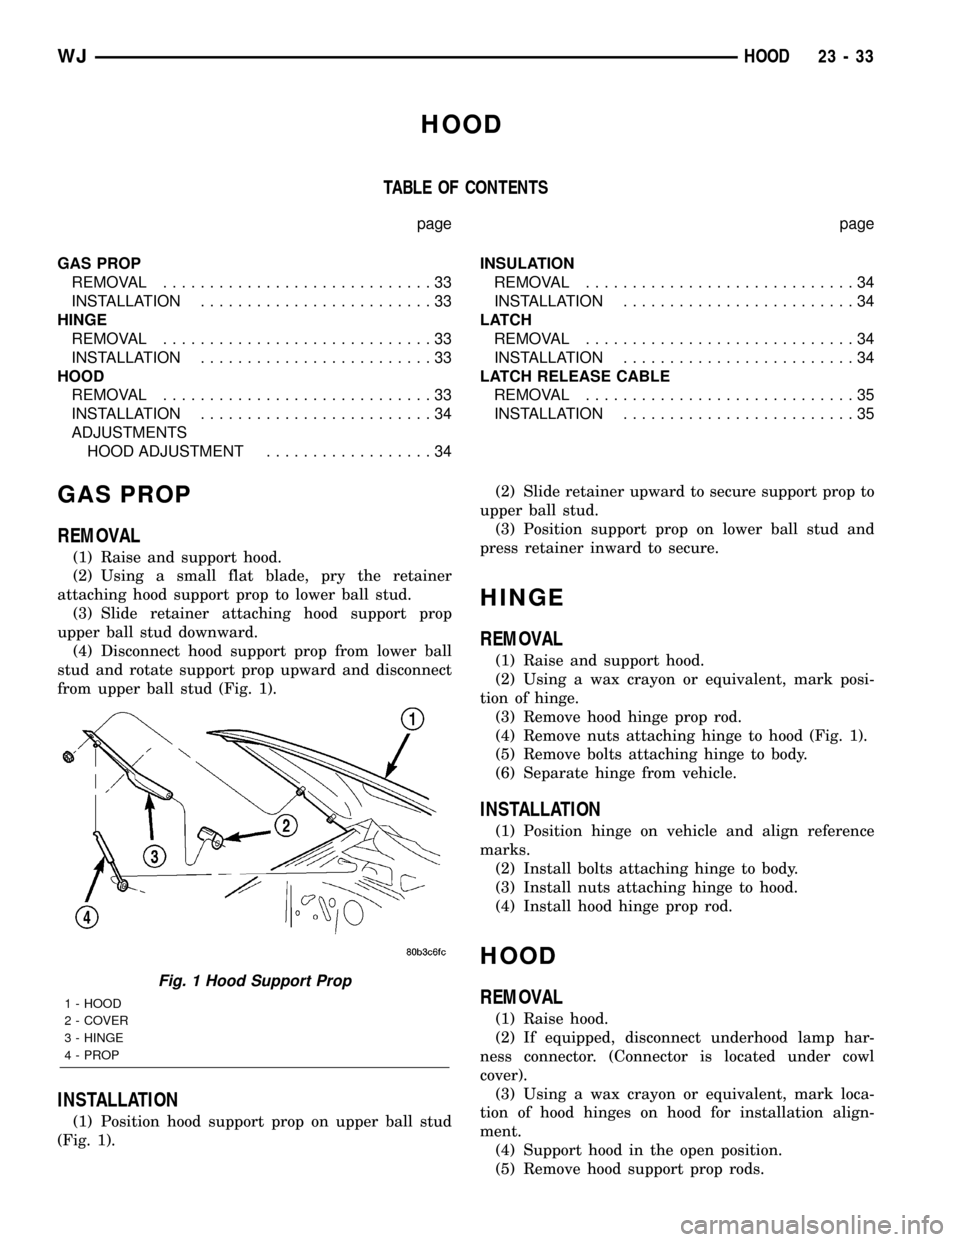
REMOVAL
(1) Raise and support hood.
(2) Using a small flat blade, pry the retainer
attaching hood support prop to lower ball stud.
(3) Slide retainer attaching hood support prop
upper ball stud downward.
(4) Disconnect hood support prop from lower ball
stud and rotate support prop upward and disconnect
from upper ball stud (Fig. 1).
INSTALLATION
(1) Position hood support prop on upper ball stud
(Fig. 1).(2) Slide retainer upward to secure support prop to
upper ball stud.
(3) Position support prop on lower ball stud and
press retainer inward to secure.
HINGE
REMOVAL
(1) Raise and support hood.
(2) Using a wax crayon or equivalent, mark posi-
tion of hinge.
(3) Remove hood hinge prop rod.
(4) Remove nuts attaching hinge to hood (Fig. 1).
(5) Remove bolts attaching hinge to body.
(6) Separate hinge from vehicle.
INSTALLATION
(1) Position hinge on vehicle and align reference
marks.
(2) Install bolts attaching hinge to body.
(3) Install nuts attaching hinge to hood.
(4) Install hood hinge prop rod.
HOOD
REMOVAL
(1) Raise hood.
(2) If equipped, disconnect underhood lamp har-
ness connector. (Connector is located under cowl
cover).
(3) Using a wax crayon or equivalent, mark loca-
tion of hood hinges on hood for installation align-
ment.
(4) Support hood in the open position.
(5) Remove hood support prop rods.
Fig. 1 Hood Support Prop
1 - HOOD
2 - COVER
3 - HINGE
4 - PROP
WJHOOD 23 - 33
Page 1909 of 2199
INSTRUMENT PANEL SYSTEM
TABLE OF CONTENTS
page page
INSTRUMENT PANEL SYSTEM
REMOVAL.............................37
INSTALLATION.........................43
CLUSTER BEZEL
REMOVAL.............................45
INSTALLATION.........................45
GLOVE BOX
STANDARD PROCEDURE - GLOVE BOX
ROLL DOWN.........................46
REMOVAL.............................47
INSTALLATION.........................47
GLOVE BOX LATCH
REMOVAL.............................48
INSTALLATION.........................48
GLOVE BOX LATCH STRIKER
REMOVAL.............................49
INSTALLATION.........................49
INSTRUMENT PANEL END CAP
REMOVAL.............................50
INSTALLATION.........................50
INSTRUMENT PANEL STUCTURAL DUCT
REMOVAL.............................51
INSTALLATION.........................51
INSTRUMENT PANEL TOP COVER
REMOVAL.............................51
INSTALLATION.........................52
INSTRUMENT PANEL TOP PAD
REMOVAL.............................52
INSTALLATION.........................54
INSTRUMENT PANEL C-CHANNEL COVER
BRACKET
REMOVAL.............................56
INSTALLATION.........................56
INSTRUMENT PANEL CENTER BEZEL -
LOWER
REMOVAL.............................57
INSTALLATION.........................57
INSTRUMENT PANEL CENTER BEZEL - UPPER
REMOVAL.............................58
INSTALLATION.........................58INSTRUMENT PANEL CENTER FLOOR
TUNNEL BRACKET
REMOVAL.............................58
INSTALLATION.........................59
INSTRUMENT PANEL COURTESY LAMP
BRACKET
REMOVAL.............................59
INSTALLATION.........................60
INSTRUMENT PANEL INTERMEDIATE
BRACKET
REMOVAL.............................60
INSTALLATION.........................61
INSTRUMENT PANEL LOWER RIGHT CENTER
BEZEL
REMOVAL.............................61
INSTALLATION.........................61
INSTRUMENT PANEL PLENUM BRACKET
REMOVAL.............................62
INSTALLATION.........................63
INSTRUMENT PANEL STEERING COLUMN
BRACKET
REMOVAL.............................63
INSTALLATION.........................63
INSTRUMENT PANEL STEERING COLUMN
SUPPORT BRACKET
REMOVAL.............................64
INSTALLATION.........................64
INSTRUMENT PANEL TRIM BEZEL - DRIVER
REMOVAL.............................65
INSTALLATION.........................65
INSTRUMENT PANEL TRIM BEZEL -
PASSENGER
REMOVAL.............................66
INSTALLATION.........................66
POWER OUTLET DOOR
REMOVAL.............................67
INSTALLATION.........................67
STEERING COLUMN OPENING COVER
REMOVAL.............................68
INSTALLATION.........................68
23 - 36 INSTRUMENT PANEL SYSTEMWJ
Page 1942 of 2199
INTERIOR
TABLE OF CONTENTS
page page
A-PILLAR TRIM
REMOVAL.............................69
INSTALLATION.........................69
ASSIST HANDLE
REMOVAL.............................70
INSTALLATION.........................70
B-PILLAR LOWER TRIM
REMOVAL.............................70
INSTALLATION.........................70
B-PILLAR UPPER TRIM
REMOVAL.............................71
INSTALLATION.........................71
CARPETS AND FLOOR MATS
REMOVAL
REMOVAL - FRONT CARPET............71
REMOVAL - CARGO AREA CARPET.......71
INSTALLATION
INSTALLATION - FRONT CARPET.........71
INSTALLATION - CARGO AREA CARPET . . . 72
COWL TRIM
REMOVAL.............................72
INSTALLATION.........................72
C-PILLAR TRIM
REMOVAL.............................72
INSTALLATION.........................72
DOOR SILL SCUFF PLATE
REMOVAL.............................74
INSTALLATION.........................74
DOOR SILL TRIM
REMOVAL.............................74INSTALLATION.........................74
D-PILLAR TRIM
REMOVAL.............................75
INSTALLATION.........................75
FLOOR CONSOLE
REMOVAL.............................76
INSTALLATION.........................76
HEADLINER
REMOVAL.............................77
INSTALLATION.........................77
LIFTGATE OPENING UPPER TRIM
REMOVAL.............................79
INSTALLATION.........................79
QUARTER TRIM PANEL
REMOVAL.............................79
INSTALLATION.........................79
REAR STORAGE BOX
REMOVAL.............................79
INSTALLATION.........................80
REAR VIEW MIRROR
REMOVAL.............................80
INSTALLATION
INSTALLATION.......................80
INSTALLATION - REARVIEW MIRROR
SUPPORT BRACKET...................80
SUN VISOR
REMOVAL.............................80
INSTALLATION.........................80
A-PILLAR TRIM
REMOVAL
The A-pillar trim is attached to the A-pillar with
spring clips.
(1) Grasp A-pillar trim and pull trim outward from
A-pillar (Fig. 1).
(2) Separate A-pillar trim from A-pillar.
INSTALLATION
(1) Position A-pillar trim on A-pillar and, starting
at the bottom, press into place (Fig. 1).
(2) Using a trim stick or other suitable tool, care-
fully cover the edge of the trim with weatherstrip.
Fig. 1 A-Pillar Trim
1 - A-PILLAR TRIM
2 - A-PILLAR
3 - SPRING CLIP
WJINTERIOR 23 - 69