Lift studs JEEP GRAND CHEROKEE 2003 WJ / 2.G Workshop Manual
[x] Cancel search | Manufacturer: JEEP, Model Year: 2003, Model line: GRAND CHEROKEE, Model: JEEP GRAND CHEROKEE 2003 WJ / 2.GPages: 2199, PDF Size: 76.01 MB
Page 214 of 2199
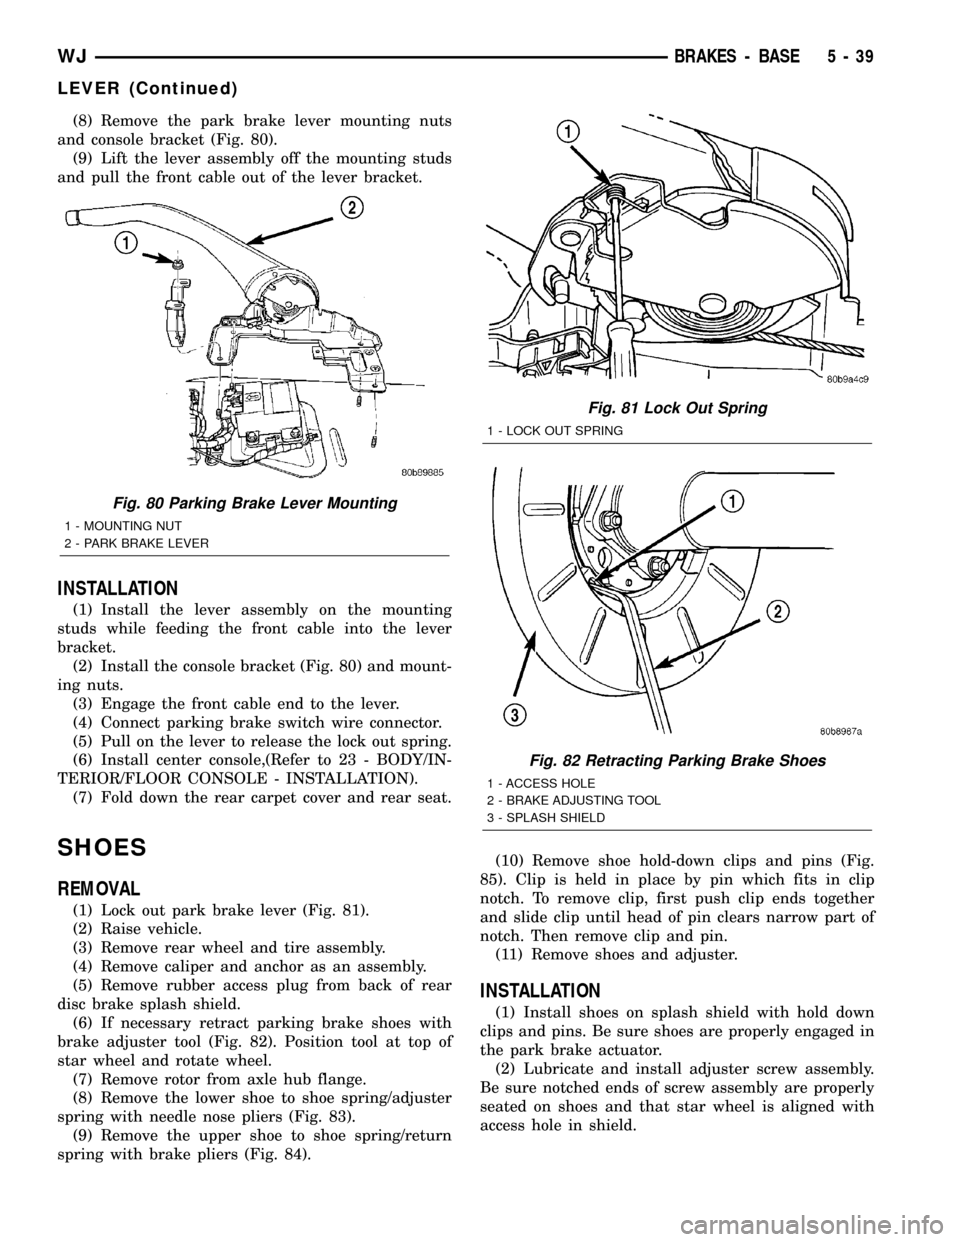
(8) Remove the park brake lever mounting nuts
and console bracket (Fig. 80).
(9) Lift the lever assembly off the mounting studs
and pull the front cable out of the lever bracket.
INSTALLATION
(1) Install the lever assembly on the mounting
studs while feeding the front cable into the lever
bracket.
(2) Install the console bracket (Fig. 80) and mount-
ing nuts.
(3) Engage the front cable end to the lever.
(4) Connect parking brake switch wire connector.
(5) Pull on the lever to release the lock out spring.
(6) Install center console,(Refer to 23 - BODY/IN-
TERIOR/FLOOR CONSOLE - INSTALLATION).
(7) Fold down the rear carpet cover and rear seat.
SHOES
REMOVAL
(1) Lock out park brake lever (Fig. 81).
(2) Raise vehicle.
(3) Remove rear wheel and tire assembly.
(4) Remove caliper and anchor as an assembly.
(5) Remove rubber access plug from back of rear
disc brake splash shield.
(6) If necessary retract parking brake shoes with
brake adjuster tool (Fig. 82). Position tool at top of
star wheel and rotate wheel.
(7) Remove rotor from axle hub flange.
(8) Remove the lower shoe to shoe spring/adjuster
spring with needle nose pliers (Fig. 83).
(9) Remove the upper shoe to shoe spring/return
spring with brake pliers (Fig. 84).(10) Remove shoe hold-down clips and pins (Fig.
85). Clip is held in place by pin which fits in clip
notch. To remove clip, first push clip ends together
and slide clip until head of pin clears narrow part of
notch. Then remove clip and pin.
(11) Remove shoes and adjuster.
INSTALLATION
(1) Install shoes on splash shield with hold down
clips and pins. Be sure shoes are properly engaged in
the park brake actuator.
(2) Lubricate and install adjuster screw assembly.
Be sure notched ends of screw assembly are properly
seated on shoes and that star wheel is aligned with
access hole in shield.
Fig. 80 Parking Brake Lever Mounting
1 - MOUNTING NUT
2 - PARK BRAKE LEVER
Fig. 81 Lock Out Spring
1 - LOCK OUT SPRING
Fig. 82 Retracting Parking Brake Shoes
1 - ACCESS HOLE
2 - BRAKE ADJUSTING TOOL
3 - SPLASH SHIELD
WJBRAKES - BASE 5 - 39
LEVER (Continued)
Page 285 of 2199
SPECIAL TOOLS
AUDIO SYSTEMS
AMPLIFIER
DESCRIPTION
Models equipped with the Infinity premium
speaker package have a separate power amplifier
unit. This power amplifier is rated at 180 watts out-
put. The power amplifier unit is mounted to the rear
floor panel under the passenger side rear seat cush-
ion. The power amplifier unit can be accessed for ser-
vice by unlatching and tilting the passenger side rear
seat cushion forward.
The power amplifier unit should be checked if
there is no sound output noted from the speakers.
For diagnosis of the power amplifier, (Refer to 8 -
ELECTRICAL/AUDIO/SPEAKER - DIAGNOSIS
AND TESTING). The power amplifier cannot be
repaired or adjusted and, if faulty or damaged, the
unit must be replaced.
OPERATION
The power amplifier is energized by a fused 12 volt
output from the radio receiver whenever the radio is
turned on. The power amplifier receives the sound
signal inputs for four speaker channels from the
radio receiver, then sends the amplified speaker out-
puts for each of those channels to the six Infinity
speakers. For complete circuit diagrams, refer to the
appropriate wiring information. The wiring informa-
tion includes wiring diagrams, proper wire and con-
nector repair procedures, details of wire harness
routing and retention, connector pin-out information
and location views for the various wire harness con-
nectors, splices and grounds.
DIAGNOSIS AND TESTING - AMPLIFIER
The power amplifier unit should be checked if
there is no sound output noted from the speakers.
For diagnosis of the power amplifier, (Refer to 8 -
ELECTRICAL/AUDIO/SPEAKER - DIAGNOSIS
AND TESTING). For complete circuit diagrams, refer
to the appropriate wiring information. The wiring
information includes wiring diagrams, proper wire
and connector repair procedures, details of wire har-
ness routing and retention, connector pin-out infor-
mation and location views for the various wire
harness connectors, splices and grounds.
REMOVAL
(1) Disconnect and isolate the battery negative
cable.
(2) Unlatch and lift the right rear seat cushion to
the upright position.
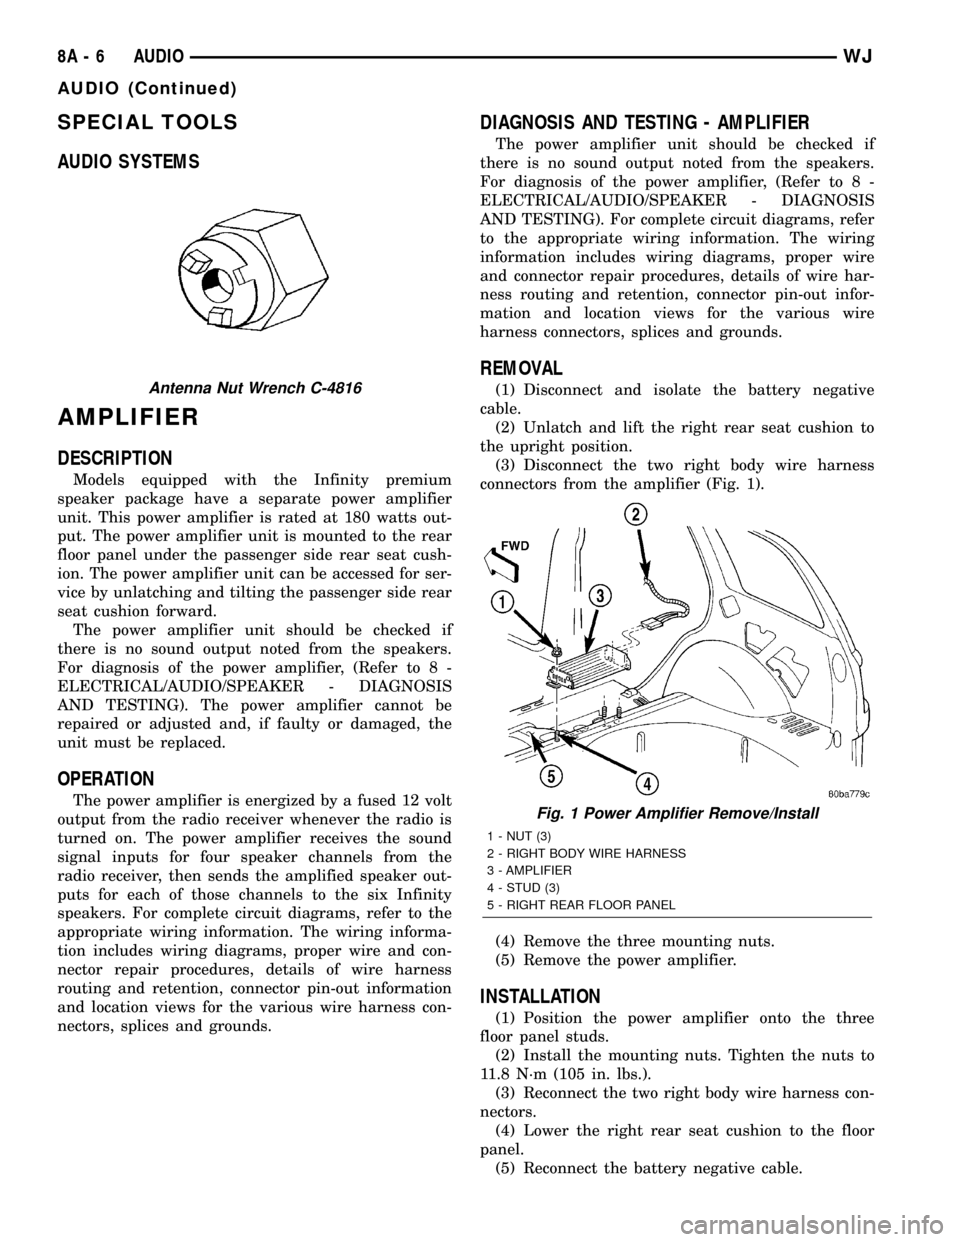
(3) Disconnect the two right body wire harness
connectors from the amplifier (Fig. 1).
(4) Remove the three mounting nuts.
(5) Remove the power amplifier.
INSTALLATION
(1) Position the power amplifier onto the three
floor panel studs.
(2) Install the mounting nuts. Tighten the nuts to
11.8 N´m (105 in. lbs.).
(3) Reconnect the two right body wire harness con-
nectors.
(4) Lower the right rear seat cushion to the floor
panel.
(5) Reconnect the battery negative cable.
Antenna Nut Wrench C-4816
Fig. 1 Power Amplifier Remove/Install
1 - NUT (3)
2 - RIGHT BODY WIRE HARNESS
3 - AMPLIFIER
4 - STUD (3)
5 - RIGHT REAR FLOOR PANEL
8A - 6 AUDIOWJ
AUDIO (Continued)
Page 293 of 2199
panel. Disconnect the 10 pin cable connector from the
radio receiver. Check for continuity between the
audio ground (Z4) circuit cavity of the right body
wire harness connector for the CD changer and a
good ground. There should be no continuity. If OK, go
to Step 3. If not OK, repair the shorted audio ground
(Z4) circuit as required.
(3) Check for continuity between the audio ground
(Z4) circuit cavity of the right body wire harness con-
nector for the CD changer and the audio ground (Z4)
circuit pin of the 10 pin cable connector for the radio
receiver. There should be continuity. If OK, go to
Step 4. If not OK, repair the open audio ground (Z4)
circuit as required.
(4) Check for continuity between the audio out
right circuit cavity of the right body wire harness
connector for the CD changer and a good ground.
There should be no continuity. If OK, go to Step 5. If
not OK, repair the shorted audio out right circuit as
required.
(5) Check for continuity between the audio out
right circuit cavity of the right body wire harness
connector for the CD changer and the audio out right
circuit pin of the 10 pin cable connector for the radio
receiver. There should be continuity. If OK, go to
Step 6. If not OK, repair the open audio out right cir-
cuit as required.
(6) Check for continuity between the audio out left
circuit cavity of the right body wire harness connec-
tor for the CD changer and a good ground. There
should be no continuity. If OK, go to Step 7. If not
OK, repair the shorted audio out left circuit as
required.
(7) Check for continuity between the audio out left
circuit cavity of the right body wire harness connec-
tor for the CD changer and the audio out left circuit
pin of the 10 pin cable connector for the radio
receiver. There should be continuity. If OK, replace
the faulty CD changer. If not OK, repair the open
audio out left circuit as required.
REMOVAL
(1) Disconnect and isolate the battery negative
cable.
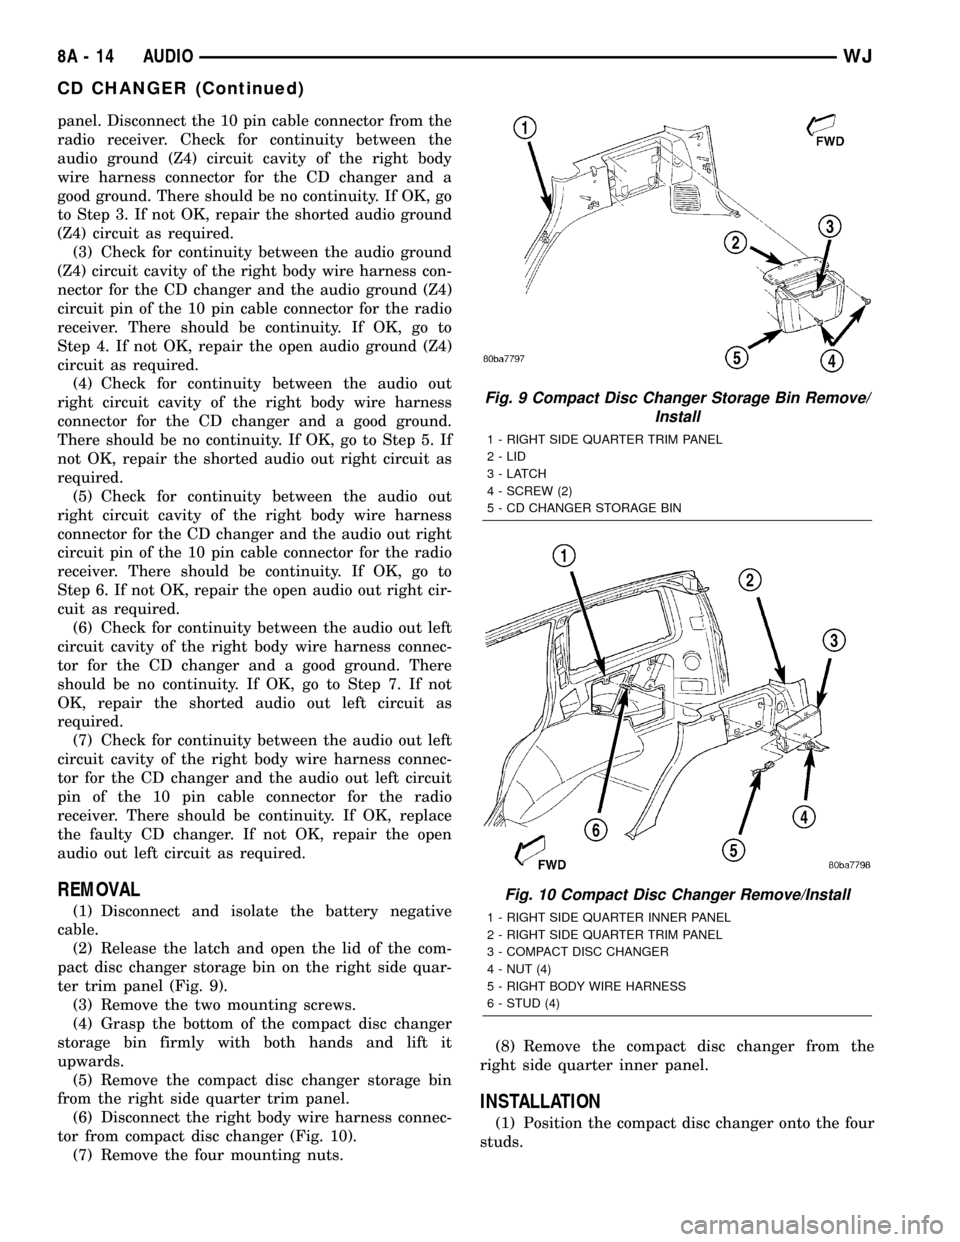
(2) Release the latch and open the lid of the com-
pact disc changer storage bin on the right side quar-
ter trim panel (Fig. 9).
(3) Remove the two mounting screws.
(4) Grasp the bottom of the compact disc changer
storage bin firmly with both hands and lift it
upwards.
(5) Remove the compact disc changer storage bin
from the right side quarter trim panel.
(6) Disconnect the right body wire harness connec-
tor from compact disc changer (Fig. 10).
(7) Remove the four mounting nuts.(8) Remove the compact disc changer from the
right side quarter inner panel.
INSTALLATION
(1) Position the compact disc changer onto the four
studs.
Fig. 9 Compact Disc Changer Storage Bin Remove/
Install
1 - RIGHT SIDE QUARTER TRIM PANEL
2 - LID
3-LATCH
4 - SCREW (2)
5 - CD CHANGER STORAGE BIN
Fig. 10 Compact Disc Changer Remove/Install
1 - RIGHT SIDE QUARTER INNER PANEL
2 - RIGHT SIDE QUARTER TRIM PANEL
3 - COMPACT DISC CHANGER
4 - NUT (4)
5 - RIGHT BODY WIRE HARNESS
6 - STUD (4)
8A - 14 AUDIOWJ
CD CHANGER (Continued)
Page 617 of 2199
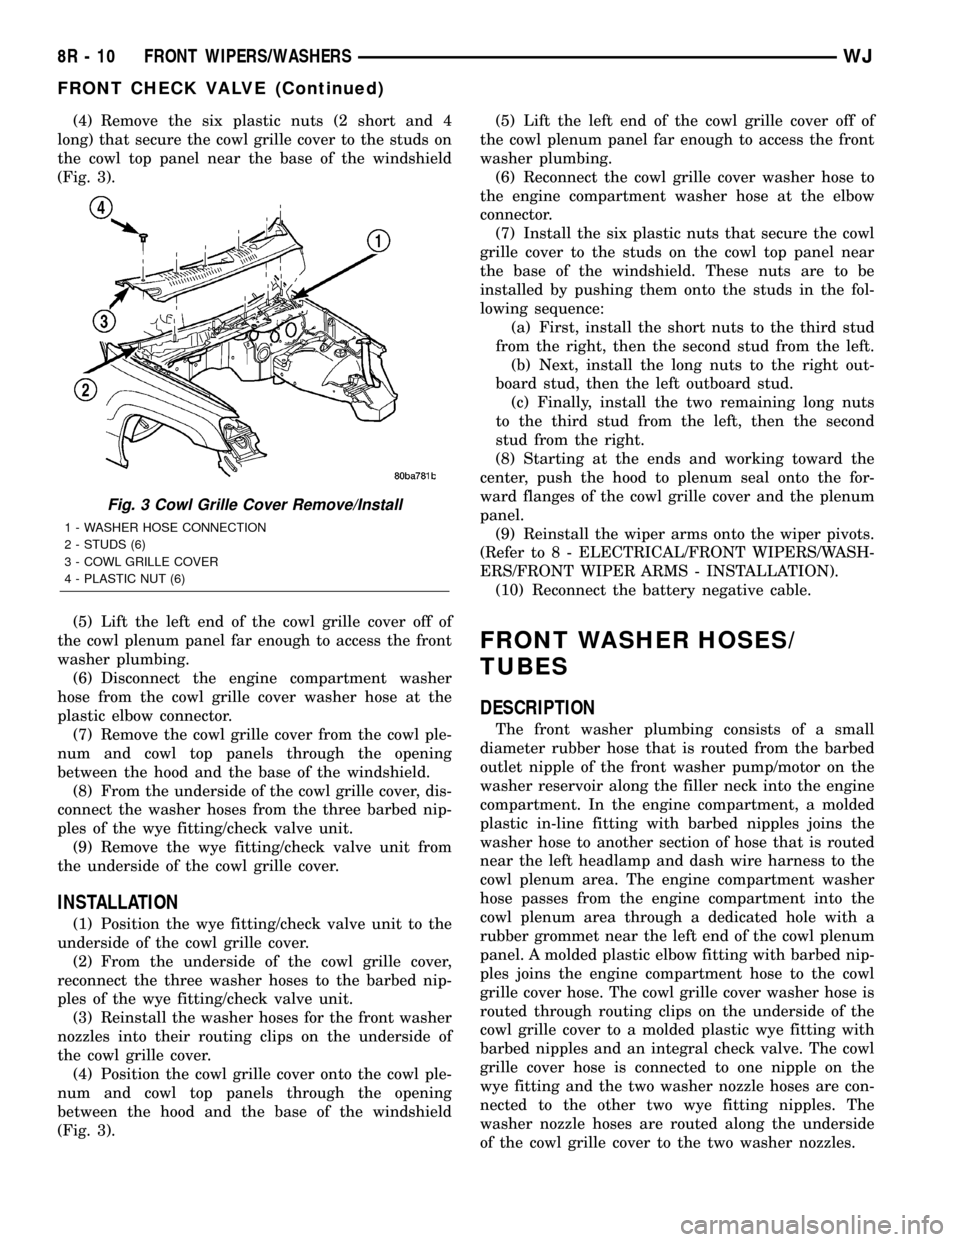
(4) Remove the six plastic nuts (2 short and 4
long) that secure the cowl grille cover to the studs on
the cowl top panel near the base of the windshield
(Fig. 3).
(5) Lift the left end of the cowl grille cover off of
the cowl plenum panel far enough to access the front
washer plumbing.
(6) Disconnect the engine compartment washer
hose from the cowl grille cover washer hose at the
plastic elbow connector.
(7) Remove the cowl grille cover from the cowl ple-
num and cowl top panels through the opening
between the hood and the base of the windshield.
(8) From the underside of the cowl grille cover, dis-
connect the washer hoses from the three barbed nip-
ples of the wye fitting/check valve unit.
(9) Remove the wye fitting/check valve unit from
the underside of the cowl grille cover.
INSTALLATION
(1) Position the wye fitting/check valve unit to the
underside of the cowl grille cover.
(2) From the underside of the cowl grille cover,
reconnect the three washer hoses to the barbed nip-
ples of the wye fitting/check valve unit.
(3) Reinstall the washer hoses for the front washer
nozzles into their routing clips on the underside of
the cowl grille cover.
(4) Position the cowl grille cover onto the cowl ple-
num and cowl top panels through the opening
between the hood and the base of the windshield
(Fig. 3).(5) Lift the left end of the cowl grille cover off of
the cowl plenum panel far enough to access the front
washer plumbing.
(6) Reconnect the cowl grille cover washer hose to
the engine compartment washer hose at the elbow
connector.
(7) Install the six plastic nuts that secure the cowl
grille cover to the studs on the cowl top panel near
the base of the windshield. These nuts are to be
installed by pushing them onto the studs in the fol-
lowing sequence:
(a) First, install the short nuts to the third stud
from the right, then the second stud from the left.
(b) Next, install the long nuts to the right out-
board stud, then the left outboard stud.
(c) Finally, install the two remaining long nuts
to the third stud from the left, then the second
stud from the right.
(8) Starting at the ends and working toward the
center, push the hood to plenum seal onto the for-
ward flanges of the cowl grille cover and the plenum
panel.
(9) Reinstall the wiper arms onto the wiper pivots.
(Refer to 8 - ELECTRICAL/FRONT WIPERS/WASH-
ERS/FRONT WIPER ARMS - INSTALLATION).
(10) Reconnect the battery negative cable.
FRONT WASHER HOSES/
TUBES
DESCRIPTION
The front washer plumbing consists of a small
diameter rubber hose that is routed from the barbed
outlet nipple of the front washer pump/motor on the
washer reservoir along the filler neck into the engine
compartment. In the engine compartment, a molded
plastic in-line fitting with barbed nipples joins the
washer hose to another section of hose that is routed
near the left headlamp and dash wire harness to the
cowl plenum area. The engine compartment washer
hose passes from the engine compartment into the
cowl plenum area through a dedicated hole with a
rubber grommet near the left end of the cowl plenum
panel. A molded plastic elbow fitting with barbed nip-
ples joins the engine compartment hose to the cowl
grille cover hose. The cowl grille cover washer hose is
routed through routing clips on the underside of the
cowl grille cover to a molded plastic wye fitting with
barbed nipples and an integral check valve. The cowl
grille cover hose is connected to one nipple on the
wye fitting and the two washer nozzle hoses are con-
nected to the other two wye fitting nipples. The
washer nozzle hoses are routed along the underside
of the cowl grille cover to the two washer nozzles.
Fig. 3 Cowl Grille Cover Remove/Install
1 - WASHER HOSE CONNECTION
2 - STUDS (6)
3 - COWL GRILLE COVER
4 - PLASTIC NUT (6)
8R - 10 FRONT WIPERS/WASHERSWJ
FRONT CHECK VALVE (Continued)
Page 618 of 2199
Washer hose is available for service only as roll
stock, which must then be cut to length. The molded
plastic washer hose fittings cannot be repaired. If
these fittings are faulty or damaged, they must be
replaced.
OPERATION
Washer fluid in the washer reservoir is pressurized
and fed by the front washer pump/motor through the
front washer system plumbing and fittings to the two
front washer nozzles. Whenever routing the washer
hose or a wire harness containing a washer hose, it
must be routed away from hot, sharp, or moving
parts; and, sharp bends that might pinch the hose
must be avoided.
FRONT WASHER NOZZLE
DESCRIPTION
The two front washer nozzles have integral snap
features that secure them in dedicated holes in the
cowl plenum cover/grille panel located near the base
of the windshield. The domed upper surface of the
washer nozzle is visible on the top of the plenum cov-
er/grille panel, and the nozzle orifice is oriented
towards the windshield glass. The washer plumbing
fittings for the washer nozzles are concealed beneath
the cowl plenum cover/grille panel. These fluidic
washer nozzles are constructed of molded plastic. The
cowl plenum cover/grille panel must be removed from
the vehicle to access the nozzles for service. The
washer nozzles cannot be adjusted or repaired. If
faulty or damaged, they must be replaced.
OPERATION
The two front washer nozzles are designed to dis-
pense washer fluid into the wiper pattern area on the
outside of the windshield glass. Pressurized washer
fluid is fed to each nozzle from the washer reservoir
by the front washer pump/motor through a single
hose, which is attached to a barbed nipple on each
front washer nozzle below the cowl plenum cover/
grille panel. The washer nozzles incorporate a fluidic
design, which causes the nozzle to emit the pressur-
ized washer fluid as an oscillating stream to more
effectively cover a larger area of the glass area to be
cleaned.
REMOVAL
(1) Disconnect and isolate the battery negative
cable.
(2) Remove the wiper arms from the wiper pivots.
(Refer to 8 - ELECTRICAL/FRONT WIPERS/WASH-
ERS/FRONT WIPER ARMS - REMOVAL).
(3) Unlatch and open the hood.(4) Pull the hood to plenum seal off of the forward
flanges of the cowl grille cover and the plenum panel.
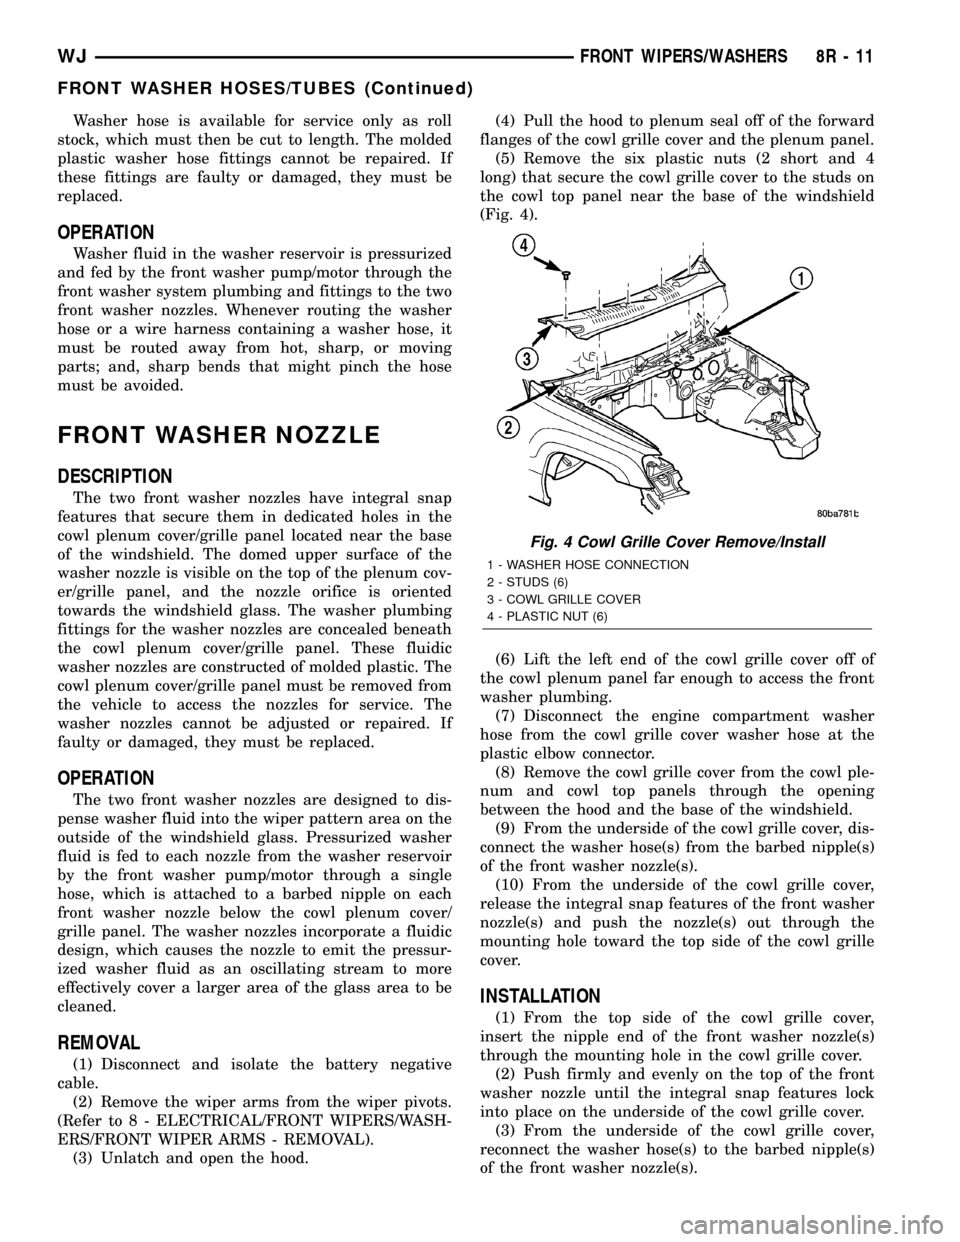
(5) Remove the six plastic nuts (2 short and 4
long) that secure the cowl grille cover to the studs on
the cowl top panel near the base of the windshield
(Fig. 4).
(6) Lift the left end of the cowl grille cover off of
the cowl plenum panel far enough to access the front
washer plumbing.
(7) Disconnect the engine compartment washer
hose from the cowl grille cover washer hose at the
plastic elbow connector.
(8) Remove the cowl grille cover from the cowl ple-
num and cowl top panels through the opening
between the hood and the base of the windshield.
(9) From the underside of the cowl grille cover, dis-
connect the washer hose(s) from the barbed nipple(s)
of the front washer nozzle(s).
(10) From the underside of the cowl grille cover,
release the integral snap features of the front washer
nozzle(s) and push the nozzle(s) out through the
mounting hole toward the top side of the cowl grille
cover.
INSTALLATION
(1) From the top side of the cowl grille cover,
insert the nipple end of the front washer nozzle(s)
through the mounting hole in the cowl grille cover.
(2) Push firmly and evenly on the top of the front
washer nozzle until the integral snap features lock
into place on the underside of the cowl grille cover.
(3) From the underside of the cowl grille cover,
reconnect the washer hose(s) to the barbed nipple(s)
of the front washer nozzle(s).
Fig. 4 Cowl Grille Cover Remove/Install
1 - WASHER HOSE CONNECTION
2 - STUDS (6)
3 - COWL GRILLE COVER
4 - PLASTIC NUT (6)
WJFRONT WIPERS/WASHERS 8R - 11
FRONT WASHER HOSES/TUBES (Continued)
Page 619 of 2199
(4) Reinstall the washer hoses for the front washer
nozzle(s) into their routing clips on the underside of
the cowl grille cover.
(5) Position the cowl grille cover onto the cowl ple-
num and cowl top panels through the opening
between the hood and the base of the windshield
(Fig. 4).
(6) Lift the left end of the cowl grille cover off of
the cowl plenum panel far enough to access the front
washer plumbing.
(7) Reconnect the cowl grille cover washer hose to
the engine compartment washer hose at the elbow
connector.
(8) Install the six plastic nuts that secure the cowl
grille cover to the studs on the cowl top panel near
the base of the windshield. These nuts are to be
installed by pushing them onto the studs in the fol-
lowing sequence:
(a) First, install the short nuts to the third stud
from the right, then the second stud from the left.
(b) Next, install the long nuts to the right out-
board stud, then the left outboard stud.
(c) Finally, install the two remaining long nuts
to the third stud from the left, then the second
stud from the right.
(9) Starting at the ends and working toward the
center, push the hood to plenum seal onto the for-
ward flanges of the cowl grille cover and the plenum
panel.
(10) Close and latch the hood.
(11) Reinstall the wiper arms onto the wiper piv-
ots. (Refer to 8 - ELECTRICAL/FRONT WIPERS/
WASHERS/FRONT WIPER ARMS -
INSTALLATION).
(12) Reconnect the battery negative cable.
FRONT WASHER PUMP/
MOTOR
DESCRIPTION
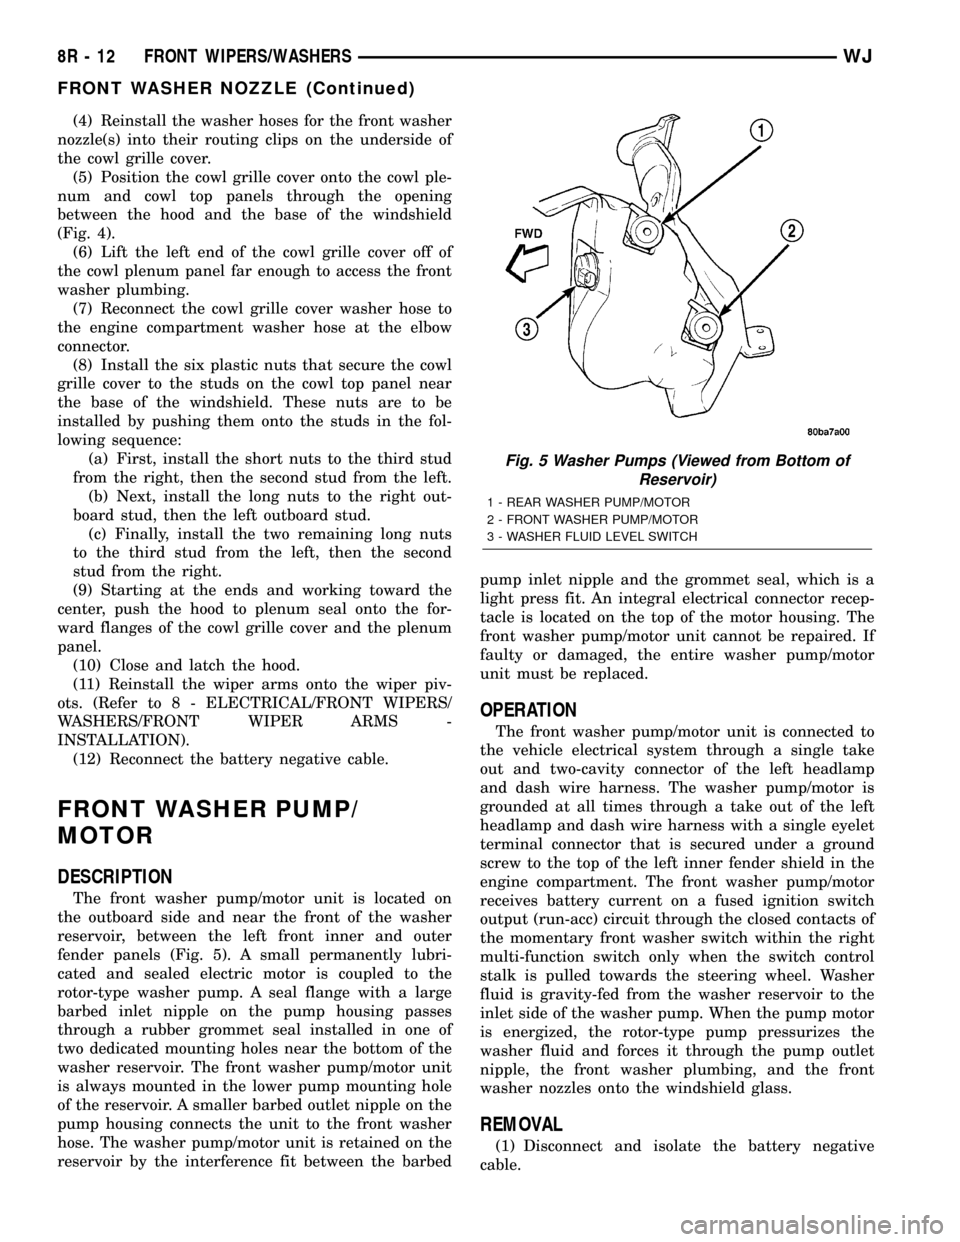
The front washer pump/motor unit is located on
the outboard side and near the front of the washer
reservoir, between the left front inner and outer
fender panels (Fig. 5). A small permanently lubri-
cated and sealed electric motor is coupled to the
rotor-type washer pump. A seal flange with a large
barbed inlet nipple on the pump housing passes
through a rubber grommet seal installed in one of
two dedicated mounting holes near the bottom of the
washer reservoir. The front washer pump/motor unit
is always mounted in the lower pump mounting hole
of the reservoir. A smaller barbed outlet nipple on the
pump housing connects the unit to the front washer
hose. The washer pump/motor unit is retained on the
reservoir by the interference fit between the barbedpump inlet nipple and the grommet seal, which is a
light press fit. An integral electrical connector recep-
tacle is located on the top of the motor housing. The
front washer pump/motor unit cannot be repaired. If
faulty or damaged, the entire washer pump/motor
unit must be replaced.
OPERATION
The front washer pump/motor unit is connected to
the vehicle electrical system through a single take
out and two-cavity connector of the left headlamp
and dash wire harness. The washer pump/motor is
grounded at all times through a take out of the left
headlamp and dash wire harness with a single eyelet
terminal connector that is secured under a ground
screw to the top of the left inner fender shield in the
engine compartment. The front washer pump/motor
receives battery current on a fused ignition switch
output (run-acc) circuit through the closed contacts of
the momentary front washer switch within the right
multi-function switch only when the switch control
stalk is pulled towards the steering wheel. Washer
fluid is gravity-fed from the washer reservoir to the
inlet side of the washer pump. When the pump motor
is energized, the rotor-type pump pressurizes the
washer fluid and forces it through the pump outlet
nipple, the front washer plumbing, and the front
washer nozzles onto the windshield glass.
REMOVAL
(1) Disconnect and isolate the battery negative
cable.
Fig. 5 Washer Pumps (Viewed from Bottom of
Reservoir)
1 - REAR WASHER PUMP/MOTOR
2 - FRONT WASHER PUMP/MOTOR
3 - WASHER FLUID LEVEL SWITCH
8R - 12 FRONT WIPERS/WASHERSWJ
FRONT WASHER NOZZLE (Continued)
Page 624 of 2199
crank arm, the two wiper linkage members, and the
two wiper pivots mechanically convert the rotary out-
put of the wiper motor to the back and forth wiping
motion of the wiper arms and blades on the glass.
REMOVAL
(1) Disconnect and isolate the battery negative
cable.
(2) Remove the front wiper arms from the wiper
pivots. (Refer to 8 - ELECTRICAL/FRONT WIPERS/
WASHERS/FRONT WIPER ARMS - REMOVAL).
(3) Unlatch and open the hood.
(4) Remove the hood to plenum seal from the for-
ward flanges of the cowl grille cover and the plenum
panel.
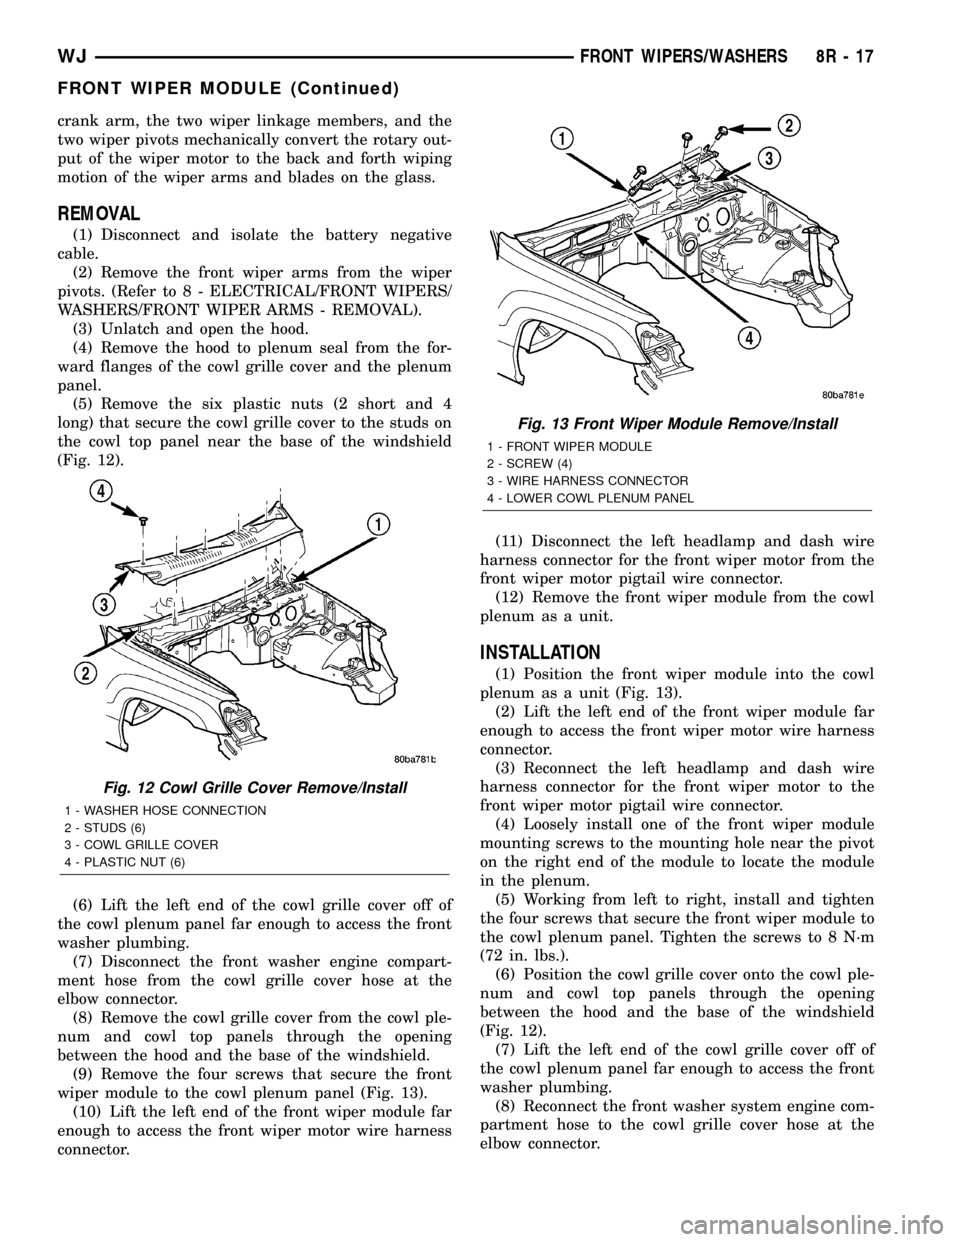
(5) Remove the six plastic nuts (2 short and 4
long) that secure the cowl grille cover to the studs on
the cowl top panel near the base of the windshield
(Fig. 12).
(6) Lift the left end of the cowl grille cover off of
the cowl plenum panel far enough to access the front
washer plumbing.
(7) Disconnect the front washer engine compart-
ment hose from the cowl grille cover hose at the
elbow connector.
(8) Remove the cowl grille cover from the cowl ple-
num and cowl top panels through the opening
between the hood and the base of the windshield.
(9) Remove the four screws that secure the front
wiper module to the cowl plenum panel (Fig. 13).
(10) Lift the left end of the front wiper module far
enough to access the front wiper motor wire harness
connector.(11) Disconnect the left headlamp and dash wire
harness connector for the front wiper motor from the
front wiper motor pigtail wire connector.
(12) Remove the front wiper module from the cowl
plenum as a unit.
INSTALLATION
(1) Position the front wiper module into the cowl
plenum as a unit (Fig. 13).
(2) Lift the left end of the front wiper module far
enough to access the front wiper motor wire harness
connector.
(3) Reconnect the left headlamp and dash wire
harness connector for the front wiper motor to the
front wiper motor pigtail wire connector.
(4) Loosely install one of the front wiper module
mounting screws to the mounting hole near the pivot
on the right end of the module to locate the module
in the plenum.
(5) Working from left to right, install and tighten
the four screws that secure the front wiper module to
the cowl plenum panel. Tighten the screws to 8 N´m
(72 in. lbs.).
(6) Position the cowl grille cover onto the cowl ple-
num and cowl top panels through the opening
between the hood and the base of the windshield
(Fig. 12).
(7) Lift the left end of the cowl grille cover off of
the cowl plenum panel far enough to access the front
washer plumbing.
(8) Reconnect the front washer system engine com-
partment hose to the cowl grille cover hose at the
elbow connector.
Fig. 12 Cowl Grille Cover Remove/Install
1 - WASHER HOSE CONNECTION
2 - STUDS (6)
3 - COWL GRILLE COVER
4 - PLASTIC NUT (6)
Fig. 13 Front Wiper Module Remove/Install
1 - FRONT WIPER MODULE
2 - SCREW (4)
3 - WIRE HARNESS CONNECTOR
4 - LOWER COWL PLENUM PANEL
WJFRONT WIPERS/WASHERS 8R - 17
FRONT WIPER MODULE (Continued)
Page 1315 of 2199

(13) Disconnect the engine block heater power
cable from the block heater.
(14) Lower vehicle.
(15) Remove throttle body resonator assembly and
inlet hose.
(16) Disconnect throttle and speed control cables.
(17) Disconnect tube from both the left and right
side crankcase breathers, then remove the breathers
(Fig. 5).
(18) Discharge A/C system (Refer to 24 - HEAT-
ING & AIR CONDITIONING/PLUMBING - STAN-
DARD PROCEDURE).(19) Remove radiator fan (Refer to 7 - COOLING/
ENGINE/RADIATOR FAN - REMOVAL) and acces-
sory drive belt (Refer to 7 - COOLING/ACCESSORY
DRIVE/DRIVE BELTS - REMOVAL).
(20) Remove A/C compressor (Refer to 24 - HEAT-
ING & AIR CONDITIONING/PLUMBING/A/C COM-
PRESSOR - REMOVAL).
(21) Disconnect transmission oil cooler lines at the
radiator.
(22) Disconnect radiator lower hose at the thermo-
stat housing.
(23) Remove A/C condenser (Refer to 24 - HEAT-
ING & AIR CONDITIONING/PLUMBING/A/C CON-
DENSER - REMOVAL).
(24) Remove radiator (Refer to 7 - COOLING/EN-
GINE/RADIATOR - REMOVAL).
(25) Remove generator (Refer to 8 - ELECTRICAL/
CHARGING/GENERATOR - REMOVAL).
(26) Disconnect the two heater hoses from the tim-
ing chain cover.
(27) Disconnect engine harness at the following
points :
²Intake air temperature (IAT) sensor (Fig. 6)
²Fuel Injectors
²Throttle Position (TPS) Switch
²Idle Air Control (IAC) Motor
²Engine Oil Pressure Switch
²Engine Coolant Temperature (ECT) Sensor
²Manifold absolute pressure (MAP) Sensor
²Camshaft Position (CMP) Sensor
²Coil Over Plugs
(28) Release fuel rail pressure (Refer to 14 - FUEL
SYSTEM/FUEL DELIVERY - STANDARD PROCE-
DURE) then disconnect the fuel supply quick connect
fitting at the fuel rail (Refer to 14 - FUEL SYSTEM/
FUEL DELIVERY/QUICK CONNECT FITTING -
STANDARD PROCEDURE).
(29) Remove power steering pump and position out
of the way.
(30) Disconnect ground straps from the left side of
the engine.
(31) Install Engine Lifting Fixture Special Tool
8347 (Fig. 7)following these steps.
²Holding the lifting fixture at a slight angle, slide
the large bore in the front plate over the hex portion
of the lifting stud.
²Position the two remaining fixture arms onto
the two lifting studs in the cylinder heads.
²Pull foward and upward on the lifting fixture so
that the lifting stud rest in the slotted area below the
large bore.
²Secure the lifting fixture to the three studs
using three 7/16 ± 14 N/C locknuts.
²Make sure the lifting loop in the lifting fixture is
in the last hole (closest to the throttle body) to min-
imize the angle of engine during removal.
Fig. 4 Crankshaft Position Sensor
1 - CRANKSHAFT POSITION SENSOR
2 - CYLINDER HEAD COVER
3 - CAMSHAFT POSITION SENSOR
4 - RIGHT SIDE CYLINDER BLOCK
Fig. 5 Crankcase Breather Connection Points
1 - CRANKCASE BREATHERS
9 - 72 ENGINE - 4.7LWJ
ENGINE - 4.7L (Continued)
Page 1323 of 2199
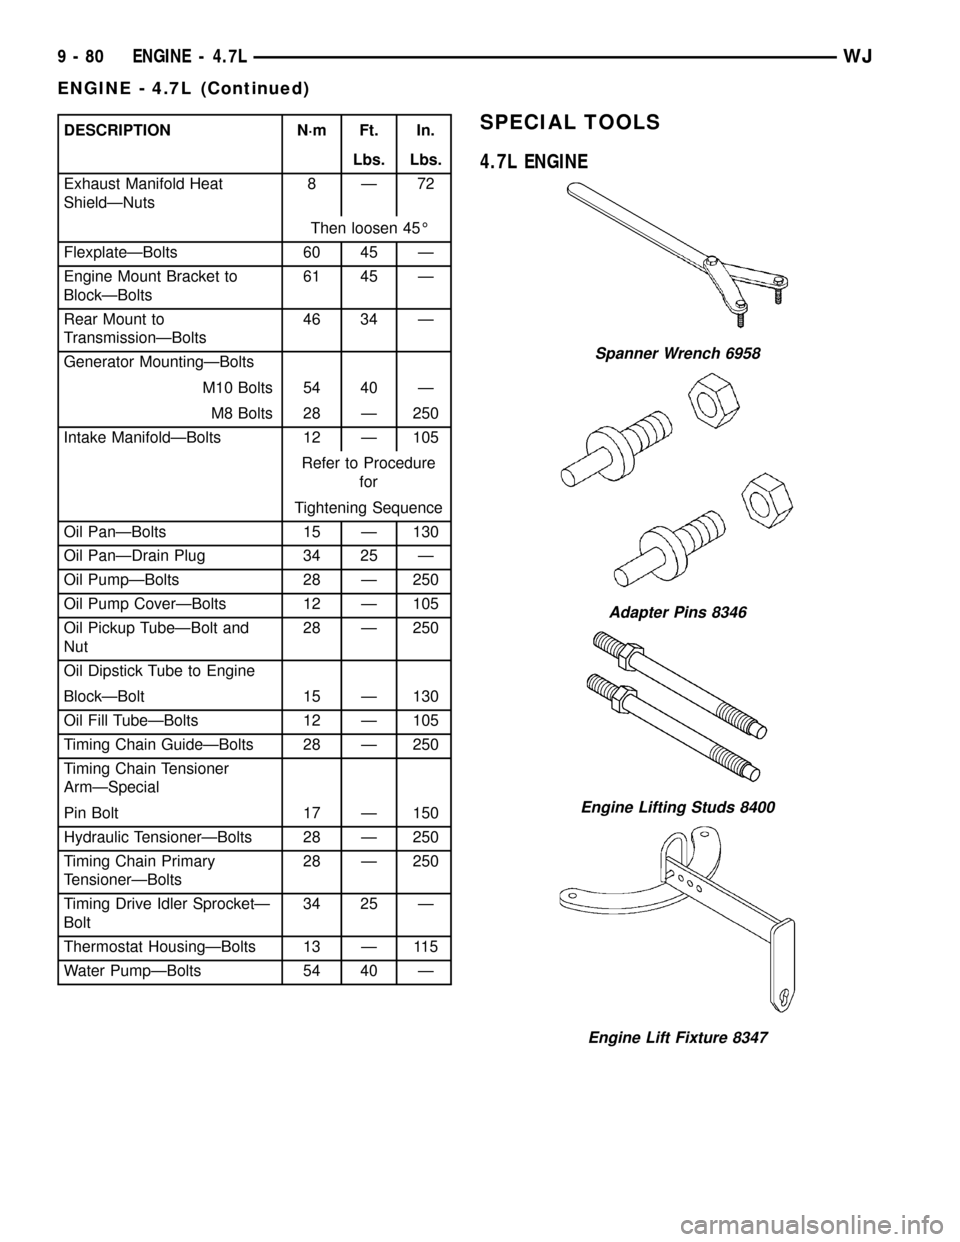
DESCRIPTION N´m Ft. In.
Lbs. Lbs.
Exhaust Manifold Heat
ShieldÐNuts8Ð72
Then loosen 45É
FlexplateÐBolts 60 45 Ð
Engine Mount Bracket to
BlockÐBolts61 45 Ð
Rear Mount to
TransmissionÐBolts46 34 Ð
Generator MountingÐBolts
M10 Bolts 54 40 Ð
M8 Bolts 28 Ð 250
Intake ManifoldÐBolts 12 Ð 105
Refer to Procedure
for
Tightening Sequence
Oil PanÐBolts 15 Ð 130
Oil PanÐDrain Plug 34 25 Ð
Oil PumpÐBolts 28 Ð 250
Oil Pump CoverÐBolts 12 Ð 105
Oil Pickup TubeÐBolt and
Nut28 Ð 250
Oil Dipstick Tube to Engine
BlockÐBolt 15 Ð 130
Oil Fill TubeÐBolts 12 Ð 105
Timing Chain GuideÐBolts 28 Ð 250
Timing Chain Tensioner
ArmÐSpecial
Pin Bolt 17 Ð 150
Hydraulic TensionerÐBolts 28 Ð 250
Timing Chain Primary
TensionerÐBolts28 Ð 250
Timing Drive Idler SprocketÐ
Bolt34 25 Ð
Thermostat HousingÐBolts 13 Ð 115
Water PumpÐBolts 54 40 ÐSPECIAL TOOLS
4.7L ENGINE
Spanner Wrench 6958
Adapter Pins 8346
Engine Lifting Studs 8400
Engine Lift Fixture 8347
9 - 80 ENGINE - 4.7LWJ
ENGINE - 4.7L (Continued)
Page 1488 of 2199
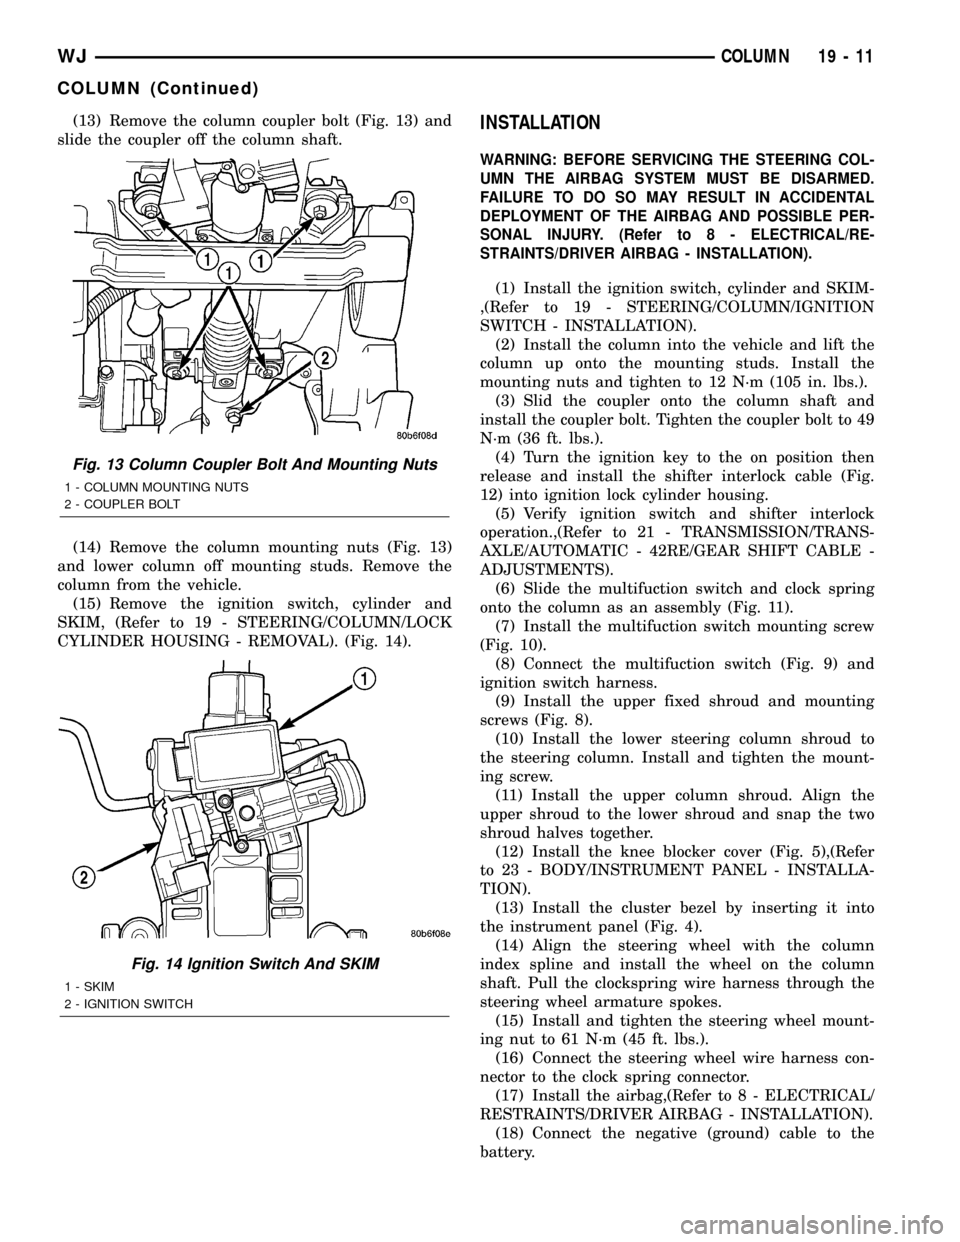
(13) Remove the column coupler bolt (Fig. 13) and
slide the coupler off the column shaft.
(14) Remove the column mounting nuts (Fig. 13)
and lower column off mounting studs. Remove the
column from the vehicle.
(15) Remove the ignition switch, cylinder and
SKIM, (Refer to 19 - STEERING/COLUMN/LOCK
CYLINDER HOUSING - REMOVAL). (Fig. 14).INSTALLATION
WARNING: BEFORE SERVICING THE STEERING COL-
UMN THE AIRBAG SYSTEM MUST BE DISARMED.
FAILURE TO DO SO MAY RESULT IN ACCIDENTAL
DEPLOYMENT OF THE AIRBAG AND POSSIBLE PER-
SONAL INJURY. (Refer to 8 - ELECTRICAL/RE-
STRAINTS/DRIVER AIRBAG - INSTALLATION).
(1) Install the ignition switch, cylinder and SKIM-
,(Refer to 19 - STEERING/COLUMN/IGNITION
SWITCH - INSTALLATION).
(2) Install the column into the vehicle and lift the
column up onto the mounting studs. Install the
mounting nuts and tighten to 12 N´m (105 in. lbs.).
(3) Slid the coupler onto the column shaft and
install the coupler bolt. Tighten the coupler bolt to 49
N´m (36 ft. lbs.).
(4) Turn the ignition key to the on position then
release and install the shifter interlock cable (Fig.
12) into ignition lock cylinder housing.
(5) Verify ignition switch and shifter interlock
operation.,(Refer to 21 - TRANSMISSION/TRANS-
AXLE/AUTOMATIC - 42RE/GEAR SHIFT CABLE -
ADJUSTMENTS).
(6) Slide the multifuction switch and clock spring
onto the column as an assembly (Fig. 11).
(7) Install the multifuction switch mounting screw
(Fig. 10).
(8) Connect the multifuction switch (Fig. 9) and
ignition switch harness.
(9) Install the upper fixed shroud and mounting
screws (Fig. 8).
(10) Install the lower steering column shroud to
the steering column. Install and tighten the mount-
ing screw.
(11) Install the upper column shroud. Align the
upper shroud to the lower shroud and snap the two
shroud halves together.
(12) Install the knee blocker cover (Fig. 5),(Refer
to 23 - BODY/INSTRUMENT PANEL - INSTALLA-
TION).
(13) Install the cluster bezel by inserting it into
the instrument panel (Fig. 4).
(14) Align the steering wheel with the column
index spline and install the wheel on the column
shaft. Pull the clockspring wire harness through the
steering wheel armature spokes.
(15) Install and tighten the steering wheel mount-
ing nut to 61 N´m (45 ft. lbs.).
(16) Connect the steering wheel wire harness con-
nector to the clock spring connector.
(17) Install the airbag,(Refer to 8 - ELECTRICAL/
RESTRAINTS/DRIVER AIRBAG - INSTALLATION).
(18) Connect the negative (ground) cable to the
battery.
Fig. 13 Column Coupler Bolt And Mounting Nuts
1 - COLUMN MOUNTING NUTS
2 - COUPLER BOLT
Fig. 14 Ignition Switch And SKIM
1 - SKIM
2 - IGNITION SWITCH
WJCOLUMN 19 - 11
COLUMN (Continued)