JEEP GRAND CHEROKEE 2004 WK / 3.G Owners Manual
Manufacturer: JEEP, Model Year: 2004, Model line: GRAND CHEROKEE, Model: JEEP GRAND CHEROKEE 2004 WK / 3.GPages: 344, PDF Size: 6.09 MB
Page 231 of 344
NOTE:If you tow a trailer frequently, especially in hilly
country or when the outdoor temperature is high, we
recommend that you change the transmission fluid at
30,000 mile (48 000 km) intervals.
CAUTION!
When pulling a heavy load or driving a fully loaded
vehicle use a premium unleaded fuel to help prevent
spark knock. If spark knock persists, lighten the
load. Otherwise, engine piston damage may result.
Other restrictions apply concerning trailer type, trailer
frontal area and tongue weight. Carefully review the
ªMinimum Vehicle Requirementsº chart in this section
before towing a trailer.
RECREATIONAL TOWING (BEHIND
MOTORHOME, ETC.)
CAUTION!
Internal damage to the transfer case will occur if a
front or rear wheel lift is used when recreational
towing.
NOTE:The transfer case must be in the N (Neutral)
position, and the transmission must be in the P (Park)
position for recreational towing.(Recreational towing is
not available on Quadra-Trac I equipped vehicles.)
STARTING AND OPERATING 231
5
Page 232 of 344

Shifting Into Neutral (N)
Use the following procedure to prepare your vehicle for
recreational towing.
CAUTION!
It is necessary to follow these steps to be certain that
the transfer case is fully in N (Neutral) before
recreational towing to prevent damage to internal
parts.
1. Depress brake pedal.
2. Shift transmission into N (Neutral).
3. Shift transfer case lever into N (Neutral).4. Start engine.
5. Shift transmission into D (Drive).
6. Release brake pedal and ensure that there is no vehicle
movement.
7. Shut the engine OFF and place the ignition key into
the unlocked OFF position.
8. Shift transmission into P (Park).
9. Apply parking brake.
10. Attach vehicle to the tow vehicle with tow bar.
11. Release parking brake.
232 STARTING AND OPERATING
Page 233 of 344
CAUTION!
Transmission damage may occur if the transmission
is shifted into P (Park) with the transfer case in N
(Neutral) and the engine running. With the transfer
case in N (Neutral) ensure that the engine is OFF
prior to shifting the transmission into P (Park) (refer
to steps7±8above).
Shifting Out Of Neutral (N)
Use the following procedure to prepare your vehicle for
normal usage.
1. Shift transmission into N (Neutral).
2. Shift transfer case lever to desired position.
3. Shift transmission into D (Drive).NOTE:When shifting out of transfer case N (Neutral),
turning the engine OFF may be required to avoid gear
clash.
WARNING!
You or others could be injured if you leave the
vehicle unattended with the transfer case in the N
(Neutral) position without first fully engaging the
parking brake. The transfer case N (Neutral) position
disengages both the front and rear driveshafts from
the powertrain and will allow the vehicle to move
regardless of the transmission position. The parking
brake should always be applied when the driver is
not in the vehicle.
STARTING AND OPERATING 233
5
Page 234 of 344
CAUTION!
²Do not use a bumper mounted clamp-on tow bar
on your vehicle. The bumper face bar will be
damaged.
²Do not disconnect the rear driveshaft because
fluid will leak from the transfer case and damage
internal parts.
SNOW PLOW
Snow plows, winches, and other aftermarket equipment
shouldnotbe added to the front end of your vehicle. The
airbag crash sensors may be affected by the change in the
front end structure. The airbags could deploy unexpect-
edly or could fail to deploy during a collision.
WARNING!
Do not add a snow plow, winches, or any other
aftermarket equipment to the front of your vehicle.
This could adversely affect the functioning of the
airbag system and you could be injured.
234 STARTING AND OPERATING
Page 235 of 344

WHAT TO DO IN EMERGENCIES
CONTENTS
mHazard Warning Flashers.................236
mIf Your Engine Overheats.................237
mChanging A Flat Tire....................238
NJack And Lug Wrench Locations...........238
NSpare Tire Location....................239NTire Changing Procedure................242
mJump Starting Procedure..................246
mEmergency Tow Hooks Ð If Equipped........248
mTowing A Disabled Vehicle................248
6
Page 236 of 344

HAZARD WARNING FLASHERS
Your vehicle's hazard warning flasher is an emergency
warning system. When you activate it, all front and rear
directional signals will flash intermittently. Use it when
your vehicle is disabled on or near the road. It warns
other drivers to steer clear of you and your vehicle. This
is an emergency warning system, not to be used when the
vehicle is in motion.
To activate the warning flasher, push down on the button
on top of the steering column until it latches. To turn the
warning flasher off, push down again to unlatch the
button.
NOTE:With extended use, the flasher may run down
your battery.
236 WHAT TO DO IN EMERGENCIES
Page 237 of 344
IF YOUR ENGINE OVERHEATS
In any of the following situations, you can reduce the
potential for overheating by taking the appropriate ac-
tion.
²On the highways Ð Slow down.
²In city traffic Ð While stopped, put transmission in N
(Neutral), but do not increase engine idle speed.
NOTE:There are steps that you can take to slow down
an impending overheat condition. If your air conditioner
is on, turn it off. The air conditioning system adds heat to
the engine cooling system and turning off the A/C
removes this heat. You can also turn the Temperature
Control to maximum heat, the Mode Control to floor, and
the Fan Control to High. This allows the heater core to act
as a supplement to the radiator and aids in removing heat
from the engine cooling system.
CAUTION!
Driving with a hot cooling system could damage
your vehicle. If the temperature gauge reads ªHº,
pull over and stop the vehicle. Idle the vehicle with
the air conditioner turned off until the pointer drops
back into the normal range. If the pointer remains on
the ªHº, and you hear continuous chimes, turn the
engine off immediately, and call for service.
WHAT TO DO IN EMERGENCIES 237
6
Page 238 of 344

CHANGING A FLAT TIRE
Jack And Lug Wrench Locations
The three piece tool set, consisting of two snap-together
extensions that operate the jack and a wheel wrench that
also is used as a crank for the jack, is stored under the
right rear seat. The scissor-type jack is located under the
left rear seat.To remove the jack from its stowage position, turn the
wing nut counterclockwise to loosen the jack assembly,
and then remove it.
238 WHAT TO DO IN EMERGENCIES
Page 239 of 344
WARNING!
²Always store the jack, lug wrench and spare, flat
or damaged tire securely in the proper place.
Never leave them loose in the vehicle where they
could become dangerous projectiles during a
quick stop or collision.
²The jack is designed to use as a tool for changing
tires only. The jack should not be used to lift the
vehicle for service purposes, unless suitable sup-
ports are placed under the vehicle as a safety
measure, The vehicle should be jacked on a firm
level surface only. Avoid ice or slippery areas.
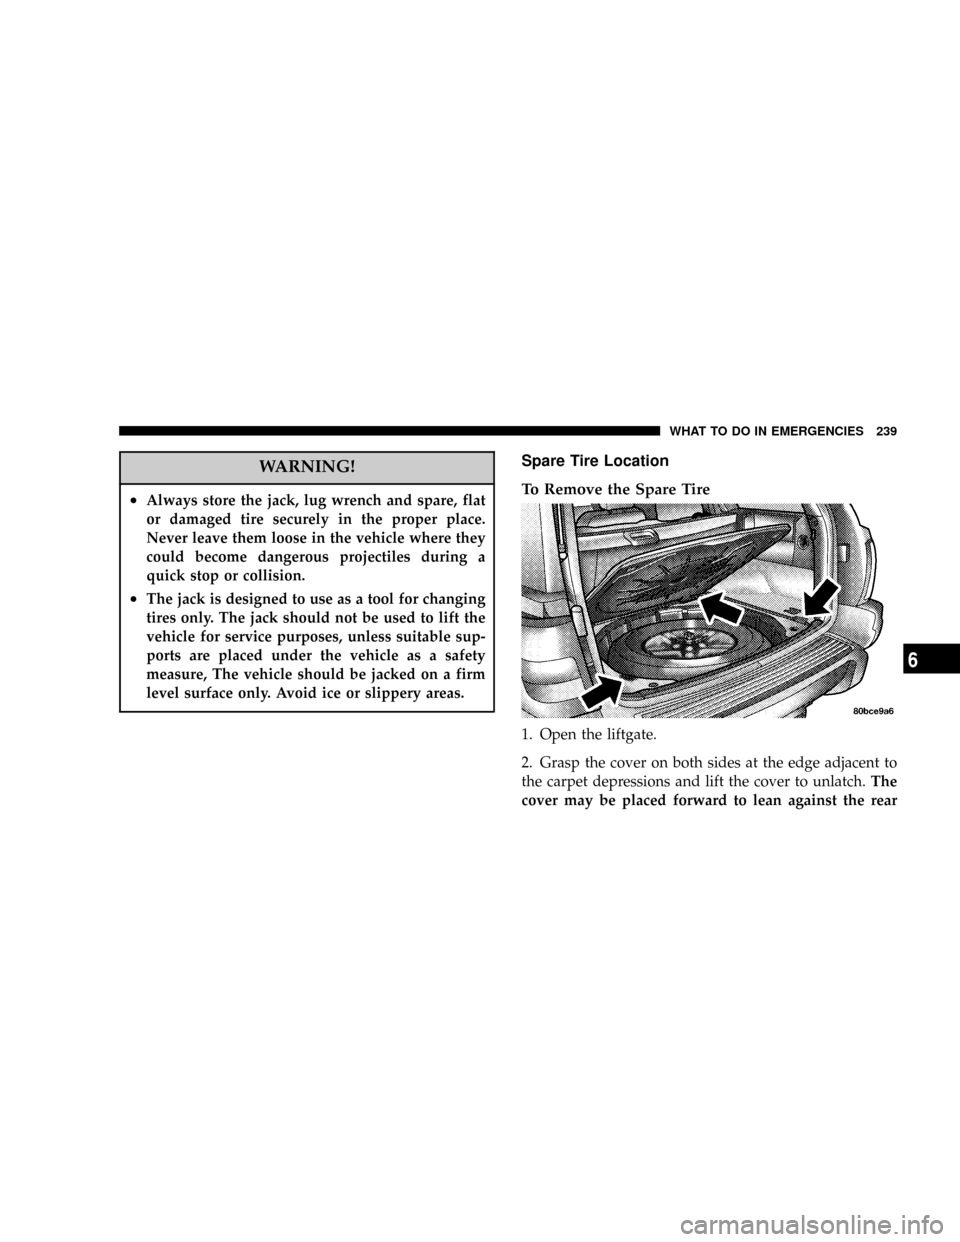
Spare Tire Location
To Remove the Spare Tire
1. Open the liftgate.
2. Grasp the cover on both sides at the edge adjacent to
the carpet depressions and lift the cover to unlatch.The
cover may be placed forward to lean against the rear
WHAT TO DO IN EMERGENCIES 239
6
Page 240 of 344

seatback or completely removed from the vehicle. It can
also be kneeled down upon and used as ground cover
to prevent clothing from getting soiled.
3. Remove the nut and tire.To Replace the Spare Tire
1. Place the tire into the rear compartment with the
wheel facing upward:
a. Replace the hold-down nut.
b. Reinstall the cover by inserting the hinges through
the carpet into the brackets at about a 30 degree angle
and lower into position. Press down to lock the cover
in position.
2. Your vehicle is equipped with either a temporary-use
spare tire or a conventional spare tire. Maintain the
temporary-use spare tire pressure at 60 psi (420 kPa), and
the conventional spare at 33 psi (228 kPa).
240 WHAT TO DO IN EMERGENCIES