instrument panel JEEP GRAND CHEROKEE 2010 WK / 3.G User Guide
[x] Cancel search | Manufacturer: JEEP, Model Year: 2010, Model line: GRAND CHEROKEE, Model: JEEP GRAND CHEROKEE 2010 WK / 3.GPages: 84, PDF Size: 14.64 MB
Page 15 of 84
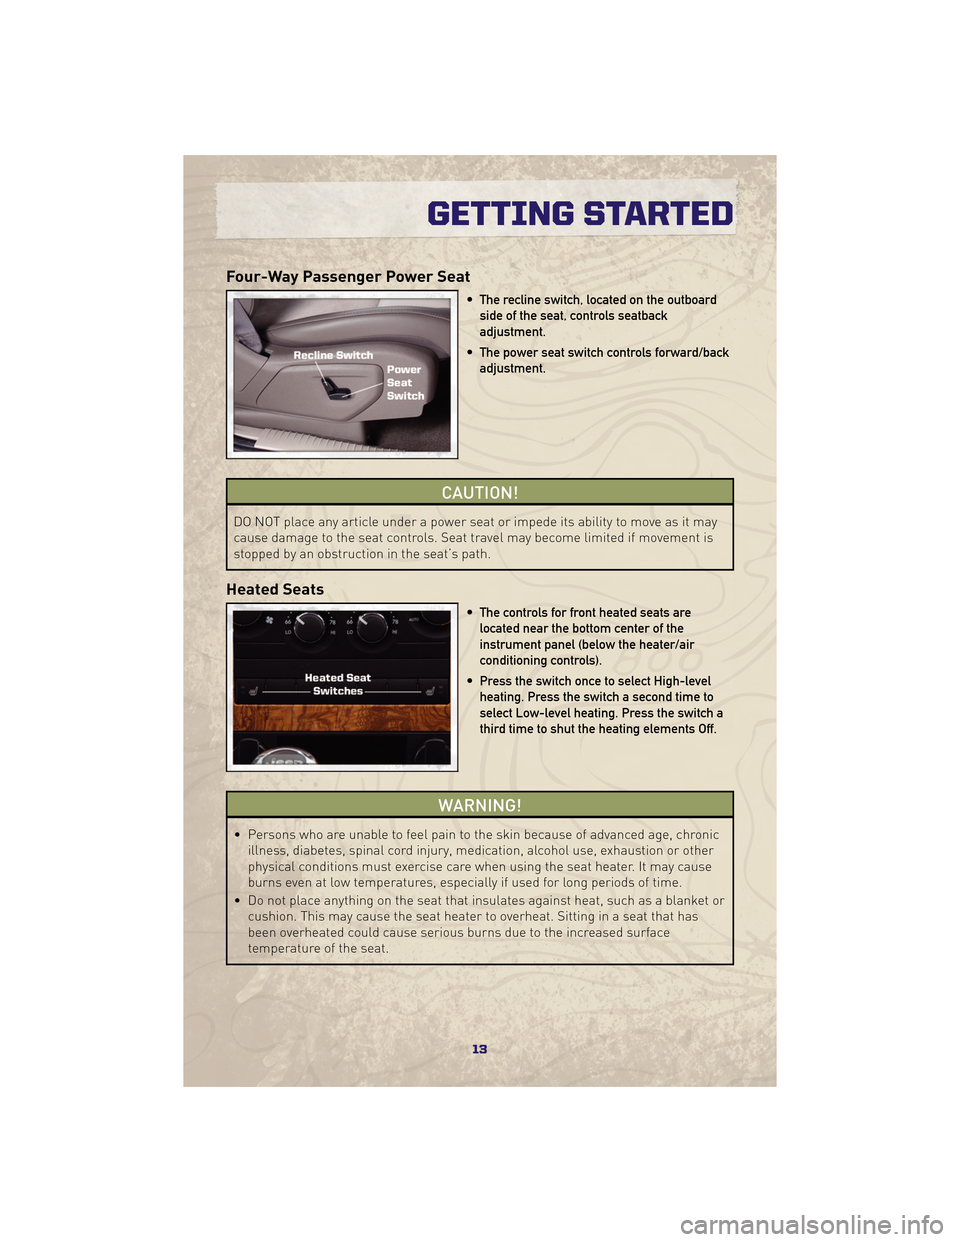
Four-Way Passenger Power Seat
• The recline switch, located on the outboardside of the seat, controls seatback
adjustment.
• The power seat switch controls forward/back adjustment.
CAUTION!
DO NOT place any article under a power seat or impede its ability to move as it may
cause damage to the seat controls. Seat travel may become limited if movement is
stopped by an obstruction in the seat’s path.
Heated Seats
• The controls for front heated seats arelocated near the bottom center of the
instrument panel (below the heater/air
conditioning controls).
• Press the switch once to select High-level heating. Press the switch a second time to
select Low-level heating. Press the switch a
third time to shut the heating elements Off.
WARNING!
• Persons who are unable to feel pain to the skin because of advanced age, chronic illness, diabetes, spinal cord injury, medication, alcohol use, exhaustion or other
physical conditions must exercise care when using the seat heater. It may cause
burns even at low temperatures, especially if used for long periods of time.
• Do not place anything on the seat that insulates against heat, such as a blanket or cushion. This may cause the seat heater to overheat. Sitting in a seat that has
been overheated could cause serious burns due to the increased surface
temperature of the seat.
13
GETTING STARTED
Page 18 of 84
• Pull upward on the lever to lock the column firmly in place.
WARNING!
Do not adjust the steering wheel while driving. The tilt/telescoping adjustment must
be locked while driving. Adjusting the steering wheel while driving or driving without
the tilt/telescoping adjustment locked could cause the driver to lose control of the
vehicle. Failure to follow this warning may result in serious injury or death.
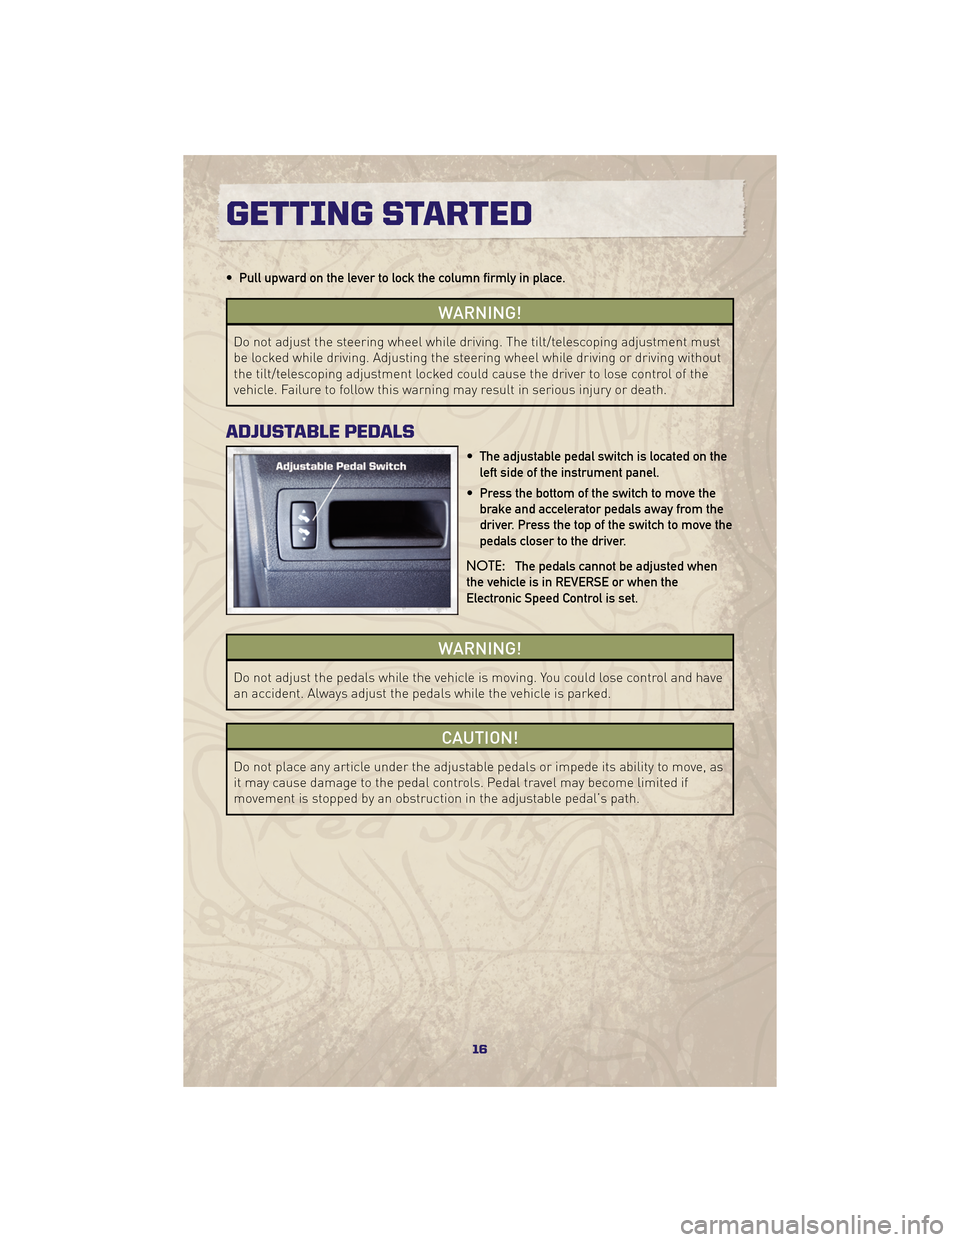
ADJUSTABLE PEDALS
• The adjustable pedal switch is located on theleft side of the instrument panel.
• Press the bottom of the switch to move the brake and accelerator pedals away from the
driver. Press the top of the switch to move the
pedals closer to the driver.
NOTE: The pedals cannot be adjusted when
the vehicle is in REVERSE or when the
Electronic Speed Control is set.
WARNING!
Do not adjust the pedals while the vehicle is moving. You could lose control and have
an accident. Always adjust the pedals while the vehicle is parked.
CAUTION!
Do not place any article under the adjustable pedals or impede its ability to move, as
it may cause damage to the pedal controls. Pedal travel may become limited if
movement is stopped by an obstruction in the adjustable pedal’s path.
GETTING STARTED
16
Page 20 of 84
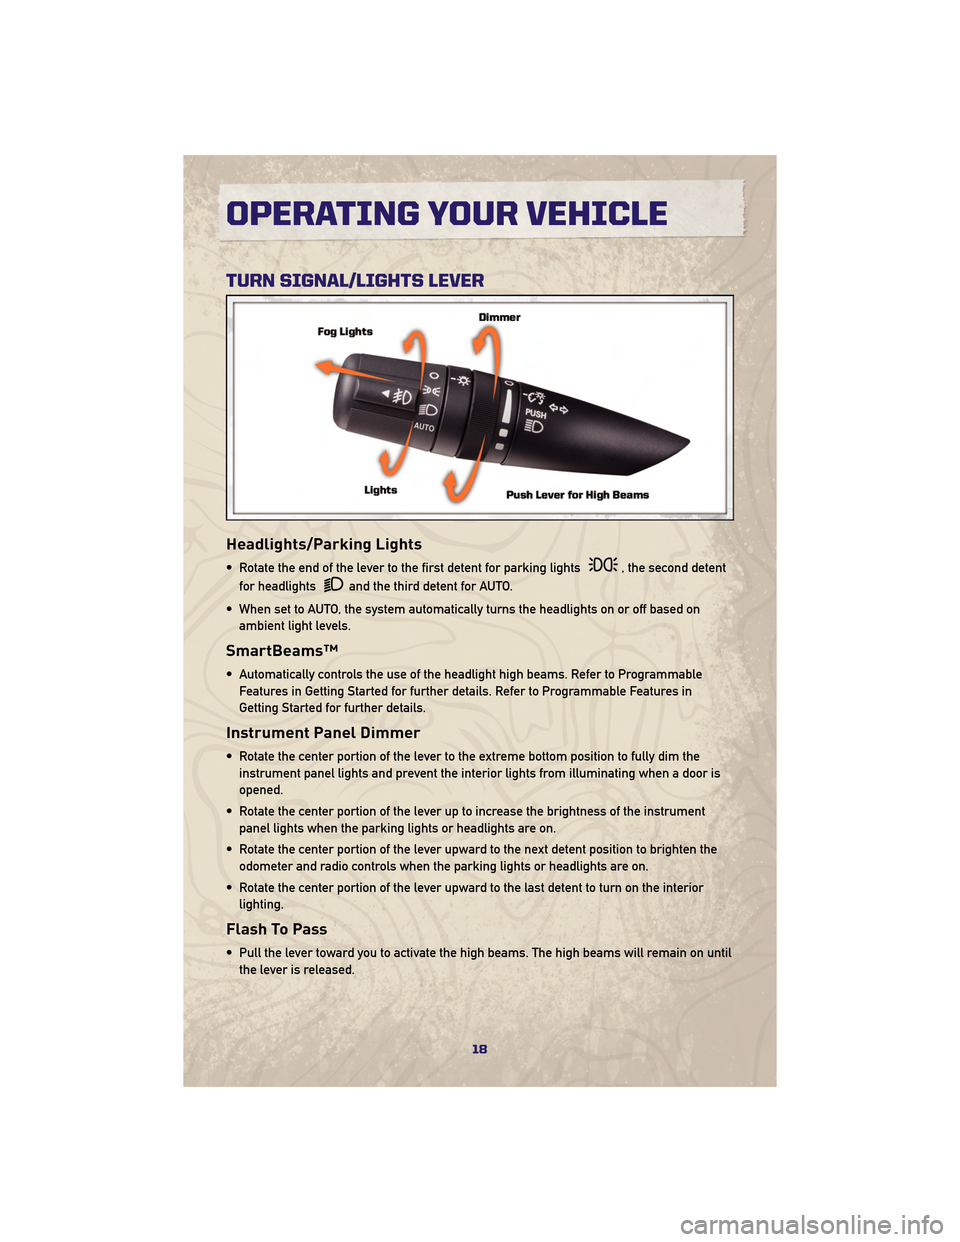
TURN SIGNAL/LIGHTS LEVER
Headlights/Parking Lights
• Rotate the end of the lever to the first detent for parking lights, the second detent
for headlights
and the third detent for AUTO.
• When set to AUTO, the system automatically turns the headlights on or off based on ambient light levels.
SmartBeams™
• Automatically controls the use of the headlight high beams. Refer to ProgrammableFeatures in Getting Started for further details. Refer to Programmable Features in
Getting Started for further details.
Instrument Panel Dimmer
• Rotate the center portion of the lever to the extreme bottom position to fully dim theinstrument panel lights and prevent the interior lights from illuminating when a door is
opened.
• Rotate the center portion of the lever up to increase the brightness of the instrument panel lights when the parking lights or headlights are on.
• Rotate the center portion of the lever upward to the next detent position to brighten the odometer and radio controls when the parking lights or headlights are on.
• Rotate the center portion of the lever upward to the last detent to turn on the interior lighting.
Flash To Pass
• Pull the lever toward you to activate the high beams. The high beams will remain on untilthe lever is released.
OPERATING YOUR VEHICLE
18
Page 25 of 84
Air Conditioning
• If the air conditioning button is pressed while in the AUTO mode, the indicator light mayflash three times to indicate the cabin air is being controlled automatically.
Air Recirculation
• Use recirculation for maximum A/C operation.
• For window defogging, turn the air recirculation button off.
• If the recirculation button is pressed while in the AUTO mode, the indicator light mayflash three times to indicate the cabin air is being controlled automatically.
PARKSENSE®REAR PARK ASSIST
• If an object is detected behind the rear bumper while the vehicle is in REVERSE, awarning will display in the headliner near the flipper glass and a chime will sound. The
chime rate will change depending on the distance of the object, getting faster as the
object gets closer to the bumper.
PARKVIEW®REAR BACK-UP CAMERA
• You can see an on-screen image of the rear of your vehicle whenever the shift lever isput into REVERSE. The ParkView®Rear Back-Up Camera image will be displayed on the
radio display screen, located on the center stack of the instrument panel.
WARNING!
Drivers must be careful when backing up even when using the ParkView®Rear
Back-Up Camera. Always check carefully behind your vehicle, and be sure to check
for pedestrians, animals, other vehicles, obstructions, or blind spots before backing
up. You are responsible for the safety of your surroundings and must continue to pay
attention while backing up. Failure to do so can result in serious injury or death.
LIFTGATE FLIPPER GLASS
• The liftgate flipper glass is also unlocked when the liftgate is unlocked. To open the
flipper glass, push up on the window switch located on the liftgate.
WARNING!
To avoid injury, stand back when opening. Glass may automatically rise.
NOTE: If a malfunction to the liftgate latch should occur, an emergency liftgate latch
release can be used to open the liftgate. The emergency liftgate latch release can be
accessed through a snap-in cover located on the liftgate trim panel.
23
OPERATING YOUR VEHICLE
Page 37 of 84
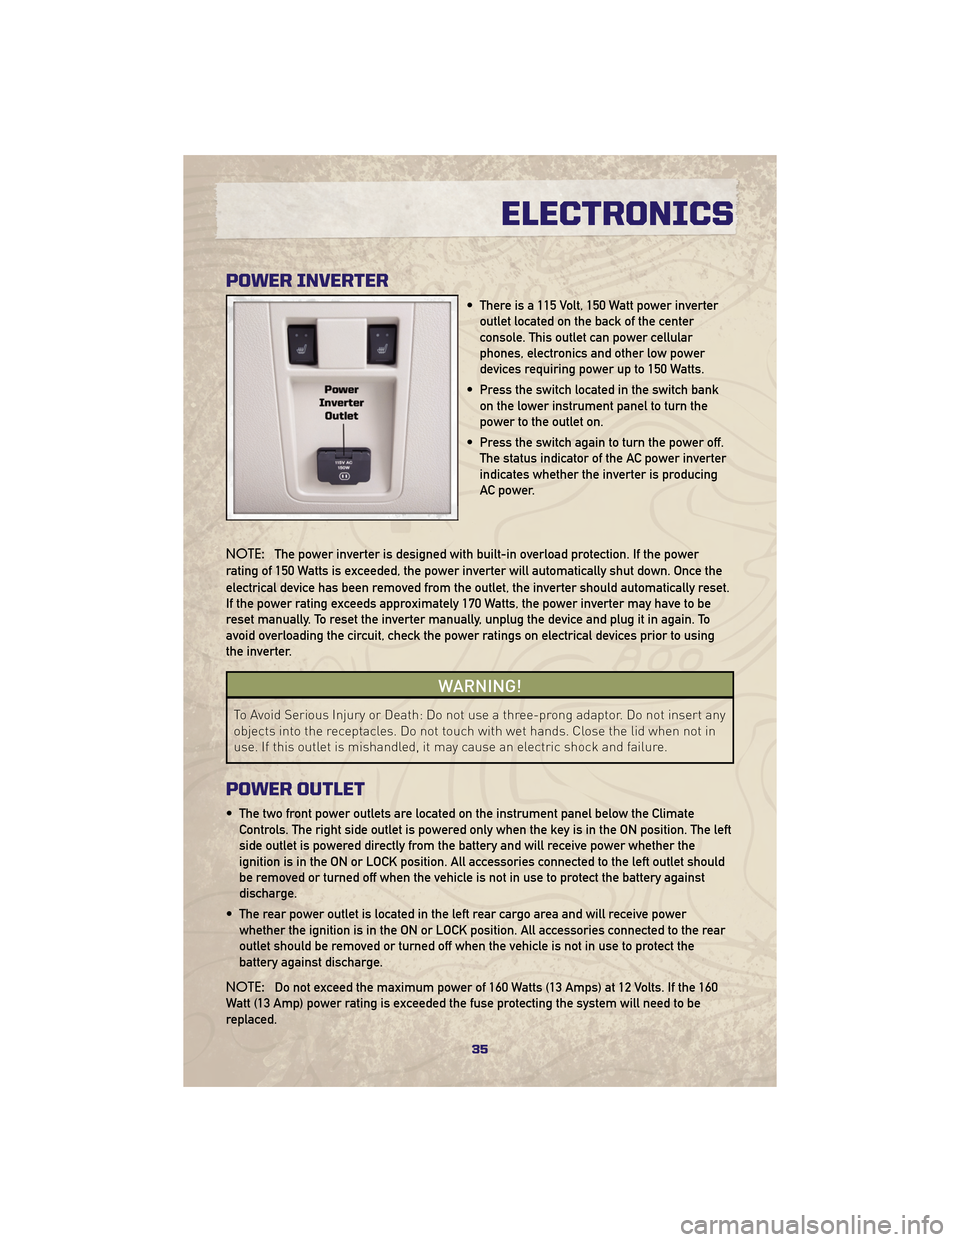
POWER INVERTER
• There is a 115 Volt, 150 Watt power inverteroutlet located on the back of the center
console. This outlet can power cellular
phones, electronics and other low power
devices requiring power up to 150 Watts.
• Press the switch located in the switch bank on the lower instrument panel to turn the
power to the outlet on.
• Press the switch again to turn the power off. The status indicator of the AC power inverter
indicates whether the inverter is producing
AC power.
NOTE: The power inverter is designed with built-in overload protection. If the power
rating of 150 Watts is exceeded, the power inverter will automatically shut down. Once the
electrical device has been removed from the outlet, the inverter should automatically reset.
If the power rating exceeds approximately 170 Watts, the power inverter may have to be
reset manually. To reset the inverter manually, unplug the device and plug it in again. To
avoid overloading the circuit, check the power ratings on electrical devices prior to using
the inverter.
WARNING!
To Avoid Serious Injury or Death: Do not use a three-prong adaptor. Do not insert any
objects into the receptacles. Do not touch with wet hands. Close the lid when not in
use. If this outlet is mishandled, it may cause an electric shock and failure.
POWER OUTLET
• The two front power outlets are located on the instrument panel below the Climate Controls. The right side outlet is powered only when the key is in the ON position. The left
side outlet is powered directly from the battery and will receive power whether the
ignition is in the ON or LOCK position. All accessories connected to the left outlet should
be removed or turned off when the vehicle is not in use to protect the battery against
discharge.
• The rear power outlet is located in the left rear cargo area and will receive power whether the ignition is in the ON or LOCK position. All accessories connected to the rear
outlet should be removed or turned off when the vehicle is not in use to protect the
battery against discharge.
NOTE: Do not exceed the maximum power of 160 Watts (13 Amps) at 12 Volts. If the 160
Watt (13 Amp) power rating is exceeded the fuse protecting the system will need to be
replaced.
35
ELECTRONICS
Page 61 of 84
OPENING THE HOOD
• Pull the hood release lever located below the steering wheel at the base of theinstrument panel.
• Reach into the opening beneath the center of the hood and move the safety latch lever while lifting the hood at the same time.
WARNING!
Be sure the hood is fully latched before driving your vehicle. If the hood is not fully
latched, it could open when the vehicle is in motion and block your vision. Failure to
follow this warning could result in serious injury or death.
59
MAINTAINING YOUR VEHICLE
Page 74 of 84
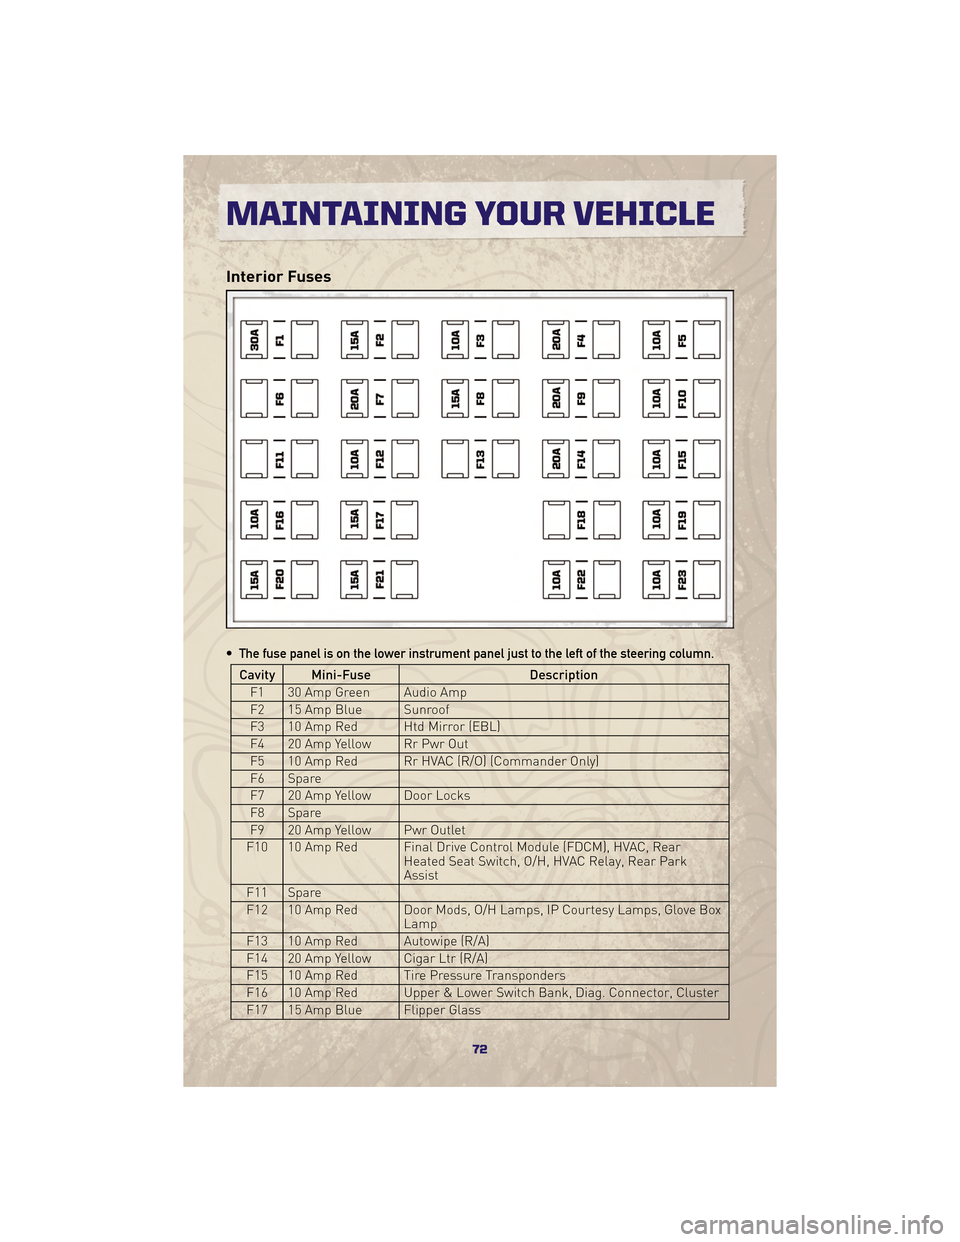
Interior Fuses
• The fuse panel is on the lower instrument panel just to the left of the steering column.
Cavity Mini-FuseDescription
F1 30 Amp Green Audio Amp
F2 15 Amp Blue Sunroof
F3 10 Amp Red Htd Mirror (EBL)
F4 20 Amp Yellow Rr Pwr Out
F5 10 Amp Red Rr HVAC (R/O) (Commander Only)
F6 Spare
F7 20 Amp Yellow Door Locks
F8 Spare
F9 20 Amp Yellow Pwr Outlet
F10 10 Amp Red Final Drive Control Module (FDCM), HVAC, Rear Heated Seat Switch, O/H, HVAC Relay, Rear Park
Assist
F11 Spare
F12 10 Amp Red Door Mods, O/H Lamps, IP Courtesy Lamps, Glove Box Lamp
F13 10 Amp Red Autowipe (R/A)
F14 20 Amp Yellow Cigar Ltr (R/A)
F15 10 Amp Red Tire Pressure Transponders
F16 10 Amp Red Upper & Lower Switch Bank, Diag. Connector, Cluster
F17 15 Amp Blue Flipper Glass
MAINTAINING YOUR VEHICLE
72