display JEEP GRAND CHEROKEE 2014 WK2 / 4.G User Guide
[x] Cancel search | Manufacturer: JEEP, Model Year: 2014, Model line: GRAND CHEROKEE, Model: JEEP GRAND CHEROKEE 2014 WK2 / 4.GPages: 220, PDF Size: 6.12 MB
Page 8 of 220
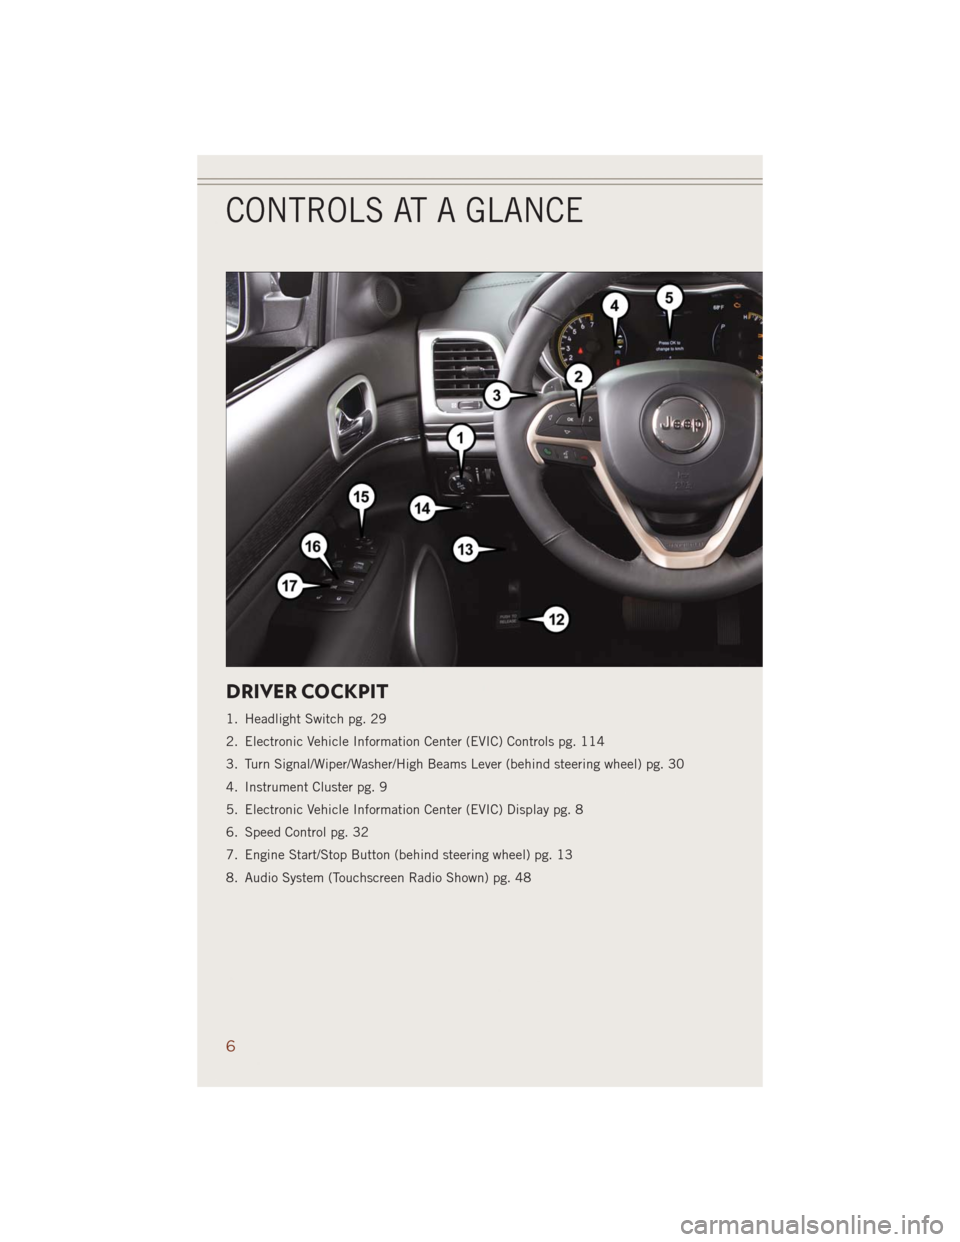
DRIVER COCKPIT
1. Headlight Switch pg. 29
2. Electronic Vehicle Information Center (EVIC) Controls pg. 114
3. Turn Signal/Wiper/Washer/High Beams Lever (behind steering wheel) pg. 30
4. Instrument Cluster pg. 9
5. Electronic Vehicle Information Center (EVIC) Display pg. 8
6. Speed Control pg. 32
7. Engine Start/Stop Button (behind steering wheel) pg. 13
8. Audio System (Touchscreen Radio Shown) pg. 48
CONTROLS AT A GLANCE
6
Page 17 of 220
VEHICLE SECURITY ALARM
This Vehicle Security Alarm monitors the doors, liftgate, and ignition switch for
unauthorized operation.
When the alarm is activated, the interior switches for door locks are disabled. The
Vehicle Security Alarm provides both audio and visual signals repeatedly for three
minutes. If the disturbance is still present (driver's door, passenger door, other doors,
ignition) after three minutes, the parking lights and tail lights will flash for an additional
15 minutes.
To A r m
Cycle the Keyless Enter-N-Go™ START/STOP button until the button display indi-
cates that the vehicle ignition is “OFF”. Push the power door lock switch while the
door is open, push the Key Fob LOCK button, or with one of the Key Fobs located
outside the vehicle and within 5 ft (1.5 m) of the driver's and passenger front door
handles, push the Keyless Enter-N-Go™ LOCK button located on the door handle.
NOTE:
After pushing the Keyless Enter-N-Go™ LOCK button, you must wait two seconds
before you can lock or unlock the vehicle via the door handle.
To Disarm
Push the Key Fob UNLOCK button or with one of the Key Fobs located outside the
vehicle and within 5 ft (1.5 m) of the driver's and passenger front door handles, grab
the Keyless Enter-N-Go™ door handle and enter the vehicle, then push the Keyless
Enter-N-Go™ START/STOP button (requires at least one valid Key Fob in the vehicle).
SEAT BELT
Be sure everyone in your vehicle is in a seat and using a seat belt properly.
• Position the lap belt across your thighs, below your abdomen. To remove slack in
the lap portion, pull up a bit on the shoulder belt. To loosen the lap belt if it is too
tight, tilt the latch plate and pull on the lap belt. A snug belt reduces the risk of
sliding under the belt in a collision.
• Position the shoulder belt on your chest so that it is comfortable and not resting
on your neck. The retractor will withdraw any slack in the belt.
A shoulder belt placed behind you will not protect you from injury during a collision.
You are more likely to hit your head in a collision if you do not wear your shoulder belt.
The lap and shoulder belt are meant to be used together.
A belt that is too loose will not protect you properly. In a sudden stop you could move
too far forward, increasing the possibility of injury. Wear your seat belt snugly.
GETTING STARTED
15
Page 27 of 220
NOTE:
Vehicle Equipped With Remote Start
On models that are equipped with remote start, this feature can be programmed to come
on during a remote start through the Uconnect®system. Refer to “Uconnect®Settings” in
“Understanding Your Instrument Panel” in the Owner's Manual on the DVD.
Front Ventilated Seats
Located in the seat cushion and seatback are small fans that draw the air from the
passenger compartment and pull air through fine perforations in the seat cover to
help keep the driver and front passenger cooler in higher ambient temperatures.
There are two ventilated seat control buttons located in the touchscreen that allow
the driver and passenger to operate the seats independently.
The ventilated seat buttons are used to control the speed of the fans located in the seat.
To operate the system, press the “Controls” button on touchscreen located on the
bottom of the Uconnect®display.
• Press the ventilated seat button
once to choose HIGH.
• Press the ventilated seat button
a second time to choose LOW.
• Press the ventilated seat button
a third time to turn the ventilated seat OFF.
NOTE:
Vehicle Equipped With Remote Start
On models that are equipped with remote start, this feature can be programmed to come
on during a remote start through the Uconnect®system. Refer to “Uconnect®Settings” in
“Understanding Your Instrument Panel” in the Owner's Manual on the DVD.
Rear Heated Seats
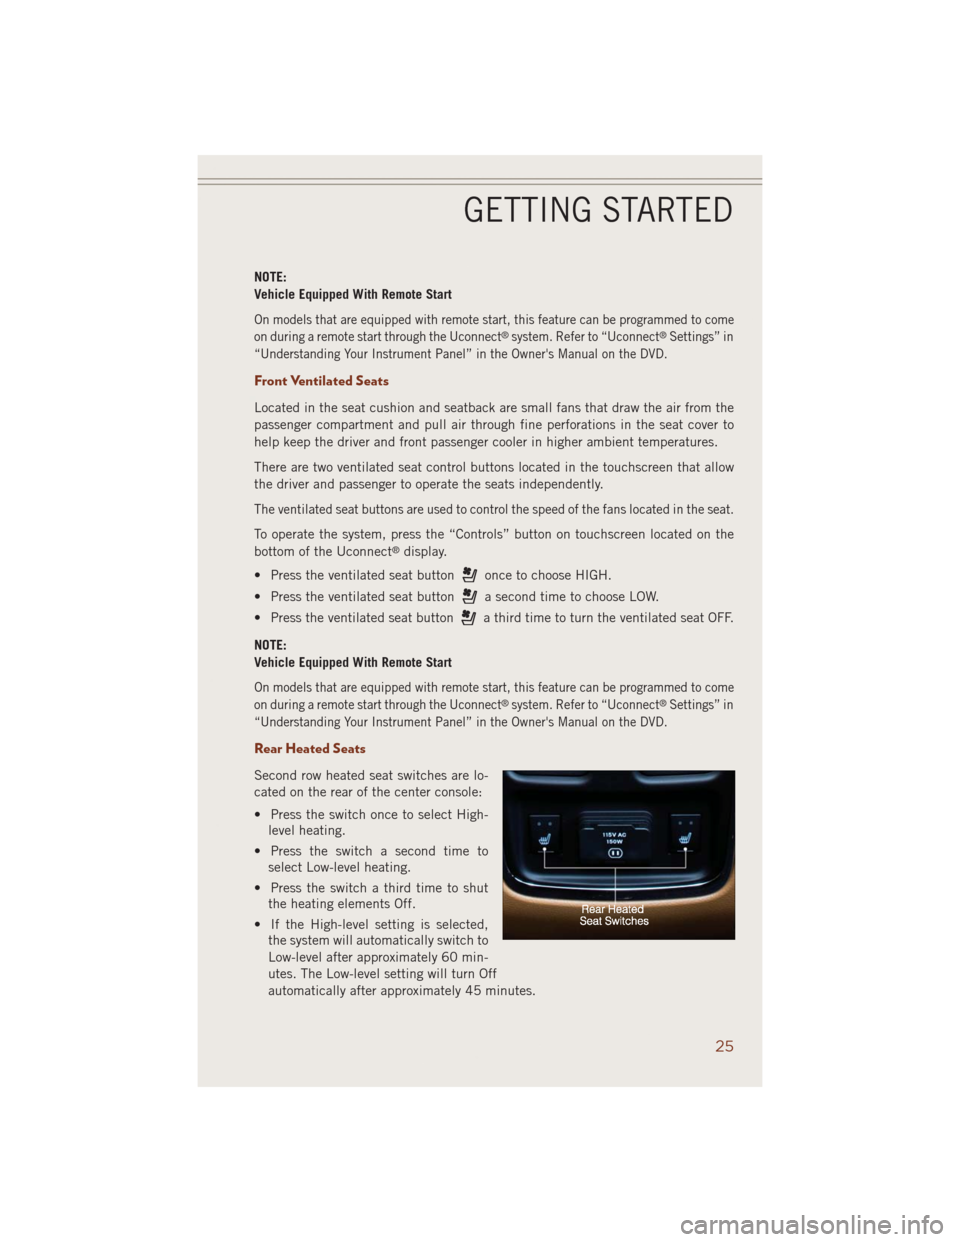
Second row heated seat switches are lo-
cated on the rear of the center console:
• Press the switch once to select High-
level heating.
• Press the switch a second time to
select Low-level heating.
• Press the switch a third time to shut
the heating elements Off.
• If the High-level setting is selected,
the system will automatically switch to
Low-level after approximately 60 min-
utes. The Low-level setting will turn Off
automatically after approximately 45 minutes.
GETTING STARTED
25
Page 36 of 220
ADAPTIVE CRUISE CONTROL (ACC)
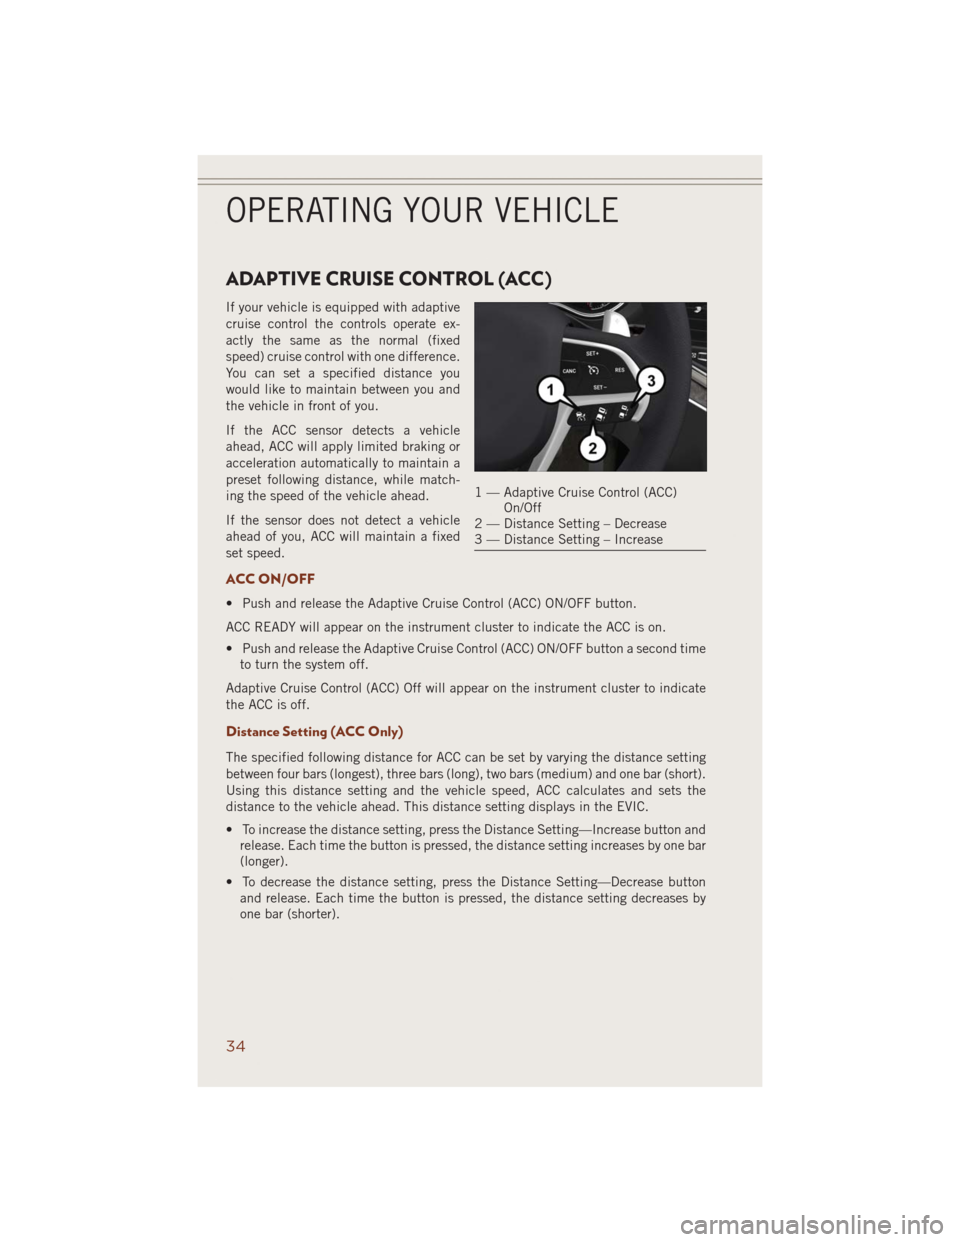
If your vehicle is equipped with adaptive
cruise control the controls operate ex-
actly the same as the normal (fixed
speed) cruise control with one difference.
You can set a specified distance you
would like to maintain between you and
the vehicle in front of you.
If the ACC sensor detects a vehicle
ahead, ACC will apply limited braking or
acceleration automatically to maintain a
preset following distance, while match-
ing the speed of the vehicle ahead.
If the sensor does not detect a vehicle
ahead of you, ACC will maintain a fixed
set speed.
ACC ON/OFF
• Push and release the Adaptive Cruise Control (ACC) ON/OFF button.
ACC READY will appear on the instrument cluster to indicate the ACC is on.
• Push and release the Adaptive Cruise Control (ACC) ON/OFF button a second time
to turn the system off.
Adaptive Cruise Control (ACC) Off will appear on the instrument cluster to indicate
the ACC is off.
Distance Setting (ACC Only)
The specified following distance for ACC can be set by varying the distance setting
between four bars (longest), three bars (long), two bars (medium) and one bar (short).
Using this distance setting and the vehicle speed, ACC calculates and sets the
distance to the vehicle ahead. This distance setting displays in the EVIC.
• To increase the distance setting, press the Distance Setting—Increase button and
release. Each time the button is pressed, the distance setting increases by one bar
(longer).
• To decrease the distance setting, press the Distance Setting—Decrease button
and release. Each time the button is pressed, the distance setting decreases by
one bar (shorter).
1 — Adaptive Cruise Control (ACC)
On/Off
2 — Distance Setting – Decrease
3 — Distance Setting – Increase
OPERATING YOUR VEHICLE
34
Page 39 of 220
Far
The default status of FCW is the “Far” setting.
The far setting provides warnings for potential collisions more distant in front of the
vehicle, allowing the driver to have the most reaction time to avoid a collision.
This setting is designed to provide early warnings per NHTSA (National Highway
Traffic Safety Administration) recommendations.
More cautious drivers that do not mind frequent warnings may prefer this setting.
NOTE:
This setting gives you the most reaction time.
Near
Changing the FCW status to the “Near” setting, allows the system to warn you of a
potential frontal collision when you are much closer.
This setting provides less reaction time than the “Far” setting, which allows for a
more dynamic driving experience.
More dynamic or aggressive drivers that want to avoid frequent warnings may prefer
this setting.
Off
Changing the FCW status to “Off” prevents the system from warning you of a possible
collision with the vehicle in front of you.
Turning Active Braking ON Or OFF
The Active Braking feature has two settings and can be changed within the
Uconnect
®System Screen:
•On
• Off
Changing the Active Braking status to “Off” prevents the system from providing
limited autonomous braking, or additional brake support if the driver is not braking
adequately in the event of a potential frontal collision.
NOTE:
If FCW is set to “Off”, “FCW OFF” will be displayed in the EVIC.
Refer to the Owner's Manual on the DVD for further details.
WARNING!
Forward Collision Warning (FCW) is not intended to avoid a collision on its own, nor
can FCW detect every type of potential collision. The driver has the responsibility
to avoid a collision by controlling the vehicle via braking and steering. Failure to
follow this warning could lead to serious injury or death.
OPERATING YOUR VEHICLE
37
Page 40 of 220
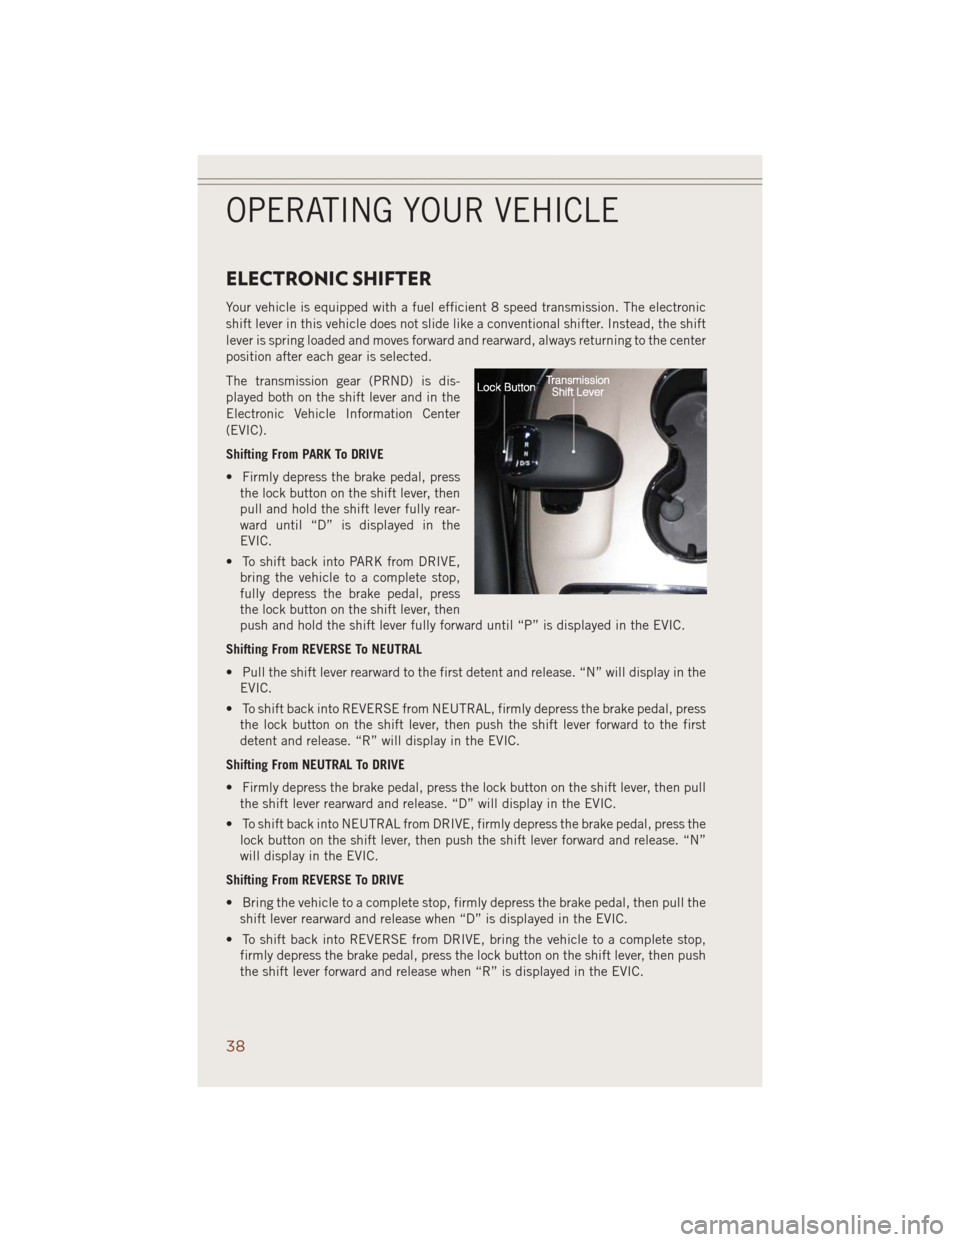
ELECTRONIC SHIFTER
Your vehicle is equipped with a fuel efficient 8 speed transmission. The electronic
shift lever in this vehicle does not slide like a conventional shifter. Instead, the shift
lever is spring loaded and moves forward and rearward, always returning to the center
position after each gear is selected.
The transmission gear (PRND) is dis-
played both on the shift lever and in the
Electronic Vehicle Information Center
(EVIC).
Shifting From PARK To DRIVE
• Firmly depress the brake pedal, press
the lock button on the shift lever, then
pull and hold the shift lever fully rear-
ward until “D” is displayed in the
EVIC.
• To shift back into PARK from DRIVE,
bring the vehicle to a complete stop,
fully depress the brake pedal, press
the lock button on the shift lever, then
push and hold the shift lever fully forward until “P” is displayed in the EVIC.
Shifting From REVERSE To NEUTRAL
• Pull the shift lever rearward to the first detent and release. “N” will display in the
EVIC.
• To shift back into REVERSE from NEUTRAL, firmly depress the brake pedal, press
the lock button on the shift lever, then push the shift lever forward to the first
detent and release. “R” will display in the EVIC.
Shifting From NEUTRAL To DRIVE
• Firmly depress the brake pedal, press the lock button on the shift lever, then pull
the shift lever rearward and release. “D” will display in the EVIC.
• To shift back into NEUTRAL from DRIVE, firmly depress the brake pedal, press the
lock button on the shift lever, then push the shift lever forward and release. “N”
will display in the EVIC.
Shifting From REVERSE To DRIVE
• Bring the vehicle to a complete stop, firmly depress the brake pedal, then pull the
shift lever rearward and release when “D” is displayed in the EVIC.
• To shift back into REVERSE from DRIVE, bring the vehicle to a complete stop,
firmly depress the brake pedal, press the lock button on the shift lever, then push
the shift lever forward and release when “R” is displayed in the EVIC.
OPERATING YOUR VEHICLE
38
Page 41 of 220
SPORT Mode
• To shift from DRIVE to SPORT, pull the shift lever rearward until “S” is displayed
in the EVIC.
• To shift back into DRIVE from SPORT, pull the shift lever rearward until “D” is
displayed in the EVIC.
PADDLE SHIFT MODE
Paddle Shift Mode is a driver-interactive transmission feature that offers manual gear
shifting to provide you with more control of the vehicle. Paddle Shift Mode allows you
to maximize engine braking, eliminate undesirable upshifts and downshifts, and
improve overall vehicle performance.
This system can also provide you with more control during passing, city driving, cold
slippery conditions, mountain driving, trailer towing, and many other situations.
Refer to the “Starting And Operating” section of your vehicle’s Owner’s Manual on
the DVD for further details.
FUEL ECONOMY (ECO) MODE
The Fuel Economy (ECO) mode can improve the vehicle’s overall fuel economy during
normal driving conditions.
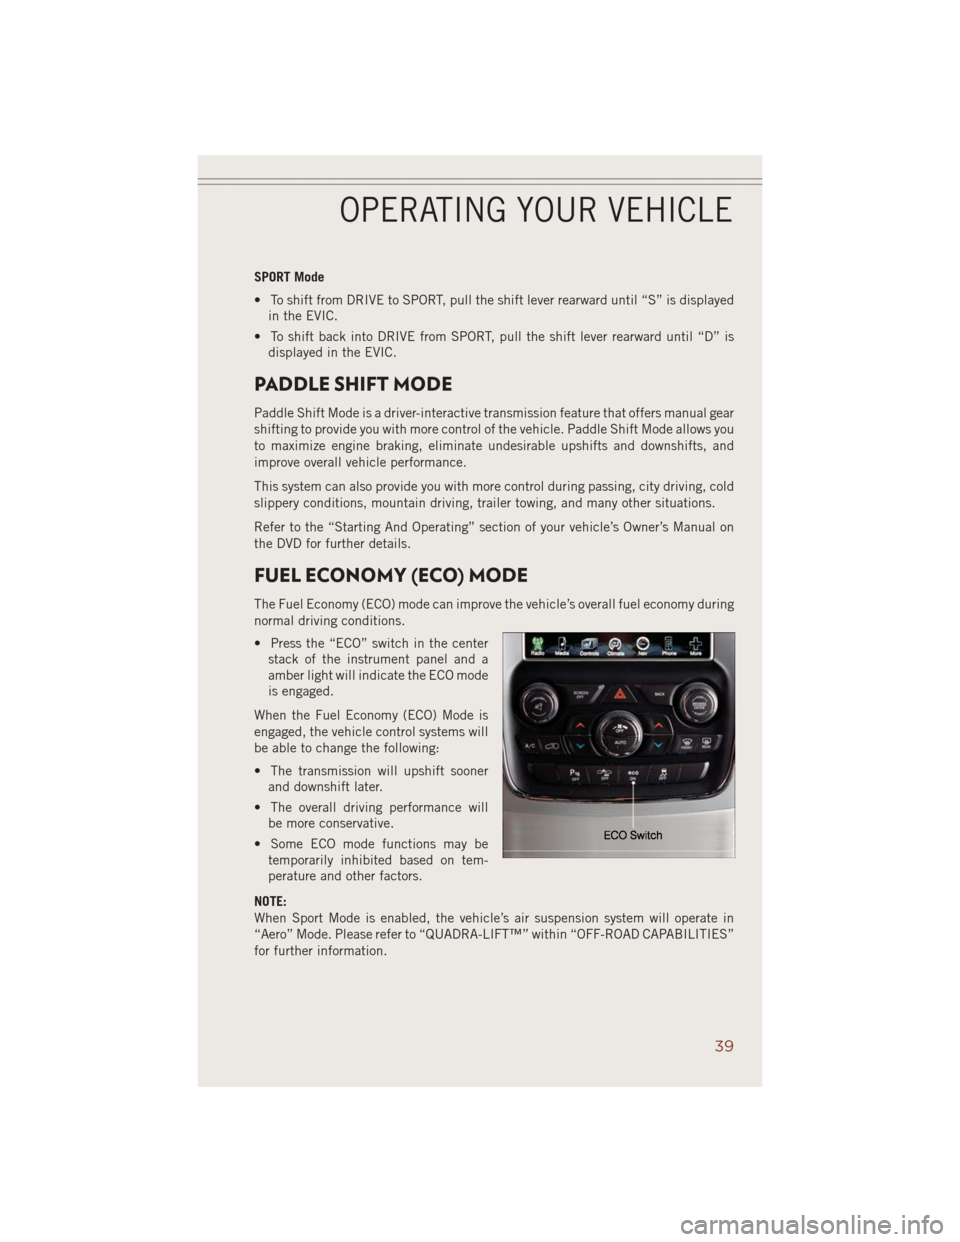
• Press the “ECO” switch in the center
stack of the instrument panel and a
amber light will indicate the ECO mode
is engaged.
When the Fuel Economy (ECO) Mode is
engaged, the vehicle control systems will
be able to change the following:
• The transmission will upshift sooner
and downshift later.
• The overall driving performance will
be more conservative.
• Some ECO mode functions may be
temporarily inhibited based on tem-
perature and other factors.
NOTE:
When Sport Mode is enabled, the vehicle’s air suspension system will operate in
“Aero” Mode. Please refer to “QUADRA-LIFT™” within “OFF-ROAD CAPABILITIES”
for further information.
OPERATING YOUR VEHICLE
39
Page 44 of 220
SYNC Temperature Soft-Key
• Touch the “SYNC” soft-key on the Uconnect®radio to control the driver and
passenger temperatures simultaneously. Touch the “SYNC” soft-key a second time
to control the temperatures individually.
Air Recirculation
• Use Recirculation for maximum A/C operation.
• For window defogging, turn the recirculation button off.
• If the recirculation button is pushed while in the AUTO mode, the indicator light
may flash three times to indicate the cabin air is being controlled automatically.
Heated Mirrors
The mirrors are heated to melt frost or ice. This feature is activated whenever you turn
on the rear window defroster.
PARKSENSE® FRONT AND REAR PARK ASSIST
ParkSense®can be enabled and disabled by pressing the ParkSense®switch located
below the climate controls, on the switch panel.
The four ParkSense
®sensors, located in the rear fascia/bumper, monitor the area
behind the vehicle that is within the sensors’ field of view. The sensors can detect
obstacles from approximately 12 in (30 cm) up to 79 in (200 cm) from the rear
fascia/bumper in the horizontal direction, depending on the location, type and
orientation of the obstacle.
The six ParkSense
®sensors, located in the front fascia/bumper, monitor the area in
front of the vehicle that is within the sensors’ field of view. The sensors can detect
obstacles from approximately 12 in (30 cm) up to 47 in (120 cm) from the front
fascia/bumper in the horizontal direction, depending on the location, type and
orientation of the obstacle.
When an object is detected within 6.5 ft (2 m) behind the rear bumper while the
vehicle is in REVERSE, a warning will display in the Electronic Vehicle Information
Center (EVIC) and a chime will sound (when Sound and Display is selected from the
Customer Programmable Features section of the Uconnect
®System screen). As the
vehicle moves closer to the object, the chime rate will change from single 1/2 second
tone (for rear only), to slow (for rear only), to fast, to continuous.
Refer to your Owner's Manual on the DVD for further details.
OPERATING YOUR VEHICLE
42
Page 45 of 220
Cleaning The ParkSense® Sensors
If “CLEAN PARK ASSIST SENSORS” appears in the Electronic Vehicle Information
Center (EVIC), clean the ParkSense®sensors with water, car wash soap and a soft
cloth. Do not use rough or hard cloths. Do not scratch or poke the sensors. Otherwise,
you could damage the sensors.
NOTE:
When the Instrument Cluster reads either Clean Sensor or Blinded, please clean off
the bumper sensors to see if the condition is corrected.
PARKVIEW® REAR BACK-UP CAMERA
You can see an on-screen image of the rear of your vehicle whenever the shift lever is
put into REVERSE. The ParkView®Rear Back-Up Camera image will be displayed on
the radio display screen, located on the center stack of the instrument panel.
If the radio display screen appears foggy, clean the camera lens located on the rear
of the vehicle above the rear license plate.
Refer to your Owner's Manual on the DVD for further details.
WARNING!
Drivers must be careful when backing up; even when using the ParkView®Rear
Back-Up Camera. Always check carefully behind your vehicle, and be sure to
check for pedestrians, animals, other vehicles, obstructions, or blind spots before
backing up. You must continue to pay attention while backing up. Failure to do so
can result in serious injury or death.
OPERATING YOUR VEHICLE
43
Page 52 of 220
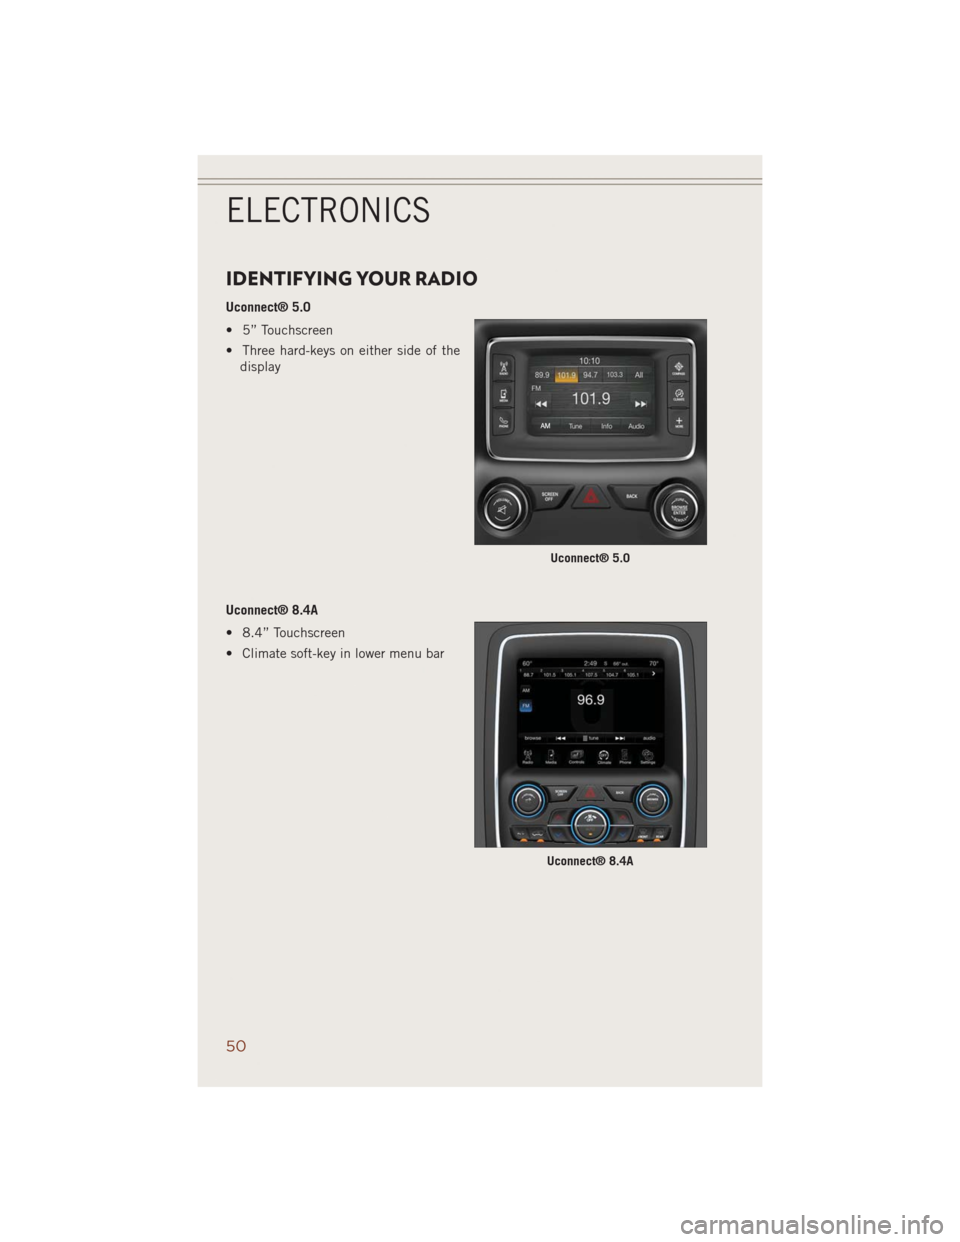
IDENTIFYING YOUR RADIO
Uconnect® 5.0
• 5” Touchscreen
• Three hard-keys on either side of the
display
Uconnect® 8.4A
• 8.4” Touchscreen
• Climate soft-key in lower menu bar
Uconnect® 5.0
Uconnect® 8.4A
ELECTRONICS
50