tow JEEP GRAND CHEROKEE 2014 WK2 / 4.G User Guide
[x] Cancel search | Manufacturer: JEEP, Model Year: 2014, Model line: GRAND CHEROKEE, Model: JEEP GRAND CHEROKEE 2014 WK2 / 4.GPages: 220, PDF Size: 6.12 MB
Page 3 of 220
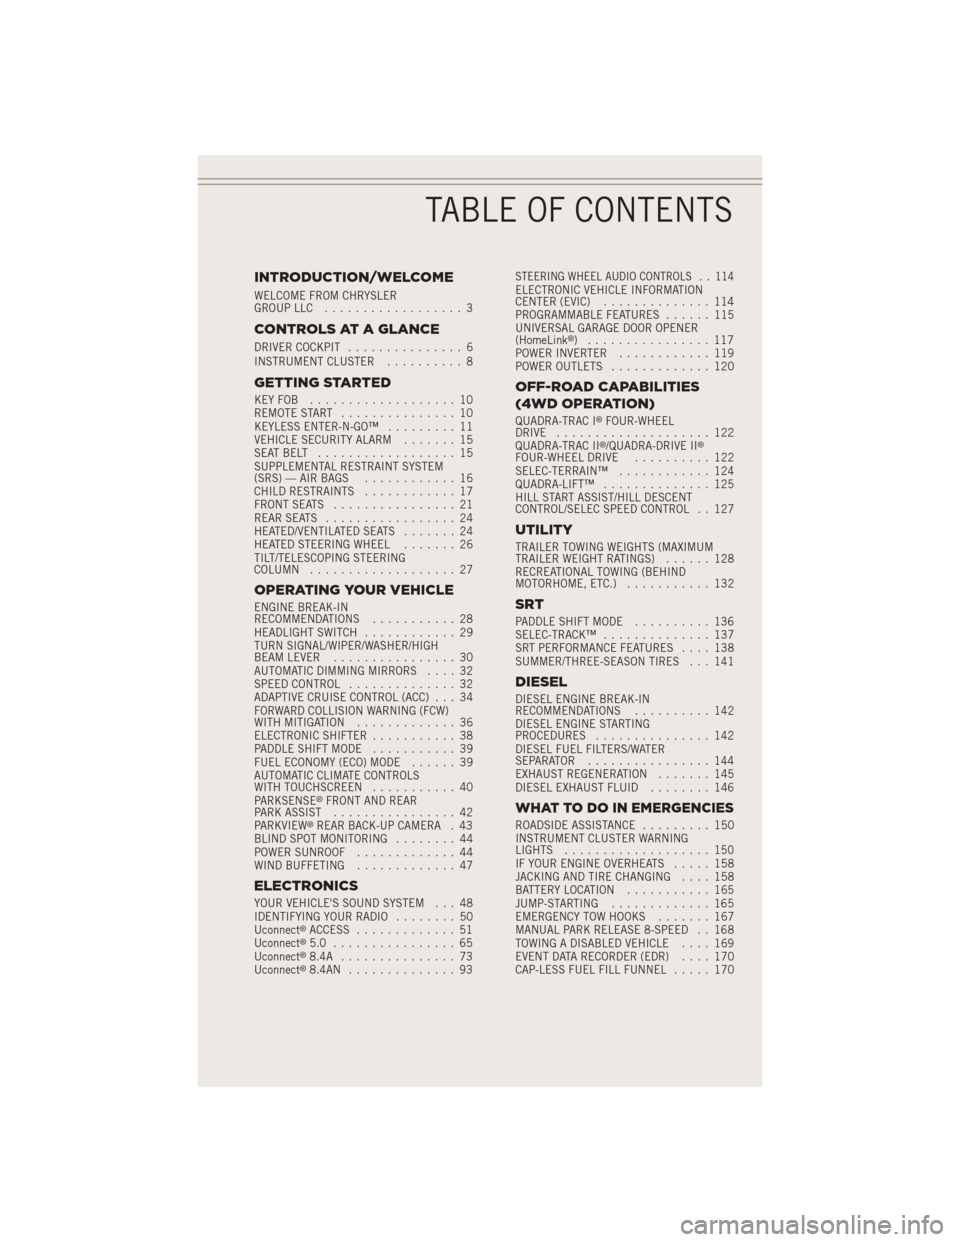
INTRODUCTION/WELCOME
WELCOME FROM CHRYSLER
GROUP LLC.................. 3
CONTROLS AT A GLANCE
DRIVER COCKPIT............... 6
INSTRUMENT CLUSTER.......... 8
GETTING STARTED
KEYFOB ................... 10
REMOTE START............... 10
KEYLESS ENTER-N-GO™......... 11
VEHICLE SECURITY ALARM....... 15
SEATBELT .................. 15
SUPPLEMENTAL RESTRAINT SYSTEM
(SRS) — AIR BAGS............ 16
CHILD RESTRAINTS............ 17
FRONT SEATS................ 21
REAR SEATS................. 24
HEATED/VENTILATED SEATS....... 24
HEATED STEERING WHEEL....... 26
TILT/TELESCOPING STEERING
COLUMN................... 27
OPERATING YOUR VEHICLE
ENGINE BREAK-IN
RECOMMENDATIONS........... 28
HEADLIGHT SWITCH............ 29
TURN SIGNAL/WIPER/WASHER/HIGH
BEAM LEVER................ 30
AUTOMATIC DIMMING MIRRORS.... 32
SPEED CONTROL.............. 32
ADAPTIVE CRUISE CONTROL (ACC) . . . 34
FORWARD COLLISION WARNING (FCW)
WITHMITIGATION ............. 36
ELECTRONIC SHIFTER........... 38
PADDLE SHIFT MODE........... 39
FUEL ECONOMY (ECO) MODE...... 39
AUTOMATIC CLIMATE CONTROLS
WITH TOUCHSCREEN........... 40
PARKSENSE
®FRONT AND REAR
PARK ASSIST................ 42
PARKVIEW
®REAR BACK-UP CAMERA . 43
BLIND SPOT MONITORING........ 44
POWER SUNROOF............. 44
WIND BUFFETING............. 47
ELECTRONICS
YOUR VEHICLE'S SOUND SYSTEM . . . 48
IDENTIFYING YOUR RADIO........ 50
Uconnect
®ACCESS............. 51
Uconnect®5.0 ................ 65
Uconnect®8.4A ............... 73
Uconnect®8.4AN .............. 93
STEERING WHEEL AUDIO CONTROLS . . 114ELECTRONIC VEHICLE INFORMATION
CENTER (EVIC).............. 114
PROGRAMMABLE FEATURES...... 115
UNIVERSAL GARAGE DOOR OPENER
(HomeLink
®) ................ 117
POWER INVERTER............ 119
POWER OUTLETS............. 120
OFF-ROAD CAPABILITIES
(4WD OPERATION)
QUADRA-TRAC I®FOUR-WHEEL
DRIVE .................... 122
QUADRA-TRAC II
®/QUADRA-DRIVE II®FOUR-WHEEL DRIVE.......... 122
SELEC-TERRAIN™............ 124
QUADRA-LIFT™.............. 125
HILL START ASSIST/HILL DESCENT
CONTROL/SELEC SPEED CONTROL . . 127
UTILITY
TRAILER TOWING WEIGHTS (MAXIMUM
TRAILER WEIGHT RATINGS)...... 128
RECREATIONAL TOWING (BEHIND
MOTORHOME, ETC.)........... 132
SRT
PADDLE SHIFT MODE.......... 136
SELEC-TRACK™.............. 137
SRT PERFORMANCE FEATURES.... 138
SUMMER/THREE-SEASON TIRES . . . 141
DIESEL
DIESEL ENGINE BREAK-IN
RECOMMENDATIONS.......... 142
DIESEL ENGINE STARTING
PROCEDURES............... 142
DIESEL FUEL FILTERS/WATER
SEPARATOR ................ 144
EXHAUST REGENERATION....... 145
DIESEL EXHAUST FLUID........ 146
WHAT TO DO IN EMERGENCIES
ROADSIDE ASSISTANCE......... 150
INSTRUMENT CLUSTER WARNING
LIGHTS................... 150
IF YOUR ENGINE OVERHEATS..... 158
JACKING AND TIRE CHANGING.... 158
BATTERY LOCATION........... 165
JUMP-STARTING............. 165
EMERGENCY TOW HOOKS....... 167
MANUAL PARK RELEASE 8-SPEED . . 168
TOWING A DISABLED VEHICLE.... 169
EVENT DATA RECORDER (EDR).... 170
CAP-LESS FUEL FILL FUNNEL..... 170
TABLE OF CONTENTS
Page 29 of 220
TILT/TELESCOPING STEERING COLUMN
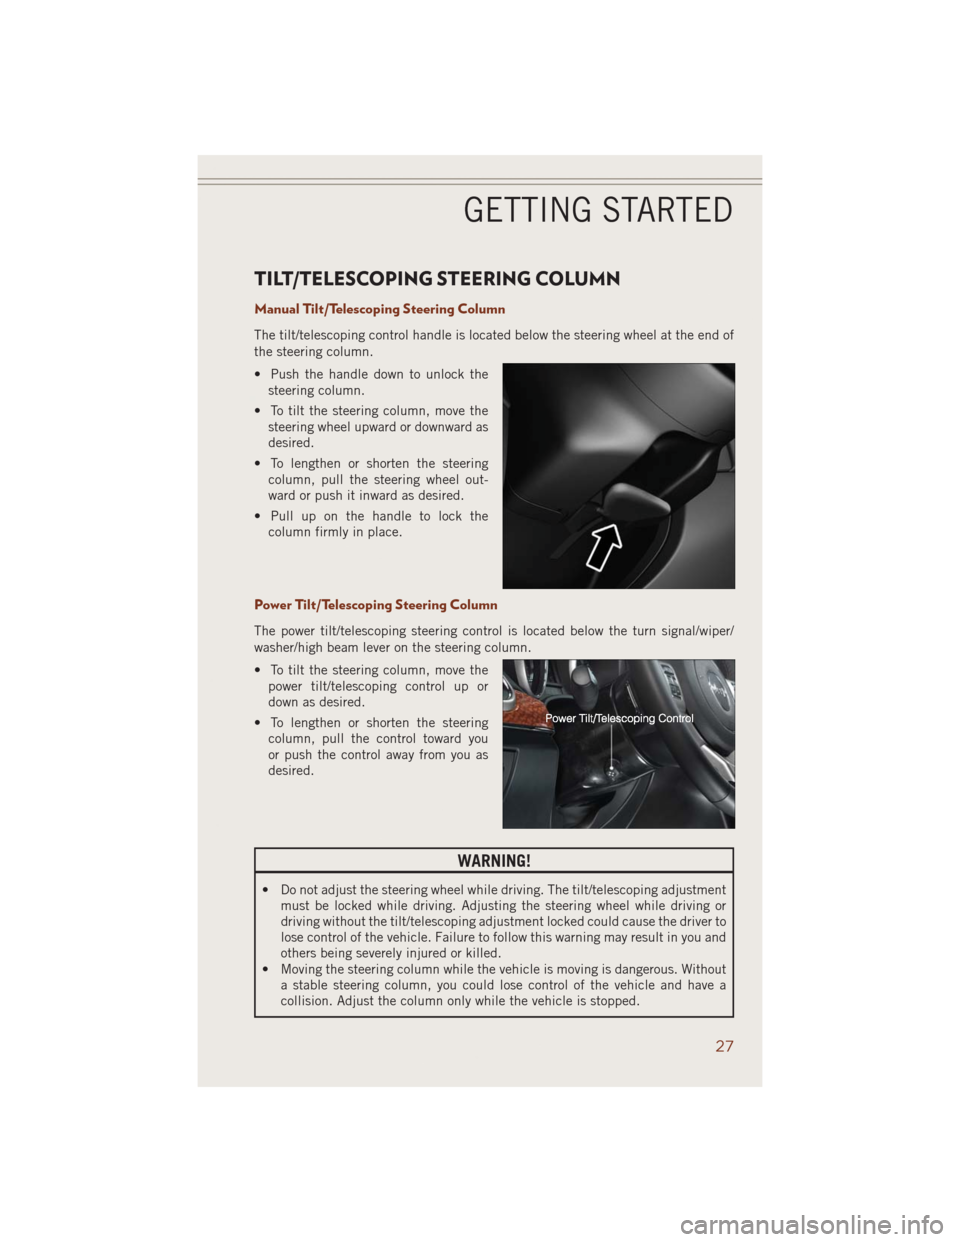
Manual Tilt/Telescoping Steering Column
The tilt/telescoping control handle is located below the steering wheel at the end of
the steering column.
• Push the handle down to unlock the
steering column.
• To tilt the steering column, move the
steering wheel upward or downward as
desired.
• To lengthen or shorten the steering
column, pull the steering wheel out-
ward or push it inward as desired.
• Pull up on the handle to lock the
column firmly in place.
Power Tilt/Telescoping Steering Column
The power tilt/telescoping steering control is located below the turn signal/wiper/
washer/high beam lever on the steering column.
• To tilt the steering column, move the
power tilt/telescoping control up or
down as desired.
• To lengthen or shorten the steering
column, pull the control toward you
or push the control away from you as
desired.
WARNING!
• Do not adjust the steering wheel while driving. The tilt/telescoping adjustment
must be locked while driving. Adjusting the steering wheel while driving or
driving without the tilt/telescoping adjustment locked could cause the driver to
lose control of the vehicle. Failure to follow this warning may result in you and
others being severely injured or killed.
• Moving the steering column while the vehicle is moving is dangerous. Without
a stable steering column, you could lose control of the vehicle and have a
collision. Adjust the column only while the vehicle is stopped.
GETTING STARTED
27
Page 33 of 220
High Beam Operation
• Push the lever forward to activate the high beams. Pull the lever toward you for
flash to pass.
NOTE:
For safe driving, turn off high beams when oncoming traffic is present to prevent
headlight glare and as a courtesy to other motorists.
Front Wipers
Intermittent, Low And High Operation
• Rotate the end of the lever to the first detent position for one of four intermittent
settings, the second detent for low wiper operation and the third detent for high
wiper operation.
Washer Operation
• Push inward on the end of the lever and hold for as long as spray is desired.
Mist
• Rotate the end of the lever downward when a single wipe is desired.
NOTE:
The mist feature does not activate the washer pump; therefore, no washer fluid will
be sprayed on the windshield. The wash function must be activated in order to spray
the windshield with washer fluid.
Rain Sensing Wipers
This feature senses moisture on the vehicles windshield and automatically activates
the wipers for the driver when the switch is in the intermittent position.
• Rotate the end of the lever to one of four settings to activate this feature and
adjust sensitivity.
This feature can be activated/deactivated using the Uconnect
®system screen. Refer
to the “Programmable Features” under the “Electronics” section in this guide.
Refer to the Owner's Manual on the DVD for further details.
Rear Wiper
Rear Wiper Operation
• Rotate the center portion of the lever forward to the first detent for intermittent
operation and to the second detent for rear wiper operation.
Rear Washer Operation
• Rotate the center portion of the lever past the second detent to activate the rear
washer.
OPERATING YOUR VEHICLE
31
Page 41 of 220
SPORT Mode
• To shift from DRIVE to SPORT, pull the shift lever rearward until “S” is displayed
in the EVIC.
• To shift back into DRIVE from SPORT, pull the shift lever rearward until “D” is
displayed in the EVIC.
PADDLE SHIFT MODE
Paddle Shift Mode is a driver-interactive transmission feature that offers manual gear
shifting to provide you with more control of the vehicle. Paddle Shift Mode allows you
to maximize engine braking, eliminate undesirable upshifts and downshifts, and
improve overall vehicle performance.
This system can also provide you with more control during passing, city driving, cold
slippery conditions, mountain driving, trailer towing, and many other situations.
Refer to the “Starting And Operating” section of your vehicle’s Owner’s Manual on
the DVD for further details.
FUEL ECONOMY (ECO) MODE
The Fuel Economy (ECO) mode can improve the vehicle’s overall fuel economy during
normal driving conditions.
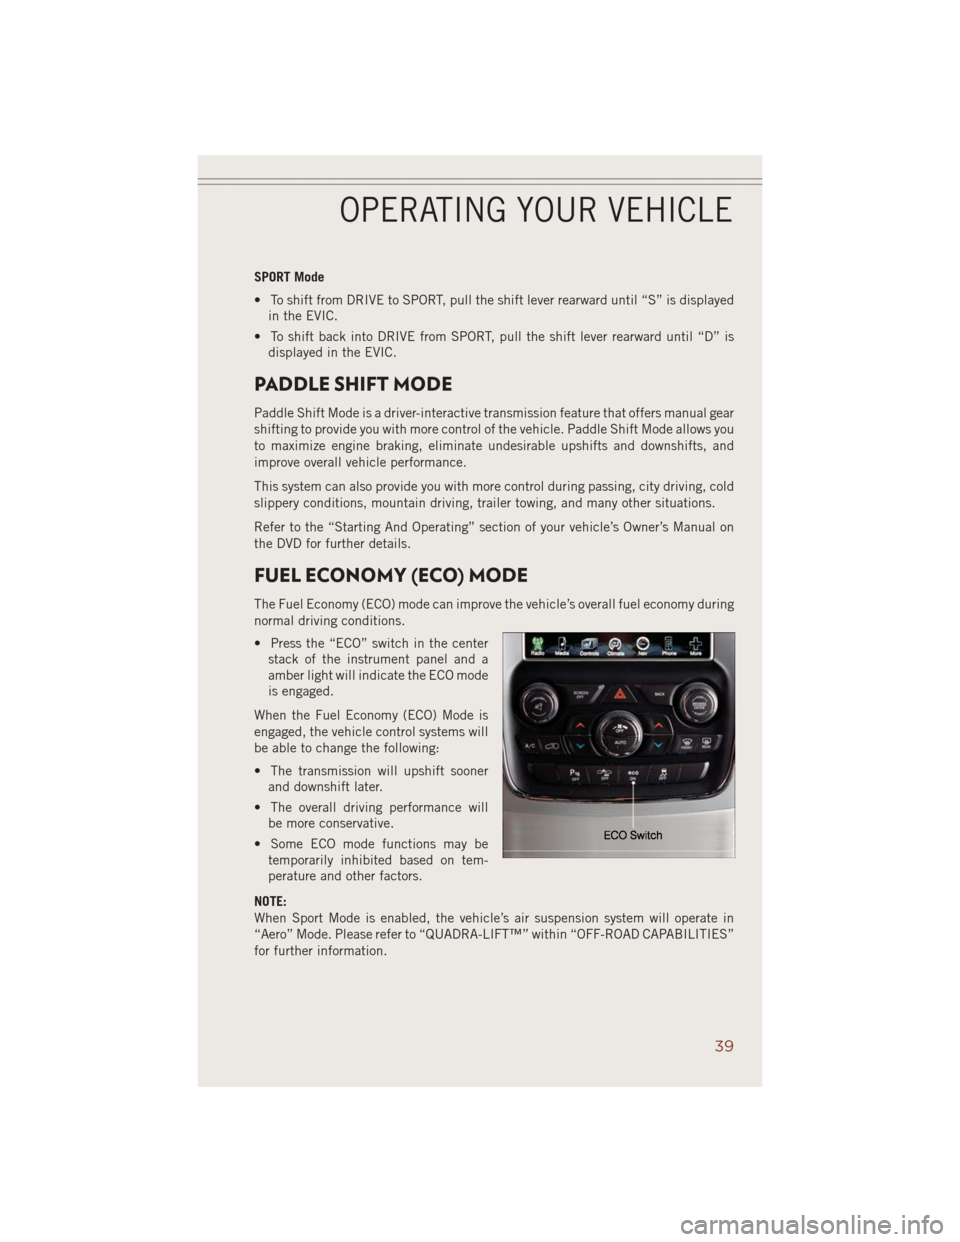
• Press the “ECO” switch in the center
stack of the instrument panel and a
amber light will indicate the ECO mode
is engaged.
When the Fuel Economy (ECO) Mode is
engaged, the vehicle control systems will
be able to change the following:
• The transmission will upshift sooner
and downshift later.
• The overall driving performance will
be more conservative.
• Some ECO mode functions may be
temporarily inhibited based on tem-
perature and other factors.
NOTE:
When Sport Mode is enabled, the vehicle’s air suspension system will operate in
“Aero” Mode. Please refer to “QUADRA-LIFT™” within “OFF-ROAD CAPABILITIES”
for further information.
OPERATING YOUR VEHICLE
39
Page 59 of 220
Selling Your Vehicle
When you sell your vehicle, we recommend that you remove your Uconnect
®Access
Account information from the vehicle. You can do this using the radio touchscreen in
the vehicle(Uconnect® 8.4AN only)or on the Mopar Owner Connect website
(moparownerconnect.com). Removing your account information cancels your sub-
scription and makes your vehicle factory-ready for a new owner/subscriber.
1.
From your vehicle’s radio touchscreen, select “Uconnect®Store” from the Apps Menu.
2. Select “My Apps,” then “Settings.” Press “Remove Uconnect®Account.”
3. Enter your Uconnect
®Security PIN, select “Proceed to Remove Vehicle from
Uconnect Account.”
For additional information on Uconnect
®:
• U.S. residents - visit DriveUconnect.com or call 1-877-855-8400.
• Canadian Residents - visit DriveUconnect.ca or call, 1-800-465-2001 (English)
or 1-800-387-9983 (French).
Built-In Features (Uconnect® 8.4A And 8.4AN Only)
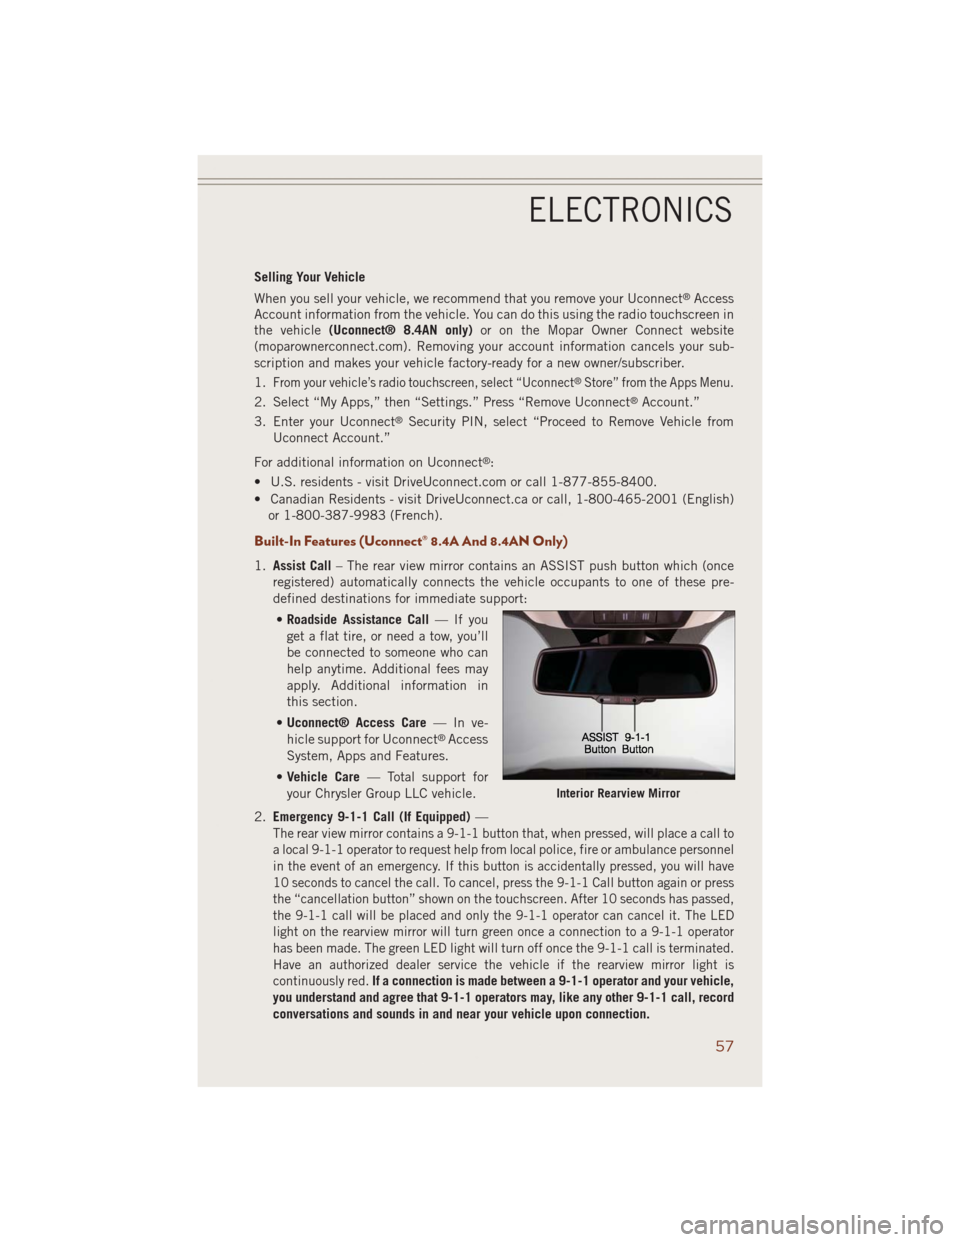
1.Assist Call– The rear view mirror contains an ASSIST push button which (once
registered) automatically connects the vehicle occupants to one of these pre-
defined destinations for immediate support:
•Roadside Assistance Call—Ifyou
get a flat tire, or need a tow, you’ll
be connected to someone who can
help anytime. Additional fees may
apply. Additional information in
this section.
•Uconnect® Access Care—Inve-
hicle support for Uconnect
®Access
System, Apps and Features.
•Vehicle Care— Total support for
your Chrysler Group LLC vehicle.
2.Emergency 9-1-1 Call (If Equipped)—
The rear view mirror contains a 9-1-1 button that, when pressed, will place a call to
a local 9-1-1 operator to request help from local police, fire or ambulance personnel
in the event of an emergency. If this button is accidentally pressed, you will have
10 seconds to cancel the call. To cancel, press the 9-1-1 Call button again or press
the “cancellation button” shown on the touchscreen. After 10 seconds has passed,
the 9-1-1 call will be placed and only the 9-1-1 operator can cancel it. The LED
light on the rearview mirror will turn green once a connection to a 9-1-1 operator
has been made. The green LED light will turn off once the 9-1-1 call is terminated.
Have an authorized dealer service the vehicle if the rearview mirror light is
continuously red.
If a connection is made between a 9-1-1 operator and your vehicle,
you understand and agree that 9-1-1 operators may, like any other 9-1-1 call, record
conversations and sounds in and near your vehicle upon connection.
Interior Rearview Mirror
ELECTRONICS
57
Page 87 of 220
Select The Mobile Phone's Priority Level
• When the pairing process has successfully completed, the system will prompt you
to choose whether or not this is your favorite phone. Selecting “Yes” will make this
phone the highest priority. This phone will take precedence over other paired
phones within range. Only one phone can be paired at a time.
• You are now ready to make hands-free calls. Press the “Uconnect
®Phone” button
on your steering wheel to begin.
Making A Phone Call
• Press the Uconnect®Phone button.
• After the BEEP, say “dial” then the number (or “call” then the name as listed in
your phone; see Phonebook).
NOTE:
You can also initiate a call by using the touchscreen on the Phone main screen.
Receiving A Call – Accept (And End)
• When an incoming call rings/is announced on Uconnect®, press the Phone
button
.
• To end a call, press the Hang Up or Phone button
.
Mute (Or Unmute) Microphone During Call
• During a call, press the “Mute” button on the touchscreen on the Phone main
screen to mute and unmute the call.
Transfer Ongoing Call Between Handset And Vehicle
• During an on-going call, touch the “Transfer” soft-key on the Phone main screen
to transfer an on-going call between handset and vehicle.
Common Phone Commands (Examples)
• “Call John Smith”
• “Call John Smith mobile”
• “Dial 1 248 555 1212”
• “Call Emergency”
• “Call Towing Assistance”
• “Redial”
ELECTRONICS
85
Page 108 of 220
Complete The Pairing Procedure
• When prompted on the phone, verify with radio password shown on the Uconnect
®
Screen.
• If your phone asks you to accept a connection request from Uconnect
®, select
“Yes”. If available, check the box telling it not to ask again – that way your phone
will automatically connect each time you start the vehicle.
Select The Mobile Phone's Priority Level
• When the pairing process has successfully completed, the system will prompt you
to choose whether or not this is your favorite phone. Selecting “Yes” will make this
phone the highest priority. This phone will take precedence over other paired
phones within range. Only one phone can be paired at a time.
• You are now ready to make hands-free calls. Press the “Uconnect
®Phone” button
on your steering wheel to begin.
Making A Phone Call
• Press the Uconnect®Phone button.
• After the BEEP, say “dial” then the number (or “call” then the name as listed in
your phone; see Phonebook).
NOTE:
You can also initiate a call by using the touchscreen on the Phone main screen.
Receiving A Call – Accept (And End)
• When an incoming call rings/is announced on Uconnect®, press the Phone
button
.
• To end a call, press the Hang Up or Phone button
.
Mute (Or Unmute) Microphone During Call
• During a call, press the “Mute” button on the touchscreen on the Phone main
screen to mute and unmute the call.
Transfer Ongoing Call Between Handset And Vehicle
• During an on-going call, touch the “Transfer” soft-key on the Phone main screen
to transfer an on-going call between handset and vehicle.
Common Phone Commands (Examples)
• “Call John Smith”
• “Call John Smith mobile”
• “Dial 1 248 555 1212”
• “Call Emergency”
• “Call Towing Assistance”
• “Redial”
ELECTRONICS
106
Page 113 of 220
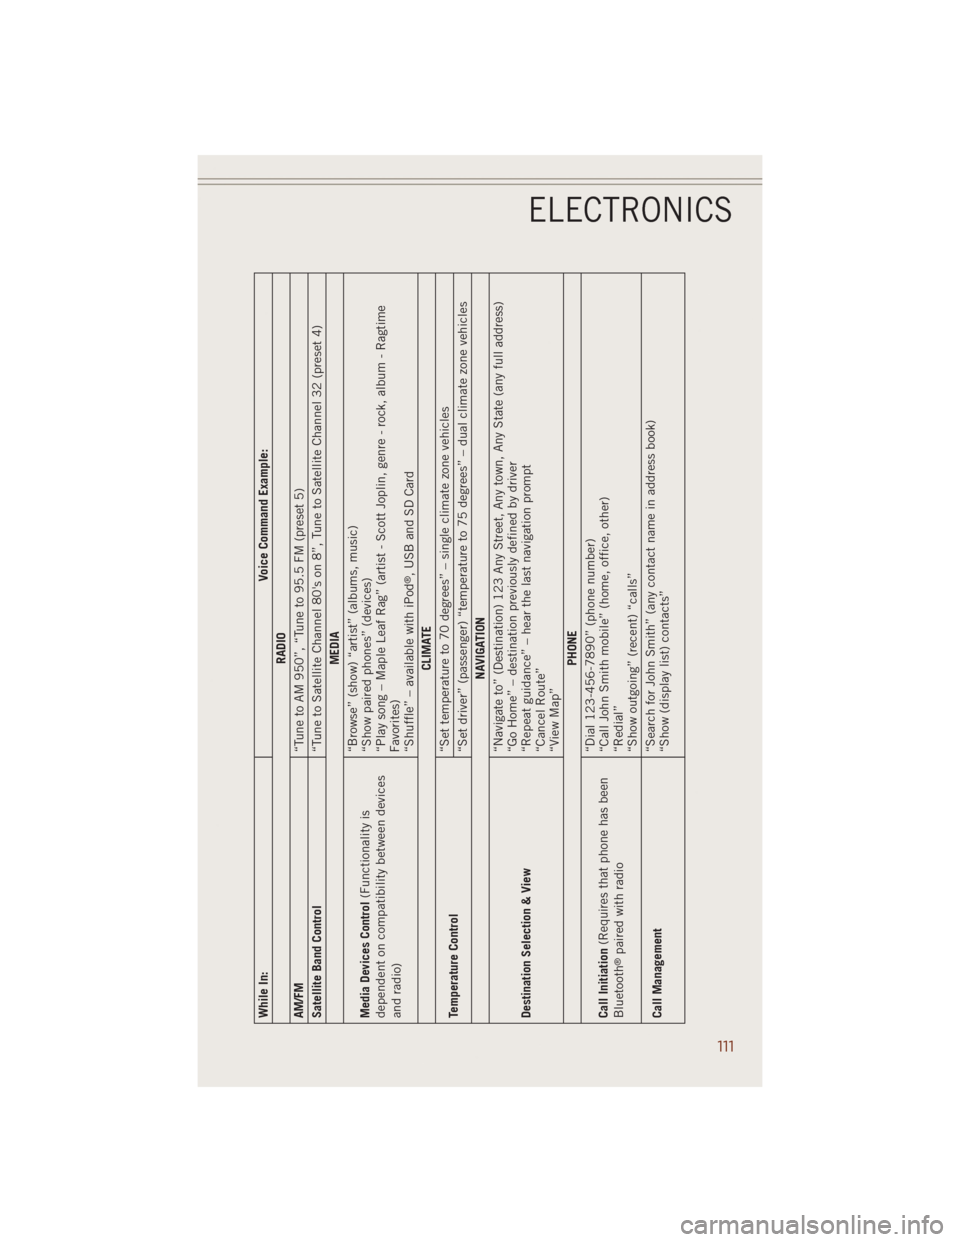
While In: Voice Command Example:
RADIO
AM/FM
“Tune to AM 950”, “Tune to 95.5 FM (preset 5)
Satellite Band Control
“Tune to Satellite Channel 80's on 8”, Tune to Satellite Channel 32 (preset 4)
MEDIA
Media Devices Control(Functionality is
dependent on compatibility between devices
and radio)“Browse” (show) “artist” (albums, music)
“Show paired phones” (devices)
“Play song – Maple Leaf Rag” (artist - Scott Joplin, genre - rock, album - Ragtime
Favorites)
“Shuffle” – available with iPod
®, USB and SD Card
CLIMATE
Temperature Control“Set temperature to 70 degrees” – single climate zone vehicles
“Set driver” (passenger) “temperature to 75 degrees” – dual climate zone vehicles
NAVIGATION
Destination Selection & View“Navigate to” (Destination) 123 Any Street, Any town, Any State (any full address)
“Go Home” – destination previously defined by driver
“Repeat guidance” – hear the last navigation prompt
“Cancel Route”
“View Map”
PHONE
Call Initiation(Requires that phone has been
Bluetooth
®paired with radio“Dial 123-456-7890” (phone number)
“Call John Smith mobile” (home, office, other)
“Redial”
“Show outgoing” (recent) “calls”
Call Management“Search for John Smith” (any contact name in address book)
“Show (display list) contacts”
ELECTRONICS
111
Page 130 of 220
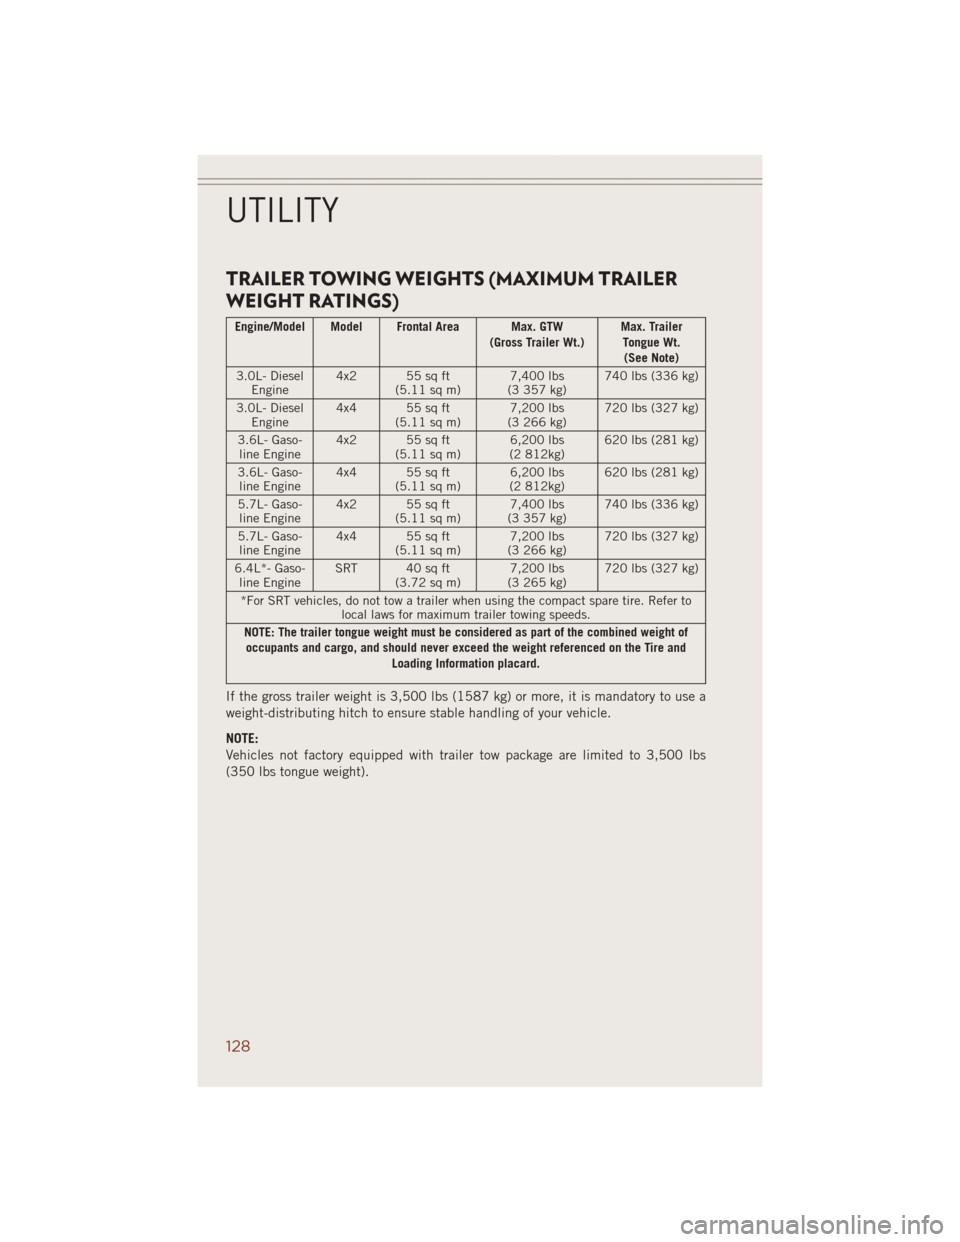
TRAILER TOWING WEIGHTS (MAXIMUM TRAILER
WEIGHT RATINGS)
Engine/Model Model Frontal Area Max. GTW
(Gross Trailer Wt.)Max. Trailer
Tongue Wt.
(See Note)
3.0L- Diesel
Engine4x2 55sqft
(5.11 sq m)7,400 lbs
(3 357 kg)740 lbs (336 kg)
3.0L- Diesel
Engine4x4 55sqft
(5.11 sq m)7,200 lbs
(3 266 kg)720 lbs (327 kg)
3.6L- Gaso-
line Engine4x2 55sqft
(5.11 sq m)6,200 lbs
(2 812kg)620 lbs (281 kg)
3.6L- Gaso-
line Engine4x4 55sqft
(5.11 sq m)6,200 lbs
(2 812kg)620 lbs (281 kg)
5.7L- Gaso-
line Engine4x2 55sqft
(5.11 sq m)7,400 lbs
(3 357 kg)740 lbs (336 kg)
5.7L- Gaso-
line Engine4x4 55sqft
(5.11 sq m)7,200 lbs
(3 266 kg)720 lbs (327 kg)
6.4L*- Gaso-
line EngineSRT 40sqft
(3.72 sq m)7,200 lbs
(3 265 kg)720 lbs (327 kg)
*For SRT vehicles, do not tow a trailer when using the compact spare tire. Refer to
local laws for maximum trailer towing speeds.
NOTE: The trailer tongue weight must be considered as part of the combined weight of
occupants and cargo, and should never exceed the weight referenced on the Tire and
Loading Information placard.
If the gross trailer weight is 3,500 lbs (1587 kg) or more, it is mandatory to use a
weight-distributing hitch to ensure stable handling of your vehicle.
NOTE:
Vehicles not factory equipped with trailer tow package are limited to 3,500 lbs
(350 lbs tongue weight).
UTILITY
128
Page 131 of 220
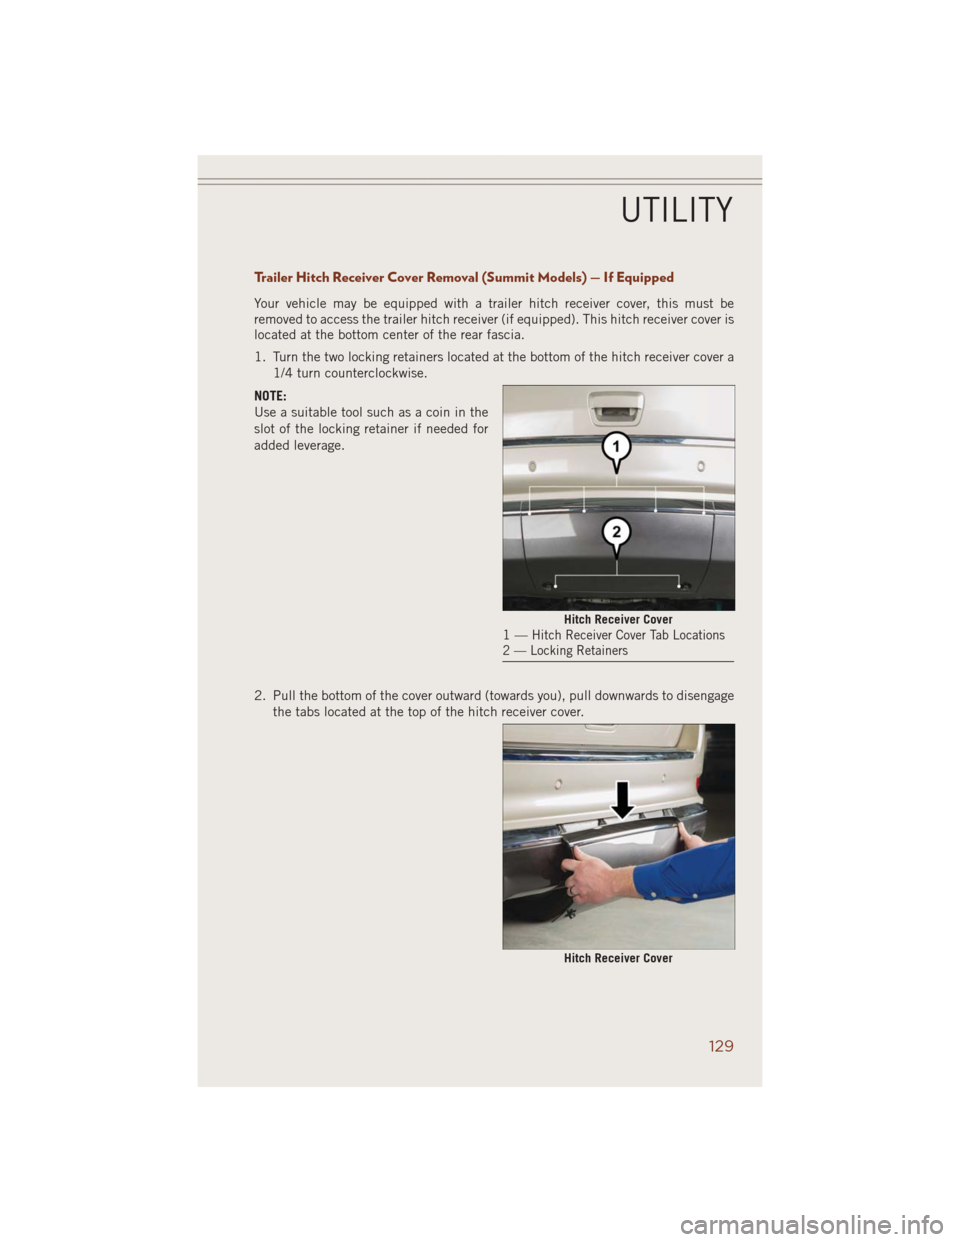
Trailer Hitch Receiver Cover Removal (Summit Models) — If Equipped
Your vehicle may be equipped with a trailer hitch receiver cover, this must be
removed to access the trailer hitch receiver (if equipped). This hitch receiver cover is
located at the bottom center of the rear fascia.
1. Turn the two locking retainers located at the bottom of the hitch receiver cover a
1/4 turn counterclockwise.
NOTE:
Use a suitable tool such as a coin in the
slot of the locking retainer if needed for
added leverage.
2. Pull the bottom of the cover outward (towards you), pull downwards to disengage
the tabs located at the top of the hitch receiver cover.
Hitch Receiver Cover1—Hitch Receiver Cover Tab Locations
2 — Locking Retainers
Hitch Receiver Cover
UTILITY
129