seats JEEP GRAND CHEROKEE 2016 WK2 / 4.G Owner's Manual
[x] Cancel search | Manufacturer: JEEP, Model Year: 2016, Model line: GRAND CHEROKEE, Model: JEEP GRAND CHEROKEE 2016 WK2 / 4.GPages: 276, PDF Size: 10.84 MB
Page 39 of 276
WARNING!
• Be certain that the seatback is securely locked into position. If the seatback isnot securely locked into position the seat will not provide the proper stability
for child seats and/or passengers. An improperly latched seat could cause
serious injury.
• The cargo area in the rear of the vehicle (with the rear seatbacks in the
locked-up or folded down position) should not be used as a play area by
children when the vehicle is in motion. They could be seriously injured in a
collision. Children should be seated and using the proper restraint system.
Reclining Rear Seat
To recline the seatback, lift the lever located on the outboard side of the seat, lean
back and release the lever at the desired position. To return the seatback, lift the
lever, lean forward and release the lever.
WARNING!
Do not ride with the seatback reclined so that the shoulder belt is no longer resting
against your chest. In a collision you could slide under the seat belt, which could
result in serious injury or death.
HEATED/VENTILATED SEATS
Front Heated Seats
The front heated seats control buttons are located within the climate or controls
screen of the touchscreen.
You can choose from HI, LO or OFF heat settings. The indicator arrows in touchscreen
buttons indicate the level of heat in use. Two indicator arrows will illuminate for HI,
one for LO and none for OFF.
• Press the heated seat button
once to turn the HI setting ON.
• Press the heated seat button
a second time to turn the LO setting ON.
• Press the heated seat button
a third time to turn the heating elements OFF.
If the HI-level setting is selected, the system will automatically switch to LO-level
after approximately 60 minutes of continuous operation. At that time, the display will
change from HI to LO, indicating the change. The LO-level setting will turn OFF
automatically after approximately 45 minutes.
NOTE:
• Once a heat setting is selected, heat will be felt within two to five minutes.
• The engine must be running for the heated seats to operate.
GETTING STARTED
37
Page 40 of 276
Vehicles Equipped With Remote Start
On models that are equipped with remote start, the heated seats can be programmed
to come on during a remote start.
This feature can be programmed through the Uconnect system. Refer to “Uconnect
Settings” in “Understanding Your Instrument Panel” in the Owner's Manual on the
DVD.
WARNING!
• Persons who are unable to feel pain to the skin because of advanced age,chronic illness, diabetes, spinal cord injury, medication, alcohol use, exhaus-
tion or other physical condition must exercise care when using the seat heater.
It may cause burns even at low temperatures, especially if used for long periods
of time.
• Do not place anything on the seat or seatback that insulates against heat, such
as a blanket or cushion. This may cause the seat heater to overheat. Sitting in
a seat that has been overheated could cause serious burns due to the increased
surface temperature of the seat.
Rear Heated Seats
On some models, the two outboard seats are equipped with heated seats. The heated
seat switches for these seats are located on the rear of the center console. There are
two heated seat switches
that allow the rear passengers to operate the seats
independently.
You can choose from HI, LO or OFF heat settings. The indicator lights in each switch
indicate the level of heat in use. Two indicator lights will illuminate for HI, one for LO
and none for OFF.
• Push the heated seat button
once to select HI-level heating.
• Push the heated seat button
a second time to select LO-level heating.
• Push the heated seat button
a third time to turn the heating elements OFF.
NOTE:
• Once a heat setting is selected, heat will be felt within two to five minutes.
• The engine must be running for the heated seats to operate.
If the HI-level setting is selected, the system will automatically switch to LO-level
after approximately 60 minutes of continuous operation. At that time, the number of
illuminated LEDs changes from two to one, indicating the change. The LO-level
setting will turn OFF automatically after approximately 45 minutes.
GETTING STARTED
38
Page 41 of 276
Front Ventilated Seats
If your vehicle is equipped with ventilated seats, the seat cushion and seat back will
have fans that draw the air from the passenger compartment and move air through
fine perforations in the seat cover to help keep the driver and front passenger cooler
in higher ambient temperatures. The fans operate at two speeds, HI and LO.
The front ventilated seats control buttons are located within the Uconnect system.
You can gain access to the control buttons through the climate screen or the controls
screen.
• Press the ventilated seat button
once to choose HI.
• Press the ventilated seat button
a second time to choose LO.
• Press the ventilated seat button
a third time to turn the ventilated seat OFF.
NOTE:
The engine must be running for the ventilated seats to operate.
Vehicles Equipped With Remote Start
On models that are equipped with remote start, the ventilated seats can be
programmed to come on during a remote start.
This feature can be programmed through the Uconnect system. Refer to “Uconnect
Settings” in “Understanding Your Instrument Panel” in the Owner's Manual on the
DVD.
HEATED STEERING WHEEL — IF EQUIPPED
The steering wheel contains a heating element that helps warm your hands in cold
weather. The heated steering wheel has only one temperature setting. Once the
heated steering wheel has been turned on it will operate for up to 80 minutes before
automatically shutting off. The heated steering wheel can shut off early or may not
turn on when the steering wheel is already warm.
The heated steering wheel control button is located within the Uconnect system. You
can gain access to the control button through the climate screen or the controls
screen.
• Press the heated steering wheel button
once to turn the heating element ON.
• Press the heated steering wheel button
a second time to turn the heating
element OFF.
NOTE:
The engine must be running for the heated steering wheel to operate.
GETTING STARTED
39
Page 127 of 276
Climate (8.4A/8.4AN)
Too hot? Too cold? Adjust vehicle temperatures hands-free and keep everyone
comfortable while you keep moving ahead. (If vehicle is equipped with climate
control.)
Push the VR button
. After the beep, say one of the following commands:
• Set driver temperature to 70degrees
• Set passenger temperature to 70degrees
TIP: Voice Command for Climate may only be used to adjust the interior temperature
of your vehicle. Voice Command will not work to adjust the heated seats or steering
wheel (if equipped).
Uconnect 8.4A/8.4AN Climate
ELECTRONICS
125
Page 146 of 276
VIDEO ENTERTAINMENT SYSTEM (VES)
System Operation
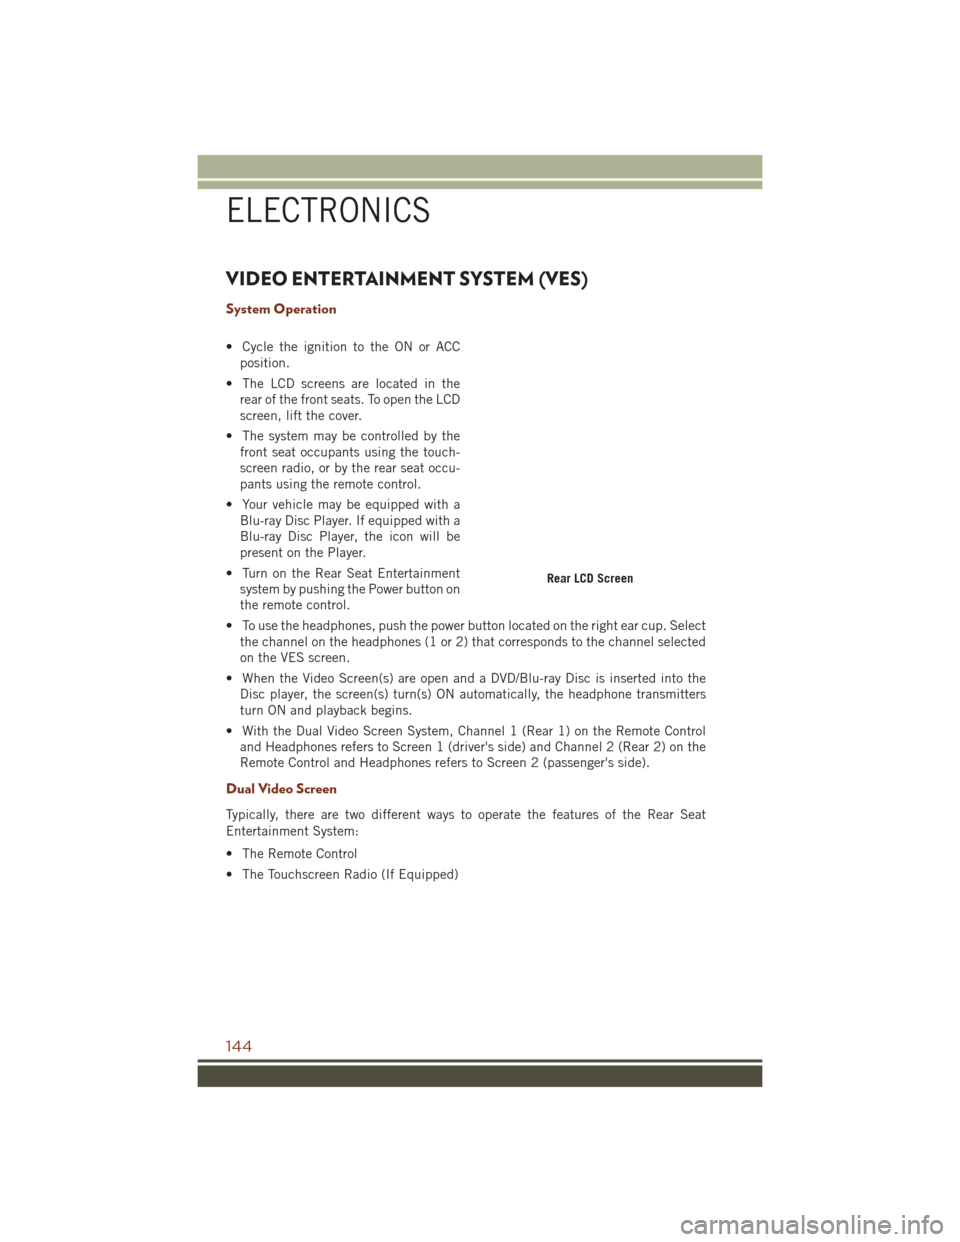
• Cycle the ignition to the ON or ACCposition.
• The LCD screens are located in the rear of the front seats. To open the LCD
screen, lift the cover.
• The system may be controlled by the front seat occupants using the touch-
screen radio, or by the rear seat occu-
pants using the remote control.
• Your vehicle may be equipped with a Blu-ray Disc Player. If equipped with a
Blu-ray Disc Player, the icon will be
present on the Player.
• Turn on the Rear Seat Entertainment system by pushing the Power button on
the remote control.
• To use the headphones, push the power button located on the right ear cup. Select the channel on the headphones (1 or 2) that corresponds to the channel selected
on the VES screen.
• When the Video Screen(s) are open and a DVD/Blu-ray Disc is inserted into the Disc player, the screen(s) turn(s) ON automatically, the headphone transmitters
turn ON and playback begins.
• With the Dual Video Screen System, Channel 1 (Rear 1) on the Remote Control and Headphones refers to Screen 1 (driver's side) and Channel 2 (Rear 2) on the
Remote Control and Headphones refers to Screen 2 (passenger's side).
Dual Video Screen
Typically, there are two different ways to operate the features of the Rear Seat
Entertainment System:
• The Remote Control
• The Touchscreen Radio (If Equipped)
Rear LCD Screen
ELECTRONICS
144
Page 253 of 276
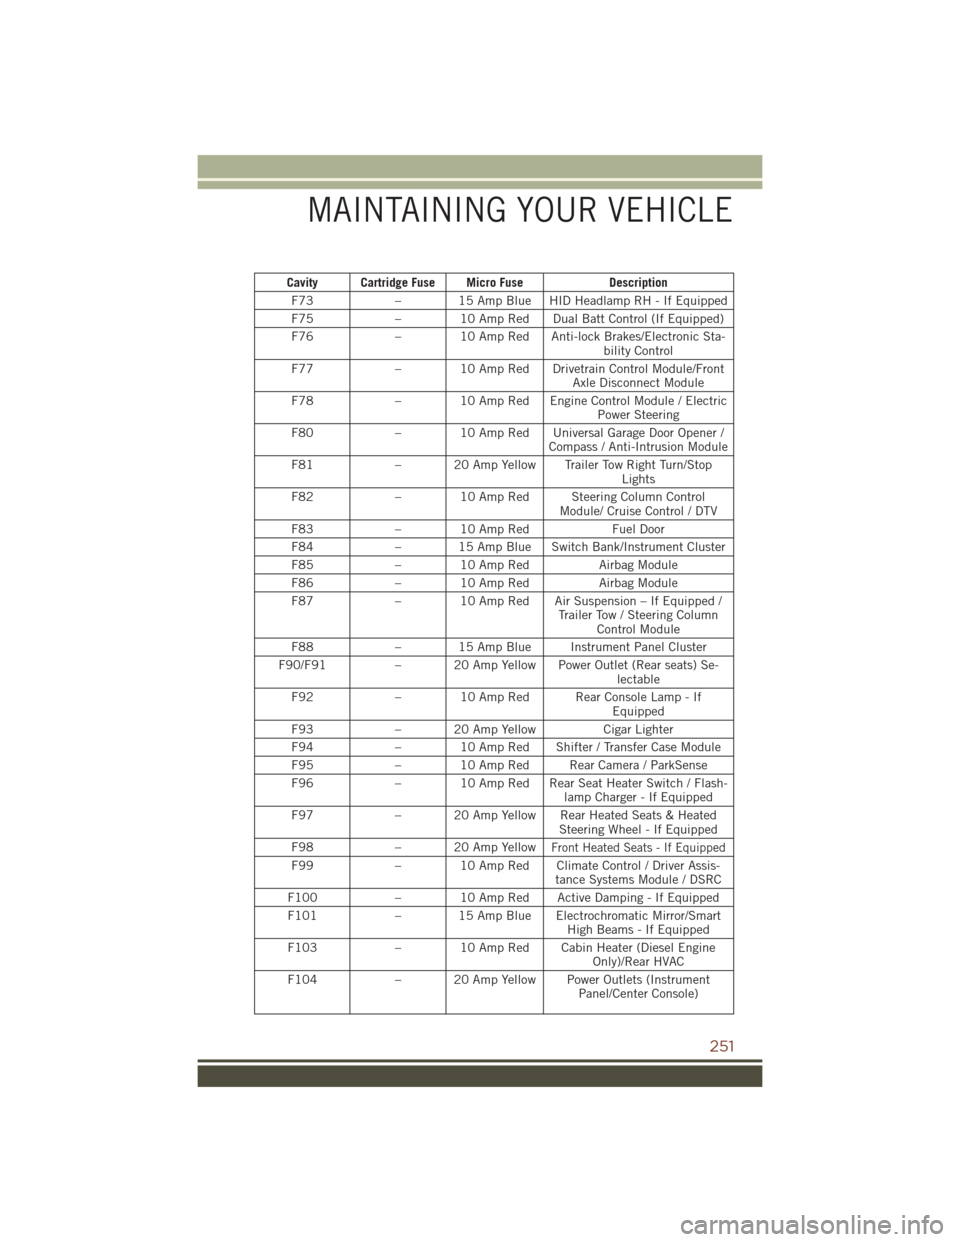
Cavity Cartridge Fuse Micro FuseDescription
F73 – 15 Amp Blue HID Headlamp RH - If Equipped
F75 – 10 Amp Red Dual Batt Control (If Equipped)
F76 – 10 Amp Red Anti-lock Brakes/Electronic Sta-
bility Control
F77 – 10 Amp Red Drivetrain Control Module/Front
Axle Disconnect Module
F78 – 10 Amp Red Engine Control Module / Electric
Power Steering
F80 – 10 Amp Red Universal Garage Door Opener /
Compass / Anti-Intrusion Module
F81 – 20 Amp Yellow Trailer Tow Right Turn/Stop
Lights
F82 – 10 Amp Red Steering Column Control
Module/ Cruise Control / DTV
F83 – 10 Amp Red Fuel Door
F84 – 15 Amp Blue Switch Bank/Instrument Cluster
F85 – 10 Amp Red Airbag Module
F86 – 10 Amp Red Airbag Module
F87 – 10 Amp Red Air Suspension – If Equipped /
Trailer Tow / Steering ColumnControl Module
F88 – 15 Amp Blue Instrument Panel Cluster
F90/F91 – 20 Amp Yellow Power Outlet (Rear seats) Se-
lectable
F92 – 10 Amp Red Rear Console Lamp - If
Equipped
F93 – 20 Amp Yellow Cigar Lighter
F94 – 10 Amp Red Shifter / Transfer Case Module
F95 – 10 Amp Red Rear Camera / ParkSense
F96 – 10 Amp Red Rear Seat Heater Switch / Flash-
lamp Charger - If Equipped
F97 – 20 Amp Yellow Rear Heated Seats & Heated
Steering Wheel - If Equipped
F98 – 20 Amp Yellow
Front Heated Seats - If Equipped
F99– 10 Amp Red Climate Control / Driver Assis-
tance Systems Module / DSRC
F100 – 10 Amp Red Active Damping - If Equipped
F101 – 15 Amp Blue Electrochromatic Mirror/Smart
High Beams - If Equipped
F103 – 10 Amp Red Cabin Heater (Diesel Engine
Only)/Rear HVAC
F104 – 20 Amp Yellow Power Outlets (Instrument
Panel/Center Console)
MAINTAINING YOUR VEHICLE
251
Page 268 of 276
Arm The Alarm...........17
Disarm The Alarm .........17
Keyless Entry ............12
Lock The Doors ...........12
Panic Alarm ............12
Remote Keyless Entry (RKE) . . .12
Remote Start ............13
Unlock The Doors .........12
Unlock The Liftgate ........12
Keyless Enter-N-Go ........12,14
Accessory Postition ........16
AutomaticTrans ..........16
EngineStopping ..........16
KeyFob ...............14
Lock The Vehicle’s Doors .....14
Lock/Unlock ..........14,15
Passive Entry ..........12,14
Remote Control ........14,15
Unlock From The Driver's Side . .14
Unlock From The Passenger
Side .................14
Unlock Liftgate ........12,15
Lane Change Assist ..........46
Lap/Shoulder Belts ...........18
LATCH (Lower Anchors And Tether ForCHildren) ............23
Liftgate .................12
Passive Entry ............12
UnlockWithKeyFob .......12
Liftgate, Power .............12
Liftgate Window Wiper/Washer ....49
Lights AirBag ...............22
Automatic Headlights .......45
Dimmer Switch, Headlight ....44
Engine Temperature Warning . .189
Fog ................195
High Beam Indicator ......195
Hill Descent Control Indicator .195
LowFuel .............195
SeatBeltReminder .......192
Security Alarm ..........195
TurnSignal .............44
Locks Liftgate, Tailgate ..........12
Lubrication, Body ...........232 Maintenance Free Battery
......232
Maintenance, General ........232
Maintenance Procedures .......232
Maintenance Record . .236, 242, 248
Maintenance Schedule.... 232, 237, 239, 243
Malfunction Indicator Light (Check Engine)...............194
Manual Transmission Lubricant Selection .......231
Master Cylinder (Brakes) .......232
MediaCenterRadio ..........98
MediaHub...............122
Memory Feature (Memory Seat) ....31
MemorySeat ..............31
Memory Seats And Radio .......31
Message Center Water In Fuel ...........181
Mopar .................260
MOPAR Accessories .........260
Multi-Function Control Lever .....44
Navigation ........ 109, 113, 126
New Vehicle Break-In Period .............42,180
Octane Rating, Gasoline (Fuel) . . .229
Oil, Engine. .196, 226, 229, 230, 232
Capacity ....... 226, 228, 230
Change Interval .........232
Checking .............232
Disposal ..............232
Filter ...... 226, 229, 230, 232
Filter Disposal ..........232
Materials Added To .......232
Recommendation . .226, 228, 232
Viscosity ....... 226, 228, 232
Oil Filter, Selection ..........232
Outlet Power ...............153
Overheating, Engine .........197
Paddle Shifters .............60
PaintCare...............232
ParkSense System, Front And Rear..69
ParkSense System, Rear .....69,70
Personalized Menu Bar ........102
Phone, Hands-Free (Uconnect) . . .133
INDEX
266
Page 269 of 276
Phone (Pairing).........116, 135
Phone (Uconnect) .....99,123, 133
Pinch Protection ............73
Placard, Tire And Loading Information .............252
Power Distribution Center (Fuses) . . .249
Glass Sunroof ...........71
Inverter ..............152
LiftGate ..............12
Outlet (Auxiliary Electrical
Outlet) ..............153
Seats ................30
Tilt/Telescoping Steering
Column ...............41
Power Shade Close.................72
Open.................72
Power Steering Fluid . .228, 229, 231
Preparation For Jacking .......200
Programmable Electronic Features ..............148
Purchase Apps UconnectAccess ......82,129
Quadra-Lift ..............158
Quadra-Trac ..............155
Radio ...............97,118 Presets ............91,103
Radio Operation ............91
Radio Screens .............100
Radio (Sound Systems) ......91,97
Rain Sensitive Wiper System .....48
RearCamera ..............70
Rear Cross Path .............71
Rear ParkSense System ......69,70
Rear Seat, Folding ...........36
Rear Wiper/Washer ...........49
Reclining Front Seats .........35
Recreational Towing .........167
Shifting Into Transfer Case
Neutral (N) ............169
Shifting Out Of Transfer Case
Neutral (N) ............170
Refrigerant ...............232
Remote Keyless Entry (RKE) Arm The Alarm ...........17 Disarm The Alarm
.........17
Lock The Doors ...........12
Unlock The Doors .........12
Remote Starting Enter Remote Start Mode .....13
How To Use Remote Start .....13
KeyFob ...............13
Remote Starting System .....13
Replacement Bulbs ..........257
Reporting Safety Defects .......259
Restraint, Head .............28
RollOverWarning ............5
Schedule, Maintenance .....232, 237, 243
SDCardPort .............107
Seat Belt Seat Belt Pretensioner ......18
SeatBeltMaintenance........232
Seat Belts ................18
Adjustable Shoulder Belt .....18
Pretensioners ...........18
Reminder .............192
Seats ...........30,34,37,38
Adjustment .............34
E a
syEntry .............34
Heated .............37,38
Manual ...............34
Memory ...............31
Rear Folding ............36
Reclining ..............35
Vented................39
Ventilated .............39
Security Alarm ............195
Arm The System ..........17
Disarm The System ........17
Security Alarm ...........17
Selec-Terrain .............157
Selection Of Coolant (Antifreeze) ......226, 229, 230
Signals, Turn .............195
Siri................ 119, 120
Sirius Satellite Radio .........104
Traffic & Weather .........113
SIRIUS Travel Link ..........114
Sound Systems (Radio) ....107, 109
SpareTire......... 199, 255, 256
SparkPlugs........... 226, 229
INDEX
267