service JEEP GRAND CHEROKEE 2016 WK2 / 4.G Owner's Guide
[x] Cancel search | Manufacturer: JEEP, Model Year: 2016, Model line: GRAND CHEROKEE, Model: JEEP GRAND CHEROKEE 2016 WK2 / 4.GPages: 276, PDF Size: 10.84 MB
Page 192 of 276
– Transmission Temperature Warning Light
This light indicates that there is excessive transmission fluid temperature that might
occur with severe usage such as trailer towing. If this light turns on, stop the vehicle
and run the engine at idle, with the transmission in NEUTRAL, until the light turns
off. Once the light turns off, you may continue to drive normally.
CAUTION!
Continuous driving with the Transmission Temperature Warning Light illuminated
will eventually cause severe transmission damage or transmission failure.
WARNING!
If you continue operating the vehicle when the Transmission Temperature Warning
Light is illuminated you could cause the fluid to boil over, come in contact with hot
engine or exhaust components and cause a fire.
– Anti-Lock Brake (ABS) Light
This light monitors the Anti-Lock Brake System (ABS). The light will turn on when the
ignition switch is turned to the ON/RUN position and may stay on for as long as four
seconds.
If the ABS light remains on or turns on while driving, it indicates that the Anti-Lock
portion of the brake system is not functioning and that service is required. However,
the conventional brake system will continue to operate normally if the BRAKE
warning light is not on.
If the ABS light is on, the brake system should be serviced as soon as possible to
restore the benefits of Anti-Lock brakes. If the ABS light does not turn on when the
ignition switch is turned to the ON/RUN position, have the light inspected by an
authorized dealer.
– Air Bag Warning Light
This light will turn on for four to eight seconds as a bulb check when the ignition
switch is first turned to the ON/RUN position. If the light is either not on during
starting, stays on, or turns on while driving, have the system inspected at an
authorized dealer as soon as possible. Refer to “Occupant Restraints” in “Things To
Know Before Starting Your Vehicle” in your Owner’s Manual on the DVD for further
information.
NOTE:
The Air Bag System is designed to be maintenance free.
WHAT TO DO IN EMERGENCIES
190
Page 193 of 276
– Electronic Throttle Control (ETC) Light
This light informs you of a problem with the Electronic Throttle Control (ETC) system.
If a problem is detected, the light will come on while the engine is running. Cycle the
ignition when the vehicle has completely stopped and the gear selector is placed in
the PARK position; the light should turn off.
If the light remains lit with the engine running, your vehicle will usually be drivable;
however, see an authorized service center immediately. If the light is flashing when
the engine is running, immediate service is required and you may experience reduced
performance, an elevated/rough idle or engine stall and your vehicle may require
towing.
– Tire Pressure Monitoring System (TPMS) Light
Each tire, including the spare (if provided), should be checked monthly, when cold
and inflated to the inflation pressure recommended by the vehicle manufacturer on
the vehicle placard or tire inflation pressure label. (If your vehicle has tires of a
different size than the size indicated on the vehicle placard or tire inflation pressure
label, you should determine the proper tire inflation pressure for those tires.)
As an added safety feature, your vehicle has been equipped with a Tire Pressure
Monitoring System (TPMS) which display in the Electronic Vehicle Information
Center (EVIC) or Driver Information Display (DID) when one or more of your tires is
significantly under-inflated. Accordingly, when the low tire pressure EVIC or DID
display illuminates, you should stop and check your tires as soon as possible, and
inflate them to the proper pressure. Driving on a significantly under-inflated tire
causes the tire to overheat and can lead to tire failure. Under-inflation also reduces
fuel efficiency and tire tread life, and may affect the vehicle’s handling and stopping
ability.
IF THE LIGHT STARTS FLASHING INDICATING A LOW TIRE PRESSURE, ADJUST THE AIR
PRESSURE IN THE LOW TIRE TO THE AIR PRESSURE SHOWN ON THE VEHICLE PLACARD OR
TIRE INFLATION PRESSURE LABEL LOCATED ON THE DRIVER'S DOOR.
NOTE:
After inflation, the vehicle may need to be driven for 20 minutes before the flashing light
will turn off.
Please note that the TPMS is not a substitute for proper tire maintenance, and it is
the driver’s responsibility to maintain correct tire pressure, even if under-inflation
has not reached the level to trigger illumination of the TPMS low EVIC or DID display.
WHAT TO DO IN EMERGENCIES
191
Page 196 of 276
– Malfunction Indicator Light (MIL)
The Malfunction Indicator Light (MIL) is part of an onboard diagnostic system called
OBD II that monitors engine and automatic transmission control systems. The light
will illuminate when the key is in the ON/RUN position before engine start. If the bulb
does not come on when turning the key from OFF to ON/RUN, have the condition
checked promptly.
Certain conditions, poor fuel quality, etc., may illuminate the light after engine start.
The vehicle should be serviced if the light stays on through several of your typical
driving cycles. In most situations, the vehicle will drive normally and will not require
towing.
CAUTION!
Prolonged driving with the Malfunction Indicator Light (MIL) on could cause
damage to the engine control system. It also could affect fuel economy and
driveability. If the MIL is flashing, severe catalytic converter damage and power
loss will soon occur. Immediate service is required.
WARNING!
A malfunctioning catalytic converter, as referenced above, can reach higher
temperatures than in normal operating conditions. This can cause a fire if you
drive slowly or park over flammable substances such as dry plants, wood,
cardboard, etc. This could result in death or serious injury to the driver, occupants
or others.
– Electronic Stability Control (ESC) Activation/Malfunction Indicator Light
The “ESC Activation/Malfunction Indicator Light” in the instrument cluster will
come on when the ignition switch is turned to the ON/RUN position. It should go out
with the engine running. If the “ESC Activation/Malfunction Indicator Light” comes
on continuously with the engine running, a malfunction has been detected in the ESC
system. If this light remains on after several ignition cycles, and the vehicle has been
driven several miles (kilometers) at speeds greater than 30 mph (48 km/h), see your
authorized dealer as soon as possible to have the problem diagnosed and corrected.
NOTE:
• The “ESC Off Indicator Light” and the “ESC Activation/Malfunction IndicatorLight” come on momentarily each time the ignition switch is turned to ON/RUN.
• Each time the ignition is turned to ON/RUN, the ESC system will be ON, even if it was turned off previously.
• The ESC system will make buzzing or clicking sounds when it is active. This is normal; the sounds will stop when ESC becomes inactive following the maneuver
that caused the ESC activation.
WHAT TO DO IN EMERGENCIES
194
Page 199 of 276
IF YOUR ENGINE OVERHEATS
In any of the following situations, you can reduce the potential for overheating by
taking the appropriate action.
• On the highways — slow down.
• In city traffic — while stopped, place the transmission in NEUTRAL, but do notincrease the engine idle speed while preventing vehicle motion with the brakes.
NOTE:
There are steps that you can take to slow down an impending overheat condition:
• If your air conditioner (A/C) is on, turn it off. The A/C system adds heat to the engine cooling system and turning the A/C off can help remove this heat.
• You can also turn the temperature control to maximum heat, the mode control to floor and the blower control to high. This allows the heater core to act as a
supplement to the radiator and aids in removing heat from the engine cooling
system.
CAUTION!
Driving with a hot cooling system could damage your vehicle. If the temperature
gauge reads HOT (H), pull over and stop the vehicle. Idle the vehicle with the air
conditioner turned off until the pointer drops back into the normal range. If the
pointer remains on HOT (H), and you hear continuous chimes, turn the engine off
immediately and call for service.
WARNING!
You or others can be badly burned by hot engine coolant (antifreeze) or steam from
your radiator. If you see or hear steam coming from under the hood, do not open
the hood until the radiator has had time to cool. Never try to open a cooling system
pressure cap when the radiator or coolant bottle is hot.
WHAT TO DO IN EMERGENCIES
197
Page 200 of 276
JACKING AND TIRE CHANGING
WARNING!
• Do not attempt to change a tire on the side of the vehicle close to movingtraffic. Pull far enough off the road to avoid the danger of being hit when
operating the jack or changing the wheel.
• Being under a jacked-up vehicle is dangerous. The vehicle could slip off the
jack and fall on you. You could be crushed. Never put any part of your body
under a vehicle that is on a jack. If you need to get under a raised vehicle, take
it to a service center where it can be raised on a lift.
• Never start or run the engine while the vehicle is on a jack.
• The jack is designed to be used as a tool for changing tires only. The jack
should not be used to lift the vehicle for service purposes. The vehicle should
be jacked on a firm level surface only. Avoid ice or slippery areas.
Run Flat Tires — SRT Models
This vehicle is equipped with “run flat” tires. Run flat tires allow the vehicle to be
driven approximately 50 miles (80km) at 55 mph (88km/h). Tire service should be
obtained to avoid prolonged run flat feature usage.
WARNING!
Do not exceed 50 mph (80 km/h) if the “Tire Pressure Monitoring Telltale Light”
is illuminated. Vehicle handling and braking may be reduced. You could have a
collision and be severely or fatally injured.
WHAT TO DO IN EMERGENCIES
198
Page 203 of 276
Jacking Instructions
WARNING!
Carefully follow these tire changing warnings to help prevent personal injury or
damage to your vehicle:
• Always park on a firm, level surface as far from the edge of the roadway aspossible before raising the vehicle.
• Turn on the Hazard Warning flasher.
• Chock the wheel diagonally opposite the wheel to be raised.
• Set the parking brake firmly and set an automatic transmission in PARK.
• Never start or run the engine with the vehicle on a jack.
• Do not let anyone sit in the vehicle when it is on a jack.
• Do not get under the vehicle when it is on a jack. If you need to get under a
raised vehicle, take it to a service center where it can be raised on a lift.
• Only use the jack in the positions indicated and for lifting this vehicle during
a tire change.
• If working on or near a roadway, be extremely careful of motor traffic.
• To assure that spare tires, flat or inflated, are securely stowed, spares must be
stowed with the valve stem facing the ground.
CAUTION!
Do not attempt to raise the vehicle by jacking on locations other than those
indicated in the Jacking Instructions for this vehicle.
1. Remove the spare tire, jack, and tools from storage.
2. Loosen (but do not remove) the wheel lug nuts by turning them to the left, one turn, while the wheel is still on the ground.
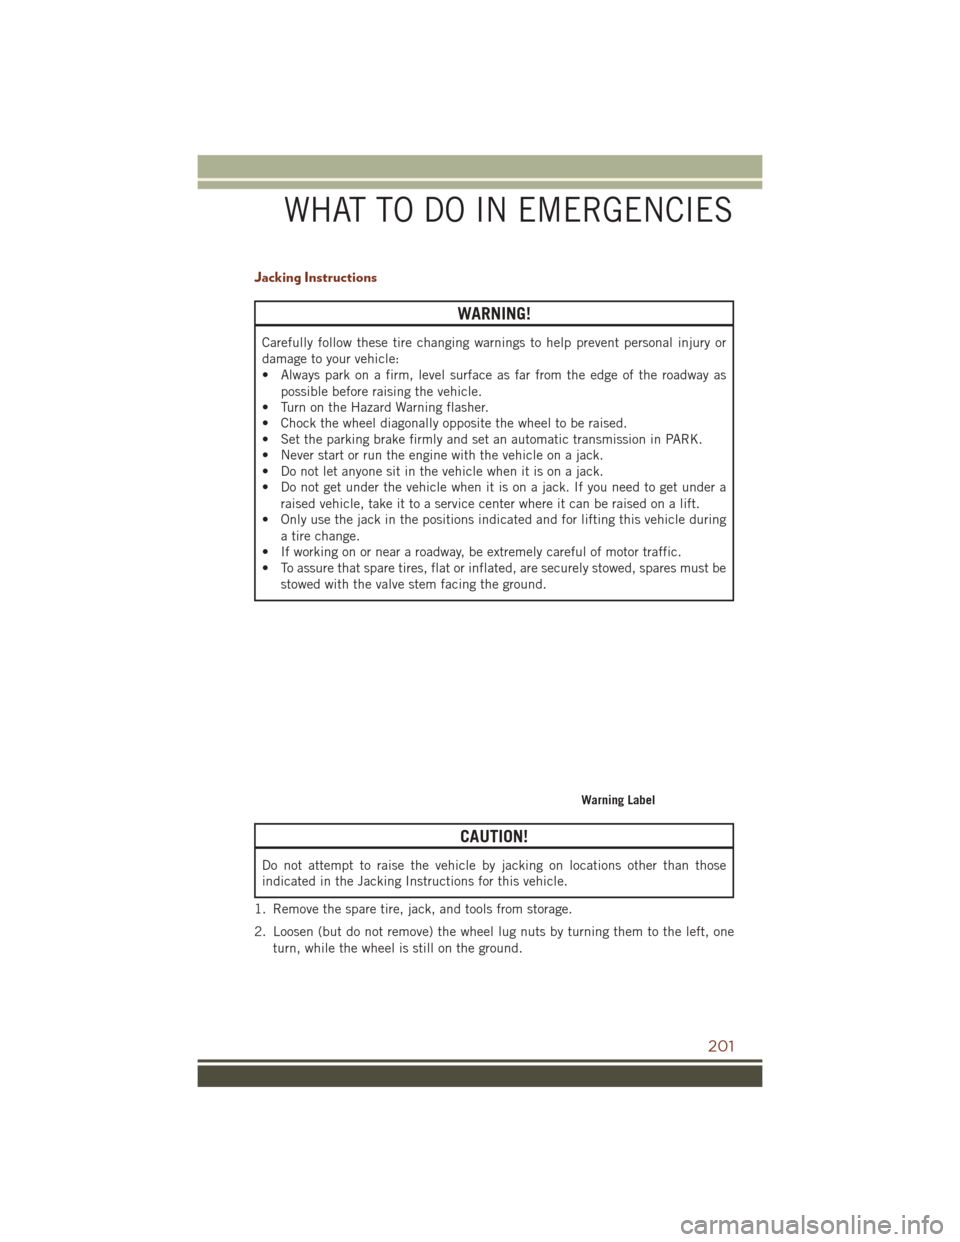
Warning Label
WHAT TO DO IN EMERGENCIES
201
Page 206 of 276
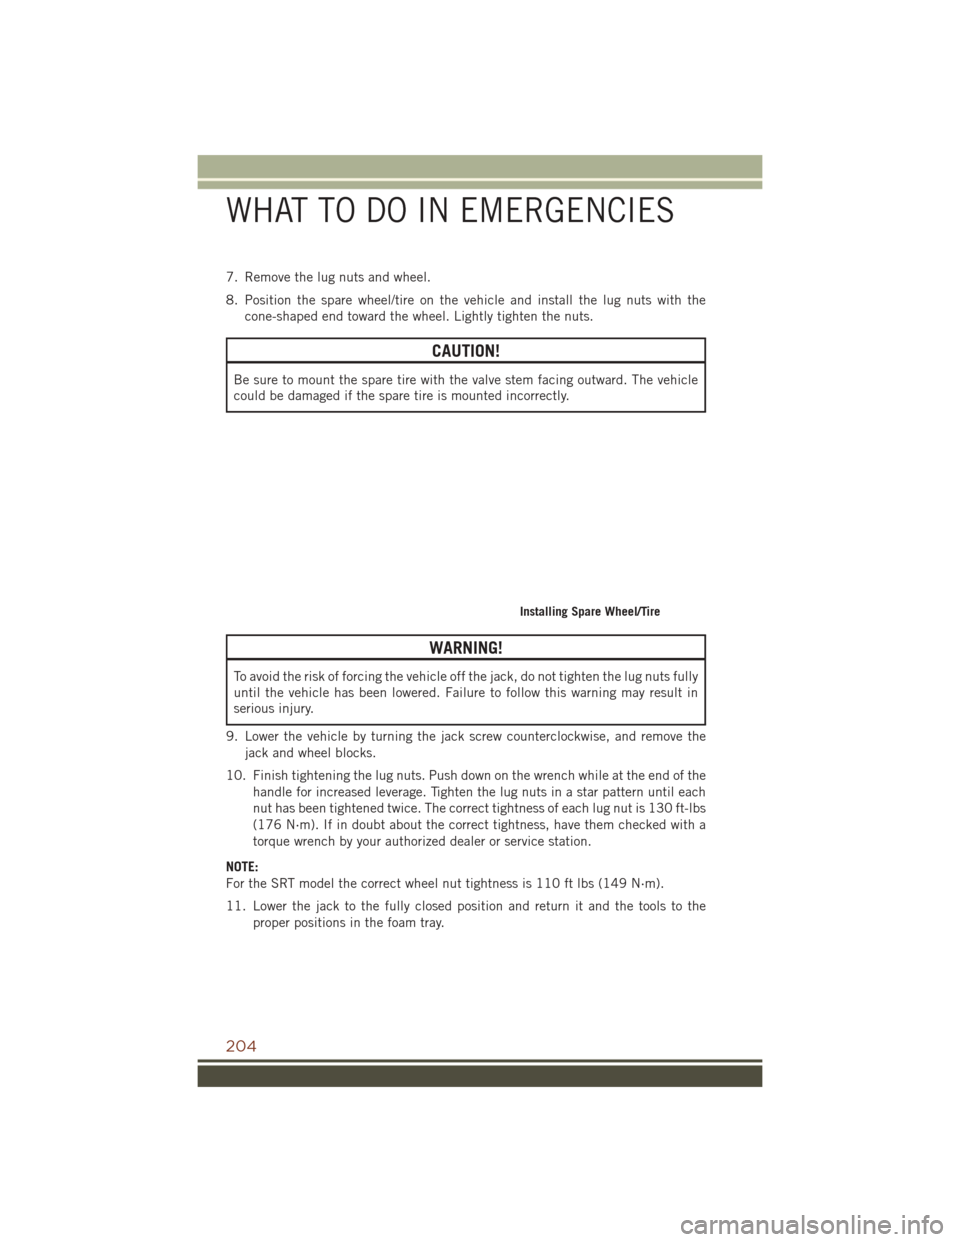
7. Remove the lug nuts and wheel.
8. Position the spare wheel/tire on the vehicle and install the lug nuts with thecone-shaped end toward the wheel. Lightly tighten the nuts.
CAUTION!
Be sure to mount the spare tire with the valve stem facing outward. The vehicle
could be damaged if the spare tire is mounted incorrectly.
WARNING!
To avoid the risk of forcing the vehicle off the jack, do not tighten the lug nuts fully
until the vehicle has been lowered. Failure to follow this warning may result in
serious injury.
9. Lower the vehicle by turning the jack screw counterclockwise, and remove the jack and wheel blocks.
10. Finish tightening the lug nuts. Push down on the wrench while at the end of the handle for increased leverage. Tighten the lug nuts in a star pattern until each
nut has been tightened twice. The correct tightness of each lug nut is 130 ft-lbs
(176 N·m). If in doubt about the correct tightness, have them checked with a
torque wrench by your authorized dealer or service station.
NOTE:
For the SRT model the correct wheel nut tightness is 110 ft lbs (149 N·m).
11. Lower the jack to the fully closed position and return it and the tools to the proper positions in the foam tray.
Installing Spare Wheel/Tire
WHAT TO DO IN EMERGENCIES
204
Page 207 of 276
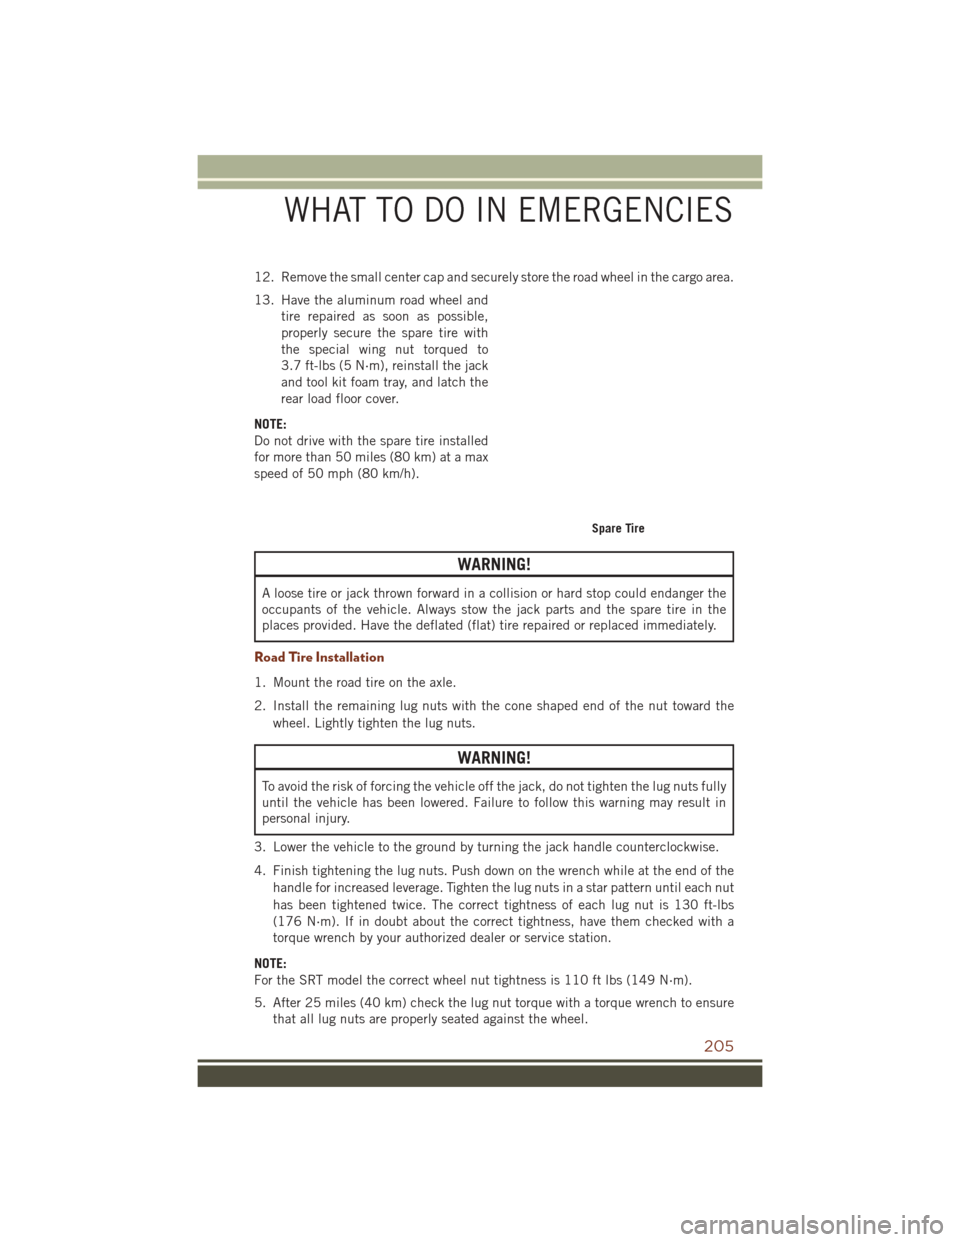
12. Remove the small center cap and securely store the road wheel in the cargo area.
13. Have the aluminum road wheel andtire repaired as soon as possible,
properly secure the spare tire with
the special wing nut torqued to
3.7 ft-lbs (5 N·m), reinstall the jack
and tool kit foam tray, and latch the
rear load floor cover.
NOTE:
Do not drive with the spare tire installed
for more than 50 miles (80 km) at a max
speed of 50 mph (80 km/h).
WARNING!
A loose tire or jack thrown forward in a collision or hard stop could endanger the
occupants of the vehicle. Always stow the jack parts and the spare tire in the
places provided. Have the deflated (flat) tire repaired or replaced immediately.
Road Tire Installation
1. Mount the road tire on the axle.
2. Install the remaining lug nuts with the cone shaped end of the nut toward the wheel. Lightly tighten the lug nuts.
WARNING!
To avoid the risk of forcing the vehicle off the jack, do not tighten the lug nuts fully
until the vehicle has been lowered. Failure to follow this warning may result in
personal injury.
3. Lower the vehicle to the ground by turning the jack handle counterclockwise.
4. Finish tightening the lug nuts. Push down on the wrench while at the end of the handle for increased leverage. Tighten the lug nuts in a star pattern until each nut
has been tightened twice. The correct tightness of each lug nut is 130 ft-lbs
(176 N·m). If in doubt about the correct tightness, have them checked with a
torque wrench by your authorized dealer or service station.
NOTE:
For the SRT model the correct wheel nut tightness is 110 ft lbs (149 N·m).
5. After 25 miles (40 km) check the lug nut torque with a torque wrench to ensure that all lug nuts are properly seated against the wheel.
Spare Tire
WHAT TO DO IN EMERGENCIES
205
Page 214 of 276
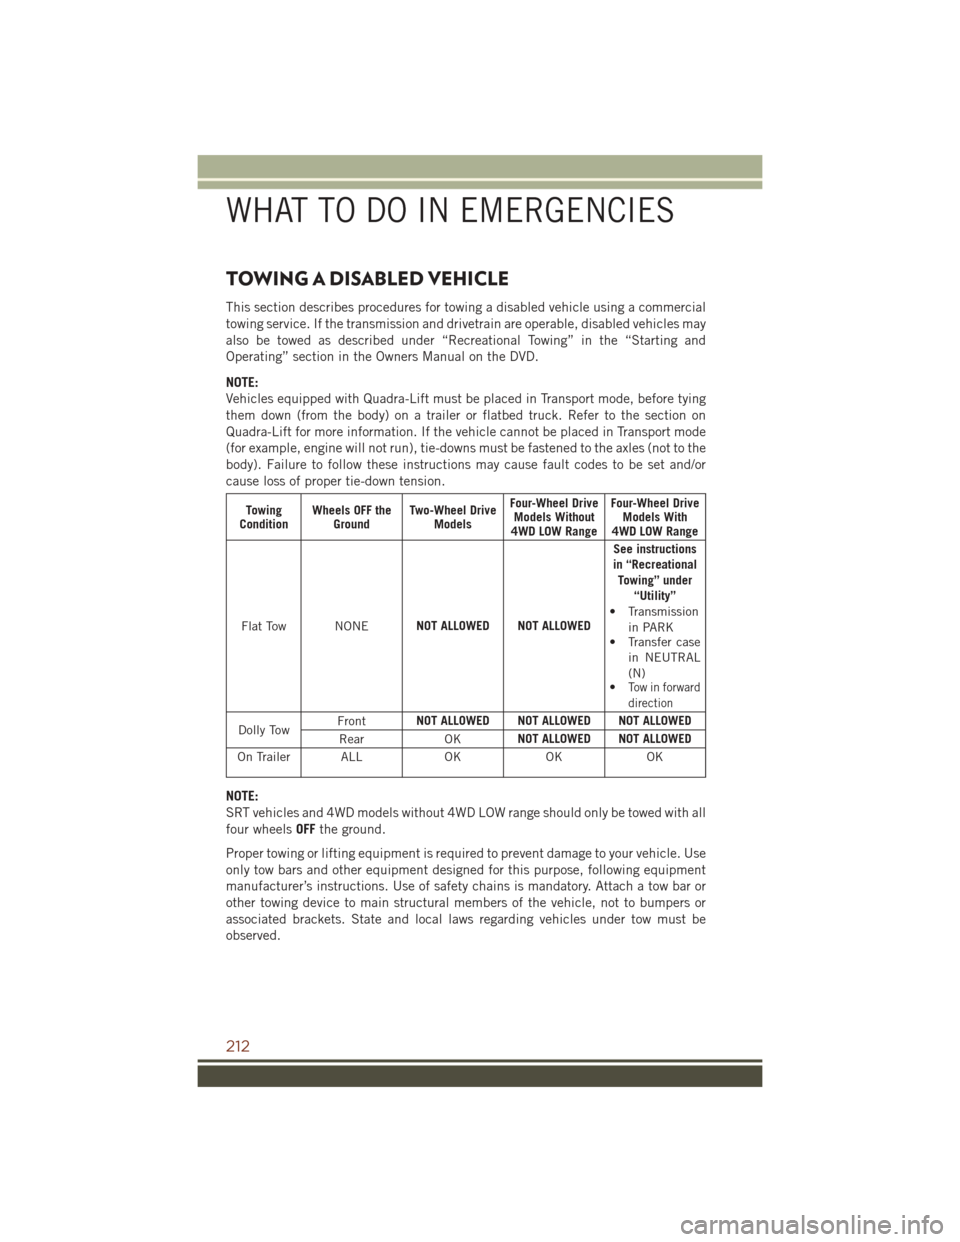
TOWING A DISABLED VEHICLE
This section describes procedures for towing a disabled vehicle using a commercial
towing service. If the transmission and drivetrain are operable, disabled vehicles may
also be towed as described under “Recreational Towing” in the “Starting and
Operating” section in the Owners Manual on the DVD.
NOTE:
Vehicles equipped with Quadra-Lift must be placed in Transport mode, before tying
them down (from the body) on a trailer or flatbed truck. Refer to the section on
Quadra-Lift for more information. If the vehicle cannot be placed in Transport mode
(for example, engine will not run), tie-downs must be fastened to the axles (not to the
body). Failure to follow these instructions may cause fault codes to be set and/or
cause loss of proper tie-down tension.
Towing
Condition Wheels OFF the
Ground Two-Wheel Drive
Models Four-Wheel Drive
Models Without
4WD LOW Range Four-Wheel Drive
Models With
4WD LOW Range
Flat Tow NONE NOT ALLOWED NOT ALLOWED See instructions
in “Recreational Towing” under “Utility”
• Transmission
in PARK
• Transfer case
in NEUTRAL
(N)
•
Tow in forward
direction
Dolly Tow Front
NOT ALLOWED NOT ALLOWED NOT ALLOWED
Rear OKNOT ALLOWED NOT ALLOWED
On Trailer ALL OKOKOK
NOTE:
SRT vehicles and 4WD models without 4WD LOW range should only be towed with all
four wheelsOFFthe ground.
Proper towing or lifting equipment is required to prevent damage to your vehicle. Use
only tow bars and other equipment designed for this purpose, following equipment
manufacturer’s instructions. Use of safety chains is mandatory. Attach a tow bar or
other towing device to main structural members of the vehicle, not to bumpers or
associated brackets. State and local laws regarding vehicles under tow must be
observed.
WHAT TO DO IN EMERGENCIES
212
Page 233 of 276
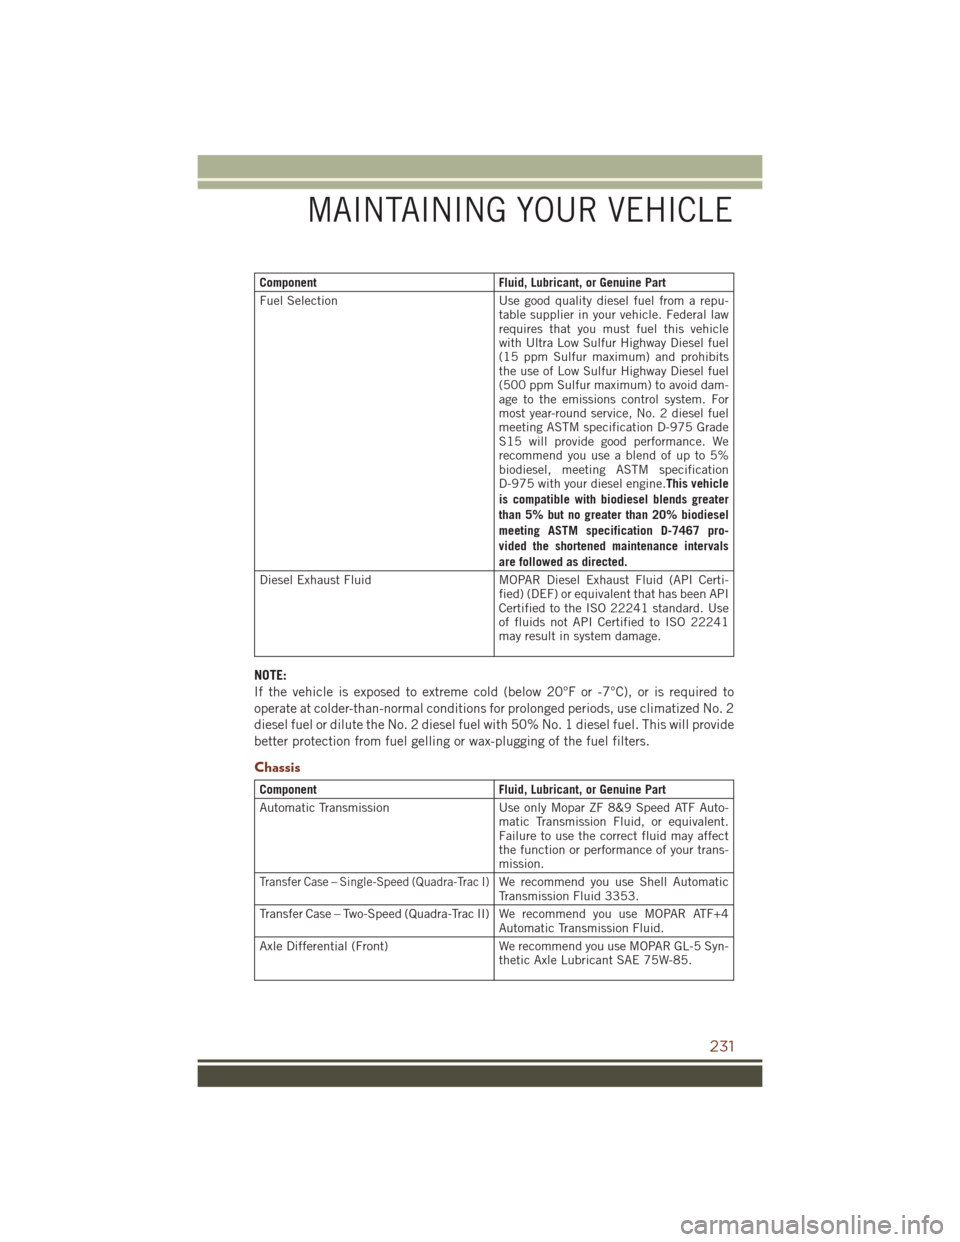
ComponentFluid, Lubricant, or Genuine Part
Fuel Selection Use good quality diesel fuel from a repu-
table supplier in your vehicle. Federal law
requires that you must fuel this vehicle
with Ultra Low Sulfur Highway Diesel fuel
(15 ppm Sulfur maximum) and prohibits
the use of Low Sulfur Highway Diesel fuel
(500 ppm Sulfur maximum) to avoid dam-
age to the emissions control system. For
most year-round service, No. 2 diesel fuel
meeting ASTM specification D-975 Grade
S15 will provide good performance. We
recommend you use a blend of up to 5%
biodiesel, meeting ASTM specification
D-975 with your diesel engine.This vehicle
is compatible with biodiesel blends greater
than 5% but no greater than 20% biodiesel
meeting ASTM specification D-7467 pro-
vided the shortened maintenance intervals
are followed as directed.
Diesel Exhaust Fluid MOPAR Diesel Exhaust Fluid (API Certi-
fied) (DEF) or equivalent that has been API
Certified to the ISO 22241 standard. Use
of fluids not API Certified to ISO 22241
may result in system damage.
NOTE:
If the vehicle is exposed to extreme cold (below 20°F or -7°C), or is required to
operate at colder-than-normal conditions for prolonged periods, use climatized No. 2
diesel fuel or dilute the No. 2 diesel fuel with 50% No. 1 diesel fuel. This will provide
better protection from fuel gelling or wax-plugging of the fuel filters.
Chassis
Component Fluid, Lubricant, or Genuine Part
Automatic Transmission Use only Mopar ZF 8&9 Speed ATF Auto-
matic Transmission Fluid, or equivalent.
Failure to use the correct fluid may affect
the function or performance of your trans-
mission.
Transfer Case – Single-Speed (Quadra-Trac I)We recommend you use Shell Automatic
Transmission Fluid 3353.
Transfer Case – Two-Speed (Quadra-Trac II) We recommend you use MOPAR ATF+4 Automatic Transmission Fluid.
Axle Differential (Front) We recommend you use MOPAR GL-5 Syn-
thetic Axle Lubricant SAE 75W-85.
MAINTAINING YOUR VEHICLE
231