mirror JEEP GRAND CHEROKEE 2017 WK2 / 4.G Owner's Manual
[x] Cancel search | Manufacturer: JEEP, Model Year: 2017, Model line: GRAND CHEROKEE, Model: JEEP GRAND CHEROKEE 2017 WK2 / 4.GPages: 372
Page 106 of 372
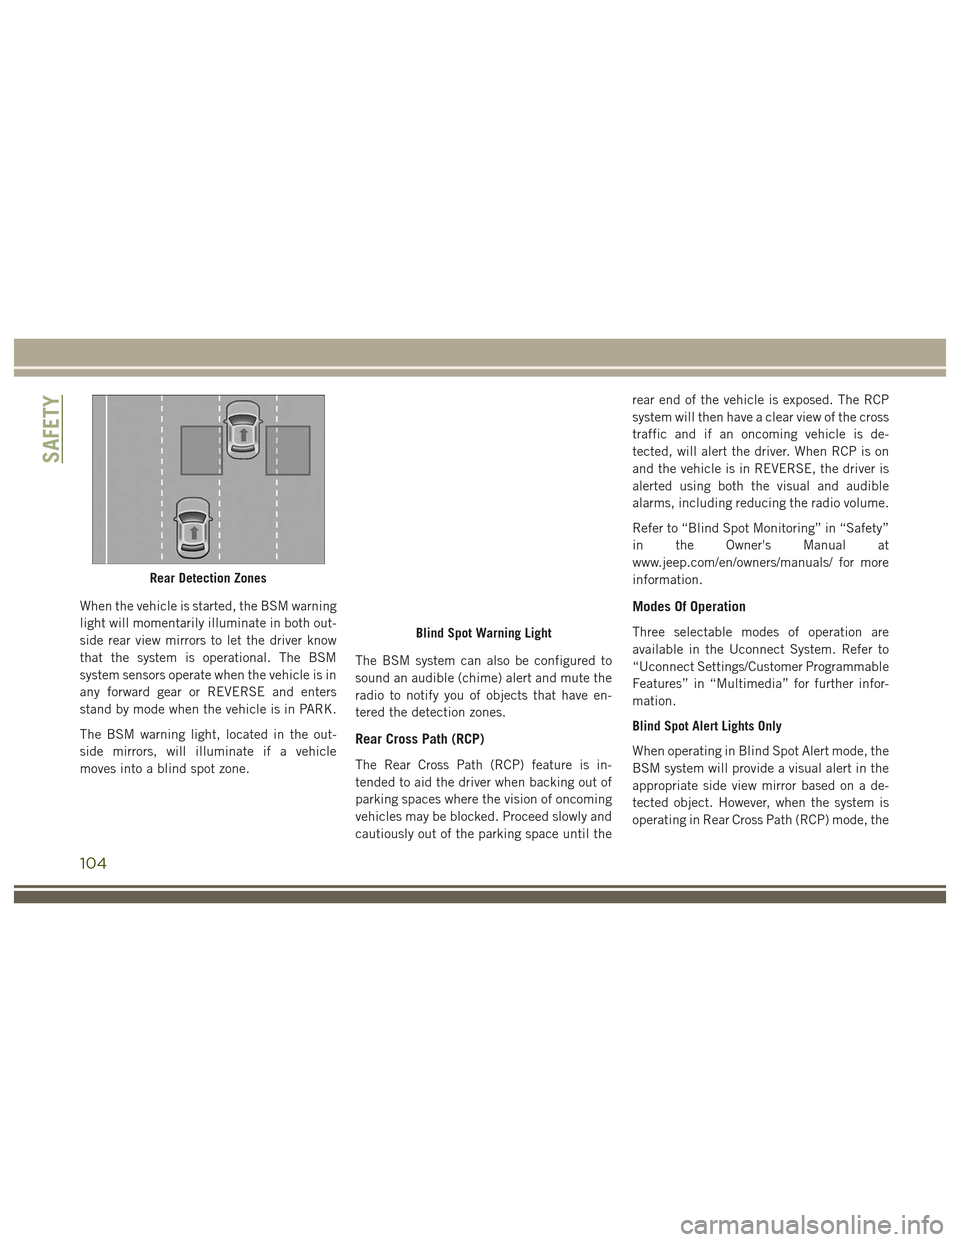
When the vehicle is started, the BSM warning
light will momentarily illuminate in both out-
side rear view mirrors to let the driver know
that the system is operational. The BSM
system sensors operate when the vehicle is in
any forward gear or REVERSE and enters
stand by mode when the vehicle is in PARK.
The BSM warning light, located in the out-
side mirrors, will illuminate if a vehicle
moves into a blind spot zone.The BSM system can also be configured to
sound an audible (chime) alert and mute the
radio to notify you of objects that have en-
tered the detection zones.
Rear Cross Path (RCP)
The Rear Cross Path (RCP) feature is in-
tended to aid the driver when backing out of
parking spaces where the vision of oncoming
vehicles may be blocked. Proceed slowly and
cautiously out of the parking space until the rear end of the vehicle is exposed. The RCP
system will then have a clear view of the cross
traffic and if an oncoming vehicle is de-
tected, will alert the driver. When RCP is on
and the vehicle is in REVERSE, the driver is
alerted using both the visual and audible
alarms, including reducing the radio volume.
Refer to “Blind Spot Monitoring” in “Safety”
in the Owner's Manual at
www.jeep.com/en/owners/manuals/ for more
information.
Modes Of Operation
Three selectable modes of operation are
available in the Uconnect System. Refer to
“Uconnect Settings/Customer Programmable
Features” in “Multimedia” for further infor-
mation.
Blind Spot Alert Lights Only
When operating in Blind Spot Alert mode, the
BSM system will provide a visual alert in the
appropriate side view mirror based on a de-
tected object. However, when the system is
operating in Rear Cross Path (RCP) mode, the
Rear Detection Zones
Blind Spot Warning Light
SAFETY
104
Page 107 of 372

system will respond with both visual and
audible alerts when a detected object is pres-
ent. Whenever an audible alert is requested,
the radio is muted.
Blind Spot Alert Lights/Chime
When operating in Blind Spot Alert Lights/
Chime mode, the BSM system will provide a
visual alert in the appropriate side view mirror
based on a detected object. If the turn signal
is then activated, and it corresponds to an
alert present on that side of the vehicle, an
audible chime will also be sounded. When-
ever a turn signal and detected object are
present on the same side at the same time,
both the visual and audible alerts will be
issued. In addition to the audible alert the
radio (if on) will also be muted.
NOTE:
Whenever an audible alert is requested by the
BSM system, the radio is also muted.
When the system is in RCP, the system shall
respond with both visual and audible alerts
when a detected object is present. Wheneveran audible alert is requested, the radio is also
muted. Turn/hazard signal status is ignored;
the RCP state always requests the chime.
Blind Spot Alert Off
When the BSM system is turned off there will
be no visual or audible alerts from either the
BSM or RCP systems.
NOTE:
The BSM system will store the current oper-
ating mode when the vehicle is shut off. Each
time the vehicle is started the previously
stored mode will be recalled and used.
Forward Collision Warning (FCW)
The Forward Collision Warning (FCW) system
provides the driver with audible and visual
warnings within the instrument cluster dis-
play to warn the driver when it detects a
potential frontal collision. The warnings are
intended to provide the driver with enough
time to react, avoid or mitigate the potential
collision.
NOTE:
FCW monitors the information from the for-
ward looking sensors as well as the Electronic
Brake Controller (EBC), to calculate the prob-
ability of a forward collision. When the sys-
tem determines that a forward collision is
probable, the driver will be provided with
audible and visual warnings.
Turning FCW ON Or OFF
The forward collision button is located in the
Uconnect display in the controls settings.
• To turn the FCW system OFF, press the
forward collision button once to turn the
system OFF.
• To turn the FCW system back ON, press the forward collision button again to turn
the system ON.
NOTE:
• The default status of FCW is “On”, this allows the system to warn you of a possible
collision with the vehicle in front of you.
105
Page 151 of 372
STARTING PROCEDURES —
GASOLINE ENGINES
Before starting your vehicle, adjust your seat,
adjust the inside and outside mirrors, fasten
your seat belt, and if present, instruct all
other occupants to buckle their seat belts.
WARNING!
• Before exiting a vehicle, always shift theautomatic transmission into PARK and
apply the parking brake. Always make
sure the keyless ignition node is in the
“OFF” mode, remove the key fob from
the vehicle and lock the vehicle.
• Never leave children alone in a vehicle,
or with access to an unlocked vehicle.
Leaving children in a vehicle unattended
is dangerous for a number of reasons. A
child or others could be seriously or
fatally injured. Children should be
warned not to touch the parking brake,
brake pedal or the gear selector.
• Do not leave the key fob in or near the
vehicle, or in a location accessible to
children, and do not leave the ignition of
WARNING!
a vehicle equipped with Keyless Enter-
N-Go in the ACC or ON/RUN mode. A
child could operate power windows,
other controls, or move the vehicle.
• Do not leave children or animals inside
parked vehicles in hot weather. Interior
heat build-up may cause serious injury
or death.
Normal Starting
To Turn On The Engine Using The ENGINE START/
STOP Button
1. The transmission must be in PARK or NEUTRAL.
2. Press and hold the brake pedal while pushing the ENGINE START/STOP button
once.
3. The system takes over and attempts to start the vehicle. If the vehicle fails to
start, the starter will disengage automati-
cally after 10 seconds.
4. If you wish to stop the cranking of the engine prior to the engine starting, push
the button again. NOTE:
Normal starting of either a cold or a warm
engine is obtained without pumping or press-
ing the accelerator pedal.
To Turn Off The Engine Using ENGINE START/
STOP Button
1. Place the gear selector in PARK, then
push and release the ENGINE START/
STOP button.
2. The ignition will return to the OFF mode.
3. If the gear selector is not in PARK, the ENGINE START/STOP button must be
held for two seconds or three short pushes
in a row with the vehicle speed above
5 mph (8 km/h) before the engine will
shut off. The ignition will remain in the
ACC mode until the gear selector is in
PARK and the button is pushed twice to
the OFF mode. If the gear selector is not in
PARK and the ENGINE START/STOP but-
ton is pushed once, the instrument cluster
will display a “Vehicle Not In Park” mes-
sage and the engine will remain running.
Never leave a vehicle out of the PARK
position, or it could roll.
149
Page 152 of 372
NOTE:
If the ignition is left in the ACC or RUN
(engine not running) mode and the transmis-
sion is in PARK, the system will automatically
time out after 30 minutes of inactivity and
the ignition will cycle to the OFF mode.
ENGINE START/STOP Button Functions — With
Driver’s Foot OFF The Brake Pedal (In PARK Or
NEUTRAL Position)
The ENGINE START/STOP button operates
similar to an ignition switch. It has four
modes, OFF, ACC, RUN and START. To
change the ignition modes without starting
the vehicle and use the accessories follow
these steps:
• Starting with the ignition in the OFF mode,
• Push the ENGINE START/STOP buttononce to place the ignition to the ACC mode
(instrument cluster will display “ACC”),
• Push the ENGINE START/STOP button a second time to place the ignition to the
RUN mode (instrument cluster will display
“ON/RUN”), • Push the ENGINE START/STOP button a
third time to return the ignition to the OFF
mode (instrument cluster will display
“OFF”).
Cold Weather Operation (Below –22°F Or
−30°C)
To ensure reliable starting at these tempera-
tures, use of an externally powered electric
engine block heater (available from your Au-
thorized Dealer) is recommended.
After Starting
The idle speed is controlled automatically,
and it will decrease as the engine warms up.
If Engine Fails To Start
WARNING!
• Never pour fuel or other flammable liq-uid into the throttle body air inlet open-
ing in an attempt to start the vehicle.
This could result in flash fire causing
serious personal injury.
• Do not attempt to push or tow your
vehicle to get it started. Vehicles
WARNING!
equipped with an automatic transmis-
sion cannot be started this way. Un-
burned fuel could enter the catalytic
converter and once the engine has
started, ignite and damage the converter
and vehicle.
• If the vehicle has a discharged battery,
booster cables may be used to obtain a
start from a booster battery or the battery
in another vehicle. This type of start can
be dangerous if done improperly. Refer
to “Jump-Starting” in “In Case Of Emer-
gency” for further information.
After Starting
The idle speed is controlled automatically,
and it will decrease as the engine warms up.
STARTING PROCEDURES —
DIESEL ENGINES
Before starting your vehicle, adjust your seat,
both inside and outside mirrors, and fasten
your seat belts.
STARTING AND OPERATING
150
Page 216 of 372
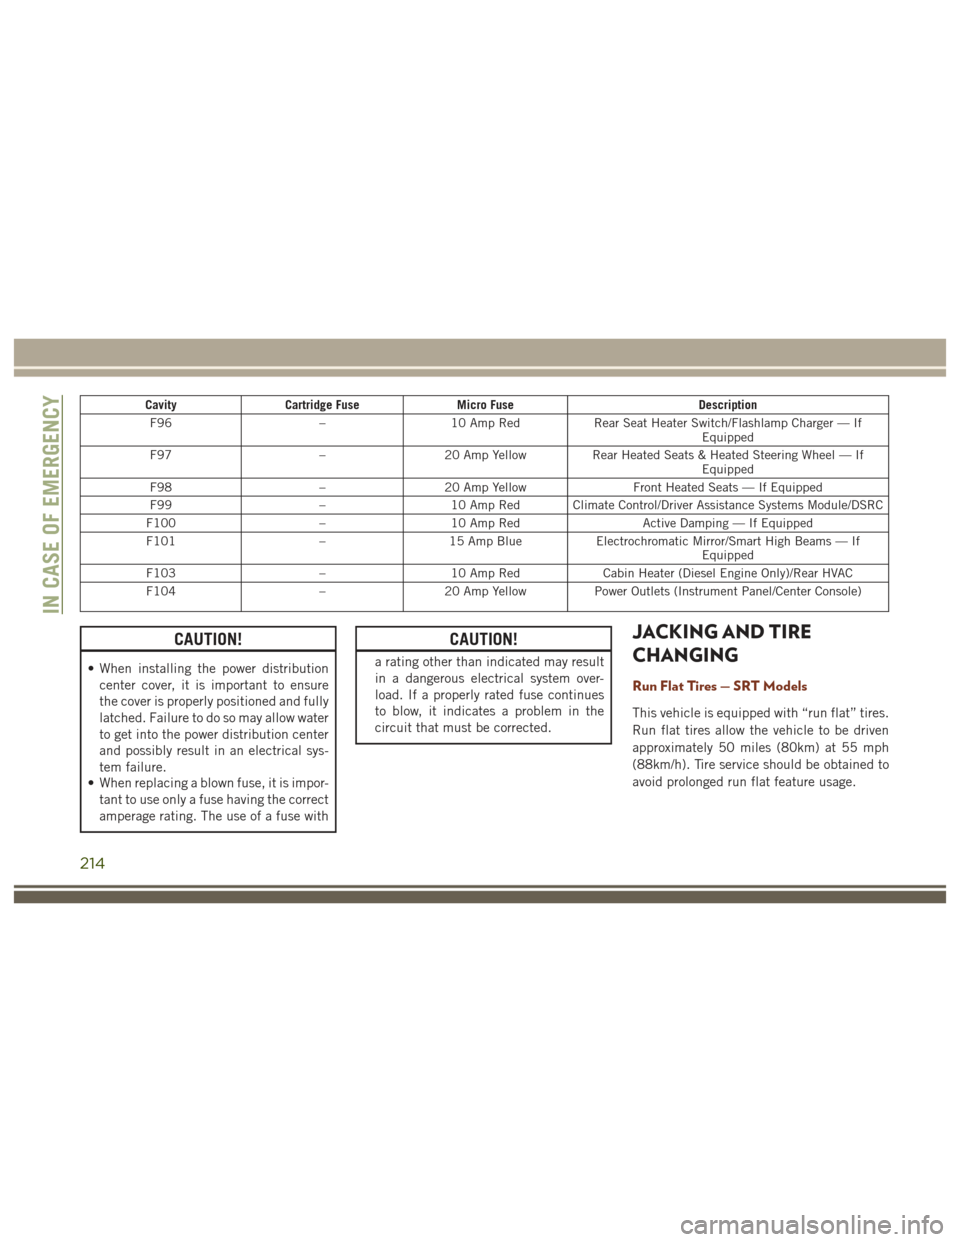
CavityCartridge Fuse Micro Fuse Description
F96 –10 Amp Red Rear Seat Heater Switch/Flashlamp Charger — If
Equipped
F97 –20 Amp Yellow Rear Heated Seats & Heated Steering Wheel — If
Equipped
F98 –20 Amp Yellow Front Heated Seats — If Equipped
F99 –10 Amp Red Climate Control/Driver Assistance Systems Module/DSRC
F100 –10 Amp Red Active Damping — If Equipped
F101 –15 Amp Blue Electrochromatic Mirror/Smart High Beams — If
Equipped
F103 –10 Amp Red Cabin Heater (Diesel Engine Only)/Rear HVAC
F104 –20 Amp Yellow Power Outlets (Instrument Panel/Center Console)
CAUTION!
• When installing the power distribution
center cover, it is important to ensure
the cover is properly positioned and fully
latched. Failure to do so may allow water
to get into the power distribution center
and possibly result in an electrical sys-
tem failure.
• When replacing a blown fuse, it is impor-
tant to use only a fuse having the correct
amperage rating. The use of a fuse with
CAUTION!
a rating other than indicated may result
in a dangerous electrical system over-
load. If a properly rated fuse continues
to blow, it indicates a problem in the
circuit that must be corrected.
JACKING AND TIRE
CHANGING
Run Flat Tires — SRT Models
This vehicle is equipped with “run flat” tires.
Run flat tires allow the vehicle to be driven
approximately 50 miles (80km) at 55 mph
(88km/h). Tire service should be obtained to
avoid prolonged run flat feature usage.
IN CASE OF EMERGENCY
214
Page 294 of 372
Uconnect Access enhances your ownership
and driving experience by connecting your
vehicle to an operable 1X (voice/data) or 3G
(data) network. When connected to an oper-
able 1X (voice/data) or 3G (data) network,
you can:
• Place a call to a local 9-1-1 Operator foremergency assistance.
• Remotely lock/unlock your doors and start your vehicle from virtually anywhere, using
the Uconnect Access App from your de-
vice. You can also do so by logging into
your owner site, or by calling Uconnect
Access Care when your vehicle has an
operable 1X (voice/data) or 3G (data) net-
work connection. Services can only be
used where coverage is available; see cov-
erage map for details.
• Turn your vehicle into a 3G Wi-Fi Hotspot and connect your devices to the internet.
• Receive text or email notifications if your vehicle's security alarm goes off.
• Receive stolen vehicle assistance, using GPS technology to help authorities locate
your vehicle if it is stolen. • Listen to your text messages or send free-
form text messages with your voice while
keeping your hands on the wheel, using
the Voice Texting feature. Requires a de-
vice that supports Bluetooth Message Ac-
cess Profile (MAP).
• Search for places to eat, shop, relax and play with Yelp, using your voice or on-
screen menu. Then navigate to them
(navigation standard on Uconnect
8.4 NAV, optional on Uconnect 8.4).
• Get operator assistance using the ASSIST button on your interior rearview mirror.
Before you drive, familiarize yourself with the
easy-to-use Uconnect Access services.
1. The ASSIST and 9-1-1 buttons are lo- cated on your rearview mirror. The ASSIST
button is used for contacting Roadside
Assistance, Vehicle Care and Uconnect
Access Care. The 9-1-1 button connects
you to emergency services. NOTE:
Vehicles sold in Canada and Mexico DO
NOT have 9-1-1 call system capabilities.
9-1-1 or other emergency line operators in
Canada and Mexico may not answer or
respond to 9-1-1 system calls.
2. The Uconnect “Apps
” button is lo-
cated in the center of the menu bar of the
radio touchscreen. This is where you can
manage your Apps and purchase 3G Wi-Fi
on demand.
3. The Uconnect Voice Command and Uconnect Phone buttons are located on
the left side of your steering wheel. These
buttons let you use your voice to give
commands, make phone calls, send and
receive text messages hands-free, enter
navigation destinations, and control your
radio and media devices.
Included Trial Period For New Vehicles
Your new vehicle may come with an included
trial period for use of the Uconnect Access
Services starting at the date of vehicle pur-
chase (date based on vehicle sales notifica-
tion from your dealer). To activate the trial, you
must first register with Uconnect Access. After
MULTIMEDIA
292
Page 295 of 372
the trial period, if you wish to continue your
Uconnect Access Services you can choose to
purchase a subscription.
Uconnect Access Subscription
• After the trial period, you can subscribe bypushing the ASSIST button on the rear-
view mirror and speaking with a Uconnect
Access Care agent or by visiting the owner
site moparownerconnect.com. If you need
assistance, U.S. residents can call
Uconnect Access Care at
1-855-792-4241
• For the latest information on packages and pricing information: U.S. residents visit
DriveUconnect.com.
Uconnect Access Registration (Uconnect
8.4/8.4 NAV, U.S. 48 Contiguous States,
Alaska And Hawaii)
To unlock the full potential of Uconnect Ac-
cess in your vehicle, you first need to register
with Uconnect Access.
1. Push the ASSIST button on your rearview
mirror. 2. Press the “Uconnect Care” button on the
touchscreen.
3. A helpful Uconnect Care Agent will regis- ter your vehicle and handle all of the
details.
Signing up is easy! Simply follow the steps
above. Or, press the “Apps
” button on
the touchscreen, then select the Uconnect
registration app to “Register By Web” and
complete the process using your device or
computer. Why sign up for Uconnect Access?
Here are
just a few examples of things you’ll be able to
do:
• Know that help, if you need it, is only a button press away.
• Lock and unlock your vehicle doors from hundreds of miles away.
• Discover great, new places around you using Yelp.
• Dictate and send text messages by speak- ing out loud (all while keeping both hands
on the wheel!)
• Enjoy the best in music and entertainment from around the world with apps like
Pandora.
For further information please visit
DriveUconnect.com.
Download The Uconnect Access App
You’re only a few steps away from using
remote commands and playing your favorite
music in your vehicle.
ASSIST Button
293
Page 299 of 372
Connect. If you need help push the ASSIST
button on the rearview mirror, then select
Uconnect Care (or dial 1-855-792-4241 ).
NOTE:
You must set up a Uconnect Access Payment
Account online (login to
moparownerconnect.com, go to Edit Profile,
then Uconnect Payment Account, to set up
and manage your Payment Account).
Getting Started With Apps
Applications (Apps for short) in your
Uconnect Access system are designed to de-
liver the features and services that you want.
There are two basic categories:
1.Built-In Features — use the 1X (voice/data)
or 3G (data) network on your Uconnect
8.4 or 8.4 NAV radio.
2. Uconnect Access Via Mobile — use the
Uconnect Access App and your device's
data plan to access your personal
Pandora, iHeartRadio, Aha and Slacker
accounts from the vehicle and control them using the touchscreen. Customer's
data plan charges will apply. Available on
Uconnect 8.4 and 8.4 NAV Radios (if
equipped).
Apps Main Menu
Press the “Apps” button on the touch-
screen to open the Apps main menu, in this
screen you will be able to access all of your
available Apps. To access an App directly,
press the corresponding button on the touch-
screen and you will be directed to that App.
To view the rest our your Apps, press the page
forward or page back button. App Manager
Press the “App Manager” button to access
the following categories:
Favorite Apps
This is the default screen when you first press
the “App Manager” button on the touch-
screen, and is a good place to put the apps
you use most frequently. To make an App a
“favorite”, press the “Settings” button on the
touchscreen to the right of the App.
All Apps
All of your available Apps will reside in the
“All Apps” folder.
Running Apps
Press this tab to see which apps are currently
running.
Uconnect 8.4/8.4 NAV Main Menu
297
Page 300 of 372
Maintaining Your Uconnect Access
Account
Selling Your Vehicle
When you sell your vehicle, we recommend
that you remove your Uconnect Access Ac-
count information from the vehicle. You can
do this on the Mopar Owner Connect website
moparownerconnect.com. Removing your ac-
count information cancels your subscription
and makes your vehicle factory-ready for a
new owner/subscriber.
For additional information on Uconnect, visit
DriveUconnect.com or call 1-877-855-8400
Built-In Features
WARNING!
ALWAYS drive safely with your hands on
the wheel. You have full responsibility and
assume all risks related to the use of the
Uconnect features and applications in this
vehicle. Only use Uconnect when it is safe
to do so. Failure to do so may result in an
accident involving serious injury or death.
WARNING!
• ALWAYS obey traffic laws and pay atten-tion to the road. Some Uconnect Access
services, including 9-1-1 and Assist,
will NOT work without an operable 1X
(voice/data) or 3G (data) network con-
nection.
• Ignoring the rearview mirror light could
mean you may not have 9-1-1 Call ser-
vice if needed. If the rearview mirror
light is illuminated, have an authorized
dealer service the 9-1-1 Call system
immediately.
• The Occupant Restraint Controller
(ORC) turns on the Air Bag Warning
Light on the instrument panel if a mal-
function is detected in any part of the
airbag system. If the Air Bag Warning
Light is illuminated, the air bag system
may not be working properly and the
9-1-1 system may not send a signal to a
9-1-1 operator if an air bag is deployed.
If the Air Bag Warning Light is illumi-
nated, have an authorized dealer service
your vehicle immediately.
WARNING!
• If anyone in the vehicle could be indanger (e.g., fire or smoke is visible,
dangerous road conditions or location),
do not wait for voice contact from a
9-1-1 operator. All occupants should
exit the vehicle immediately and move
to a safe location.
• The 9-1-1 Call system is embedded into
the vehicle’s electrical system. Do not
add aftermarket electrical equipment to
the vehicle’s electrical system. This may
prevent your vehicle from sending a sig-
nal to initiate an emergency call. To
avoid interference that can cause the
9-1-1 Call system to fail, never add
aftermarket equipment (e.g., two-way
mobile radio, CB radio, data recorder,
etc.) to your vehicle’s electrical system
or modify the antennas on your vehicle.
• IF YOUR VEHICLE LOSES BATTERY
POWER FOR ANY REASON (INCLUD-
ING DURING OR AFTER AN ACCI-
DENT), the Uconnect features, apps and
services, among others, will not operate.
MULTIMEDIA
298
Page 301 of 372
NOTE:
• Your vehicle may be transmitting data asauthorized by the subscriber.
• Your vehicle must have a working electri- cal system for any of the in vehicle
Uconnect features to operate.
Assist Call (8.4/8.4 NAV)
The rearview mirror contains an ASSIST push
button, and the touchscreen contains a
Uconnect Access App, which will automati-
cally connect the vehicle occupants to one of
these predefined destinations for immediate
support:
•Roadside Assistance Call — If you get a flat
tire, or need a tow, you’ll be connected to
someone who can help anytime. Addi-
tional fees may apply. Additional informa-
tion in this section.
• Uconnect Access Care — In vehicle sup-
port for Uconnect Access System, Apps
and Features. •
Vehicle Care — Total support for your FCA
US LLC vehicle.
Emergency 9-1-1 Call (If Equipped)
The rearview mirror contains a 9-1-1 button
that, when pressed, may place a call from
your vehicle to a local 9-1-1 operator to
request help from local police, fire or ambu-
lance personnel. If this button is accidentally
pressed, you will have 7 seconds to stop the
call. To cancel, press the 9-1-1 Call button
again or press the “Cancel” button shown on
the touchscreen. After 7 seconds has passed,
the 9-1-1 call will be placed and only the
9-1-1 operator can cancel it. The LED light
on the rearview mirror will turn green once a
connection to a 9-1-1 operator has been
made. The green LED light will turn off once
the 9-1-1 call is terminated. Have an autho-
rized dealer service the vehicle if the rearview
mirror light is continuously red. On equipped
vehicles, this feature requires a functioning
electrical system and an operable 1X (voice/
data) or 3G (data) network connection to
function properly. If a connection is made
between a 9-1-1 operator and your vehicle, you
9-1-1 Button And ASSIST
1 — 9-1-1 Button
2 — ASSIST Button
299