ECU JEEP GRAND CHEROKEE 2017 WK2 / 4.G Owner's Manual
[x] Cancel search | Manufacturer: JEEP, Model Year: 2017, Model line: GRAND CHEROKEE, Model: JEEP GRAND CHEROKEE 2017 WK2 / 4.GPages: 372
Page 134 of 372
Older Children And Child Restraints
Children who are two years old or who have
outgrown their rear-facing convertible child
seat can ride forward-facing in the vehicle.
Forward-facing child seats and convertible
child seats used in the forward-facing direc-
tion are for children who are over two years
old or who have outgrown the rear-facing
weight or height limit of their rear-facing
convertible child seat. Children should re-
main in a forward-facing child seat with a
harness for as long as possible, up to the
highest weight or height allowed by the child
seat.
All children whose weight or height is above
the forward-facing limit for the child seat
should use a belt-positioning booster seat
until the vehicle’s seat belts fit properly. If
the child cannot sit with knees bent over the
vehicle’s seat cushion while the child’s back
is against the seatback, they should use a
belt-positioning booster seat. The child and
belt-positioning booster seat are held in the
vehicle by the seat belt.WARNING!
• Improper installation can lead to failureof an infant or child restraint. It could
come loose in a collision. The child
could be badly injured or killed. Follow
the child restraint manufacturer’s direc-
tions exactly when installing an infant or
child restraint.
• After a child restraint is installed in the
vehicle, do not move the vehicle seat
forward or rearward because it can
loosen the child restraint attachments.
Remove the child restraint before ad-
justing the vehicle seat position. When
the vehicle seat has been adjusted, re-
install the child restraint.
• When your child restraint is not in use,
secure it in the vehicle with the seat belt
or LATCH anchorages, or remove it from
the vehicle. Do not leave it loose in the
vehicle. In a sudden stop or accident, it
could strike the occupants or seatbacks
and cause serious personal injury.
Children Too Large For Booster Seats
Children who are large enough to wear the
shoulder belt comfortably, and whose legs are
long enough to bend over the front of the seat
when their back is against the seatback,
should use the seat belt in a rear seat. Use
this simple 5-step test to decide whether the
child can use the vehicle’s seat belt alone:
1. Can the child sit all the way back against the back of the vehicle seat?
2. Do the child’s knees bend comfortably over the front of the vehicle seat – while
they are still sitting all the way back?
3. Does the shoulder belt cross the child’s shoulder between their neck and arm?
4. Is the lap part of the belt as low as possible, touching the child’s thighs and
not their stomach?
5. Can the child stay seated like this for the whole trip?
If the answer to any of these questions was
“no,” then the child still needs to use a
booster seat in this vehicle. If the child is
using the lap/shoulder belt, check seat belt
fit periodically and make sure the seat belt
SAFETY
132
Page 138 of 372
Locating LATCH Anchorages
The lower anchorages are round bars that are
found at the rear of the seat cushion where it
meets the seatback, below the anchorage
symbols
on the seatback. They are just
visible when you lean into the rear seat to
install the child restraint. You will easily feel
them if you run your finger along the gap
between the seatback and seat cushion.
Locating Tether Anchorages
There are tether strap anchorages behind
each rear seating position located on the
back of the seat. To access them, pull the
carpeted floor panel away from the seat back,
this will expose the top tether strap anchor-
ages.
LATCH-compatible child restraint systems
will be equipped with a rigid bar or a flexible
strap on each side. Each will have a hook or
connector to attach to the lower anchorage
and a way to tighten the connection to the
anchorage. Forward-facing child restraints and some rear-facing child restraints will also
be equipped with a tether strap. The tether
strap will have a hook at the end to attach to
the top tether anchorage and a way to tighten
the strap after it is attached to the anchorage.
Center Seat LATCH
WARNING!
• Do not install a child restraint in the
center position using the LATCH system.
This position is not approved for install-
ing child seats using the LATCH attach-
ments. You must use the seat belt and
tether anchor to install a child seat in
the center seating position.
• Never use the same lower anchorage to
attach more than one child restraint.
Please refer to “Installing The LATCH-
Compatible Child Restraint System” for
typical installation instructions.
For rear-facing child restraints secured in the
center seat position with the vehicle seat
belts, the rear center seat position has an
armrest tether that secures the arm rest in
the upward position.
LATCH AnchoragesTether Strap Anchorages
SAFETY
136
Page 139 of 372
1. To access the center seat arm rest tether,first lower the arm rest. The tether is
located behind the armrest and hooked
onto the plastic seat backing.
2. Pull down on the tether to unhook it from the plastic seat backing.
3. Raise the armrest and attach the tether hook to the strap located on the front of
the arm rest.
Always follow the directions of the child re-
straint manufacturer when installing your
child restraint. Not all child restraint systems
will be installed as described here.
Center Arm Rest Tether
For rear-facing child restraints secured in the
center seat position with the vehicle seat
belts, the rear center seat position has an
armrest tether that secures the arm rest in the
upward position.
1. To access the center seat arm rest tether, first lower the arm rest. The tether is
located behind the armrest and hooked
onto the plastic seat backing. 2. Pull down on the tether to unhook it from
the plastic seat backing.
3. Raise the armrest and attach the tether hook to the strap located on the front of
the arm rest. Always follow the directions of the child re-
straint manufacturer when installing your
child restraint. Not all child restraint systems
will be installed as described here.
To Install A LATCH-Compatible Child Re-
straint
If the selected seating position has a Switch-
able Automatic Locking Retractor (ALR) seat
belt, stow the seat belt, following the instruc-
Center Seat Position Arm Rest TetherCenter Seat Position Arm Rest Tether At-
tached
137
Page 140 of 372
tions below. See the section “Installing Child
Restraints Using the Vehicle Seat Belt” to
check what type of seat belt each seating
position has.
1. Loosen the adjusters on the lower strapsand on the tether strap of the child seat so
that you can more easily attach the hooks
or connectors to the vehicle anchorages.
2. Place the child seat between the lower anchorages for that seating position. For
some second row seats, you may need to
recline the seat and / or raise the head
restraint to get a better fit. If the rear seat
can be moved forward and rearward in the
vehicle, you may wish to move it to its
rear-most position to make room for the
child seat. You may also move the front
seat forward to allow more room for the
child seat.
3. Attach the lower hooks or connectors of the child restraint to the lower anchorages
in the selected seating position.
4. If the child restraint has a tether strap, connect it to the top tether anchorage. See the section “Installing Child Re-
straints Using the Top Tether Anchorage”
for directions to attach a tether anchor.
5. Tighten all of the straps as you push the child restraint rearward and downward
into the seat. Remove slack in the straps
according to the child restraint manufac-
turer’s instructions.
6. Test that the child restraint is installed tightly by pulling back and forth on the
child seat at the belt path. It should not
move more than 1 inch (25.4 mm) in any
direction.
How To Stow An Unused Switchable-ALR
(ALR) Seat Belt
When using the LATCH attaching system to
install a child restraint, stow all ALR seat
belts that are not being used by other occu-
pants or being used to secure child restraints.
An unused belt could injure a child if they
play with it and accidentally lock the seat belt
retractor. Before installing a child restraint
using the LATCH system, buckle the seat belt
behind the child restraint and out of the
child’s reach. If the buckled seat belt inter-
feres with the child restraint installation, instead of buckling it behind the child re-
straint, route the seat belt through the child
restraint belt path and then buckle it. Do not
lock the seat belt. Remind all children in the
vehicle that the seat belts are not toys and
that they should not play with them.
WARNING!
• Improper installation of a child restraint
to the LATCH anchorages can lead to
failure of the restraint. The child could
be badly injured or killed. Follow the
child restraint manufacturer’s directions
exactly when installing an infant or child
restraint.
• Child restraint anchorages are designed
to withstand only those loads imposed
by correctly-fitted child restraints. Un-
der no circumstances are they to be
used for adult seat belts, harnesses, or
for attaching other items or equipment
to the vehicle.
SAFETY
138
Page 141 of 372
Installing Child Restraints Using The Ve-
hicle Seat Belt
Child restraint systems are designed to be
secured in vehicle seats by lap belts or the lap
belt portion of a lap/shoulder belt.
WARNING!
• Improper installation or failure to prop-erly secure a child restraint can lead to
failure of the restraint. The child could
be badly injured or killed.
• Follow the child restraint manufacturer’s
directions exactly when installing an in-
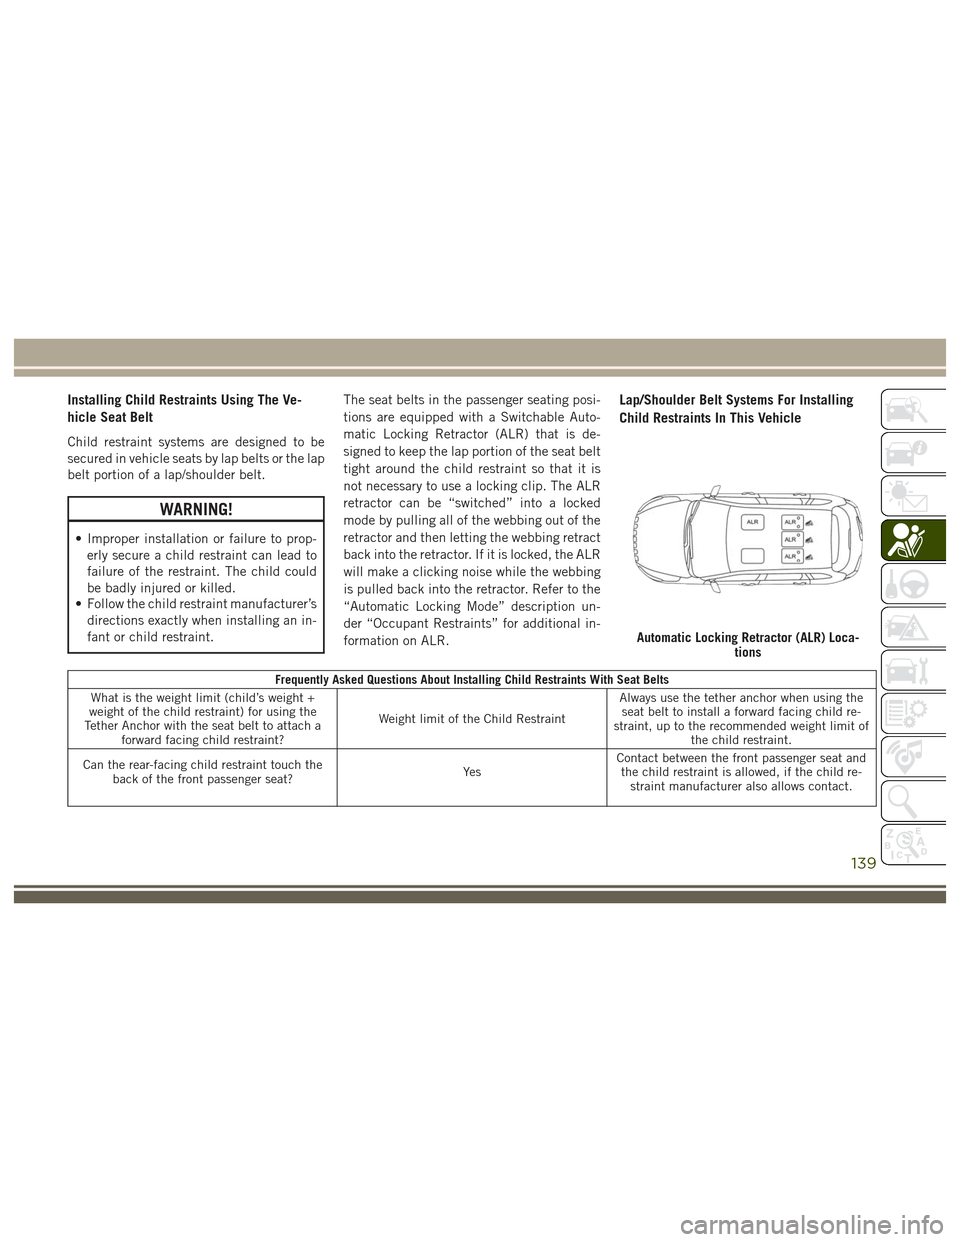
fant or child restraint. The seat belts in the passenger seating posi-
tions are equipped with a Switchable Auto-
matic Locking Retractor (ALR) that is de-
signed to keep the lap portion of the seat belt
tight around the child restraint so that it is
not necessary to use a locking clip. The ALR
retractor can be “switched” into a locked
mode by pulling all of the webbing out of the
retractor and then letting the webbing retract
back into the retractor. If it is locked, the ALR
will make a clicking noise while the webbing
is pulled back into the retractor. Refer to the
“Automatic Locking Mode” description un-
der “Occupant Restraints” for additional in-
formation on ALR.
Lap/Shoulder Belt Systems For Installing
Child Restraints In This Vehicle
Frequently Asked Questions About Installing Child Restraints With Seat Belts
What is the weight limit (child’s weight +
weight of the child restraint) for using the
Tether Anchor with the seat belt to attach a forward facing child restraint? Weight limit of the Child RestraintAlways use the tether anchor when using the
seat belt to install a forward facing child re-
straint, up to the recommended weight limit of the child restraint.
Can the rear-facing child restraint touch the back of the front passenger seat? Ye sContact between the front passenger seat and
the child restraint is allowed, if the child re- straint manufacturer also allows contact.
Automatic Locking Retractor (ALR) Loca- tions
139
Page 142 of 372
Frequently Asked Questions About Installing Child Restraints With Seat Belts
Can the head restraints be removed? YesThe head restraint may be removed in the cen-
ter seating position only.
Can the buckle stalk be twisted to tighten the seat belt against the belt path of the child re- straint? No
Do not twist the buckle stalk in a seating posi-
tion with an ALR retractor.
Installing A Child Restraint With A Switch-
able Automatic Locking Retractor (ALR)
Child restraint systems are designed to be
secured in vehicle seats by lap belts or the
lap belt portion of a lap/shoulder belt.
WARNING!
• Improper installation or failure to prop-
erly secure a child restraint can lead to
failure of the restraint. The child could
be badly injured or killed.
• Follow the child restraint manufactur-
er’s directions exactly when installing an
infant or child restraint. 1. Place the child seat in the center of the
seating position.
2. Pull enough of the seat belt webbing from the retractor to pass it through the belt
path of the child restraint. Do not twist the
belt webbing in the belt path.
3. Slide the latch plate into the buckle until you hear a “click.”
4. Pull on the webbing to make the lap portion tight against the child seat.
5. To lock the seat belt, pull down on the shoulder part of the belt until you have
pulled all the seat belt webbing out of the
retractor. Then, allow the webbing to re-
tract back into the retractor. As the web-
bing retracts, you will hear a clicking
sound. This means the seat belt is now in
the Automatic Locking mode. 6. Try to pull the webbing out of the retractor.
If it is locked, you should not be able to
pull out any webbing. If the retractor is
not locked, repeat step 5.
7. Finally, pull up on any excess webbing to tighten the lap portion around the child
restraint while you push the child restraint
rearward and downward into the vehicle
seat.
8. If the child restraint has a top tether strap and the seating position has a top tether
anchorage, connect the tether strap to the
anchorage and tighten the tether strap.
See the section “Installing Child Re-
straints Using the Top Tether Anchorage”
for directions to attach a tether anchor.
SAFETY
140
Page 144 of 372
3. Route the tether strap to provide the mostdirect path for the strap between the an-
chor and the child seat. If your vehicle is
equipped with adjustable rear head re-
straints, raise the head restraint, and
where possible, route the tether strap un-
der the head restraint and between the
two posts. If not possible, lower the head
restraint and pass the tether strap around
the outboard side of the head restraint.
4. For the center seating position, route the tether strap over the seatback and head-
rest then attach the hook to the tether
anchor located on the back of the seat.
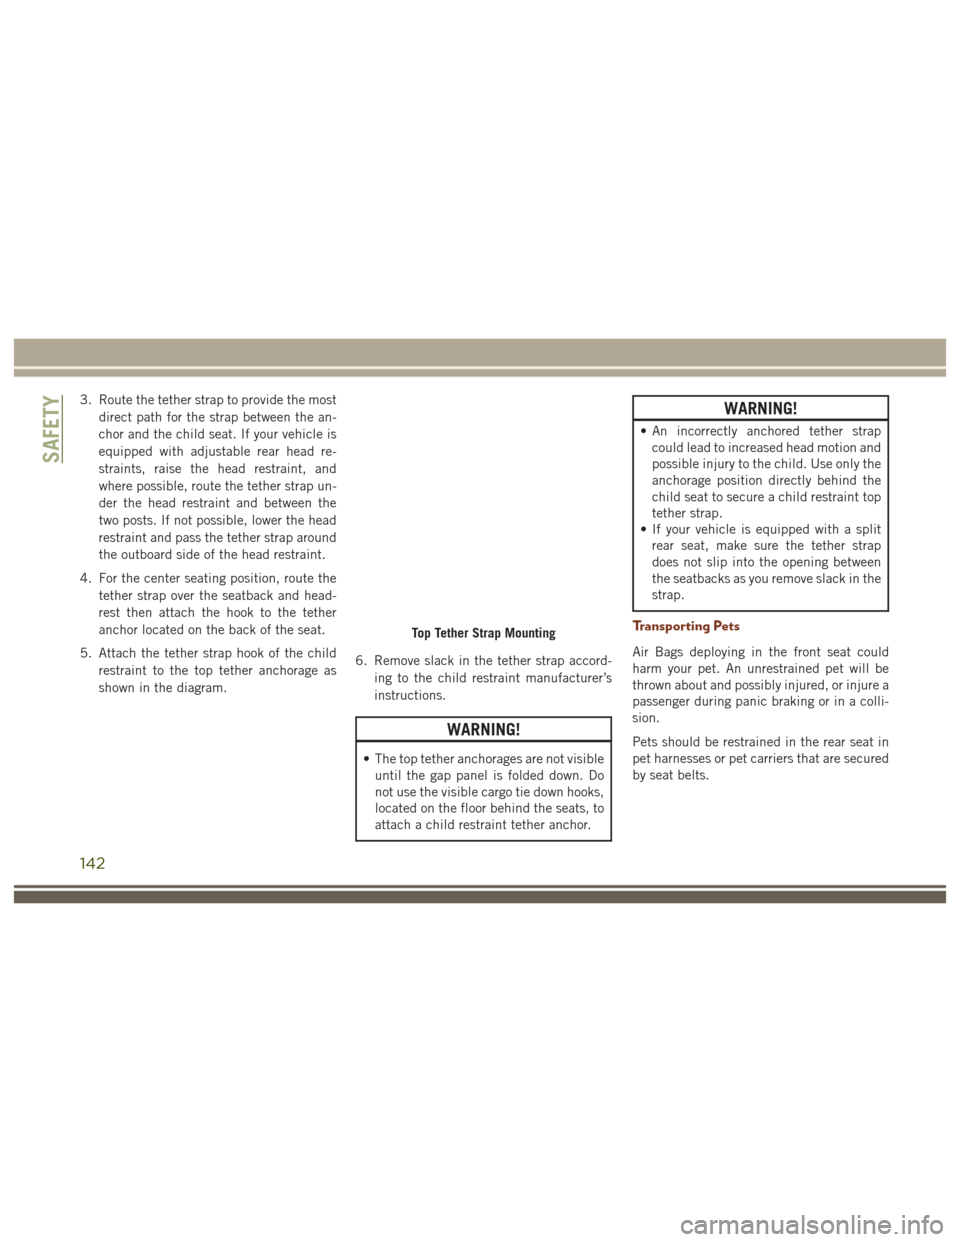
5. Attach the tether strap hook of the child restraint to the top tether anchorage as
shown in the diagram. 6. Remove slack in the tether strap accord-
ing to the child restraint manufacturer’s
instructions.
WARNING!
• The top tether anchorages are not visibleuntil the gap panel is folded down. Do
not use the visible cargo tie down hooks,
located on the floor behind the seats, to
attach a child restraint tether anchor.
WARNING!
• An incorrectly anchored tether strapcould lead to increased head motion and
possible injury to the child. Use only the
anchorage position directly behind the
child seat to secure a child restraint top
tether strap.
• If your vehicle is equipped with a split
rear seat, make sure the tether strap
does not slip into the opening between
the seatbacks as you remove slack in the
strap.
Transporting Pets
Air Bags deploying in the front seat could
harm your pet. An unrestrained pet will be
thrown about and possibly injured, or injure a
passenger during panic braking or in a colli-
sion.
Pets should be restrained in the rear seat in
pet harnesses or pet carriers that are secured
by seat belts.
Top Tether Strap Mounting
SAFETY
142
Page 146 of 372
Front seat belt assemblies must be replaced
after a collision. Rear seat belt assemblies
must be replaced after a collision if they have
been damaged (i.e., bent retractor, torn web-
bing, etc.). If there is any question regarding
seat belt or retractor condition, replace the
seat belt.
Air Bag Warning Light
The Air Bag warning lightwill turn on for
four to eight seconds as a bulb check when
the ignition switch is first turned to ON/RUN.
If the light is either not on during starting,
stays on, or turns on while driving, have the
system inspected at an authorized dealer as
soon as possible. This light will illuminate
with a single chime when a fault with the Air
Bag Warning Light has been detected, it will
stay on until the fault is cleared. If the light
comes on intermittently or remains on while
driving, have an authorized dealer service the
vehicle immediately. Refer to “Occupant Re-
straint Systems” in “Safety” for further infor-
mation.
Defroster
Check operation by selecting the defrost
mode and place the blower control on high
speed. You should be able to feel the air
directed against the windshield. See your
authorized dealer for service if your defroster
is inoperable.
Floor Mat Safety Information
Always use floor mats designed to fit your
vehicle. Only use a floor mat that does not
interfere with the operation of the accelera-
tor, brake or clutch pedals. Only use a floor
mat that is securely attached using the floor
mat fasteners so it cannot slip out of position
and interfere with the accelerator, brake or
clutch pedals or impair safe operation of your
vehicle in other ways.
WARNING!
An improperly attached, damaged, folded,
or stacked floor mat, or damaged floor mat
fasteners may cause your floor mat to
interfere with the accelerator, brake, or
clutch pedals and cause a loss of vehicle
WARNING!
control. To prevent SERIOUS INJURY or
DEATH:
• ALWAYS securely attach
your floor
mat using the floor mat fasteners. DO
NOT install your floor mat upside down
or turn your floor mat over. Lightly pull to
confirm mat is secured using the floor
mat fasteners on a regular basis.
• ALWAYS REMOVE THE EXISTING
FLOOR MAT FROM THE VEHICLE
before installing any other floor mat.
NEVER install or stack an additional
floor mat on top of an existing floor mat.
• ONLY install floor mats designed to fit
your vehicle. NEVER install a floor mat
that cannot be properly attached and
secured to your vehicle. If a floor mat
needs to be replaced, only use a FCA
approved floor mat for the specific
make, model, and year of your vehicle.
• ONLY use the driver’s side floor mat on
the driver’s side floor area. To check for
interference, with the vehicle properly
parked with the engine off, fully depress
the accelerator, the brake, and the
SAFETY
144
Page 147 of 372
WARNING!
clutch pedal (if present) to check for
interference. If your floor mat interferes
with the operation of any pedal, or is not
secure to the floor, remove the floor mat
from the vehicle and place the floor mat
in your trunk.
• ONLY use the passenger’s side floor mat
on the passenger’s side floor area.
• ALWAYS make sure objects cannot fall
or slide into the driver’s side floor area
when the vehicle is moving. Objects can
become trapped under accelerator,
brake, or clutch pedals and could cause
a loss of vehicle control.
• NEVER place any objects under the floor
mat (e.g., towels, keys, etc.). These ob-
jects could change the position of the
floor mat and may cause interference
with the accelerator, brake, or clutch
pedals.
• If the vehicle carpet has been removed
and re-installed, always properly attach
WARNING!
carpet to the floor and check the floor
mat fasteners are secure to the vehicle
carpet. Fully depress each pedal to
check for interference with the accelera-
tor, brake, or clutch pedals then re-
install the floor mats.
• It is recommended to only use mild soap
and water to clean your floor mats. After
cleaning, always check your floor mat
has been properly installed and is se-
cured to your vehicle using the floor mat
fasteners by lightly pulling mat.
Periodic Safety Checks You Should Make
Outside The Vehicle
Tires
Examine tires for excessive tread wear and
uneven wear patterns. Check for stones,
nails, glass, or other objects lodged in the
tread or sidewall. Inspect the tread for cuts and cracks. Inspect sidewalls for cuts,
cracks, and bulges. Check the wheel nuts for
tightness. Check the tires (including spare)
for proper cold inflation pressure.
Lights
Have someone observe the operation of brake
lights and exterior lights while you work the
controls. Check turn signal and high beam
indicator lights on the instrument panel.
Door Latches
Check for proper closing, latching, and lock-
ing.
Fluid Leaks
Check area under vehicle after overnight
parking for fuel, engine coolant, oil, or other
fluid leaks. Also, if gasoline fumes are de-
tected or if fuel, power steering fluid (if
equipped), or brake fluid leaks are sus-
pected. The cause should be located and
corrected immediately.
145
Page 159 of 372
300 to 500 miles (483 to 805 km):
• Exercise the full engine rpm range, shift-ing manually (paddles or gear shift) at
higher rpms when possible.
• Do not perform sustained operation with the accelerator pedal at wide open
throttle.
• Maintain vehicle speed below 85 mph (136 km/h) and observe local speed
limits.
For the first 1500 miles (2414 km):
• Do not participate in track events, sport driving schools, or similar activities during
the first 1500 mi (2414 km).
NOTE:
Check engine oil with every refueling and add
if necessary. Oil and fuel consumption may
be higher through the first oil change interval.
Running the engine with an oil level below
the add mark can cause severe engine dam-
age.AUTOMATIC
TRANSMISSION
WARNING!
• It is dangerous to shift out of PARK or NEUTRAL if the engine speed is higher
than idle speed. If your foot is not firmly
pressing the brake pedal, the vehicle
could accelerate quickly forward or in
reverse. You could lose control of the
vehicle and hit someone or something.
Only shift into gear when the engine is
idling normally and your foot is firmly
pressing the brake pedal.
• Unintended movement of a vehicle
could injure those in or near the vehicle.
As with all vehicles, you should never
exit a vehicle while the engine is run-
ning. Before exiting a vehicle, always
apply the parking brake, shift the trans-
mission into PARK, and turn the ignition
OFF. When the ignition is in the OFF
mode, the transmission is locked in
PARK, securing the vehicle against un-
wanted movement.
WARNING!
• When leaving the vehicle, always makesure the ignition is in the OFF mode,
remove the key fob from the vehicle, and
lock the vehicle.
• Never leave children alone in a vehicle,
or with access to an unlocked vehicle.
Allowing children to be in a vehicle un-
attended is dangerous for a number of
reasons. A child or others could be seri-
ously or fatally injured. Children should
be warned not to touch the parking
brake, brake pedal or the transmission
gear selector.
• Do not leave the key fob in or near the
vehicle (or in a location accessible to
children), and do not leave the ignition
in the ACC or ON/RUN mode. A child
could operate power windows, other con-
trols, or move the vehicle.
157