ECU JEEP GRAND CHEROKEE 2017 WK2 / 4.G Owner's Manual
[x] Cancel search | Manufacturer: JEEP, Model Year: 2017, Model line: GRAND CHEROKEE, Model: JEEP GRAND CHEROKEE 2017 WK2 / 4.GPages: 372
Page 63 of 372
Cargo Area Features
Rechargeable Flashlight
The rechargeable flashlight is mounted on
the left side of the cargo area. The flashlight
snaps out of the bezel when needed. The
flashlight features two bright LED light bulbs
and is powered by rechargeable lithium bat-
teries that recharge when snapped back into
place.
Push in on the flashlight to release it.
To operate the flashlight, push the switch
once for high, twice for low, and a third time
to return to off.
Cargo Storage Bins
There are up to four removable storage bins
located in the rear cargo area. There are two
storage bins located on either side of the
cargo area.
NOTE:
If your vehicle is equipped with a rear sub-
woofer, the passenger side cargo area will not
be available.Two additional storage bins are located under
the load floor. To access the lower storage
bins, raise the load floor and attach the tether
strap (attached to the bottom of the load
floor) to the liftgate opening.
Retractable Cargo Area Cover — If
Equipped
NOTE:
The purpose of this cover is for privacy, not to
secure loads. It will not prevent cargo from
shifting or protect passengers from loose
cargo.
To cover the cargo area:
1. Grasp the cover at the center handle. Pull
it over the cargo area.
2. Insert the pins on the ends of the cover into the slots in the pillar trim cover.
3. The liftgate may be opened with the cargo cover in place.
WARNING!
In a collision, a loose cargo cover in the
vehicle could cause injury. It could fly
WARNING!
around in a sudden stop and strike some-
one in the vehicle. Do not store the cargo
cover on the cargo floor or in the passenger
compartment. Remove the cover from the
vehicle when taken from its mounting. Do
not store it in the vehicle.
Rear Cargo Tie-Downs
The rear cargo tie-downs, located on the
cargo area floor, should be used to safely
secure loads when the vehicle is moving.
WARNING!
• To help protect against personal injury,passengers should not be seated in the
rear cargo area. The rear cargo space is
intended for load carrying purposes only,
not for passengers, who should sit in
seats and use seat belts.
• Cargo tie-down hooks are not safe an-
chors for a child seat tether strap. In a
sudden stop or accident, a hook could
pull loose and allow the child seat to
come loose. A child could be badly in-
61
Page 64 of 372
WARNING!
jured. Use only the anchors provided for
child seat tethers.
The weight and position of cargo and pas-
sengers can change the vehicle center of
gravity and vehicle handling. To avoid loss
of control resulting in personal injury, fol-
low these guidelines for loading your ve-
hicle:
• Do not carry loads which exceed the load
limits described on the label attached to
the left door or left door center pillar.
• Always place cargo evenly on the cargo
floor. Put heavier objects as low and as
far forward as possible.
• Place as much cargo as possible in front
of the rear axle. Too much weight or
improperly placed weight over or behind
the rear axle can cause the rear of the
vehicle to sway.
• Do not pile luggage or cargo higher than
the top of the seatback. This could im-
pair visibility or become a dangerous
projectile in a sudden stop or accident.
UNIVERSAL GARAGE DOOR
OPENER (HomeLink)
• HomeLink replaces up to three hand-held
transmitters that operate devices such as
garage door openers, motorized gates,
lighting or home security systems. The
HomeLink unit is powered by your vehicles
12 Volt battery. • The HomeLink buttons that are located in
the overhead console or sunvisor desig-
nate the three different HomeLink chan-
nels.
• The HomeLink indicator is located above the center button.
Before You Begin Programming
HomeLink
Ensure that your vehicle is parked outside of
the garage before you begin programming.
For efficient programming and accurate
transmission of the radio-frequency signal, it
is recommended that a new battery be placed
in the hand-held transmitter of the device
that is being programmed to the HomeLink
system.
To erase the channels, place the ignition
switch into the ON/RUN position, then push
and hold the two outside HomeLink buttons
(I and III) for up to 20 seconds or until the red
indicator flashes.
Universal Garage Door Opener (HomeLink)GETTING TO KNOW YOUR VEHICLE
62
Page 66 of 372
3. Push and hold the HomeLink button youwant to program while you push and hold
the hand-held transmitter button.
4. Continue to hold both buttons and ob- serve the indicator light. The HomeLink
indicator will flash slowly and then rapidly
after HomeLink has received the fre-
quency signal from the hand-held trans-
mitter. Release both buttons after the
indicator light changes from slow to rapid.
5. Push and hold the programmed HomeLink button and observe the indica-
tor light. If the indicator light stays on
constantly, programming is complete and
the garage door (or device) should activate
when the HomeLink button is pushed.
6. To program the two remaining HomeLink buttons, repeat each step for each re-
maining button. DO NOT erase the
channels.Using HomeLink
To operate, push and release the pro-
grammed HomeLink button. Activation will
now occur for the programmed device (i.e.,
garage door opener, gate operator, security
system, entry door lock, home/office lighting,
etc.). The hand-held transmitter of the device
may also be used at any time.
WARNING!
• Your motorized door or gate will openand close while you are programming
the universal transceiver. Do not pro-
gram the transceiver if people or pets are
in the path of the door or gate.
• Do not run your vehicle in a closed
garage or confined area while program-
ming the transceiver. Exhaust gas from
your vehicle contains Carbon Monoxide
(CO) which is odorless and colorless.
Carbon Monoxide is poisonous when in-
haled and can cause you and others to
be severely injured or killed.
INTERNAL EQUIPMENT
Power Outlets
There are three 12 Volt electrical power out-
lets on this vehicle.
The front power outlet is located inside the
center storage bin of the instrument panel.
Push inward on the storage lid to open the
compartment and gain access to this power
outlet.
Front Power Outlet
GETTING TO KNOW YOUR VEHICLE
64
Page 71 of 372
GETTING TO KNOW YOUR INSTRUMENT PANEL
INSTRUMENT CLUSTER.......70
Instrument Cluster Descriptions ......73
INSTRUMENT CLUSTER
DISPLAY...................74
Instrument Cluster Display Location and
Controls....................74
Oil Change Reset ...............75
Instrument Cluster Display Selectable
Items ......................75
SRT Performance Features .........76Diesel Particulate Filter (DPF)
Messages
...................76
Diesel Exhaust Fluid (DEF) Warning
Messages ....................78
Diesel Exhaust Fluid (DEF) Fault Warning
Messages ....................78
TRIPCOMPUTER.............80
WARNING/INDICATOR LIGHTS AND
MESSAGES.................80
Red Telltale Lights ..............80 Yellow Telltale Lights
.............83
Blue Telltale Lights ..............87
Green Telltale Lights .............87
White Telltale Lights .............88
ONBOARD DIAGNOSTIC SYSTEM —
OBDII ....................89
Onboard Diagnostic System (OBD II)
Cybersecurity.................89
GETTING TO KNOW YOUR INSTRUMENT PANEL
69
Page 83 of 372
indicate that the parking brake is applied,
that the brake fluid level is low, or that there
is a problem with the anti-lock brake system
reservoir.
If the light remains on when the parking
brake has been disengaged, and the fluid
level is at the full mark on the master cylinder
reservoir, it indicates a possible brake hy-
draulic system malfunction or that a problem
with the Brake Booster has been detected by
the Anti-Lock Brake System (ABS) / Elec-
tronic Stability Control (ESC) system. In this
case, the light will remain on until the condi-
tion has been corrected. If the problem is
related to the brake booster, the ABS pump
will run when applying the brake, and a brake
pedal pulsation may be felt during each stop.
The dual brake system provides a reserve
braking capacity in the event of a failure to a
portion of the hydraulic system. A leak in
either half of the dual brake system is indi-
cated by the Brake Warning Light, which will
turn on when the brake fluid level in the
master cylinder has dropped below a speci-
fied level.The light will remain on until the cause is
corrected.
NOTE:
The light may flash momentarily during sharp
cornering maneuvers, which change fluid
level conditions. The vehicle should have
service performed, and the brake fluid level
checked.
If brake failure is indicated, immediate repair
is necessary.
WARNING!
Driving a vehicle with the red brake light
on is dangerous. Part of the brake system
may have failed. It will take longer to stop
the vehicle. You could have a collision.
Have the vehicle checked immediately.
Vehicles equipped with the Anti-Lock Brake
System (ABS) are also equipped with Elec-
tronic Brake Force Distribution (EBD). In the
event of an EBD failure, the Brake Warning
Light will turn on along with the ABS Light.
Immediate repair to the ABS system is re-
quired. Operation of the Brake Warning Light can be
checked by turning the ignition switch from
the OFF position to the ON/RUN position.
The light should illuminate for approximately
two seconds. The light should then turn off
unless the parking brake is applied or a brake
fault is detected. If the light does not illumi-
nate, have the light inspected by an autho-
rized dealer.
The light also will turn on when the parking
brake is applied with the ignition switch in
the ON/RUN position.
NOTE:
This light shows only that the parking brake is
applied. It does not show the degree of brake
application.
– Vehicle Security Light
This light will flash at a fast rate for approxi-
mately 15 seconds when the vehicle security
alarm is arming, and then will flash slowly
until the vehicle is disarmed.
81
Page 91 of 372
ONBOARD DIAGNOSTIC
SYSTEM — OBD II
Your vehicle is equipped with a sophisticated
Onboard Diagnostic system called OBD II.
This system monitors the performance of the
emissions, engine, and automatic transmis-
sion control systems. When these systems are
operating properly, your vehicle will provide
excellent performance and fuel economy, as
well as engine emissions well within current
government regulations.
If any of these systems require service, the
OBD II system will turn on the Malfunction
Indicator Light (MIL). It will also store diag-
nostic codes and other information to assist
your service technician in making repairs.
Although your vehicle will usually be drivable
and not need towing, see your authorized
dealer for service as soon as possible.
CAUTION!
• Prolonged driving with the MIL on couldcause further damage to the emission
control system. It could also affect fuel
economy and driveability. The vehicle
must be serviced before any emissions
tests can be performed.
• If the MIL is flashing while the engine is
running, severe catalytic converter dam-
age and power loss will soon occur. Im-
mediate service is required.
Onboard Diagnostic System (OBD II)
Cybersecurity
Your vehicle is required to have an Onboard
Diagnostic system (OBD II) and a connection
port to allow access to information related to
the performance of your emissions controls.
Authorized service technicians may need to
access this information to assist with the
diagnosis and service of your vehicle and
emissions system.
WARNING!
• ONLY an authorized service technicianshould connect equipment to the OBD II
connection port in order to diagnose or
service your vehicle.
• If unauthorized equipment is connected
to the OBD II connection port, such as a
driver-behavior tracking device, it may:• Be possible that vehicle systems,
including safety related systems,
could be impaired or a loss of ve-
hicle control could occur that may
result in an accident involving seri-
ous injury or death.
• Access, or allow others to access,
information stored in your vehicle
systems, including personal infor-
mation.
For further information, refer to “Privacy
Practices” and “Uconnect CyberSecurity” in
“All About Uconnect Access” in your Owner’s
Manual Radio Supplement and “Cybersecu-
rity” in “Multimedia” in your Owner's Manual
at www.jeep.com/en/owners/manuals/.
89
Page 114 of 372
2. If a child from 2 to 12 years old (not in arear-facing child restraint) must ride in
the front passenger seat, move the seat as
far back as possible and use the proper
child restraint (Refer to “Child
Restraints”).
3. Children that are not big enough to wear the vehicle seat belt properly (Refer to
"Child Restraints") should be secured in a
vehicle with a rear seat in child restraints
or belt-positioning booster seats. Older
children who do not use child restraints or
belt-positioning booster seats should ride
properly buckled up in a vehicle with a
rear seat.
4. Never allow children to slide the shoulder belt behind them or under their arm.
5. You should read the instructions provided with your child restraint to make sure that
you are using it properly.
6. All occupants should always wear their lap and shoulder belts properly.
7. The driver and front passenger seats should be moved back as far as practical
to allow the front air bags room to inflate. 8. Do not lean against the door or window. If
your vehicle has side air bags, and deploy-
ment occurs, the side air bags will inflate
forcefully into the space between occu-
pants and the door and occupants could
be injured.
9. If the air bag system in this vehicle needs to be modified to accommodate a dis-
abled person, contact the Customer Cen-
ter. Phone numbers are provided under
"Customer Assistance.”
WARNING!
• Never place a rear-facing child restraintin front of an air bag. A deploying pas-
senger front air bag can cause death or
serious injury to a child 12 years or
younger, including a child in a rear-
facing child restraint.
• Only use a rear-facing child restraint in a
vehicle with a rear seat.
Seat Belt Systems
Buckle up even though you are an excellent
driver, even on short trips. Someone on the
road may be a poor driver and could cause a
collision that includes you. This can happen
far away from home or on your own street.
Research has shown that seat belts save
lives, and they can reduce the seriousness of
injuries in a collision. Some of the worst
injuries happen when people are thrown from
the vehicle. Seat belts reduce the possibility
of ejection and the risk of injury caused by
striking the inside of the vehicle. Everyone in
a motor vehicle should be belted at all times.
Enhanced Seat Belt Use Reminder System
(BeltAlert)
Driver and Passenger BeltAlert (If Equipped)
BeltAlert is a feature intended to remind
the driver and outboard front seat passenger
(if equipped with outboard front passenger
seat BeltAlert) to buckle their seat belts. The
Belt Alert feature is active whenever the igni-
tion switch is in the START or ON/RUN posi-
tion.
SAFETY
112
Page 115 of 372
Initial Indication
If the driver is unbuckled when the ignition
switch is first in the START or ON/RUN posi-
tion, a chime will signal for a few seconds. If
the driver or outboard front seat passenger (if
equipped with outboard front passenger seat
BeltAlert) is unbuckled when the ignition
switch is first in the START or ON/RUN posi-
tion the Seat Belt Reminder Light will turn on
and remain on until both outboard front seat
belts are buckled. The outboard front passen-
ger seat BeltAlert is not active when an out-
board front passenger seat is unoccupied.
BeltAlert Warning Sequence
The BeltAlert warning sequence is activated
when the vehicle is moving above a specified
vehicle speed range and the driver or out-
board front seat passenger is unbuckled (if
equipped with outboard front passenger seat
BeltAlert) (the outboard front passenger seat
BeltAlert is not active when the outboard
front passenger seat is unoccupied). The
BeltAlert warning sequence starts by blinking
the Seat Belt Reminder Light and sounding
an intermittent chime. Once the BeltAlert
warning sequence has completed, the SeatBelt Reminder Light will remain on until the
seat belts are buckled. The BeltAlert warning
sequence may repeat based on vehicle speed
until the driver and occupied outboard front
seat passenger seat belts are buckled. The
driver should instruct all occupants to buckle
their seat belts.
Change Of Status
If the driver or outboard front seat passenger
(if equipped with outboard front passenger
seat BeltAlert) unbuckles their seat belt while
the vehicle is traveling, the BeltAlert warning
sequence will begin until the seat belts are
buckled again. The outboard front passenger
seat BeltAlert is not active when the outboard
front passenger seat is unoccupied. BeltAlert
may be triggered when an animal or other
items are placed on the outboard front pas-
senger seat or when the seat is folded flat (if
equipped). It is recommended that pets be
restrained in the rear seat (if equipped) in pet
harnesses or pet carriers that are secured by
seat belts, and cargo is properly stowed.
BeltAlert can be activated or deactivated by
your authorized dealer. FCA US LLC does not
recommend deactivating BeltAlert.NOTE:
If BeltAlert has been deactivated and the
driver or outboard front seat passenger (if
equipped with outboard front passenger seat
BeltAlert) is unbuckled the Seat Belt Re-
minder Light will turn on and remain on until
the driver and outboard front seat passenger
seat belts are buckled.
Lap/Shoulder Belts
All seating positions in your vehicle are
equipped with lap/shoulder belts.
The seat belt webbing retractor will lock only
during very sudden stops or collisions. This
feature allows the shoulder part of the seat
belt to move freely with you under normal
conditions. However, in a collision the seat
belt will lock and reduce your risk of striking
the inside of the vehicle or being thrown out
of the vehicle.
WARNING!
• Relying on the air bags alone could lead
to more severe injuries in a collision. The
air bags work with your seat belt to
113
Page 120 of 372
Energy Management Feature
This vehicle has a seat belt system with an
Energy Management feature in the front seat-
ing positions that may help further reduce the
risk of injury in the event of a collision. The
seat belt system has a retractor assembly that
is designed to release webbing in a controlled
manner.
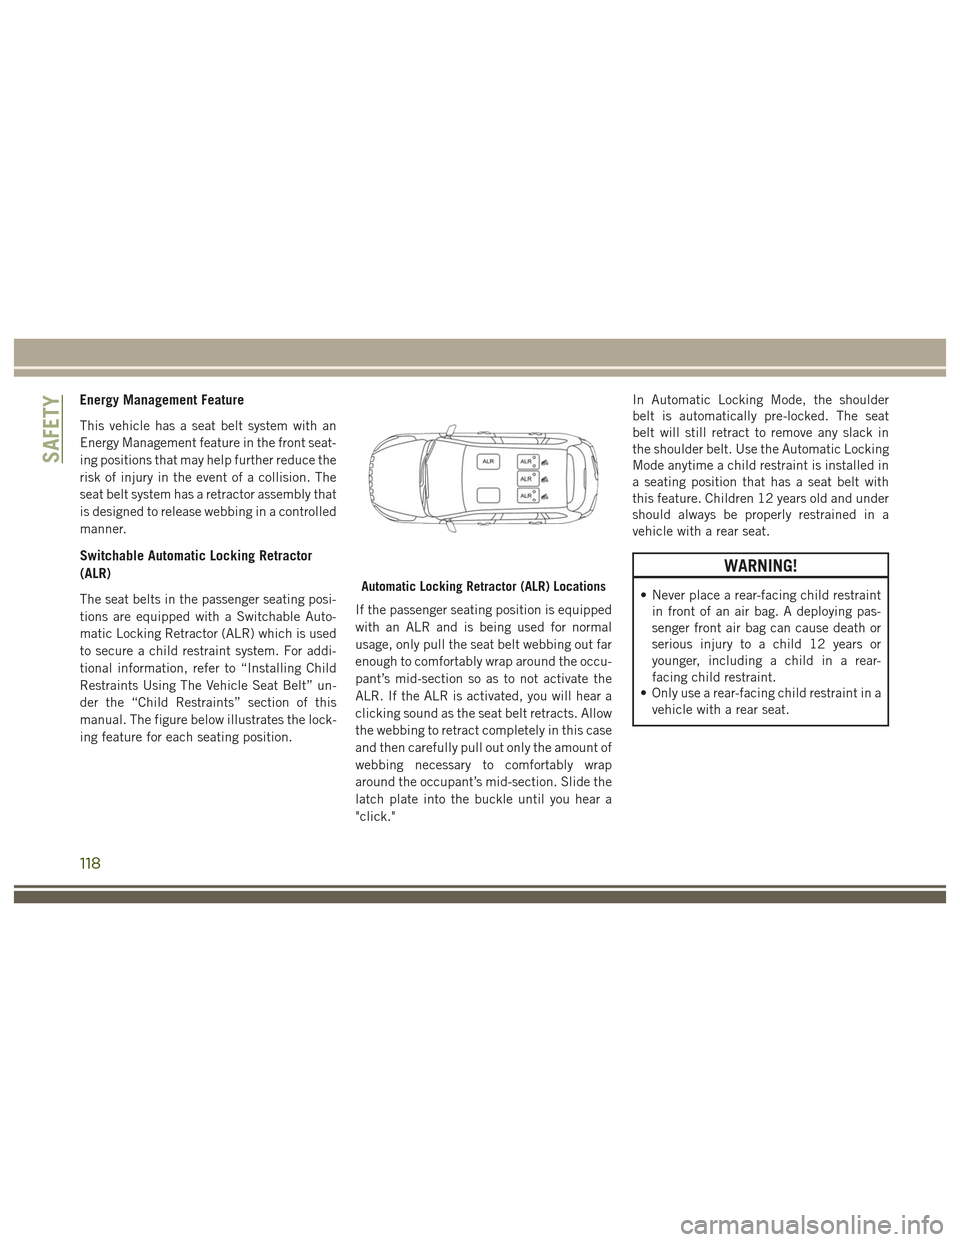
Switchable Automatic Locking Retractor
(ALR)
The seat belts in the passenger seating posi-
tions are equipped with a Switchable Auto-
matic Locking Retractor (ALR) which is used
to secure a child restraint system. For addi-
tional information, refer to “Installing Child
Restraints Using The Vehicle Seat Belt” un-
der the “Child Restraints” section of this
manual. The figure below illustrates the lock-
ing feature for each seating position.Automatic Locking Retractor (ALR) Locations
If the passenger seating position is equipped
with an ALR and is being used for normal
usage, only pull the seat belt webbing out far
enough to comfortably wrap around the occu-
pant’s mid-section so as to not activate the
ALR. If the ALR is activated, you will hear a
clicking sound as the seat belt retracts. Allow
the webbing to retract completely in this case
and then carefully pull out only the amount of
webbing necessary to comfortably wrap
around the occupant’s mid-section. Slide the
latch plate into the buckle until you hear a
"click." In Automatic Locking Mode, the shoulder
belt is automatically pre-locked. The seat
belt will still retract to remove any slack in
the shoulder belt. Use the Automatic Locking
Mode anytime a child restraint is installed in
a seating position that has a seat belt with
this feature. Children 12 years old and under
should always be properly restrained in a
vehicle with a rear seat.
WARNING!
• Never place a rear-facing child restraint
in front of an air bag. A deploying pas-
senger front air bag can cause death or
serious injury to a child 12 years or
younger, including a child in a rear-
facing child restraint.
• Only use a rear-facing child restraint in a
vehicle with a rear seat.
SAFETY
118
Page 132 of 372
NOTE:
EDR data are recorded by your vehicle only if
a non-trivial crash situation occurs; no data
are recorded by the EDR under normal driving
conditions and no personal data (e.g., name,
gender, age, and crash location) are re-
corded. However, other parties, such as law
enforcement, could combine the EDR data
with the type of personally identifying data
routinely acquired during a crash investiga-
tion.
To read data recorded by an EDR, special
equipment is required, and access to the
vehicle or the EDR is needed. In addition to
the vehicle manufacturer, other parties, such
as law enforcement, that have the special
equipment, can read the information if they
have access to the vehicle or the EDR.
Child Restraints
Everyone in your vehicle needs to be buckled
up at all times, including babies and chil-
dren. Every state in the United States, andevery Canadian province, requires that small
children ride in proper restraint systems. This
is the law, and you can be prosecuted for
ignoring it.
Children 12 years or younger should ride
properly buckled up in a rear seat, if avail-
able. According to crash statistics, children
are safer when properly restrained in the rear
seats rather than in the front.
WARNING!
In a collision, an unrestrained child can
become a projectile inside the vehicle.
The force required to hold even an infant
on your lap could become so great that you
could not hold the child, no matter how
strong you are. The child and others could
be badly injured. Any child riding in your
vehicle should be in a proper restraint for
the child’s size.
There are different sizes and types of re-
straints for children from newborn size to the child almost large enough for an adult safety
belt. Always check the child seat Owner’s
Manual to make sure you have the correct
seat for your child. Carefully read and follow
all the instructions and warnings in the child
restraint Owner’s Manual and on all the la-
bels attached to the child restraint.
Before buying any restraint system, make
sure that it has a label certifying that it meets
all applicable Safety Standards. You should
also make sure that you can install it in the
vehicle where you will use it.
NOTE:
• For additional information, refer to
www.safercar.gov/parents/index.htm or
call 1–888–327–4236.
• Canadian residents should refer to Trans- port Canada’s website for additional infor-
mation:
www.tc.gc.ca/eng/motorvehiclesafety/
safedrivers-childsafety-index-53.htm
SAFETY
130