window JEEP GRAND CHEROKEE 2017 WK2 / 4.G Owner's Manual
[x] Cancel search | Manufacturer: JEEP, Model Year: 2017, Model line: GRAND CHEROKEE, Model: JEEP GRAND CHEROKEE 2017 WK2 / 4.GPages: 372
Page 151 of 372
STARTING PROCEDURES —
GASOLINE ENGINES
Before starting your vehicle, adjust your seat,
adjust the inside and outside mirrors, fasten
your seat belt, and if present, instruct all
other occupants to buckle their seat belts.
WARNING!
• Before exiting a vehicle, always shift theautomatic transmission into PARK and
apply the parking brake. Always make
sure the keyless ignition node is in the
“OFF” mode, remove the key fob from
the vehicle and lock the vehicle.
• Never leave children alone in a vehicle,
or with access to an unlocked vehicle.
Leaving children in a vehicle unattended
is dangerous for a number of reasons. A
child or others could be seriously or
fatally injured. Children should be
warned not to touch the parking brake,
brake pedal or the gear selector.
• Do not leave the key fob in or near the
vehicle, or in a location accessible to
children, and do not leave the ignition of
WARNING!
a vehicle equipped with Keyless Enter-
N-Go in the ACC or ON/RUN mode. A
child could operate power windows,
other controls, or move the vehicle.
• Do not leave children or animals inside
parked vehicles in hot weather. Interior
heat build-up may cause serious injury
or death.
Normal Starting
To Turn On The Engine Using The ENGINE START/
STOP Button
1. The transmission must be in PARK or NEUTRAL.
2. Press and hold the brake pedal while pushing the ENGINE START/STOP button
once.
3. The system takes over and attempts to start the vehicle. If the vehicle fails to
start, the starter will disengage automati-
cally after 10 seconds.
4. If you wish to stop the cranking of the engine prior to the engine starting, push
the button again. NOTE:
Normal starting of either a cold or a warm
engine is obtained without pumping or press-
ing the accelerator pedal.
To Turn Off The Engine Using ENGINE START/
STOP Button
1. Place the gear selector in PARK, then
push and release the ENGINE START/
STOP button.
2. The ignition will return to the OFF mode.
3. If the gear selector is not in PARK, the ENGINE START/STOP button must be
held for two seconds or three short pushes
in a row with the vehicle speed above
5 mph (8 km/h) before the engine will
shut off. The ignition will remain in the
ACC mode until the gear selector is in
PARK and the button is pushed twice to
the OFF mode. If the gear selector is not in
PARK and the ENGINE START/STOP but-
ton is pushed once, the instrument cluster
will display a “Vehicle Not In Park” mes-
sage and the engine will remain running.
Never leave a vehicle out of the PARK
position, or it could roll.
149
Page 153 of 372
The starter is allowed to crank for up to
30-second intervals. Waiting a few minutes
between such intervals will protect the starter
from overheating.
WARNING!
• Before exiting a vehicle, always shift theautomatic transmission into PARK and
apply the parking brake. Always make
sure the keyless ignition node is in the
“OFF” mode, remove the key fob from
the vehicle and lock the vehicle.
• Never leave children alone in a vehicle,
or with access to an unlocked vehicle.
Leaving children in a vehicle unattended
is dangerous for a number of reasons. A
child or others could be seriously or
fatally injured. Children should be
warned not to touch the parking brake,
brake pedal or the gear selector.
• Do not leave the key fob in or near the
vehicle, or in a location accessible to
children, and do not leave the ignition of
a vehicle equipped with Keyless Enter-
N-Go in the ACC or ON/RUN mode. A
WARNING!
child could operate power windows,
other controls, or move the vehicle.
• Do not leave children or animals inside
parked vehicles in hot weather. Interior
heat build-up may cause serious injury
or death.
NOTE:
Engine start up in very low ambient tempera-
ture could result in evident white smoke. This
condition will disappear as the engine warms
up.
CAUTION!
• The engine is allowed to crank as long as 30 seconds. If the engine fails to start
during this period, please wait at least
two minutes for the starter to cool before
repeating start procedure.
• If the “Water in Fuel Indicator Light”
remains on, DO NOT START engine be-
fore you drain the water from the fuel
filters to avoid engine damage. Refer to
“Draining Fuel/Water Separator Filter”
CAUTION!
in “Servicing And Maintenance” for fur-
ther information.
Automatic Transmission
Start the engine with the transmission gear
selector in the PARK position. Apply the
brake before shifting to any driving range.
Extreme Cold Weather
The engine block heater is a resistance heater
installed in the water jacket of the engine. It
requires a 110–115 Volt AC electrical outlet
with a grounded, three-wire extension cord.
Its use is recommended for environments
that routinely fall below -10°F (-23°C). It
should be used when the vehicle has not been
running overnight or longer periods and
should be plugged in two hours prior to start.
Its use is required for cold starts with tem-
peratures under -20°F (-28°C).
151
Page 155 of 372
WARNING!
• Do not leave the key fob in or near thevehicle, or in a location accessible to
children, and do not leave the ignition of
a vehicle equipped with Keyless Enter-
N-Go in the ACC or ON/RUN mode. A
child could operate power windows,
other controls, or move the vehicle.
STOP/START SYSTEM — IF
EQUIPPED
The Stop/Start function is developed to re-
duce fuel consumption. The system will stop
the engine automatically during a vehicle
stop if the required conditions are met. Re-
leasing the brake pedal or pressing the accel-
erator pedal will automatically re-start the
engine.
Automatic Mode
The Stop/Start feature is
enabled after every nor-
mal customer engine
start. At that time, the
system will go into STOP/
START READY and if all
other conditions are met,
can go into a STOP/START AUTOSTOP AC-
TIVE “Autostop” mode.
To Activate The Autostop Mode, The Following
Must Occur:
• The system must be in STOP/START READY state. A STOP/START READY mes-
sage will be displayed in the instrument
cluster display within the Stop/Start sec-
tion. Refer to “Instrument Cluster Dis-
play” in “Getting To Know Your Instrument
Panel” in your Owners Manual at
www.jeep.com/en/owners/manuals/ .
• The vehicle must be completely stopped.
• The shifter must be in a forward gear and the brake pedal depressed. The engine will shut down, the tachometer
will move to the zero position and the Stop/
Start telltale will illuminate indicating you
are in Autostop. Customer settings will be
maintained upon return to an engine running
condition.
Refer to the “Stop/Start System” in the
“Starting And Operating” section located in
your Owners Manual at
www.jeep.com/en/owners/manuals/ .
Possible Reasons The Engine Does Not
Autostop
Prior to engine shut down, the system will
check many safety and comfort conditions to
see if they are fulfilled. Detailed information
about the operation of the Stop/Start system
may be viewed in the instrument cluster dis-
play Stop/Start Screen. In the following situ-
ations, the engine will not stop:
• Driver’s seat belt is not buckled.
• Driver’s door is not closed.
• Battery temperature is too warm or cold.
• Battery charge is low.
• The vehicle is on a steep grade.
153
Page 159 of 372
300 to 500 miles (483 to 805 km):
• Exercise the full engine rpm range, shift-ing manually (paddles or gear shift) at
higher rpms when possible.
• Do not perform sustained operation with the accelerator pedal at wide open
throttle.
• Maintain vehicle speed below 85 mph (136 km/h) and observe local speed
limits.
For the first 1500 miles (2414 km):
• Do not participate in track events, sport driving schools, or similar activities during
the first 1500 mi (2414 km).
NOTE:
Check engine oil with every refueling and add
if necessary. Oil and fuel consumption may
be higher through the first oil change interval.
Running the engine with an oil level below
the add mark can cause severe engine dam-
age.AUTOMATIC
TRANSMISSION
WARNING!
• It is dangerous to shift out of PARK or NEUTRAL if the engine speed is higher
than idle speed. If your foot is not firmly
pressing the brake pedal, the vehicle
could accelerate quickly forward or in
reverse. You could lose control of the
vehicle and hit someone or something.
Only shift into gear when the engine is
idling normally and your foot is firmly
pressing the brake pedal.
• Unintended movement of a vehicle
could injure those in or near the vehicle.
As with all vehicles, you should never
exit a vehicle while the engine is run-
ning. Before exiting a vehicle, always
apply the parking brake, shift the trans-
mission into PARK, and turn the ignition
OFF. When the ignition is in the OFF
mode, the transmission is locked in
PARK, securing the vehicle against un-
wanted movement.
WARNING!
• When leaving the vehicle, always makesure the ignition is in the OFF mode,
remove the key fob from the vehicle, and
lock the vehicle.
• Never leave children alone in a vehicle,
or with access to an unlocked vehicle.
Allowing children to be in a vehicle un-
attended is dangerous for a number of
reasons. A child or others could be seri-
ously or fatally injured. Children should
be warned not to touch the parking
brake, brake pedal or the transmission
gear selector.
• Do not leave the key fob in or near the
vehicle (or in a location accessible to
children), and do not leave the ignition
in the ACC or ON/RUN mode. A child
could operate power windows, other con-
trols, or move the vehicle.
157
Page 214 of 372
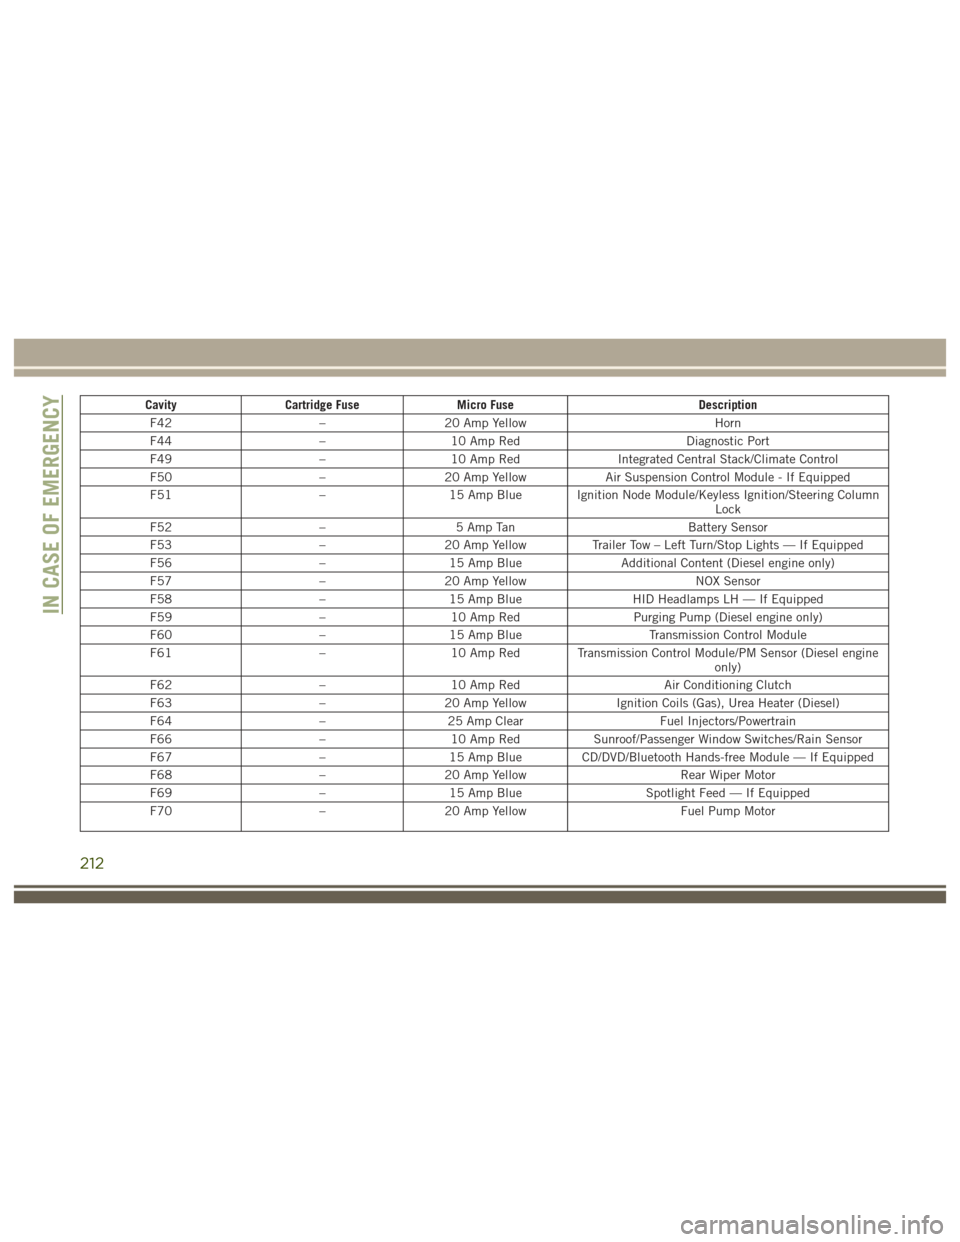
CavityCartridge Fuse Micro Fuse Description
F42 –20 Amp Yellow Horn
F44 –10 Amp Red Diagnostic Port
F49 –10 Amp Red Integrated Central Stack/Climate Control
F50 –20 Amp Yellow Air Suspension Control Module - If Equipped
F51 –15 Amp Blue Ignition Node Module/Keyless Ignition/Steering Column
Lock
F52 –5 Amp Tan Battery Sensor
F53 –20 Amp Yellow Trailer Tow – Left Turn/Stop Lights — If Equipped
F56 –15 Amp Blue Additional Content (Diesel engine only)
F57 –20 Amp Yellow NOX Sensor
F58 –15 Amp Blue HID Headlamps LH — If Equipped
F59 –10 Amp Red Purging Pump (Diesel engine only)
F60 –15 Amp Blue Transmission Control Module
F61 –10 Amp Red Transmission Control Module/PM Sensor (Diesel engine
only)
F62 –10 Amp Red Air Conditioning Clutch
F63 –20 Amp Yellow Ignition Coils (Gas), Urea Heater (Diesel)
F64 –25 Amp Clear Fuel Injectors/Powertrain
F66 –10 Amp Red Sunroof/Passenger Window Switches/Rain Sensor
F67 –15 Amp Blue CD/DVD/Bluetooth Hands-free Module — If Equipped
F68 –20 Amp Yellow Rear Wiper Motor
F69 –15 Amp Blue Spotlight Feed — If Equipped
F70 –20 Amp Yellow Fuel Pump Motor
IN CASE OF EMERGENCY
212
Page 250 of 372
Checking Oil Level — Gasoline Engine
To assure proper lubrication of your vehicle’s
engine, the engine oil must be maintained at
the correct level. Check the oil level at regular
intervals, such as every fuel stop. The best
time to check the engine oil level is about five
minutes after a fully warmed up engine is
shut off.
Checking the oil while the vehicle is on level
ground will improve the accuracy of the oil
level readings. Always maintain the oil level
within the SAFE zone on the dipstick. Adding
one quart of oil when the reading is at the
bottom of the SAFE zone will result in a
reading at the top of the safe zone on these
engines.
CAUTION!
Overfilling or underfilling the crankcase
will cause aeration or loss of oil pressure.
This could damage your engine.
Checking Oil Level — Diesel Engine
To assure proper lubrication of your vehicle's
engine, the engine oil must be maintained at
the correct level. Check the oil level at regular
intervals. The best time to check the oil level
is before starting the engine after it has been
parked overnight. When checking oil after
operating the engine, first ensure the engine
is at full operating temperature, then wait for
five minutes after engine shutdown to check
the oil.
Checking the oil while the vehicle is on level
ground will improve the accuracy of the oil
level readings. Add oil only when the level on
the dipstick is below the “MIN” mark. The
total capacity from the MIN mark to the MAX
mark is 1.7 qts (1.6L).
CAUTION!
Overfilling or underfilling the crankcase
will cause oil aeration or loss of oil pres-
sure. This could damage your engine.NOTE:
It is possible for your oil level to be slightly
higher than a previous check. This would be
due to diesel fuel that may temporarily be in
the crankcase due to operation of the diesel
particulate filter regeneration strategy. This
fuel will evaporate out under normal opera-
tion.
Never operate the engine with oil level below
the “MIN” mark or above the upper “MAX”
mark.
Adding Washer Fluid
The instrument cluster display will indicate
when the washer fluid level is low. When the
sensor detects a low fluid level, the wind-
shield will light on the vehicle graphic outline
and the “WASHER FLUID LOW” message
will be displayed.
The fluid reservoir for the windshield washers
and the rear window washer is shared. The
fluid reservoir is located in the engine com-
partment, be sure to check the fluid level at
regular intervals. Fill the reservoir with wind-
shield washer solvent only (not radiator anti-
freeze). When refilling the washer fluid reser-
SERVICING AND MAINTENANCE
248
Page 269 of 372
WARNING!
The traction grade assigned to this tire is
based on straight-ahead braking traction
tests, and does not include acceleration,
cornering, hydroplaning, or peak traction
characteristics.
Temperature Grades
The temperature grades are A (the highest),
B, and C, representing the tire's resistance to
the generation of heat and its ability to dissi-
pate heat, when tested under controlled con-
ditions on a specified indoor laboratory test
wheel.
Sustained high temperature can cause the
material of the tire to degenerate and reduce
tire life, and excessive temperature can lead
to sudden tire failure. The grade C corre-
sponds to a level of performance, which all
passenger vehicle tires must meet under the
Federal Motor Vehicle Safety Standard No.
109. Grades B and A represent higher levels
of performance on the laboratory test wheel,
than the minimum required by law.
WARNING!
The temperature grade for this tire is es-
tablished for a tire that is properly inflated
and not overloaded. Excessive speed,
under-inflation, or excessive loading, ei-
ther separately or in combination, can
cause heat buildup and possible tire fail-
ure.
STORING THE VEHICLE
If the vehicle should remain stationary for
more than a month, observe the following
precautions:
• Park your vehicle in a covered, dry andpossibly airy location the windows open
slightly.
• Check that the Electric Park Brake is not engaged.
• Disconnect the negative (-) terminal from the battery post and be sure that the
battery is fully charged. During storage
check battery charge quarterly. • If you do not disconnect the battery from
the electrical system, check the battery
charge every thirty days.
• Clean and protect the painted parts by applying protective waxes.
• Clean and protect polished metal parts by applying protective waxes.
• Apply talcum powder to the front and rear wiper blades and leave raised from the
glass.
• Cover the vehicle with an appropriate cover taking care not to damage the
painted surface by dragging across dirty
surfaces. Do not use plastic sheeting
which will not allow the evaporation of
moisture present on the surface of the
vehicle.
• Inflate the tires at a pressure of +7.25 psi (+0.5 bar) higher than recommended on
the tire placard and check it periodically.
• Do not drain the engine cooling system.
• Whenever you leave the vehicle is station- ary for two weeks or more, run idle the
engine for approximately five minutes,
with the air conditioning system on and
high fan speed. This will ensure a proper
267
Page 274 of 372
VEHICLE IDENTIFICATION
NUMBER
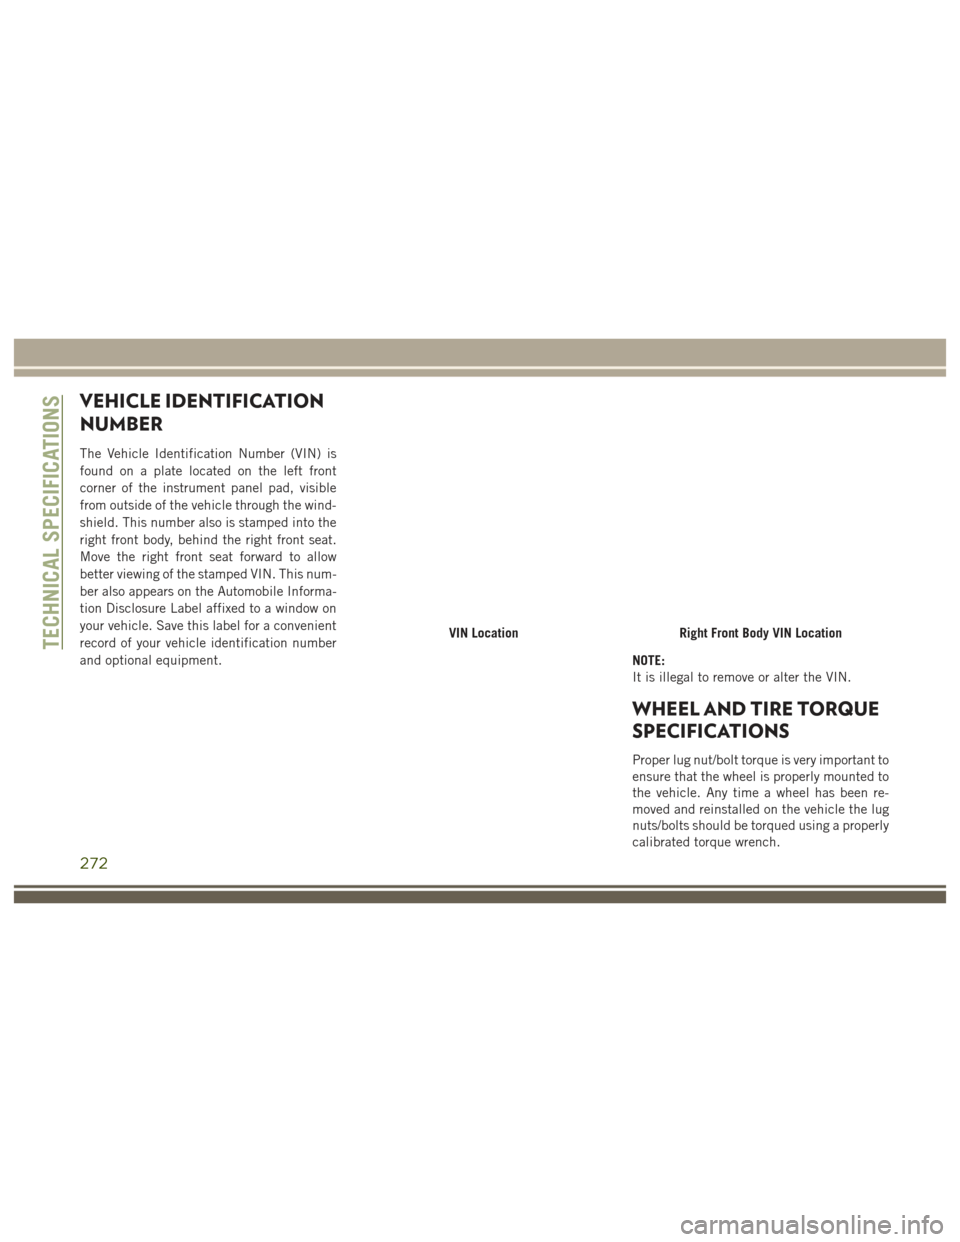
The Vehicle Identification Number (VIN) is
found on a plate located on the left front
corner of the instrument panel pad, visible
from outside of the vehicle through the wind-
shield. This number also is stamped into the
right front body, behind the right front seat.
Move the right front seat forward to allow
better viewing of the stamped VIN. This num-
ber also appears on the Automobile Informa-
tion Disclosure Label affixed to a window on
your vehicle. Save this label for a convenient
record of your vehicle identification number
and optional equipment.NOTE:
It is illegal to remove or alter the VIN.
WHEEL AND TIRE TORQUE
SPECIFICATIONS
Proper lug nut/bolt torque is very important to
ensure that the wheel is properly mounted to
the vehicle. Any time a wheel has been re-
moved and reinstalled on the vehicle the lug
nuts/bolts should be torqued using a properly
calibrated torque wrench.
VIN LocationRight Front Body VIN LocationTECHNICAL SPECIFICATIONS
272
Page 286 of 372
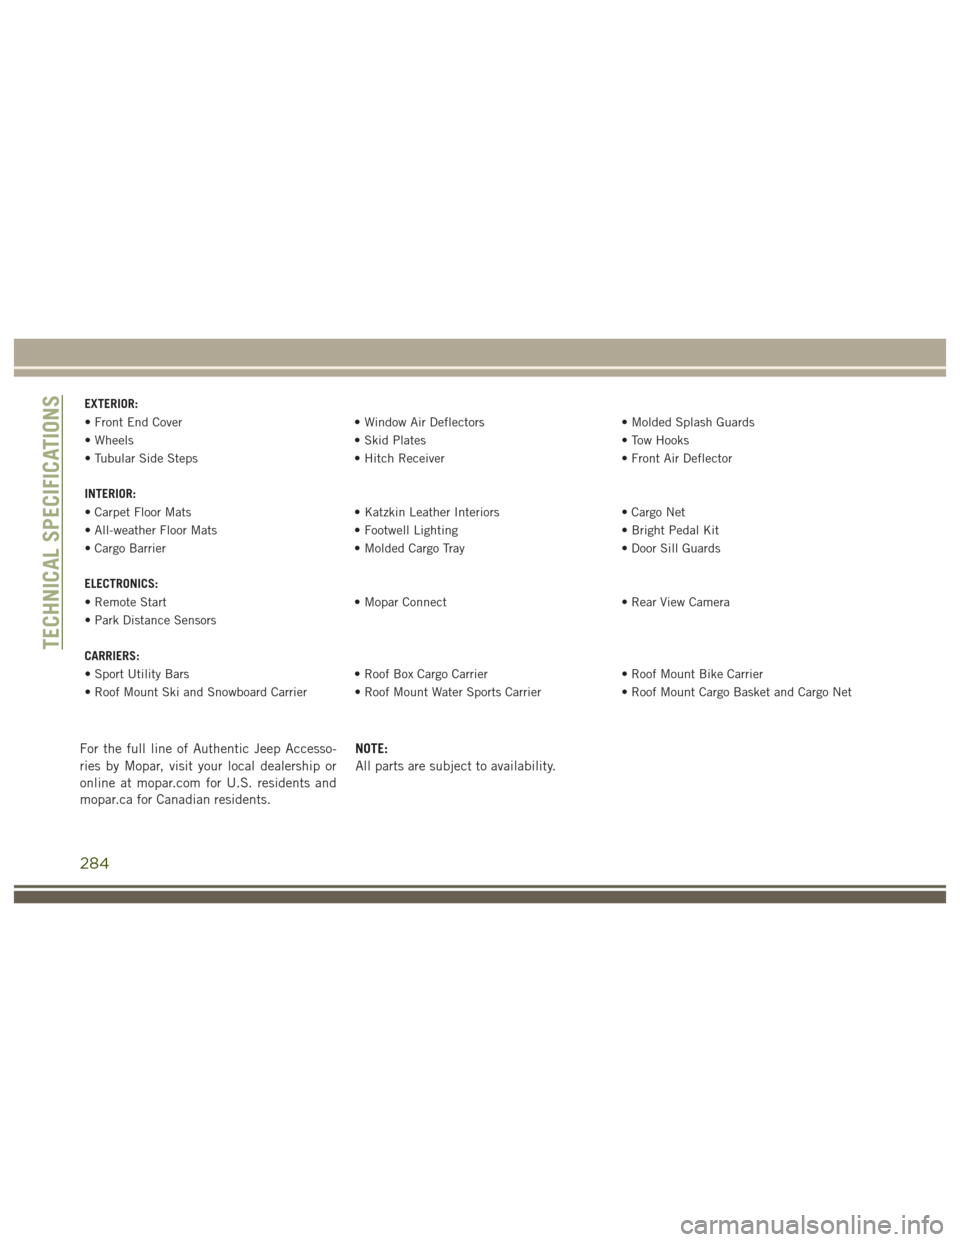
EXTERIOR:
• Front End Cover• Window Air Deflectors• Molded Splash Guards
• Wheels • Skid Plates• Tow Hooks
• Tubular Side Steps • Hitch Receiver• Front Air Deflector
INTERIOR:
• Carpet Floor Mats • Katzkin Leather Interiors• Cargo Net
• All-weather Floor Mats • Footwell Lighting• Bright Pedal Kit
• Cargo Barrier • Molded Cargo Tray• Door Sill Guards
ELECTRONICS:
• Remote Start • Mopar Connect• Rear View Camera
• Park Distance Sensors
CARRIERS:
• Sport Utility Bars • Roof Box Cargo Carrier• Roof Mount Bike Carrier
• Roof Mount Ski and Snowboard Carrier • Roof Mount Water Sports Carrier • Roof Mount Cargo Basket and Cargo Net
For the full line of Authentic Jeep Accesso-
ries by Mopar, visit your local dealership or
online at mopar.com for U.S. residents and
mopar.ca for Canadian residents.NOTE:
All parts are subject to availability.
TECHNICAL SPECIFICATIONS
284
Page 361 of 372
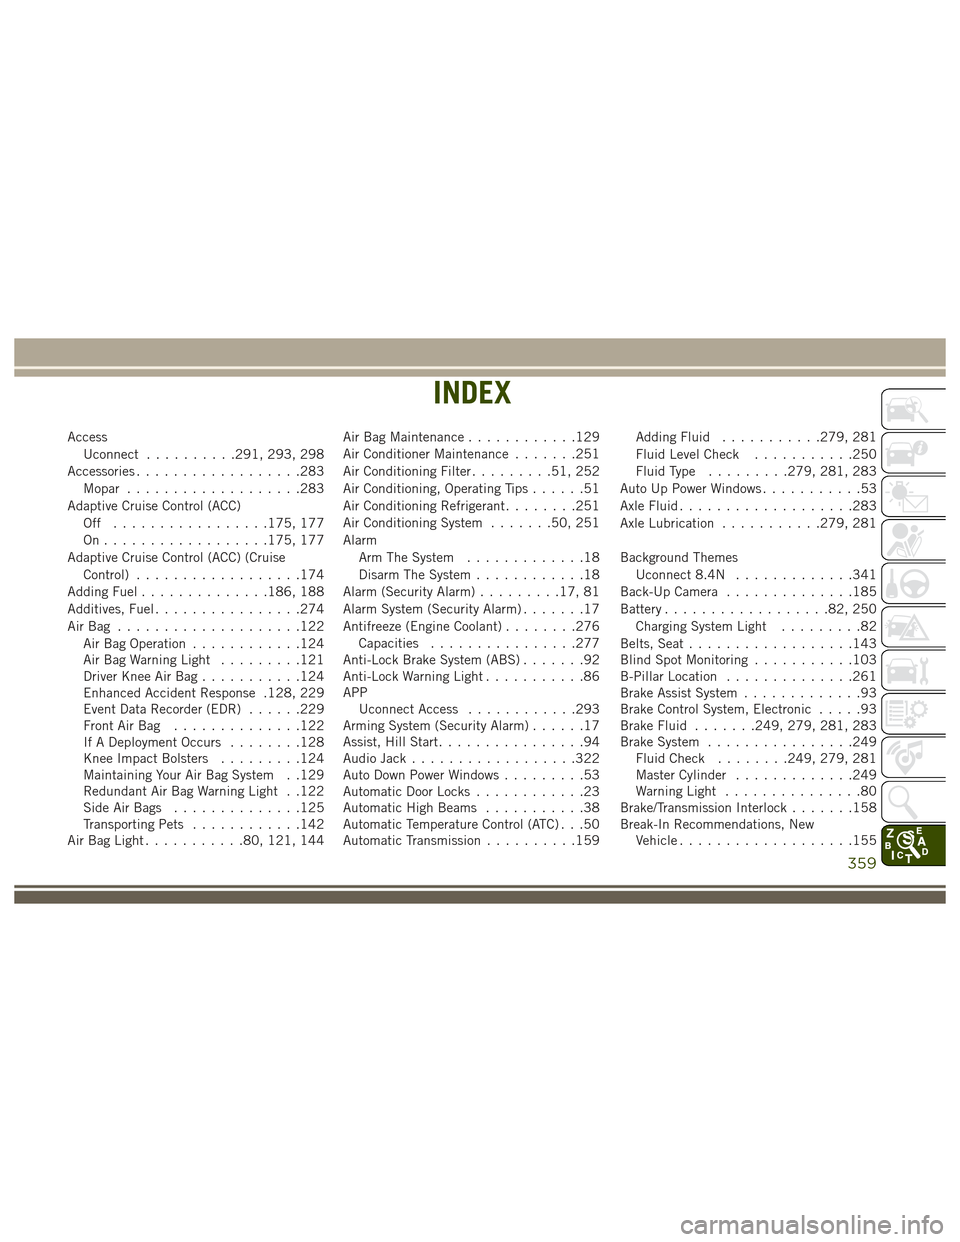
AccessUconnect ..........291, 293, 298
Accessories ..................283
Mopar ...................283
Adaptive Cruise Control (ACC) Off .................175, 177
On..................175, 177
Adaptive Cruise Control (ACC) (Cruise Control) ..................174
Adding Fuel ..............186, 188
Additives, Fuel ................274
AirBag ....................122 Air Bag Operation ............124
Air Bag Warning Light .........121
Driver Knee Air Bag ...........124
Enhanced Accident Response .128, 229
Event Data Recorder (EDR) ......229
Front Air Bag ..............122
If A Deployment Occurs ........128
Knee Impact Bolsters .........124
Maintaining Your Air Bag System . .129
Redundant Air Bag Warning Light . .122
Side Air Bags ..............125
Transporting Pets ............142
Air Bag Light ...........80, 121, 144 Air Bag Maintenance
............129
Air Conditioner Maintenance .......251
Air Conditioning Filter .........51, 252
Air Conditioning, Operating Tips ......51
Air Conditioning Refrigerant ........251
Air Conditioning System .......50, 251
Alarm Arm The System .............18
Disarm The System ............18
Alarm (Security Alarm) .........17, 81
Alarm System (Security Alarm) .......17
Antifreeze (Engine Coolant) ........276
Capacities ................277
Anti-Lock Brake System (ABS) .......92
Anti-Lock Warning Light ...........86
APP Uconnect Access ............293
Arming System (Security Alarm) ......17
Assist, Hill Start ................94
Audio
Jack ..................322
Auto Down Power Windows .........53
Automatic Door Locks ............23
Automatic High Beams ...........38
Automatic Temperature Control (ATC) . . .50
Automatic Transmission ..........159 Adding Fluid
...........279, 281
Fluid Level Check ...........250
Fluid Type .........279, 281, 283
Auto Up Power Windows ...........53
Axle Fluid ...................283
Axle Lubrication ...........279, 281
Background Themes Uconnect 8.4N .............341
Back-Up Camera ..............185
Battery ..................82, 250
Charging System Light .........82
Belts, Seat ..................143
Blind Spot Monitoring ...........103
B-Pillar Location ..............261
Brake Assist System .............93
Brake Control System, Electronic .....93
Brake Fluid .......249, 279, 281, 283
Brake System ................249
Fluid Check ........249, 279, 281
Master Cylinder .............249
Warning Light ...............80
Brake/Transmission Interlock .......158
Break-In Recommendations, New Vehicle ...................155
INDEX
359