radio JEEP GRAND CHEROKEE 2017 WK2 / 4.G Service Manual
[x] Cancel search | Manufacturer: JEEP, Model Year: 2017, Model line: GRAND CHEROKEE, Model: JEEP GRAND CHEROKEE 2017 WK2 / 4.GPages: 372
Page 323 of 372
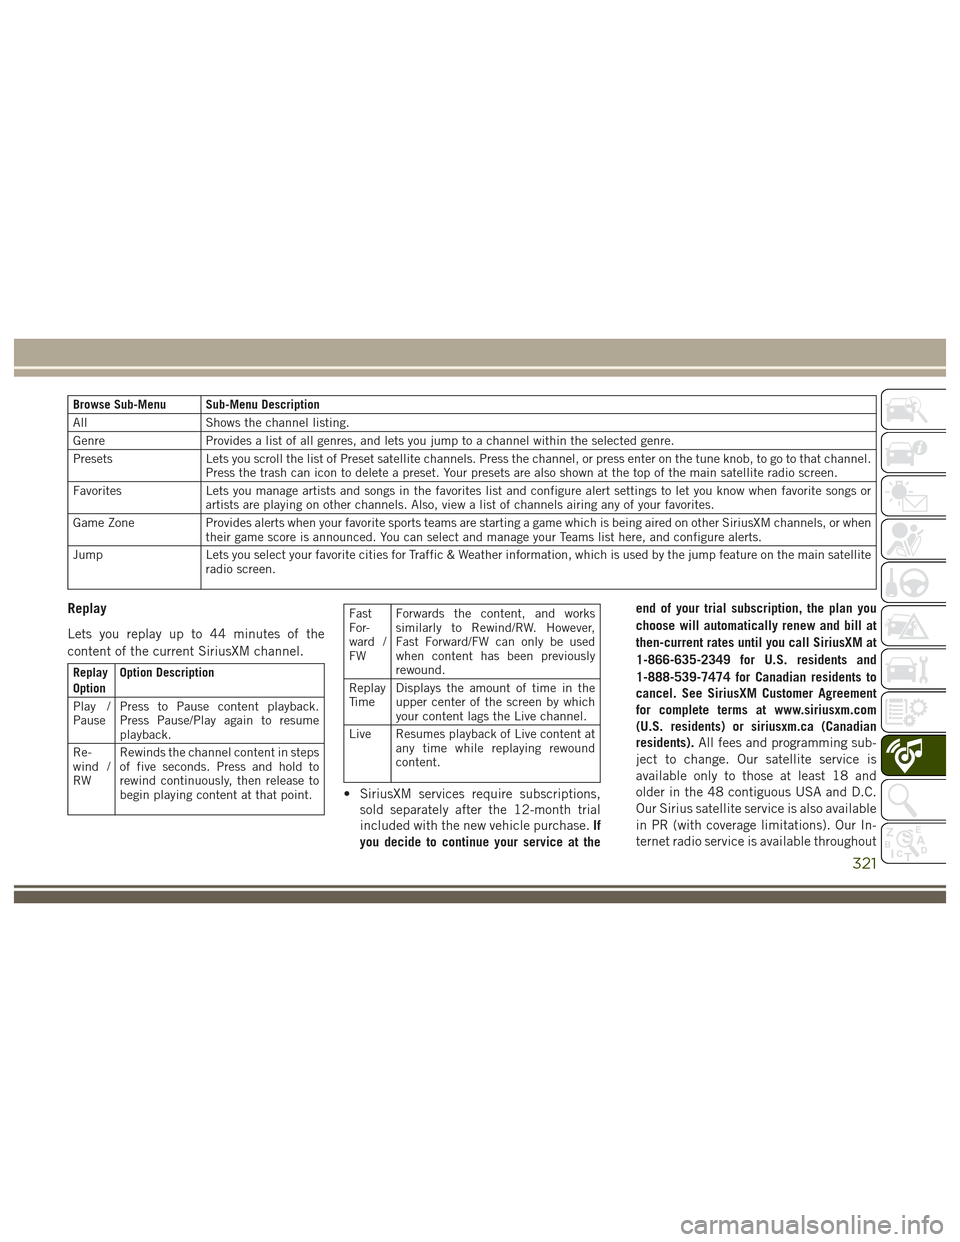
Browse Sub-Menu Sub-Menu Description
AllShows the channel listing.
Genre Provides a list of all genres, and lets you jump to a channel within the selected genre.
Presets Lets you scroll the list of Preset satellite channels. Press the channel, or press enter on the tune knob, to go to that channel.
Press the trash can icon to delete a preset. Your presets are also shown at the top of the main satellite radio screen.
Favorites Lets you manage artists and songs in the favorites list and configure alert settings to let you know when favorite songs or
artists are playing on other channels. Also, view a list of channels airing any of your favorites.
Game Zone Provides alerts when your favorite sports teams are starting a game which is being aired on other SiriusXM channels, or when
their game score is announced. You can select and manage your Teams list here, and configure alerts.
Jump Lets you select your favorite cities for Traffic & Weather information, which is used by the jump feature on the main satellite
radio screen.
Replay
Lets you replay up to 44 minutes of the
content of the current SiriusXM channel.
Replay
Option Option Description
Play /
Pause Press to Pause content playback.
Press Pause/Play again to resume
playback.
Re-
wind /
RW Rewinds the channel content in steps
of five seconds. Press and hold to
rewind continuously, then release to
begin playing content at that point.
Fast
For-
ward /
FWForwards the content, and works
similarly to Rewind/RW. However,
Fast Forward/FW can only be used
when content has been previously
rewound.
Replay
Ti m e Displays the amount of time in the
upper center of the screen by which
your content lags the Live channel.
Live Resumes playback of Live content at any time while replaying rewound
content.
• SiriusXM services require subscriptions,
sold separately after the 12-month trial
included with the new vehicle purchase. If
you decide to continue your service at the end of your trial subscription, the plan you
choose will automatically renew and bill at
then-current rates until you call SiriusXM at
1-866-635-2349 for U.S. residents and
1-888-539-7474 for Canadian residents to
cancel. See SiriusXM Customer Agreement
for complete terms at www.siriusxm.com
(U.S. residents) or siriusxm.ca (Canadian
residents).
All fees and programming sub-
ject to change. Our satellite service is
available only to those at least 18 and
older in the 48 contiguous USA and D.C.
Our Sirius satellite service is also available
in PR (with coverage limitations). Our In-
ternet radio service is available throughout
321
Page 324 of 372
our satellite service area and in AK and HI.
©2016 Sirius XM Radio Inc. Sirius, XM
and all related marks and logos are trade-
marks of Sirius XM Radio Inc.
UCONNECT TOUCH
SETTINGS
The Uconnect system allows you to access
Customer Programmable feature settings
such as Display, Voice, Clock, Safety & Driv-
ing Assistance, Lights, Doors & Locks,
Auto-On Comfort & Remote Start, Engine Off
Options, Compass Settings, Audio, Phone/
Bluetooth, Suspension, SiriusXM Setup, Re-
store Settings, Clear Personal Data, and Sys-
tem Information through buttons on the
touchscreen.
Push the SETTINGS button (Uconnect 5.0),
or press the “Apps” button (Uconnect 8.4)
located near the bottom of the touchscreen,
then press the “Settings” button on the
touchscreen to access the Settings screen.
When making a selection, scroll up or down
until the preferred setting is highlighted,
then press the preferred setting until a check-mark appears next to the setting, showing
that setting has been selected. The following
feature settings are available:
• Display
• Engine Off Op-
tions
• Voice • Suspension
• Clock • Audio
• Safety & Driving Assistance • Phone/Bluetooth
• Lights • SiriusXM Setup
• Doors & Locks • Restore Settings
• Auto-On Comfort & Remote Start • Clear Personal
Data
• Compass (Uconnect 5.0) • System Informa-
tion
NOTE:
Depending on the vehicles options, feature
settings may vary.
Refer to “Uconnect Settings/Customer Pro-
grammable Features” in the “Multimedia”
Chapter on
www.jeep.com/en/owners/manuals/ for fur-
ther information.
IPOD/USB/SD CARD/MEDIA
PLAYER CONTROL
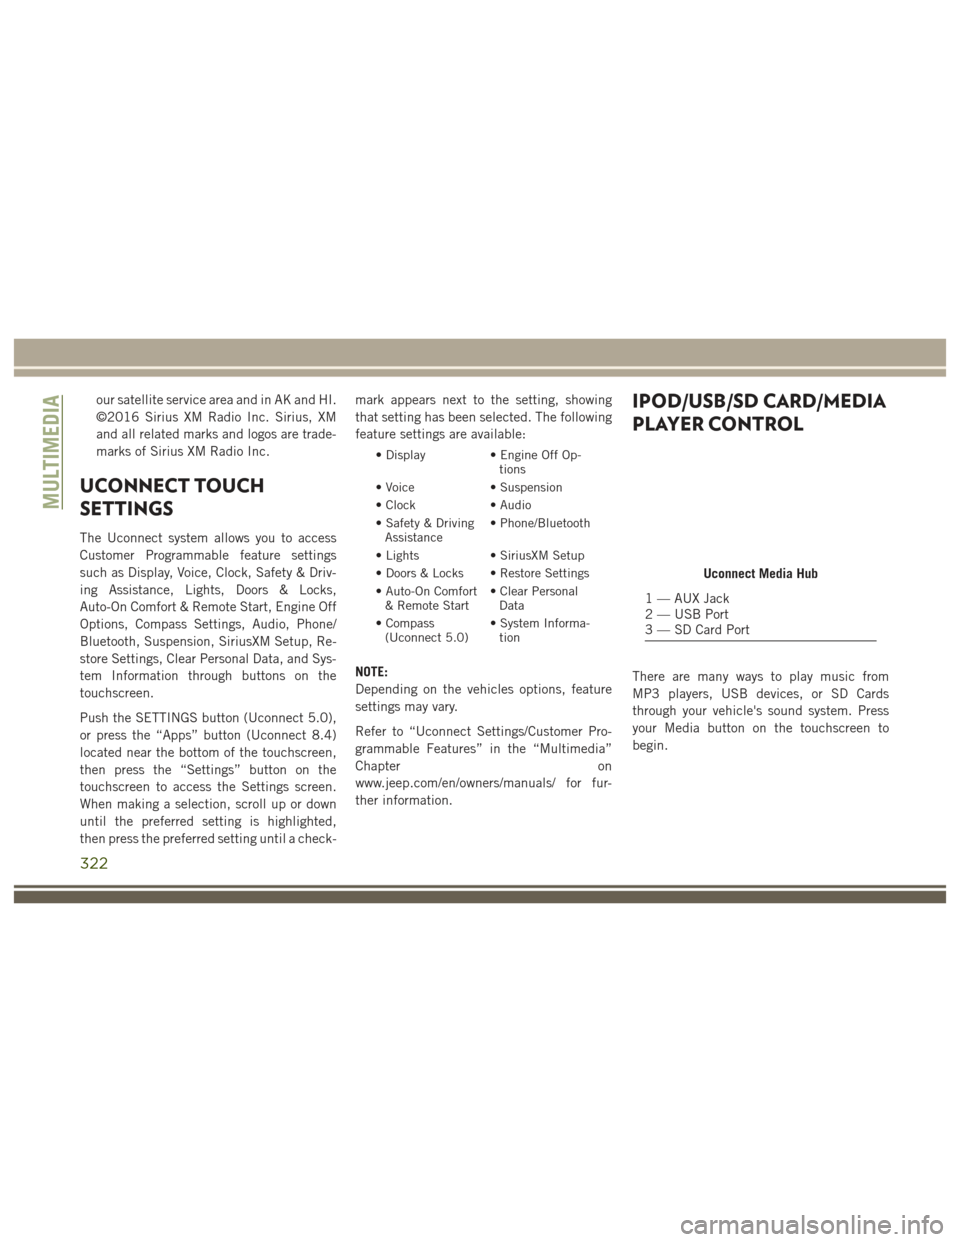
There are many ways to play music from
MP3 players, USB devices, or SD Cards
through your vehicle's sound system. Press
your Media button on the touchscreen to
begin.
Uconnect Media Hub
1 — AUX Jack
2 — USB Port
3 — SD Card Port
MULTIMEDIA
322
Page 325 of 372
Audio Jack (AUX)
• The AUX allows a device to be plugged intothe radio and utilize the vehicle’s sound
system, using a 3.5 mm audio cable, to
amplify the source and play through the
vehicle speakers.
• Pressing the “AUX” button on the touch- screen will change the mode to auxiliary
device if the audio jack is connected,
allowing the music from your device to be
heard through the vehicle's speakers. To
activate the AUX, plug in the audio jack.
• The functions of the device are controlled using the device buttons. The volume may
be controlled using the radio or device.
• To route the audio cable out of the center console, use the access cut out in the front
of the console.
USB Port
• Connect your compatible device using aUSB cable into the USB Port. USB
Memory sticks with audio files can also be
used. Audio from the device can be played
on the vehicles sound system while provid-
ing metadata (artist, track title, album,
etc.) information on the radio display. • When connected, the compatible USB de-
vice can be controlled using the radio or
Steering Wheel Audio Controls to play,
skip to the next or previous track, browse,
and list the contents.
• The battery charges when plugged into the USB port (if supported by the specific
device).
• To route the USB cable out of the center console, use the access cut out.
NOTE:
When connecting your device for the first
time, the system may take several minutes to
read your music, depending on the number of
files. For example, the system will take ap-
proximately five minutes for every
1,000 songs loaded on the device. Also dur-
ing the reading process, the Shuffle and
Browse functions will be disabled. This pro-
cess is needed to ensure the full use of your
features and only happens the first time it is
connected. After the first time, the reading
process of your device will take considerably
less time unless changes are made or new
songs are added to the playlist.
SD Card
• Play songs stored on an SD card inserted into the SD card slot.
• Song playback can be controlled using the radio or Steering Wheel Audio Controls to
play, skip to the next or previous track,
browse, and list the contents.
Bluetooth Streaming Audio
If using a Bluetooth equipped device you may
also be able to stream music to your vehicle's
sound system. Your connected device must
be Bluetooth compatible and paired with your
system (see Uconnect Phone for pairing in-
structions). You can access the music from
your connected Bluetooth device by pressing
the Bluetooth button on the touchscreen
while in Media mode.
323
Page 327 of 372
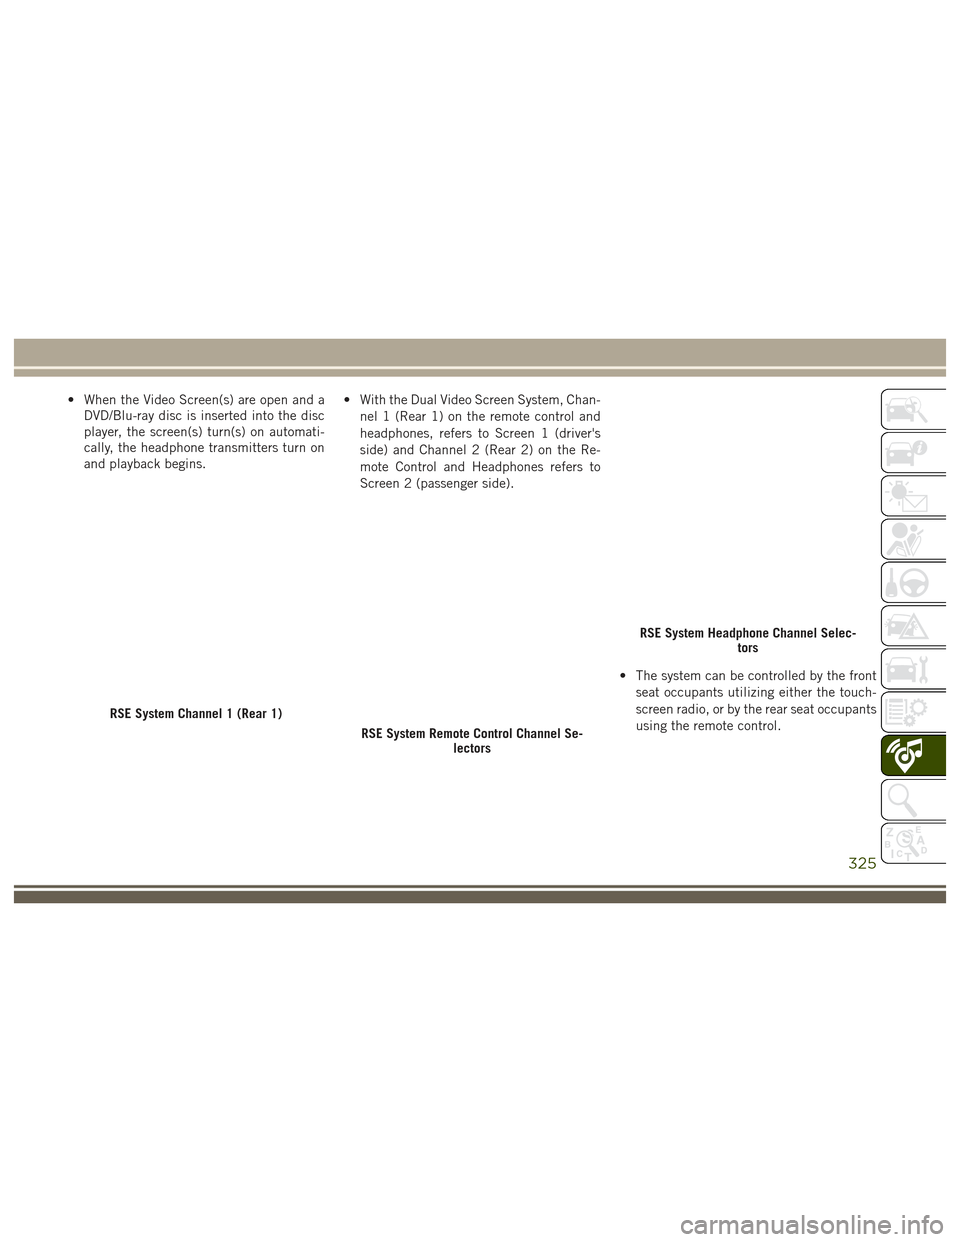
• When the Video Screen(s) are open and aDVD/Blu-ray disc is inserted into the disc
player, the screen(s) turn(s) on automati-
cally, the headphone transmitters turn on
and playback begins. • With the Dual Video Screen System, Chan-
nel 1 (Rear 1) on the remote control and
headphones, refers to Screen 1 (driver's
side) and Channel 2 (Rear 2) on the Re-
mote Control and Headphones refers to
Screen 2 (passenger side).
• The system can be controlled by the frontseat occupants utilizing either the touch-
screen radio, or by the rear seat occupants
using the remote control.
RSE System Channel 1 (Rear 1)
RSE System Remote Control Channel Se- lectors
RSE System Headphone Channel Selec- tors
325
Page 328 of 372
Dual Video Screen
NOTE:
Typically there are two different ways to op-
erate the features of the Rear Seat Entertain-
ment System.
• The Remote Control
• The Touchscreen Radio (If Equipped)
Blu-ray Disc Player
Play A Blu-ray Disc
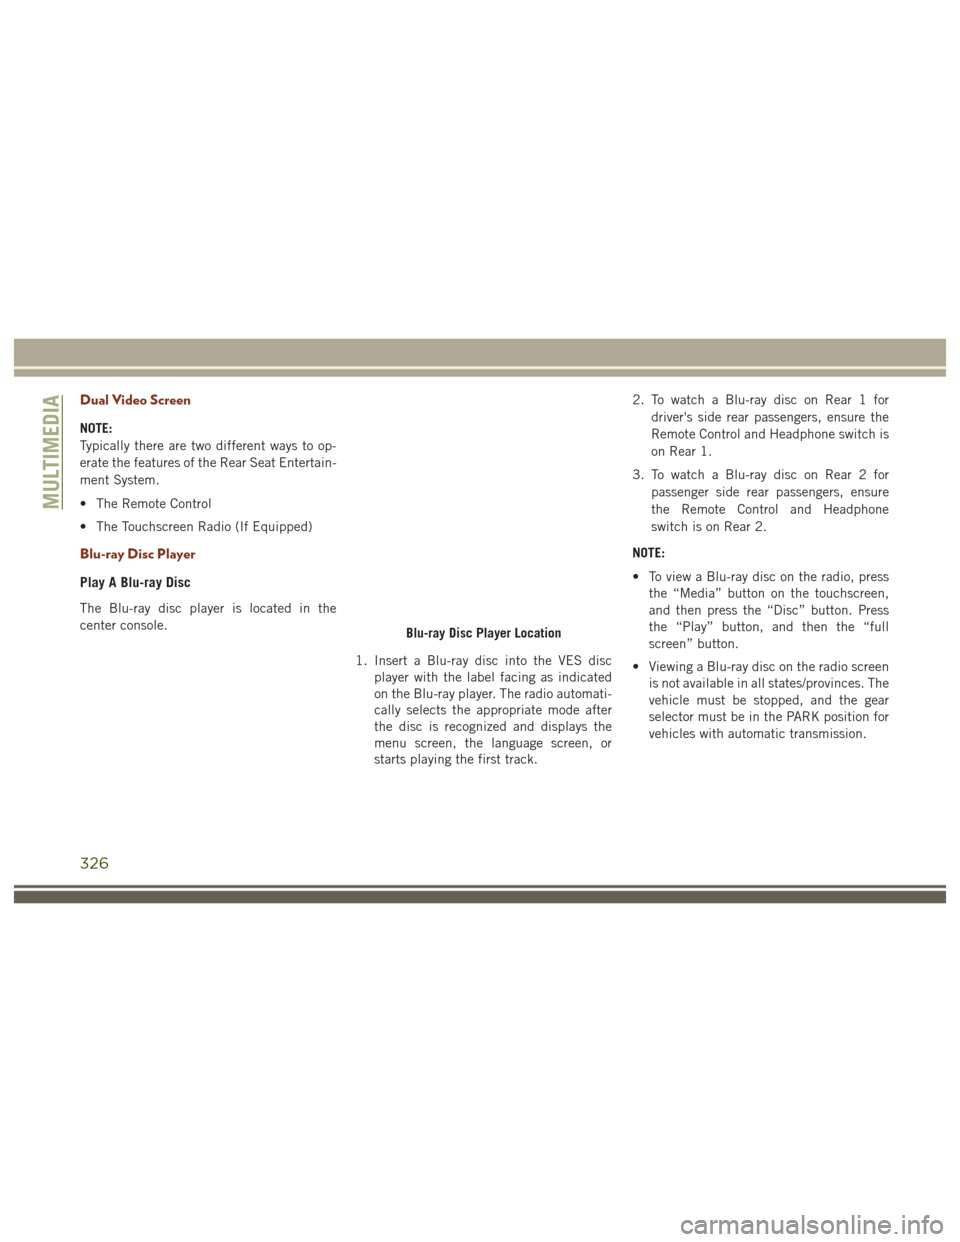
The Blu-ray disc player is located in the
center console.1. Insert a Blu-ray disc into the VES discplayer with the label facing as indicated
on the Blu-ray player. The radio automati-
cally selects the appropriate mode after
the disc is recognized and displays the
menu screen, the language screen, or
starts playing the first track. 2. To watch a Blu-ray disc on Rear 1 for
driver's side rear passengers, ensure the
Remote Control and Headphone switch is
on Rear 1.
3. To watch a Blu-ray disc on Rear 2 for passenger side rear passengers, ensure
the Remote Control and Headphone
switch is on Rear 2.
NOTE:
• To view a Blu-ray disc on the radio, press the “Media” button on the touchscreen,
and then press the “Disc” button. Press
the “Play” button, and then the “full
screen” button.
• Viewing a Blu-ray disc on the radio screen is not available in all states/provinces. The
vehicle must be stopped, and the gear
selector must be in the PARK position for
vehicles with automatic transmission.
Blu-ray Disc Player Location
MULTIMEDIA
326
Page 329 of 372
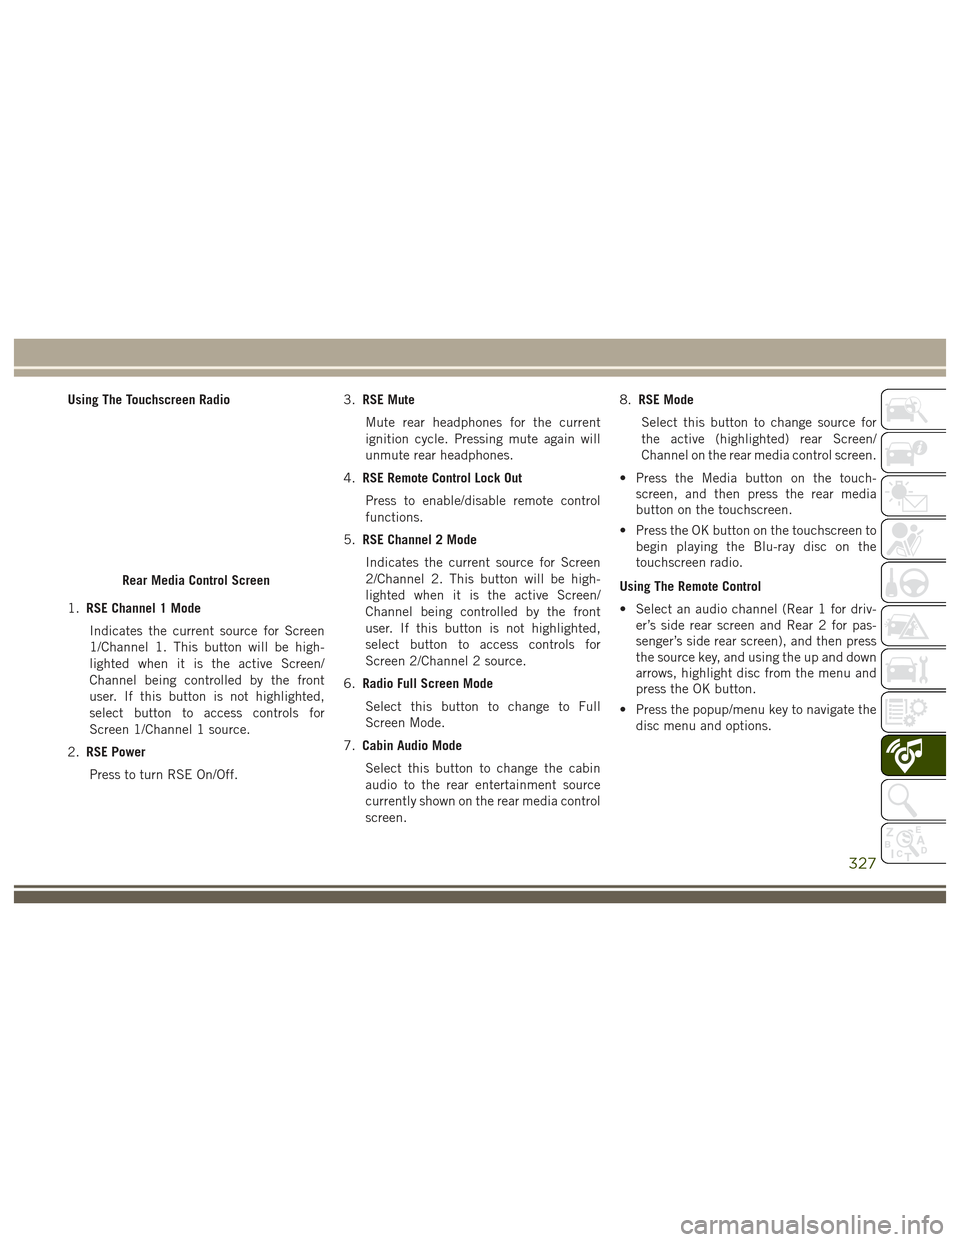
Using The Touchscreen Radio
1.RSE Channel 1 Mode
Indicates the current source for Screen
1/Channel 1. This button will be high-
lighted when it is the active Screen/
Channel being controlled by the front
user. If this button is not highlighted,
select button to access controls for
Screen 1/Channel 1 source.
2. RSE Power
Press to turn RSE On/Off. 3.
RSE Mute
Mute rear headphones for the current
ignition cycle. Pressing mute again will
unmute rear headphones.
4. RSE Remote Control Lock Out
Press to enable/disable remote control
functions.
5. RSE Channel 2 Mode
Indicates the current source for Screen
2/Channel 2. This button will be high-
lighted when it is the active Screen/
Channel being controlled by the front
user. If this button is not highlighted,
select button to access controls for
Screen 2/Channel 2 source.
6. Radio Full Screen Mode
Select this button to change to Full
Screen Mode.
7. Cabin Audio Mode
Select this button to change the cabin
audio to the rear entertainment source
currently shown on the rear media control
screen. 8.
RSE Mode
Select this button to change source for
the active (highlighted) rear Screen/
Channel on the rear media control screen.
• Press the Media button on the touch- screen, and then press the rear media
button on the touchscreen.
• Press the OK button on the touchscreen to begin playing the Blu-ray disc on the
touchscreen radio.
Using The Remote Control
• Select an audio channel (Rear 1 for driv- er’s side rear screen and Rear 2 for pas-
senger’s side rear screen), and then press
the source key, and using the up and down
arrows, highlight disc from the menu and
press the OK button.
• Press the popup/menu key to navigate the disc menu and options.
Rear Media Control Screen
327
Page 330 of 372
Play Video Games
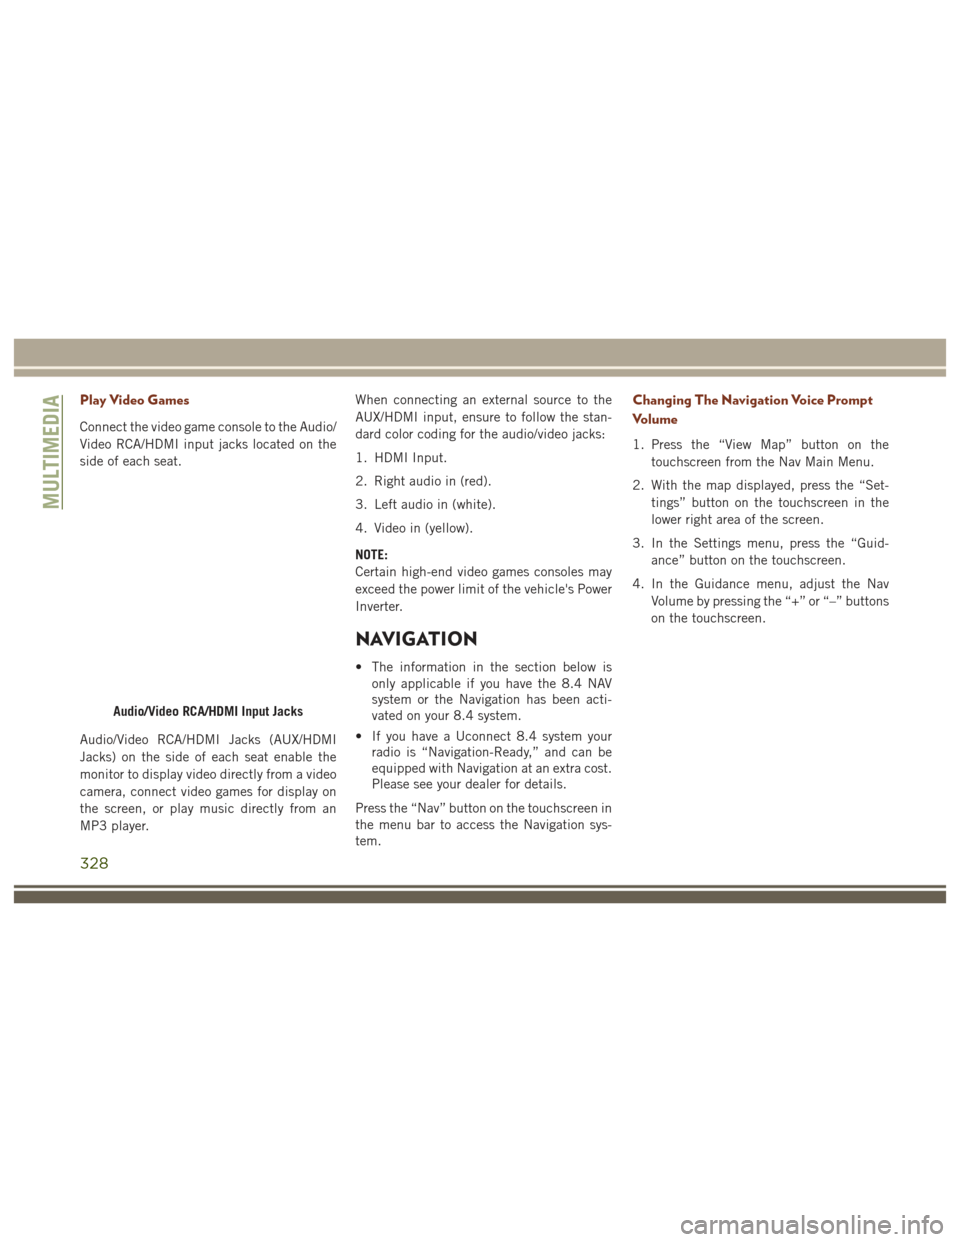
Connect the video game console to the Audio/
Video RCA/HDMI input jacks located on the
side of each seat.
Audio/Video RCA/HDMI Jacks (AUX/HDMI
Jacks) on the side of each seat enable the
monitor to display video directly from a video
camera, connect video games for display on
the screen, or play music directly from an
MP3 player.When connecting an external source to the
AUX/HDMI input, ensure to follow the stan-
dard color coding for the audio/video jacks:
1. HDMI Input.
2. Right audio in (red).
3. Left audio in (white).
4. Video in (yellow).
NOTE:
Certain high-end video games consoles may
exceed the power limit of the vehicle's Power
Inverter.
NAVIGATION
• The information in the section below is
only applicable if you have the 8.4 NAV
system or the Navigation has been acti-
vated on your 8.4 system.
• If you have a Uconnect 8.4 system your radio is “Navigation-Ready,” and can be
equipped with Navigation at an extra cost.
Please see your dealer for details.
Press the “Nav” button on the touchscreen in
the menu bar to access the Navigation sys-
tem.
Changing The Navigation Voice Prompt
Volume
1. Press the “View Map” button on the touchscreen from the Nav Main Menu.
2. With the map displayed, press the “Set- tings” button on the touchscreen in the
lower right area of the screen.
3. In the Settings menu, press the “Guid- ance” button on the touchscreen.
4. In the Guidance menu, adjust the Nav Volume by pressing the “+” or “–” buttons
on the touchscreen.
Audio/Video RCA/HDMI Input Jacks
MULTIMEDIA
328
Page 335 of 372
• A maximum of 10 mobile phones can bepaired to the Uconnect system.
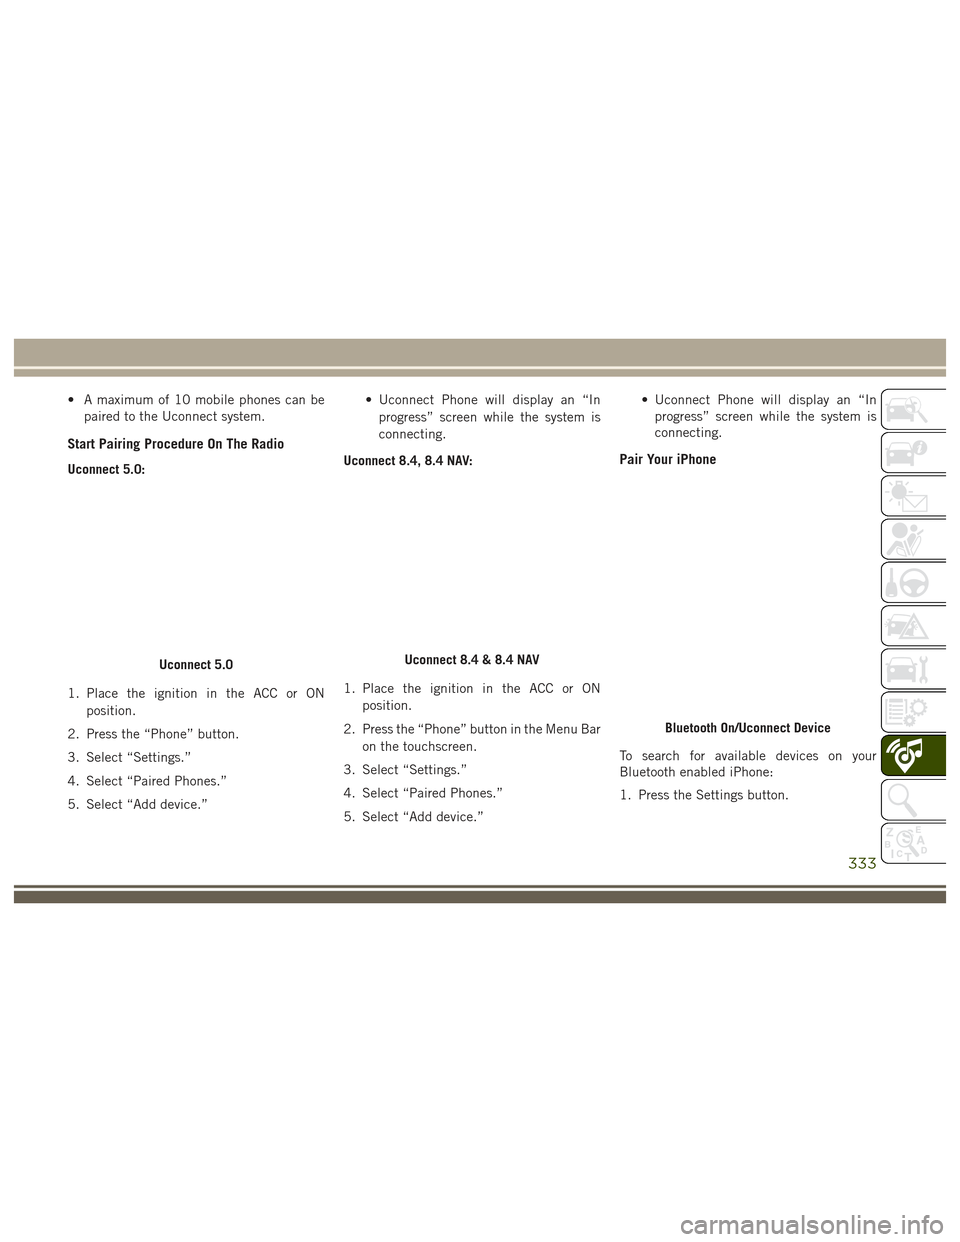
Start Pairing Procedure On The Radio
Uconnect 5.0:
1. Place the ignition in the ACC or ON
position.
2. Press the “Phone” button.
3. Select “Settings.”
4. Select “Paired Phones.”
5. Select “Add device.” • Uconnect Phone will display an “In
progress” screen while the system is
connecting.
Uconnect 8.4, 8.4 NAV:
1. Place the ignition in the ACC or ON position.
2. Press the “Phone” button in the Menu Bar on the touchscreen.
3. Select “Settings.”
4. Select “Paired Phones.”
5. Select “Add device.” • Uconnect Phone will display an “In
progress” screen while the system is
connecting.Pair Your iPhone
To search for available devices on your
Bluetooth enabled iPhone:
1. Press the Settings button.
Uconnect 5.0Uconnect 8.4 & 8.4 NAV
Bluetooth On/Uconnect Device
333
Page 338 of 372
Common Phone Commands (Examples)
• “Call John Smith”
• “Call John Smith mobile”
• “Dial 1 248 555 1212”
• “Redial”
Mute (Or Unmute) Microphone During
Call
• During a call, press the “Mute” button onthe Phone main screen to mute and un-
mute the call.
Transfer Ongoing Call Between Handset
And Vehicle
• During an on-going call, press the “Trans-fer” button on the Phone main screen to
transfer an on-going call between handset
and vehicle.
Phonebook
The Uconnect system will automatically sync
your phonebook from your paired phone, if
this feature is supported by your phone.
Phonebook contacts are updated each time
that the phone is connected. If your phone book entries do not appear, check the set-
tings on your phone. Some phones require
you to enable this feature manually.
• Your phonebook can be browsed on the
Uconnect system touchscreen, but editing
can only be done on your phone. To
browse, press the “Phone” button on the
touchscreen, then the “Phonebook” but-
ton on the touchscreen.
Favorite phonebook entries can be saved as
Favorites for quicker access. Favorites are
shown at the top of the main phone screen.
Voice Command Tips
• Speaking complete names (i.e; Call John Doe vs. Call John) will result in greater
system accuracy.
• You can “link” commands together for faster results. Say “Call John Doe, mo-
bile,” for example.
• If you are listening to available voice com- mand options, you do not have to listen to
the entire list. When you hear the com-
mand that you need, push the
button on the steering wheel, wait for the
beep and say your command.
Changing The Volume
• Start a dialogue by pushing the Phone
button
, then say a command for
example - "Help".
• Use the radio VOLUME/MUTE rotary knob to adjust the volume to a comfortable level
while the Uconnect system is speaking.
NOTE:
The volume setting for Uconnect is different
than the audio system.
NOTE:
To access help, push the Uconnect Phone
button
on the steering wheel and say
"help." Push the Uconnect Phone Pickup
button
or the VR buttonand say
"cancel" to cancel the help session.
Using Do Not Disturb
With Do Not Disturb, you can disable notifi-
cations from incoming calls and texts, allow-
ing you to keep your eyes on the road and
hands on the wheel. For your convenience
there is a counter display to keep track of
your missed calls and text messages while
you were using Do Not Disturb.
MULTIMEDIA
336
Page 343 of 372
1. Uconnect Phone Button, Push to
initiate, answer, or end a phone call, send
or receive a text.
2. Uconnect Voice Recognition Button
.
a. Short Press: Push and release the VR
button to begin Radio, Climate, Navi-
gation, and other embedded func-
tions. After you hear the single beep,
say a command.
b. Long Press: Push and hold continuously
for a few milliseconds, then release the
VR button for Siri functions. After you
hear the familiar Siri "double beep,"
say a command. 3. Phone Hang Up Button.
Basic Voice Commands
The basic Voice Commands below can be
given at any point while using your Uconnect
system.
Push the VR button
. After the beep,
say:
• Cancel to stop a current voice session
• Help to hear a list of suggested Voice
Commands
• Repeat to listen to the system prompts
again
Notice the visual cues that inform you of your
voice recognition system’s status. Cues ap-
pear on the touchscreen.
Uconnect VR And Phone ButtonsUconnect 5.0 Visual Cues
Uconnect 8.4/8.4 NAV
341