tow JEEP GRAND CHEROKEE 2017 WK2 / 4.G Repair Manual
[x] Cancel search | Manufacturer: JEEP, Model Year: 2017, Model line: GRAND CHEROKEE, Model: JEEP GRAND CHEROKEE 2017 WK2 / 4.GPages: 372
Page 255 of 372
6. Remove the A/C air filter by pulling itstraight out of the housing.
7. Install the A/C air filter with the arrow on the filter pointing toward the floor. When
installing the filter cover, make sure the
retaining tabs fully engage the cover.
CAUTION!
The cabin air filter is identified with an
arrow to indicate airflow direction through
the filter. Failure to properly install the
filter will result in the need to replace it
more often.
8. Reinstall the glove compartment door on the glove compartment door hinge and
reattach the glove compartment tension
tether by inserting the tether clip in the
glove compartment and sliding the clip
away from the face of the glove compart-
ment door.
9. Push the door to the near closed position to reengage the glove compartment travel
stops.
NOTE:
Ensure the glove compartment door
hinges and glove compartment travel
stops are fully engaged.
Windshield Wiper Blades
Clean the rubber edges of the wiper blades
and the windshield periodically with a sponge
or soft cloth and a mild nonabrasive cleaner.
This will remove accumulations of salt or road
film.
Operation of the wipers on dry glass for long
periods may cause deterioration of the wiper
blades. Always use washer fluid when using
the wipers to remove salt or dirt from a dry
windshield.
Avoid using the wiper blades to remove frost
or ice from the windshield. Keep the blade
rubber out of contact with petroleum prod-
ucts such as engine oil, gasoline, etc.
NOTE:
Life expectancy of wiper blades varies de-
pending on geographical area and frequency
of use. Poor performance of blades may be
present with chattering, marks, water lines or
wet spots. If any of these conditions are
present, clean the wiper blades or replace as
necessary.
A/C Air Filter Cover
1 — Retaining Tab
2 — Mid Way Snap
3 — Filter Cover Hinge
253
Page 256 of 372
The wiper blades and wiper arms should be
inspected periodically, not just when wiper
performance problems are experienced. This
inspection should include the following
points:
• Wear Or Uneven Edges
• Foreign Material
• Hardening Or Cracking
• Deformation Or Fatigue
If a wiper blade or wiper arm is damaged,
replace the affected wiper arm or blade with
a new unit. Do not attempt to repair a wiper
arm or blade that is damaged.
Front Wiper Blade Removal/Installation
CAUTION!
Do not allow the wiper arm to spring back
against the glass without the wiper blade
in place or the glass may be damaged.
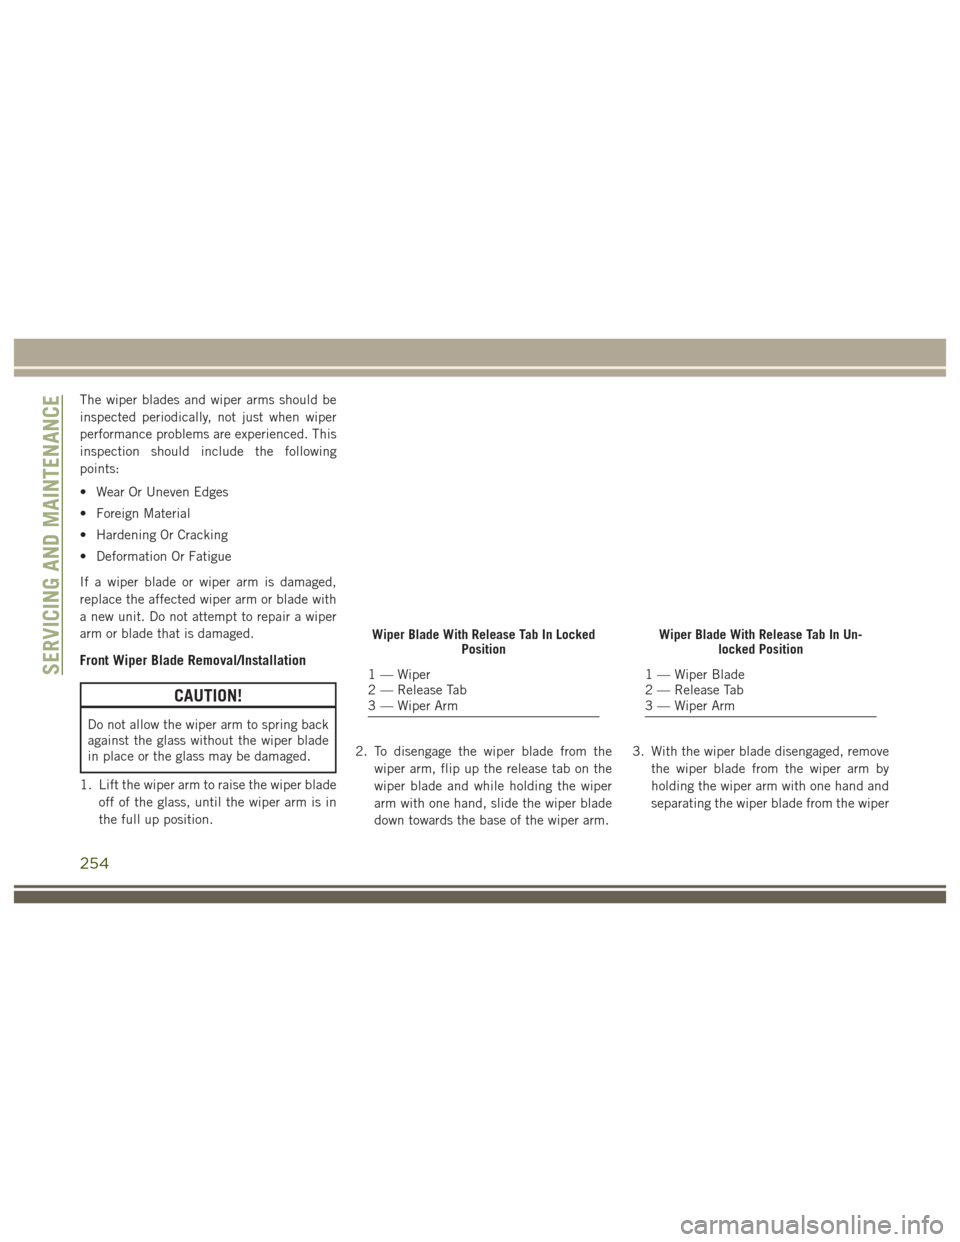
1. Lift the wiper arm to raise the wiper blade off of the glass, until the wiper arm is in
the full up position. 2. To disengage the wiper blade from the
wiper arm, flip up the release tab on the
wiper blade and while holding the wiper
arm with one hand, slide the wiper blade
down towards the base of the wiper arm. 3. With the wiper blade disengaged, remove
the wiper blade from the wiper arm by
holding the wiper arm with one hand and
separating the wiper blade from the wiper
Wiper Blade With Release Tab In Locked Position
1 — Wiper
2 — Release Tab
3 — Wiper Arm
Wiper Blade With Release Tab In Un-locked Position
1 — Wiper Blade
2 — Release Tab
3 — Wiper ArmSERVICING AND MAINTENANCE
254
Page 257 of 372
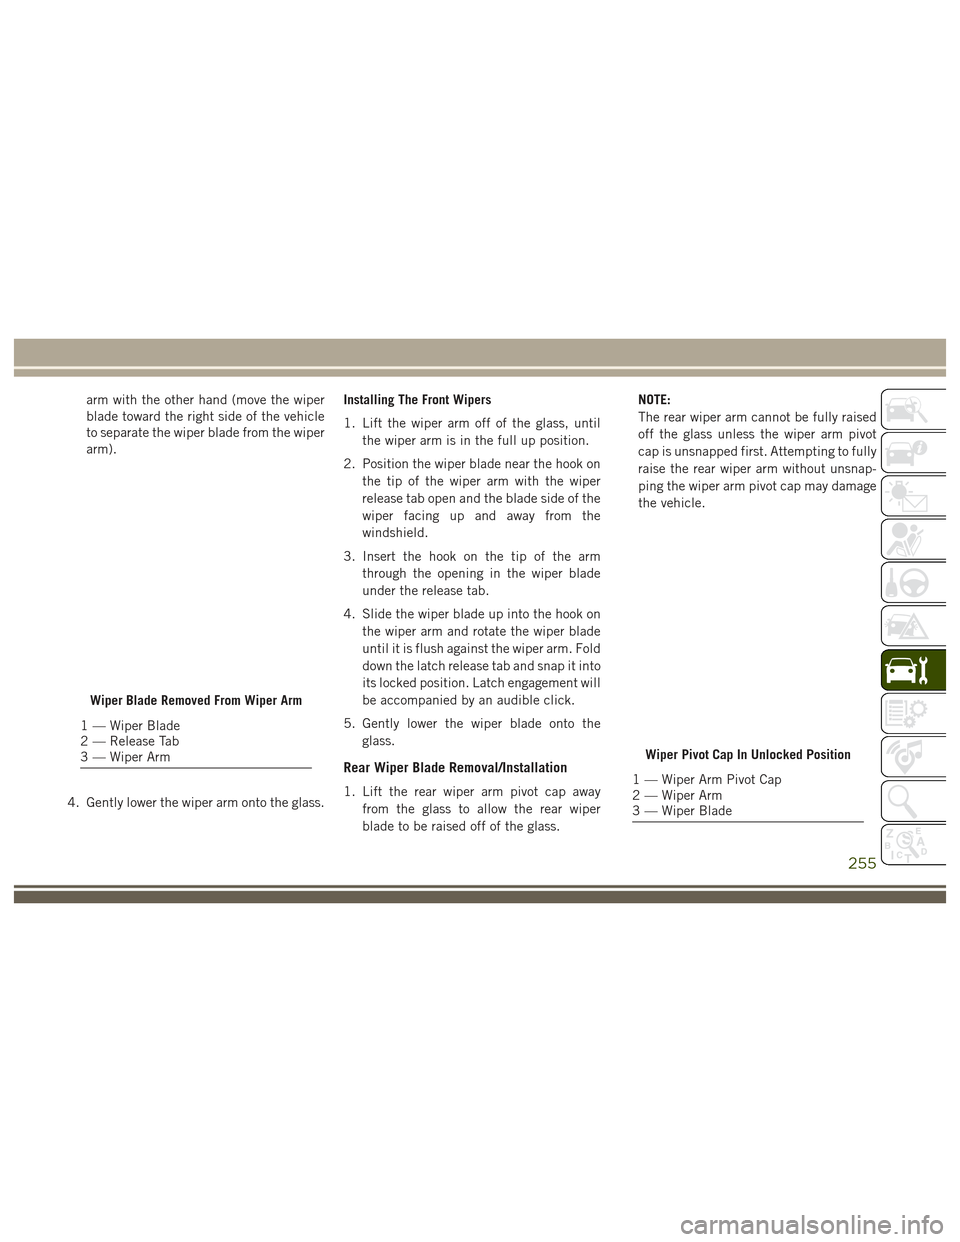
arm with the other hand (move the wiper
blade toward the right side of the vehicle
to separate the wiper blade from the wiper
arm).
4. Gently lower the wiper arm onto the glass. Installing The Front Wipers
1. Lift the wiper arm off of the glass, until
the wiper arm is in the full up position.
2. Position the wiper blade near the hook on the tip of the wiper arm with the wiper
release tab open and the blade side of the
wiper facing up and away from the
windshield.
3. Insert the hook on the tip of the arm through the opening in the wiper blade
under the release tab.
4. Slide the wiper blade up into the hook on the wiper arm and rotate the wiper blade
until it is flush against the wiper arm. Fold
down the latch release tab and snap it into
its locked position. Latch engagement will
be accompanied by an audible click.
5. Gently lower the wiper blade onto the glass.
Rear Wiper Blade Removal/Installation
1. Lift the rear wiper arm pivot cap awayfrom the glass to allow the rear wiper
blade to be raised off of the glass. NOTE:
The rear wiper arm cannot be fully raised
off the glass unless the wiper arm pivot
cap is unsnapped first. Attempting to fully
raise the rear wiper arm without unsnap-
ping the wiper arm pivot cap may damage
the vehicle.
Wiper Blade Removed From Wiper Arm
1 — Wiper Blade
2 — Release Tab
3 — Wiper Arm
Wiper Pivot Cap In Unlocked Position
1 — Wiper Arm Pivot Cap
2 — Wiper Arm
3 — Wiper Blade
255
Page 264 of 372
NOTE:
Under a maximum loaded vehicle condition,
gross axle weight ratings (GAWRs) for the
front and rear axles must not be exceeded.
For further information on GAWRs, vehicle
loading, and trailer towing, refer to “Vehicle
Loading” in the “Starting And Operating”
section of this manual.
To determine the maximum loading condi-
tions of your vehicle, locate the statement
“The combined weight of occupants and
cargo should never exceed XXX kg or XXX lbs”
on the Tire and Loading Information placard.
The combined weight of occupants, cargo/
luggage and trailer tongue weight (if appli-
cable) should never exceed the weight refer-
enced here.
Steps For Determining Correct Load
Limit—
(1) Locate the statement “The com-
bined weight of occupants and cargo
should never exceed XXX kg or
XXX lbs.” on your vehicle's placard.(2) Determine the combined weight of
the driver and passengers that will be
riding in your vehicle.
(3) Subtract the combined weight of
the driver and passengers from XXX kg
or XXX lbs.
(4) The resulting figure equals the
available amount of cargo and luggage
load capacity. For example, if “XXX”
amount equals 1400 lbs. and there
will be five 150 lb passengers in your
vehicle, the amount of available cargo
and luggage load capacity is 650 lbs.
(1400-750 (5x150) = 650 lbs.)
(5)Determine the combined weight of
luggage and cargo being loaded on the
vehicle. That weight may not safely ex-
ceed the available cargo and luggage
load capacity calculated in Step 4.
(6) If your vehicle will be towing a
trailer, load from your trailer will be
transferred to your vehicle. Consult this manual to determine how this
reduces the available cargo and lug-
gage load capacity of your vehicle.
Metric Example For Load Limit
For example, if “XXX” amount equals 635 kg
and there will be five 68 kg passengers in
your vehicle, the amount of available cargo
and luggage load capacity is 295 kg (635-
340 (5x68) = 295 kg) as shown in step 4.
NOTE:
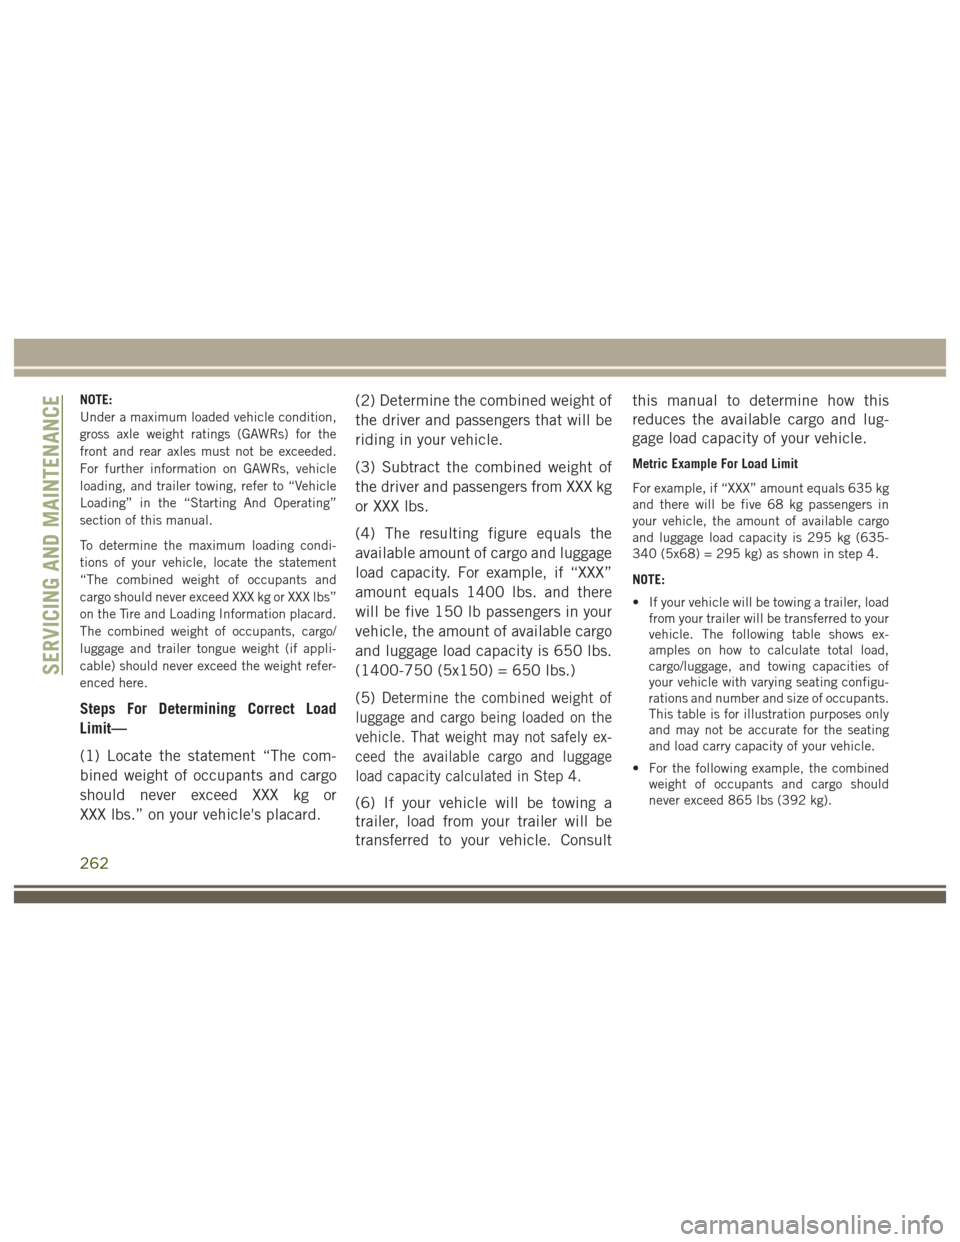
• If your vehicle will be towing a trailer, load
from your trailer will be transferred to your
vehicle. The following table shows ex-
amples on how to calculate total load,
cargo/luggage, and towing capacities of
your vehicle with varying seating configu-
rations and number and size of occupants.
This table is for illustration purposes only
and may not be accurate for the seating
and load carry capacity of your vehicle.
• For the following example, the combined weight of occupants and cargo should
never exceed 865 lbs (392 kg).
SERVICING AND MAINTENANCE
262
Page 278 of 372
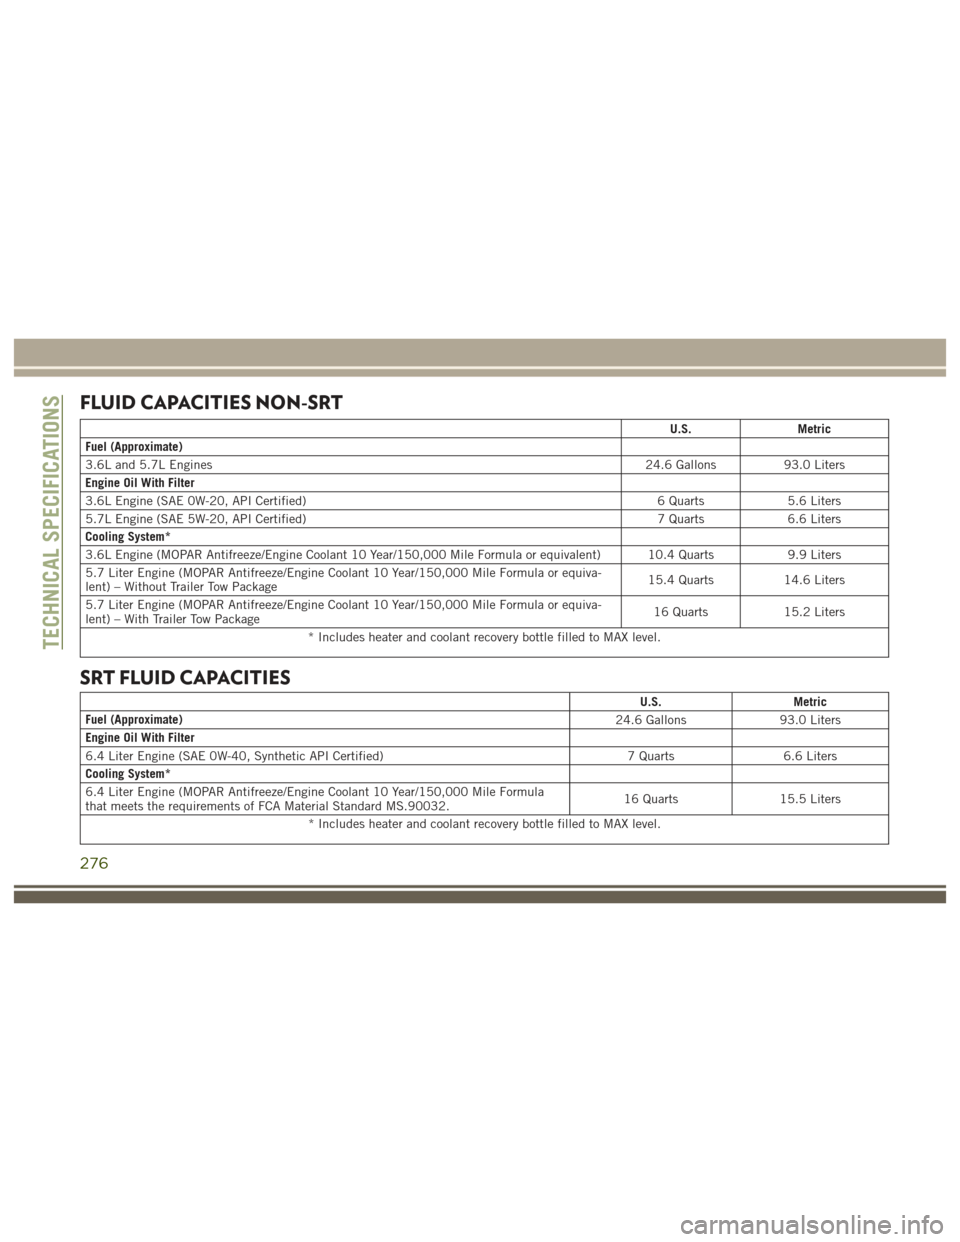
FLUID CAPACITIES NON-SRT
U.S.Metric
Fuel (Approximate)
3.6L and 5.7L Engines 24.6 Gallons93.0 Liters
Engine Oil With Filter
3.6L Engine (SAE 0W-20, API Certified) 6 Quarts5.6 Liters
5.7L Engine (SAE 5W-20, API Certified) 7 Quarts6.6 Liters
Cooling System*
3.6L Engine (MOPAR Antifreeze/Engine Coolant 10 Year/150,000 Mile Formula or equivalent) 10.4 Quarts 9.9 Liters
5.7 Liter Engine (MOPAR Antifreeze/Engine Coolant 10 Year/150,000 Mile Formula or equiva-
lent) – Without Trailer Tow Package 15.4 Quarts
14.6 Liters
5.7 Liter Engine (MOPAR Antifreeze/Engine Coolant 10 Year/150,000 Mile Formula or equiva-
lent) – With Trailer Tow Package 16 Quarts
15.2 Liters
* Includes heater and coolant recovery bottle filled to MAX level.
SRT FLUID CAPACITIES
U.S. Metric
Fuel (Approximate) 24.6 Gallons93.0 Liters
Engine Oil With Filter
6.4 Liter Engine (SAE 0W-40, Synthetic API Certified) 7 Quarts6.6 Liters
Cooling System*
6.4 Liter Engine (MOPAR Antifreeze/Engine Coolant 10 Year/150,000 Mile Formula
that meets the requirements of FCA Material Standard MS.90032. 16 Quarts
15.5 Liters
* Includes heater and coolant recovery bottle filled to MAX level.
TECHNICAL SPECIFICATIONS
276
Page 286 of 372
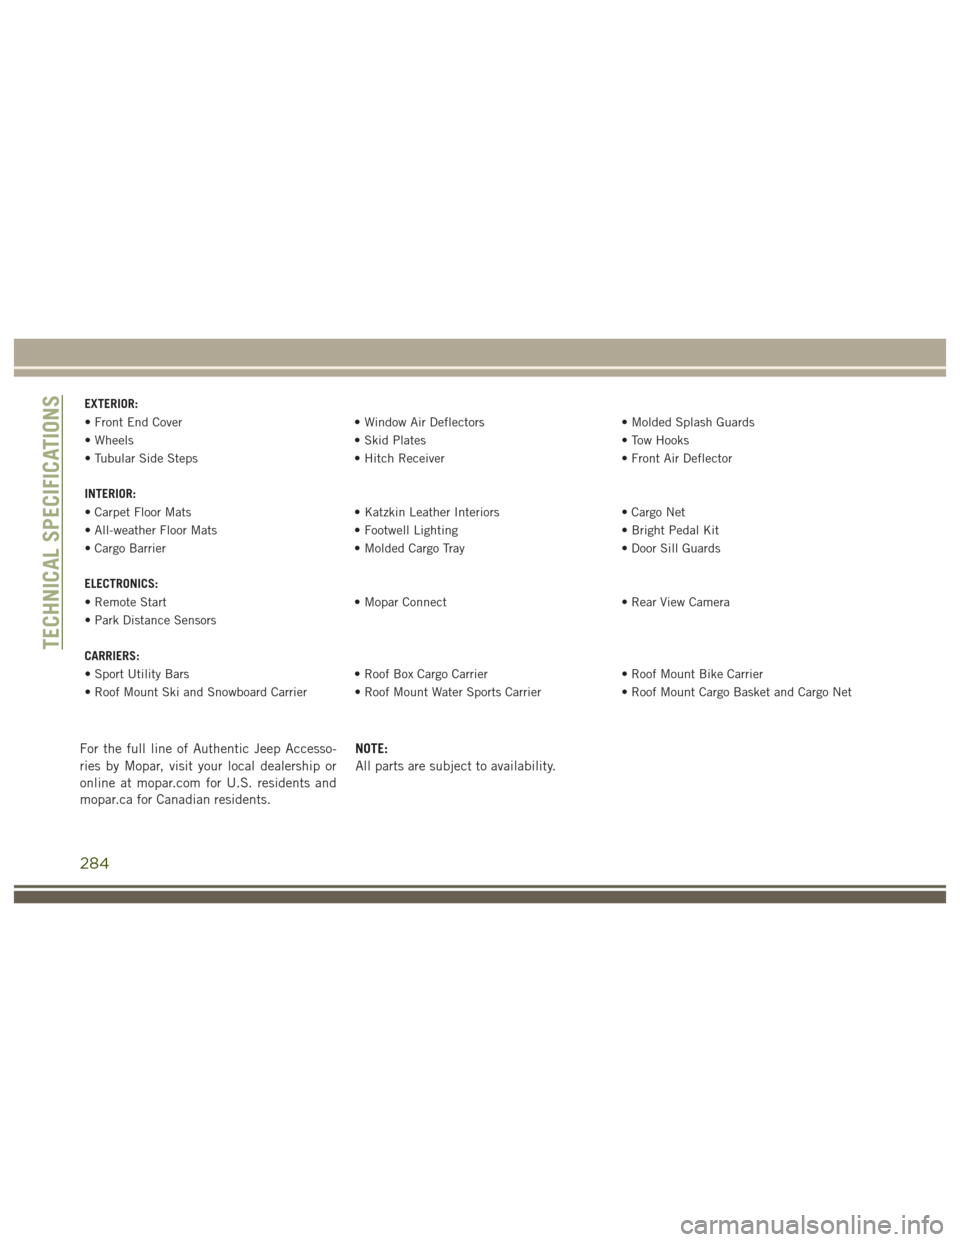
EXTERIOR:
• Front End Cover• Window Air Deflectors• Molded Splash Guards
• Wheels • Skid Plates• Tow Hooks
• Tubular Side Steps • Hitch Receiver• Front Air Deflector
INTERIOR:
• Carpet Floor Mats • Katzkin Leather Interiors• Cargo Net
• All-weather Floor Mats • Footwell Lighting• Bright Pedal Kit
• Cargo Barrier • Molded Cargo Tray• Door Sill Guards
ELECTRONICS:
• Remote Start • Mopar Connect• Rear View Camera
• Park Distance Sensors
CARRIERS:
• Sport Utility Bars • Roof Box Cargo Carrier• Roof Mount Bike Carrier
• Roof Mount Ski and Snowboard Carrier • Roof Mount Water Sports Carrier • Roof Mount Cargo Basket and Cargo Net
For the full line of Authentic Jeep Accesso-
ries by Mopar, visit your local dealership or
online at mopar.com for U.S. residents and
mopar.ca for Canadian residents.NOTE:
All parts are subject to availability.
TECHNICAL SPECIFICATIONS
284
Page 301 of 372
NOTE:
• Your vehicle may be transmitting data asauthorized by the subscriber.
• Your vehicle must have a working electri- cal system for any of the in vehicle
Uconnect features to operate.
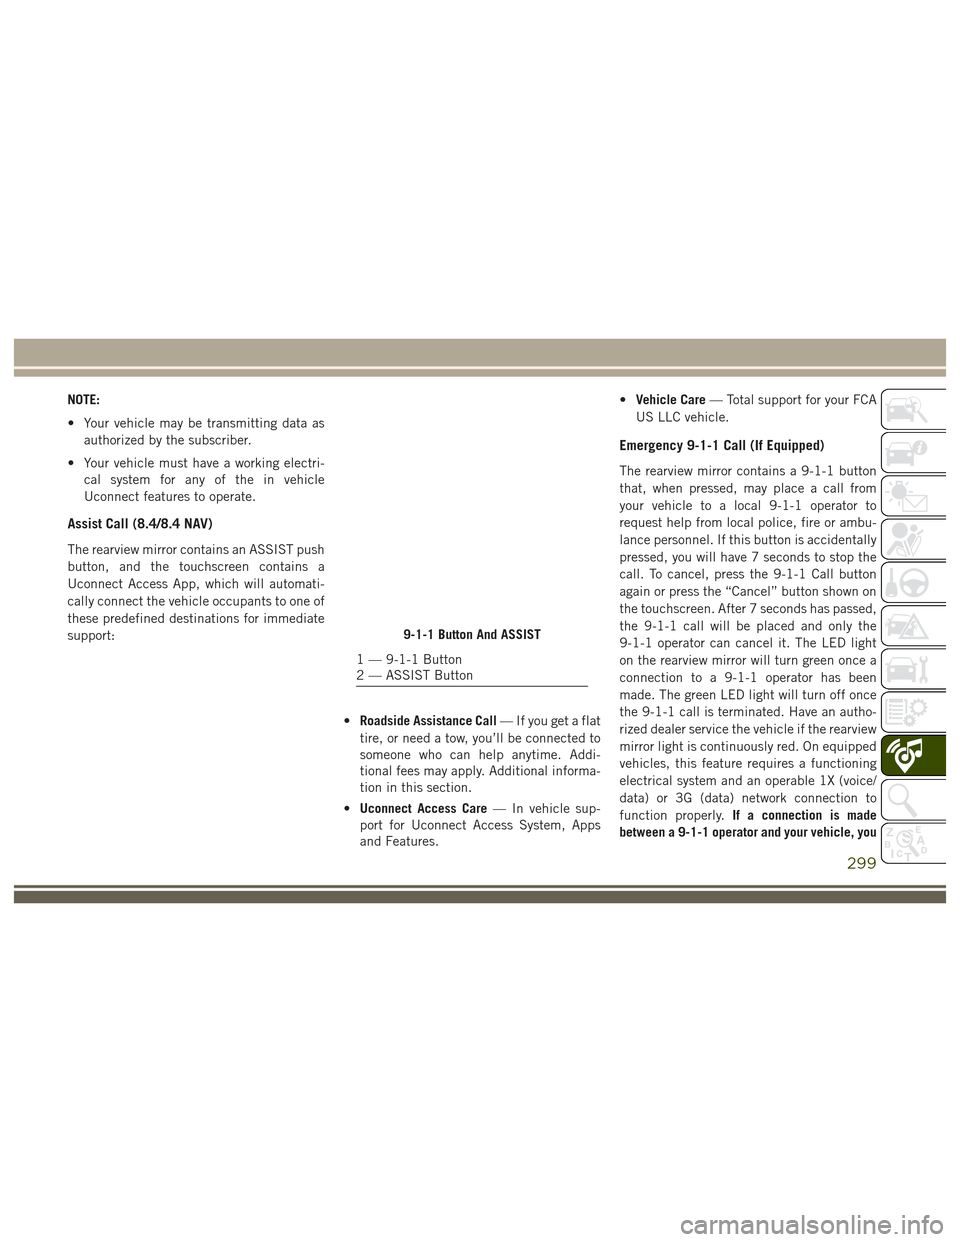
Assist Call (8.4/8.4 NAV)
The rearview mirror contains an ASSIST push
button, and the touchscreen contains a
Uconnect Access App, which will automati-
cally connect the vehicle occupants to one of
these predefined destinations for immediate
support:
•Roadside Assistance Call — If you get a flat
tire, or need a tow, you’ll be connected to
someone who can help anytime. Addi-
tional fees may apply. Additional informa-
tion in this section.
• Uconnect Access Care — In vehicle sup-
port for Uconnect Access System, Apps
and Features. •
Vehicle Care — Total support for your FCA
US LLC vehicle.
Emergency 9-1-1 Call (If Equipped)
The rearview mirror contains a 9-1-1 button
that, when pressed, may place a call from
your vehicle to a local 9-1-1 operator to
request help from local police, fire or ambu-
lance personnel. If this button is accidentally
pressed, you will have 7 seconds to stop the
call. To cancel, press the 9-1-1 Call button
again or press the “Cancel” button shown on
the touchscreen. After 7 seconds has passed,
the 9-1-1 call will be placed and only the
9-1-1 operator can cancel it. The LED light
on the rearview mirror will turn green once a
connection to a 9-1-1 operator has been
made. The green LED light will turn off once
the 9-1-1 call is terminated. Have an autho-
rized dealer service the vehicle if the rearview
mirror light is continuously red. On equipped
vehicles, this feature requires a functioning
electrical system and an operable 1X (voice/
data) or 3G (data) network connection to
function properly. If a connection is made
between a 9-1-1 operator and your vehicle, you
9-1-1 Button And ASSIST
1 — 9-1-1 Button
2 — ASSIST Button
299
Page 362 of 372
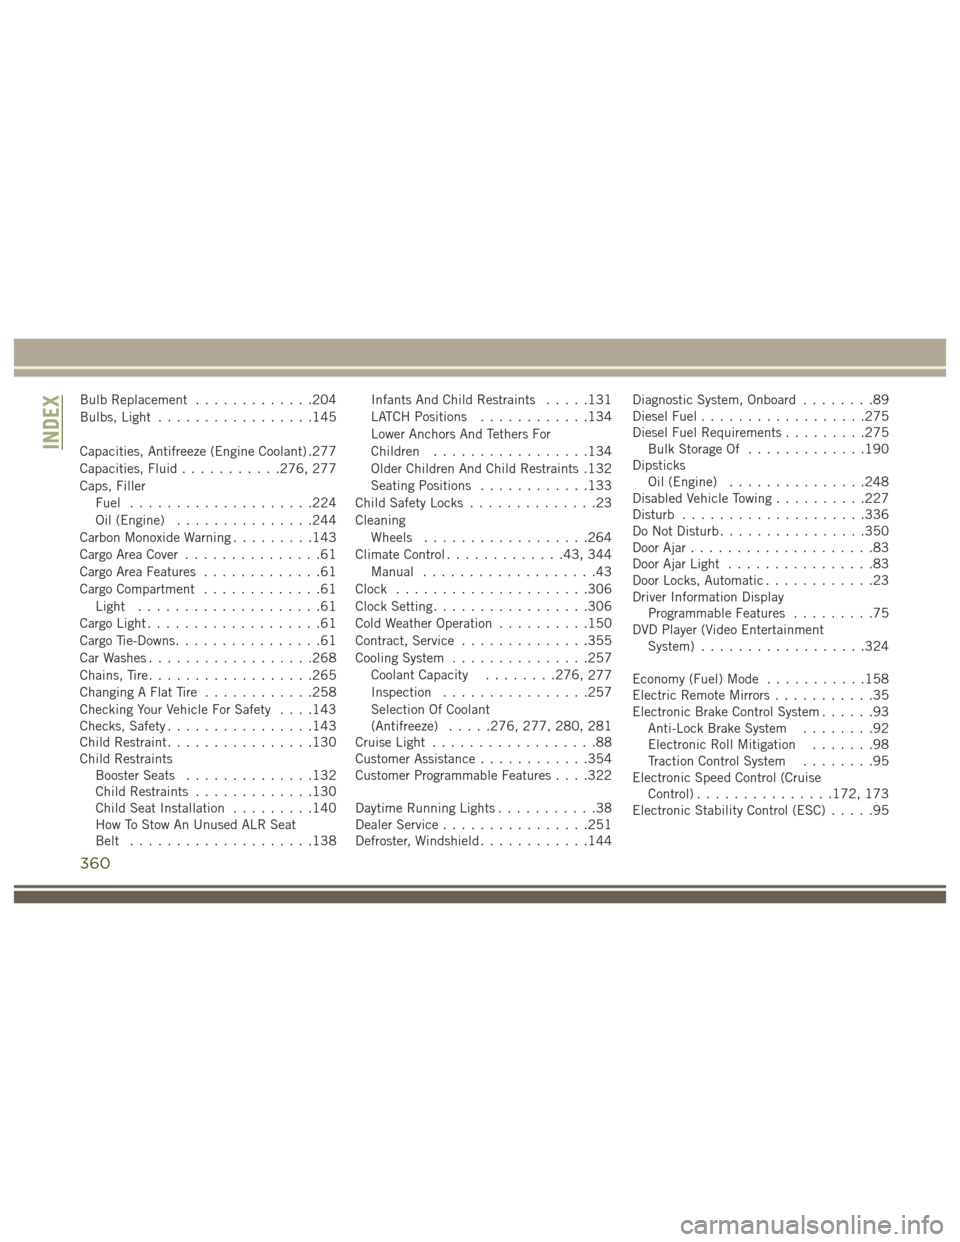
Bulb Replacement.............204
Bulbs, Light .................145
Capacities, Antifreeze (Engine Coolant) .277
Capacities, Fluid ...........276, 277
Caps, Filler Fuel ....................224
Oil (Engine) ...............244
Carbon Monoxide Warning .........143
Cargo Area Cover ...............61
Cargo Area Features .............61
Cargo Compartment .............61
Light ....................61
Cargo Light ...................61
Cargo Tie-Downs ................61
Car Washes ..................268
Chains, Tire ..................265
Changing A Flat Tire ............258
Checking Your Vehicle For Safety . . . .143
Checks, Safety ................143
Child Restraint ................130
Child Restraints Booster Seats ..............132
Child Restraints .............130
Child Seat Installation .........140
How To Stow An Unused ALR Seat
Belt ....................138 Infants And Child Restraints
.....131
LATCH Positions ............134
Lower Anchors And Tethers For
Children .................134
Older Children And Child Restraints .132
Seating Positions ............133
Child Safety Locks ..............23
Cleaning Wheels ..................264
Climate Control .............43, 344
Manual ...................43
Clock .....................306
Clock Setting .................306
Cold Weather Operation ..........150
Contract, Service ..............355
Cooling System ...............257
Coolant Capacity ........276,
277
Inspection ................257
Selection Of Coolant
(Antifreeze) .....276, 277, 280, 281
Cruise Light ..................88
Customer Assistance ............354
Customer Programmable Features . . . .322
Daytime Running Lights ...........38
Dealer Service ................251
Defroster, Windshield ............144 Diagnostic System, Onboard
........89
Diesel Fuel ..................275
Diesel Fuel Requirements .........275
Bulk Storage Of .............190
Dipsticks Oil (Engine) ...............248
Disabled Vehicle Towing ..........227
Disturb ....................336
Do Not Disturb ................350
Door Ajar ....................83
Door Ajar Light ................83
Door Locks, Automatic ............23
Driver Information Display Programmable Features .........75
DVD Player (Video Entertainment System) ..................324
Economy (Fuel) Mode ...........158
Electric Remote Mirrors ...........35
Electronic Brake Control System ......93
Anti-Lock Brake System ........92
Electronic Roll Mitigation .......98
Traction Control System ........95
Electronic Speed Control (Cruise Control) ...............172, 173
Electronic Stability Control (ESC) .....95
INDEX
360
Page 366 of 372
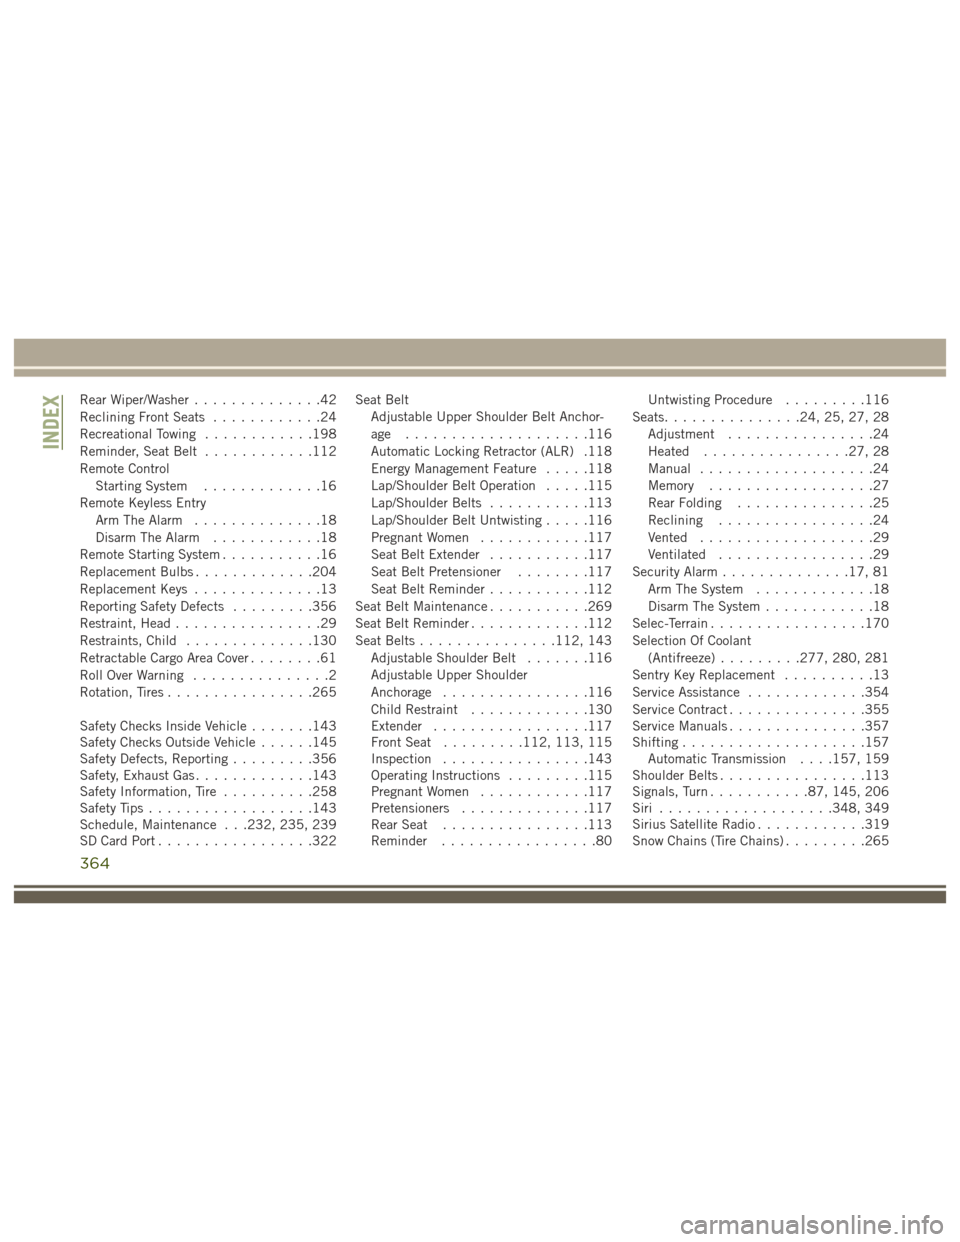
Rear Wiper/Washer..............42
Reclining Front Seats ............24
Recreational Towing ............198
Reminder, Seat Belt ............112
Remote Control Starting System .............16
Remote Keyless Entry Arm The Alarm ..............18
Disarm The Alarm ............18
Remote Starting System ...........16
Replacement Bulbs .............204
Replacement Keys ..............13
Reporting Safety Defects .........356
Restraint, Head ................29
Restraints, Child ..............130
Retractable Cargo Area Cover ........61
Roll Over Warning ...............2
Rotation, Tires ................265
Safety Checks Inside Vehicle .......143
Safety Checks Outside Vehicle ......145
Safety Defects, Reporting .........356
Safety, Exhaust Gas .............143
Safety Information, Tire ..........258
Safety Tips ..................143
Schedule, Maintenance . . .232, 235, 239
SD Card Port .................322 Seat Belt
Adjustable Upper Shoulder Belt Anchor-
age ....................116
Automatic Locking Retractor (ALR) .118
Energy Management Feature .....118
Lap/Shoulder Belt Operation .....115
Lap/Shoulder Belts ...........113
Lap/Shoulder Belt Untwisting .....116
Pregnant Women ............117
Seat Belt Extender ...........117
Seat Belt Pretensioner ........117
Seat Belt Reminder ...........112
Seat Belt Maintenance ...........269
Seat Belt Reminder .............112
Seat Belts ...............112, 143
Adjustable Shoulder Belt .......116
Adjustable Upper Shoulder
Anchorage ................116
Child
Restraint .............130
Extender .................117
Front Seat .........112, 113, 115
Inspection ................143
Operating Instructions .........115
Pregnant Women ............117
Pretensioners ..............117
Rear Seat ................113
Reminder .................80 Untwisting Procedure
.........116
Seats ...............24, 25, 27, 28
Adjustment ................24
Heated ................27, 28
Manual ...................24
Memory ..................27
Rear Folding ...............25
Reclining .................24
Vented ...................29
Ventilated .................29
Security Alarm ..............17, 81
Arm The System .............18
Disarm The System ............18
Selec-Terrain .................170
Selection Of Coolant (Antifreeze) .........277, 280, 281
Sentry Key Replacement ..........13
Service Assistance .............354
Service Contract ...............355
Service Manuals ...............357
Shifting ....................157
Automatic Transmission . . . .157, 159
Shoulder Belts ................113
Signals, Turn ...........87, 145, 206
Siri ...................348, 349
Sirius Satellite Radio ............319
Snow Chains (Tire Chains) .........265
INDEX
364
Page 367 of 372
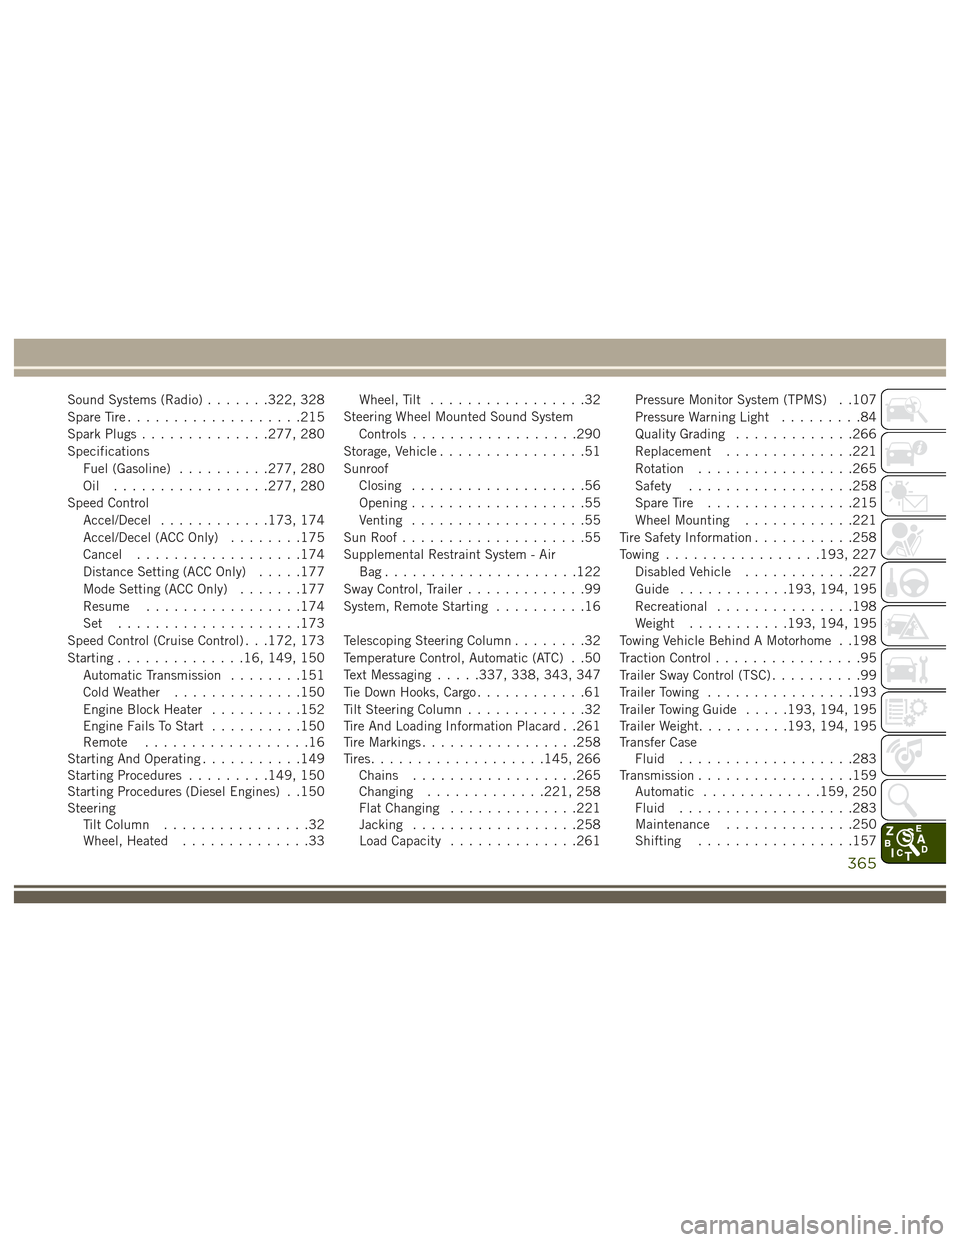
Sound Systems (Radio).......322, 328
Spare Tire ...................215
Spark Plugs ..............277, 280
Specifications Fuel (Gasoline) ..........277, 280
Oil .................277, 280
Speed Control Accel/Decel ............173, 174
Accel/Decel (ACC Only) ........175
Cancel ..................174
Distance Setting (ACC Only) .....177
Mode Setting (ACC Only) .......177
Resume .................174
Set ....................173
Speed Control (Cruise Control) . . .172, 173
Starting ..............16, 149, 150
Automatic Transmission ........151
Cold Weather ..............150
Engine Block Heater ..........152
Engine Fails To Start ..........150
Remote ..................16
Starting And Operating ...........149
Starting Procedures .........149, 150
Starting Procedures (Diesel Engines) . .150
Steering Tilt Column ................32
Wheel, Heated ..............33 Wheel, Tilt
.................32
Steering Wheel Mounted Sound System Controls ..................290
Storage, Vehicle ................51
Sunroof Closing ...................56
Opening ...................55
Venting ...................55
Sun Roof ....................55
Supplemental Restraint System - Air Bag.....................122
Sway Control, Trailer .............99
System, Remote Starting ..........16
Telescoping Steering Column ........32
Temperature Control, Automatic (ATC) . .50
Text Messaging .....337, 338, 343, 347
Tie Down Hooks, Cargo ............61
Tilt Steering Column .............32
Tire And Loading Information Placard . .261
Tire Markings .................258
Tires ...................145,
266
Chains ..................265
Changing .............221, 258
Flat Changing ..............221
Jacking ..................258
Load Capacity ..............261 Pressure Monitor System (TPMS) . .107
Pressure Warning Light
.........84
Quality Grading .............266
Replacement ..............221
Rotation .................265
Safety ..................258
Spare Tire ................215
Wheel Mounting ............221
Tire Safety Information ...........258
Towing .................193, 227
Disabled Vehicle ............227
Guide ............193, 194, 195
Recreational ...............198
Weight ...........193, 194, 195
Towing Vehicle Behind A Motorhome . .198
Traction Control ................95
Trailer Sway Control (TSC) ..........99
Trailer Towing ................193
Trailer Towing Guide .....193, 194, 195
Trailer Weight ..........193, 194, 195
Transfer Case Fluid ...................283
Transmission .................159
Automatic .............159, 250
Fluid ...................283
Maintenance ..............250
Shifting .................157
365