homelink JEEP GRAND CHEROKEE 2017 WK2 / 4.G User Guide
[x] Cancel search | Manufacturer: JEEP, Model Year: 2017, Model line: GRAND CHEROKEE, Model: JEEP GRAND CHEROKEE 2017 WK2 / 4.GPages: 372
Page 14 of 372
Automatic Temperature Control (ATC) — If
Equipped....................50
Operating Tips .................51
WINDOWS .................53
Power Windows ................53
Wind Buffeting ................55
POWER SUNROOF ...........55
Opening.....................55
Closing .....................56
Wind Buffeting ................56
Anti-Pinch Safety Device ..........56
COMMANDVIEW SUNROOF WITH
POWER SHADE..............56
Opening Power Shade ............57
HOOD.....................57
Opening .....................57
Closing .....................58
LIFTGATE ..................58
Opening.....................58
Closing .....................59
Power Liftgate — If Equipped .......59
Cargo Area Features .............61
UNIVERSAL GARAGE DOOR
OPENER (HomeLink) ..........62
Before You Begin Programming
HomeLink...................62
Programming A Rolling Code ........63
Programming A Non-Rolling Code .....63
Using HomeLink ...............64
INTERNAL EQUIPMENT ........64
Power Outlets.................64
Power Inverter ................67
GETTING TO KNOW YOUR VEHICLE
12
Page 64 of 372
WARNING!
jured. Use only the anchors provided for
child seat tethers.
The weight and position of cargo and pas-
sengers can change the vehicle center of
gravity and vehicle handling. To avoid loss
of control resulting in personal injury, fol-
low these guidelines for loading your ve-
hicle:
• Do not carry loads which exceed the load
limits described on the label attached to
the left door or left door center pillar.
• Always place cargo evenly on the cargo
floor. Put heavier objects as low and as
far forward as possible.
• Place as much cargo as possible in front
of the rear axle. Too much weight or
improperly placed weight over or behind
the rear axle can cause the rear of the
vehicle to sway.
• Do not pile luggage or cargo higher than
the top of the seatback. This could im-
pair visibility or become a dangerous
projectile in a sudden stop or accident.
UNIVERSAL GARAGE DOOR
OPENER (HomeLink)
• HomeLink replaces up to three hand-held
transmitters that operate devices such as
garage door openers, motorized gates,
lighting or home security systems. The
HomeLink unit is powered by your vehicles
12 Volt battery. • The HomeLink buttons that are located in
the overhead console or sunvisor desig-
nate the three different HomeLink chan-
nels.
• The HomeLink indicator is located above the center button.
Before You Begin Programming
HomeLink
Ensure that your vehicle is parked outside of
the garage before you begin programming.
For efficient programming and accurate
transmission of the radio-frequency signal, it
is recommended that a new battery be placed
in the hand-held transmitter of the device
that is being programmed to the HomeLink
system.
To erase the channels, place the ignition
switch into the ON/RUN position, then push
and hold the two outside HomeLink buttons
(I and III) for up to 20 seconds or until the red
indicator flashes.
Universal Garage Door Opener (HomeLink)GETTING TO KNOW YOUR VEHICLE
62
Page 65 of 372
NOTE:
Erasing all channels should only be per-
formed when programming HomeLink for the
first time. Do not erase channels when pro-
gramming additional buttons.
If you have any problems, or require assis-
tance, please call toll-free 1-800-355-3515
or, on the Internet at HomeLink.com for in-
formation or assistance.
Programming A Rolling Code
NOTE:
For programming Garage Door Openers that
were manufactured after 1995. These Ga-
rage Door Openers can be identified by the
“LEARN” or “TRAIN” button located where
the hanging antenna is attached to the Ga-
rage Door Opener. It is NOT the button that is
normally used to open and close the door. The
name and color of the button may vary by
manufacturer.
1. Place the ignition switch into the ON/RUNposition. 2. Place the hand-held transmitter 1 to
3 inches (3 to 8 cm) away from the
HomeLink button you wish to program
while keeping the HomeLink indicator
light in view.
3. Push and hold the HomeLink button you want to program while you push and hold
the hand-held transmitter button.
4. Continue to hold both buttons and ob- serve the indicator light. The HomeLink
indicator will flash slowly and then rapidly
after HomeLink has received the fre-
quency signal from the hand-held trans-
mitter. Release both buttons after the in-
dicator light changes from slow to rapid.
5. At the garage door opener motor (in the garage), locate the “LEARN” or “TRAIN-
ING” button. This can usually be found
where the hanging antenna wire is at-
tached to the garage door opener motor.
Firmly push and release the “LEARN” or
“TRAINING” button.
NOTE:
You have 30 seconds in which to initiate
the next step after the LEARN button has
been pushed. 6. Return to the vehicle and push the pro-
grammed HomeLink button twice (hold-
ing the button for two seconds each time).
If the device is plugged in and activates,
programming is complete.
NOTE:
If the device does not activate, push the
button a third time (for two seconds) to
complete the training.
7. To program the remaining two HomeLink buttons, repeat each step for each re-
maining button. DO NOT erase the
channels.
Programming A Non-Rolling Code
NOTE:
For programming Garage Door Openers
manufactured before 1995.
1. Place the ignition switch to the ON/RUNposition.
2. Place the hand-held transmitter 1 to 3 inches (3 to 8 cm) away from the
HomeLink button you wish to program
while keeping the HomeLink indicator
light in view.
63
Page 66 of 372
3. Push and hold the HomeLink button youwant to program while you push and hold
the hand-held transmitter button.
4. Continue to hold both buttons and ob- serve the indicator light. The HomeLink
indicator will flash slowly and then rapidly
after HomeLink has received the fre-
quency signal from the hand-held trans-
mitter. Release both buttons after the
indicator light changes from slow to rapid.
5. Push and hold the programmed HomeLink button and observe the indica-
tor light. If the indicator light stays on
constantly, programming is complete and
the garage door (or device) should activate
when the HomeLink button is pushed.
6. To program the two remaining HomeLink buttons, repeat each step for each re-
maining button. DO NOT erase the
channels.Using HomeLink
To operate, push and release the pro-
grammed HomeLink button. Activation will
now occur for the programmed device (i.e.,
garage door opener, gate operator, security
system, entry door lock, home/office lighting,
etc.). The hand-held transmitter of the device
may also be used at any time.
WARNING!
• Your motorized door or gate will openand close while you are programming
the universal transceiver. Do not pro-
gram the transceiver if people or pets are
in the path of the door or gate.
• Do not run your vehicle in a closed
garage or confined area while program-
ming the transceiver. Exhaust gas from
your vehicle contains Carbon Monoxide
(CO) which is odorless and colorless.
Carbon Monoxide is poisonous when in-
haled and can cause you and others to
be severely injured or killed.
INTERNAL EQUIPMENT
Power Outlets
There are three 12 Volt electrical power out-
lets on this vehicle.
The front power outlet is located inside the
center storage bin of the instrument panel.
Push inward on the storage lid to open the
compartment and gain access to this power
outlet.
Front Power Outlet
GETTING TO KNOW YOUR VEHICLE
64
Page 363 of 372
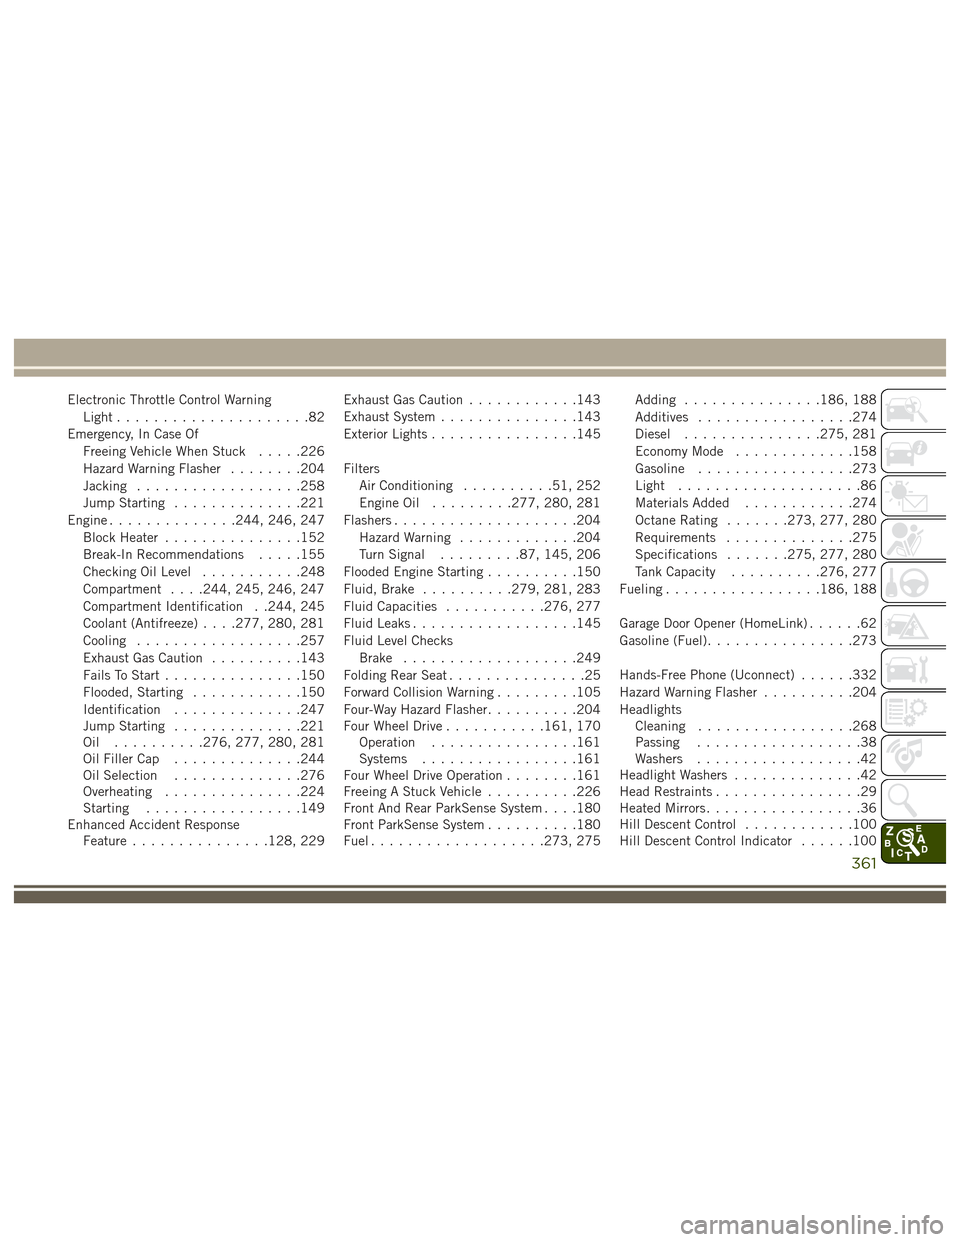
Electronic Throttle Control WarningLight .....................82
Emergency, In Case Of Freeing Vehicle When Stuck .....226
Hazard Warning Flasher ........204
Jacking ..................258
Jump Starting ..............221
Engine ..............244, 246, 247
Block Heater ...............152
Break-In Recommendations .....155
Checking Oil Level ...........248
Compartment . . . .244, 245, 246, 247
Compartment Identification . .244, 245
Coolant (Antifreeze) . . . .277, 280, 281
Cooling ..................257
Exhaust Gas Caution ..........143
Fails To Start ...............150
Flooded, Starting ............150
Identification ..............247
Jump Starting ..............221
Oil ..........276, 277, 280, 281
Oil Filler Cap ..............244
Oil Selection ..............276
Overheating ...............224
Starting .................149
Enhanced Accident Response Feature ...............128, 229 Exhaust Gas Caution
............143
Exhaust System ...............143
Exterior Lights ................145
Filters Air Conditioning ..........51, 252
Engine Oil .........277, 280, 281
Flashers ....................204
Hazard Warning .............204
Turn Signal .........87, 145, 206
Flooded Engine Starting ..........150
Fluid, Brake ..........279, 281, 283
Fluid Capacities ...........276, 277
Fluid
Leaks ..................145
Fluid Level Checks Brake ...................249
Folding Rear Seat ...............25
Forward Collision Warning .........105
Four-Way Hazard Flasher ..........204
Four Wheel Drive ...........161, 170
Operation ................161
Systems .................161
Four Wheel Drive Operation ........161
Freeing A Stuck Vehicle ..........226
Front And Rear ParkSense System . . . .180
Front ParkSense System ..........180
Fuel ...................273, 275 Adding
...............186, 188
Additives .................274
Diesel ...............275, 281
Economy Mode .............158
Gasoline .................273
Light ....................86
Materials Added ............274
Octane Rating .......273, 277, 280
Requirements ..............275
Specifications .......275, 277, 280
Tank Capacity ..........276, 277
Fueling .................186, 188
Garage Door Opener (HomeLink) ......62
Gasoline (Fuel) ................273
Hands-Free Phone (Uconnect) ......332
Hazard Warning Flasher ..........204
Headlights Cleaning .................268
Passing ..................38
Washers ..................42
Headlight Washers ..............42
Head Restraints ................29
Heated Mirrors .................36
Hill Descent Control ............100
Hill
Descent Control Indicator ......100
361
Page 364 of 372
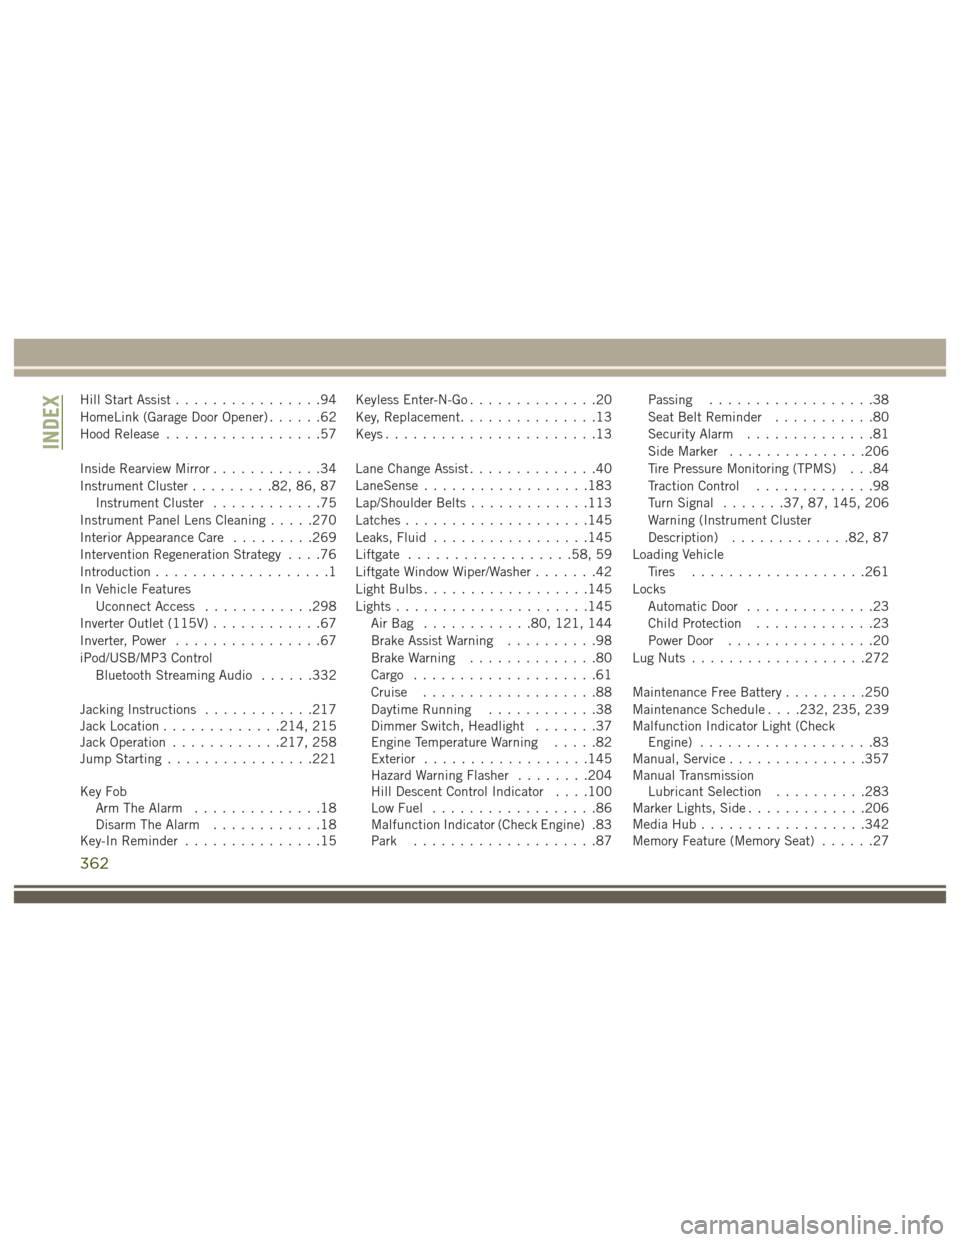
Hill Start Assist................94
HomeLink (Garage Door Opener) ......62
Hood Release .................57
Inside Rearview Mirror ............34
Instrument Cluster .........82, 86, 87
Instrument Cluster ............75
Instrument Panel Lens Cleaning .....270
Interior Appearance Care .........269
Intervention Regeneration Strategy ....76
Introduction ...................1
In Vehicle Features Uconnect Access ............298
Inverter Outlet (115V) ............67
Inverter, Power ................67
iPod/USB/MP3 Control Bluetooth Streaming Audio ......332
Jacking Instructions ............217
Jack Location .............214, 215
Jack Operation ............217, 258
Jump Starting ................221
Key Fob Arm The Alarm ..............18
Disarm The Alarm ............18
Key-In Reminder ...............15 Keyless Enter-N-Go
..............20
Key, Replacement ...............13
Keys .......................13
Lane Change Assist ..............40
LaneSense ..................183
Lap/Shoulder Belts .............113
Latches ....................145
Leaks, Fluid .................145
Liftgate ..................58, 59
Liftgate Window Wiper/Washer .......42
Light Bulbs ..................145
Lights .....................145
AirBag ............80, 121, 144
Brake Assist Warning ..........98
Brake Warning ..............80
Cargo ....................61
Cruise ...................88
Daytime Running ............38
Dimmer Switch, Headlight .......37
Engine Temperature Warning .....82
Exterior ..................145
Hazard
Warning Flasher ........204
Hill Descent Control Indicator . . . .100
Low Fuel ..................86
Malfunction Indicator (Check Engine) .83
Park ....................87 Passing
..................38
Seat Belt Reminder ...........80
Security Alarm ..............81
Side Marker ...............206
Tire Pressure Monitoring (TPMS) . . .84
Traction Control .............98
Turn Signal .......37, 87, 145, 206
Warning (Instrument Cluster
Description) .............82, 87
Loading Vehicle Tires ...................261
Locks Automatic Door ..............23
Child Protection .............23
Power Door ................20
Lug Nuts ...................272
Maintenance Free Battery .........250
Maintenance Schedule . . . .232, 235, 239
Malfunction Indicator Light (Check Engine) ...................83
Manual, Service ...............357
Manual Transmission Lubricant Selection ..........283
Marker Lights, Side .............206
Media Hub ..................342
Memory Feature (Memory Seat) ......27
INDEX
362