tire size JEEP GRAND CHEROKEE 2017 WK2 / 4.G User Guide
[x] Cancel search | Manufacturer: JEEP, Model Year: 2017, Model line: GRAND CHEROKEE, Model: JEEP GRAND CHEROKEE 2017 WK2 / 4.GPages: 372
Page 87 of 372
Each tire, including the spare (if provided),
should be checked monthly when cold and
inflated to the inflation pressure recom-
mended by the vehicle manufacturer on the
vehicle placard or tire inflation pressure la-
bel. If your vehicle has tires of a different size
than the size indicated on the vehicle placard
or tire inflation pressure label, you should
determine the proper tire inflation pressure
for those tires.
As an added safety feature, your vehicle has
been equipped with a Tire Pressure Monitor-
ing System (TPMS) that illuminates a low tire
pressure telltale when one or more of your
tires is significantly under-inflated. Accord-
ingly, when the low tire pressure telltale illu-
minates, you should stop and check your tires
as soon as possible and inflate them to the
proper pressure. Driving on a significantly
under-inflated tire causes the tire to overheat
and can lead to tire failure. Under-inflation
also reduces fuel efficiency and tire tread
life, and may affect the vehicle’s handling
and stopping ability.Please note that the TPMS is not a substitute
for proper tire maintenance, and it is the
driver’s responsibility to maintain correct tire
pressure, even if under-inflation has not
reached the level to trigger illumination of the
TPMS low tire pressure telltale.
Your vehicle has also been equipped with a
TPMS malfunction indicator to indicate when
the system is not operating properly. The
TPMS malfunction indicator is combined
with the low tire pressure telltale. When the
system detects a malfunction, the telltale will
flash for approximately one minute and then
remain continuously illuminated. This se-
quence will continue upon subsequent ve-
hicle start-ups as long as the malfunction
exists. When the malfunction indicator is
illuminated, the system may not be able to
detect or signal low tire pressure as intended.
TPMS malfunctions may occur for a variety of
reasons, including the installation of replace-
ment or alternate tires or wheels on the ve-
hicle that prevent the TPMS from functioning
properly. Always check the TPMS malfunc-
tion telltale after replacing one or more tiresor wheels on your vehicle, to ensure that the
replacement or alternate tires and wheels
allow the TPMS to continue to function
properly.
CAUTION!
The TPMS has been optimized for the
original equipment tires and wheels.
TPMS pressures and warning have been
established for the tire size equipped on
your vehicle. Undesirable system opera-
tion or sensor damage may result when
using replacement equipment that is not
of the same size, type, and/or style. After-
market wheels can cause sensor damage.
Using aftermarket tire sealants may cause
the Tire Pressure Monitoring System
(TPMS) sensor to become inoperable. Af-
ter using an aftermarket tire sealant it is
recommended that you take your vehicle to
an authorized dealer to have your sensor
function checked.
85
Page 98 of 372
ESC uses sensors in the vehicle to determine
the vehicle path intended by the driver and
compares it to the actual path of the vehicle.
When the actual path does not match the
intended path, ESC applies the brake of the
appropriate wheel to assist in counteracting
the oversteer or understeer condition.
• Oversteer - when the vehicle is turningmore than appropriate for the steering
wheel position.
• Understeer - when the vehicle is turning less than appropriate for the steering
wheel position.
The “ESC Activation/Malfunction Indicator
Light” located in the instrument cluster will
start to flash as soon as the ESC system
becomes active. The “ESC Activation/
Malfunction Indicator Light” also flashes
when the TCS is active. If the “ESC
Activation/Malfunction Indicator Light” be-
gins to flash during acceleration, ease up on
the accelerator and apply as little throttle as
possible. Be sure to adapt your speed and
driving to the prevailing road conditions.WARNING!
• Electronic Stability Control (ESC) can- not prevent the natural laws of physics
from acting on the vehicle, nor can it
increase the traction afforded by prevail-
ing road conditions. ESC cannot prevent
accidents, including those resulting
from excessive speed in turns, driving on
very slippery surfaces, or hydroplaning.
ESC also cannot prevent accidents re-
sulting from loss of vehicle control due
to inappropriate driver input for the con-
ditions. Only a safe, attentive, and skill-
ful driver can prevent accidents. The
capabilities of an ESC equipped vehicle
must never be exploited in a reckless or
dangerous manner which could jeopar-
dize the user’s safety or the safety of
others.
• Vehicle modifications, or failure to prop-
erly maintain your vehicle, may change
the handling characteristics of your ve-
hicle, and may negatively affect the per-
formance of the ESC system. Changes to
the steering system, suspension, brak-
WARNING!
ing system, tire type and size or wheel
size may adversely affect ESC perfor-
mance. Improperly inflated and un-
evenly worn tires may also degrade ESC
performance. Any vehicle modification
or poor vehicle maintenance that re-
duces the effectiveness of the ESC sys-
tem can increase the risk of loss of
vehicle control, vehicle rollover, per-
sonal injury and death.
ESC Operating Modes
NOTE:
Depending upon model and mode of opera-
tion, the ESC system may have multiple op-
erating modes.
ESC On
This is the normal operating mode for the
ESC. Whenever the vehicle is started, the
ESC system will be in this mode. This mode
SAFETY
96
Page 110 of 372
Monitoring Telltale Light will turn OFF only
after the tires have been inflated to the vehi-
cle’s recommended cold tire pressure value.
CAUTION!
• The TPMS has been optimized for theoriginal equipment tires and wheels.
TPMS pressures and warnings have
been established for the tire size
equipped on your vehicle. Undesirable
system operation or sensor damage may
result when using replacement equip-
ment that is not of the same size, type,
and/or style. Aftermarket wheels can
cause sensor damage. Using aftermar-
ket tire sealants may cause the Tire Pres-
sure Monitoring System (TPMS) sensor
to become inoperable. After using an
aftermarket tire sealant it is recom-
mended that you take your vehicle to an
authorized dealership to have your sen-
sor function checked.
• After inspecting or adjusting the tire
pressure, always reinstall the valve stem
cap. This will prevent moisture and dirt
from entering the valve stem, which
CAUTION!
could damage the Tire Pressure Monitor-
ing Sensor.
NOTE:
• The TPMS is not intended to replace nor- mal tire care and maintenance, or to pro-
vide warning of a tire failure or condition.
• The TPMS should not be used as a tire pressure gauge while adjusting your tire
pressure.
• Driving on a significantly under-inflated tire causes the tire to overheat and can
lead to tire failure. Under-inflation also
reduces fuel efficiency and tire tread life,
and may affect the vehicle’s handling and
stopping ability.
• The TPMS is not a substitute for proper tire maintenance, and it is the driver’s
responsibility to maintain correct tire pres-
sure using an accurate tire gauge, even if
under-inflation has not reached the level
to trigger illumination of the Tire Pressure
Monitoring Telltale Light. • Seasonal temperature changes will affect
tire pressure, and the TPMS will monitor
the actual tire pressure in the tire.
Premium System
The Tire Pressure Monitor System (TPMS)
uses wireless technology with wheel rim-
mounted electronic sensors to monitor tire
pressure levels. Sensors, mounted to each
wheel as part of the valve stem, transmit tire
pressure readings to the Receiver Module.
Tire Pressure Monitor Display
SAFETY
108
Page 164 of 372
Quadra-Trac II Operating Instructions/
Precautions — If Equipped
The Quadra-Trac II transfer case is fully au-
tomatic in the normal driving 4WD AUTO
mode. The Quadra-Trac II transfer case pro-
vides three mode positions:
• 4WD HI
• NEUTRAL
• 4WD LOW
This transfer case is fully automatic in the
4WD HI mode.
When additional traction is required, the
4WD LOW position can be used to lock the
front and rear driveshafts together and force
the front and rear wheels to rotate at the
same speed. The 4WD LOW position is in-
tended for loose, slippery road surfaces only.
Driving in the 4WD LOW position on dry,
hard-surfaced roads may cause increased tire
wear and damage to driveline components.When operating your vehicle in 4WD LOW,
the engine speed is approximately three
times that of the 4WD HI position at a given
road speed. Take care not to overspeed the
engine and do not exceed 25 mph (40 km/h).
Proper operation of four-wheel drive vehicles
depends on tires of equal size, type, and
circumference on each wheel. Any difference
will adversely affect shifting and cause dam-
age to the transfer case.
Because four-wheel drive provides improved
traction, there is a tendency to exceed safe
turning and stopping speeds. Do not go faster
than road conditions permit.
WARNING!
You or others could be injured or killed if
you leave the vehicle unattended with the
transfer case in the NEUTRAL position
without first fully engaging the parking
brake. The transfer case NEUTRAL posi-
tion disengages both the front and rear
drive shafts from the powertrain and will
allow the vehicle to roll, even if the trans-
mission is in PARK. The parking brake
WARNING!
should always be applied when the driver
is not in the vehicle.
Shift Positions
For additional information on the appropriate
use of each 4WD system mode position, see
the information below:
4WD AUTO
This range is used on surfaces such as ice,
snow, gravel, sand, and dry hard pavement.
NOTE:
Refer to “Selec-Terrain – If Equipped” fur-
ther on in this section for further information
on the various positions and their intended
usages.
NEUTRAL
This range disengages the driveline from the
powertrain. It is to be used for flat towing
behind another vehicle. Refer to “Recre-
ational Towing” in “Starting And Operating”
for further information.
STARTING AND OPERATING
162
Page 260 of 372
RAISING THE VEHICLE
In the case where it is necessary to raise the
vehicle, go to an authorized dealer or service
station.
TIRES
Tire Safety Information
Tire safety information will cover aspects of
the following information: Tire Markings, Tire
Identification Numbers, Tire Terminology and
Definitions, Tire Pressures and Tire Loading.
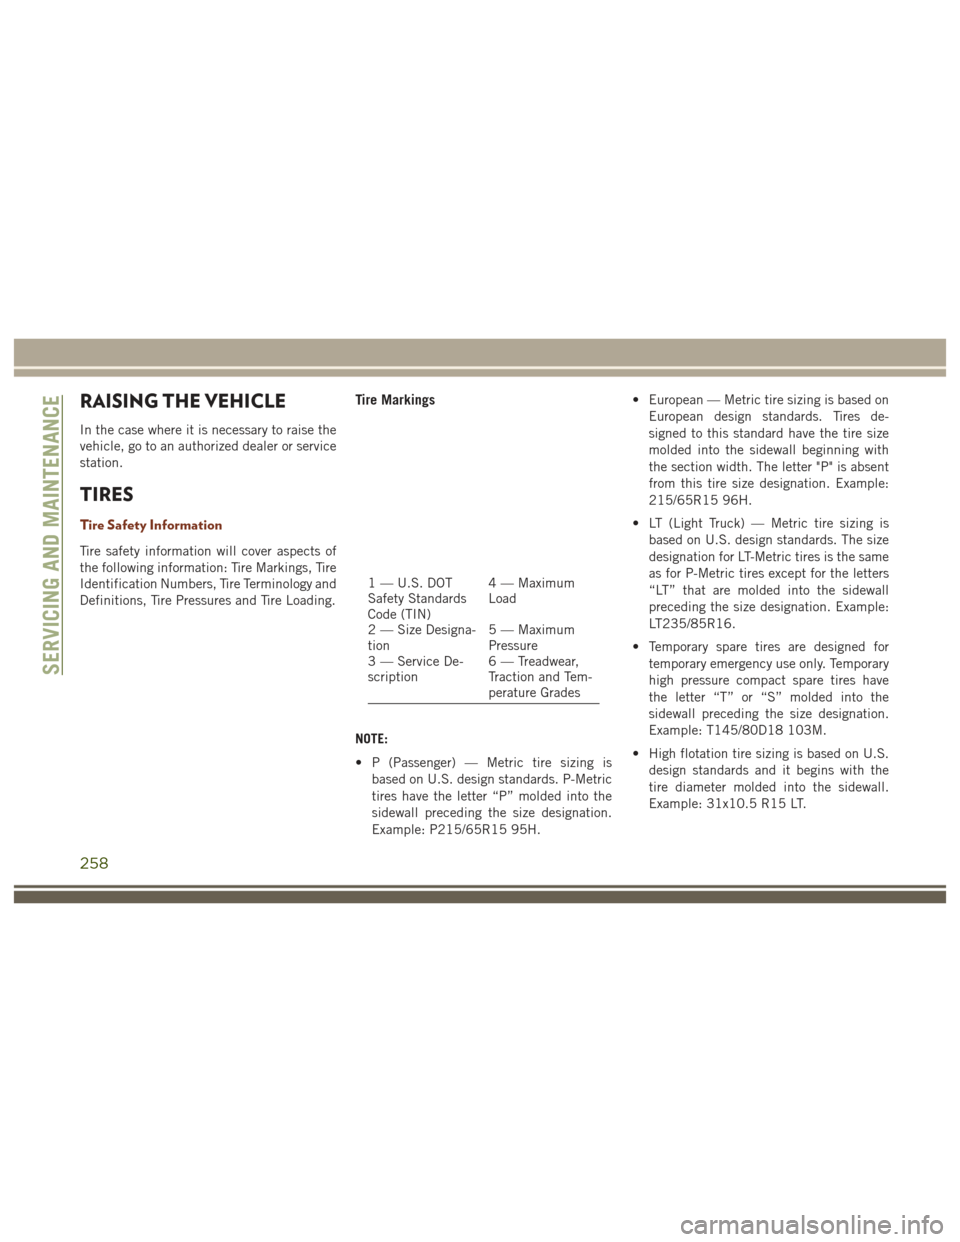
Tire Markings
NOTE:
• P (Passenger) — Metric tire sizing isbased on U.S. design standards. P-Metric
tires have the letter “P” molded into the
sidewall preceding the size designation.
Example: P215/65R15 95H. • European — Metric tire sizing is based on
European design standards. Tires de-
signed to this standard have the tire size
molded into the sidewall beginning with
the section width. The letter "P" is absent
from this tire size designation. Example:
215/65R15 96H.
• LT (Light Truck) — Metric tire sizing is based on U.S. design standards. The size
designation for LT-Metric tires is the same
as for P-Metric tires except for the letters
“LT” that are molded into the sidewall
preceding the size designation. Example:
LT235/85R16.
• Temporary spare tires are designed for temporary emergency use only. Temporary
high pressure compact spare tires have
the letter “T” or “S” molded into the
sidewall preceding the size designation.
Example: T145/80D18 103M.
• High flotation tire sizing is based on U.S. design standards and it begins with the
tire diameter molded into the sidewall.
Example: 31x10.5 R15 LT.
1 — U.S. DOT
Safety Standards
Code (TIN) 4 — Maximum
Load
2 — Size Designa-
tion 5 — Maximum
Pressure
3 — Service De-
scription 6 — Treadwear,
Traction and Tem-
perature Grades
SERVICING AND MAINTENANCE
258
Page 261 of 372
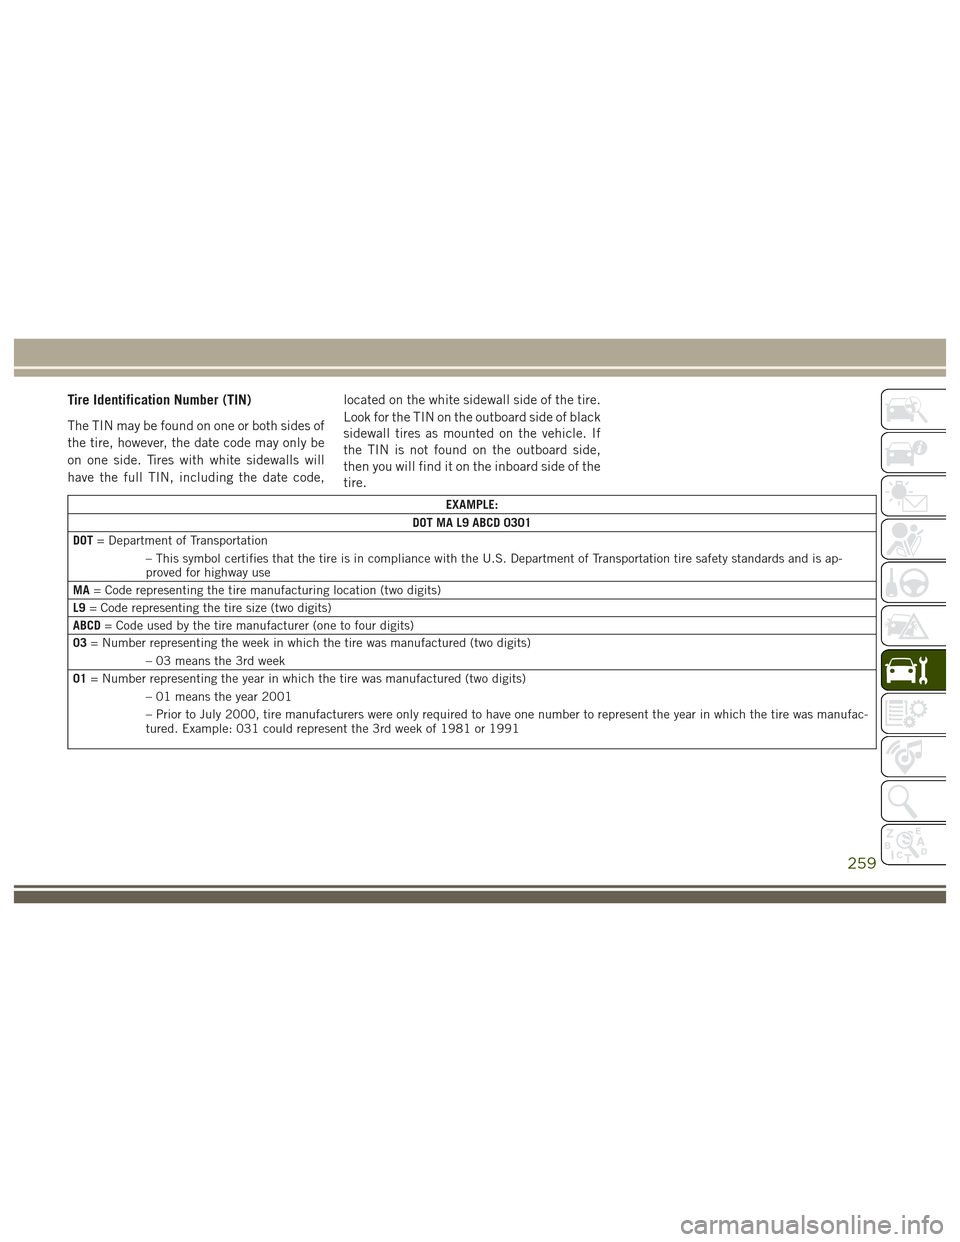
Tire Identification Number (TIN)
The TIN may be found on one or both sides of
the tire, however, the date code may only be
on one side. Tires with white sidewalls will
have the full TIN, including the date code,located on the white sidewall side of the tire.
Look for the TIN on the outboard side of black
sidewall tires as mounted on the vehicle. If
the TIN is not found on the outboard side,
then you will find it on the inboard side of the
tire.
EXAMPLE:
DOT MA L9 ABCD 0301
DOT = Department of Transportation
– This symbol certifies that the tire is in compliance with the U.S. Department of Transportation tire safety standards and is ap-
proved for highway use
MA = Code representing the tire manufacturing location (two digits)
L9 = Code representing the tire size (two digits)
ABCD = Code used by the tire manufacturer (one to four digits)
03 = Number representing the week in which the tire was manufactured (two digits)
– 03 means the 3rd week
01 = Number representing the year in which the tire was manufactured (two digits)
– 01 means the year 2001
– Prior to July 2000, tire manufacturers were only required to have one number to represent the year in which the tire was manufac-
tured. Example: 031 could represent the 3rd week of 1981 or 1991
259
Page 262 of 372
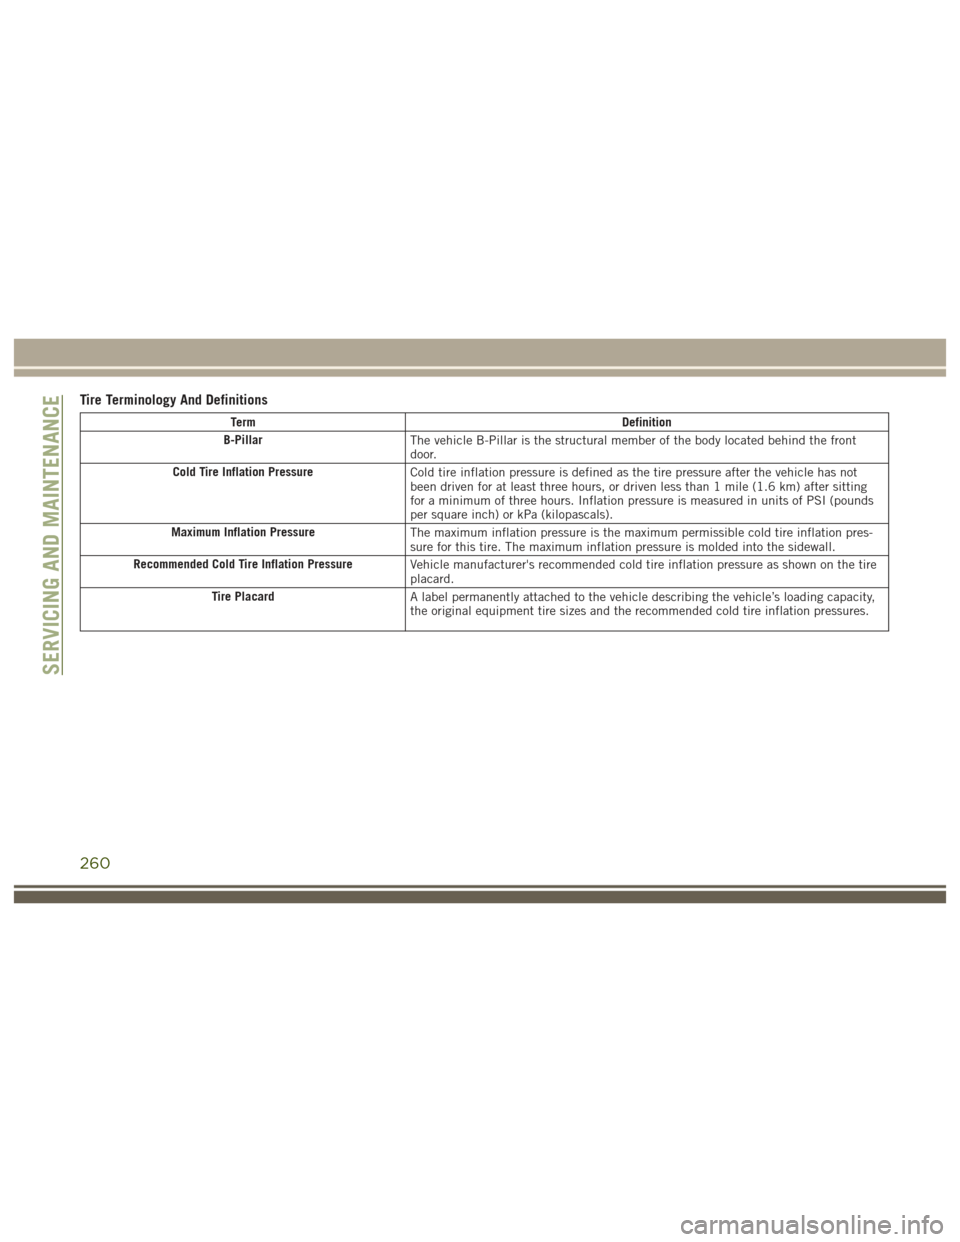
Tire Terminology And Definitions
TermDefinition
B-Pillar The vehicle B-Pillar is the structural member of the body located behind the front
door.
Cold Tire Inflation Pressure Cold tire inflation pressure is defined as the tire pressure after the vehicle has not
been driven for at least three hours, or driven less than 1 mile (1.6 km) after sitting
for a minimum of three hours. Inflation pressure is measured in units of PSI (pounds
per square inch) or kPa (kilopascals).
Maximum Inflation Pressure The maximum inflation pressure is the maximum permissible cold tire inflation pres-
sure for this tire. The maximum inflation pressure is molded into the sidewall.
Recommended Cold Tire Inflation Pressure Vehicle manufacturer's recommended cold tire inflation pressure as shown on the tire
placard.
Tire Placard A label permanently attached to the vehicle describing the vehicle’s loading capacity,
the original equipment tire sizes and the recommended cold tire inflation pressures.
SERVICING AND MAINTENANCE
260
Page 263 of 372
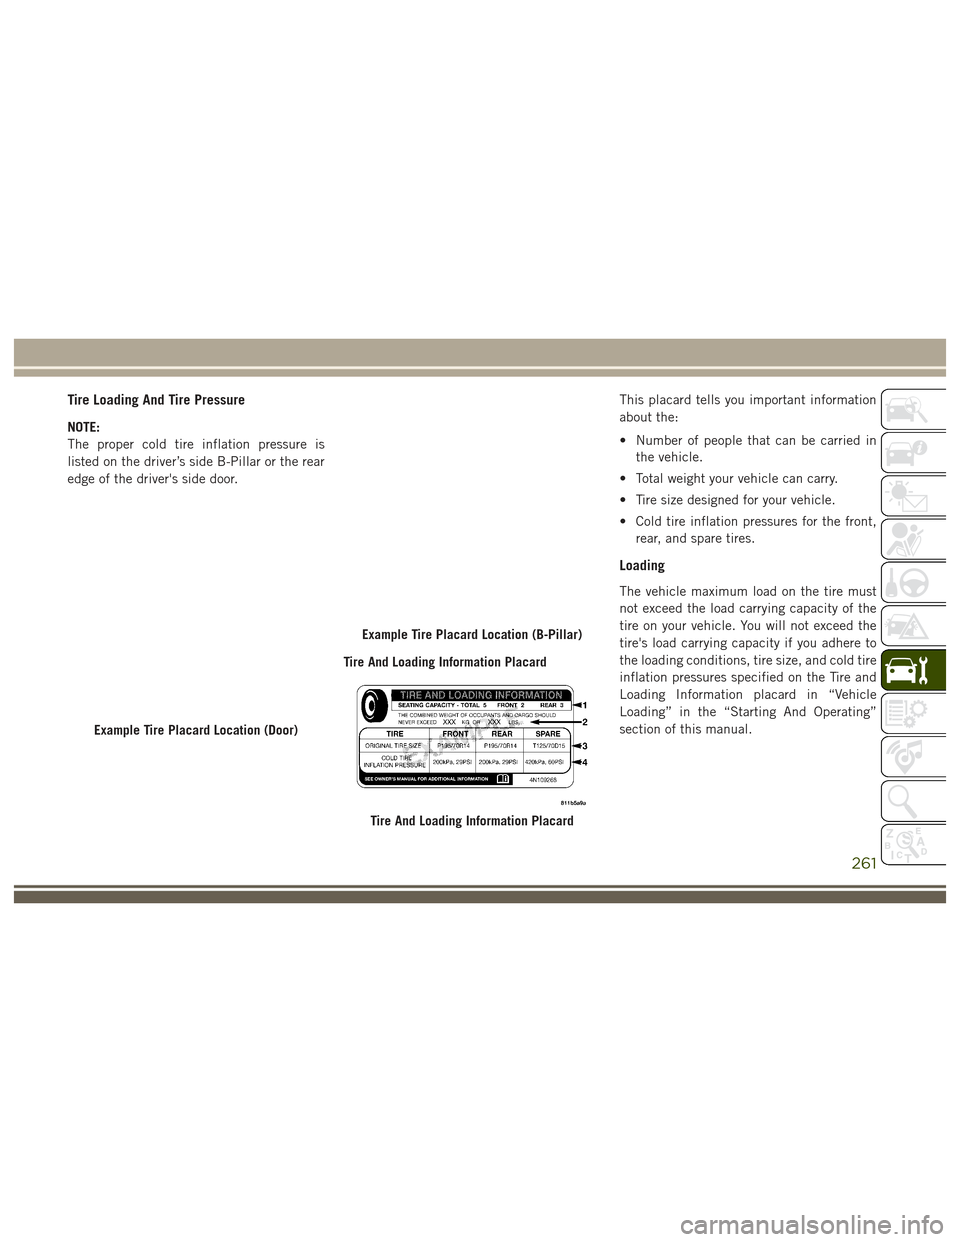
Tire Loading And Tire Pressure
NOTE:
The proper cold tire inflation pressure is
listed on the driver’s side B-Pillar or the rear
edge of the driver's side door.Tire And Loading Information PlacardThis placard tells you important information
about the:
• Number of people that can be carried in
the vehicle.
• Total weight your vehicle can carry.
• Tire size designed for your vehicle.
• Cold tire inflation pressures for the front, rear, and spare tires.
Loading
The vehicle maximum load on the tire must
not exceed the load carrying capacity of the
tire on your vehicle. You will not exceed the
tire's load carrying capacity if you adhere to
the loading conditions, tire size, and cold tire
inflation pressures specified on the Tire and
Loading Information placard in “Vehicle
Loading” in the “Starting And Operating”
section of this manual.
Example Tire Placard Location (Door)
Example Tire Placard Location (B-Pillar)
Tire And Loading Information Placard
261
Page 264 of 372
NOTE:
Under a maximum loaded vehicle condition,
gross axle weight ratings (GAWRs) for the
front and rear axles must not be exceeded.
For further information on GAWRs, vehicle
loading, and trailer towing, refer to “Vehicle
Loading” in the “Starting And Operating”
section of this manual.
To determine the maximum loading condi-
tions of your vehicle, locate the statement
“The combined weight of occupants and
cargo should never exceed XXX kg or XXX lbs”
on the Tire and Loading Information placard.
The combined weight of occupants, cargo/
luggage and trailer tongue weight (if appli-
cable) should never exceed the weight refer-
enced here.
Steps For Determining Correct Load
Limit—
(1) Locate the statement “The com-
bined weight of occupants and cargo
should never exceed XXX kg or
XXX lbs.” on your vehicle's placard.(2) Determine the combined weight of
the driver and passengers that will be
riding in your vehicle.
(3) Subtract the combined weight of
the driver and passengers from XXX kg
or XXX lbs.
(4) The resulting figure equals the
available amount of cargo and luggage
load capacity. For example, if “XXX”
amount equals 1400 lbs. and there
will be five 150 lb passengers in your
vehicle, the amount of available cargo
and luggage load capacity is 650 lbs.
(1400-750 (5x150) = 650 lbs.)
(5)Determine the combined weight of
luggage and cargo being loaded on the
vehicle. That weight may not safely ex-
ceed the available cargo and luggage
load capacity calculated in Step 4.
(6) If your vehicle will be towing a
trailer, load from your trailer will be
transferred to your vehicle. Consult this manual to determine how this
reduces the available cargo and lug-
gage load capacity of your vehicle.
Metric Example For Load Limit
For example, if “XXX” amount equals 635 kg
and there will be five 68 kg passengers in
your vehicle, the amount of available cargo
and luggage load capacity is 295 kg (635-
340 (5x68) = 295 kg) as shown in step 4.
NOTE:
• If your vehicle will be towing a trailer, load
from your trailer will be transferred to your
vehicle. The following table shows ex-
amples on how to calculate total load,
cargo/luggage, and towing capacities of
your vehicle with varying seating configu-
rations and number and size of occupants.
This table is for illustration purposes only
and may not be accurate for the seating
and load carry capacity of your vehicle.
• For the following example, the combined weight of occupants and cargo should
never exceed 865 lbs (392 kg).
SERVICING AND MAINTENANCE
262
Page 267 of 372
Dark Vapor Or Black Satin Chrome Wheels
CAUTION!
If your vehicle is equipped with Dark Vapor
or Black Satin Chrome wheels DO NOT
USE wheel cleaners, abrasives or polishing
compounds. They will permanently dam-
age this finish and such damage is not
covered by the New Vehicle Limited War-
ranty. USE ONLY MILD SOAP AND WATER
WITH A SOFT CLOTH. Used on a regular
basis this is all that is required to maintain
this finish.
Tire Chains (Traction Devices)
Use of traction devices require sufficient tire-
to-body clearance. Follow these recommen-
dations to guard against damage.
• Traction device must be of proper size forthe tire, as recommended by the traction
device manufacturer.
• Install on Rear Tires Only • Due to limited clearance, Thule XG-12 Pro
or equivalent is recommended on P245/
70/R17, P265/60R18 or
265/50R20 tires.
WARNING!
Using tires of different size and type (M+S,
Snow) between front and rear axles can
cause unpredictable handling. You could
lose control and have a collision.
CAUTION!
To avoid damage to your vehicle or tires,
observe the following precautions:
• Because of restricted traction deviceclearance between tires and other sus-
pension components, it is important that
only traction devices in good condition
are used. Broken devices can cause se-
rious damage. Stop the vehicle immedi-
ately if noise occurs that could indicate
device breakage. Remove the damaged
parts of the device before further use.
CAUTION!
• Install device as tightly as possible andthen retighten after driving about ½ mile
(0.8 km).
• Do not exceed 30 mph (48 km/h).
• Drive cautiously and avoid severe turns
and large bumps, especially with a
loaded vehicle.
• Do not drive for a prolonged period on
dry pavement.
• Observe the traction device manufactur-
er’s instructions on the method of instal-
lation, operating speed, and conditions
for use. Always use the suggested oper-
ating speed of the device manufacturer’s
if it is less than 30 mph (48 km/h).
• Do not use traction devices on a com-
pact spare tire.
Tire Rotation Recommendations
The tires on the front and rear of your vehicle
operate at different loads and perform differ-
ent steering, handling, and braking func-
tions. For these reasons, they wear at unequal
rates.
265