check engine JEEP GRAND CHEROKEE 2018 Owner handbook (in English)
[x] Cancel search | Manufacturer: JEEP, Model Year: 2018, Model line: GRAND CHEROKEE, Model: JEEP GRAND CHEROKEE 2018Pages: 368, PDF Size: 5.72 MB
Page 145 of 368
display. Refer to “Instrument Cluster Dis-
play“ in “Getting to Know Your Instrument
Panel” for further information.
If the “SERVICE STOP/START SYSTEM”
message appears in the instrument cluster
display, have the system checked by an au-
thorized dealer.
ENGINE BREAK-IN
RECOMMENDATIONS
3.6L & 5.7L Engines
A long break-in period is not required for the
drivetrain (engine, transmission, clutch, and
rear axle) in your new vehicle.
Drive moderately during the first 300 miles
(500 km). After the initial 60 miles
(100 km), speeds up to 50 or 55 mph (80 or
90 km/h) are desirable.
While cruising, brief full-throttle acceleration
within the limits of local traffic laws contrib-
utes to a good break-in. However, wide-open
throttle acceleration in low gear can be det-
rimental and should be avoided.The engine oil, transmission fluid, and axle
lubricant installed at the factory is high-
quality and energy-conserving. Oil, fluid, and
lubricant changes should be consistent with
anticipated climate and conditions under
which vehicle operations will occur. For the
recommended viscosity and quality grades,
refer to “Fluids And Lubricants” in "Techni-
cal Specifications”.
CAUTION!
Never use Non-Detergent Oil or Straight
Mineral Oil in the engine or damage may
result.
NOTE:
A new engine may consume some oil during
its first few thousand miles (kilometers) of
operation. This should be considered a nor-
mal part of the break-in and not interpreted
as an indication of difficulty. Please check
your oil level with the engine oil indicator
often during the break in period. Add oil as
required.
Diesel Engine
The diesel engine does not require a break-in
period due to its construction. Normal opera-
tion is allowed, providing the following rec-
ommendations are followed:
• Warm up the engine before placing it under
load.
• Do not operate the engine at idle for pro-
longed periods.
• Use the appropriate transmission gear to
prevent engine lugging.
• Observe vehicle oil pressure and tempera-
ture indicators.
• Check the coolant and oil levels frequently.
• Vary throttle position at highway speeds
when carrying or towing significant weight.
NOTE:
Light duty operation such as light trailer tow-
ing or no load operation will extend the time
before the engine is at full efficiency. Re-
duced fuel economy and power may be seen
at this time.
143
Page 146 of 368
The engine oil installed in the engine at the
factory is a high-quality energy conserving
type lubricant. Oil changes should be consis-
tent with anticipated climate conditions un-
der which vehicle operations will occur. The
recommended viscosity and quality grades
are shown under “Fluids And Lubricants” in
"Technical Specifications” in this manual.
NON-DETERGENT OR STRAIGHT MINERAL
OILS MUST NEVER BE USED.
SRT Engines
The following tips will be helpful in obtaining
optimum performance and maximum dura-
bility for your new SRT Vehicle.
Despite modern technology and World Class
manufacturing methods, the moving parts of
the vehicle must still wear in with each other.
This wearing in occurs mainly during the first
500 miles (805 km) and continues through
the first oil change interval.It is recommended for the operator to observe
the following driving behaviors during the
new vehicle break-in period:
0 to 100 miles (0 to 161 km):
• Do not allow the engine to operate at idle
for an extended period of time.
• Depress the accelerator pedal slowly and
not more than halfway to avoid rapid accel-
eration.
• Avoid aggressive braking.
• Drive with the engine speed less than
3,500 RPM.
• Maintain vehicle speed below 55 mph
(88 km/h) and observe local speed limits.
100 to 300 miles (161 to 483 km):
• Depress the accelerator pedal slowly and
not more than halfway to avoid rapid accel-
eration in lower gears (1st to 3rd gears).
• Avoid aggressive braking.
• Drive with the engine speed less than
5,000 RPM.• Maintain vehicle speed below 70 mph
(112 km/h) and observe local speed limits.
300 to 500 miles (483 to 805 km):
• Exercise the full engine rpm range, shifting
manually (paddles or gear shift) at higher
rpms when possible.
• Do not perform sustained operation with
the accelerator pedal at wide open throttle.
• Maintain vehicle speed below 85 mph
(136 km/h) and observe local speed limits.
For the first 1500 miles (2414 km):
• Do not participate in track events, sport
driving schools, or similar activities during
the first 1500 mi (2414 km).
NOTE:
Check engine oil with every refueling and add
if necessary. Oil and fuel consumption may
be higher through the first oil change inter-
val. Running the engine with an oil level
below the add mark can cause severe engine
damage.
STARTING AND OPERATING
144
Page 147 of 368
AUTOMATIC
TRANSMISSION
WARNING!
• Never use the PARK position as a sub-
stitute for the parking brake. Always ap-
ply the parking brake fully when exiting
the vehicle to guard against vehicle
movement and possible injury or dam-
age.
• Your vehicle could move and injure you
and others if it is not in PARK. Check by
trying to move the transmission gear
selector out of PARK with the brake
pedal released. Make sure the transmis-
sion is in PARK before exiting the ve-
hicle.
• The transmission may not engage PARK
if the vehicle is moving. Always bring the
vehicle to a complete stop before shift-
ing to PARK, and verify that the trans-
mission gear position indicator solidly
indicates PARK (P) without blinking. En-
sure that the vehicle is completely
stopped, and the PARK position is prop-
WARNING!
erly indicated, before exiting the ve-
hicle.
• It is dangerous to shift out of PARK or
NEUTRAL if the engine speed is higher
than idle speed. If your foot is not firmly
pressing the brake pedal, the vehicle
could accelerate quickly forward or in
reverse. You could lose control of the
vehicle and hit someone or something.
Only shift into gear when the engine is
idling normally and your foot is firmly
pressing the brake pedal.
• Unintended movement of a vehicle
could injure those in or near the vehicle.
As with all vehicles, you should never
exit a vehicle while the engine is run-
ning. Before exiting a vehicle, always
come to a complete stop, then apply the
parking brake, shift the transmission
into PARK, and turn the ignition OFF.
When the ignition is in the OFF mode,
the transmission is locked in PARK, se-
curing the vehicle against unwanted
movement.
WARNING!
• When exiting the vehicle, always make
sure the ignition is in the OFF mode,
remove the key fob from the vehicle, and
lock the vehicle.
• Never leave children alone in a vehicle,
or with access to an unlocked vehicle.
Allowing children to be in a vehicle un-
attended is dangerous for a number of
reasons. A child or others could be seri-
ously or fatally injured. Children should
be warned not to touch the parking
brake, brake pedal or the transmission
gear selector.
• Do not leave the key fob in or near the
vehicle (or in a location accessible to
children), and do not leave the ignition
in the ACC or ON/RUN mode. A child
could operate power windows, other con-
trols, or move the vehicle.
145
Page 162 of 368
•Track– Track road calibration for use on
high traction surfaces. Driveline is maxi-
mized for traction. Some binding may be
felt on less forgiving surfaces. This feature
will reset to AUTO on an ignition cycle.
•To w– Use this mode for towing and hauling
heavy loads. Vehicle suspension will go to
sport mode. Trailer sway control is enabled
in the ESC system. This feature will reset to
AUTO upon an ignition cycle.
Custom
This mode allows the driver to create a cus-
tom vehicle configuration that is saved for
quick selection of favorite settings. The sys-
tem will return to AUTO mode when the
ignition switch is cycled from RUN to OFF to
RUN, if this mode is selected. While in Cus-
tom Mode the Stability, Transmission, Steer-
ing, Suspension, all-wheel drive set up, and
Paddle shifter settings may be configured
through the custom mode set-up.
NOTE:
Refer to “SRT Drive Modes” in the “Multime-
dia” section in your Owner’s Manual for fur-
ther information.
Active Damping System
This vehicle is equipped with an electronic
controlled damping system. This system re-
duces body roll and pitch in many driving
situations including cornering, acceleration
and braking. There are 3 modes:
•Street Mode(Available in terrain positions
AUTO, SNOW and CUSTOM.) — Used dur-
ing highway speeds where a touring sus-
pension feel is desired.
•Sport Mode(Available in terrain positions
AUTO, SPORT, CUSTOM and TOW.) — Pro-
vides a firm suspension for better handling.
•Track Mode(Available in terrain positions
AUTO, TRACK and CUSTOM.) — Provides
a full firm suspension for an aggressive
track experience.
Refer to “SRT Drive Modes” in the “Multime-
dia” section in your Owner’s Manual for fur-
ther information.
Launch Control— If Equipped
This vehicle is equipped with a Launch Con-
trol system that is designed to allow the driver
to achieve maximum vehicle acceleration in astraight line. Launch Control is a form of
traction control that manages tire slip while
launching the vehicle. This feature is in-
tended for use during race events on a closed
course where consistent quarter mile and
zero to sixty times are desired. The system is
not intended to compensate for lack of driver
experience or familiarity with the race track.
Use of this feature in low traction (cold, wet,
gravel, etc.) conditions may results in excess
wheel slip outside this systems control result-
ing in an aborted launch.
Preconditions:
• Launch Control should not be used on pub-
lic roads. Always check track conditions
and the surrounding area.
• Launch Control is not available within the
first 500 miles (805 km) of engine break-
in.
• Launch Control should only be used when
the engine and transmission are at operat-
ing temperature.
• Launch Control is intended to be used on
dry, paved road surfaces only.
STARTING AND OPERATING
160
Page 164 of 368
Guidelines For Track Use
NOTE:
Because of the extreme conditions encoun-
tered during track use, any damage or wear
associated with track use may not be covered
by warranty.
• If your SRT vehicle is equipped with Drive
Modes they will alter the vehicle’s perfor-
mance in various driving situations. It is
recommended that your vehicle operates in
SPORT or TRACK modes during the track
event.
• Prior to each track event/day, verify all
fluids are at the correct levels. Refer to
“Fluid Capacities” in “Technical Specifica-
tions” for further information.
• Prior to each track event, verify the front
and rear brake pads have more than ½ pad
thickness remaining. If the brake pads re-
quire changing, please burnish prior to
track outing at full pace.
NOTE:
Use of DOT 4 brake fluid is suggested for
extended track usage due to increased ther-
mal capacity.• At the conclusion of each track event, it is
recommended that a brake bleed proce-
dure is performed to maintain the pedal
feel and stopping capability of your Brembo
High Performance brake system.
• It is recommended that each track outing
should end with a minimum of one cool
down lap using minimal braking.
• If equipped with a removable lower front
fascia grille, it is recommended to remove it
for track use during warm/hot weather to
improve cooling airflow to critical pow-
ertrain and cooling system components.
• All SRT vehicles are track tested for
24 hours of endurance, however, it is rec-
ommended that suspension system, brake
system, prop shaft, and ½ shaft boots
should be checked for wear or damage after
every track event.
• Track usage results in increased operating
temperatures of the engine, transmission,
driveline and brake system. This may affect
noise vibrations and harshness (NVH)
countermeasures designed into your ve-
hicle. New components may need to be
installed to return the system to the original
NVH performance.• Tire pressure:
– 40 psi (276 kpa) hot, recommend
32 psi (221 kpa) front, 30 psi
(207 kpa) rear cold
NOTE:
It is recommended that you target 40 psi
(276 kpa) Hot Tire Pressure at the conclusion
of each track session. Starting at 32 psi
(221 kpa) Front & 30 psi (207 kpa) Rear
Cold and adjusting based on ambient & track
conditions is recommended. Tire pressure
can be monitored via the instrument cluster
display and can assist with adjustments.
Track burnishing your brakes:
To avoid “green lining fade” during track use,
the brake pads and rotors must have a ther-
mal burnish for factory installed components
or when new brake friction components are
installed:
1. Use one track session to burnish brakes
by driving at 75% speed. Brake at ap-
proximately 0.60-0.80g maximum with-
out ABS intervention.
STARTING AND OPERATING
162
Page 197 of 368
• If the vehicle is equipped with Quadra-Lift
air suspension, the engine should be
started and left running for a minimum of
60 seconds (with all the doors closed) at
least once every 24 hours. This process
allows the air suspension to adjust the
vehicle’s ride height to compensate for
temperature effects.
Shifting Out Of NEUTRAL (N)
Use the following procedure to prepare your
vehicle for normal usage.
1. Bring the vehicle to a complete stop, leav-
ing it connected to the tow vehicle.
2. Firmly apply the parking brake.
3. Reconnect the negative battery cable.
4. Turn the ignition to the LOCK/OFF mode.
5. Start the engine.
6. Press and hold the brake pedal.
7. Shift the transmission into NEUTRAL.
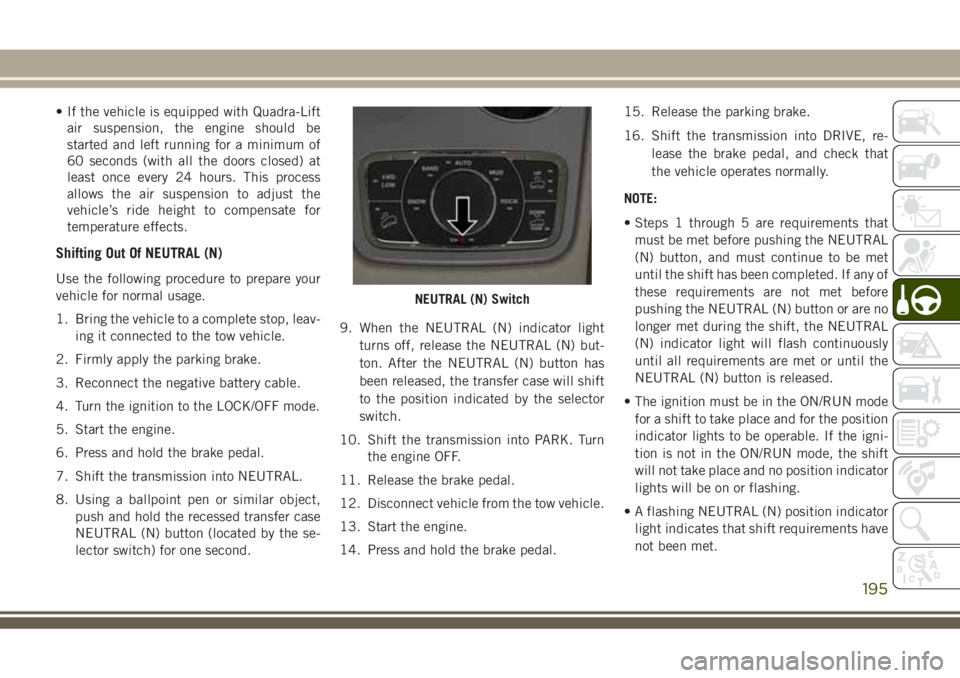
8. Using a ballpoint pen or similar object,
push and hold the recessed transfer case
NEUTRAL (N) button (located by the se-
lector switch) for one second.9. When the NEUTRAL (N) indicator light
turns off, release the NEUTRAL (N) but-
ton. After the NEUTRAL (N) button has
been released, the transfer case will shift
to the position indicated by the selector
switch.
10. Shift the transmission into PARK. Turn
the engine OFF.
11. Release the brake pedal.
12. Disconnect vehicle from the tow vehicle.
13. Start the engine.
14. Press and hold the brake pedal.15. Release the parking brake.
16. Shift the transmission into DRIVE, re-
lease the brake pedal, and check that
the vehicle operates normally.
NOTE:
• Steps 1 through 5 are requirements that
must be met before pushing the NEUTRAL
(N) button, and must continue to be met
until the shift has been completed. If any of
these requirements are not met before
pushing the NEUTRAL (N) button or are no
longer met during the shift, the NEUTRAL
(N) indicator light will flash continuously
until all requirements are met or until the
NEUTRAL (N) button is released.
• The ignition must be in the ON/RUN mode
for a shift to take place and for the position
indicator lights to be operable. If the igni-
tion is not in the ON/RUN mode, the shift
will not take place and no position indicator
lights will be on or flashing.
• A flashing NEUTRAL (N) position indicator
light indicates that shift requirements have
not been met.
NEUTRAL (N) Switch
195
Page 206 of 368
FUSES
WARNING!
• When replacing a blown fuse, always use
an appropriate replacement fuse with
the same amp rating as the original fuse.
Never replace a fuse with another fuse of
higher amp rating. Never replace a
blown fuse with metal wires or any other
material. Do not place a fuse inside a
circuit breaker cavity or vice versa. Fail-
ure to use proper fuses may result in
serious personal injury, fire and/or prop-
erty damage.
• Before replacing a fuse, make sure that
the ignition is off and that all the other
services are switched off and/or disen-
gaged.
• If the replaced fuse blows again, contact
an authorized dealer.
• If a general protection fuse for safety
systems (air bag system, braking sys-
WARNING!
tem), power unit systems (engine sys-
tem, transmission system) or steering
system blows, contact an authorized
dealer.
General Information
The fuses protect electrical systems against
excessive current.
When a device does not work, you must check
the fuse element inside the blade fuse for a
break/melt.
Also, please be aware that when using power
outlets for extended periods of time with the
engine off may result in vehicle battery dis-
charge.
Underhood Fuses
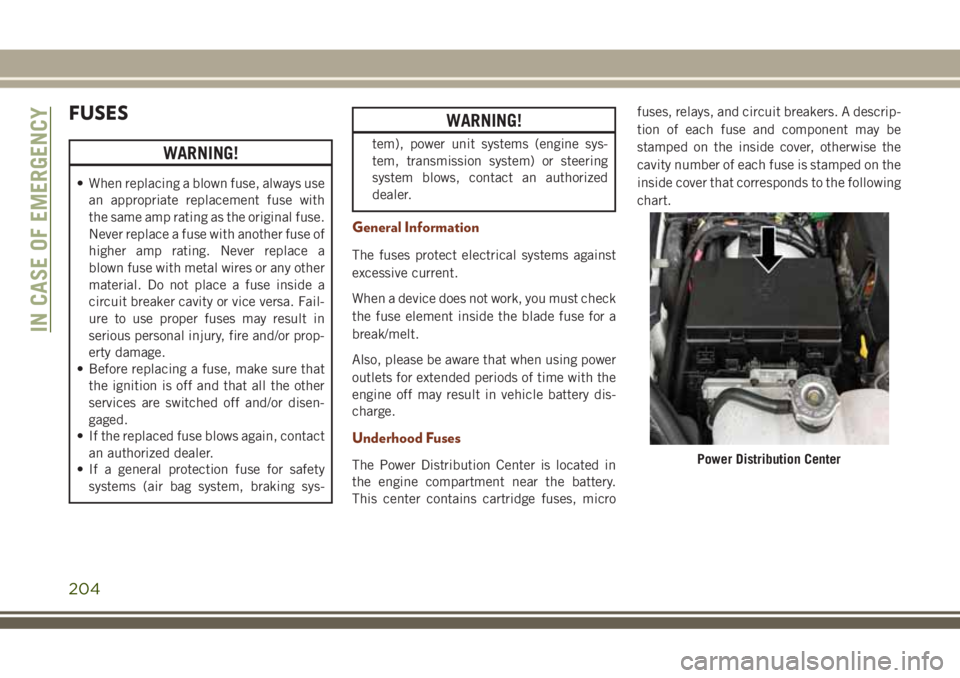
The Power Distribution Center is located in
the engine compartment near the battery.
This center contains cartridge fuses, microfuses, relays, and circuit breakers. A descrip-
tion of each fuse and component may be
stamped on the inside cover, otherwise the
cavity number of each fuse is stamped on the
inside cover that corresponds to the following
chart.Power Distribution Center
IN CASE OF EMERGENCY
204
Page 231 of 368
SERVICING AND MAINTENANCE
SCHEDULED SERVICING......230
Scheduled Servicing — Non SRT. . . .230
Scheduled Servicing — SRT.......234
Scheduled Servicing — Diesel Engine .238
ENGINE COMPARTMENT.....242
3.6L Engine.................242
5.7L Engine.................243
6.2L Supercharged Engine........244
6.4L Engine.................245
3.0L Diesel Engine.............246
Checking Oil Level — Gasoline Engine .247
Checking Oil Level — 3.0 Diesel
Engine.....................247Adding Washer Fluid............247
Maintenance-Free Battery........248
DEALER SERVICE...........248
Air Conditioner Maintenance.......249
Windshield Wiper Blades.........251
Cooling System...............254
RAISING THE VEHICLE.......255
TIRES....................255
Tires — General Information.......255
Tire Types...................259
Spare Tires — If Equipped........260
Wheel And Wheel Trim Care.......262Tire Chains (Traction Devices) —
Non-SRT...................263
Tire Chains (Traction Devices) — SRT . .264
Tire Rotation Recommendations.....264
STORING THE VEHICLE.......265
BODYWORK...............266
Preserving The Bodywork.........266
INTERIORS................267
Seats And Fabric Parts...........267
Plastic And Coated Parts..........267
Leather Parts.................268
Glass Surfaces...............268
SERVICING AND MAINTENANCE
229
Page 232 of 368
SCHEDULED SERVICING
Scheduled Servicing — Non SRT
The scheduled services listed in this manual
must be done at the times or mileages speci-
fied to protect your vehicle warranty and
ensure the best vehicle performance and re-
liability. More frequent maintenance may be
needed for vehicles in severe operating con-
ditions, such as dusty areas and very short
trip driving. Inspection and service should
also be done anytime a malfunction is sus-
pected.
The oil change indicator system will remind
you that it is time to take your vehicle in for
scheduled maintenance.
In the instrument cluster an “Oil Change
Required” message will be displayed and a
single chime will sound, indicating that an oil
change is necessary.
The oil change indicator message will illuminate
approximately 7,000 miles (11,200 km) after
the most recent oil change was performed. Have
your vehicle serviced as soon as possible, within
500 miles (800 km).
NOTE:
•
The oil change indicator message will not moni-
tor the time since the last oil change. Change
your vehicles oil if it has been 12 months since
your last oil change even if the oil change
indicator message is NOT illuminated.
• Change your engine oil more often if you
drive your vehicle off-road for an extended
period of time.
• Under no circumstances should oil change
intervals exceed 7,500 miles (12,000 km)
or 12 months, whichever comes first.
Your authorized dealer will reset the oil
change indicator message after completing
the scheduled oil change. If this scheduled
oil change is performed by someone other
than your authorized dealer the message can
be reset by referring to the steps described
under ”Instrument Cluster Display” in “Get-
ting To Know Your Instrument Panel” for
further information.
At Each Stop for Fuel
• Check the engine oil level about 5 minutes
after a fully warmed engine is shut off.
Checking the oil level while the vehicle is
on level ground will improve the accuracy ofthe oil level reading. Add oil only when the
level is at or below the ADD or MIN mark.
• Check the windshield washer solvent and
add if required.
Once a Month
• Check tire pressure and look for unusual
wear or damage. Rotate tires at the first
sign of irregular wear.
• Inspect the battery and clean and tighten
the terminals as required.
• Check the fluid levels of the coolant reser-
voir, and brake master cylinder; add fluid as
needed.
• Check all lights and other electrical items
for correct operation.
At Each Oil Change
• Change the engine oil filter.
• Inspect the brake hoses and lines.
CAUTION!
Failure to perform the required maintenance
items may result in damage to the vehicle.
SERVICING AND MAINTENANCE
230
Page 236 of 368
Severe Duty Conditions
†† Change the engine oil and engine oil filter
at every 4500 miles (7,500 km) or
12 months if using your vehicle under any of
the following severe duty conditions:
• Stop and go driving.
• Driving in dusty conditions.
• Short trips of less than 10 miles (16 km).
• Trailer towing.
• Taxi, police, or delivery service (commercial
service).
• Off-road or desert operation.
Scheduled Servicing — SRT
The scheduled services listed in this manual
must be done at the times or mileages speci-
fied to protect your vehicle warranty and
ensure the best vehicle performance and re-
liability. More frequent maintenance may be
needed for vehicles in severe operating con-
ditions, such as dusty areas and very short
trip driving. Inspection and service should
also be done anytime a malfunction is sus-
pected.The oil change indicator system will remind
you that it is time to take your vehicle in for
scheduled maintenance.
The Instrument Cluster Display will display
an “Oil Change Required” message and a
single chime will sound, indicating that an oil
change is necessary.
Based on engine operation conditions, the oil
change indicator message will illuminate.
This means that service is required for your
vehicle. Have your vehicle serviced as soon as
possible, within the next 500 miles
(805 km).
NOTE:
• The oil change indicator message will not
monitor the time since the last oil change.
Change your vehicle's oil if it has been six
months since your last oil change, even if
the oil change indicator message is NOT
illuminated.
• Change your engine oil more often if you
drive your vehicle off-road for an extended
period of time.• Under no circumstances should oil change
intervals exceed 6,000 miles (10,000 km)
or six months, whichever comes first.
Your authorized dealer will reset the oil
change indicator message after completing
the scheduled oil change. If a scheduled oil
change is performed by someone other than
your authorized dealer, the message can be
reset by referring to the steps described un-
der “Instrument Cluster Display” in “Getting
To Know Your Instrument Panel” in this
guide.
At Each Stop For Fuel
• Check the engine oil level. Refer to “Engine
Compartment” in this section for further
information.
• Check the windshield washer solvent and
add if required.
Once A Month
• Check tire pressure and look for unusual
wear or damage.
• Inspect the battery, and clean and tighten
the terminals as required.
SERVICING AND MAINTENANCE
234