JEEP GRAND CHEROKEE 2018 Owner handbook (in English)
Manufacturer: JEEP, Model Year: 2018, Model line: GRAND CHEROKEE, Model: JEEP GRAND CHEROKEE 2018Pages: 368, PDF Size: 5.72 MB
Page 21 of 368
Rearming Of The System
If something triggers the alarm, and no action
is taken to disarm it, the vehicle security
alarm will turn the horn off after 29 seconds,
five seconds between cycles, up to eight
cycles if the trigger remains active and the
vehicle security alarm will rearm itself.
PREMIUM VEHICLE
SECURITY ALARM — IF
EQUIPPED
This premium vehicle security alarm moni-
tors the vehicle doors, hood, liftgate and
ignition for unauthorized operation. When the
alarm is armed, the interior switches for door
locks, and power liftgate are disabled. If
something triggers the alarm, the vehicle
security alarm will provide the following au-
dible and visible signals: the horn will pulse,
and the park lamps and/or turn signals will
flash.
To Arm The System
Follow these steps to arm the security alarm:
1. Remove the key from the ignition system
(refer to "Starting The Engine" in "Starting
And Operating" for further information).
• For vehicles equipped with Keyless
Enter-N-Go, make sure the vehicle igni-
tion system is "OFF."
• For vehicles not equipped with Keyless
Enter-N-Go, make sure the vehicle igni-
tion system is "OFF" and the key is physi-
cally removed from the ignition.
2. Perform one of the following methods to
lock the vehicle:
• Push lock on the interior power door
lock switch with the driver and/or passen-
ger door open.
• Push the lock button on the exterior
Passive Entry Door Handle with a valid
key fob available in the same exterior
zone (refer to "Keyless Enter-N-Go" in
“Doors” in Getting To Know Your Vehicle"
in your Owner’s Manual for further infor-
mation).• Push the lock button on the key fob.
3. If any doors are open, close them.
NOTE:
• Once the security system is armed, it re-
mains in that state until you disarm it by
following either of the disarming proce-
dures described. If a power loss occurs
after arming the system, you must disarm
the system after restoring power to prevent
alarm activation.
• The ultrasonic intrusion sensor (motion de-
tector) actively monitors your vehicle every
time you arm the security system. If you
prefer, you can turn off the ultrasonic intru-
sion sensor when arming the security sys-
tem. To do so, push the lock button on the
key fob three times within 15 seconds of
arming the system (while the vehicle secu-
rity light is flashing rapidly).
19
Page 22 of 368
To Disarm The System
The vehicle security alarm can be disarmed
using any of the following methods:
• Push the unlock button on the key fob.
• Grasp the Passive Entry Unlock Door
Handle (refer to "Keyless Enter-N-Go" in
“Doors” in Getting To Know Your Vehicle" in
your Owner’s Manual for further informa-
tion).
• Cycle the vehicle ignition system out of the
OFF position.
– For vehicles equipped with Keyless
Enter-N-Go, push the Keyless Enter-
N-Go Start/Stop button (requires at
least one valid key fob in the vehicle).
– For vehicles not equipped with Keyless
Enter-N-Go, insert a valid key into the
ignition switch and turn the key to the
ON position.
NOTE:
• The driver's door key cylinder and the lift-
gate button on the key fob cannot arm or
disarm the vehicle security alarm.• The vehicle security alarm remains armed
during power liftgate entry. Pushing the
liftgate button will not disarm the vehicle
security alarm. If someone enters the ve-
hicle through the liftgate and opens any
door the alarm will sound.
• When the vehicle security alarm is armed,
the interior power door lock switches will
not unlock the doors.
• The ultrasonic intrusion sensor (motion de-
tector) actively monitors your vehicle every
time you arm the security system. If you
prefer, you can turn off the ultrasonic intru-
sion sensor when arming the security sys-
tem. To do so, push the lock button on the
key fob three times within 15 seconds of
arming the system (while the vehicle secu-
rity light is flashing rapidly).
The vehicle security alarm is designed to
protect your vehicle; however, you can create
conditions where the system will give you a
false alarm. If one of the previously described
arming sequences has occurred, the vehicle
security alarm will arm regardless of whetheryou are in the vehicle or not. If you remain in
the vehicle and open a door, the alarm will
sound. If this occurs, disarm the vehicle
security alarm.
If the vehicle security alarm is armed and the
battery becomes disconnected, the vehicle
security alarm will remain armed when the
battery is reconnected; the exterior lights will
flash, the horn will sound. If this occurs,
disarm the vehicle security alarm.
Security System Manual Override
The system will not arm if you lock the doors
using the manual door lock plunger.
DOORS
Keyless Enter-N-Go — Passive Entry
The Passive Entry system is an enhancement
to the vehicle’s key fob and a feature of
Keyless Enter-N-Go — Passive Entry. This
feature allows you to lock and unlock the
vehicle’s door(s) and fuel door without having
to push the key fob lock or unlock buttons.
GETTING TO KNOW YOUR VEHICLE
20
Page 23 of 368
NOTE:
• Passive Entry may be programmed ON/OFF;
refer to “Uconnect Settings” in “Multime-
dia” for further information.
• The key fob may not be able to be detected
by the vehicle passive entry system if it is
located next to a mobile phone, laptop, or
other electronic device; these devices may
block the key fob’s wireless signal and pre-
vent the passive entry system from locking/
unlocking the vehicle.
• Passive Entry Unlock initiates illuminated
approach (Low Beams, License Plate
Lamp, Position Lamps) for whichever time
duration is set between 0, 30 (default),
60 or 90 seconds. Passive Entry Unlock
also initiates two flashes of the turn signal
lamps.
• If wearing gloves on your hands, or if it has
been raining/snowing on the Passive Entry
door handle, the unlock sensitivity can be
affected, resulting in a slower response
time.• If the vehicle is unlocked by Passive Entry
and no door is opened within 60 seconds,
the vehicle will re-lock and if equipped will
arm the security alarm.
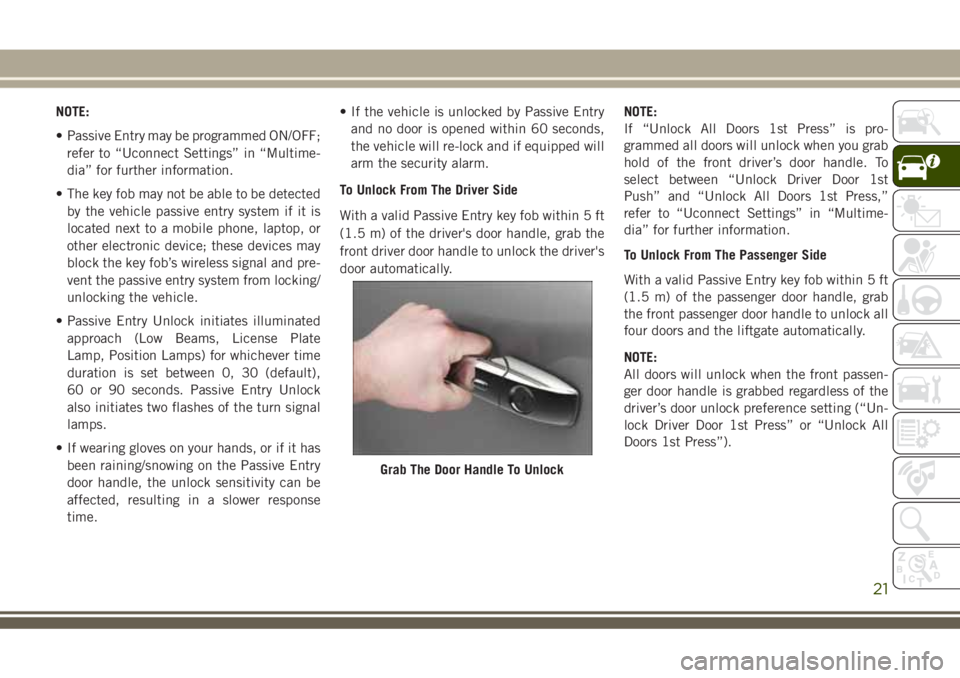
To Unlock From The Driver Side
With a valid Passive Entry key fob within 5 ft
(1.5 m) of the driver's door handle, grab the
front driver door handle to unlock the driver's
door automatically.NOTE:
If “Unlock All Doors 1st Press” is pro-
grammed all doors will unlock when you grab
hold of the front driver’s door handle. To
select between “Unlock Driver Door 1st
Push” and “Unlock All Doors 1st Press,”
refer to “Uconnect Settings” in “Multime-
dia” for further information.
To Unlock From The Passenger Side
With a valid Passive Entry key fob within 5 ft
(1.5 m) of the passenger door handle, grab
the front passenger door handle to unlock all
four doors and the liftgate automatically.
NOTE:
All doors will unlock when the front passen-
ger door handle is grabbed regardless of the
driver’s door unlock preference setting (“Un-
lock Driver Door 1st Press” or “Unlock All
Doors 1st Press”).
Grab The Door Handle To Unlock
21
Page 24 of 368
Preventing Inadvertent Locking Of Passive Entry
Key Fob In Vehicle (FOBIK-Safe)
To minimize the possibility of unintentionally
locking a Passive Entry key fob inside your
vehicle, the Passive Entry system is equipped
with an automatic door unlock feature which
will function if the ignition switch is in the
OFF position.
FOBIK-Safe only executes in vehicles with
passive entry. There are five situations that
trigger a FOBIK-Safe search in any passive
entry vehicle:
• A lock request is made by a valid Passive
Entry key fob while a door is open.
• A lock request is made by the Passive Entry
door handle while a door is open.
• A lock request is made by the door panel
switch while the door is open.
• When the vehicle security alarm is in pre-
arm or armed status and the liftgate transi-
tions from open to closed.
• When the liftgate transitions from opened
to closed and remote start is active.When any of these situations occur, after all
open doors are shut, the FOBIK-Safe search
will be executed. If it finds a Passive Entry
key fob inside the car, the car will unlock and
alert the customer.
NOTE:
The vehicle will only unlock the doors when a
valid Passive Entry key fob is detected inside
the vehicle. The vehicle will not unlock the
doors when any of the following conditions
are true:
• The doors are manually locked using the
door lock knobs.
• Three attempts are made to lock the doors
using the door panel switch and then close
the doors.
• There is a valid Passive Entry key fob out-
side the vehicle within 5 ft. (1.5 m) of a
Passive Entry door handle.
• If the keys are left in the vehicle while the
liftgate is opened, and all four doors are
then locked, closing the liftgate will lock
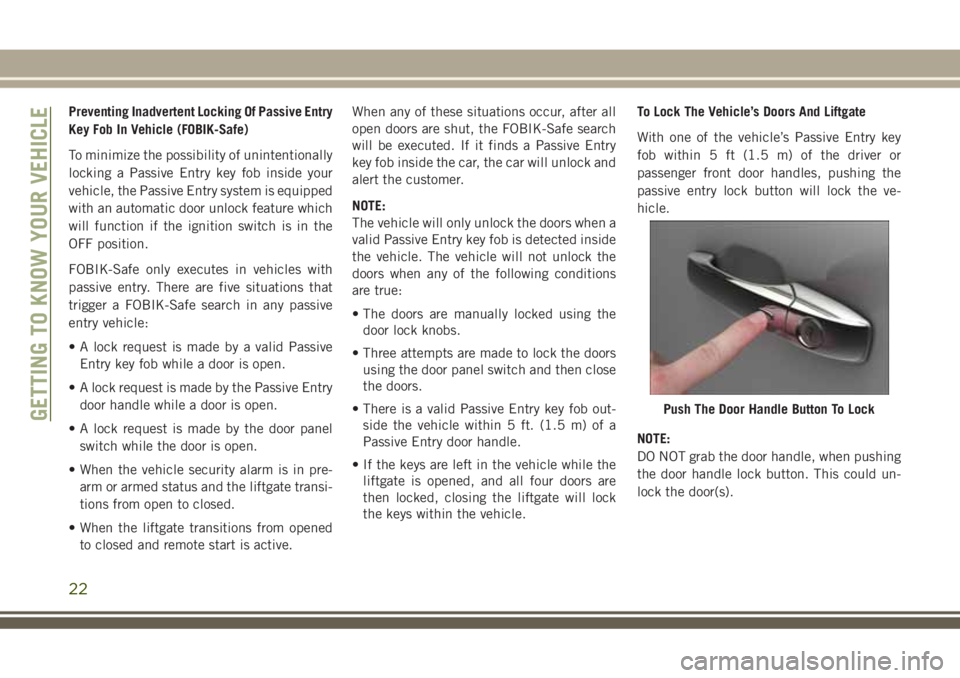
the keys within the vehicle.To Lock The Vehicle’s Doors And Liftgate
With one of the vehicle’s Passive Entry key
fob within 5 ft (1.5 m) of the driver or
passenger front door handles, pushing the
passive entry lock button will lock the ve-
hicle.
NOTE:
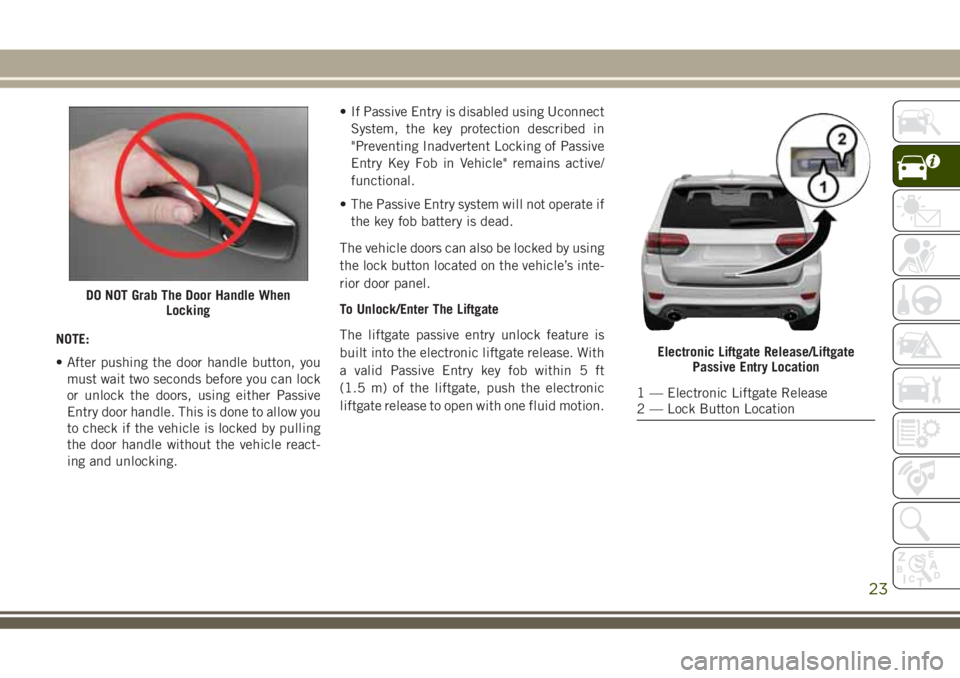
DO NOT grab the door handle, when pushing
the door handle lock button. This could un-
lock the door(s).
Push The Door Handle Button To LockGETTING TO KNOW YOUR VEHICLE
22
Page 25 of 368
NOTE:
• After pushing the door handle button, you
must wait two seconds before you can lock
or unlock the doors, using either Passive
Entry door handle. This is done to allow you
to check if the vehicle is locked by pulling
the door handle without the vehicle react-
ing and unlocking.• If Passive Entry is disabled using Uconnect
System, the key protection described in
"Preventing Inadvertent Locking of Passive
Entry Key Fob in Vehicle" remains active/
functional.
• The Passive Entry system will not operate if
the key fob battery is dead.
The vehicle doors can also be locked by using
the lock button located on the vehicle’s inte-
rior door panel.
To Unlock/Enter The Liftgate
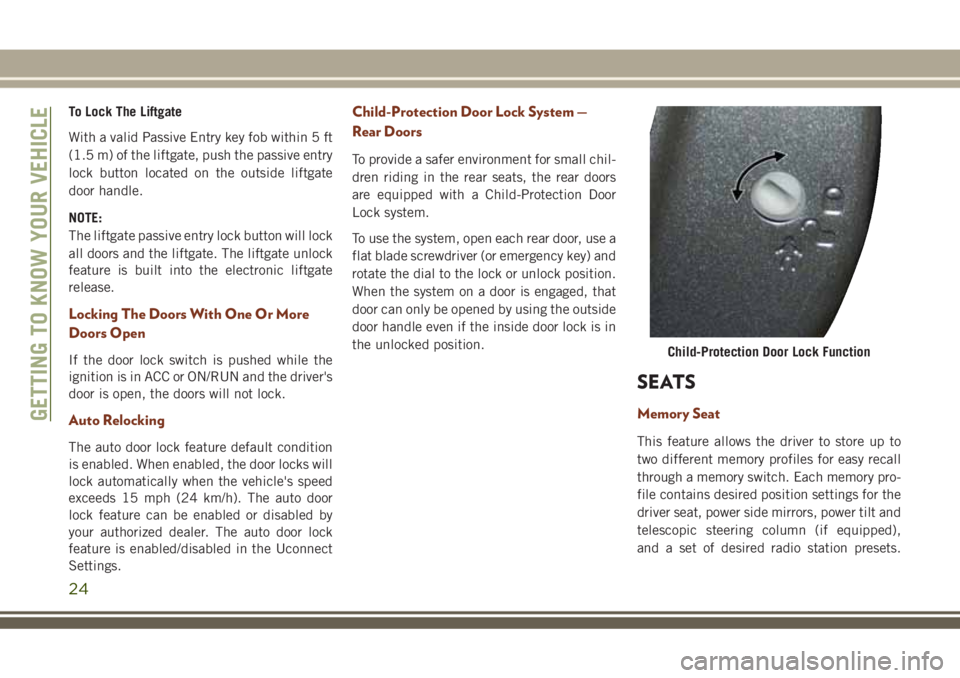
The liftgate passive entry unlock feature is
built into the electronic liftgate release. With
a valid Passive Entry key fob within 5 ft
(1.5 m) of the liftgate, push the electronic
liftgate release to open with one fluid motion.
DO NOT Grab The Door Handle When
Locking
Electronic Liftgate Release/Liftgate
Passive Entry Location
1 — Electronic Liftgate Release
2 — Lock Button Location
23
Page 26 of 368
To Lock The Liftgate
With a valid Passive Entry key fob within 5 ft
(1.5 m) of the liftgate, push the passive entry
lock button located on the outside liftgate
door handle.
NOTE:
The liftgate passive entry lock button will lock
all doors and the liftgate. The liftgate unlock
feature is built into the electronic liftgate
release.
Locking The Doors With One Or More
Doors Open
If the door lock switch is pushed while the
ignition is in ACC or ON/RUN and the driver's
door is open, the doors will not lock.
Auto Relocking
The auto door lock feature default condition
is enabled. When enabled, the door locks will
lock automatically when the vehicle's speed
exceeds 15 mph (24 km/h). The auto door
lock feature can be enabled or disabled by
your authorized dealer. The auto door lock
feature is enabled/disabled in the Uconnect
Settings.
Child-Protection Door Lock System —
Rear Doors
To provide a safer environment for small chil-
dren riding in the rear seats, the rear doors
are equipped with a Child-Protection Door
Lock system.
To use the system, open each rear door, use a
flat blade screwdriver (or emergency key) and
rotate the dial to the lock or unlock position.
When the system on a door is engaged, that
door can only be opened by using the outside
door handle even if the inside door lock is in
the unlocked position.
SEATS
Memory Seat
This feature allows the driver to store up to
two different memory profiles for easy recall
through a memory switch. Each memory pro-
file contains desired position settings for the
driver seat, power side mirrors, power tilt and
telescopic steering column (if equipped),
and a set of desired radio station presets.
Child-Protection Door Lock Function
GETTING TO KNOW YOUR VEHICLE
24
Page 27 of 368
Your remote keyless entry key fob can also be
programmed to recall the same positions
when the unlock button is pushed.
NOTE:
Your vehicle is equipped with two key fobs,
one key fob can be linked to memory position
1 and the other key fob can be linked to
memory position 2.
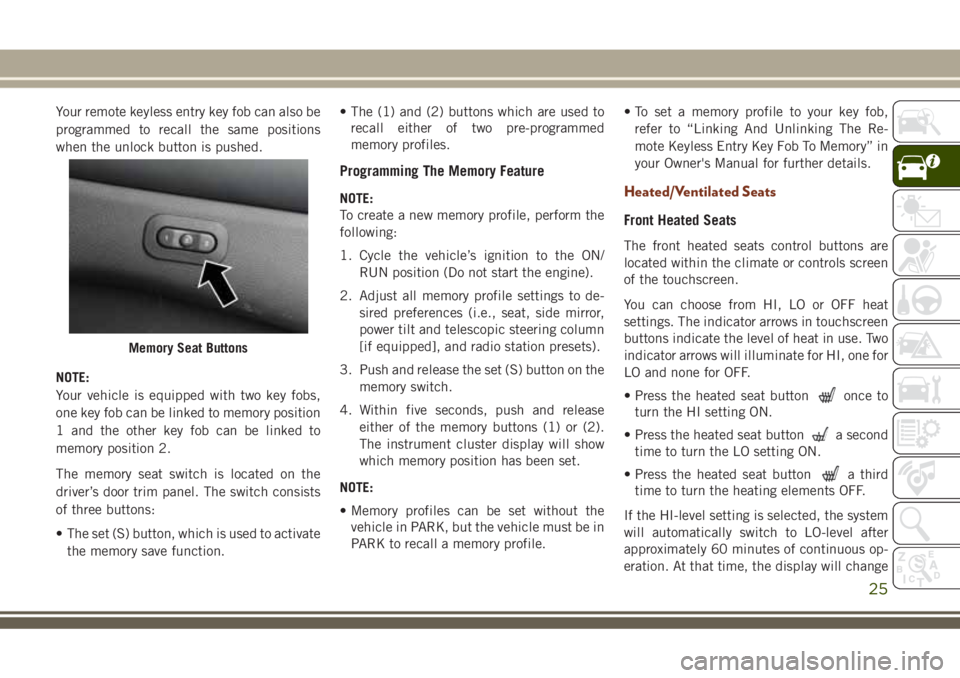
The memory seat switch is located on the
driver’s door trim panel. The switch consists
of three buttons:
• The set (S) button, which is used to activate
the memory save function.• The (1) and (2) buttons which are used to
recall either of two pre-programmed
memory profiles.
Programming The Memory Feature
NOTE:
To create a new memory profile, perform the
following:
1. Cycle the vehicle’s ignition to the ON/
RUN position (Do not start the engine).
2. Adjust all memory profile settings to de-
sired preferences (i.e., seat, side mirror,
power tilt and telescopic steering column
[if equipped], and radio station presets).
3. Push and release the set (S) button on the
memory switch.
4. Within five seconds, push and release
either of the memory buttons (1) or (2).
The instrument cluster display will show
which memory position has been set.
NOTE:
• Memory profiles can be set without the
vehicle in PARK, but the vehicle must be in
PARK to recall a memory profile.• To set a memory profile to your key fob,
refer to “Linking And Unlinking The Re-
mote Keyless Entry Key Fob To Memory” in
your Owner's Manual for further details.Heated/Ventilated Seats
Front Heated Seats
The front heated seats control buttons are
located within the climate or controls screen
of the touchscreen.
You can choose from HI, LO or OFF heat
settings. The indicator arrows in touchscreen
buttons indicate the level of heat in use. Two
indicator arrows will illuminate for HI, one for
LO and none for OFF.
• Press the heated seat button
once to
turn the HI setting ON.
• Press the heated seat button
a second
time to turn the LO setting ON.
• Press the heated seat button
a third
time to turn the heating elements OFF.
If the HI-level setting is selected, the system
will automatically switch to LO-level after
approximately 60 minutes of continuous op-
eration. At that time, the display will change
Memory Seat Buttons
25
Page 28 of 368
from HI to LO, indicating the change. The
LO-level setting will turn OFF automatically
after approximately 45 minutes.
NOTE:
• Once a heat setting is selected, heat will be
felt within two to five minutes.
• The engine must be running for the heated
seats to operate.
Vehicles Equipped With Remote Start
On models that are equipped with remote
start, the heated seats can be programmed to
come on during a remote start.
This feature can be programmed through the
Uconnect system. Refer to your Owner's
Manual for further details.
WARNING!
• Persons who are unable to feel pain to
the skin because of advanced age,
chronic illness, diabetes, spinal cord in-
jury, medication, alcohol use, exhaus-
tion or other physical condition must
exercise care when using the seat
WARNING!
heater. It may cause burns even at low
temperatures, especially if used for long
periods of time.
• Do not place anything on the seat or
seatback that insulates against heat,
such as a blanket or cushion. This may
cause the seat heater to overheat. Sit-
ting in a seat that has been overheated
could cause serious burns due to the
increased surface temperature of the
seat.
Rear Heated Seats
On some models, the two outboard seats are
equipped with heated seats. The heated seat
switches for these seats are located on the
rear of the center console. There are two
heated seat switches
that allow the rear
passengers to operate the seats indepen-
dently.
You can choose from HI, LO or OFF heat
settings. The indicator lights in each switch
indicate the level of heat in use. Two indica-
tor lights will illuminate for HI, one for LO
and none for OFF.• Push the heated seat button
once to
select HI-level heating.
• Push the heated seat button
a second
time to select LO-level heating.
• Push the heated seat button
a third
time to turn the heating elements OFF.
NOTE:
• Once a heat setting is selected, heat will be
felt within two to five minutes.
• The engine must be running for the heated
seats to operate.
If the HI-level setting is selected, the system
will automatically switch to LO-level after
approximately 60 minutes of continuous op-
eration. At that time, the number of illumi-
nated LEDs changes from two to one, indicat-
ing the change. The LO-level setting will turn
OFF automatically after approximately
45 minutes.
Front Ventilated Seats
If your vehicle is equipped with ventilated
seats, the seat cushion and seat back will
have fans that draw the air from the passen-
ger compartment and move air through fine
GETTING TO KNOW YOUR VEHICLE
26
Page 29 of 368
perforations in the seat cover to help keep the
driver and front passenger cooler in higher
ambient temperatures. The fans operate at
two speeds, HI and LO.
The front ventilated seats control buttons are
located within the Uconnect system. You can
gain access to the control buttons through
the climate screen or the controls screen.
• Press the ventilated seat button
once
to choose HI.
• Press the ventilated seat button
a
second time to choose LO.
• Press the ventilated seat button
a third
time to turn the ventilated seat OFF.
NOTE:
The engine must be running for the ventilated
seats to operate.
Vehicles Equipped With Remote Start
On models that are equipped with remote
start, the ventilated seats can be pro-
grammed to come on during a remote start.
This feature can be programmed through the
Uconnect system. Refer to your Owner's
Manual for further details.
HEAD RESTRAINTS
Head restraints are designed to reduce the
risk of injury by restricting head movement in
the event of a rear impact. Head restraints
should be adjusted so that the top of the head
restraint is located above the top of your ear.
WARNING!
• All occupants, including the driver,
should not operate a vehicle or sit in a
vehicle’s seat until the head restraints
are placed in their proper positions in
order to minimize the risk of neck injury
in the event of a crash.
• Head restraints should never be ad-
justed while the vehicle is in motion.
Driving a vehicle with the head restraints
improperly adjusted or removed could
cause serious injury or death in the event
of a collision.
Front Adjustment
Active Head Restraints are passive, deploy-
able components, and vehicles with this
equipment cannot be readily identified by
any markings, only through visual inspection
of the head restraint. The Active Head Re-
straints (AHR) will be split in two halves, with
the front half being soft foam and trim, the
back half being decorative plastic.
When AHRs deploy during a rear impact, the
front half of the head restraint extends for-
ward to minimize the gap between the back of
the occupant’s head and the AHR. This sys-
tem is designed to help prevent or reduce the
extent of injuries to the driver and front pas-
senger in certain types of rear impacts. Refer
to “Occupant Restraint Systems” in “Safety”
in your Owner’s Manual for further informa-
tion.
27
Page 30 of 368
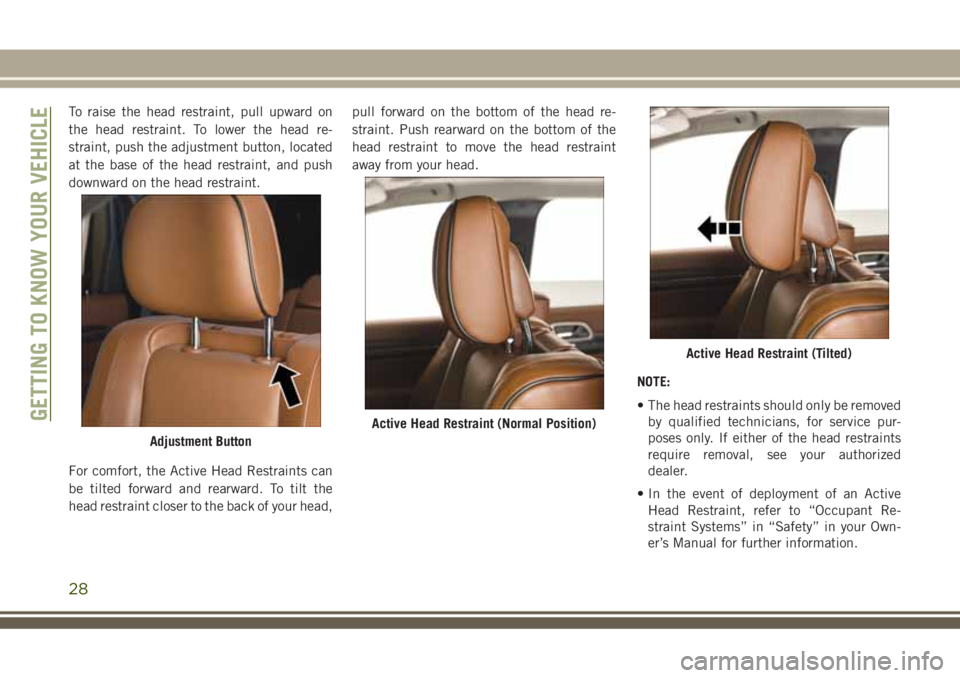
To raise the head restraint, pull upward on
the head restraint. To lower the head re-
straint, push the adjustment button, located
at the base of the head restraint, and push
downward on the head restraint.
For comfort, the Active Head Restraints can
be tilted forward and rearward. To tilt the
head restraint closer to the back of your head,pull forward on the bottom of the head re-
straint. Push rearward on the bottom of the
head restraint to move the head restraint
away from your head.
NOTE:
• The head restraints should only be removed
by qualified technicians, for service pur-
poses only. If either of the head restraints
require removal, see your authorized
dealer.
• In the event of deployment of an Active
Head Restraint, refer to “Occupant Re-
straint Systems” in “Safety” in your Own-
er’s Manual for further information.
Adjustment Button
Active Head Restraint (Normal Position)
Active Head Restraint (Tilted)
GETTING TO KNOW YOUR VEHICLE
28