JEEP GRAND CHEROKEE 2018 Owner handbook (in English)
Manufacturer: JEEP, Model Year: 2018, Model line: GRAND CHEROKEE, Model: JEEP GRAND CHEROKEE 2018Pages: 368, PDF Size: 5.72 MB
Page 51 of 368
WINDOWS
Power Window Controls
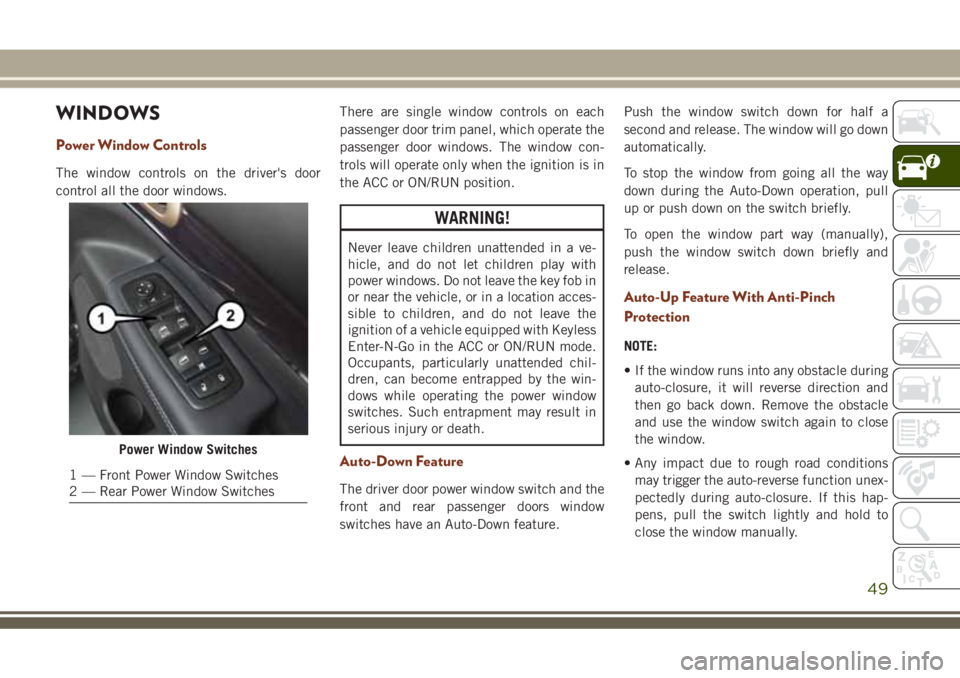
The window controls on the driver's door
control all the door windows.There are single window controls on each
passenger door trim panel, which operate the
passenger door windows. The window con-
trols will operate only when the ignition is in
the ACC or ON/RUN position.
WARNING!
Never leave children unattended in a ve-
hicle, and do not let children play with
power windows. Do not leave the key fob in
or near the vehicle, or in a location acces-
sible to children, and do not leave the
ignition of a vehicle equipped with Keyless
Enter-N-Go in the ACC or ON/RUN mode.
Occupants, particularly unattended chil-
dren, can become entrapped by the win-
dows while operating the power window
switches. Such entrapment may result in
serious injury or death.
Auto-Down Feature
The driver door power window switch and the
front and rear passenger doors window
switches have an Auto-Down feature.Push the window switch down for half a
second and release. The window will go down
automatically.
To stop the window from going all the way
down during the Auto-Down operation, pull
up or push down on the switch briefly.
To open the window part way (manually),
push the window switch down briefly and
release.
Auto-Up Feature With Anti-Pinch
Protection
NOTE:
• If the window runs into any obstacle during
auto-closure, it will reverse direction and
then go back down. Remove the obstacle
and use the window switch again to close
the window.
• Any impact due to rough road conditions
may trigger the auto-reverse function unex-
pectedly during auto-closure. If this hap-
pens, pull the switch lightly and hold to
close the window manually.
Power Window Switches
1 — Front Power Window Switches
2 — Rear Power Window Switches
49
Page 52 of 368
WARNING!
There is no anti-pinch protection when the
window is almost closed. To avoid personal
injury be sure to clear your arms, hands,
fingers and all objects from the window
path before closing.
Reset Auto-Up
Should the Auto-Up feature stop working, the
window probably needs to be reset. To reset
Auto-Up:
1. Pull the window switch up to close the
window completely and continue to hold
the switch up for an additional two sec-
onds after the window is closed.
2. Push the window switch down firmly to
open the window completely and continue
to hold the switch down for an additional
two seconds after the window is fully
open.
Window Lockout Switch
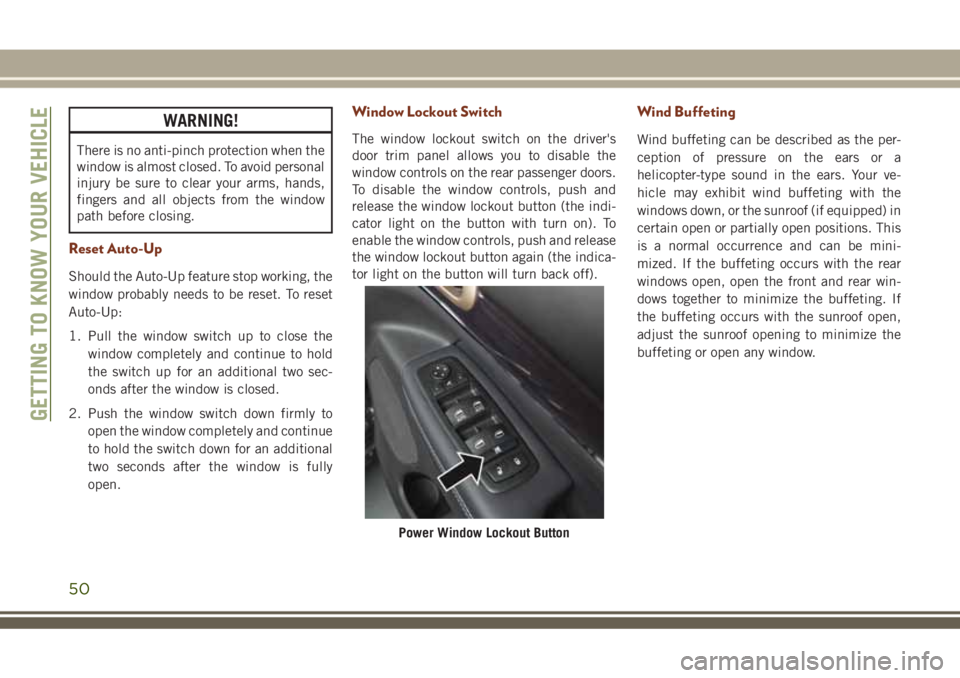
The window lockout switch on the driver's
door trim panel allows you to disable the
window controls on the rear passenger doors.
To disable the window controls, push and
release the window lockout button (the indi-
cator light on the button with turn on). To
enable the window controls, push and release
the window lockout button again (the indica-
tor light on the button will turn back off).
Wind Buffeting
Wind buffeting can be described as the per-
ception of pressure on the ears or a
helicopter-type sound in the ears. Your ve-
hicle may exhibit wind buffeting with the
windows down, or the sunroof (if equipped) in
certain open or partially open positions. This
is a normal occurrence and can be mini-
mized. If the buffeting occurs with the rear
windows open, open the front and rear win-
dows together to minimize the buffeting. If
the buffeting occurs with the sunroof open,
adjust the sunroof opening to minimize the
buffeting or open any window.
Power Window Lockout Button
GETTING TO KNOW YOUR VEHICLE
50
Page 53 of 368
POWER SUNROOF
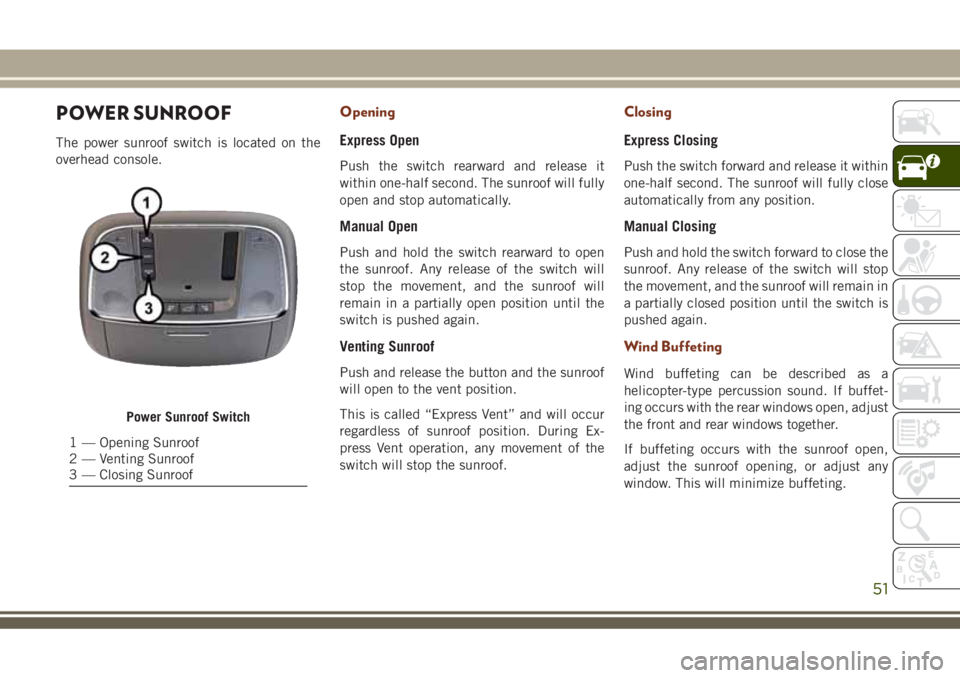
The power sunroof switch is located on the
overhead console.
Opening
Express Open
Push the switch rearward and release it
within one-half second. The sunroof will fully
open and stop automatically.
Manual Open
Push and hold the switch rearward to open
the sunroof. Any release of the switch will
stop the movement, and the sunroof will
remain in a partially open position until the
switch is pushed again.
Venting Sunroof
Push and release the button and the sunroof
will open to the vent position.
This is called “Express Vent” and will occur
regardless of sunroof position. During Ex-
press Vent operation, any movement of the
switch will stop the sunroof.
Closing
Express Closing
Push the switch forward and release it within
one-half second. The sunroof will fully close
automatically from any position.
Manual Closing
Push and hold the switch forward to close the
sunroof. Any release of the switch will stop
the movement, and the sunroof will remain in
a partially closed position until the switch is
pushed again.
Wind Buffeting
Wind buffeting can be described as a
helicopter-type percussion sound. If buffet-
ing occurs with the rear windows open, adjust
the front and rear windows together.
If buffeting occurs with the sunroof open,
adjust the sunroof opening, or adjust any
window. This will minimize buffeting.
Power Sunroof Switch
1 — Opening Sunroof
2 — Venting Sunroof
3 — Closing Sunroof
51
Page 54 of 368
Anti-Pinch Safety Device
This feature will detect an obstruction in the
opening of the sunroof during Express Close
operation. If an obstruction in the path of the
sunroof is detected, the sunroof will auto-
matically retract. Remove the obstruction if
this occurs. Next, push the switch forward
and release to Express Close.
NOTE:
If three consecutive sunroof close attempts
result in Pinch Protect reversals, the fourth
close attempt will be a Manual Close move-
ment with Pinch Protect disabled.
WARNING!
• Do not let children play with the sunroof.
Never leave children unattended in a
vehicle, or with access to an unlocked
vehicle. Do not leave the key fob in or
near the vehicle, and do not leave the
ignition of a vehicle equipped with Key-
less Enter-N-Go in the ACC or ON/RUN
mode. Occupants, particularly unat-
tended children, can become entrapped
by the power sunroof while operating the
WARNING!
power sunroof switch. Such entrapment
may result in serious injury or death.
• In a collision, there is a greater risk of
being thrown from a vehicle with an
open sunroof. You could also be severely
injured or killed. Always fasten your seat
belt properly and make sure all passen-
gers are properly secured.
• Do not allow small children to operate
the sunroof. Never allow your fingers,
other body parts, or any object to project
through the sunroof opening. Injury may
result.
COMMANDVIEW SUNROOF
WITH POWER SHADE
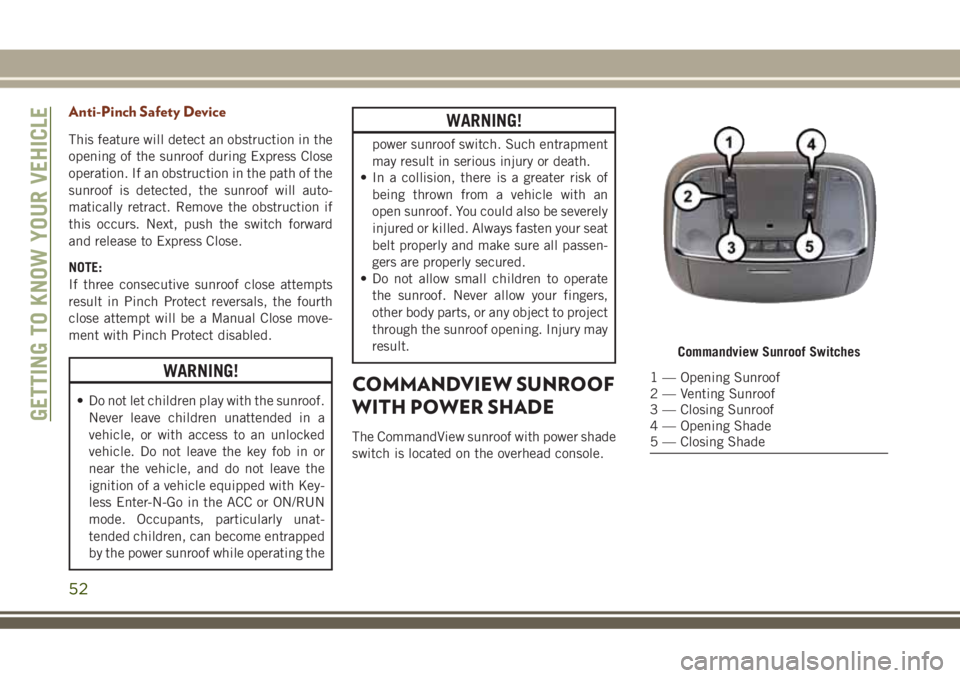
The CommandView sunroof with power shade
switch is located on the overhead console.
Commandview Sunroof Switches
1 — Opening Sunroof
2 — Venting Sunroof
3 — Closing Sunroof
4 — Opening Shade
5 — Closing Shade
GETTING TO KNOW YOUR VEHICLE
52
Page 55 of 368
Opening Power Shade
Express Open
Push the shade switch rearward and release it
within one-half second and the shade will
automatically open to the halfway position
and stop automatically.
Push the switch a second time from the
halfway position and the shade will automati-
cally open to the full open position and stop
automatically.
Manual Open
To open the shade, push and hold the switch
rearward. The shade will open and stop auto-
matically at the half-open position.
Push and hold the shade switch rearward
again and the shade will open automatically
to the full-open position.
NOTE:
Any release of the switch will stop the move-
ment and the shade will remain in a partially
opened condition until the switch is pushed
and held rearward again.
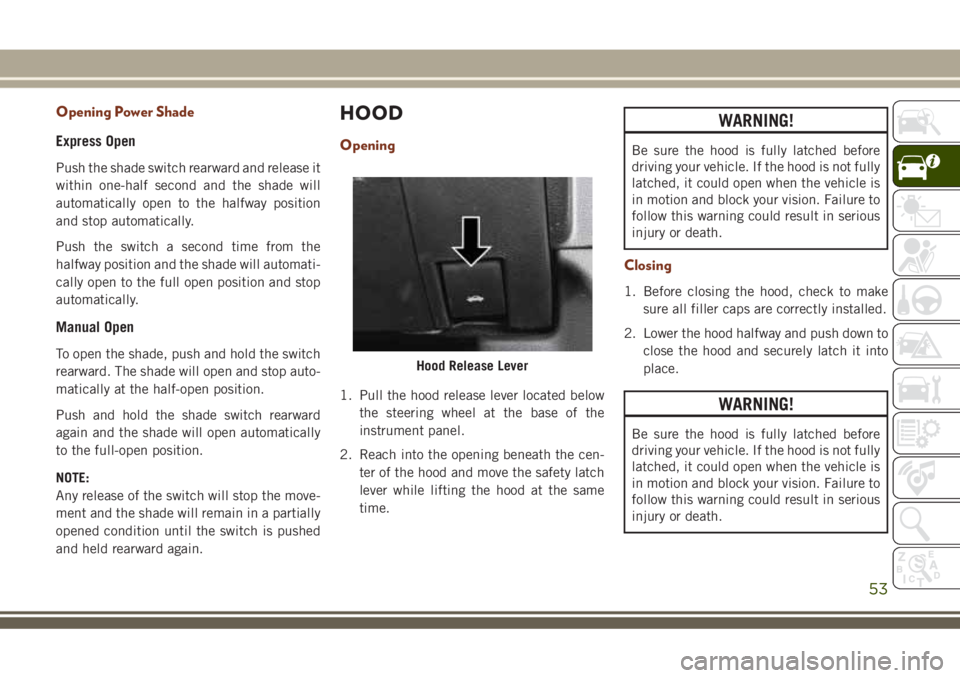
HOOD
Opening
1. Pull the hood release lever located below
the steering wheel at the base of the
instrument panel.
2. Reach into the opening beneath the cen-
ter of the hood and move the safety latch
lever while lifting the hood at the same
time.
WARNING!
Be sure the hood is fully latched before
driving your vehicle. If the hood is not fully
latched, it could open when the vehicle is
in motion and block your vision. Failure to
follow this warning could result in serious
injury or death.
Closing
1. Before closing the hood, check to make
sure all filler caps are correctly installed.
2. Lower the hood halfway and push down to
close the hood and securely latch it into
place.
WARNING!
Be sure the hood is fully latched before
driving your vehicle. If the hood is not fully
latched, it could open when the vehicle is
in motion and block your vision. Failure to
follow this warning could result in serious
injury or death.
Hood Release Lever
53
Page 56 of 368
CAUTION!
To prevent possible damage, do not slam
the hood to close it. Use a firm downward
push at the front center of the hood to
ensure that both latches engage.
LIFTGATE
Opening
The liftgate can be opened from inside the
vehicle using the power liftgate button on the
overhead console, using the key fob outside
of the vehicle or the electronic liftgate re-
lease.
To Unlock/Enter The Liftgate
The liftgate may be released in several ways:
• Key fob
• Outside handle
• Button on overhead consoleThe liftgate passive entry unlock feature is
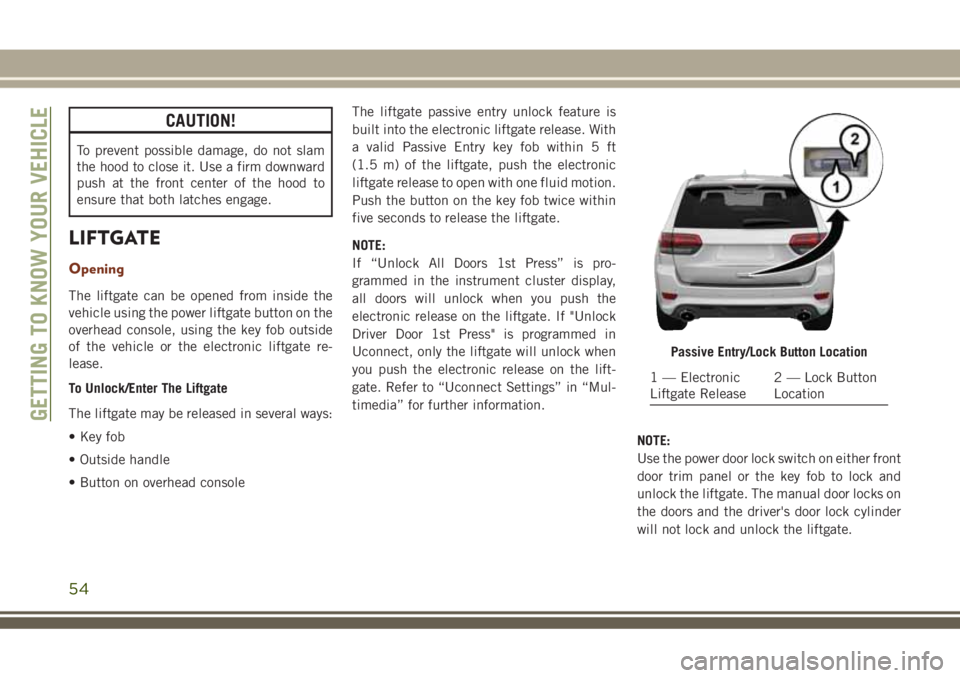
built into the electronic liftgate release. With
a valid Passive Entry key fob within 5 ft
(1.5 m) of the liftgate, push the electronic
liftgate release to open with one fluid motion.
Push the button on the key fob twice within
five seconds to release the liftgate.
NOTE:
If “Unlock All Doors 1st Press” is pro-
grammed in the instrument cluster display,
all doors will unlock when you push the
electronic release on the liftgate. If "Unlock
Driver Door 1st Press" is programmed in
Uconnect, only the liftgate will unlock when
you push the electronic release on the lift-
gate. Refer to “Uconnect Settings” in “Mul-
timedia” for further information.
NOTE:
Use the power door lock switch on either front
door trim panel or the key fob to lock and
unlock the liftgate. The manual door locks on
the doors and the driver's door lock cylinder
will not lock and unlock the liftgate.
Passive Entry/Lock Button Location
1 — Electronic
Liftgate Release2 — Lock Button
Location
GETTING TO KNOW YOUR VEHICLE
54
Page 57 of 368
WARNING!
Driving with the liftgate open can allow
poisonous exhaust gases into your vehicle.
You and your passengers could be injured
by these fumes. Keep the liftgate closed
when you are operating the vehicle.
Closing
Grasp the liftgate closing handle and initiate
lowering the liftgate. Release the handle
when the liftgate takes over the closing effort.
To Lock The Liftgate
With a valid Passive Entry key fob within 5 ft
(1.5 m) of the liftgate, pushing the Keyless
Enter-N-Go — Passive Entry lock button lo-
cated to the left of the outside handle release
will lock the vehicle.
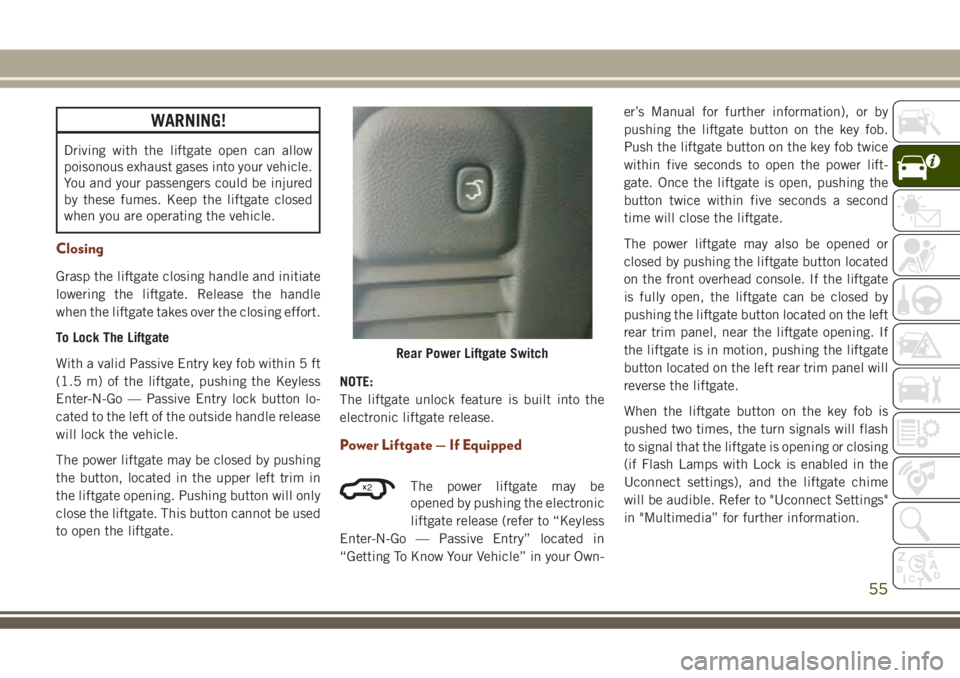
The power liftgate may be closed by pushing
the button, located in the upper left trim in
the liftgate opening. Pushing button will only
close the liftgate. This button cannot be used
to open the liftgate.NOTE:
The liftgate unlock feature is built into the
electronic liftgate release.
Power Liftgate — If Equipped
The power liftgate may be
opened by pushing the electronic
liftgate release (refer to “Keyless
Enter-N-Go — Passive Entry” located in
“Getting To Know Your Vehicle” in your Own-er’s Manual for further information), or by
pushing the liftgate button on the key fob.
Push the liftgate button on the key fob twice
within five seconds to open the power lift-
gate. Once the liftgate is open, pushing the
button twice within five seconds a second
time will close the liftgate.
The power liftgate may also be opened or
closed by pushing the liftgate button located
on the front overhead console. If the liftgate
is fully open, the liftgate can be closed by
pushing the liftgate button located on the left
rear trim panel, near the liftgate opening. If
the liftgate is in motion, pushing the liftgate
button located on the left rear trim panel will
reverse the liftgate.
When the liftgate button on the key fob is
pushed two times, the turn signals will flash
to signal that the liftgate is opening or closing
(if Flash Lamps with Lock is enabled in the
Uconnect settings), and the liftgate chime
will be audible. Refer to "Uconnect Settings"
in "Multimedia” for further information.
Rear Power Liftgate Switch
2
55
Page 58 of 368
NOTE:
• In the event of a power malfunction to the
liftgate, an emergency liftgate latch release
can be used to open the liftgate. The emer-
gency liftgate latch release can be ac-
cessed through a snap-in cover located on
the liftgate trim panel.
• If liftgate is left open for an extended pe-
riod of time, the liftgate may need to be
closed manually to reset power liftgate
functionality.
WARNING!
During power operation, personal injury or
cargo damage may occur. Ensure the lift-
gate travel path is clear. Make sure the
liftgate is closed and latched before driv-
ing away.
NOTE:
• The power liftgate buttons will not operate
if the vehicle is in gear or the vehicle speed
is above 0 MPH (0 km/h).• The power liftgate will not operate in tem-
peratures below −22°F (−30°C) or tem-
peratures above 150° F (65° C). Be sure to
remove any buildup of snow or ice from the
liftgate before pushing any of the power
liftgate switches.
• If anything obstructs the power liftgate
while it is closing or opening, the liftgate
will automatically reverse to the closed or
open position, provided it meets sufficient
resistance.
• There are also pinch sensors attached to
the side of the liftgate. Light pressure any-
where along these strips will cause the
liftgate to return to the open position.
• If the liftgate is not fully open, push the
liftgate button on the key fob twice to
operate the liftgate.
• If the electronic liftgate release is pushed
while the power liftgate is closing, the lift-
gate will reverse to the full open position.
• If the electronic liftgate release is pushed
while the power liftgate is opening, the
liftgate motor will disengage to allow
manual operation.• If the power liftgate encounters multiple
obstructions within the same cycle, the
system will automatically stop and the lift-
gate must be opened or closed manually.
WARNING!
• Driving with the liftgate open can allow
poisonous exhaust gases into your ve-
hicle. You and your passengers could be
injured by these fumes. Keep the liftgate
closed when you are operating the ve-
hicle.
• If you are required to drive with the
liftgate open, make sure that all win-
dows are closed, and the climate control
blower switch is set at high speed. Do
not use the recirculation mode.
GETTING TO KNOW YOUR VEHICLE
56
Page 59 of 368
INTERNAL EQUIPMENT
Power Outlets
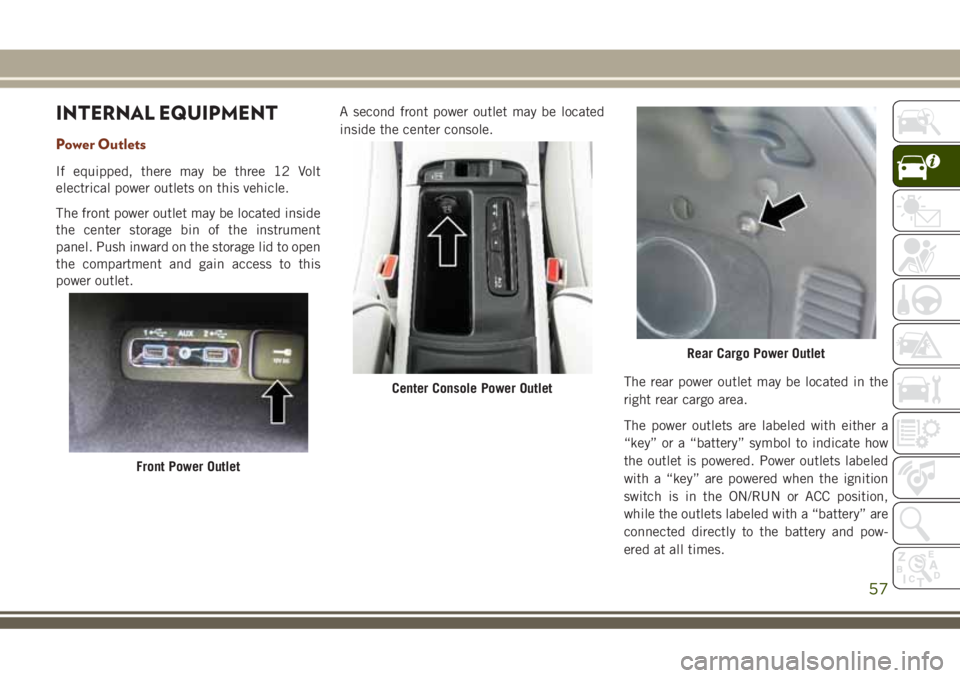
If equipped, there may be three 12 Volt
electrical power outlets on this vehicle.
The front power outlet may be located inside
the center storage bin of the instrument
panel. Push inward on the storage lid to open
the compartment and gain access to this
power outlet.A second front power outlet may be located
inside the center console.
The rear power outlet may be located in the
right rear cargo area.
The power outlets are labeled with either a
“key” or a “battery” symbol to indicate how
the outlet is powered. Power outlets labeled
with a “key” are powered when the ignition
switch is in the ON/RUN or ACC position,
while the outlets labeled with a “battery” are
connected directly to the battery and pow-
ered at all times.
Front Power Outlet
Center Console Power Outlet
Rear Cargo Power Outlet
57
Page 60 of 368
NOTE:
• Do not exceed the maximum power of
160 Watts (13 Amps) at 12 Volts. If the
160 Watt (13 Amp) power rating is ex-
ceeded, the fuse protecting the system will
need to be replaced.
• Power outlets are designed for accessory
plugs only. Do not insert any other object in
the power outlet as this will damage the
outlet and blow the fuse. Improper use of
the power outlet can cause damage not
covered by your new vehicle warranty.
• The rear cargo power outlet can be
switched to “battery” powered all the time
by switching the power outlet right rear
quarter panel fuse in the fuse panel.
GETTING TO KNOW YOUR VEHICLE
58