Ignition switch JEEP GRAND CHEROKEE 2020 Owner handbook (in English)
[x] Cancel search | Manufacturer: JEEP, Model Year: 2020, Model line: GRAND CHEROKEE, Model: JEEP GRAND CHEROKEE 2020Pages: 378, PDF Size: 6.88 MB
Page 28 of 378
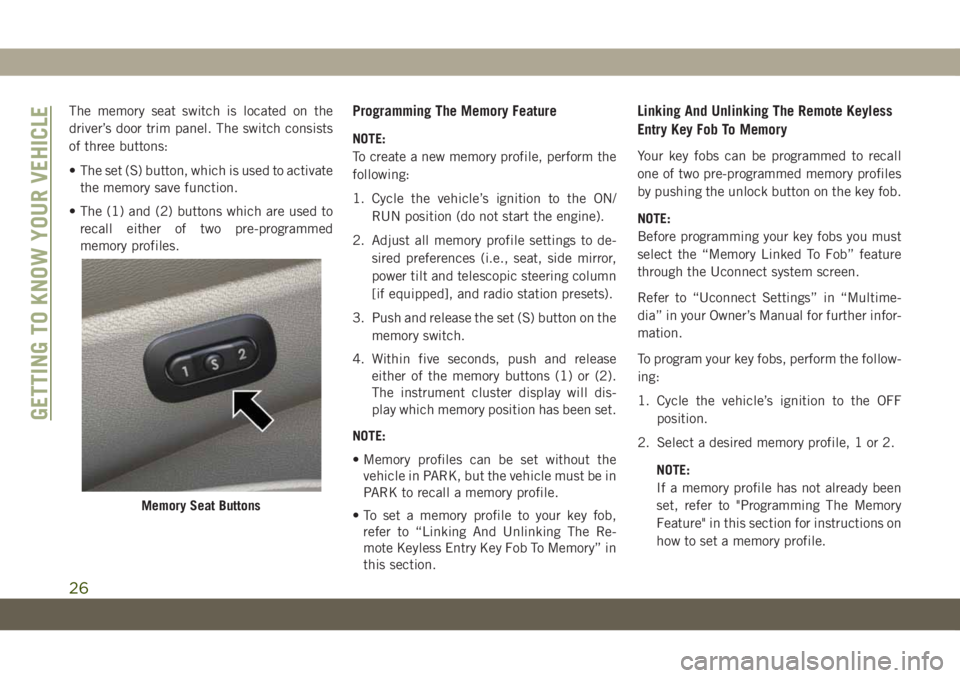
The memory seat switch is located on the
driver’s door trim panel. The switch consists
of three buttons:
• The set (S) button, which is used to activate
the memory save function.
• The (1) and (2) buttons which are used to
recall either of two pre-programmed
memory profiles.Programming The Memory Feature
NOTE:
To create a new memory profile, perform the
following:
1. Cycle the vehicle’s ignition to the ON/
RUN position (do not start the engine).
2. Adjust all memory profile settings to de-
sired preferences (i.e., seat, side mirror,
power tilt and telescopic steering column
[if equipped], and radio station presets).
3. Push and release the set (S) button on the
memory switch.
4. Within five seconds, push and release
either of the memory buttons (1) or (2).
The instrument cluster display will dis-
play which memory position has been set.
NOTE:
• Memory profiles can be set without the
vehicle in PARK, but the vehicle must be in
PARK to recall a memory profile.
• To set a memory profile to your key fob,
refer to “Linking And Unlinking The Re-
mote Keyless Entry Key Fob To Memory” in
this section.
Linking And Unlinking The Remote Keyless
Entry Key Fob To Memory
Your key fobs can be programmed to recall
one of two pre-programmed memory profiles
by pushing the unlock button on the key fob.
NOTE:
Before programming your key fobs you must
select the “Memory Linked To Fob” feature
through the Uconnect system screen.
Refer to “Uconnect Settings” in “Multime-
dia” in your Owner’s Manual for further infor-
mation.
To program your key fobs, perform the follow-
ing:
1. Cycle the vehicle’s ignition to the OFF
position.
2. Select a desired memory profile, 1 or 2.
NOTE:
If a memory profile has not already been
set, refer to "Programming The Memory
Feature" in this section for instructions on
how to set a memory profile.
Memory Seat Buttons
GETTING TO KNOW YOUR VEHICLE
26
Page 29 of 378
3. Once the profile has been recalled, push
and release the set (S) button on the
memory switch.
4. Within five seconds, push and release
button (1) or (2) accordingly. “Memory
Profile Set” (1 or 2) will display in the
instrument cluster.
5. Push and release the lock button on the
key fob within 10 seconds.
NOTE:
Your key fobs can be unlinked to your memory
settings by pushing the set (S) button, and
within 10 seconds, followed by pushing the
unlock button on the key fob.
Memory Position Recall
NOTE:
The vehicle must be in PARK to recall
memory positions. If a recall is attempted
when the vehicle is not in PARK, a message
will be displayed in the instrument cluster
display.Driver One Memory Position Recall
• To recall the memory settings for driver one
using the memory switch, push memory
button (1) on the memory switch.
• To recall the memory settings for driver one
using the key fob, push the unlock button
on the key fob linked to memory position 1.
Driver Two Memory Position Recall
• To recall the memory setting for driver two
using the memory switch, push memory
button (2) on the memory switch.
• To recall the memory settings for driver two
using the key fob, push the unlock button
on the key fob linked to memory position 2.
A recall can be canceled by pushing any of
the memory buttons during a recall (S, 1, or
2), or by pushing any of the seat adjustment
switches. When a recall is canceled, the driv-
er's seat and steering column (if equipped)
stop moving. A delay of one second will occur
before another recall can be selected.
Easy Entry/Exit Seat
This feature provides automatic driver seat
positioning to enhance driver mobility when
entering and exiting the vehicle.
The distance the driver seat moves depends
on where you have the driver seat positioned
when you cycle the vehicle’s ignition to the
OFF position.
• When you cycle the vehicle’s ignition to the
OFF position, the driver seat will move
about 2.4 inches (60 mm) rearward if the
driver seat position is greater than or equal
to 2.7 inches (67.7 mm) forward of the rear
stop. The seat will return to its previously
set position when you cycle the vehicle’s
ignition to the ACC or RUN position.
• The Easy Entry/Easy Exit feature is disabled
when the driver seat position is less than
0.9 of an inch (22.7 mm) forward of the
rear stop. At this position, there is no ben-
efit to the driver by moving the seat for Easy
Exit or Easy Entry.
Each stored memory setting will have an
associated Easy Entry and Easy Exit position.
27
Page 37 of 378
NOTE:
The engine must be running for the heated
steering wheel to operate.
Vehicles Equipped With Remote Start
On models that are equipped with remote
start, the heated steering wheel can be pro-
grammed to come on during a remote start.
This feature can be programmed through the
Uconnect system. Refer to “Uconnect Set-
tings” in “Multimedia” in your Owner’s
Manual for further information.
WARNING!
• Persons who are unable to feel pain to
the skin because of advanced age,
chronic illness, diabetes, spinal cord in-
jury, medication, alcohol use, exhaus-
tion, or other physical conditions must
exercise care when using the steering
wheel heater. It may cause burns even at
low temperatures, especially if used for
long periods.
WARNING!
• Do not place anything on the steering
wheel that insulates against heat, such
as a blanket or steering wheel covers of
any type and material. This may cause
the steering wheel heater to overheat.
MIRRORS
Power Folding Outside Mirrors — If
Equipped
If equipped with power folding mirrors, they
can be electrically folded rearward and un-
folded into the drive position.
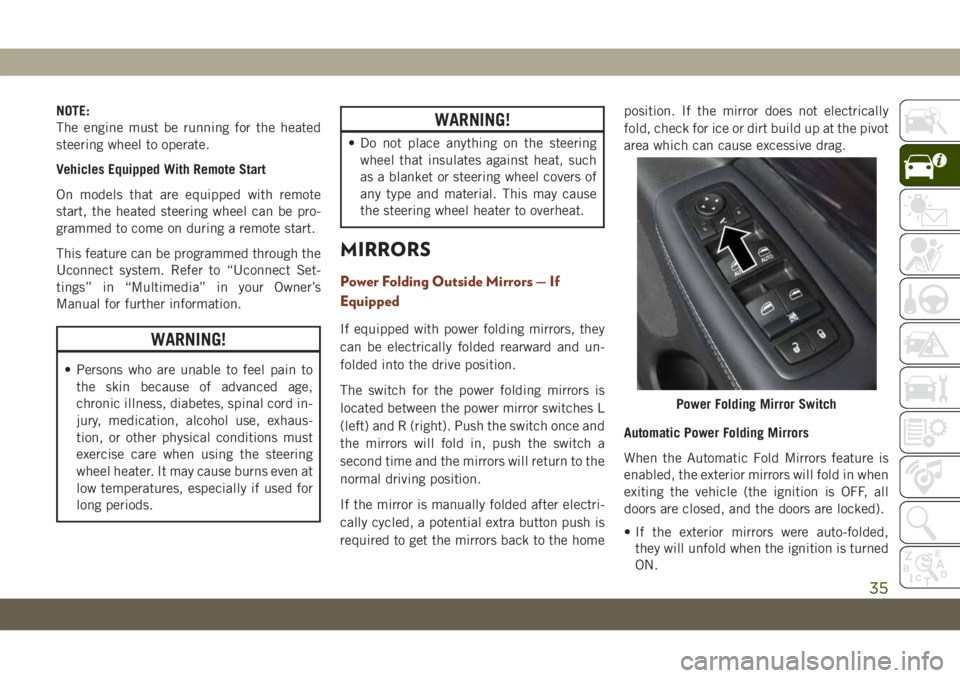
The switch for the power folding mirrors is
located between the power mirror switches L
(left) and R (right). Push the switch once and
the mirrors will fold in, push the switch a
second time and the mirrors will return to the
normal driving position.
If the mirror is manually folded after electri-
cally cycled, a potential extra button push is
required to get the mirrors back to the homeposition. If the mirror does not electrically
fold, check for ice or dirt build up at the pivot
area which can cause excessive drag.
Automatic Power Folding Mirrors
When the Automatic Fold Mirrors feature is
enabled, the exterior mirrors will fold in when
exiting the vehicle (the ignition is OFF, all
doors are closed, and the doors are locked).
• If the exterior mirrors were auto-folded,
they will unfold when the ignition is turned
ON.
Power Folding Mirror Switch
35
Page 40 of 378
The lights will remain on until the ignition is
switched to the OFF or ACC position or the
parking brake is engaged.
NOTE:
• If a turn signal is activated, the DRL lamp
on the same side of the vehicle will turn off
for the duration of the turn signal activa-
tion. Once the turn signal is no longer
active, the DRL lamp will illuminate.
• The DRL function may be disabled through
the Uconnect system. Refer to “Uconnect
Settings” in “Multimedia” in the Owner’s
Manual for further information.
SRT Vehicles
The Daytime Running Lights (bright inten-
sity) come on whenever the engine is run-
ning, and the transmission is not in the PARK
position. The lights will remain on until the
ignition is switched to the OFF or ACC posi-
tion or the parking brake is engaged.
The headlight switch must be used for normal
nighttime driving.High/Low Beam Switch
Push the multifunction lever toward the in-
strument panel to switch the headlights to
high beams. Pulling the multifunction back
toward the steering wheel will turn the low
beams back on, or shut the high beams off.
Automatic High Beam — If Equipped
The Automatic High Beam Headlamp Control
system provides increased forward lighting at
night by automating high beam control
through the use of a digital camera mounted
on the inside rearview mirror. This camera
detects vehicle specific light and automati-
cally switches from high beams to low beams
until the approaching vehicle is out of view.
NOTE:
• The Automatic High Beam Headlamp Con-
trol can be turned on or off by selecting
“ON” under “Auto High Beam” within your
Uconnect settings, as well as turning the
headlight switch to the AUTO position. Re-
fer to “Uconnect Settings” in “Multime-
dia” in the Owner’s Manual for further in-
formation.• Broken, muddy, or obstructed headlights
and taillights of vehicles in the field of view
will cause headlights to remain on longer
(closer to the vehicle). Also, dirt, film, and
other obstructions on the windshield or
camera lens will cause the system to func-
tion improperly.
If the windshield or Automatic High Beam
Headlamp Control mirror is replaced, the
mirror must be re-aimed to ensure proper
performance. See a local authorized dealer.
Flash-To-Pass
You can signal another vehicle with your
headlights by lightly pulling the multifunc-
tion lever toward you. This will cause the high
beam headlights to turn on, and remain on,
until the lever is released.
Automatic Headlights — If Equipped
This system automatically turns the head-
lights on or off according to ambient light
levels. To turn the system on, rotate the
headlight switch to the A (auto) position.
GETTING TO KNOW YOUR VEHICLE
38
Page 41 of 378
When the system is on, the Headlight Delay
feature is also on. This means the headlights
will stay on for up to 90 seconds after you
turn the ignition switch to the OFF position.
To turn the automatic headlights off, turn the
headlight switch out of the A (auto) position.
NOTE:
The engine must be running before the head-
lights will turn on in the Automatic Mode.
Parking Lights And Panel Lights
To turn on the parking lights and instrument
panel lights, rotate the headlight switch
clockwise. To turn off the parking lights,
rotate the headlight switch back to the O (off)
position.
Headlights On Automatically With
Wipers
If your vehicle is equipped with Automatic
Headlights, it also has this customer-
programmable feature. When your headlights
are in the automatic mode and the engine is
running, they will automatically turn on when
the wiper system is on. This feature is pro-grammable through the Uconnect system
screen. Refer to “Uconnect Settings” in
“Multimedia” in the Owner’s Manual for fur-
ther information.
If your vehicle is equipped with a “Rain
Sensitive Wiper System” and it is activated,
the headlights will automatically turn on after
the wipers complete five wipe cycles within
approximately one minute, and they will turn
off approximately four minutes after the wip-
ers completely stop.
Refer to “Windshield Wipers And Washers” in
“Getting To Know Your Vehicle” for further
information.
NOTE:
When your headlights come on during the
daytime, the instrument panel lights will au-
tomatically dim to the lower nighttime inten-
sity.Adaptive Bi-Xenon High Intensity
Discharge Headlights — If Equipped
This system automatically swivels the head-
light beam pattern horizontally to provide
increased illumination in the direction the
vehicle is steering.NOTE:
• Each time the Adaptive Headlight System
is turned on, the headlights will initialize by
performing a brief sequence of rotations.
• The Adaptive Headlight System is active
only when the vehicle is moving forward.
The Adaptive Headlight System can be
turned on or off using the Uconnect System,
refer to “Uconnect Settings” in “Multime-
dia” in the Owner’s Manual for further infor-
mation.
Headlight Delay
To aid in your exit, your vehicle is equipped
with a headlight delay that will leave the
headlights on for approximately up to 90 sec-
onds. This delay is initiated when the ignition
is turned OFF while the headlight switch is
on, and then the headlight switch is cycled
off. Headlight delay can be cancelled by
either turning the headlight switch on then
off, or by turning the ignition ON.
39
Page 42 of 378
NOTE:
• This feature can be programmed through
the Uconnect system. Refer to “Uconnect
Settings” in “Multimedia” in the Owner’s
Manual for further information.
• The headlight delay feature is automati-
cally activated if the headlight switch is left
in the A (auto) position when the ignition is
placed in the OFF position.
Lights-On Reminder
If the headlights, parking lights, or cargo
lights are left on after the ignition is turned
OFF, a chime will sound when the driver’s
door is opened.
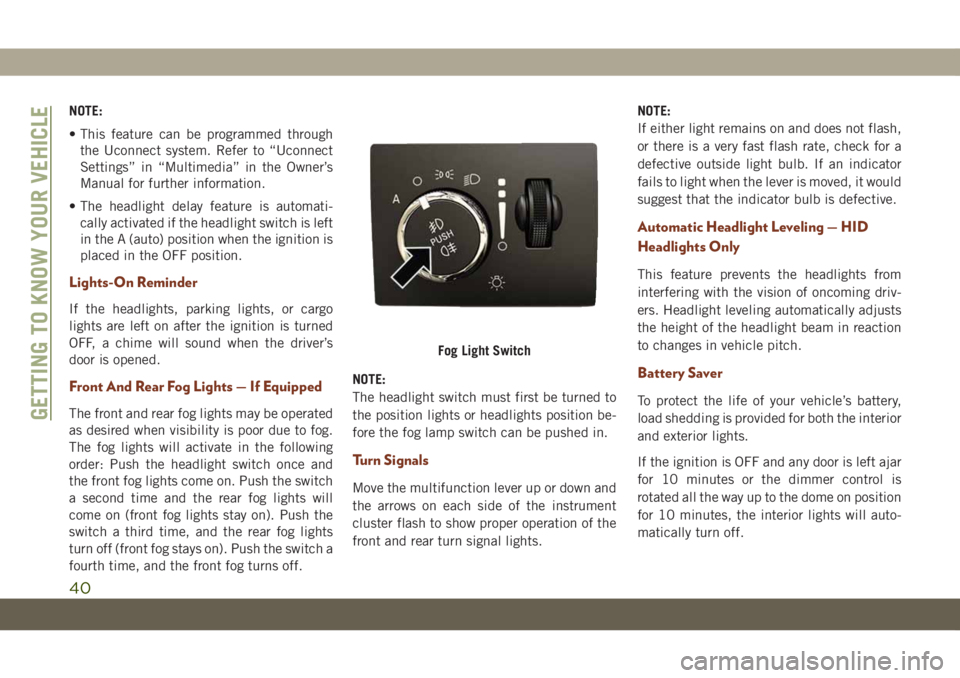
Front And Rear Fog Lights — If Equipped
The front and rear fog lights may be operated
as desired when visibility is poor due to fog.
The fog lights will activate in the following
order: Push the headlight switch once and
the front fog lights come on. Push the switch
a second time and the rear fog lights will
come on (front fog lights stay on). Push the
switch a third time, and the rear fog lights
turn off (front fog stays on). Push the switch a
fourth time, and the front fog turns off.NOTE:
The headlight switch must first be turned to
the position lights or headlights position be-
fore the fog lamp switch can be pushed in.
Turn Signals
Move the multifunction lever up or down and
the arrows on each side of the instrument
cluster flash to show proper operation of the
front and rear turn signal lights.NOTE:
If either light remains on and does not flash,
or there is a very fast flash rate, check for a
defective outside light bulb. If an indicator
fails to light when the lever is moved, it would
suggest that the indicator bulb is defective.
Automatic Headlight Leveling — HID
Headlights Only
This feature prevents the headlights from
interfering with the vision of oncoming driv-
ers. Headlight leveling automatically adjusts
the height of the headlight beam in reaction
to changes in vehicle pitch.
Battery Saver
To protect the life of your vehicle’s battery,
load shedding is provided for both the interior
and exterior lights.
If the ignition is OFF and any door is left ajar
for 10 minutes or the dimmer control is
rotated all the way up to the dome on position
for 10 minutes, the interior lights will auto-
matically turn off.
Fog Light Switch
GETTING TO KNOW YOUR VEHICLE
40
Page 43 of 378
NOTE:
Battery saver mode is canceled if the ignition
is ON.
If the headlights remain on while the ignition
is cycled OFF, the exterior lights will auto-
matically turn off after eight minutes. If the
headlights are turned on and left on for eight
minutes while the ignition is OFF, the exterior
lights will automatically turn off.
NOTE:
The battery saver mode is canceled if the
ignition is OFF and the headlamp switch is in
the park lamp position. The parking lamps
will remain on and drain the vehicle's battery.
WINDSHIELD WIPERS AND
WASHERS
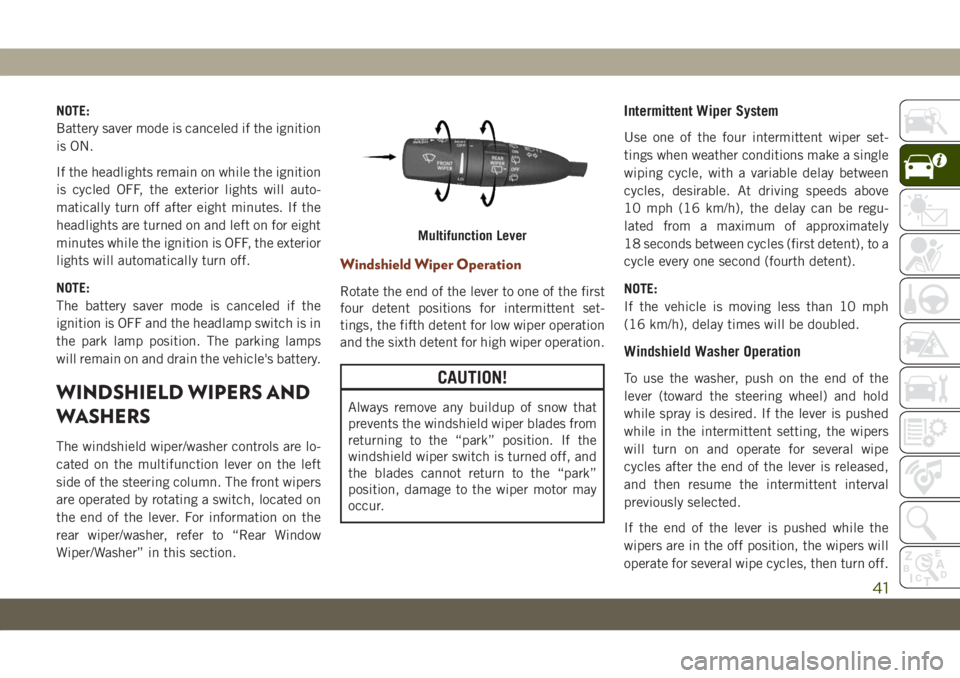
The windshield wiper/washer controls are lo-
cated on the multifunction lever on the left
side of the steering column. The front wipers
are operated by rotating a switch, located on
the end of the lever. For information on the
rear wiper/washer, refer to “Rear Window
Wiper/Washer” in this section.
Windshield Wiper Operation
Rotate the end of the lever to one of the first
four detent positions for intermittent set-
tings, the fifth detent for low wiper operation
and the sixth detent for high wiper operation.
CAUTION!
Always remove any buildup of snow that
prevents the windshield wiper blades from
returning to the “park” position. If the
windshield wiper switch is turned off, and
the blades cannot return to the “park”
position, damage to the wiper motor may
occur.
Intermittent Wiper System
Use one of the four intermittent wiper set-
tings when weather conditions make a single
wiping cycle, with a variable delay between
cycles, desirable. At driving speeds above
10 mph (16 km/h), the delay can be regu-
lated from a maximum of approximately
18 seconds between cycles (first detent), to a
cycle every one second (fourth detent).
NOTE:
If the vehicle is moving less than 10 mph
(16 km/h), delay times will be doubled.
Windshield Washer Operation
To use the washer, push on the end of the
lever (toward the steering wheel) and hold
while spray is desired. If the lever is pushed
while in the intermittent setting, the wipers
will turn on and operate for several wipe
cycles after the end of the lever is released,
and then resume the intermittent interval
previously selected.
If the end of the lever is pushed while the
wipers are in the off position, the wipers will
operate for several wipe cycles, then turn off.
Multifunction Lever
41
Page 45 of 378
The Rain Sensing system has protection fea-
tures for the wiper blades and arms, and will
not operate under the following conditions:
•Low Ambient Temperature— When the igni-
tion is first turned ON, the Rain Sensing
system will not operate until the wiper
switch is moved, vehicle speed is greater
than 3 mph (5 km/h), or the outside tem-
perature is greater than 32°F (0°C).
•Transmission In NEUTRAL Position— When
the ignition is ON, and the automatic trans-
mission is in the NEUTRAL position, the
Rain Sensing system will not operate until
the wiper switch is moved, vehicle speed is
greater than 3 mph (5 km/h), or the gear
selector is moved out of the NEUTRAL
position.
Rear Window Wiper/Washer
The rear wiper/washer controls are located on
the multifunction lever on the left side of the
steering column. The rear wiper/washer is
operated by rotating a switch, located at the
middle of the lever.Rotate the center portion of the lever upward
to the first detent for intermittent operation
and to the second detent for continuous rear
wiper operation.
Rotating the center portion upward once
more will activate the washer pump which
will continue to operate as long as the switch
is held. Upon release of the switch, the wip-
ers will resume the continuous rear wiper
operation. When this rotary control is in the
OFF position, rotating it downward will acti-
vate the rear washer pump which will con-
tinue to operate as long as the switch is held.
Once the switch is released it will return to
the OFF position and the wipers will cycle
several times before returning to the parked
position.
NOTE:
As a protective measure, the pump will stop if
the switch is held for more than 20 seconds.
Once the switch is released the pump will
resume normal operation.
If the rear wiper is operating when the igni-
tion is turned OFF, the wiper will automati-
cally return to the “park” position.
CLIMATE CONTROLS
The Climate Control System allows you to
regulate the temperature, air flow, and direc-
tion of air circulating throughout the vehicle.
The controls are located on the touchscreen
(if equipped) and on the instrument panel
below the radio.
43
Page 54 of 378
Cabin Air Filter
The climate control system filters out dust
and pollen from the air. Contact an autho-
rized dealer to service your cabin air filter,
and to have it replaced when needed.
WINDOWS
Power Window Controls
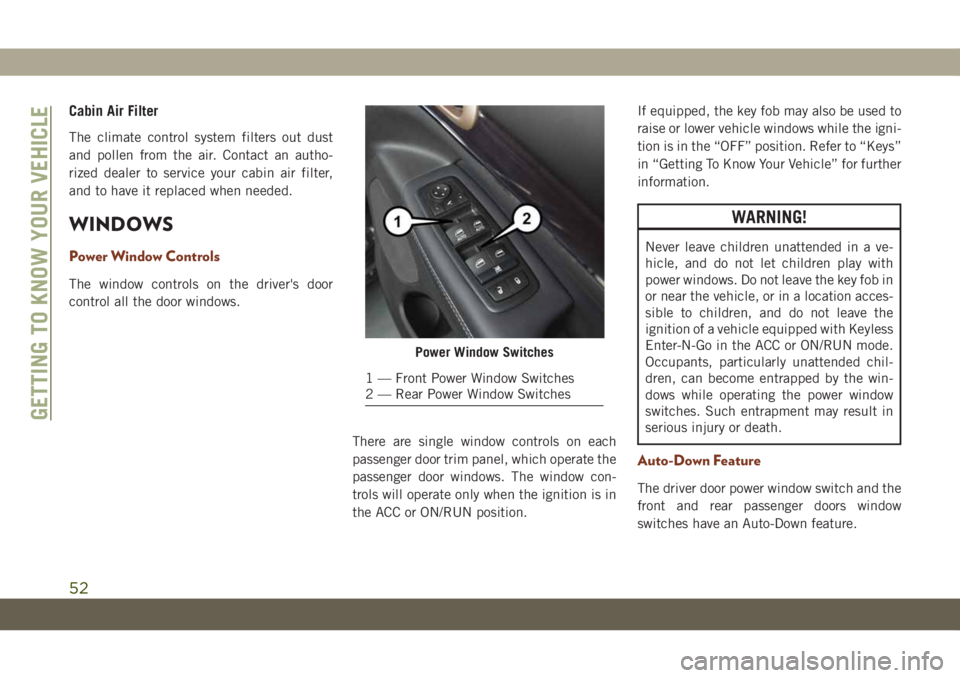
The window controls on the driver's door
control all the door windows.
There are single window controls on each
passenger door trim panel, which operate the
passenger door windows. The window con-
trols will operate only when the ignition is in
the ACC or ON/RUN position.If equipped, the key fob may also be used to
raise or lower vehicle windows while the igni-
tion is in the “OFF” position. Refer to “Keys”
in “Getting To Know Your Vehicle” for further
information.
WARNING!
Never leave children unattended in a ve-
hicle, and do not let children play with
power windows. Do not leave the key fob in
or near the vehicle, or in a location acces-
sible to children, and do not leave the
ignition of a vehicle equipped with Keyless
Enter-N-Go in the ACC or ON/RUN mode.
Occupants, particularly unattended chil-
dren, can become entrapped by the win-
dows while operating the power window
switches. Such entrapment may result in
serious injury or death.
Auto-Down Feature
The driver door power window switch and the
front and rear passenger doors window
switches have an Auto-Down feature.
Power Window Switches
1 — Front Power Window Switches
2 — Rear Power Window Switches
GETTING TO KNOW YOUR VEHICLE
52
Page 57 of 378
will close fully and stop automatically. This is
called “Express Close”. During Express Close
operation, any other actuation of the switch
will stop the sunroof.
Manual
To close the sunroof, push and hold the
switch in the forward position. Any release of
the switch will stop the movement and the
sunroof will remain in a partially closed con-
dition until the sunroof switch is pushed
again.
Sunshade Operation
The sunshade can be opened manually. How-
ever, the sunshade will open automatically as
the sunroof opens.
NOTE:
The sunshade cannot be closed if the sunroof
is open.
Pinch Protect Feature
This feature will detect an obstruction in the
closing of the sunroof during the Express
Close operation. If an obstruction in the path
of the sunroof is detected, the sunroof will
automatically retract. Remove the obstruc-
tion if this occurs.
NOTE:
If three consecutive sunroof close attempts
result in Pinch Protect reversals, Pinch Pro-
tect will disable and the sunroof must be
closed in Manual Mode.
Venting Sunroof — Express
Push and release the Vent button within one
half second and the sunroof will open to the
vent position. This is called “Express Vent”
and it will occur regardless of sunroof posi-
tion. During Express Vent operation, any
movement of the switch will stop the sunroof.
Sunroof Maintenance
Use only a non-abrasive cleaner and a soft
cloth to clean the glass panel.
Relearn Procedure
For vehicles equipped with a single-pane
sunroof, there is a relearn procedure that
allows you to reset the sunroof when the
“Express Open” feature stops working. To
reset the sunroof, follow these steps:
1. Set the ignition to the ACC or ON/RUN
position.
2. Make sure that the sunroof is fully closed.
3. Push sunroof switch forward and hold.
The sunroof will close fully then move to
the Vent position after 10 seconds.
4. Release the sunroof switch, then push
forward and hold the switch again within
5 seconds to begin the relearn process.
The sunroof will complete one full cycle
and return to the Fully Closed position.
NOTE:
If the sunroof switch is released anytime
during the relearn cycle, the procedure
will need to be repeated starting from the
first step.
55