height JEEP GRAND CHEROKEE 2023 Owner's Manual
[x] Cancel search | Manufacturer: JEEP, Model Year: 2023, Model line: GRAND CHEROKEE, Model: JEEP GRAND CHEROKEE 2023Pages: 424, PDF Size: 15.48 MB
Page 199 of 424
STARTING AND OPERATING197
Shifting Into Transfer Case N (NEUTRAL)
Use the following procedure to prepare your
vehicle for recreational towing:
1. Bring the vehicle to a complete stop on level
ground, with the engine running.
2. Press and hold the brake pedal.
3. Shift the transmission into NEUTRAL. 4. If vehicle is equipped with Quadra-Lift air
suspension, ensure the vehicle is set to
Normal Ride Height with the Auto Entry/Exit
setting deselected.
NOTE:
Steps 1 through 4 are requirements that
must be met before pushing the N
(NEUTRAL) button, and must continue to be
met until the shift has been completed. If
any of these requirements are not met
before pushing the N (NEUTRAL) button or
are no longer met during the shift, then the
N (NEUTRAL) indicator light will flash contin -
uously until all requirements are met or until
the N (NEUTRAL) button is released.
The ignition must be in the ON/RUN position
for a shift to take place and for the position
indicator lights to be operable. If the ignition
is not in the ON/RUN position, the shift will
not take place and no position indicator
lights will be on or flashing.
A flashing N (NEUTRAL) position indicator
light indicates that shift requirements have
not been met.
CAUTION!
DO NOT dolly tow any 4WD vehicle. Towing
with only one set of wheels on the ground
(front or rear) will cause severe transmission
and/or transfer case damage. Tow with all
four wheels either ON the ground, or OFF the
ground (using a vehicle trailer).
Tow only in a forward direction. Towing this
vehicle backwards can cause severe damage
to the transfer case.
The transmission must be in PARK for recre -
ational towing.
Before recreational towing, perform the proce -
dure outlined under “Shifting into N
(NEUTRAL)” to be certain that the transfer
case is fully in N (NEUTRAL). Otherwise,
internal damage will result.
Towing this vehicle in violation of the above
requirements can cause severe transmission
and/or transfer case damage. Damage from
improper towing is not covered under the New
Vehicle Limited Warranty.
Do not use a bumper-mounted clamp-on tow
bar on your vehicle. The bumper face bar will
be damaged.
WARNING!
You or others could be injured or killed if you
leave the vehicle unattended with the transfer
case in the N (NEUTRAL) position without first
fully engaging the Electric Park Brake. The
transfer case N (NEUTRAL) position disengages
both the front and rear driveshafts from the
powertrain and will allow the vehicle to roll, even
if the transmission is in PARK. The Electric Park
Brake should always be applied when the driver
is not in the vehicle.
CAUTION!
It is necessary to follow these steps to be certain
that the transfer case is fully in N (NEUTRAL)
before recreational towing to prevent damage to
internal parts.
4
23_WL_OM_EN_USC_t.book Page 197
Page 200 of 424
198STARTING AND OPERATING
If the vehicle is equipped with Quadra-Lift
air suspension, the engine should be
started and left running for a minimum of
60 seconds (with all the doors closed) at
least once every 24 hours. This process
allows the air suspension to adjust the
vehicle’s ride height to compensate for
temperature effects.
Engaging/disengaging of the Electric Park
Brake requires the ignition to be in the ON/
RUN position.
If shift conditions/interlocks are not met, a
“4WD Shift Canceled” or a “4WD Shift
Aborted/ Retry Shift” message will be
displayed on the instrument cluster. To reat -
tempt shift, put the transmission in
NEUTRAL (N) and push and hold the 4WD
LOW button.
If shift conditions/interlocks are not met, a
“To Complete 4WD Shift Put Transmission
In Neutral” or a “To Complete 4WD Shift
Speed Must Be Below 3 MPH” or a “To
Complete 4WD Shift Allow Engine To Return
To Idle” message will flash from the instru -
ment cluster display Ú page 98.
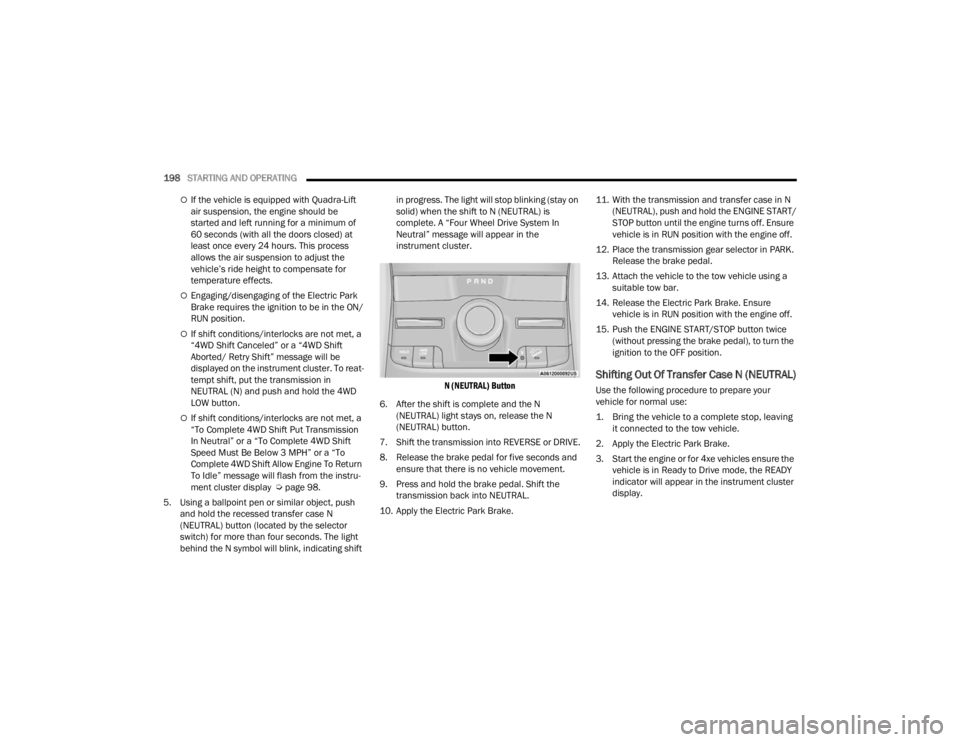
5. Using a ballpoint pen or similar object, push and hold the recessed transfer case N
(NEUTRAL) button (located by the selector
switch) for more than four seconds. The light
behind the N symbol will blink, indicating shift in progress. The light will stop blinking (stay on
solid) when the shift to N (NEUTRAL) is
complete. A “Four Wheel Drive System In
Neutral” message will appear in the
instrument cluster.
N (NEUTRAL) Button
6. After the shift is complete and the N (NEUTRAL) light stays on, release the N
(NEUTRAL) button.
7. Shift the transmission into REVERSE or DRIVE.
8. Release the brake pedal for five seconds and ensure that there is no vehicle movement.
9. Press and hold the brake pedal. Shift the transmission back into NEUTRAL.
10. Apply the Electric Park Brake. 11. With the transmission and transfer case in N
(NEUTRAL), push and hold the ENGINE START/
STOP button until the engine turns off. Ensure
vehicle is in RUN position with the engine off.
12. Place the transmission gear selector in PARK. Release the brake pedal.
13. Attach the vehicle to the tow vehicle using a suitable tow bar.
14. Release the Electric Park Brake. Ensure vehicle is in RUN position with the engine off.
15. Push the ENGINE START/STOP button twice (without pressing the brake pedal), to turn the
ignition to the OFF position.
Shifting Out Of Transfer Case N (NEUTRAL)
Use the following procedure to prepare your
vehicle for normal use:
1. Bring the vehicle to a complete stop, leaving it connected to the tow vehicle.
2. Apply the Electric Park Brake.
3. Start the engine or for 4xe vehicles ensure the vehicle is in Ready to Drive mode, the READY
indicator will appear in the instrument cluster
display.
23_WL_OM_EN_USC_t.book Page 198
Page 202 of 424
200STARTING AND OPERATING
OFF-ROAD DRIVING TIPS
Quadra-Lift — If Equipped
When off-roading, it is recommended that the
lowest useable vehicle height that will clear the
current obstacle or terrain be selected. The vehicle
height should then be raised as required by the
changes in terrain.
The Selec-Terrain switch will automatically change
the vehicle to the optimized height based on the
Selec-Terrain switch position. The vehicle height
can be changed from the default height for each
Selec-Terrain mode by normal use of the air
suspension switches Úpage 131.
When To Use 4WD LOW Range —
If Equipped
When off-road driving, shift to 4WD LOW for
additional traction. This range should be limited to
extreme situations such as deep snow, mud, or
sand where additional low speed pulling power is
needed. Vehicle speeds in excess of 25 mph
(40 km/h) should be avoided when in 4WD LOW
range.
Driving Through Water
Although your vehicle is capable of driving through
water, there are a number of precautions that
must be considered before entering the water.
NOTE:Your vehicle is capable of water fording in up to
24 inches (61 cm) with air suspension or
21 inches (53 cm) without air suspension, of water
while crossing small rivers or streams. To maintain
optimal performance of your vehicle's heating and
ventilation system it is recommended to switch the
system into recirculation mode during water
fording. Be sure to avoid lowering the vehicle in
water, ensure that the easy exit entry setting is
turned off in Uconnect settings. Driving through water more than a few inches/
centimeters deep will require extra caution to
ensure safety and prevent damage to your vehicle.
If you must drive through water, try to determine
the depth and the bottom condition (and location
of any obstacles) prior to entering. Proceed with
caution and maintain a steady controlled speed
less than 5 mph (8 km/h) in deep water to
minimize wave effects.
Flowing Water
If the water is swift flowing and rising (as in storm
run-off), avoid crossing until the water level
recedes and/or the flow rate is reduced. If you
must cross flowing water avoid depths in excess of
9 inches (23 cm). The flowing water can erode the
streambed, causing your vehicle to sink into
deeper water. Determine exit point(s) that are
downstream of your entry point to allow for drifting.
WARNING!
Do not drive in 4WD LOW range on dry
pavement; driveline damage may result. 4WD
LOW range locks front and rear drivelines
together and does not allow for differential
action between the front to rear driveshafts.
Driving in 4WD LOW on pavement will cause
driveline binding; use only on wet or slippery
surfaces.
CAUTION!
When driving through water, do not exceed
5 mph (8 km/h). Always check water depth
before entering as a precaution, and check all
fluids afterward. Driving through water may
cause damage that may not be covered by the
New Vehicle Limited Warranty.
23_WL_OM_EN_USC_t.book Page 200
Page 247 of 424
MULTIMEDIA245
LEGAL & COMPLIANCE
To access Legal and Compliance information
about Rear Seat Entertainment with Fire TV built-in
from the rear screens, follow these steps:
1. Push the Gear/Settings button on the Voice
Remote with Alexa or tap the screen.
2. Select the Gear/Settings icon on the screen.
3. Select “Settings” on the screen.
4. While in the Settings menu, select “My Fire TV” and then “Legal & Compliance”.
OFF-ROAD PAGES — IF EQUIPPED
Your vehicle may be equipped with Off-Road
Pages, which provides the vehicle status
information while operating on off-road conditions.
It supplies information relating to the vehicle ride
height, the status of the transfer case, the pitch
and roll of the vehicle, and the active Selec-Terrain
Mode.
To access Off-Road Pages, press the Off Road
button on the touchscreen from the Vehicle menu,
and then press “Launch Off-Road”. Off-Road Pages has the following selectable pages:
Vehicle Dynamics
Accessory Gauges
Pitch & Roll
Selec-Terrain — If Equipped
Suspension — If Equipped
Forward Facing Camera — If Equipped
NOTE:With a Connected Services subscription (if
equipped), you can record your Off-Road data and
send it directly to the mobile app. Press the Record
button to begin.
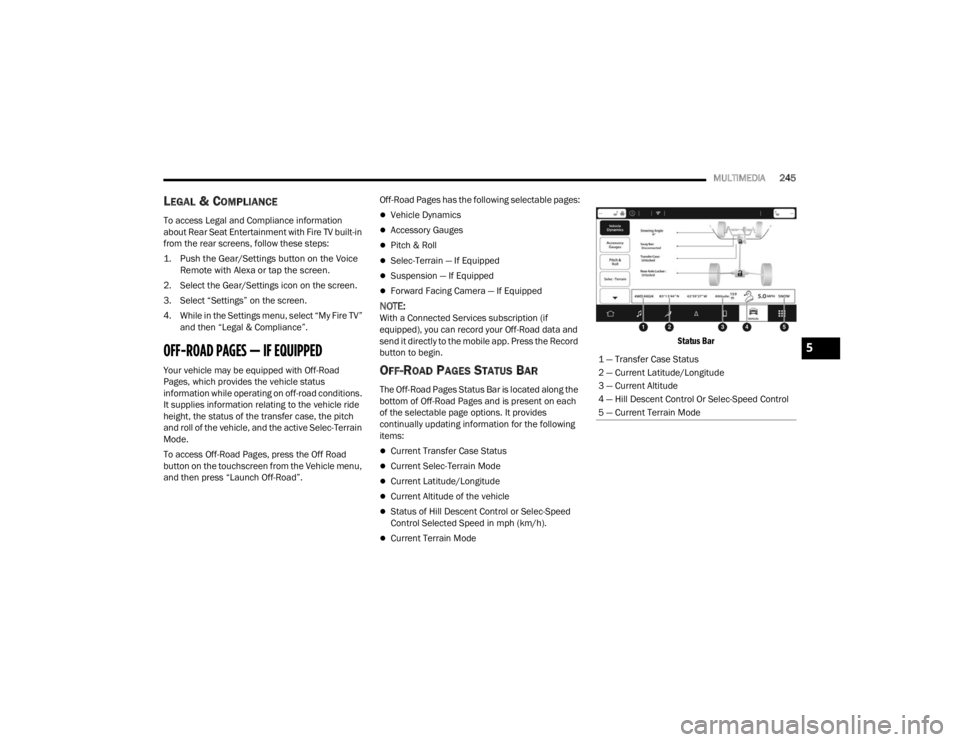
OFF-ROAD PAGES STATUS BAR
The Off-Road Pages Status Bar is located along the
bottom of Off-Road Pages and is present on each
of the selectable page options. It provides
continually updating information for the following
items:
Current Transfer Case Status
Current Selec-Terrain Mode
Current Latitude/Longitude
Current Altitude of the vehicle
Status of Hill Descent Control or Selec-Speed
Control Selected Speed in mph (km/h).
Current Terrain Mode
Status Bar
1 — Transfer Case Status
2 — Current Latitude/Longitude
3 — Current Altitude
4 — Hill Descent Control Or Selec-Speed Control
5 — Current Terrain Mode
5
23_WL_OM_EN_USC_t.book Page 245
Page 249 of 424
MULTIMEDIA247
The selectable modes are as follows:
Rock — Vehicle Must Be In 4WD Low
Sand/Mud
Snow
Auto — Default
Sport
NOTE:The Off-Road Pages Status Bar will also display the
current Selec-Terrain Mode.
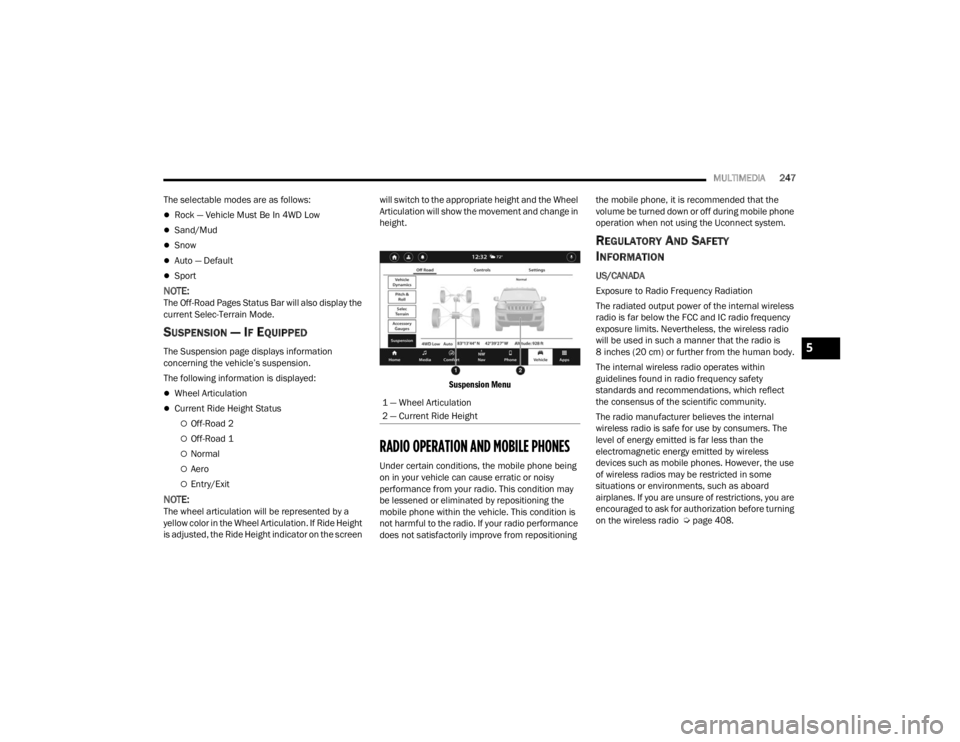
SUSPENSION — IF EQUIPPED
The Suspension page displays information
concerning the vehicle’s suspension.
The following information is displayed:
Wheel Articulation
Current Ride Height Status
Off-Road 2
Off-Road 1
Normal
Aero
Entry/Exit
NOTE:The wheel articulation will be represented by a
yellow color in the Wheel Articulation. If Ride Height
is adjusted, the Ride Height indicator on the screen will switch to the appropriate height and the Wheel
Articulation will show the movement and change in
height.
Suspension Menu
RADIO OPERATION AND MOBILE PHONES
Under certain conditions, the mobile phone being
on in your vehicle can cause erratic or noisy
performance from your radio. This condition may
be lessened or eliminated by repositioning the
mobile phone within the vehicle. This condition is
not harmful to the radio. If your radio performance
does not satisfactorily improve from repositioning the mobile phone, it is recommended that the
volume be turned down or off during mobile phone
operation when not using the Uconnect system.
REGULATORY AND SAFETY
I
NFORMATION
US/CANADA
Exposure to Radio Frequency Radiation
The radiated output power of the internal wireless
radio is far below the FCC and IC radio frequency
exposure limits. Nevertheless, the wireless radio
will be used in such a manner that the radio is
8 inches (20 cm) or further from the human body.
The internal wireless radio operates within
guidelines found in radio frequency safety
standards and recommendations, which reflect
the consensus of the scientific community.
The radio manufacturer believes the internal
wireless radio is safe for use by consumers. The
level of energy emitted is far less than the
electromagnetic energy emitted by wireless
devices such as mobile phones. However, the use
of wireless radios may be restricted in some
situations or environments, such as aboard
airplanes. If you are unsure of restrictions, you are
encouraged to ask for authorization before turning
on the wireless radio Ú page 408.
1 — Wheel Articulation
2 — Current Ride Height
5
23_WL_OM_EN_USC_t.book Page 247
Page 276 of 424
274SAFETY
Adjustable Upper Shoulder Belt Anchorage
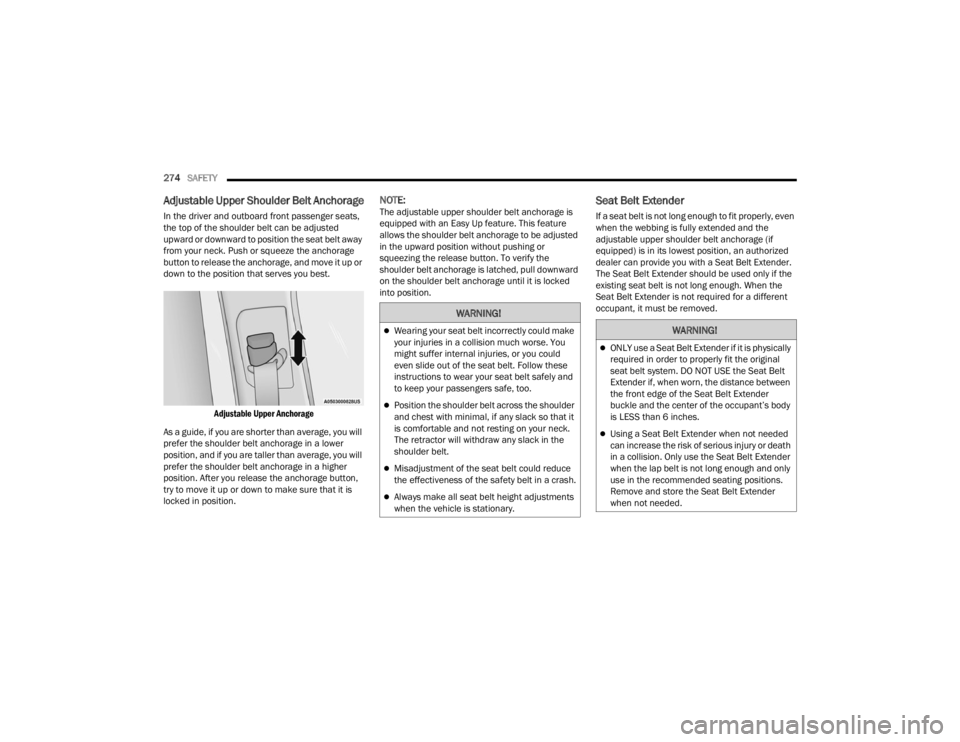
In the driver and outboard front passenger seats,
the top of the shoulder belt can be adjusted
upward or downward to position the seat belt away
from your neck. Push or squeeze the anchorage
button to release the anchorage, and move it up or
down to the position that serves you best.
Adjustable Upper Anchorage
As a guide, if you are shorter than average, you will
prefer the shoulder belt anchorage in a lower
position, and if you are taller than average, you will
prefer the shoulder belt anchorage in a higher
position. After you release the anchorage button,
try to move it up or down to make sure that it is
locked in position.
NOTE:The adjustable upper shoulder belt anchorage is
equipped with an Easy Up feature. This feature
allows the shoulder belt anchorage to be adjusted
in the upward position without pushing or
squeezing the release button. To verify the
shoulder belt anchorage is latched, pull downward
on the shoulder belt anchorage until it is locked
into position.Seat Belt Extender
If a seat belt is not long enough to fit properly, even
when the webbing is fully extended and the
adjustable upper shoulder belt anchorage (if
equipped) is in its lowest position, an authorized
dealer can provide you with a Seat Belt Extender.
The Seat Belt Extender should be used only if the
existing seat belt is not long enough. When the
Seat Belt Extender is not required for a different
occupant, it must be removed.
WARNING!
Wearing your seat belt incorrectly could make
your injuries in a collision much worse. You
might suffer internal injuries, or you could
even slide out of the seat belt. Follow these
instructions to wear your seat belt safely and
to keep your passengers safe, too.
Position the shoulder belt across the shoulder
and chest with minimal, if any slack so that it
is comfortable and not resting on your neck.
The retractor will withdraw any slack in the
shoulder belt.
Misadjustment of the seat belt could reduce
the effectiveness of the safety belt in a crash.
Always make all seat belt height adjustments
when the vehicle is stationary.
WARNING!
ONLY use a Seat Belt Extender if it is physically
required in order to properly fit the original
seat belt system. DO NOT USE the Seat Belt
Extender if, when worn, the distance between
the front edge of the Seat Belt Extender
buckle and the center of the occupant’s body
is LESS than 6 inches.
Using a Seat Belt Extender when not needed
can increase the risk of serious injury or death
in a collision. Only use the Seat Belt Extender
when the lap belt is not long enough and only
use in the recommended seating positions.
Remove and store the Seat Belt Extender
when not needed.
23_WL_OM_EN_USC_t.book Page 274
Page 292 of 424
290SAFETY
Summary Of Recommendations For Restraining Children In Vehicles
Infant And Child Restraints
Safety experts recommend that children ride
rear-facing in the vehicle until they are two years
old or until they reach either the height or weight
limit of their rear-facing child restraint. Two types of
child restraints can be used rear-facing: infant
carriers and convertible child seats. The infant carrier is only used rear-facing in the
vehicle. It is recommended for children from birth
until they reach the weight or height limit of the
infant carrier. Convertible child seats can be used
either rear-facing or forward-facing in the vehicle.
Convertible child seats often have a higher weight
limit in the rear-facing direction than infant carriers
do, so they can be used rear-facing by children who
have outgrown their infant carrier but are still less
than at least two years old. Children should remain
rear-facing until they reach the highest weight or
height allowed by their convertible child seat.
Child Size, Height, Weight Or Age
Recommended Type Of Child Restraint
Infants and ToddlersChildren who are two years old or younger and who
have not reached the height or weight limits of their
child restraint Either an Infant Carrier or a Convertible Child
Restraint, facing rearward in a rear seat of the
vehicle
Small Children Children who are at least two years old or who have
outgrown the height or weight limit of their
rear-facing child restraint Forward-Facing Child Restraint with a five-point
Harness, facing forward in a rear seat of the
vehicle
Larger Children Children who have outgrown their forward-facing
child restraint, but are too small to properly fit the
vehicle’s seat belt Belt Positioning Booster Seat and the vehicle seat
belt, seated in a rear seat of the vehicle
Children Too Large for Child Restraints Children 12 years old or younger, who have
outgrown the height or weight limit of their booster
seat Vehicle Seat Belt, seated in a rear seat of the
vehicle
WARNING!
Never place a rear-facing child restraint in
front of an air bag. A deploying passenger
front air bag can cause death or serious injury
to a child 12 years or younger, including a
child in a rear-facing child restraint.
Never install a rear-facing child restraint in the
front seat of a vehicle. Only use a rear-facing
child restraint in the rear seat. If the vehicle
does not have a rear seat, do not transport a
rear-facing child restraint in that vehicle.
23_WL_OM_EN_USC_t.book Page 290
Page 293 of 424
SAFETY291
(Continued)
Older Children And Child Restraints
Children who are two years old or who have
outgrown their rear-facing convertible child seat
can ride forward-facing in the vehicle.
Forward-facing child seats and convertible child
seats used in the forward-facing direction are for
children who are over two years old or who have
outgrown the rear-facing weight or height limit of
their rear-facing convertible child seat. Children
should remain in a forward-facing child seat with a
harness for as long as possible, up to the highest
weight or height allowed by the child seat.
All children whose weight or height is above the
forward-facing limit for the child seat should use a
belt-positioning booster seat until the vehicle’s
seat belts fit properly. If the child cannot sit with
knees bent over the vehicle’s seat cushion while
the child’s back is against the seatback, they
should use a belt-positioning booster seat. The
child and belt-positioning booster seat are held in
the vehicle by the seat belt.
Children Too Large For Booster Seats
Children who are large enough to wear the
shoulder belt comfortably, and whose legs are long
enough to bend over the front of the seat when
their back is against the seatback, should use the
seat belt in a rear seat. Use this simple 5-step test
to decide whether the child can use the vehicle’s
seat belt alone:
1. Can the child sit all the way back against the back of the vehicle seat?
2. Do the child’s knees bend comfortably over
the front of the vehicle seat while the child is
still sitting all the way back?
3. Does the shoulder belt cross the child’s shoulder between the neck and arm?
4. Is the lap part of the belt as low as possible, touching the child’s thighs and not the
stomach?
5. Can the child stay seated like this for the whole trip?
If the answer to any of these questions was “no,”
then the child still needs to use a booster seat in
this vehicle. If the child is using the lap/shoulder
belt, check seat belt fit periodically and make sure
the seat belt buckle is latched. A child’s squirming
or slouching can move the belt out of position. If
the shoulder belt contacts the face or neck, move
the child closer to the center of the vehicle, or use
a booster seat to position the seat belt on the child
correctly.
WARNING!
Improper installation can lead to failure of an
infant or child restraint. It could come loose in
a collision. The child could be badly injured or
killed. Follow the child restraint manufac -
turer’s directions exactly when installing an
infant or child restraint.
After a child restraint is installed in the
vehicle, do not move the vehicle seat forward
or rearward because it can loosen the child
restraint attachments. Remove the child
restraint before adjusting the vehicle seat
position. When the vehicle seat has been
adjusted, reinstall the child restraint.
When your child restraint is not in use, secure
it in the vehicle with the seat belt or LATCH
anchorages, or remove it from the vehicle. Do
not leave it loose in the vehicle. In a sudden
stop or accident, it could strike the occupants
or seatbacks and cause serious personal
injury.
WARNING!
WARNING!
Never allow a child to put the shoulder belt
under an arm or behind their back. In a crash,
the shoulder belt will not protect a child properly,
which may result in serious injury or death. A
child must always wear both the lap and
shoulder portions of the seat belt correctly.
6
23_WL_OM_EN_USC_t.book Page 291
Page 377 of 424
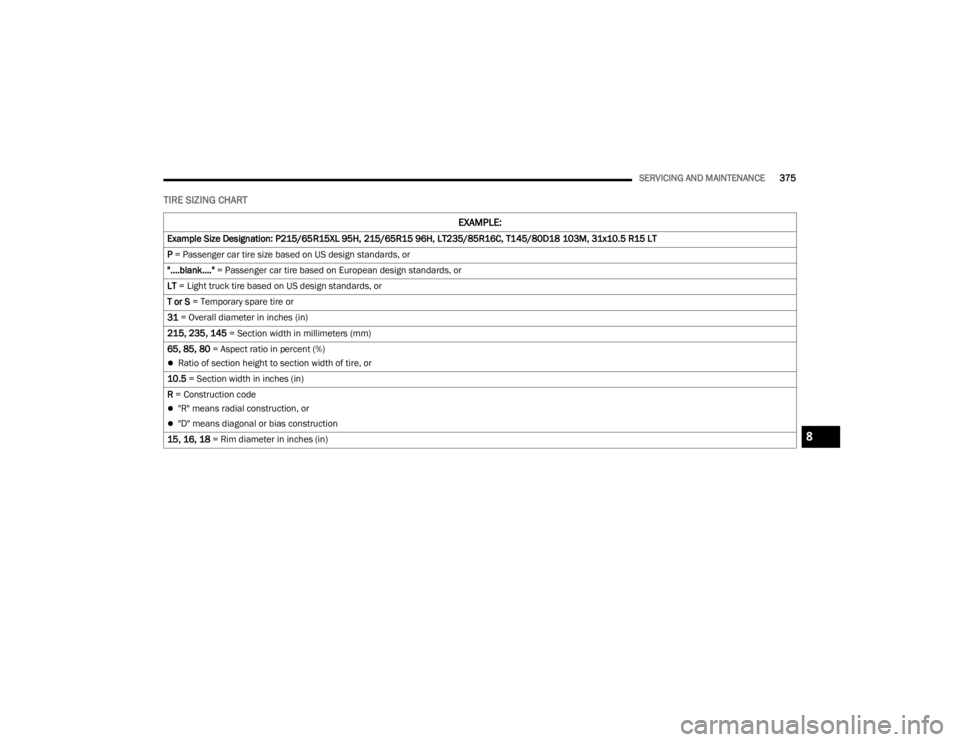
SERVICING AND MAINTENANCE375
TIRE SIZING CHART
EXAMPLE:
Example Size Designation: P215/65R15XL 95H, 215/65R15 96H, LT235/85R16C, T145/80D18 103M, 31x10.5 R15 LT
P = Passenger car tire size based on US design standards, or
"....blank...." = Passenger car tire based on European design standards, or
LT = Light truck tire based on US design standards, or
T or S = Temporary spare tire or
31 = Overall diameter in inches (in)
215, 235, 145 = Section width in millimeters (mm)
65, 85, 80 = Aspect ratio in percent (%)
Ratio of section height to section width of tire, or
10.5 = Section width in inches (in)
R = Construction code
"R" means radial construction, or
"D" means diagonal or bias construction
15, 16, 18 = Rim diameter in inches (in)
8
23_WL_OM_EN_USC_t.book Page 375
Page 416 of 424

414 J
Jack Location
................................................. 311Jack Operation............................................... 315Jacking And Tire Changing
b
....................... 310Jacking And Tire Changing Instructions......... 311Jacking Instructions....................................... 315Jump Starting................................................ 319
K
Key Fob Arm The System
.......................................... 26Disarm The System..................................... 27Programming Additional Key Fobs.............. 21Key Fob Battery Service
(Remote Keyless Entry)................................... 19
Key Fob Programming (Remote Keyless Entry).. 21
Keyless Enter 'n Go™..................................... 119Passive Entry............................................... 29Passive Entry Programming......................... 29Keys................................................................. 18Replacement............................................... 21Sentry (Immobilizer).................................... 22
L
Lane Change Assist......................................... 61Lane Management System............................ 171Lap/Shoulder Belts....................................... 271Latches.......................................................... 305Lead Free Gasoline........................................ 397Leaks, Fluid................................................... 305
Life Of Tires................................................... 384Liftgate...................................................88, 110Adjustable Height........................................ 89Closing......................................................... 88Hands-Free.................................................. 89Opening....................................................... 88Liftgate Window Wiper/Washer....................... 66Light Bulbs.................................................... 305Lighted Cupholders.......................................... 76Lights............................................................ 305Air Bag.................................... 108, 277, 303Ambient....................................................... 62Ambient, Mutlicolor..................................... 63Automatic Headlights.................................. 59Brake Assist Warning............................... 252Brake Warning.......................................... 108Bulb Replacement.................................... 374Cruise.............................................. 115, 116Daytime Running......................................... 58Dimmer Switch............................................ 62Dimmer Switch, Headlight........................... 57Electric Power Steering............................. 109Electronic Stability Control............... 111, 112Exterior...............................................57, 305Fog.....................................................61, 115Hazard Warning Flasher........................... 307Headlights On With Wipers.......................... 60High Beam................................................ 117
High Beam/Low Beam Select......................59Hill Descent Control Indicator.......... 116, 253Interior.........................................................62Lights On Reminder.....................................61Low Fuel................................................... 112Malfunction Indicator (Check Engine)....... 112NEUTRAL.................................................. 115Night Vision.............................110, 113, 116Oil Temperature........................................ 110Park................................................... 59, 116Passing........................................................59Reading.......................................................62Seat Belt Reminder.................................. 110Security Alarm.......................................... 111SelecSpeed Control.................................. 117Service...................................................... 374Sport Mode............................................... 116StopStart.................................................. 116Sway Bar................................................... 115Sway Bar Fault.......................................... 113Traction Control........................................ 252Transmission Temperature....................... 110Turn Signals.............................. 61, 116, 305Vanity Mirror................................................50Load Shed Battery Saver Mode..................... 106Load Shed Battery Saver On......................... 106Load Shed Electrical Load Reduction........... 106Load Shed Intelligent Battery Sensor............ 106
23_WL_OM_EN_USC_t.book Page 414