check engine JEEP LIBERTY 2002 KJ / 1.G Repair Manual
[x] Cancel search | Manufacturer: JEEP, Model Year: 2002, Model line: LIBERTY, Model: JEEP LIBERTY 2002 KJ / 1.GPages: 1803, PDF Size: 62.3 MB
Page 254 of 1803
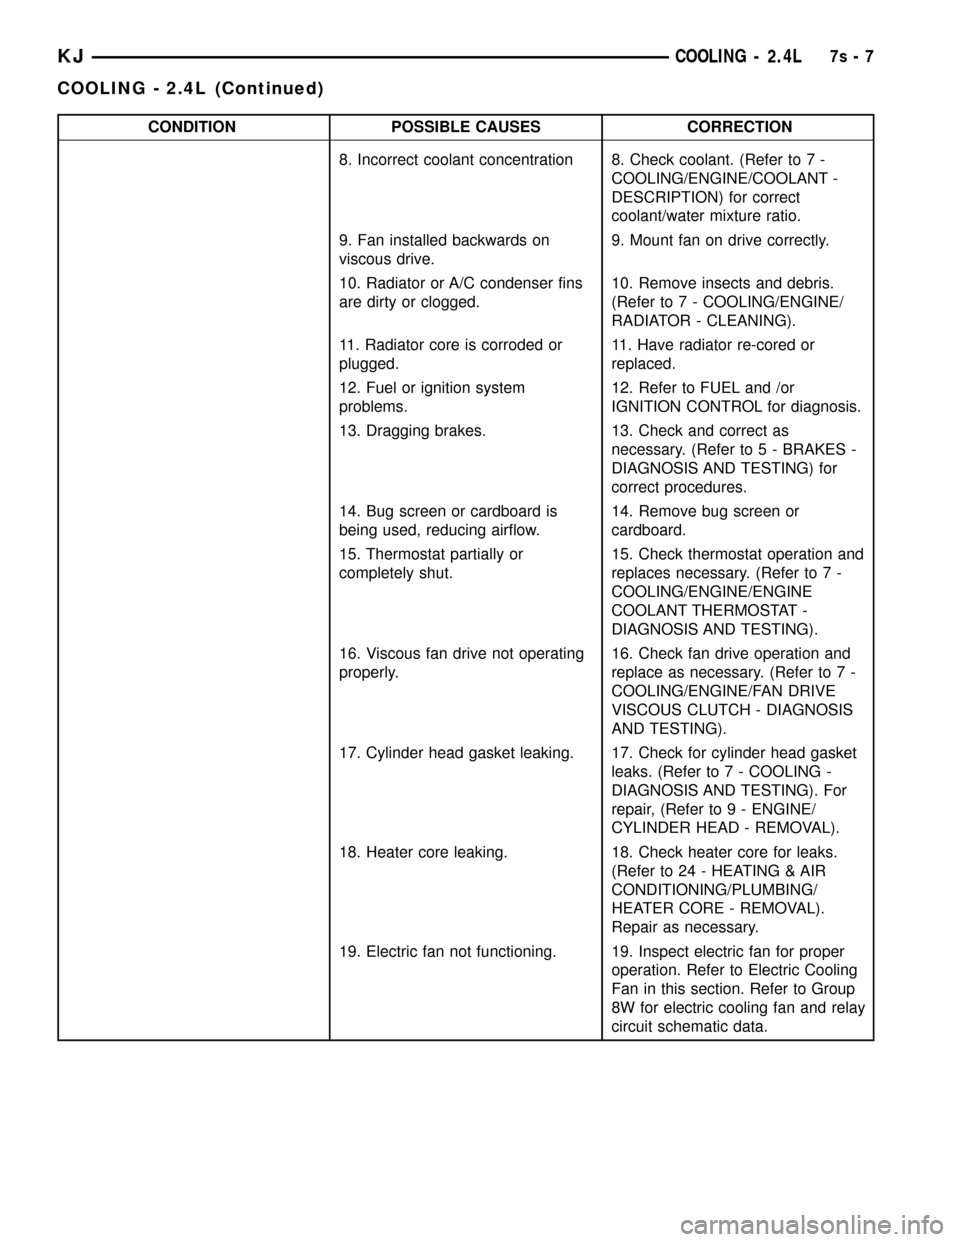
CONDITION POSSIBLE CAUSES CORRECTION
8. Incorrect coolant concentration 8. Check coolant. (Refer to 7 -
COOLING/ENGINE/COOLANT -
DESCRIPTION) for correct
coolant/water mixture ratio.
9. Fan installed backwards on
viscous drive.9. Mount fan on drive correctly.
10. Radiator or A/C condenser fins
are dirty or clogged.10. Remove insects and debris.
(Refer to 7 - COOLING/ENGINE/
RADIATOR - CLEANING).
11. Radiator core is corroded or
plugged.11. Have radiator re-cored or
replaced.
12. Fuel or ignition system
problems.12. Refer to FUEL and /or
IGNITION CONTROL for diagnosis.
13. Dragging brakes. 13. Check and correct as
necessary. (Refer to 5 - BRAKES -
DIAGNOSIS AND TESTING) for
correct procedures.
14. Bug screen or cardboard is
being used, reducing airflow.14. Remove bug screen or
cardboard.
15. Thermostat partially or
completely shut.15. Check thermostat operation and
replaces necessary. (Refer to 7 -
COOLING/ENGINE/ENGINE
COOLANT THERMOSTAT -
DIAGNOSIS AND TESTING).
16. Viscous fan drive not operating
properly.16. Check fan drive operation and
replace as necessary. (Refer to 7 -
COOLING/ENGINE/FAN DRIVE
VISCOUS CLUTCH - DIAGNOSIS
AND TESTING).
17. Cylinder head gasket leaking. 17. Check for cylinder head gasket
leaks. (Refer to 7 - COOLING -
DIAGNOSIS AND TESTING). For
repair, (Refer to 9 - ENGINE/
CYLINDER HEAD - REMOVAL).
18. Heater core leaking. 18. Check heater core for leaks.
(Refer to 24 - HEATING & AIR
CONDITIONING/PLUMBING/
HEATER CORE - REMOVAL).
Repair as necessary.
19. Electric fan not functioning. 19. Inspect electric fan for proper
operation. Refer to Electric Cooling
Fan in this section. Refer to Group
8W for electric cooling fan and relay
circuit schematic data.
KJCOOLING - 2.4L7s-7
COOLING - 2.4L (Continued)
Page 255 of 1803
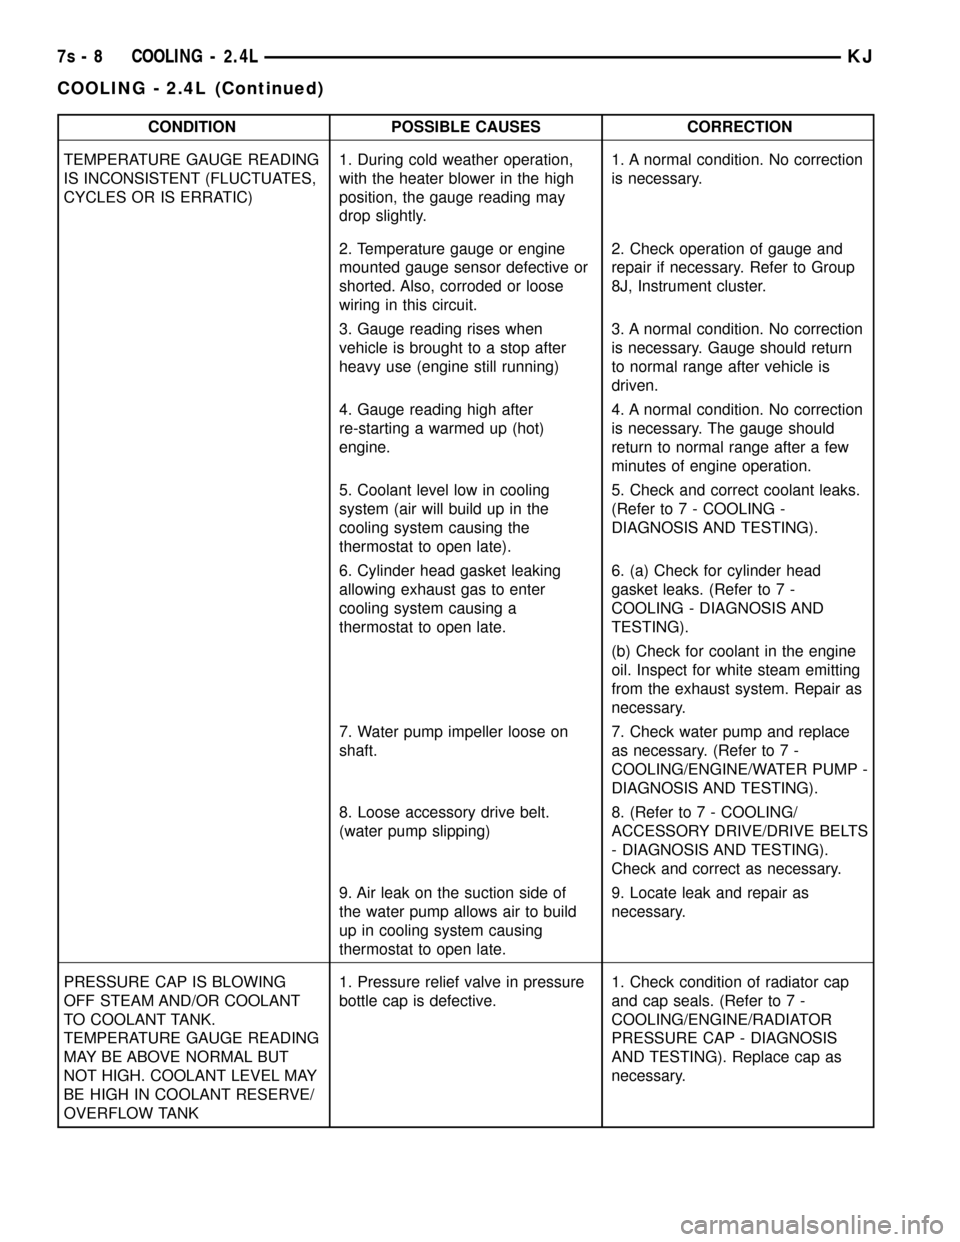
CONDITION POSSIBLE CAUSES CORRECTION
TEMPERATURE GAUGE READING
IS INCONSISTENT (FLUCTUATES,
CYCLES OR IS ERRATIC)1. During cold weather operation,
with the heater blower in the high
position, the gauge reading may
drop slightly.1. A normal condition. No correction
is necessary.
2. Temperature gauge or engine
mounted gauge sensor defective or
shorted. Also, corroded or loose
wiring in this circuit.2. Check operation of gauge and
repair if necessary. Refer to Group
8J, Instrument cluster.
3. Gauge reading rises when
vehicle is brought to a stop after
heavy use (engine still running)3. A normal condition. No correction
is necessary. Gauge should return
to normal range after vehicle is
driven.
4. Gauge reading high after
re-starting a warmed up (hot)
engine.4. A normal condition. No correction
is necessary. The gauge should
return to normal range after a few
minutes of engine operation.
5. Coolant level low in cooling
system (air will build up in the
cooling system causing the
thermostat to open late).5. Check and correct coolant leaks.
(Refer to 7 - COOLING -
DIAGNOSIS AND TESTING).
6. Cylinder head gasket leaking
allowing exhaust gas to enter
cooling system causing a
thermostat to open late.6. (a) Check for cylinder head
gasket leaks. (Refer to 7 -
COOLING - DIAGNOSIS AND
TESTING).
(b) Check for coolant in the engine
oil. Inspect for white steam emitting
from the exhaust system. Repair as
necessary.
7. Water pump impeller loose on
shaft.7. Check water pump and replace
as necessary. (Refer to 7 -
COOLING/ENGINE/WATER PUMP -
DIAGNOSIS AND TESTING).
8. Loose accessory drive belt.
(water pump slipping)8. (Refer to 7 - COOLING/
ACCESSORY DRIVE/DRIVE BELTS
- DIAGNOSIS AND TESTING).
Check and correct as necessary.
9. Air leak on the suction side of
the water pump allows air to build
up in cooling system causing
thermostat to open late.9. Locate leak and repair as
necessary.
PRESSURE CAP IS BLOWING
OFF STEAM AND/OR COOLANT
TO COOLANT TANK.
TEMPERATURE GAUGE READING
MAY BE ABOVE NORMAL BUT
NOT HIGH. COOLANT LEVEL MAY
BE HIGH IN COOLANT RESERVE/
OVERFLOW TANK1. Pressure relief valve in pressure
bottle cap is defective.1. Check condition of radiator cap
and cap seals. (Refer to 7 -
COOLING/ENGINE/RADIATOR
PRESSURE CAP - DIAGNOSIS
AND TESTING). Replace cap as
necessary.
7s - 8 COOLING - 2.4LKJ
COOLING - 2.4L (Continued)
Page 256 of 1803
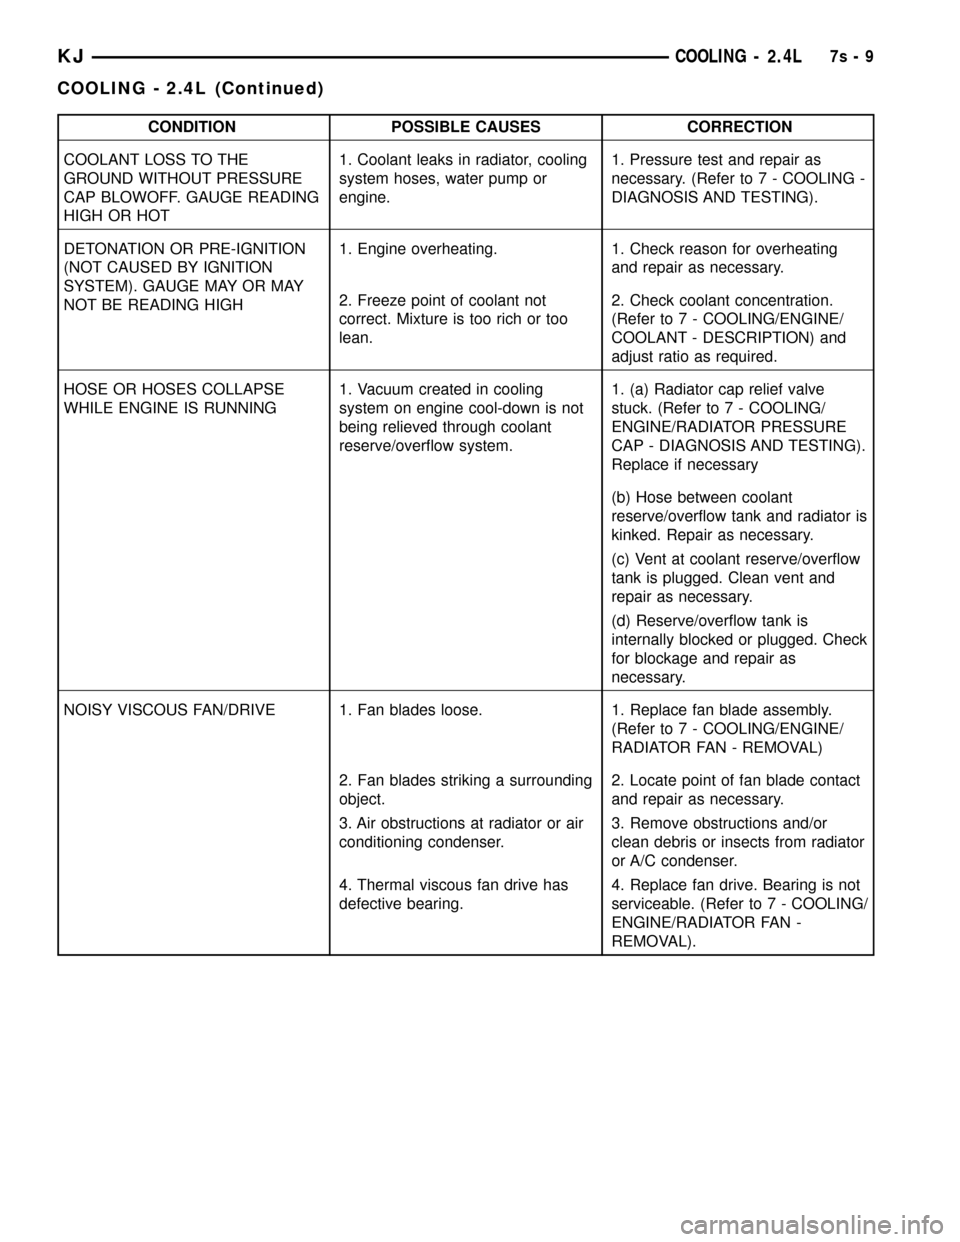
CONDITION POSSIBLE CAUSES CORRECTION
COOLANT LOSS TO THE
GROUND WITHOUT PRESSURE
CAP BLOWOFF. GAUGE READING
HIGH OR HOT1. Coolant leaks in radiator, cooling
system hoses, water pump or
engine.1. Pressure test and repair as
necessary. (Refer to 7 - COOLING -
DIAGNOSIS AND TESTING).
DETONATION OR PRE-IGNITION
(NOT CAUSED BY IGNITION
SYSTEM). GAUGE MAY OR MAY
NOT BE READING HIGH1. Engine overheating. 1. Check reason for overheating
and repair as necessary.
2. Freeze point of coolant not
correct. Mixture is too rich or too
lean.2. Check coolant concentration.
(Refer to 7 - COOLING/ENGINE/
COOLANT - DESCRIPTION) and
adjust ratio as required.
HOSE OR HOSES COLLAPSE
WHILE ENGINE IS RUNNING1. Vacuum created in cooling
system on engine cool-down is not
being relieved through coolant
reserve/overflow system.1. (a) Radiator cap relief valve
stuck. (Refer to 7 - COOLING/
ENGINE/RADIATOR PRESSURE
CAP - DIAGNOSIS AND TESTING).
Replace if necessary
(b) Hose between coolant
reserve/overflow tank and radiator is
kinked. Repair as necessary.
(c) Vent at coolant reserve/overflow
tank is plugged. Clean vent and
repair as necessary.
(d) Reserve/overflow tank is
internally blocked or plugged. Check
for blockage and repair as
necessary.
NOISY VISCOUS FAN/DRIVE 1. Fan blades loose. 1. Replace fan blade assembly.
(Refer to 7 - COOLING/ENGINE/
RADIATOR FAN - REMOVAL)
2. Fan blades striking a surrounding
object.2. Locate point of fan blade contact
and repair as necessary.
3. Air obstructions at radiator or air
conditioning condenser.3. Remove obstructions and/or
clean debris or insects from radiator
or A/C condenser.
4. Thermal viscous fan drive has
defective bearing.4. Replace fan drive. Bearing is not
serviceable. (Refer to 7 - COOLING/
ENGINE/RADIATOR FAN -
REMOVAL).
KJCOOLING - 2.4L7s-9
COOLING - 2.4L (Continued)
Page 257 of 1803
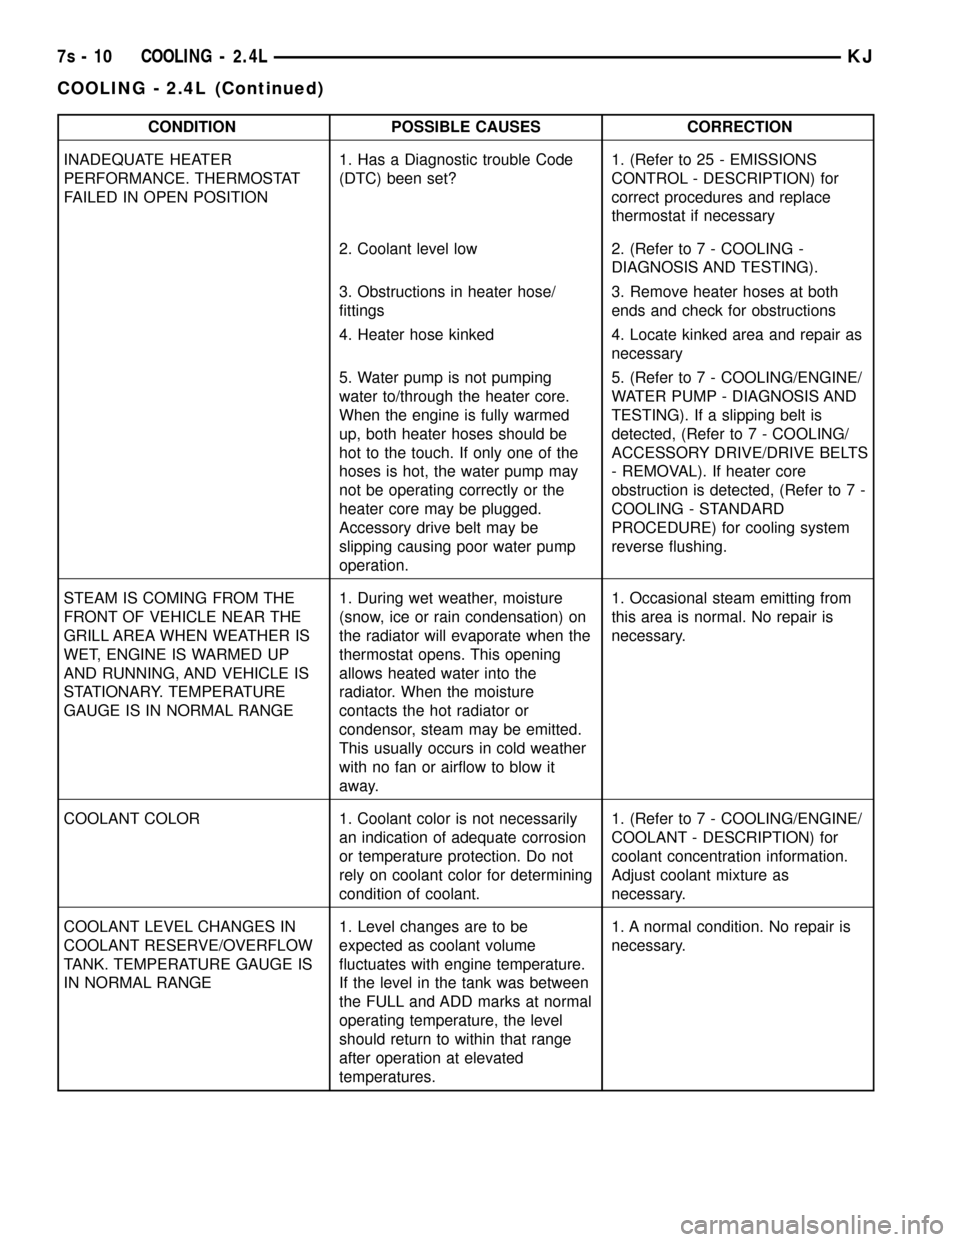
CONDITION POSSIBLE CAUSES CORRECTION
INADEQUATE HEATER
PERFORMANCE. THERMOSTAT
FAILED IN OPEN POSITION1. Has a Diagnostic trouble Code
(DTC) been set?1. (Refer to 25 - EMISSIONS
CONTROL - DESCRIPTION) for
correct procedures and replace
thermostat if necessary
2. Coolant level low 2. (Refer to 7 - COOLING -
DIAGNOSIS AND TESTING).
3. Obstructions in heater hose/
fittings3. Remove heater hoses at both
ends and check for obstructions
4. Heater hose kinked 4. Locate kinked area and repair as
necessary
5. Water pump is not pumping
water to/through the heater core.
When the engine is fully warmed
up, both heater hoses should be
hot to the touch. If only one of the
hoses is hot, the water pump may
not be operating correctly or the
heater core may be plugged.
Accessory drive belt may be
slipping causing poor water pump
operation.5. (Refer to 7 - COOLING/ENGINE/
WATER PUMP - DIAGNOSIS AND
TESTING). If a slipping belt is
detected, (Refer to 7 - COOLING/
ACCESSORY DRIVE/DRIVE BELTS
- REMOVAL). If heater core
obstruction is detected, (Refer to 7 -
COOLING - STANDARD
PROCEDURE) for cooling system
reverse flushing.
STEAM IS COMING FROM THE
FRONT OF VEHICLE NEAR THE
GRILL AREA WHEN WEATHER IS
WET, ENGINE IS WARMED UP
AND RUNNING, AND VEHICLE IS
STATIONARY. TEMPERATURE
GAUGE IS IN NORMAL RANGE1. During wet weather, moisture
(snow, ice or rain condensation) on
the radiator will evaporate when the
thermostat opens. This opening
allows heated water into the
radiator. When the moisture
contacts the hot radiator or
condensor, steam may be emitted.
This usually occurs in cold weather
with no fan or airflow to blow it
away.1. Occasional steam emitting from
this area is normal. No repair is
necessary.
COOLANT COLOR 1. Coolant color is not necessarily
an indication of adequate corrosion
or temperature protection. Do not
rely on coolant color for determining
condition of coolant.1. (Refer to 7 - COOLING/ENGINE/
COOLANT - DESCRIPTION) for
coolant concentration information.
Adjust coolant mixture as
necessary.
COOLANT LEVEL CHANGES IN
COOLANT RESERVE/OVERFLOW
TANK. TEMPERATURE GAUGE IS
IN NORMAL RANGE1. Level changes are to be
expected as coolant volume
fluctuates with engine temperature.
If the level in the tank was between
the FULL and ADD marks at normal
operating temperature, the level
should return to within that range
after operation at elevated
temperatures.1. A normal condition. No repair is
necessary.
7s - 10 COOLING - 2.4LKJ
COOLING - 2.4L (Continued)
Page 258 of 1803
CONDITION POSSIBLE CAUSES CORRECTION
FAN RUNS ALL THE TIME 1. Fan control sensors inoperative. 1. Check for DTC's. Verify sensor
readings.
2. Fan control solenoid stuck9on9. 2. Check fan operation speeds.
Refer to fan speed operation table.
3. Fan control solenoid harness
damaged.3. Check for DTC 1499. Repair as
required.
4. Transmission temperature too
high.4. Check for transmission over
temp. DTC.
5. Engine coolant temperature too
high.5. (a) Check coolant level. Correct
level as required.
(b) Thermostat stuck. Replace
thermostat.
(c) Water pump failed. Replace
water pump.
(d) Coolant flow restricted. Clean
radiator.
(e) Air flow over radiator
obstructed.Remove obstruction.
STANDARD PROCEDURE
STANDARD PROCEDURE - DRAINING COOLING
SYSTEM
WARNING: DO NOT REMOVE THE CYLINDER
BLOCK DRAIN PLUGS (Fig. 4) OR LOOSEN THE
RADIATOR DRAINCOCK WITH SYSTEM HOT AND
UNDER PRESSURE. SERIOUS BURNS FROM
COOLANT CAN OCCUR.
(1) DO NOT remove radiator cap first. With engine
cold, raise vehicle on a hoist and locate radiator
draincock.
NOTE: Radiator draincock is located on the left/
lower side of radiator facing to rear of vehicle.
(2) Attach one end of a hose to the draincock. Put
the other end into a clean container. Open draincock
and drain coolant from radiator. This will empty the
coolant reserve/overflow tank. The coolant does not
have to be removed from the tank unless the system
is being refilled with a fresh mixture. When tank is
empty, remove radiator cap and continue draining
cooling system.
STANDARD PROCEDURE - REFILLING
COOLING SYSTEM
(1) Tighten the radiator draincock and the cylinder
block drain plug(s) (if removed).CAUTION: Failure to purge air from the cooling sys-
tem can result in an overheating condition and
severe engine damage.
(2) .Fill system using a 50/50 mixture of ethylene-
glycol antifreeze and low mineral content water.Fill
pressure bottle to service line.and install cap.
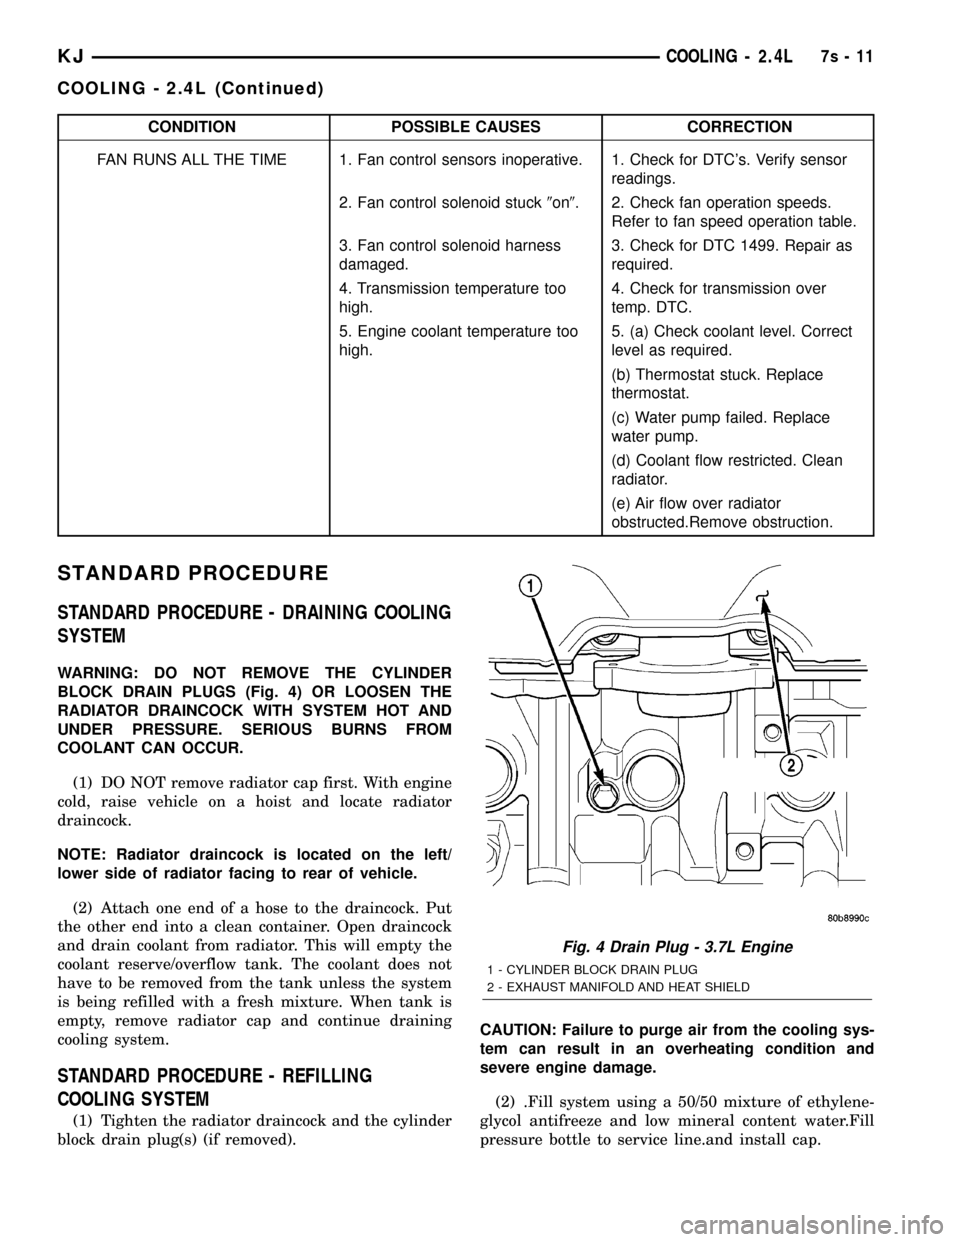
Fig. 4 Drain Plug - 3.7L Engine
1 - CYLINDER BLOCK DRAIN PLUG
2 - EXHAUST MANIFOLD AND HEAT SHIELD
KJCOOLING - 2.4L7s-11
COOLING - 2.4L (Continued)
Page 261 of 1803

ACCESSORY DRIVE
TABLE OF CONTENTS
page page
BELT TENSIONERS - 2.4L
REMOVAL - 2.4L ENGINE.................14
INSTALLATION - 2.4L ENGINE.............14
DRIVE BELTS -2.4L
DIAGNOSIS AND TESTING - SERPENTINE
DRIVE BELT DIAGNOSIS................15REMOVAL - 2.4L ENGINE.................16
INSTALLATION - 2.4L ENGINE.............17
BELT TENSIONERS - 2.4L
REMOVAL - 2.4L ENGINE
(1) Remove accessory drive belt (Refer to 7 -
COOLING/ACCESSORY DRIVE/DRIVE BELTS -
REMOVAL).
(2) Remove tensioner assembly from engine acces-
sory drive bracket (Fig. 1).WARNING: BECAUSE OF HIGH SPRING TENSION,
DO NOT ATTEMPT TO DISASSEMBLE AUTOMATIC
TENSIONER. UNIT IS SERVICED AS AN ASSEMBLY
(EXCEPT FOR PULLEY ON TENSIONER).
(3) Remove pulley bolt. Remove pulley from ten-
sioner.
INSTALLATION - 2.4L ENGINE
(1) Install pulley and pulley bolt to tensioner.
Tighten bolt to 61 N´m (45 ft. lbs.) torque.
(2) An indexing slot is located on back of tensioner.
Align this slot to the head of the nut on the front
cover. Install the mounting nut on the stud. Tighten
stud to 41 N´m (30 ft. lbs.).
(3) Install drive belt (Refer to 7 - COOLING/AC-
CESSORY DRIVE/DRIVE BELTS - INSTALLA-
TION).
(4) Check belt indexing marks (Refer to 7 - COOL-
ING/ACCESSORY DRIVE/DRIVE BELTS - INSTAL-
LATION).
Fig. 1 ACCESSORY DRIVE BRACKET
1- UPPER TIMING BELT COVER
2- LOWER TIMING BELT COVER
3- BELT TENSIONER
4- ACCESSORY DRIVE BRACKET
7s - 14 ACCESSORY DRIVEKJ
Page 263 of 1803
CONDITION POSSIBLE CAUSES CORRECTION
BELT SLIPS 1. Belt slipping because of
insufficient tension.1. Replace automatic belt tensioner.
2. Belt routed 2. Verify belt routing.
incorrectly
3. Incorrect belt. 3. Replace belt.
4. Belt or pulley subjected to
substance (belt dressing, oil
ethylene glycol) that has reduced
friction.4. Replace belt and clean pulleys.
5. Driven component bearing failure. 5. Replace faulty component
bearing.
6. Belt glazed and hardened from
heat and excessive slippage.6. Replace belt.
ªGROOVE JUMPING9(BELT
DOES NOT MAINTAIN CORRECT
POSITION ON PULLEY)1. Belt tension either too high or too
low.1. Replace automatic belt tensioner.
2. Belt routed 2. Verify belt routing.
incorrectly.
3. Incorrect belt. 3. Replace belt.
4. Pulley(s) not within design
tolerance.4. Replace pulley(s).
5. Foreign object(s) in grooves. 5. Remove foreign objects from
grooves.
6. Pulley misalignment. 6. Check and replace.
7. Belt cord line is broken. 7. Replace belt.
BELT BROKEN (NOTE: IDENTIFY
AND CORRECT PROBLEM
BEFORE NEW BELT IS
INSTALLED)1. Excessive tension. 1. Replace belt and automatic belt
tensioner.
2. Incorrect belt. 2. Replace belt.
3. Tensile member damaged during
belt installation.3. Replace belt.
4. Severe misalignment. 4. Check and replace.
5. Bracket, pulley, or bearing failure. 5. Replace defective component and
belt.
NOISE (OBJECTIONABLE
SQUEAL, SQUEAK, OR RUMBLE
IS HEARD OR FELT WHILE
DRIVE BELT IS IN OPERATION)1. Belt slippage. 1. Replace belt or automatic belt
tensioner.
2. Bearing noise. 2. Locate and repair.
3. Belt misalignment. 3. Replace belt.
4. Belt-to-pulley mismatch. 4. Install correct belt.
REMOVAL - 2.4L ENGINE
NOTE: The belt routing schematics are published
from the latest information available at the time of
publication. If anything differs between these sche-
matics and the Belt Routing Label, use the sche-
matics on Belt Routing Label. This label is located
in the engine compartment.CAUTION: DO NOT LET TENSIONER ARM SNAP
BACK TO THE FREEARM POSITION, SEVERE DAM-
AGE MAY OCCUR TO THE TENSIONER.
Belt tension is not adjustable. Belt adjustment is
maintained by an automatic ( spring load ) belt ten-
sioner.
(1) Disconnect negative battery cable from battery.
(2) Rotate belt tensioner until it contacts its stop.
Remove belt, then slowly rotate the tensioner into
the freearm position.
7s - 16 ACCESSORY DRIVEKJ
DRIVE BELTS -2.4L (Continued)
Page 264 of 1803

INSTALLATION - 2.4L ENGINE
NOTE: The belt routing schematics are published
from the latest information available at the time of
publication. If anything differs between these sche-
matics and the Belt Routing Label, use the sche-
matics on Belt Routing Label. This label is located
in the engine compartment.
Belt tension is not adjustable. Belt adjustment is
maintained by an automatic ( spring load ) belt ten-
sioner.
(1) Check condition of all pulleys.
CAUTION: When installing the serpentine accessory
drive belt, the belt MUST be routed correctly. If not,
the engine may overheat due to the water pump
rotating in the wrong direction.
(2) Install new belt (Fig. 3) or (Fig. 4). Route the
belt around all pulleys except the idler pulley. Rotate
the tensioner arm until it contacts its stop position.
Route the belt around the idler and slowly let the
tensioner rotate into the belt. Make sure the belt is
seated onto all pulleys.
(3) With the drive belt installed, inspect the belt
wear indicator. On 2.4L Engines the gap between the
tang and the housing stop ( measurement A ) must
not exceed 24 mm (.94 inches).
Fig. 3 BELT ROUTING 2.4L WITH A/C
1 - IDLER PULLEY
2 - GENERATOR PULLEY
3 - IDLER PULLEY
4 - POWER STEERING PUMP PULLEY
5 -CRANKSHAFT PULLEY
6 - TENSIONER
7 - A/C COMPRESSOR PULLEY
8 - ACCESSORY DRIVE BELT
Fig. 4 BELT ROUTING 2.4L WITHOUT A/C
1 - IDLER PULLEY
2 - GENERATOR PULLEY
3 - IDLER PULLEY
4 - POWER STEERING PUMP PULLEY
5 -CRANKSHAFT PULLEY
6 - TENSIONER
7 - NON A/C IDLER PULLEY
8 - ACCESSORY DRIVE BELT
KJACCESSORY DRIVE7s-17
DRIVE BELTS -2.4L (Continued)
Page 267 of 1803

Propylene-glycol/ethylene-glycol Mixtures can
cause the destabilization of various corrosion inhibi-
tors, causing damage to the various cooling system
components. Also, once ethylene-glycol and propy-
lene-glycol based coolants are mixed in the vehicle,
conventional methods of determining freeze point will
not be accurate. Both the refractive index and spe-
cific gravity differ between ethylene glycol and propy-
lene glycol.
OPERATION
Coolant flows through the engine block absorbing
the heat from the engine, then flows to the radiator
where the cooling fins in the radiator transfers the
heat from the coolant to the atmosphere. During cold
weather the ethylene-glycol coolant prevents water
present in the cooling system from freezing within
temperatures indicated by mixture ratio of coolant to
water.
COOLANT RECOVERY PRESS
CONTAINER
DESCRIPTION
This system works along with the radiator pres-
sure cap. This is done by using thermal expansion
and contraction of the coolant to keep the coolant
free of trapped air. It provides:
²A volume for coolant expansion and contraction.
²A convenient and safe method for checking/ad-
justing coolant level at atmospheric pressure. This is
done without removing the radiator pressure cap.
²Some reserve coolant to the radiator to cover
minor leaks and evaporation or boiling losses.
As the engine cools, a vacuum is formed in the
cooling system of both the radiator and engine. Cool-
ant will then be drawn from the coolant tank and
returned to a proper level in the radiator.
The coolant reservoir/overflow system has a radia-
tor mounted pressurized cap, an overflow tube, and a
plastic coolant reservoir/overflow tank, mounted to
the right side of the cowl. It is mounted to the cowl
with two nuts on top, and a slide bracket on the bot-
tom.
OPERATION
The pressure chamber keeps the coolant free of
trapped air, provides a volume for expansion and con-
traction, and provides a convenient and safe method
for checking and adjusting coolant level at atmo-
spheric pressure. It also provides some reserve cool-
ant to cover minor leaks, evaporation or boiling
losses. The overflow chamber allows coolant recovery
in case of an overheat.
ENGINE BLOCK HEATER - 2.4L
DESCRIPTION
The block heater is operated by ordinary house
current (110 Volt A.C.) through a power cord and con-
nector located in the engine compartment. The
heater is mounted in a core hole (in place of a core
hole plug) in the engine block, with the heating ele-
ment immersed in coolant.
CAUTION: The power cord must be secured in its
retainer clips, and not positioned so it could con-
tact linkages or exhaust manifolds and become
damaged.
OPERATION
The block heater element is submerged in the cool-
ing system's coolant. When electrical power (110 volt
A.C.) is applied to the element, it creates heat. This
heat is transferred to the engine coolant. This pro-
vides easier engine starting and faster warm-up
when vehicle is operated in areas having extremely
low temperatures.
REMOVAL - 2.4L
(1) Drain cooling system (Refer to 7 - COOLING/
ENGINE - STANDARD PROCEDURE).
(2) Raise vehicle on hoist.
(3) Detach power cord plug from heater.
(4) Loosen screw in center of heater. Remove
heater assembly.
INSTALLATION - 2.4L
(1) Thoroughly clean core hole and heater seat.
(2) Insert heater assembly (Fig. 1) with element
loop positionedupward.
(3) With heater seated, tighten center screw
securely to assure a positive seal.
CAUTION: To prevent damage, the power cord must
be secured in it's retaining clips, and not positioned
so it could contact linkages or exhaust manifold.
(4) Connect power cord to heater.
(5) Lower vehicle.
(6) Fill cooling system (Refer to 7 - COOLING/EN-
GINE - STANDARD PROCEDURE).
7s - 20 ENGINEKJ
COOLANT (Continued)
Page 271 of 1803

(8) Disconnect the power steering cooler line from
cooler.
(9) Disconnect the radiator upper and lower hoses.
(10) Disconnect the overflow hose from radiator.
(11) The lower part of radiator is equipped with
two alignment dowel pins (Fig. 8). They are located
on the bottom of radiator tank and fit into rubber
grommets. These rubber grommets are pressed into
the radiator lower crossmember.
WARNING: THE AIR CONDITIONING SYSTEM (IF
EQUIPPED) IS UNDER A CONSTANT PRESSURE
EVEN WITH THE ENGINE OFF. REFER TO REFRIG-
ERANT WARNINGS IN, HEATING AND AIR CONDI-
TIONING BEFORE HANDLING ANY AIR
CONDITIONING COMPONENT.
NOTE: The radiator and radiator cooling fan can be
removed as an assembly. It is not necessary to
remove the cooling fan before removing or install-
ing the radiator.
(12) Gently lift up and remove radiator from vehi-
cle. Be careful not to scrape the radiator fins against
any other component. Also be careful not to disturb
the air conditioning condenser (if equipped).CLEANING
Clean radiator fins With the engine cold, apply cold
water and compressed air to the back (engine side) of
the radiator to flush the radiator and/or A/C con-
denser of debris.
INSPECTION
The radiator cooling fins should be checked for
damage or deterioration. Inspect cooling fins to make
sure they are not bent or crushed, these areas result
in reduced heat exchange causing the cooling system
to operate at higher temperatures. Inspect the plastic
end tanks for cracks, damage or leaks.
Inspect the radiator neck for damage or distortion.
INSTALLATION
CAUTION: Before installing the radiator or A/C con-
denser, be sure the radiator-to-body and radiator-to-
A/C condenser rubber air seals are properly
fastened to their original positions. These are used
at the top, bottom and sides of the radiator and A/C
condenser. To prevent overheating, these seals
must be installed to their original positions.
(1) Gently lower the radiator and fan shroud into
the vehicle. Guide the two radiator alignment dowels
into the rubber grommets located in lower radiator
crossmember.
(2) Connect the radiator upper and lower hoses
and hose clamps to radiator.
CAUTION: The tangs on the hose clamps must be
positioned straight down.
(3) Install coolant reserve/overflow tank hose at
radiator.
(4) Connect both transmission cooler lines at the
radiator.
(5) Install both radiator mounting bolts.
(6) Reconnect the electric cooling fan.
(7) Install the grill (Refer to 23 - BODY/EXTERI-
OR/GRILLE - INSTALLATION).
(8) Reinstall the cooling fan to the engine.
(9) Rotate the fan blades (by hand) and check for
interference at fan shroud.
(10) Refill cooling system (Refer to 7 - COOLING -
STANDARD PROCEDURE).
(11) Connect battery cable at battery.
(12) Start and warm engine. Check for leaks.
Fig. 8 Radiator Alignment Dowels - Typical
1 - RADIATOR
2 - ALIGNMENT DOWEL
3 - RADIATOR LOWER ISOLATOR
4 - RADIATOR LOWER CROSSMEMBER
7s - 24 ENGINEKJ
RADIATOR (Continued)