wheel bolt torque JEEP LIBERTY 2002 KJ / 1.G Workshop Manual
[x] Cancel search | Manufacturer: JEEP, Model Year: 2002, Model line: LIBERTY, Model: JEEP LIBERTY 2002 KJ / 1.GPages: 1803, PDF Size: 62.3 MB
Page 25 of 1803
STANDARD PROCEDURE - CAMBER AND
CASTER ADJUSTMENT
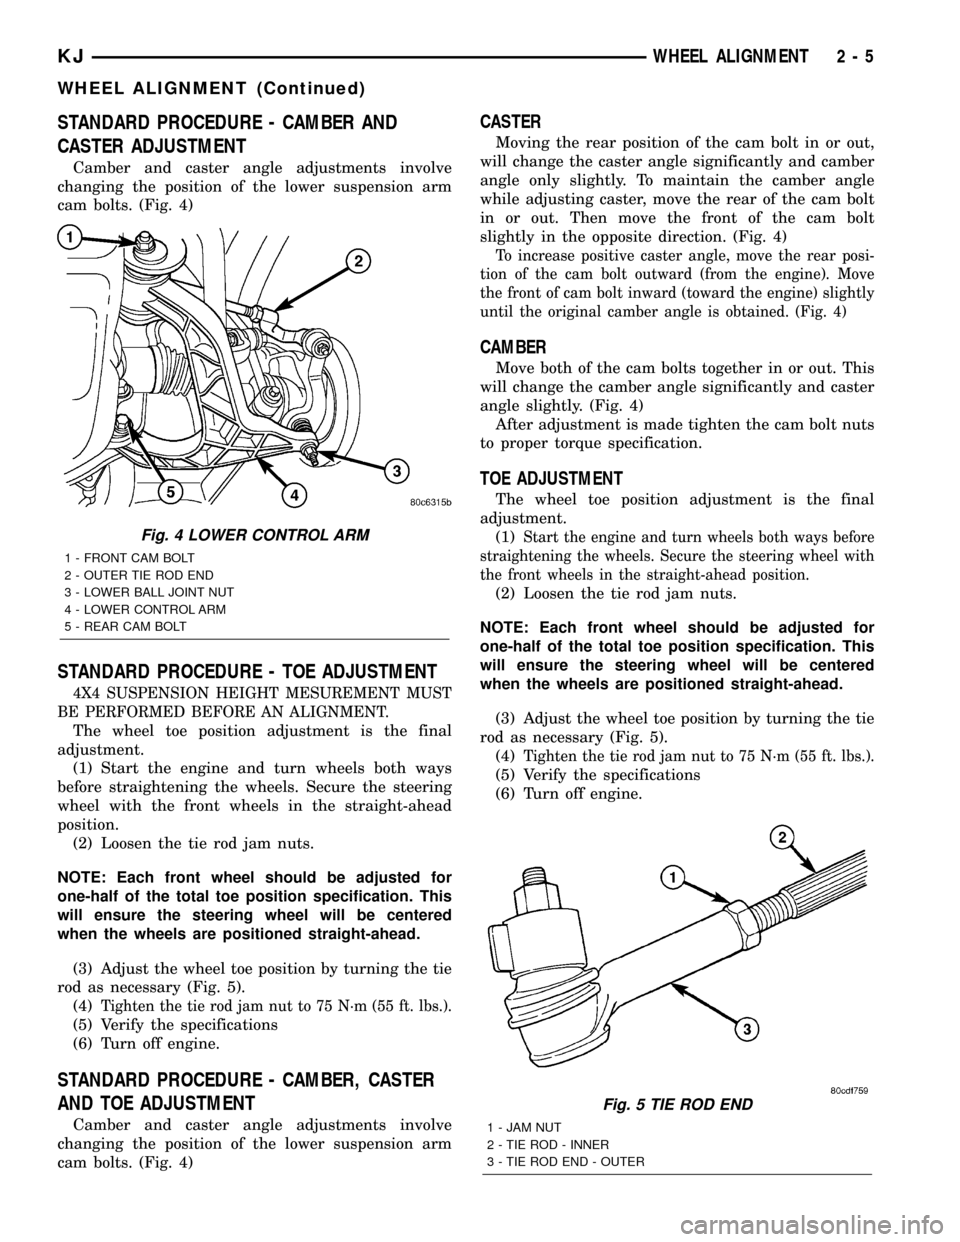
Camber and caster angle adjustments involve
changing the position of the lower suspension arm
cam bolts. (Fig. 4)
STANDARD PROCEDURE - TOE ADJUSTMENT
4X4 SUSPENSION HEIGHT MESUREMENT MUST
BE PERFORMED BEFORE AN ALIGNMENT.
The wheel toe position adjustment is the final
adjustment.
(1) Start the engine and turn wheels both ways
before straightening the wheels. Secure the steering
wheel with the front wheels in the straight-ahead
position.
(2) Loosen the tie rod jam nuts.
NOTE: Each front wheel should be adjusted for
one-half of the total toe position specification. This
will ensure the steering wheel will be centered
when the wheels are positioned straight-ahead.
(3) Adjust the wheel toe position by turning the tie
rod as necessary (Fig. 5).
(4)
Tighten the tie rod jam nut to 75 N´m (55 ft. lbs.).
(5) Verify the specifications
(6) Turn off engine.
STANDARD PROCEDURE - CAMBER, CASTER
AND TOE ADJUSTMENT
Camber and caster angle adjustments involve
changing the position of the lower suspension arm
cam bolts. (Fig. 4)
CASTER
Moving the rear position of the cam bolt in or out,
will change the caster angle significantly and camber
angle only slightly. To maintain the camber angle
while adjusting caster, move the rear of the cam bolt
in or out. Then move the front of the cam bolt
slightly in the opposite direction. (Fig. 4)
To increase positive caster angle, move the rear posi-
tion of the cam bolt outward (from the engine). Move
the front of cam bolt inward (toward the engine) slightly
until the original camber angle is obtained. (Fig. 4)
CAMBER
Move both of the cam bolts together in or out. This
will change the camber angle significantly and caster
angle slightly. (Fig. 4)
After adjustment is made tighten the cam bolt nuts
to proper torque specification.
TOE ADJUSTMENT
The wheel toe position adjustment is the final
adjustment.
(1)
Start the engine and turn wheels both ways before
straightening the wheels. Secure the steering wheel with
the front wheels in the straight-ahead position.
(2) Loosen the tie rod jam nuts.
NOTE: Each front wheel should be adjusted for
one-half of the total toe position specification. This
will ensure the steering wheel will be centered
when the wheels are positioned straight-ahead.
(3) Adjust the wheel toe position by turning the tie
rod as necessary (Fig. 5).
(4)
Tighten the tie rod jam nut to 75 N´m (55 ft. lbs.).
(5) Verify the specifications
(6) Turn off engine.
Fig. 5 TIE ROD END
1 - JAM NUT
2 - TIE ROD - INNER
3 - TIE ROD END - OUTER
Fig. 4 LOWER CONTROL ARM
1 - FRONT CAM BOLT
2 - OUTER TIE ROD END
3 - LOWER BALL JOINT NUT
4 - LOWER CONTROL ARM
5 - REAR CAM BOLT
KJWHEEL ALIGNMENT 2 - 5
WHEEL ALIGNMENT (Continued)
Page 28 of 1803
SPECIFICATIONS
TORQUE CHART
TORQUE SPECIFICATIONS
DESCRIPTION N´m Ft. Lbs. In. Lbs.
Front Shock Absorber Clevis Bracket Upper Nut 136 100 Ð
Front Shock Absorber Clevis Bracket Lower Nut 150 110 Ð
Front Shock Absorber Top (4) Mounting Nuts 108 80 Ð
Front Shock to Spring and Insulator Nut 41 30 Ð
Upper Suspension Arm Front Nut 122 90 Ð
Upper Suspension Arm Rear Nut 122 90 Ð
Lower Suspension Arm Front Nut 170 125 Ð
Lower Suspension Arm Rear Nut 170 125 Ð
Stabilizer Bar Clamp Nut 149 110 Ð
Stabilizer Bar Link Upper Nut 136 100 Ð
Stabilizer Bar Link Lower Nut 115 85 Ð
Hub/Bearing
Bolt130 96 Ð
Hub/Bearing
Halfshaft Nut135 100 Ð
Upper Ball Joint Nut 81 60 Ð
Lower Ball Joint Nut 81 60 Ð
Wheel Speed Sensor 13.5 10 Ð
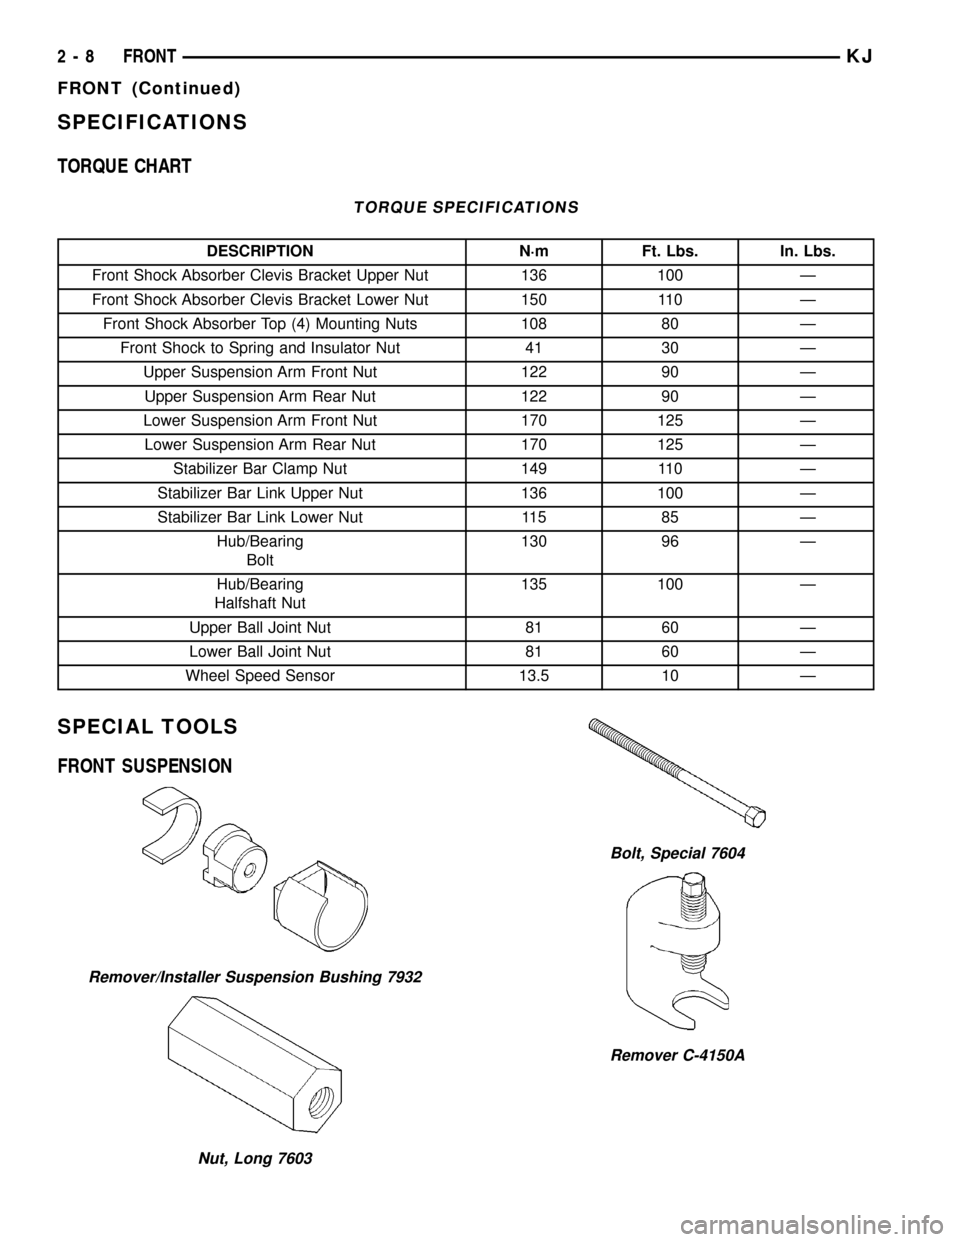
SPECIAL TOOLS
FRONT SUSPENSION
Remover/Installer Suspension Bushing 7932
Nut, Long 7603
Bolt, Special 7604
Remover C-4150A
2 - 8 FRONTKJ
FRONT (Continued)
Page 37 of 1803
DIAGNOSIS AND TESTING - REAR SUSPENSION
CONDITION POSSIBLE CAUSES CORRECTION
VEHICLE INSTABILITY 1. Loose or worn wheel bearings. 1. Replace wheel bearings.
2. Loose, worn or bent suspension
components.2. Inspect, tighten or replace components
as necessary.
3. Tire pressure. 3. Adjust tire pressure.
VEHICLE PULLS TO ONE
SIDE1. Weak or broken spring. 1. Replace spring.
2. Alignment. 2. Align vehicle to specifications.
3.Tires. 3. Replace tires.
4. Brakes. 4. Repair as necassary.
KNOCKING, RATTLING
OR SQUEAKING1. Worn shock bushings. 1. Replace shock.
2. Loose shock mounting. 2. Tighten to specifications.
3. Shock valve. 3. Replace shock.
4. Loose upper ball joint. 4. Replace ball joint.
5. Loose, worn or bent suspension
components.5. Inspect, tighten or replace components
as necessary.
IMPROPER TRACKING 1. Loose, worn or bent suspension
components.1. Inspect, tighten or replace components
as necessary.
2. Bent axle. 2.Replace axle.
SPECIFICATIONS
TORQUE CHART
TORQUE SPECIFICATIONS
DESCRIPTION N´m Ft. Lbs. In. Lbs.
Shock Absorber Upper Nut 108 80 Ð
Shock Absorber Lower Nut 115 85 Ð
Suspension Arm Upper Ball Joint Nut 95 70 Ð
Suspension Arm Upper Frame Bolts 100 74 Ð
Rear Upper Ball Joint Bracket Bolts 136 100 Ð
Suspension Arms Lower Body/Axle Bracket Nut 163 120 Ð
Suspension Arms Lower Frame Bracket Nut 163 120 Ð
Stabilizer Bar Bolts 99 73 Ð
KJREAR 2 - 17
REAR (Continued)
Page 60 of 1803
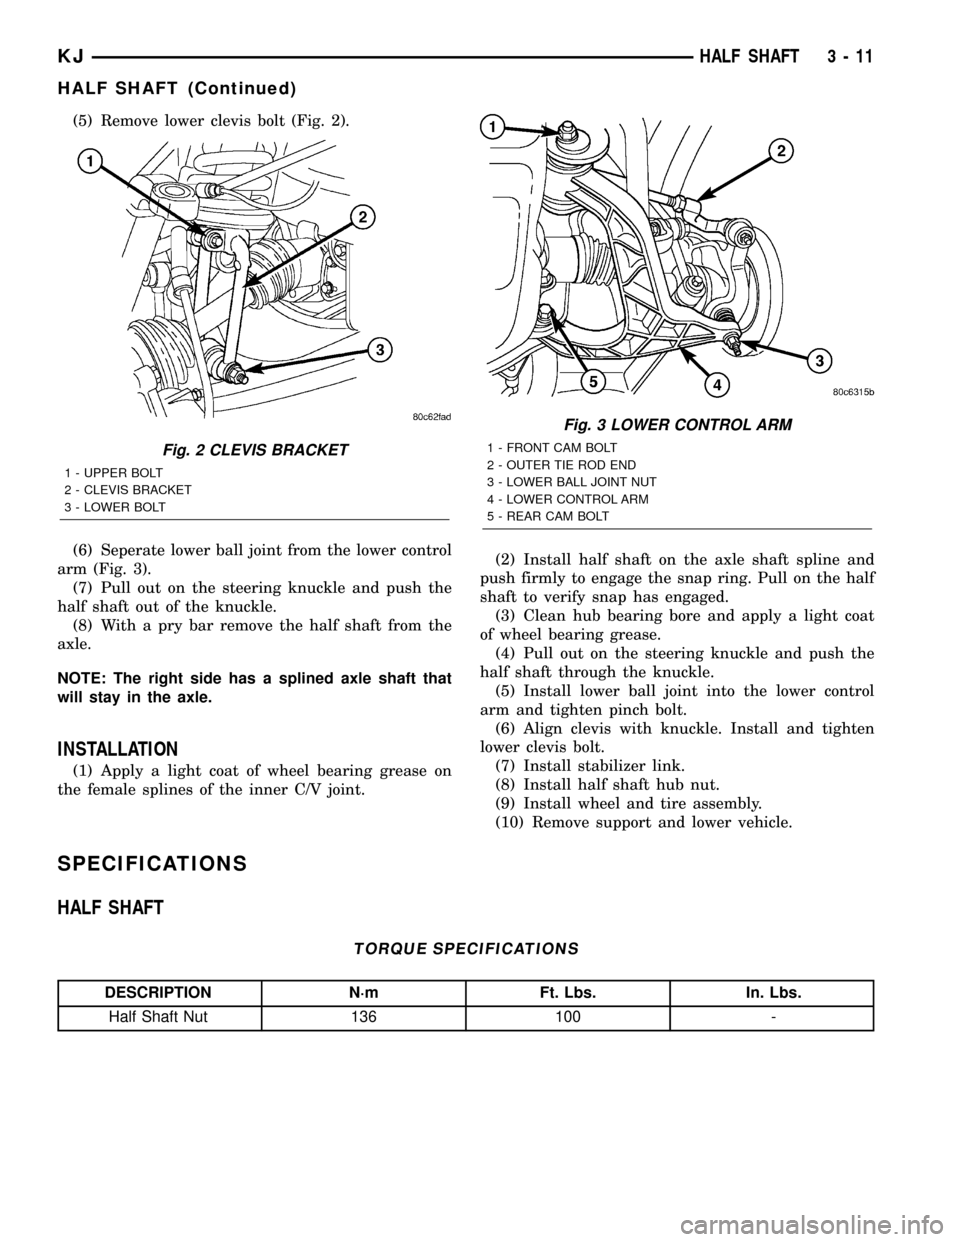
(5) Remove lower clevis bolt (Fig. 2).
(6) Seperate lower ball joint from the lower control
arm (Fig. 3).
(7) Pull out on the steering knuckle and push the
half shaft out of the knuckle.
(8) With a pry bar remove the half shaft from the
axle.
NOTE: The right side has a splined axle shaft that
will stay in the axle.
INSTALLATION
(1) Apply a light coat of wheel bearing grease on
the female splines of the inner C/V joint.(2) Install half shaft on the axle shaft spline and
push firmly to engage the snap ring. Pull on the half
shaft to verify snap has engaged.
(3) Clean hub bearing bore and apply a light coat
of wheel bearing grease.
(4) Pull out on the steering knuckle and push the
half shaft through the knuckle.
(5) Install lower ball joint into the lower control
arm and tighten pinch bolt.
(6) Align clevis with knuckle. Install and tighten
lower clevis bolt.
(7) Install stabilizer link.
(8) Install half shaft hub nut.
(9) Install wheel and tire assembly.
(10) Remove support and lower vehicle.
SPECIFICATIONS
HALF SHAFT
TORQUE SPECIFICATIONS
DESCRIPTION N´m Ft. Lbs. In. Lbs.
Half Shaft Nut 136 100 -
Fig. 3 LOWER CONTROL ARM
1 - FRONT CAM BOLT
2 - OUTER TIE ROD END
3 - LOWER BALL JOINT NUT
4 - LOWER CONTROL ARM
5 - REAR CAM BOLTFig. 2 CLEVIS BRACKET
1 - UPPER BOLT
2 - CLEVIS BRACKET
3 - LOWER BOLT
KJHALF SHAFT 3 - 11
HALF SHAFT (Continued)
Page 68 of 1803
FRONT AXLE - 186FIA
TABLE OF CONTENTS
page page
FRONT AXLE - 186FIA
DESCRIPTION.........................19
OPERATION...........................19
DIAGNOSIS AND TESTING - AXLE..........20
REMOVAL.............................24
INSTALLATION.........................24
ADJUSTMENTS........................25
SPECIFICATIONS - FRONT AXLE...........33
SPECIAL TOOLS
FRONT AXLE........................34
AXLE SHAFTS
REMOVAL.............................37
INSTALLATION.........................37
AXLE SHAFT SEALS
REMOVAL.............................37
INSTALLATION.........................38
AXLE BEARINGS
REMOVAL.............................38INSTALLATION.........................38
PINION SEAL
REMOVAL.............................38
INSTALLATION.........................39
DIFFERENTIAL
REMOVAL.............................40
DISASSEMBLY.........................41
ASSEMBLY............................41
INSTALLATION.........................42
DIFFERENTIAL CASE BEARINGS
REMOVAL.............................43
INSTALLATION.........................44
PINION GEAR/RING GEAR
REMOVAL.............................44
INSTALLATION.........................46
FRONT AXLE - 186FIA
DESCRIPTION
The 186FIA (Model 30) axle consists of an alumu-
num center section with an axle tube extending from
one side. The tube is pressed into the differential
housing. The integral type housing, hypoid gear
design has the centerline of the pinion set below the
centerline of the ring gear.
The differential case is a one-piece design. The differ-
ential pinion mate shaft is retained with a roll-pin. Dif-
ferential bearing preload and ring gear backlash is
adjusted by the use of shims (select thickness). The
shims are located between the differential bearing cups
and the axle housing. Pinion bearing preload is set and
maintained by the use of a collapsible spacer.
The power is transferred from the axle through two
constant velocity (C/V) drive shafts to the wheel hubs.
The differential cover provides a means for inspec-
tion and service without removing the axle from the
vehicle. The cover has a vent tube used to relieve
internal pressure caused by vaporization and inter-
nal expansion.
OPERATION
The axle receives power from the transfer case through
the front propeller shaft. The front propeller shaft is con-
nected to the pinion gear which rotates the differential
through the gear mesh with the ring gear bolted to thedifferential case. The engine power is transmitted to the
axle shafts through the pinion mate and side gears. The
side gears are splined to the axle shafts.
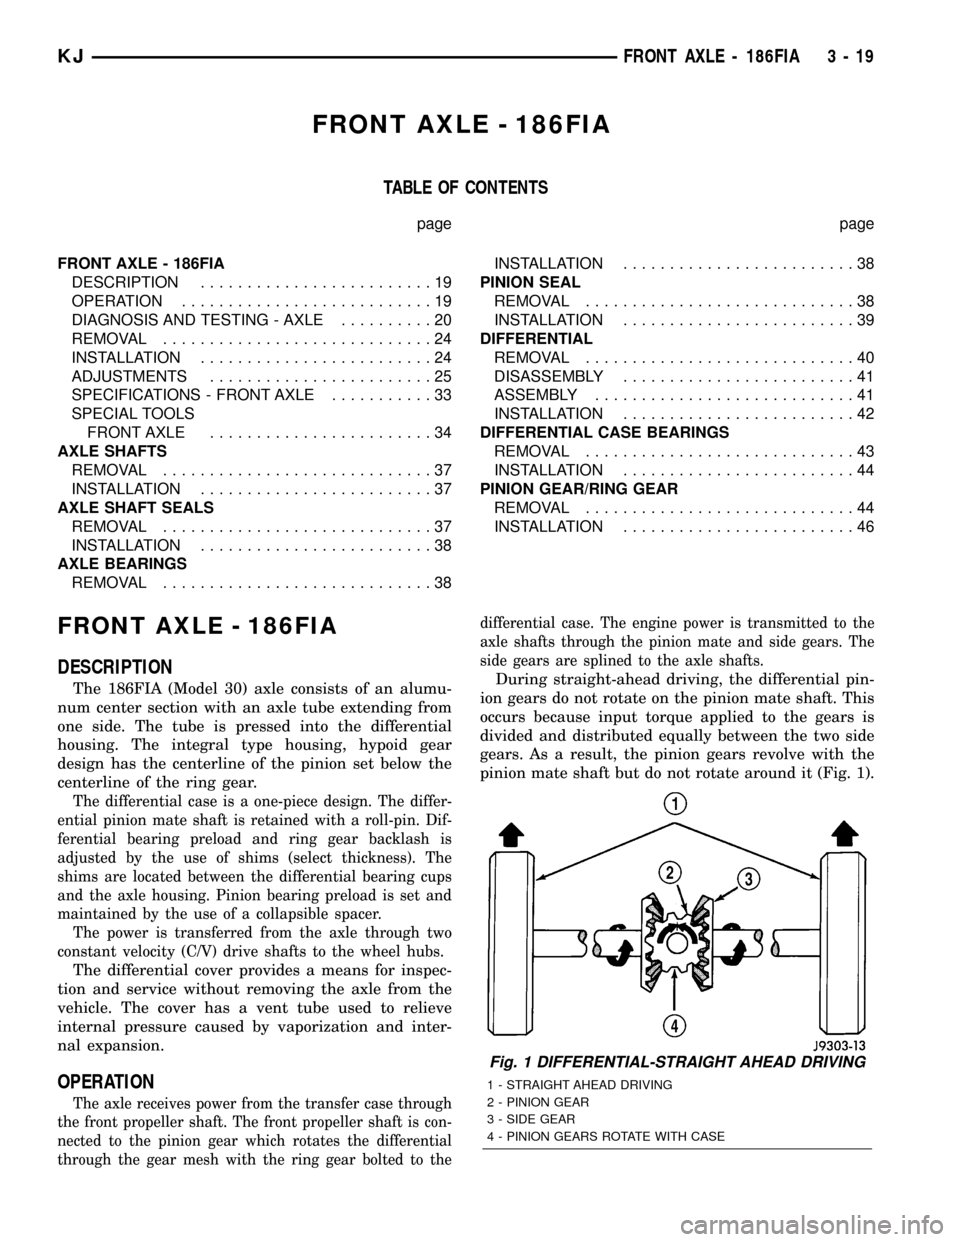
During straight-ahead driving, the differential pin-
ion gears do not rotate on the pinion mate shaft. This
occurs because input torque applied to the gears is
divided and distributed equally between the two side
gears. As a result, the pinion gears revolve with the
pinion mate shaft but do not rotate around it (Fig. 1).
Fig. 1 DIFFERENTIAL-STRAIGHT AHEAD DRIVING
1 - STRAIGHT AHEAD DRIVING
2 - PINION GEAR
3 - SIDE GEAR
4 - PINION GEARS ROTATE WITH CASE
KJFRONT AXLE - 186FIA 3 - 19
Page 89 of 1803
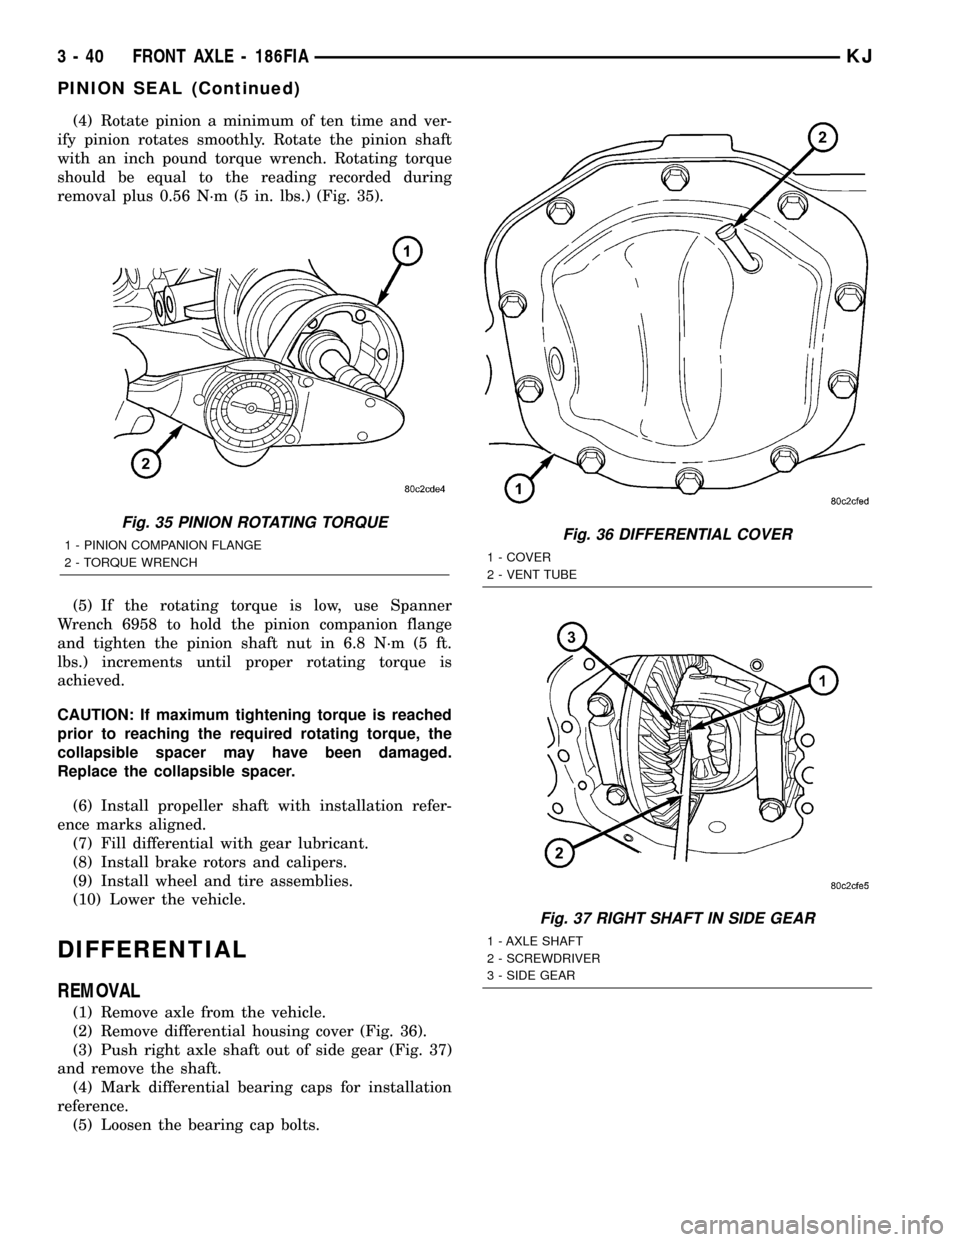
(4) Rotate pinion a minimum of ten time and ver-
ify pinion rotates smoothly. Rotate the pinion shaft
with an inch pound torque wrench. Rotating torque
should be equal to the reading recorded during
removal plus 0.56 N´m (5 in. lbs.) (Fig. 35).
(5) If the rotating torque is low, use Spanner
Wrench 6958 to hold the pinion companion flange
and tighten the pinion shaft nut in 6.8 N´m (5 ft.
lbs.) increments until proper rotating torque is
achieved.
CAUTION: If maximum tightening torque is reached
prior to reaching the required rotating torque, the
collapsible spacer may have been damaged.
Replace the collapsible spacer.
(6) Install propeller shaft with installation refer-
ence marks aligned.
(7) Fill differential with gear lubricant.
(8) Install brake rotors and calipers.
(9) Install wheel and tire assemblies.
(10) Lower the vehicle.
DIFFERENTIAL
REMOVAL
(1) Remove axle from the vehicle.
(2) Remove differential housing cover (Fig. 36).
(3) Push right axle shaft out of side gear (Fig. 37)
and remove the shaft.
(4) Mark differential bearing caps for installation
reference.
(5) Loosen the bearing cap bolts.
Fig. 35 PINION ROTATING TORQUE
1 - PINION COMPANION FLANGE
2 - TORQUE WRENCHFig. 36 DIFFERENTIAL COVER
1 - COVER
2 - VENT TUBE
Fig. 37 RIGHT SHAFT IN SIDE GEAR
1 - AXLE SHAFT
2 - SCREWDRIVER
3 - SIDE GEAR
3 - 40 FRONT AXLE - 186FIAKJ
PINION SEAL (Continued)
Page 99 of 1803
rear propeller shaft is connected to the pinion gear
which rotates the differential through the gear mesh
with the ring gear bolted to the differential case. The
engine power is transmitted to the axle shafts
through the pinion mate and side gears. The side
gears are splined to the axle shafts.
STANDARD DIFFERENTIAL
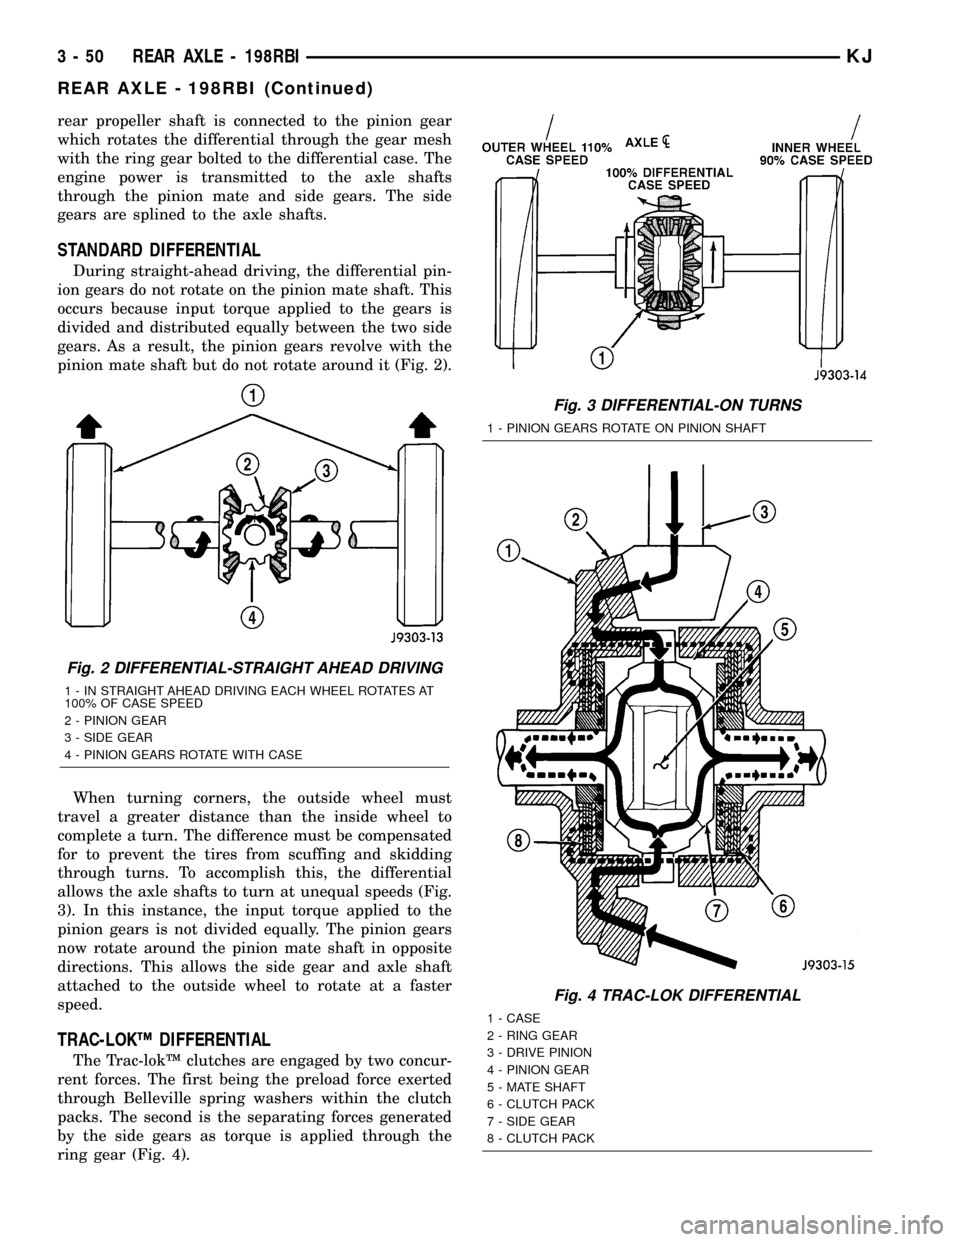
During straight-ahead driving, the differential pin-
ion gears do not rotate on the pinion mate shaft. This
occurs because input torque applied to the gears is
divided and distributed equally between the two side
gears. As a result, the pinion gears revolve with the
pinion mate shaft but do not rotate around it (Fig. 2).
When turning corners, the outside wheel must
travel a greater distance than the inside wheel to
complete a turn. The difference must be compensated
for to prevent the tires from scuffing and skidding
through turns. To accomplish this, the differential
allows the axle shafts to turn at unequal speeds (Fig.
3). In this instance, the input torque applied to the
pinion gears is not divided equally. The pinion gears
now rotate around the pinion mate shaft in opposite
directions. This allows the side gear and axle shaft
attached to the outside wheel to rotate at a faster
speed.
TRAC-LOKŸ DIFFERENTIAL
The Trac-lokŸ clutches are engaged by two concur-
rent forces. The first being the preload force exerted
through Belleville spring washers within the clutch
packs. The second is the separating forces generated
by the side gears as torque is applied through the
ring gear (Fig. 4).
Fig. 2 DIFFERENTIAL-STRAIGHT AHEAD DRIVING
1 - IN STRAIGHT AHEAD DRIVING EACH WHEEL ROTATES AT
100% OF CASE SPEED
2 - PINION GEAR
3 - SIDE GEAR
4 - PINION GEARS ROTATE WITH CASE
Fig. 3 DIFFERENTIAL-ON TURNS
1 - PINION GEARS ROTATE ON PINION SHAFT
Fig. 4 TRAC-LOK DIFFERENTIAL
1 - CASE
2 - RING GEAR
3 - DRIVE PINION
4 - PINION GEAR
5 - MATE SHAFT
6 - CLUTCH PACK
7 - SIDE GEAR
8 - CLUTCH PACK
3 - 50 REAR AXLE - 198RBIKJ
REAR AXLE - 198RBI (Continued)
Page 103 of 1803
REMOVAL
(1) Raise and support the vehicle.
(2) Position a lift/jack under the axle and secure
axle to device.
(3) Remove wheels and tires.
(4) Mark propeller shaft and pinion yoke for
installation reference.
(5) Remove propeller shaft and suspend under the
vehicle.
(6) Remove brake drums, parking brake cables and
speed sensor from the axle.
(7) Disconnect the brake hose at the body junction
block.
(8) Remove brakes and backing plates.
(9) Remove vent hose from the axle shaft tube.
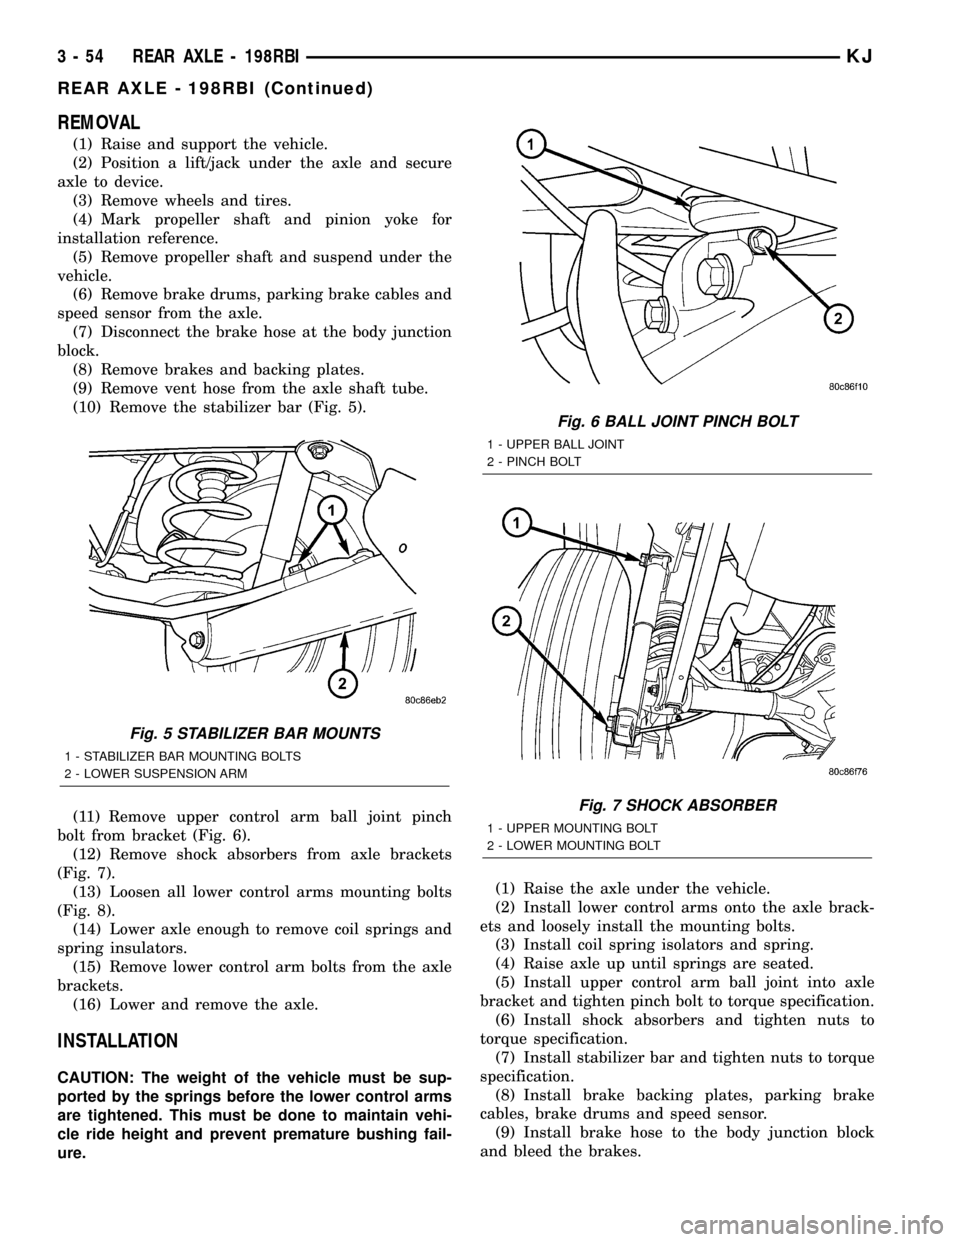
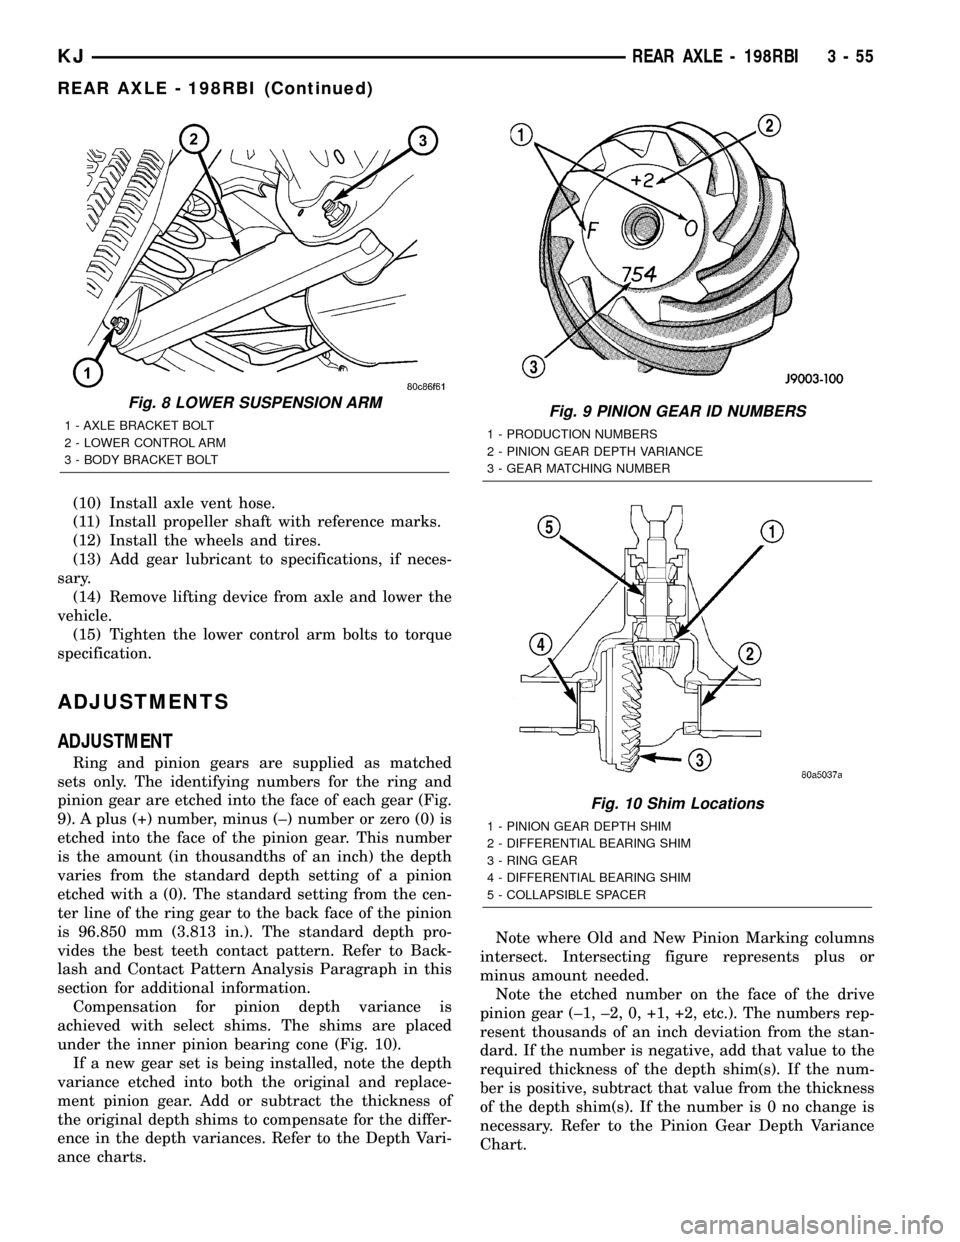
(10) Remove the stabilizer bar (Fig. 5).
(11) Remove upper control arm ball joint pinch
bolt from bracket (Fig. 6).
(12) Remove shock absorbers from axle brackets
(Fig. 7).
(13) Loosen all lower control arms mounting bolts
(Fig. 8).
(14) Lower axle enough to remove coil springs and
spring insulators.
(15) Remove lower control arm bolts from the axle
brackets.
(16) Lower and remove the axle.
INSTALLATION
CAUTION: The weight of the vehicle must be sup-
ported by the springs before the lower control arms
are tightened. This must be done to maintain vehi-
cle ride height and prevent premature bushing fail-
ure.(1) Raise the axle under the vehicle.
(2) Install lower control arms onto the axle brack-
ets and loosely install the mounting bolts.
(3) Install coil spring isolators and spring.
(4) Raise axle up until springs are seated.
(5) Install upper control arm ball joint into axle
bracket and tighten pinch bolt to torque specification.
(6) Install shock absorbers and tighten nuts to
torque specification.
(7) Install stabilizer bar and tighten nuts to torque
specification.
(8) Install brake backing plates, parking brake
cables, brake drums and speed sensor.
(9) Install brake hose to the body junction block
and bleed the brakes.
Fig. 5 STABILIZER BAR MOUNTS
1 - STABILIZER BAR MOUNTING BOLTS
2 - LOWER SUSPENSION ARM
Fig. 6 BALL JOINT PINCH BOLT
1 - UPPER BALL JOINT
2 - PINCH BOLT
Fig. 7 SHOCK ABSORBER
1 - UPPER MOUNTING BOLT
2 - LOWER MOUNTING BOLT
3 - 54 REAR AXLE - 198RBIKJ
REAR AXLE - 198RBI (Continued)
Page 104 of 1803
(10) Install axle vent hose.
(11) Install propeller shaft with reference marks.
(12) Install the wheels and tires.
(13) Add gear lubricant to specifications, if neces-
sary.
(14) Remove lifting device from axle and lower the
vehicle.
(15) Tighten the lower control arm bolts to torque
specification.
ADJUSTMENTS
ADJUSTMENT
Ring and pinion gears are supplied as matched
sets only. The identifying numbers for the ring and
pinion gear are etched into the face of each gear (Fig.
9). A plus (+) number, minus (±) number or zero (0) is
etched into the face of the pinion gear. This number
is the amount (in thousandths of an inch) the depth
varies from the standard depth setting of a pinion
etched with a (0). The standard setting from the cen-
ter line of the ring gear to the back face of the pinion
is 96.850 mm (3.813 in.). The standard depth pro-
vides the best teeth contact pattern. Refer to Back-
lash and Contact Pattern Analysis Paragraph in this
section for additional information.
Compensation for pinion depth variance is
achieved with select shims. The shims are placed
under the inner pinion bearing cone (Fig. 10).
If a new gear set is being installed, note the depth
variance etched into both the original and replace-
ment pinion gear. Add or subtract the thickness of
the original depth shims to compensate for the differ-
ence in the depth variances. Refer to the Depth Vari-
ance charts.Note where Old and New Pinion Marking columns
intersect. Intersecting figure represents plus or
minus amount needed.
Note the etched number on the face of the drive
pinion gear (±1, ±2, 0, +1, +2, etc.). The numbers rep-
resent thousands of an inch deviation from the stan-
dard. If the number is negative, add that value to the
required thickness of the depth shim(s). If the num-
ber is positive, subtract that value from the thickness
of the depth shim(s). If the number is 0 no change is
necessary. Refer to the Pinion Gear Depth Variance
Chart.
Fig. 8 LOWER SUSPENSION ARM
1 - AXLE BRACKET BOLT
2 - LOWER CONTROL ARM
3 - BODY BRACKET BOLTFig. 9 PINION GEAR ID NUMBERS
1 - PRODUCTION NUMBERS
2 - PINION GEAR DEPTH VARIANCE
3 - GEAR MATCHING NUMBER
Fig. 10 Shim Locations
1 - PINION GEAR DEPTH SHIM
2 - DIFFERENTIAL BEARING SHIM
3 - RING GEAR
4 - DIFFERENTIAL BEARING SHIM
5 - COLLAPSIBLE SPACER
KJREAR AXLE - 198RBI 3 - 55
REAR AXLE - 198RBI (Continued)
Page 123 of 1803
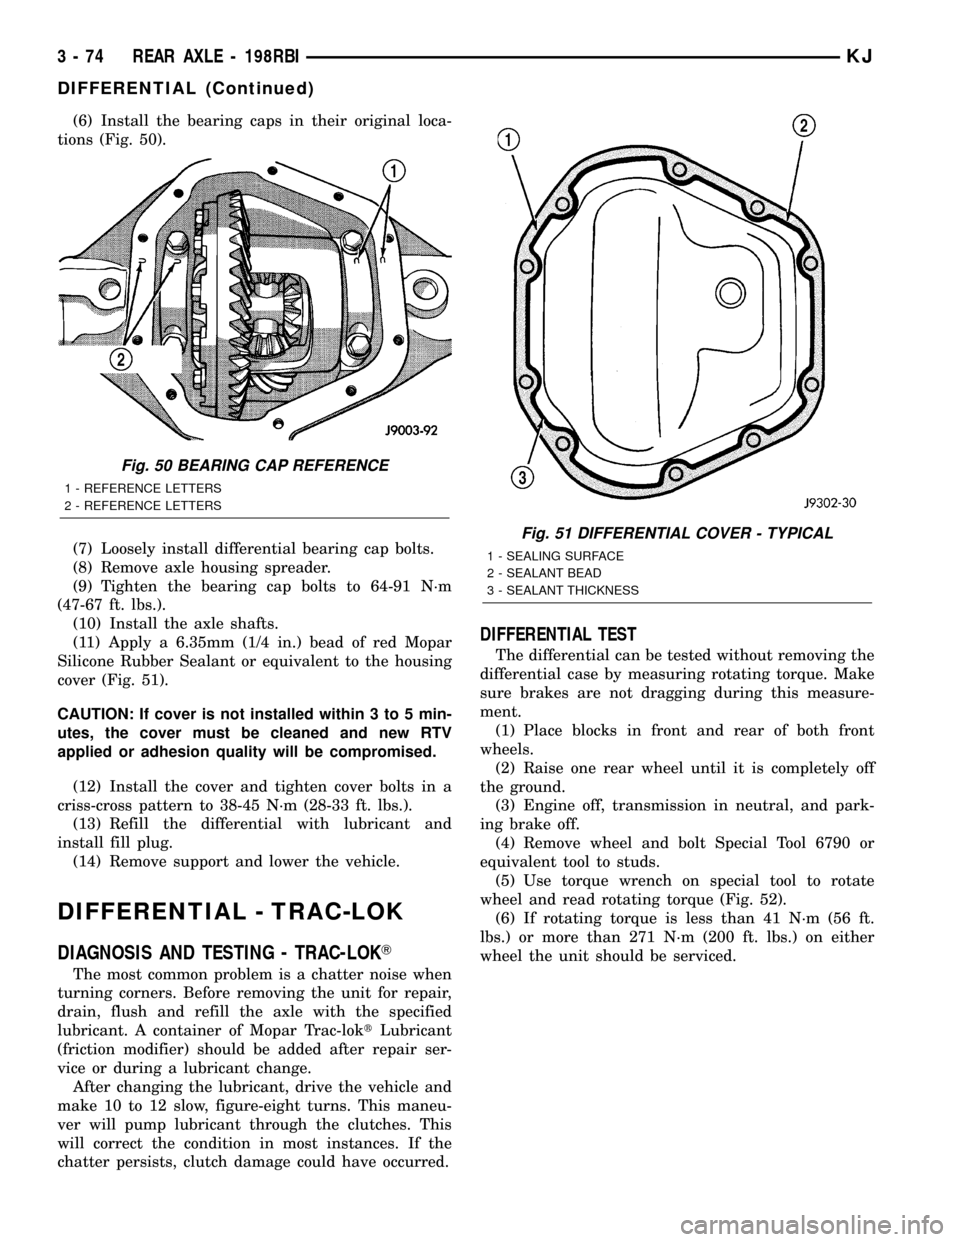
(6) Install the bearing caps in their original loca-
tions (Fig. 50).
(7) Loosely install differential bearing cap bolts.
(8) Remove axle housing spreader.
(9) Tighten the bearing cap bolts to 64-91 N´m
(47-67 ft. lbs.).
(10) Install the axle shafts.
(11) Apply a 6.35mm (1/4 in.) bead of red Mopar
Silicone Rubber Sealant or equivalent to the housing
cover (Fig. 51).
CAUTION: If cover is not installed within 3 to 5 min-
utes, the cover must be cleaned and new RTV
applied or adhesion quality will be compromised.
(12) Install the cover and tighten cover bolts in a
criss-cross pattern to 38-45 N´m (28-33 ft. lbs.).
(13) Refill the differential with lubricant and
install fill plug.
(14) Remove support and lower the vehicle.
DIFFERENTIAL - TRAC-LOK
DIAGNOSIS AND TESTING - TRAC-LOKT
The most common problem is a chatter noise when
turning corners. Before removing the unit for repair,
drain, flush and refill the axle with the specified
lubricant. A container of Mopar Trac-loktLubricant
(friction modifier) should be added after repair ser-
vice or during a lubricant change.
After changing the lubricant, drive the vehicle and
make 10 to 12 slow, figure-eight turns. This maneu-
ver will pump lubricant through the clutches. This
will correct the condition in most instances. If the
chatter persists, clutch damage could have occurred.
DIFFERENTIAL TEST
The differential can be tested without removing the
differential case by measuring rotating torque. Make
sure brakes are not dragging during this measure-
ment.
(1) Place blocks in front and rear of both front
wheels.
(2) Raise one rear wheel until it is completely off
the ground.
(3) Engine off, transmission in neutral, and park-
ing brake off.
(4) Remove wheel and bolt Special Tool 6790 or
equivalent tool to studs.
(5) Use torque wrench on special tool to rotate
wheel and read rotating torque (Fig. 52).
(6) If rotating torque is less than 41 N´m (56 ft.
lbs.) or more than 271 N´m (200 ft. lbs.) on either
wheel the unit should be serviced.
Fig. 50 BEARING CAP REFERENCE
1 - REFERENCE LETTERS
2 - REFERENCE LETTERS
Fig. 51 DIFFERENTIAL COVER - TYPICAL
1 - SEALING SURFACE
2 - SEALANT BEAD
3 - SEALANT THICKNESS
3 - 74 REAR AXLE - 198RBIKJ
DIFFERENTIAL (Continued)