automatic transmission JEEP LIBERTY 2004 KJ / 1.G User Guide
[x] Cancel search | Manufacturer: JEEP, Model Year: 2004, Model line: LIBERTY, Model: JEEP LIBERTY 2004 KJ / 1.GPages: 374, PDF Size: 5.71 MB
Page 231 of 374
rearward into 4LO. In 4 FULL TIME, there is a neutral
stop to prevent shifting into N (Neutral) by accident.
NOTE:Pausing in transfer case N (Neutral) in vehicles
equipped with an automatic transmission may require
shutting the engine OFF to avoid gear clash while
completing the shift. If difficulty occurs, shift transmis-
sion to N (Neutral), hold foot on brake, and turn engine
OFF. Make shift to desired mode.
NOTE:Shifting into or out of 4LO is possible with the
vehicle completely stopped, however difficulty may oc-
cur due to the mating clutch teeth not being properly
aligned. Several attempts may be required for clutch
teeth alignment and shift completion to occur. The pre-
ferred method is with the vehicle rolling 2 to 3 mph (3 to
5 km/h). Avoid attempting to engage or disengage 4LO
with the vehicle moving faster than 2 to 3 mph (3 to 5
km/h).TRAC-LOKŸ REAR AXLE Ð IF EQUIPPED
The optional Trac-LokŸ rear axle provides a constant
driving force to both rear wheels and reduces wheel spin
caused by the loss of traction at one driving wheel. If
traction differs between the two rear wheels, the differ-
ential automatically proportions the usable torque by
providing more torque to the wheel that has traction.
Trac-LokŸ is especially helpful during slippery driving
conditions. With both rear wheels on a slippery surface, a
slight application of the accelerator will supply maxi-
mum traction. When starting with only one rear wheel on
an excessively slippery surface, slight application of the
parking brake may be necessary to gain maximum trac-
tion.
STARTING AND OPERATING 231
5
Page 264 of 374
TRAILER TOWING
In this section you will find information on limits to the
type of towing you can reasonably do with your vehicle.
Before towing a trailer, carefully review this information
to tow your load as efficiently and safely as possible.
To maintain warranty coverage, follow the requirements
and recommendations in this manual concerning ve-
hicles used for trailer towing.
Perform maintenance services as prescribed in the
ªMaintenance Schedulesº section. When your vehicle is
used for trailer towing, never exceed the gross axle
weight rating (GAWR) by the addition of:
²The tongue weight of the trailer.
²The weight of any other type of cargo or equipment
put in or on your vehicle.
Remember that everything put in or on the trailer adds to
the load on your vehicle.
Warranty Requirements
The manufacturer's warranty will apply to vehicles used
to tow trailers for noncommercial use, however the
following conditions must be met:
²The ªDº Overdrive range can be selected when tow-
ing. However, if frequent shifting occurs select the
ªO/D Offº function or move the shift lever to the next
lower position to eliminate excessive automatic trans-
mission shifting. This action will also reduce the
possibility of transmission overheating and provide
better engine braking. Refer to ªTransmission Shift-
ingº in this section for additional information.
²A load equalizing hitch is recommended for loaded
trailer weights above 1,000 lbs (454 kg).
264 STARTING AND OPERATING
Page 265 of 374
CAUTION!
If the trailer weighs more than 1,000 lbs (454 kg)
loaded, it should have its own brakes and they
should be of adequate capacity. Failure to do this
could lead to accelerated brake lining wear, higher
brake pedal effort, and longer stopping distances.
WARNING!
Connecting trailer brakes to your vehicle's hydraulic
brake lines can overload your brake system and
cause it to fail. You might not have brakes when you
need them and could have an accident.
²Whenever you pull a trailer, regardless of the trailer
size, stop lights and turn signals on the trailer are
mandatory for motoring safety.
²Follow the maintenance intervals in schedule ªBº for
changing the automatic transmission fluid and filter, if
you REGULARLY tow a trailer for more than 45
minutes of continuous operation.
STARTING AND OPERATING 265
5
Page 268 of 374
CAUTION!
It is necessary to follow these steps to be certain that
the transfer case is fully in N (Neutral) before
recreational towing to prevent damage to internal
parts.
1. Depress brake pedal.
2. Shift transmission into N (Neutral).
3. Shift transfer case lever into N (Neutral).
4. Start engine.
5. Shift automatic transmission into D (Drive) or manual
transmission into any forward gear.
6. Release brake pedal and ensure that there is no vehicle
movement.7. Shut the engine OFF and place the ignition key into
the unlocked OFF position.
8. Shift automatic transmission into P (Park) or ensure
manual transmission is in any forward gear.
9. Apply parking brake.
10. Attach vehicle to the tow vehicle with tow bar.
11. Release parking brake.
CAUTION!
Transmission damage may occur if the automatic
transmission is shifted into P (Park) with the transfer
case in N (Neutral) and the engine running. With the
transfer case in N (Neutral) ensure that the engine is
OFF prior to shifting the transmission into P (Park)
(refer to steps7±8above).
268 STARTING AND OPERATING
Page 269 of 374
Shifting Out Of Neutral (N)
Use the following procedure to prepare your vehicle for
normal usage.
1. Shift transmission into N (Neutral).
2. Shift transfer case lever to desired position.
3. Shift automatic transmission into D (Drive) or manual
transmission into any forward gear.
NOTE:When shifting out of transfer case N (Neutral)
on automatic transmission equipped vehicles, turning
the engine OFF may be required to avoid gear clash.WARNING!
You or others could be injured if you leave the
vehicle unattended with the transfer case in the N
(Neutral) position without first fully engaging the
parking brake. The transfer case N (Neutral) position
disengages both the front and rear driveshafts from
the powertrain and will allow the vehicle to move
regardless of the transmission position. The parking
brake should always be applied when the driver is
not in the vehicle.
CAUTION!
Do not use a bumper mounted clamp-on tow bar on
your vehicle. The bumper face bar will be damaged.
STARTING AND OPERATING 269
5
Page 276 of 374
Preparation
²
Park on a firm, level surface well off the road, to
provide ample work space. Place automatic transmis-
sion in P (Park), or manual transmission in R (Re-
verse), and stop engine. Set parking brake firmly and
activate hazard warning flasher.
²Block tire diagonally oppo-
site tire to be changed to pre-
vent forward and backward
vehicle movement.
Instructions
1. Remove spare tire, jack and tools from stored location.
2. Before raising vehicle, loosen lug nuts on wheel with
flat tire.3. Assemble the jack and jacking tools as shown. Connect
jack handle driver to extensions, then to lug wrench.
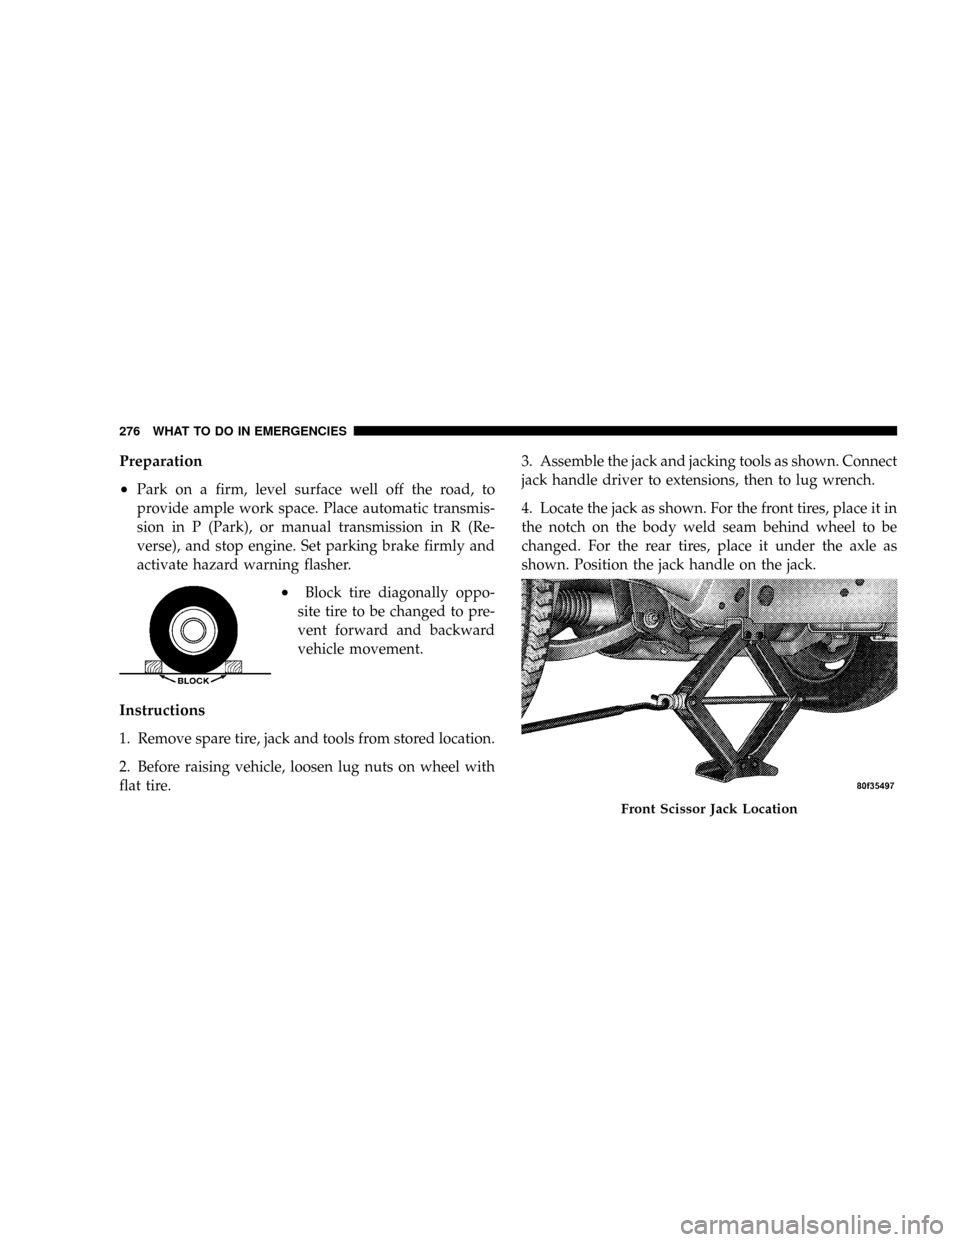
4. Locate the jack as shown. For the front tires, place it in
the notch on the body weld seam behind wheel to be
changed. For the rear tires, place it under the axle as
shown. Position the jack handle on the jack.
Front Scissor Jack Location
276 WHAT TO DO IN EMERGENCIES
Page 279 of 374
²Do not let passengers sit in the vehicle when it is on a
jack.
²Do not get under the vehicle when it is on a jack.
²Failure to follow the ªTire Changing Procedureº may
result in personal injury or damage to your vehicle.
²Only use the jack in the positions indicated.
JUMP STARTING PROCEDURE
NOTE:Check the charge indicator on the battery. If the
indicator is light or yellow, replace the battery.
1. Wear eye protection and remove any metal jewelry
such as watch bands or bracelets that might make an
unintended electrical contact.
2. When boost is provided by a battery in another
vehicle, park that vehicle within booster cable reach but
without letting the vehicles touch. Set the parking brake,place the automatic transmission in P (Park), or manual
transmission in N (Neutral), and turn the ignition to OFF
for both vehicles.
3. Turn off the heater, radio and all unnecessary electrical
loads.
4. Connect one end of a jumper cable to the positive
terminal of the discharged battery. Connect the other end
of the same cable to the positive terminal of the booster
battery.
5. Connect the other cable, first to the negative terminal
of the booster battery and then connect the other end to
a non-paint metal surface on the engine of the vehicle
with the discharged battery. Make sure you have a good
contact on the engine.
6. Start the engine in the vehicle which has the booster
battery, let the engine idle a few minutes, then start the
engine in the vehicle with the discharged battery.
WHAT TO DO IN EMERGENCIES 279
6
Page 284 of 374
NPower Steering Fluid Check..............300
NDriveline And Steering Component
Lubrication..........................301
NBody Lubrication.....................301
NWindshield Wiper Blades................301
NWindshield Washers...................302
NExhaust System......................302
NCooling System.......................303
NHoses And Vacuum/Vapor Harnesses.......307
NBrake System........................308
NAutomatic Transmission................311
NHydraulic Clutch Fluid
Ð Manual Transmission................313
NManual Transmission..................313NTransfer Case........................313
NFront/Rear Axle Fluid..................315
NAppearance Care And Protection From
Corrosion...........................315
mFuse Panel...........................320
NInterior Fuses........................320
N
Underhood Fuses (Power Distribution Center). 323
mVehicle Storage........................324
mReplacement Bulbs......................324
mFluid Capacities........................326
mRecommended Fluids, Lubricants And Genuine
Parts................................327
NEngine.............................327
NChassis............................328
284 MAINTAINING YOUR VEHICLE
Page 287 of 374
ONBOARD DIAGNOSTIC SYSTEM Ð OBD II
Your vehicle is equipped with a sophisticated onboard
diagnostic system called OBD II. This system monitors
the performance of the emissions, engine, and automatic
transmission control systems. When these systems are
operating properly, your vehicle will provide excellent
performance and fuel economy, as well as engine emis-
sions well within current government regulations.
If any of these systems require service, the OBD II system
will turn on the ªMalfunction Indicator Light.º It will
also store diagnostic codes and other information to
assist your service technician in making repairs. Al-
though your vehicle will usually be drivable and not
need towing, see your dealer for service as soon as
possible.CAUTION!
²Prolonged driving with the ªMalfunction Indica-
tor Lightº on could cause further damage to the
emission control system. It could also affect fuel
economy and driveability. The vehicle must be
serviced before any emissions tests can be per-
formed.
²If the ªMalfunction Indicator Lightº is flashing
while the engine is running, severe catalytic con-
verter damage and power loss will soon occur.
Immediate service is required.
MAINTAINING YOUR VEHICLE 287
7
Page 311 of 374

WARNING!
Overfilling the brake fluid reservoir can result in
spilling brake fluid on hot engine parts and the
brake fluid catching fire.
Use only brake fluid that has been in a tightly closed
container to avoid contamination from foreign matter. Do
not allow petroleum base fluid to contaminate the brake
fluid as seal damage will result.
Automatic Transmission
Selection of Lubricant
It is important that the proper lubricant is used in the
transmission to assure optimum transmission perfor-
mance. Use only manufacturer's recommended transmis-
sion fluid, refer to Recommended Fluids, Lubricants, and
Genuine Parts for correct fluid type. It is important that
the transmission fluid be maintained at the prescribed
level using the recommended fluid.
CAUTION!
Using a transmission fluid other than the manufac-
turer's recommended fluid may cause deterioration
in transmission shift quality and/or torque converter
shudder. Using a transmission fluid other than the
manufacturer's recommended fluid will result in
more frequent fluid and filter changes. Refer to
Recommended Fluids, Lubricants, and Genuine
Parts for correct fluid type.
Fluid Level Check ± 3.7L 42RLE
This fluid level should be checked when the engine is
fully warmed up and the fluid in the transmission is
heated to its normal operating temperature. Operation of
the transmission with an improper fluid level will greatly
reduce the life of the transmission and of the fluid.
MAINTAINING YOUR VEHICLE 311
7