spare tire JEEP PATRIOT 2007 1.G Owners Manual
[x] Cancel search | Manufacturer: JEEP, Model Year: 2007, Model line: PATRIOT, Model: JEEP PATRIOT 2007 1.GPages: 440, PDF Size: 7.26 MB
Page 72 of 440
Defroster
Check operation by selecting the defrost mode and place
the blower control on high speed. You should be able to
feel the air directed against the windshield.
Periodic Safety Checks You Should Make Outside
The Vehicle
Tires
Examine tires for excessive tread wear or uneven wear
patterns. Check for stones, nails, glass, or other objects
lodged in the tread. Inspect tread and sidewall for cuts or
cracks. Check wheel nuts for tightness, and tires (includ-
ing spare) for proper pressure.
Lights
Have someone observe the operation of exterior lights
while you work the controls. Check turn signal and high
beam indicator lights on the instrument panel.
Fluid Leaks
Check area under vehicle after overnight parking for fuel,
engine coolant, oil or other fluid leaks. Also, if gasoline
fumes are detected or fuel, power steering fluid, trans-
mission fluid or brake fluid leaks are suspected, the cause
should be located and corrected immediately.
THINGS TO KNOW BEFORE STARTING YOUR VEHICLE 71
2
Page 175 of 440
the pointer drops back into the normal range. If the
pointer remains on theH(red) mark, turn the engine off
immediately and call for service.
There are steps that you can take to slow down an
impending overheat condition. If your air conditioning is
on, turn it off. The air conditioning system adds heat to
the engine cooling system and turning off the A/C
removes this heat. You can also turn the Temperature
control to maximum heat, the Mode control to Floor and
the Fan control to High. This allows the heater core to act
as a supplement to the radiator and aids in removing heat
from the engine cooling system.
18. Cruise Indicator Ð If Equipped
This indicator shows that the Speed Control
System is ON.
19. Speed ControlSETlight.
This indicator shows that the Speed Control System is
SET.20. Transmission Range Indicator
This display indicator shows the automatic transmission
gear selection.
21. Odometer/Trip Odometer Reset Button
Press this button to change the display from odometer to
either of the two trip odometer settings. Trip A or Trip B
will appear when in the trip odometer mode. Push in and
hold the button for two seconds to reset the trip odometer
to 0 miles or kilometers. The odometer must be in trip
mode to reset.
22. Tire Pressure Monitor Light
Each tire, including the spare (if provided),
should be checked monthly when cold and
inflated to the inflation pressure recommended
by the vehicle manufacturer on the vehicle
placard or tire inflation pressure label. (If your vehicle
has tires of a different size than the size indicated on the
174 UNDERSTANDING YOUR INSTRUMENT PANEL
Page 236 of 440
mTires Ð General Information...............285
NTire Pressure.........................285
NTire Inflation Pressures.................286
NRadial-Ply Tires......................289
NCompact Spare Tire Ð If Equipped.........289
NLimited Use Spare Ð If Equipped.........290
NTire Spinning........................291
NTread Wear Indicators..................291
NLife Of Tire.........................292
NReplacement Tires.....................292
NAlignment And Balance.................294
mTire Pressure Monitoring System (TPMS) Ð If
Equipped............................294NBase Tire Pressure Monitoring System (TPMS)
Operation ± If Equipped................294
NPremium System ± If Equipped...........296
NGeneral Information...................301
mTire Chains...........................301
mSnow Tires...........................302
mTire Rotation Recommendations............302
mFuel Requirements......................303
NGasoline Engines.....................303
NReformulated Gasoline.................303
NGasoline/Oxygenate Blends..............304
NMMT In Gasoline.....................304
NMaterials Added To Fuel................305
STARTING AND OPERATING 235
5
Page 278 of 440
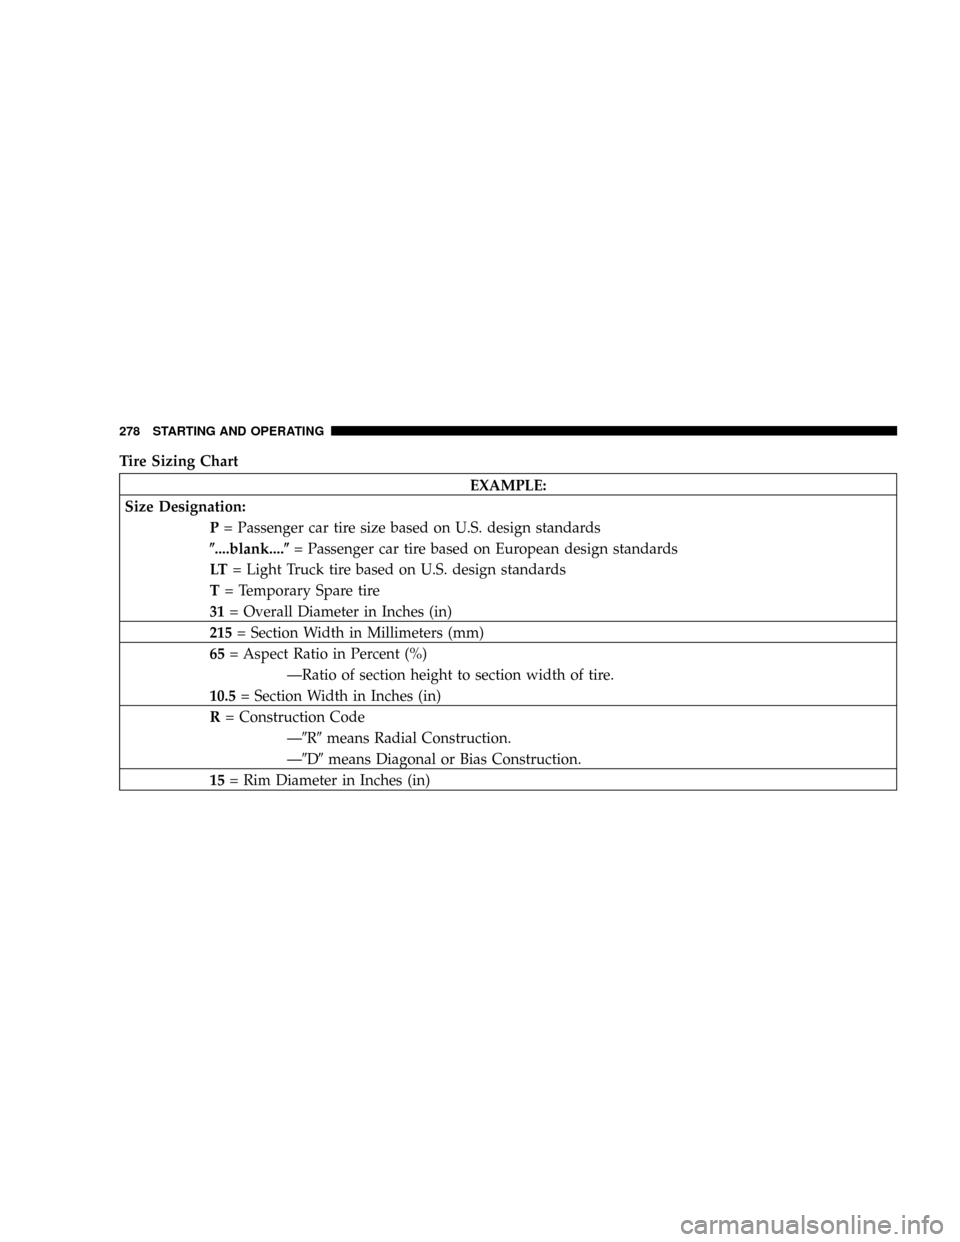
TIRE SAFETY INFORMATION
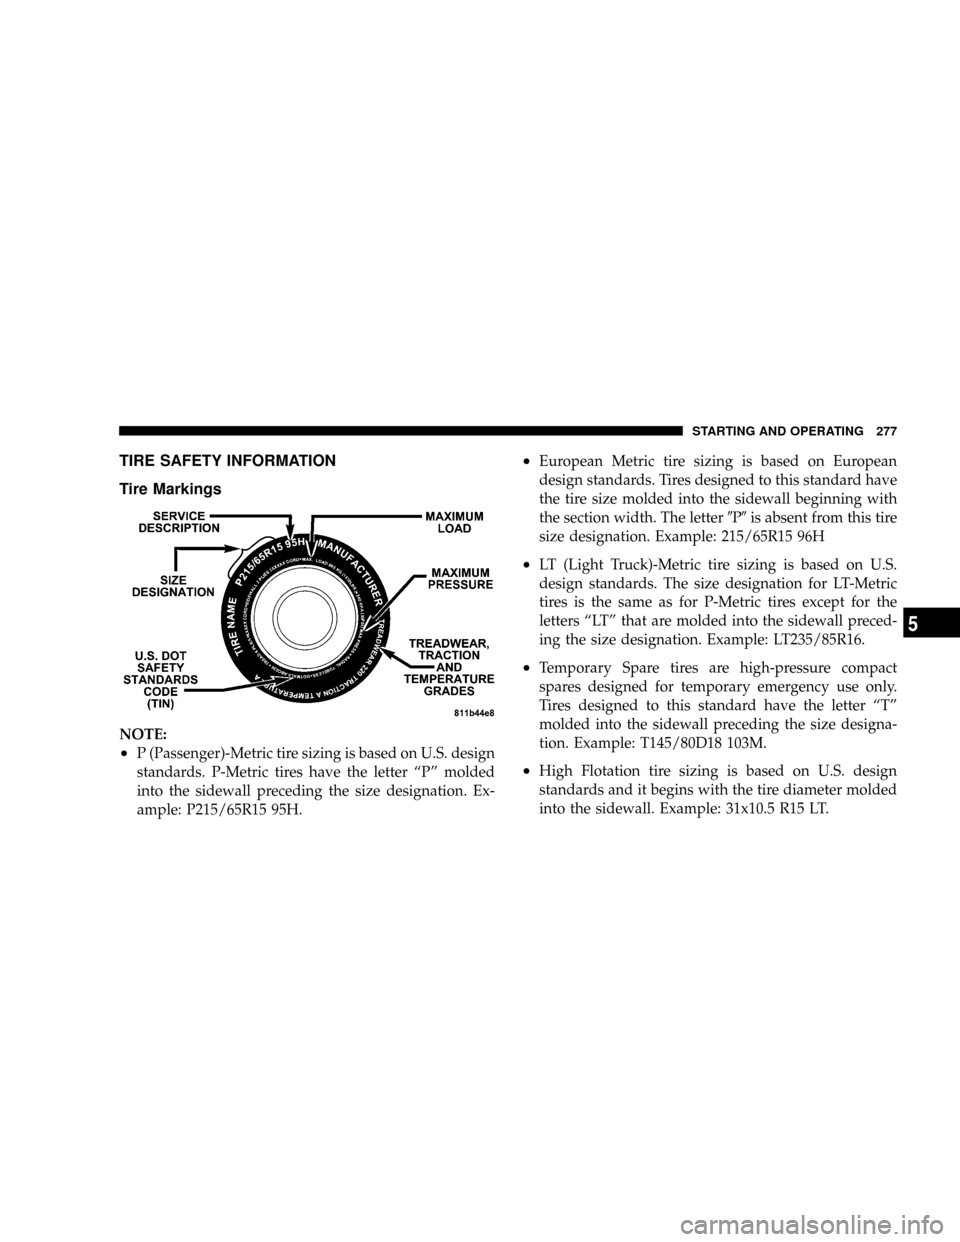
Tire Markings
NOTE:
²P (Passenger)-Metric tire sizing is based on U.S. design
standards. P-Metric tires have the letter ªPº molded
into the sidewall preceding the size designation. Ex-
ample: P215/65R15 95H.
²European Metric tire sizing is based on European
design standards. Tires designed to this standard have
the tire size molded into the sidewall beginning with
the section width. The letter9P9is absent from this tire
size designation. Example: 215/65R15 96H
²LT (Light Truck)-Metric tire sizing is based on U.S.
design standards. The size designation for LT-Metric
tires is the same as for P-Metric tires except for the
letters ªLTº that are molded into the sidewall preced-
ing the size designation. Example: LT235/85R16.
²Temporary Spare tires are high-pressure compact
spares designed for temporary emergency use only.
Tires designed to this standard have the letter ªTº
molded into the sidewall preceding the size designa-
tion. Example: T145/80D18 103M.
²High Flotation tire sizing is based on U.S. design
standards and it begins with the tire diameter molded
into the sidewall. Example: 31x10.5 R15 LT.
STARTING AND OPERATING 277
5
Page 279 of 440
Tire Sizing Chart
EXAMPLE:
Size Designation:
P= Passenger car tire size based on U.S. design standards
(....blank....(= Passenger car tire based on European design standards
LT= Light Truck tire based on U.S. design standards
T= Temporary Spare tire
31= Overall Diameter in Inches (in)
215= Section Width in Millimeters (mm)
65= Aspect Ratio in Percent (%)
ÐRatio of section height to section width of tire.
10.5= Section Width in Inches (in)
R= Construction Code
Ð9R9means Radial Construction.
Ð9D9means Diagonal or Bias Construction.
15= Rim Diameter in Inches (in)
278 STARTING AND OPERATING
Page 283 of 440
3) the tire size designed for your vehicle
4) the cold tire inflation pressures for the front, rear,
and spare tires.
Loading
The vehicle maximum load on the tire must not exceed
the load carrying capacity of the tire on your vehicle. You
will not exceed the tire's load carrying capacity if you
adhere to the loading conditions, tire size, and cold tire
inflation pressures specified on the ªTire and Loading
Informationº placard and in the ªVehicle Loadingº sec-
tion of this manual.
NOTE:Under a maximum loaded vehicle condition,
gross axle weight ratings (GAWR's) for the front and rear
axles must not be exceeded. For further information on
GAWR's, vehicle loading, and trailer towing, refer to the
ªVehicle Loadingº section of this manual.To determine the maximum loading conditions of your
vehicle, locate the statement ªThe combined weight of
occupants and cargo should never exceed XXX kg or XXX
lbs.º on the Tire and Loading Information placard. The
combined weight of occupants, cargo/luggage and
trailer tongue weight (if applicable) should never exceed
the weight referenced here.
Steps for Determining Correct Load Limit
1. Locate the statement ªThe combined weight of occu-
pants and cargo should never exceed XXX poundsº on
your vehicle's placard.
2. Determine the combined weight of the driver and
passengers that will be riding in your vehicle.
3. Subtract the combined weight of the driver and pas-
sengers from XXX kilograms or XXX pounds.
282 STARTING AND OPERATING
Page 290 of 440
Radial-Ply Tires
WARNING!
Combining radial ply tires with other types of tires
on your vehicle will cause your vehicle to handle
poorly. The instability could cause an accident. Al-
ways use radial ply tires in sets of four (or 6, in case
of trucks with dual rear wheels). Never combine
them with other types of tires.
Cuts and punctures in radial tires are repairable only in
the tread area because of sidewall flexing. Consult your
authorized tire dealer for radial tire repairs.
Compact Spare Tire Ð If Equipped
The compact spare is for temporary emergency use with
radial tires. It is engineered to be used on your style
vehicle only. Since this tire has limited tread life, the
original tire should be repaired (or replaced) and rein-
stalled at the first opportunity.
WARNING!
Temporary use spare tires are for emergency use only.
With these tires, do not drive more than 50 mph (80
km/h). Temporary-use spare tires have limited tread
life. When the tread is worn to the tread wear
indicators, the temporary use spare tire needs to be
replaced. Be sure to follow the warnings, which
apply to your spare. Failure to do so could result in
spare tire failure and loss of vehicle control.
STARTING AND OPERATING 289
5
Page 291 of 440
Do not install a wheel cover or attempt to mount a
conventional tire on the compact spare wheel, since the
wheel is designed specifically for the compact spare.
Do not install more than one compact spare tire/wheel
on the vehicle at any given time.
CAUTION!
Because of the reduced ground clearance, do not take
your vehicle through an automatic car wash with the
compact spare installed. Damage to the vehicle may
result.
Limited Use Spare Ð If Equipped
The limited use spare tire is for temporary emergency use
on your vehicle. This tire is identified by a limited use
spare tire warning label located on the limited use spare
tire and wheel assembly. This tire may look like theoriginal equipped tire on the front or rear axle of your
vehicle, but it is not. Installation of this limited use spare
tire affects vehicle handling. Since it is not the same tire,
replace (or repair) the original tire and reinstall on the
vehicle at the first opportunity.
WARNING!
The limited use spare tires are for emergency use
only. Installation of this limited use spare tire affects
vehicle handling. With this tire, do not drive more
than 60 mph (100 km/h). Keep inflated to the cold tire
inflation pressure listed on either your tire placard or
limited use spare tire and wheel assembly. Replace
(or repair) the original tire at the first opportunity
and reinstall it on your vehicle. Failure to do so could
result in loss of vehicle control.
290 STARTING AND OPERATING
Page 293 of 440
These indicators are molded into the bottom of the tread
grooves. They will appear as bands when the tread depth
becomes 1/16 inch (2 mm). When the tread is worn to the
tread wear indicators, the tire should be replaced.
Many states have laws requiring tire replacement at this
point.
Life of Tire
The service life of a tire is dependent upon varying
factors including but not limited to:
²Driving style
²Tire pressure
²Distance driven
WARNING!
Tires and spare tire should be replaced after six years,
regardless of the remaining tread. Failure to follow
this warning can result in sudden tire failure. You
could lose control and have an accident resulting in
serious injury or death.
Keep dismounted tires in a cool, dry place with as little
exposure to light as possible. Protect tires from contact
with oil, grease, and gasoline.
Replacement Tires
The tires on your new vehicle provide a balance of many
characteristics. They should be inspected regularly for
wear and correct cold tire inflation pressure. The manu-
facturer strongly recommends that you use tires equiva-
lent to the originals in size, quality and performance
when replacement is needed (refer to the paragraph on
292 STARTING AND OPERATING
Page 298 of 440
Display Settings
²Your system can be set to display pressure units in PSI,
kPa, or BAR.NOTE:These display settings may not be available due
to Regulatory Authorities. In this case, the display will
only show approved units.
NOTE:A low spare tire will not cause the Tire Pressure
Monitoring Telltale Lamp to illuminate or the chime to
sound.
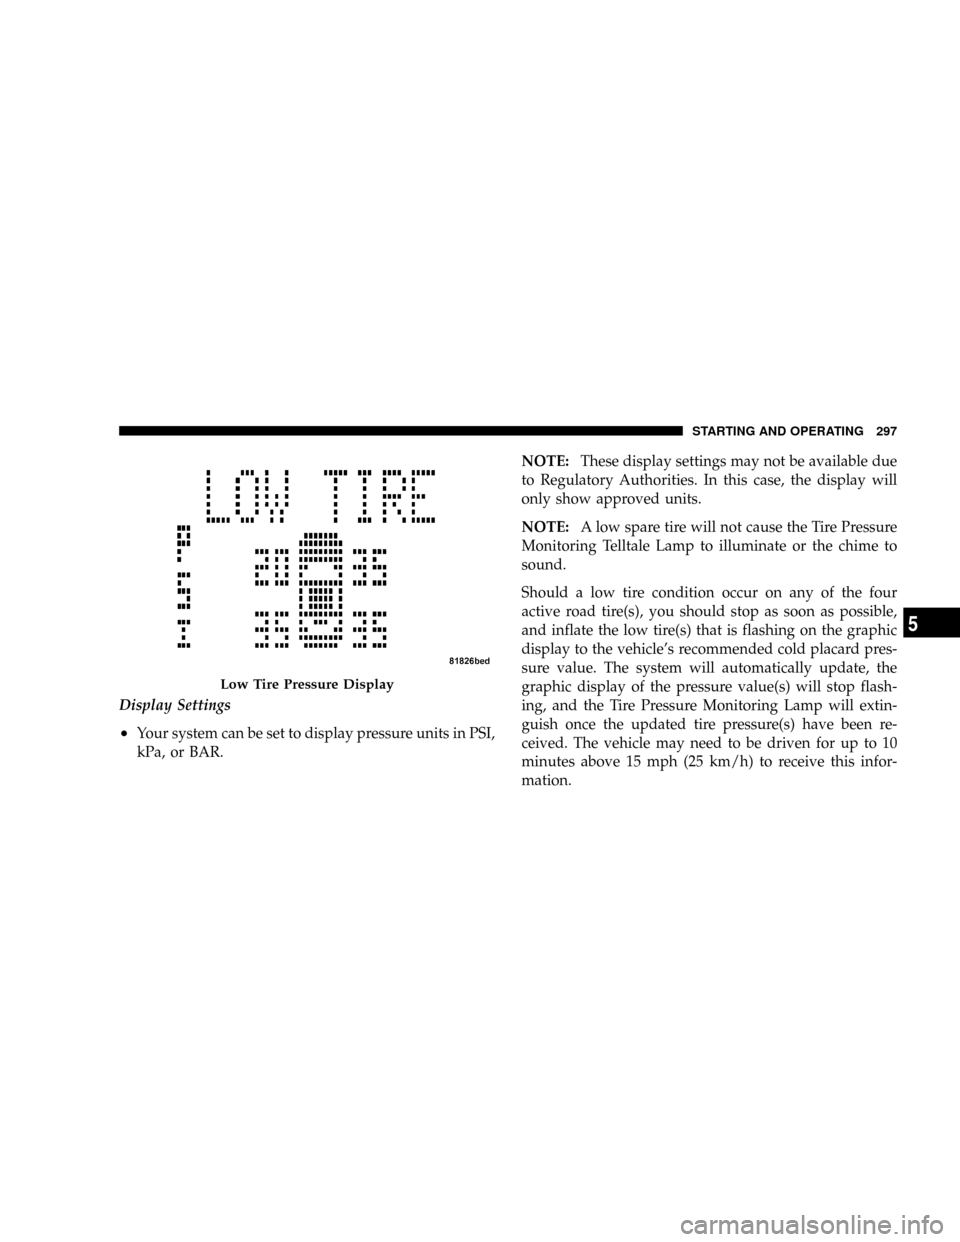
Should a low tire condition occur on any of the four
active road tire(s), you should stop as soon as possible,
and inflate the low tire(s) that is flashing on the graphic
display to the vehicle's recommended cold placard pres-
sure value. The system will automatically update, the
graphic display of the pressure value(s) will stop flash-
ing, and the Tire Pressure Monitoring Lamp will extin-
guish once the updated tire pressure(s) have been re-
ceived. The vehicle may need to be driven for up to 10
minutes above 15 mph (25 km/h) to receive this infor-
mation.
Low Tire Pressure Display
STARTING AND OPERATING 297
5