jump start JEEP PATRIOT 2016 1.G User Guide
[x] Cancel search | Manufacturer: JEEP, Model Year: 2016, Model line: PATRIOT, Model: JEEP PATRIOT 2016 1.GPages: 148, PDF Size: 8.25 MB
Page 3 of 148
INTRODUCTION/WELCOME
WELCOME FROM FCA US LLC...... 2
CONTROLS AT A GLANCE
DRIVER COCKPIT.............. 6
INSTRUMENT CLUSTER .......... 8
GETTING STARTED
KEYFOB ................... 10
REMOTE START............... 11
VEHICLE SECURITY ALARM ....... 12
SEAT BELT SYSTEMS ........... 13
SUPPLEMENTAL RESTRAINT SYSTEM
(SRS) — AIR BAGS ............ 14
CHILD RESTRAINTS ............ 18
HEAD RESTRAINTS ............. 22
FRONT SEATS ................ 23
REAR SEATS ................ 26
HEATEDSEATS ............... 27
TILT STEERING COLUMN ......... 28
OPERATING YOUR VEHICLE
ENGINE BREAK-IN
RECOMMENDATIONS........... 29
MULTIFUNCTION LEVER ......... 29
WINDSHIELD WIPERS AND WASHERS.. 31
ELECTRONIC SPEED CONTROL ..... 34
PARKVIEW REAR BACK-UP CAMERA... 37
CONTINUOUSLY VARIABLE AUTOMATIC
TRANSMISSION (CVT) ........... 37
SIX-SPEED AUTOMATIC
TRANSMISSION ............... 38
MANUAL CLIMATE CONTROLS ...... 38
AUTOMATIC TEMPERATURE CONTROLS
(ATC) ..................... 39
POWER SUNROOF ............. 40
ELECTRONICS
YOUR VEHICLE'S SOUND SYSTEM . . . 42
UCONNECT 130............... 44
UCONNECT 130 WITH SiriusXM SATELLITE
RADIO ..................... 47
UCONNECT 230 ............... 51
UCONNECT 430/430N ........... 54
SiriusXM SATELLITE RADIO/TRAVEL
LINK ...................... 66
STEERING WHEEL AUDIO CONTROLS.. 71
AUX/USB/MP3 CONTROL ......... 71
UCONNECT PHONE ............. 72
UCONNECT VOICE COMMAND ...... 75
Bluetooth STREAMING AUDIO ...... 77
ELECTRONIC VEHICLE INFORMATION
CENTER (EVIC) ............... 78
PROGRAMMABLE FEATURES ....... 79
UNIVERSAL GARAGE DOOR OPENER
(HomeLink) ................. 81
POWER INVERTER ............. 83
POWER OUTLET .............. 84
OFF-ROAD CAPABILITIES
FOUR-WHEEL DRIVE OPERATION . . . 85
UTILITY
TRAILER TOWING WEIGHTS (MAXIMUM
TRAILER WEIGHT RATINGS) ....... 87
RECREATIONAL TOWING (BEHIND
MOTORHOME, ETC.) ............ 88
WHAT TO DO IN EMERGENCIES
ROADSIDE ASSISTANCE .......... 89
INSTRUMENT CLUSTER WARNING
LIGHTS .................... 89
INSTRUMENT CLUSTER INDICATOR
LIGHTS .................... 94
IF YOUR ENGINE OVERHEATS ...... 95
AUTOMATIC TRANSMISSION
OVERHEATING ............... 96
JACKING AND TIRE CHANGING ..... 96
JUMP-STARTING PROCEDURES .... 103
SHIFT LEVER OVERRIDE ........ 106
TOWING A DISABLED VEHICLE .... 107
FREEING A STUCK VEHICLE ...... 108
ENHANCED ACCIDENT RESPONSE SYSTEM
(EARS) .................... 109
EVENT DATA RECORDER (EDR) .... 109
MAINTAINING YOUR VEHICLE
TO OPEN AND CLOSE THE HOOD . . . 110
ENGINE COMPARTMENT — 2.0L . . . 112
ENGINE COMPARTMENT — 2.4L . . . 114
FLUID CAPACITIES............ 116
FLUIDS, LUBRICANTS, AND GENUINE
PARTS .................... 116
MAINTENANCE PROCEDURES ..... 118
MAINTENANCE SCHEDULE ....... 118
FUSES .................... 123
TIRES — GENERAL INFORMATION . . 125
REPLACEMENT BULBS ......... 128
CUSTOMER ASSISTANCE
FCA US LLC CUSTOMER CENTER . . . 129
FCA CANADA INC. CUSTOMER
CENTER.................. 129
ASSISTANCE FOR THE HEARING
IMPAIRED ................. 129
PUBLICATIONS ORDERING ....... 129
REPORTING SAFETY DEFECTS IN THE
UNITEDSTATES .............. 130
MOPAR® ACCESSORIES
AUTHENTIC ACCESSORIES BY
MOPAR ................... 131
FAQ
FREQUENTLY ASKED QUESTIONS . . . 132
INDEX.................. 134
TABLE OF CONTENTS
Page 105 of 148
Vehicles Without Wheel Covers
1. Mount the road tire on the axle.
2. Install the remaining lug nuts with the cone shaped end of the nut toward thewheel. Lightly tighten the lug nuts.
WARNING!
To avoid the risk of forcing the vehicle off the jack, do not fully tighten the lug nuts
until the vehicle has been lowered. Failure to follow this warning may result in
serious injury.
3. Lower the vehicle to the ground by turning the jack handle counterclockwise.
4. Finish tightening the lug nuts. Push down on the wrench while at the end of the handle for increased leverage. Tighten the lug nuts in a star pattern until each nut
has been tightened twice. The correct tightness of each lug nut is 100 ft/lbs (135
N·m). If in doubt about the correct tightness, have them checked with a torque
wrench by your authorized dealer or service station.
5. After 25 miles (40 km) check the lug nut torque with a torque wrench to ensure that all lug nuts are properly seated against the wheel.
JUMP-STARTING PROCEDURES
If your vehicle has a discharged battery it can be jump-started using a set of jumper
cables and a battery in another vehicle or by using a portable battery booster pack.
Jump-starting can be dangerous if done improperly so please follow the procedures
in this section carefully.
NOTE:
When using a portable battery booster pack follow the manufacturer’s operating
instructions and precautions.
CAUTION!
Do not use a portable battery booster pack or any other booster source with a
system voltage greater than 12 Volts or damage to the battery, starter motor,
alternator or electrical system may occur.
WARNING!
Do not attempt jump-starting if the battery is frozen. It could rupture or explode
and cause personal injury.
WHAT TO DO IN EMERGENCIES
103
Page 106 of 148
Preparations For Jump-Start
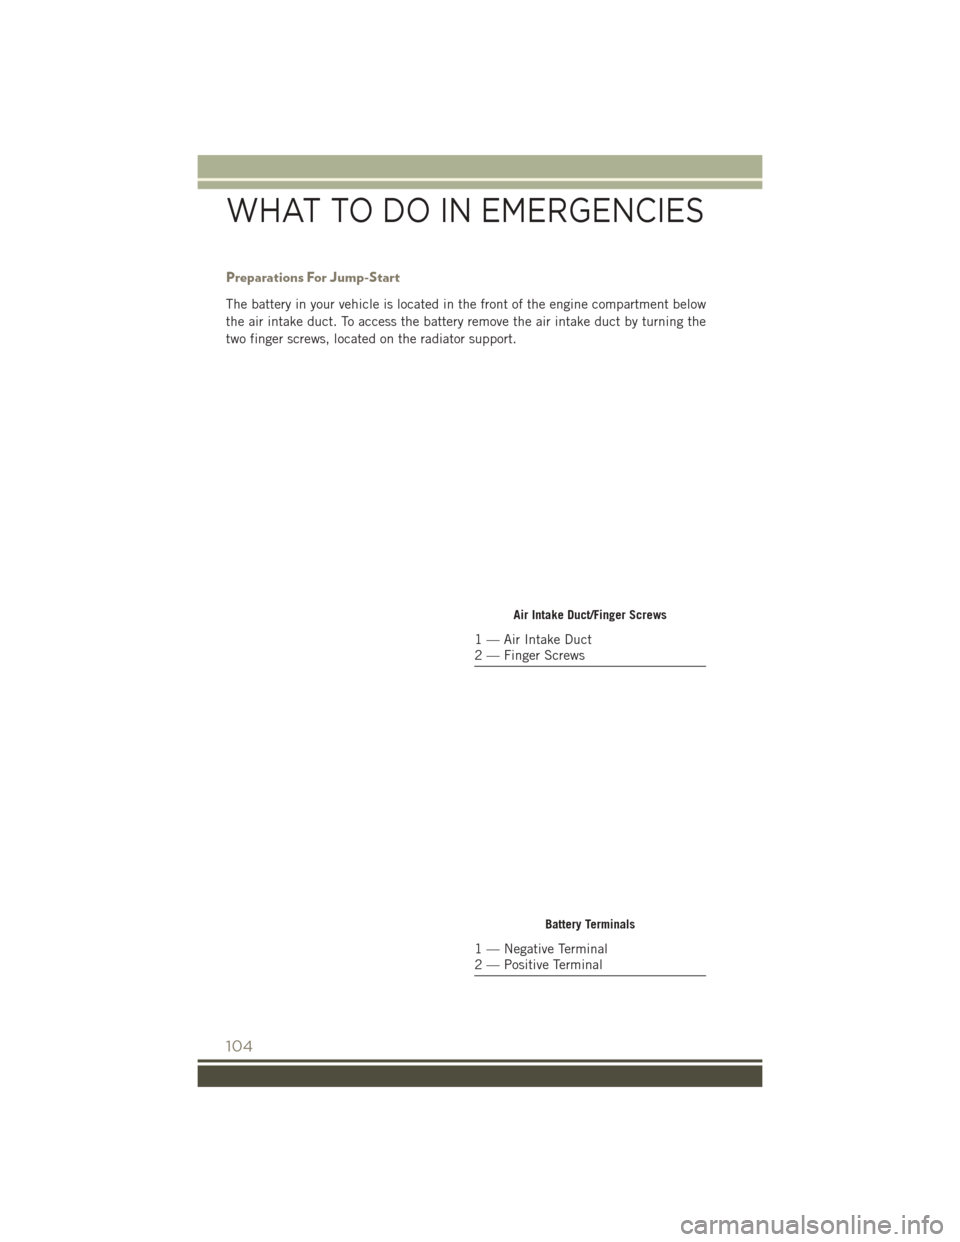
The battery in your vehicle is located in the front of the engine compartment below
the air intake duct. To access the battery remove the air intake duct by turning the
two finger screws, located on the radiator support.
Air Intake Duct/Finger Screws
1 — Air Intake Duct
2 — Finger Screws
Battery Terminals
1 — Negative Terminal
2 — Positive Terminal
WHAT TO DO IN EMERGENCIES
104
Page 107 of 148
WARNING!
• Take care to avoid the radiator cooling fan whenever the hood is raised. It canstart anytime the ignition switch is ON. You can be injured by moving fan
blades.
• Remove any metal jewelry such as rings, watch bands and bracelets that could
make an inadvertent electrical contact. You could be seriously injured.
• Batteries contain sulfuric acid that can burn your skin or eyes and generate
hydrogen gas which is flammable and explosive. Keep open flames or sparks
away from the battery.
1. Set the parking brake, shift the automatic transmission into PARK (manual transmission to NEUTRAL) and turn the ignition to LOCK.
2. Turn off the heater, radio, and all unnecessary electrical accessories.
3. If using another vehicle to jump-start the battery, park the vehicle within the jumper cables reach, set the parking brake and make sure the ignition is OFF.
WARNING!
Do not allow vehicles to touch each other as this could establish a ground
connection and personal injury could result.
Jump-Starting Procedure
WARNING!
Failure to follow this jump-starting procedure could result in personal injury or
property damage due to battery explosion.
CAUTION!
Failure to follow these procedures could result in damage to the charging system
of the booster vehicle or the discharged vehicle.
NOTE:
Remove Air Intake before proceeding with this Jump-Starting procedure.
Connecting The Jumper Cables
1. Connect the positive (+)end of the jumper cable to the positive (+)post of the
discharged vehicle.
2. Connect the opposite end of the positive (+)jumper cable to the positive (+)post
of the booster battery.
3. Connect the negative end (-)of the jumper cable to the negative (-)post of the
booster battery.
WHAT TO DO IN EMERGENCIES
105
Page 108 of 148
4. Connect the opposite end of the negative(-)jumper cable to a good engine ground
(exposed metal part of the discharged vehicle’s engine) away from the battery and
the fuel injection system.
WARNING!
Do not connect the jumper cable to the negative (-)post of the discharged battery.
The resulting electrical spark could cause the battery to explode and could result
in personal injury. Only use the specific ground point, do not use any other exposed
metal parts.
5. Start the engine in the vehicle that has the booster battery, let the engine idle a few minutes, and then start the engine in the vehicle with the discharged battery.
6. Once the engine is started, remove the jumper cables in the reverse sequence:
Disconnecting The Jumper Cables
1. Disconnect the negative (-)end of the jumper cable from the engine ground of the
vehicle with the discharged battery.
2. Disconnect the opposite end of the negative (-)jumper cable from the negative (-)
post of the booster battery.
3. Disconnect the positive (+)end of the jumper cable from the positive (+)post of
the booster battery.
4. Disconnect the opposite end of the positive (+)jumper cable from the positive (+)
post of the vehicle with the discharged battery.
5. Reinstall the air intake duct.
If frequent jump-starting is required to start your vehicle you should have the battery
and charging system inspected at your authorized dealer.
CAUTION!
Accessories plugged into the vehicle power outlets draw power from the vehicle’s
battery, even when not in use (i.e., cellular devices, etc.). Eventually, if plugged in
long enough without engine operation, the vehicle’s battery will discharge suffi-
ciently to degrade battery life and/or prevent the engine from starting.
SHIFT LEVER OVERRIDE
If a malfunction occurs and the shift lever cannot be moved out of the PARK position,
you can use the following procedure to temporarily move the shift lever:
1. Turn the engine OFF.
2. Firmly apply the parking brake.
3. Using a small screwdriver or similar tool, remove the shift lever override access cover (located on the right side of the shift lever housing).
WHAT TO DO IN EMERGENCIES
106
Page 135 of 148
UTILITY
How do I know how much I can tow with my Jeep Patriot? pg. 87
WHAT TO DO IN EMERGENCIES
What do I do if my TPMS warning light is blinking? pg. 90
How do I change a flat tire? pg. 96
How do I Jump-Start my vehicle? pg. 103
MAINTAINING YOUR VEHICLE
Where is my Fuse Block located? pg. 123
What type of oil do I use? pg. 116
How often should I change my engine’s oil? pg. 118
What should my tire pressure be set at? pg. 125
FAQ
133
Page 137 of 148
Electronic Stability Control (ESC)
Activation/Malfunction Indicator
Light ................93
Electronic Throttle Control (ETC)
Indicator Light...........90
FrontFogLightIndicator .....94
HighBeamIndicator .......94
Instrument Cluster Warning
Lights ................89
Malfunction Indicator Light
(MIL).................93
Oil Pressure Warning Light ....89
Tire Pressure Monitoring System
(TPMS) Light ............90
Turn Signal Indicator .......94
Vehicle Security Light .......94
Clutch .................118
ClutchFluid..............118
Compact Spare Tire ..........126
Compass Calibration ..........78
Coolant (Antifreeze) .........116
Cooling System ............118
Adding Coolant (Antifreeze) . .118
Coolant Level ...........118
Disposal Of Used Coolant ....118
Drain, Flush, And Refill .....118
Inspection ............118
Points To Remember ......118
Pressure Cap ...........118
Selection Of Coolant
(Antifreeze) ........116, 118
Corrosion Protection .........118
Customer Assistance ......129, 130
Defects, Reporting ..........130
Delay (Intermittent) Wipers ......32
Dimmer Switch, Headlight ......30
Disabled Vehicle Towing ........89
Disarming, Security System ......12
Disposal Antifreeze (Engine Coolant) . . .118
Driver's Seat Back Tilt .........26
Electronics Your Vehicle's Sound System . . .42
Electronic Speed Control (Cruise Control) ................34
Electronic Stability Control (ESC) . .93 Electronic Throttle Control Warning
Light.................90
Electronic Vehicle Information Center (EVIC) ................79
Average Fuel Consumption ....78
Distance Traveled .........78
Electronic Vehicle Information Cen-
ter(EVIC) ..............78
ExitMenu ..............78
Language (Selecting The
Language) ..............79
Travel Time .............78
Trip Functions ...........78
Units (Set Units) ..........79
Emergency, In Case Of Jacking ...............96
Jump Starting ..........103
Overheating ............95
Towing ............89,107
Engine Air Cleaner ............118
Break-In Recommendations . . .29
Checking Oil Level ........118
Compartment ........112, 114
Coolant (Antifreeze) .......116
Cooling ...............118
Jump Starting ..........103
Oil .............. 116, 118
Oil Filler Cap ...........118
Oil
Selection ...........118
Overheating ............95
Enhanced Accident Response Feature ...............109
Exhaust System ............118
Filters Air Cleaner ............118
EngineOil ......... 116, 118
Engine Oil Disposal .......118
Flashers TurnSignal .............94
Fluid, Brake ..............117
Fluid Capacities ............116
Fluids, Lubricants And Genuine Parts ................116
FogLights .............30,94
FoldingRearSeat ...........26
FoldingRearSeat(Sedan) ......26
INDEX
135
Page 138 of 148
Four Wheel Drive Operation......85
Freeing A Stuck Vehicle .......108
Fuel Capacity ..............116
Octane Rating ..........116
Tank Capacity ..........116
Garage Door Opener (HomeLink) ...........81,83
Gasoline(Fuel) ............116
Gear Select Lever Override ......106
GeneralMaintenance.........118
Glass Cleaning ............118
GPS Navigation (Uconnect GPS) . . .65
Hard Drive (HDD) ............59
Headlights Cleaning .............118
High Beam/Low Beam Select
Switch ...............30
OnWithWipers ..........32
Passing ...............30
Switch ...............30
Head Restraints ............22
Heated Mirrors ...........38,39
Heated Seats ..............27
High Beam Indicator ..........94
High Beam/Low Beam Select (Dimmer) Switch ................30
HomeLink Operation ..............83
HomeLink (Garage Door Opener). .81, 83
Hood Release .............110
Installing A Child Restraint With ALR..................20
Installing Child Restraints Using The LATCH Lower Anchorages .....20
Installing Child Restraints Using The Vehicle Seat Belt ..........20
Instrument Cluster ............8
Indicators ..............8
Instrument Cluster Warning Lights ............8,89,94
Instrument Panel Cover .......118
Instrument Panel Lens Cleaning . .118
Integrated Power Module (Fuses) . .123
Interior And Instrument Lights . . .6, 7 Interior Appearance Care
.......118
Intermittent Wipers (Delay Wipers) . .32
Introduction ...............2
Canada ................3
Inverter Outlet (115V) .........83
Inverter, Power .............83
iPod/USB/MP3 Control ........71
Bluetooth Streaming Audio ....77
Jacking Instructions ..........98
Jack Location ..............96
Jack Operation ...........96,98
Jump Starting .............103
KeyFob.................10 Arm The Alarm ...........12
Disarm The Alarm .........12
Lock The Doors ...........10
Panic Alarm ............10
Remote Start ............11
Unlock The Doors .........10
Key Fob Programmable Features . . .79
Lane Change Assist ..........31
Lap/Shoulder Belts ...........13
Latches Hood ...............110
LATCH (Lower Anchors And Tether For CHildren)...............18
Left Switch Steering Wheel Audio Controls . .71
Liftgate Window Wiper/Washer ....33
LightBulbs ..............128
Lights AirBag ...............17
Cruise ................94
Dimmer Switch,
Headlight ...........29,30
Engine Temperature Warning . . .92
Fog ...............30,94
Four-Wheel Drive Indicator ....94
Headlights .............30
Headlights On With Wipers ....32
Headlight Switch .........30
HighBeam .............30
High Beam Indicator .......94
High Beam/Low Beam Select . .30
Hill Descent Control Indicator . .94
INDEX
136