ignition JEEP PATRIOT 2019 Owner handbook (in English)
[x] Cancel search | Manufacturer: JEEP, Model Year: 2019, Model line: PATRIOT, Model: JEEP PATRIOT 2019Pages: 332, PDF Size: 1.99 MB
Page 191 of 332
WARNING!(Continued)
your vehicle harder to control. You could
have a collision. Have the vehicle checked
immediately.
ELECTRONIC BRAKE
CONTROL SYSTEM
Your vehicle is equipped with an advanced
Electronic Brake Control system (EBC). This
system includes Electronic Brake Force Distri-
bution (EBD), Anti-Lock Brake System (ABS),
Brake Assist System (BAS), Hill Start Assist
(HSA), Traction Control System (TCS), Elec-
tronic Stability Control (ESC), and Electronic
Roll Mitigation (ERM). These systems work
together to enhance both vehicle stability and
control in various driving conditions.
Your vehicle may also be equipped with Hill
Descent Control (HDC).
Electronic Brake Force Distribution
(EBD)
This function manages the distribution of the
braking torque between the front and rear axles
by limiting braking pressure to the rear axle.
This is done to prevent overslip of the rear
wheels to avoid vehicle instability, and to pre-
vent the rear axle from entering ABS before the
front axle.
Brake System Warning LightThe red “Brake System Warning Light” will turn
on when the ignition switch is turned to the ON
position and may stay on for as long as four
seconds.
If the “Brake System Warning Light” remains on
or comes on while driving, it indicates that the
brake system is not functioning properly and
that immediate service is required. If the “Brake
System Warning Light” does not come on when
the ignition switch is turned to the ON position,
have the light repaired as soon as possible.
Anti-Lock Brake System (ABS)The Anti-Lock Brake System (ABS) provides
increased vehicle stability and brake perfor-
mance under most braking conditions. The sys-
tem automatically prevents wheel lock, and
enhances vehicle control during braking.
The ABS performs a self-check cycle to ensure
that the ABS is working properly each time the
vehicle is started and driven. During this self-
check, you may hear a slight clicking sound as
well as some related motor noises.
ABS is activated during braking when the sys-
tem detects one or more wheels begins to lock.
Road conditions such as ice, snow, gravel,
bumps, railroad tracks, loose debris, or panic
stops may increase the likelihood of ABS acti-
vation(s).
You also may experience the following when
ABS activates:
•The ABS motor noise (it may continue to run
for a short time after the stop).
•The clicking sound of solenoid valves.
•Brake pedal pulsations.
187
Page 192 of 332
•A slight drop of the brake pedal at the end of
the stop.
These are all normal characteristics of ABS.
WARNING!
•The ABS contains sophisticated electronic
equipment that may be susceptible to in-
terference caused by improperly installed
or high output radio transmitting equip-
ment. This interference can cause possible
loss of anti-lock braking capability. Instal-
lation of such equipment should be per-
formed by qualified professionals.
•Pumping of the Anti-Lock Brakes will di-
minish their effectiveness and may lead to
a collision. Pumping makes the stopping
distance longer. Just press firmly on your
brake pedal when you need to slow down
or stop.
(Continued)
WARNING!(Continued)
•The ABS cannot prevent the natural laws
of physics from acting on the vehicle, nor
can it increase braking or steering effi-
ciency beyond that afforded by the condi-
tion of the vehicle brakes and tires or the
traction afforded.
•The ABS cannot prevent collisions, includ-
ing those resulting from excessive speed
in turns, following another vehicle too
closely, or hydroplaning.
•The capabilities of an ABS equipped ve-
hicle must never be exploited in a reckless
or dangerous manner that could jeopar-
dize the user’s safety or the safety of
others.
ABS is designed to function with the OEM tires.
Modification may result in degraded ABS per-
formance.
Anti-Lock Brake Warning LightThe amber “Anti-Lock Brake Warning Light” will
turn on when the ignition switch is turned to the
ON position and may stay on for as long as four
seconds.
If the “Anti-Lock Brake Warning Light” remains
on or comes on while driving, it indicates that
the anti-lock portion of the brake system is not
functioning and that service is required. How-
ever, the conventional brake system will con-
tinue to operate normally if the “Brake System
Warning Light” is not on.
If the “Anti-Lock Brake Warning Light” is on, the
brake system should be serviced as soon as
possible to restore the benefits of anti-lock
brakes. If the “Anti-Lock Brake Warning Light”
does not come on when the ignition switch is
turned to the ON position, have the light re-
paired as soon as possible.
188
Page 195 of 332
four times within twenty seconds. The “ESC
Off Indicator Light” should turn on and turn
off two times.
7. Rotate the steering wheel back to center and
then an additional slighty more than one-half
turn to the right.
8. Turn the ignition switch to the OFF position
and then back to the ON position. If the
sequence was completed properly, the “ESC
Off Indicator Light” will blink several times to
confirm HSA is disabled.
9. Repeat these steps if you want to return this
feature to its previous setting.
Traction Control System (TCS)This system monitors the amount of wheel spin
of each of the driven wheels. If wheel spin is
detected, the TCS may apply brake pressure to
the spinning wheel(s) and/or reduce engine
power to provide enhanced acceleration and
stability. A feature of the TCS, Brake Limited
Differential (BLD), functions similar to a limited
slip differential and controls the wheel spin
across a driven axle. If one wheel on a drivenaxle is spinning faster than the other, the sys-
tem will apply the brake of the spinning wheel.
This will allow more engine torque to be applied
to the wheel that is not spinning. BLD may
remain enabled even if TCS and ESC are in a
reduced mode.
Electronic Stability Control (ESC)This system enhances directional control and
stability of the vehicle under various driving
conditions. ESC corrects for over-steering or
under-steering of the vehicle by applying the
brake of the appropriate wheel to assist in
counteracting the over-steering or under-
steering condition. Engine power may also be
reduced to help the vehicle maintain the desired
path. ESC uses sensors in the vehicle to deter-
mine the vehicle path intended by the driver and
compares it to the actual path of the vehicle.
When the actual path does not match the
intended path, ESC applies the brake of the
appropriate wheel to assist in counteracting the
over-steer or under-steer condition
•Oversteer - when the vehicle is turning more
than appropriate for the steering wheel posi-
tion.•Understeer - when the vehicle is turning less
than appropriate for the steering wheel
position.
WARNING!
•The Electronic Stability Control (ESC) can-
not prevent the natural laws of physics
from acting on the vehicle, nor can it
increase the traction afforded by prevailing
road conditions.
•ESC cannot prevent accidents, including
those resulting from excessive speed in
turns, driving on very slippery surfaces, or
hydroplaning. ESC also cannot prevent
collisions resulting from loss of vehicle
control due to inappropriate driver input for
the conditions. Only a safe, attentive, and
skillful driver can prevent collisions.
(Continued)
191
Page 197 of 332
WARNING!(Continued)
Light” will be illuminated. When in “Partial
Off” mode, the engine power reduction of
TCS is disabled, and the enhanced vehicle
stability offered by the ESC system is re-
duced. Trailer Sway control (TSC) (if
equipped) is disabled when the ESC system
is in the"Partial Off"mode.
Full Off (Four-Wheel Drive Models Only)
This mode is intended for off-highway or off-
road use when ESC stability features could
inhibit vehicle maneuverability due to trail con-
ditions. This mode is entered by pushing and
holding the “ESC Off” switch for five seconds
when the vehicle is stopped and the engine is
running. After five seconds, the"ESC OFF
Indicator Light"will illuminate and the “ESC
OFF” message will appear in the odometer.
Push and release the Trip Odometer button
located on the instrument cluster to clear this
message.
In this mode, ESC and TCS, except for the
“limited slip” feature described in the TCS sec-tion, are turned off until the vehicle reaches a
speed of 35 mph (56 km/h). At 35 mph
(56 km/h), the system returns to “Partial Off”
mode, as described above. TCS remains off.
When the vehicle speed drops below 30 mph
(48 km/h), the ESC system shuts off. ESC is
deactivated at low vehicle speeds so that it will
not interfere with off-road driving however, ESC
function returns to provide the stability feature
at speeds above 35 mph (56 km/h). The"ESC
OFF Indicator Light"will always be illuminated
when ESC is off.
To turn ESC on again, momentarily push the
“ESC Off” switch. This will restore the “ESC On”
mode of operation.
NOTE:
The “ESC OFF” message will display and an
audible chime will sound when the gear
selector is placed into the PARK position
from any other position, and then moved out
of the PARK position. This will occur even if
the message was previously cleared.
WARNING!
In the"Full Off"mode, the engine torque
reduction and stability features are disabled.
In an emergency evasive maneuver, the
ESC system will not engage to assist in
maintaining stability. “ESC Off” mode is in-
tended for off-highway or off-road use only.
ESC Activation/Malfunction Indicator Light
And ESC OFF Indicator Light
The “ESC Activation/Malfunction
Indicator Light” in the instrument
cluster will come on when the igni-
tion switch is cycled to the ON/
RUN position. It should go out with
the engine running. If the “ESC
Activation/Malfunction Indicator Light” comes
on continuously with the engine running, a
malfunction has been detected in the ESC
system. If this light remains on after several
ignition cycles, and the vehicle has been driven
several miles (kilometers) at speeds greater
than 30 mph (48 km/h), see your authorized
193
Page 198 of 332
dealer as soon as possible to have the problem
diagnosed and corrected.
The “ESC Activation/Malfunction Indicator
Light” (located in the instrument cluster) starts
to flash as soon as the tires lose traction and the
ESC system becomes active. The “ESC
Activation/Malfunction Indicator Light” also
flashes when TCS is active. If the “ESC
Activation/Malfunction Indicator Light” begins to
flash during acceleration, ease up on the accel-
erator and apply as little throttle as possible. Be
sure to adapt your speed and driving to the
prevailing road conditions.
NOTE:
•The “ESC Off Indicator Light” and the
“ESC Activation/Malfunction Indicator
Light” come on momentarily each time
the ignition switch is placed in the ON/
RUN position.
•Each time the ignition is cycled to the
ON/RUN position, the ESC system will be
ON even if it was cycled off previously,
except for when the vehicle is started
while in 4L Range.•The ESC system will make buzzing or
clicking sounds when it is active. This is
normal; the sounds will stop when ESC
becomes inactive following the maneuver
that caused the ESC activation.
The “ESC OFF Indicator Light” in-
dicates the Electronic Stability
Control (ESC) is partially off or full
off.
Electronic Roll Mitigation (ERM)This system anticipates the potential for wheel
lift by monitoring the driver’s steering wheel
input and the speed of the vehicle. When ERM
determines that the rate of change of the steer-
ing wheel angle and vehicle’s speed are suffi-
cient to potentially cause wheel lift, it then
applies the appropriate brake and may also
reduce engine power to lessen the chance that
wheel lift will occur. ERM can only reduce the
chance of wheel lift occurring during severe or
evasive driving maneuvers; it cannot preventwheel lift due to other factors, such as road
conditions, leaving the roadway, or striking ob-
jects or other vehicles.
NOTE:
ERM is disabled anytime the ESC is in “Full
Off” mode (if equipped). Refer to “Electronic
Stability Control (ESC)” in this section for a
complete explanation of the available ESC
modes.
WARNING!
Many factors, such as vehicle loading, road
conditions and driving conditions, influence
the chance that wheel lift or rollover may
occur. ERM cannot prevent all wheel lift or
roll overs, especially those that involve leav-
ing the roadway or striking objects or other
vehicles. The capabilities of an ERM-
equipped vehicle must never be exploited in
a reckless or dangerous manner which could
jeopardize the user’s safety or the safety of
others.
194
Page 210 of 332
Tire Pressure Monitoring Low Pressure
Warnings
The Tire Pressure Monitoring Telltale Light will
illuminate in the instrument cluster, a LOW TIRE
message will be displayed for a minimum of five
seconds, and an audible chime will be activated
when one or more of the four active road tire
pressures are low. Should this occur, you
should stop as soon as possible, check the
inflation pressure of each tire on your vehicle,
and inflate each tire to the vehicle’s recom-
mended cold placard pressure value. The sys-
tem will automatically update and the Tire Pres-
sure Monitoring Light will extinguish and the
LOW TIRE message will turn off once the
updated tire pressures have been received.
NOTE:
When filling warm tires, the tire pressure
may need to be increased up to an additional
4 psi (30 kPa) above the recommended cold
placard pressure in order to turn the Tire
Pressure Monitoring Telltale Light off.
The vehicle may need to be driven for up to 10
minutes above 15 mph (24 km/h) to receive this
information.Check TPMS Warnings
The Tire Pressure Monitoring Telltale Light will
flash on and off for 75 seconds and remain on
solid when a system fault is detected. The
system fault will also sound a chime. If the
ignition key is cycled, this sequence will repeat
providing the system fault still exists. The Tire
Pressure Monitoring Telltale Light will turn off
when the fault condition no longer exists. A
system fault can occur with any of the following
scenarios:
1. Jamming due to electronic devices or driving
next to facilities emitting the same radio
frequencies as the TPM sensors.
2. Installing some form of aftermarket window
tinting that affects radio wave signals.
3. Snow or ice around the wheels or wheel
housings.
4. Using tire chains on the vehicle.
5. Using wheels/tires not equipped with TPM
sensors.NOTE:
Your vehicle is equipped with a compact
spare wheel and tire assembly.
1. The compact spare tire does not have a tire
pressure monitoring sensor. Therefore, the
TPMS will not monitor the tire pressure in the
compact spare tire.
2. If you install the compact spare tire in place
of a road tire that has a pressure below the
low-pressure warning limit, upon the next
ignition key cycle, a chime will sound and the
Tire Pressure Monitoring Telltale Light and
LOW TIRE message will still turn ON due to
the low tire.
3. However, after driving the vehicle for up to
10 minutes above 15 mph (24 km/h), the Tire
Pressure Monitoring Telltale Light will flash
on and off for 75 seconds and then remain
on solid.
4. For each subsequent ignition key cycle, a
chime will sound and the Tire Pressure
Monitoring Telltale Light will flash on and off
for 75 seconds and then remain on solid.
206
Page 212 of 332
NOTE:
When filling warm tires, the tire pressure
may need to be increased up to an additional
4 psi (30 kPa) above the recommended cold
placard pressure in order to turn the Tire
Pressure Monitoring Telltale Light off.
The vehicle may need to be driven for up to 10
minutes above 15 mph (24 km/h) to receive this
information.
Service TPMS Message
The Tire Pressure Monitoring Telltale Light will
flash on and off for 75 seconds, and remain on
solid when a system fault is detected. The
system fault will also sound a chime. The EVIC
will display a “SERVICE TPM SYSTEM” mes-
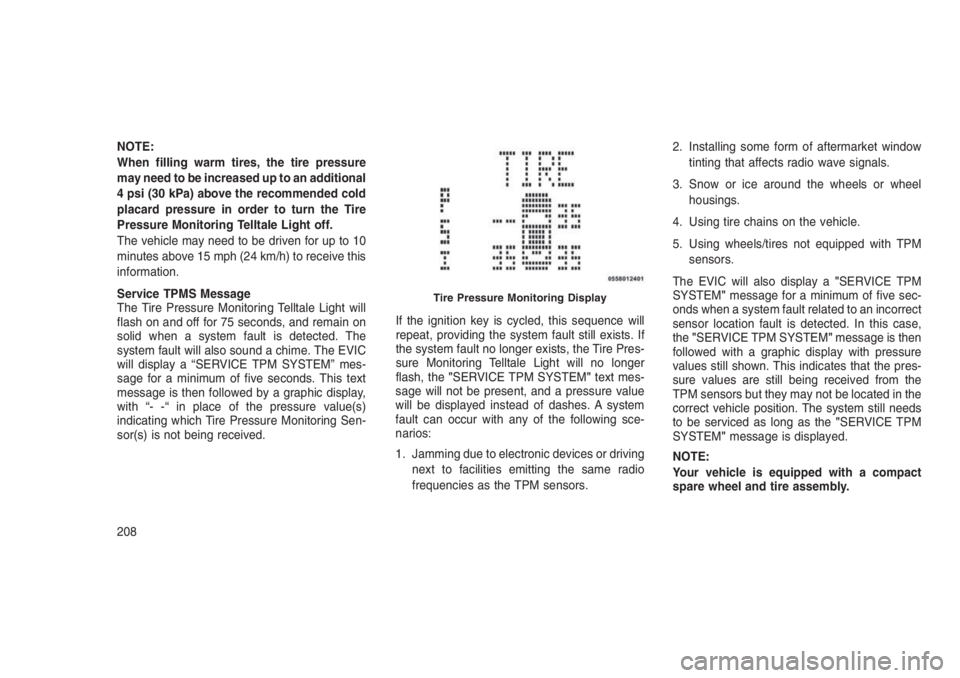
sage for a minimum of five seconds. This text
message is then followed by a graphic display,
with “- -“ in place of the pressure value(s)
indicating which Tire Pressure Monitoring Sen-
sor(s) is not being received.If the ignition key is cycled, this sequence will
repeat, providing the system fault still exists. If
the system fault no longer exists, the Tire Pres-
sure Monitoring Telltale Light will no longer
flash, the"SERVICE TPM SYSTEM"text mes-
sage will not be present, and a pressure value
will be displayed instead of dashes. A system
fault can occur with any of the following sce-
narios:
1. Jamming due to electronic devices or driving
next to facilities emitting the same radio
frequencies as the TPM sensors.2. Installing some form of aftermarket window
tinting that affects radio wave signals.
3. Snow or ice around the wheels or wheel
housings.
4. Using tire chains on the vehicle.
5. Using wheels/tires not equipped with TPM
sensors.
The EVIC will also display a"SERVICE TPM
SYSTEM"message for a minimum of five sec-
onds when a system fault related to an incorrect
sensor location fault is detected. In this case,
the"SERVICE TPM SYSTEM"message is then
followed with a graphic display with pressure
values still shown. This indicates that the pres-
sure values are still being received from the
TPM sensors but they may not be located in the
correct vehicle position. The system still needs
to be serviced as long as the"SERVICE TPM
SYSTEM"message is displayed.
NOTE:
Your vehicle is equipped with a compact
spare wheel and tire assembly.
Tire Pressure Monitoring Display
208
Page 213 of 332
1. The compact spare tire does not have a tire
pressure monitoring sensor. Therefore, the
TPMS will not monitor the tire pressure in the
compact spare tire.
2. If you install the compact spare tire in place
of a road tire that has a pressure below the
low-pressure warning limit, upon the next
ignition key cycle, a chime will sound and the
Tire Pressure Monitoring Telltale Light will
still turn ON due to the low tire. The “LOW
TIRE” text message and the graphic with the
low tire pressure flashing will be displayed.
3. However, after driving the vehicle for up to
10 minutes above 15 mph (24 km/h), the Tire
Pressure Monitoring Telltale Light will flash
on and off for 75 seconds and then remain
on solid. In addition, the EVIC will display a
“SERVICE TPM SYSTEM” message for a
minimum of five seconds and then display
dashes (- -) in place of the pressure values.
4. For each subsequent ignition key cycle, a
chime will sound and the Tire Pressure
Monitoring Telltale Light will flash on and offfor 75 seconds and then remain on solid,
and the EVIC will display a “SERVICE TPM
SYSTEM” message for a minimum of five
seconds and then display dashes (- -) in
place of the pressure values.
5.
Once you repair or replace the original road
tire and reinstall it on the vehicle in place of the
compact spare tire, the TPMS will update
automatically and the Tire Pressure Monitoring
Telltale Light will turn OFF, as long as no tire
pressure is below the low-pressure warning
limit in any of the four active road tires. The
vehicle may need to be driven for up to 10
minutes above 15 mph (24 km/h) in order for
the TPMS to receive this information.
TPMS Deactivation — If EquippedThe TPMS can be deactivated if replacing all
four wheel and tire assemblies (road tires) with
wheel and tire assemblies that do not have
TPMS Sensors, such as when installing Winter
wheel and tire assemblies on your vehicle. To
deactivate the TPMS, first, replace all four
wheel and tire assemblies (road tires) with tires
not equipped with Tire Pressure Monitoring(TPM) Sensors. Then, drive the vehicle for 10
minutes above 15 mph (24 km/h). The TPMS
will chime, the “TPM Telltale Light” will flash on
and off for 75 seconds and then remain on and
the Electronic Vehicle Information Center
(EVIC) will display the “SERVICE TPM SYS-
TEM” message and then display dashes (--) in
place of the pressure values. Beginning with the
next ignition switch cycle, the TPMS will no
longer chime or flash the TPM telltale and
display the “SERVICE TPM SYSTEM” message
in the EVIC but dashes (--) will remain in place
of the pressure values.
To reactivate the TPMS, replace all four wheel
and tire assemblies (road tires) with tires
equipped with TPM sensors. Then, drive the
vehicle for up to 10 minutes above 15 mph
(24 km/h). The TPMS will chime, the “TPM
Telltale Light” will flash on and off for 75 sec-
onds and then turn off, and the Electronic
Vehicle Information Center (EVIC) will display
the “SERVICE TPM SYSTEM” message. The
EVIC will also display pressure values in place
of the dashes. On the next ignition switch cycle
209
Page 214 of 332
the “SERVICE TPM SYSTEM” message will no
longer be displayed as long as no system fault
exists.
To reactivate the TPMS, replace all four wheel
and tire assemblies (road tires) with tires
equipped with TPM sensors. Then, drive the
vehicle for up to 10 minutes above 15 mph
(24 km/h). The TPMS will chime, the “TPM
Telltale Light” will flash on and off for 75 sec-
onds and then turn off, and the Electronic
Vehicle Information Center (EVIC) will display
the “SERVICE TPM SYSTEM” message. The
EVIC will also display pressure values in place
of the dashes. On the next ignition switch cycle,
the “SERVICE TPM SYSTEM” message will no
longer be displayed as long as no system fault
exists.
FUEL REQUIREMENTS —
GASOLINE ENGINE
All gasoline engines are designed to meet all
emissions regulations and provide excellent
fuel economy and performance when using
high quality unleaded gasoline with a minimum
research octane rating (RON) of 91.Light spark knock at low engine speeds is not
harmful to your engine. However, continued
heavy spark knock at high speeds can cause
damage and immediate service is required.
Poor quality gasoline can cause problems such
as hard starting, stalling, and hesitations. If you
experience these symptoms, try another brand
of gasoline before considering service for the
vehicle.
Besides using unleaded gasoline with the
proper octane rating, gasolines that contain
detergents, corrosion and stability additives are
recommended. Using gasolines that have these
additives may help improve fuel economy, re-
duce emissions, and maintain vehicle perfor-
mance.
Poor quality gasoline can cause problems such
as hard starting, stalling and stumble. If you
experience these problems, try another brand
of gasoline before considering service for the
vehicle.
Methanol(Methyl) is used in a variety of concentrations
when blended with unleaded gasoline. You mayfind fuels containing 3% or more methanol
along with other alcohols called cosolvents.
Problems that result from using methanol/
gasoline blends are not the responsibility of the
manufacturer.
CAUTION!
Do not use gasolines containing Methanol.
Use of these blends may result in starting
and drivability problems and may damage
critical fuel system components.
EthanolThe manufacturer recommends that your ve-
hicle be operated on fuel containing no more
than 15% ethanol. Purchasing your fuel from a
reputable supplier may reduce the risk of ex-
ceeding this 15% limit and/or of receiving fuel
with abnormal properties. It should also be
noted that an increase in fuel consumption
should be expected when using ethanol-
blended fuels, due to the lower energy content
of ethanol. Problems that result from using
210
Page 216 of 332
WARNING!(Continued)
•Guard against carbon monoxide with
proper maintenance. Have the exhaust
system inspected every time the vehicle is
raised. Have any abnormal conditions re-
paired promptly. Until repaired, drive with
all side windows fully open.
•Keep the liftgate closed when driving your
vehicle to prevent carbon monoxide and
other poisonous exhaust gases from en-
tering the vehicle.
ADDING FUEL
Locking Fuel Filler Cap (Gas Cap)The locking gas cap is inside the fuel filler door,
on the left side of the vehicle. If the gas cap is
lost or damaged, be sure the replacement cap
is for use with this vehicle.
1. Turn off the engine.2. Insert the ignition key into the fuel cap and
turn the key one-quarter turn to the right,
then rotate the fuel cap to the left to remove.
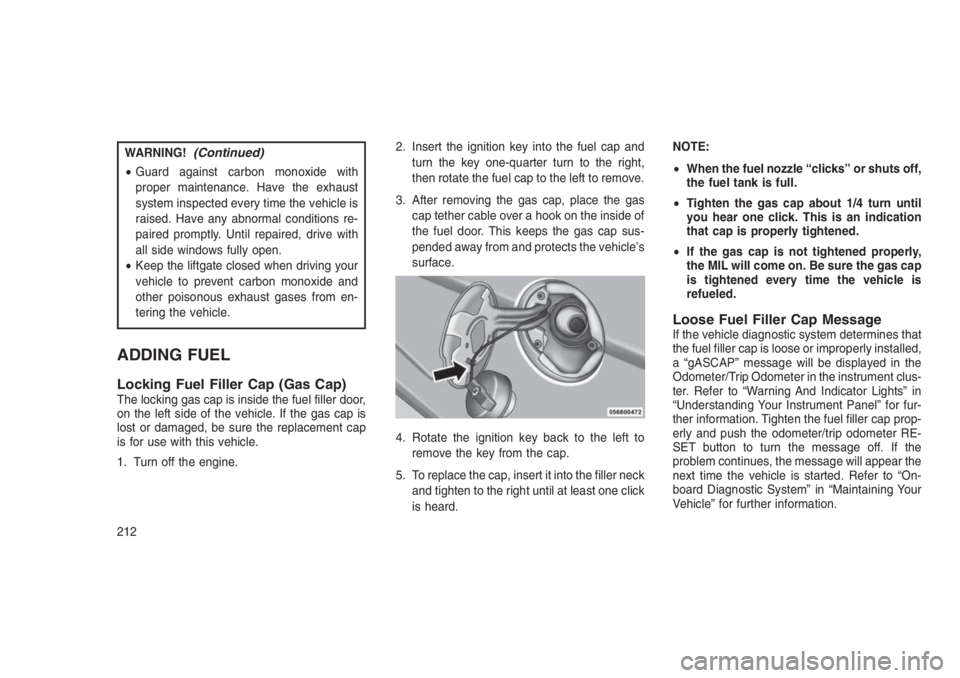
3. After removing the gas cap, place the gas
cap tether cable over a hook on the inside of
the fuel door. This keeps the gas cap sus-
pended away from and protects the vehicle’s
surface.
4. Rotate the ignition key back to the left to
remove the key from the cap.
5. To replace the cap, insert it into the filler neck
and tighten to the right until at least one click
is heard.NOTE:
•When the fuel nozzle “clicks” or shuts off,
the fuel tank is full.
•Tighten the gas cap about 1/4 turn until
you hear one click. This is an indication
that cap is properly tightened.
•If the gas cap is not tightened properly,
the MIL will come on. Be sure the gas cap
is tightened every time the vehicle is
refueled.
Loose Fuel Filler Cap MessageIf the vehicle diagnostic system determines that
the fuel filler cap is loose or improperly installed,
a “gASCAP” message will be displayed in the
Odometer/Trip Odometer in the instrument clus-
ter. Refer to “Warning And Indicator Lights” in
“Understanding Your Instrument Panel” for fur-
ther information. Tighten the fuel filler cap prop-
erly and push the odometer/trip odometer RE-
SET button to turn the message off. If the
problem continues, the message will appear the
next time the vehicle is started. Refer to “On-
board Diagnostic System” in “Maintaining Your
Vehicle” for further information.
212