JEEP RENEGADE 2014 1.G Owners Manual
Manufacturer: JEEP, Model Year: 2014, Model line: RENEGADE, Model: JEEP RENEGADE 2014 1.GPages: 212, PDF Size: 17.48 MB
Page 181 of 212
CO2EMISSIONS
The CO2emission levels given in the following table refer to combined consumption.
VersionsCO2EMISSIONS ACCORDING TO CURRENT EUROPEAN DIRECTIVE
(g/km)
1.4 Turbo MultiAir 136/140 HP140
1.6 16V MultiJet 115/120 HP120
2.0 16V MultiJet 120 / 140 HP
134 / 150
(*)
2.0 16V MultiJet 170 HP
151(**)
(*) Versions with automatic transmission and 4WD LOW
(**) Trailhawk versions
PRESCRIPTIONS FOR HANDLING THE VEHICLE AT THE END OF
ITS LIFE
Jeep has been committed for many years to safeguarding the environment through the constant improvement of its production
processes and manufacturing products that are increasingly "eco-compatible". To assure customers of the best possible
service in terms of respecting environmental laws and in response to European Directive 2000/53/EC governing vehicles at the
end of their life, Jeep is offering their customers the opportunity of handing over their vehicle (*) at the end of its life without
incurring any additional costs.
The European Directive sets out that when the vehicle is handed over the last keeper or owner should not incur any expenses
as a result of it having a zero or negative market value. In particular, in almost all European Union countries, until 1st January
2007, vehicles registered after 1st July 2002 will be collected free of charge, whilst from 2007 collection will be free of charge
irrespective of the year of registration as long as the vehicle contains its basic components (in particular, the engine and
bodywork) and has no additional waste.
To hand your vehicle over at the end of its life without extra cost, go to one of our Dealerships or Jeep-authorised collection
and scrapping centres. These centres have been carefully chosen to offer high quality service for the collection, treatment and
recycling of vehicles at their end of life, respecting the surrounding environment. You can find further information on these
collection and scrapping centres either from a Jeep Dealership or by calling the freephone number 00 800 0 426 5337 or on
the Jeep website.
(*) Vehicle for transporting passengers with a maximum of nine seats and a total permitted weight of 3.5 t.
179
Page 182 of 212
MULTIMEDIA
This chapter describes the main
functions of the infotainment systems
for theUconnect™5" Radio, or
Uconnect™5" Radio Nav or
Uconnect™6.5" Radio Nav that can
be fitted on the vehicle.TIPS, CONTROLS AND GENERAL
INFORMATION ................................181
UCONNECT 5"
RADIO/UCONNECT 5" RADIO
NAV ................................................183
UCONNECT 6.5" RADIO NAV .........194
180
MULTIMEDIA
Page 183 of 212
TIPS, CONTROLS
AND GENERAL
INFORMATION
ROAD SAFETY
Learn how to use the various system
functions before setting off.
Read the instructions for the system
carefully before setting off.
182) 183)
RECEPTION CONDITIONS
Reception conditions change
constantly while driving. Reception may
be interfered with by the presence of
mountains, buildings or bridges,
especially when you are far away from
the broadcaster.
IMPORTANT The volume may be
increased when receiving traffic alerts
and news.
CARE AND MAINTENANCE
Observe the following precautions
to ensure the system is fully
operational:
❒the display lens should not come into
contact with pointed or rigid objects
which could damage its surface; use a
soft, dry anti-static cloth to clean and
do not press.
❒never use alcohol, petrols and
derivatives to clean the display lens.❒prevent any liquid from entering the
system: this could damage it beyond
repair.
80) 81)
ANTI-THEFT
PROTECTION
The system is equipped with an
anti-theft protection system based on
the exchange of information with the
electronic control unit (Body Computer)
on the vehicle.
This guarantees maximum safety and
prevents the secret code from being
entered after the power supply has
been disconnected.
If the check has a positive outcome, the
system will start to operate, whereas if
the comparison codes are not the
same or if the electronic control unit
(Body Computer) is replaced, the
system will ask the user to enter the
secret code according to the procedure
described in the paragraph below.
Entering the secret code(excluding versions equipped with
Uconnect 6.5" Radionav)
When the system is switched on, if the
code is requested, the display will
show "Please enter Anti-Theft Code"
followed by the video page showing
a keypad to enter the secret code.The secret code is made up of four
digits, from 0 to 9: to insert the first digit
of the code, turn the BROWSE/ENTER
right knob and press to confirm.
After entering the fourth digit, the
system begins operating.
If an incorrect code is entered, the
system displays "Incorrect Code" to
notify the user of the need to enter the
correct code.
After the 3 available attempts to enter
the code, the system displays
"Incorrect Code. Radio locked. Wait for
30 minutes". Once the text has
disappeared you can start the code
entering procedure again.
Vehicle radio passport(excluding versions equipped with
Uconnect 6.5" Radionav)
This document certifies ownership of
the system. The vehicle radio passport
shows the system model, serial number
and secret code.
In the case of loss of the vehicle radio
passport, contact the Jeep Dealership,
taking an ID document and the vehicle
ownership documents.
IMPORTANT Keep the vehicle radio
passport in a safe place so that you
can give the information to the relevant
authorities if the system is stolen.
181
Page 184 of 212
IMPORTANT
In the event of a fault, the system must
only be checked and repaired by a
Jeep Dealership.
If the temperature is particularly low, the
display may take a while to reach
optimum brightness.
If the vehicle is stopped for a while and
the external temperature is very high,
the system may go into “thermal
protection” mode, suspending
operation until the radio temperature
returns to acceptable levels.
Look at the screen only when it is
necessary and safe. If you need to look
at the screen for a long time, pull over
to a safe place so as not to be
distracted while driving.
Immediately stop using the system in
the event of a fault. Otherwise the
system might be damaged. Contact a
Jeep Dealership as soon as possible to
have the system repaired.WARNING
182)Follow the safety rules below;
otherwise serious injuries may occur to the
occupants or the system may be
damaged.
183)If the volume is too loud this can be
dangerous. Adjust the volume so that
you can still hear background noises (e.g.
horns, ambulances, police vehicles, etc.).
WARNING
80)Only clean the front panel and the
display with a soft, clean, dry, anti-static
cloth. Cleaning and polishing products
may damage the surface. Do not use
alcohol or similar products to clean the
panel or the display.
81)Do not use the display as a base for
supports with suction pads or adhesives
for external navigators or smartphones
or similar devices.
182
MULTIMEDIA
Page 185 of 212
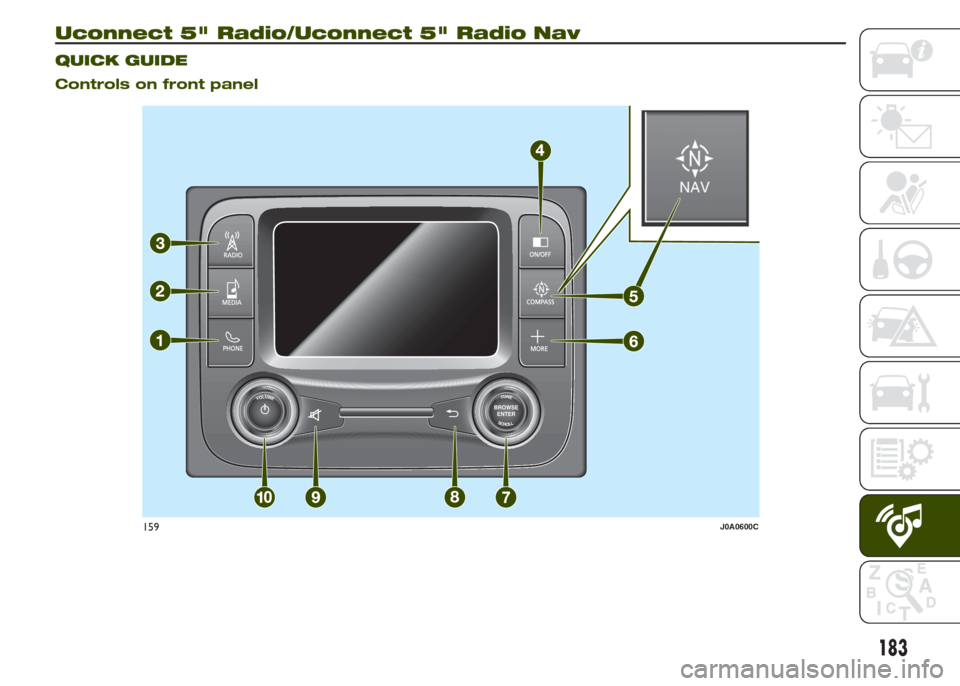
Uconnect 5" Radio/Uconnect 5" Radio Nav.
QUICK GUIDE
Controls on front panel
VOLUMETUNEBROWSE
ENTERSCROLL
159J0A0600C
183
Page 186 of 212
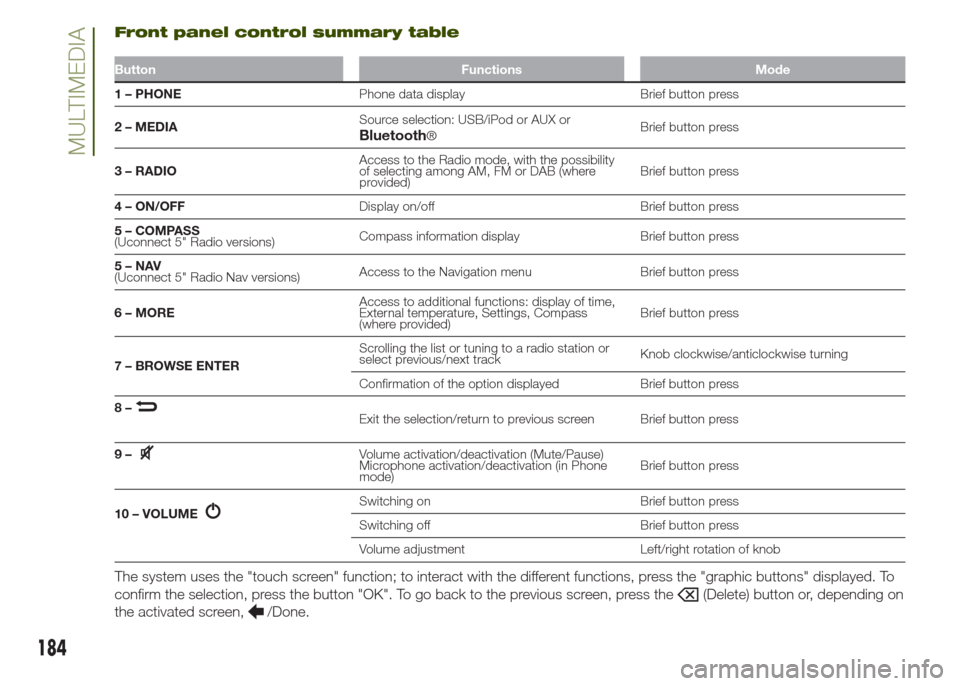
Front panel control summary table
Button Functions Mode
1 – PHONEPhone data display Brief button press
2 – MEDIASource selection: USB/iPod or AUX or
®Brief button press
3 – RADIOAccess to the Radio mode, with the possibility
of selecting among AM, FM or DAB (where
provided)Brief button press
4 – ON/OFFDisplay on/off Brief button press
5 – COMPASS
(Uconnect 5" Radio versions)Compass information display Brief button press
5–NAV
(Uconnect 5" Radio Nav versions)Access to the Navigation menu Brief button press
6 – MOREAccess to additional functions: display of time,
External temperature, Settings, Compass
(where provided)Brief button press
7 – BROWSE ENTERScrolling the list or tuning to a radio station or
select previous/next trackKnob clockwise/anticlockwise turning
Confirmation of the option displayed Brief button press
8–
Exit the selection/return to previous screen Brief button press
9–
Volume activation/deactivation (Mute/Pause)
Microphone activation/deactivation (in Phone
mode)Brief button press
10 – VOLUME
Switching on Brief button press
Switching off Brief button press
Volume adjustment Left/right rotation of knob
The system uses the "touch screen" function; to interact with the different functions, press the "graphic buttons" displayed. To
confirm the selection, press the button "OK". To go back to the previous screen, press the
(Delete) button or, depending on
the activated screen,
/Done.
184
MULTIMEDIABluetooth
Page 187 of 212
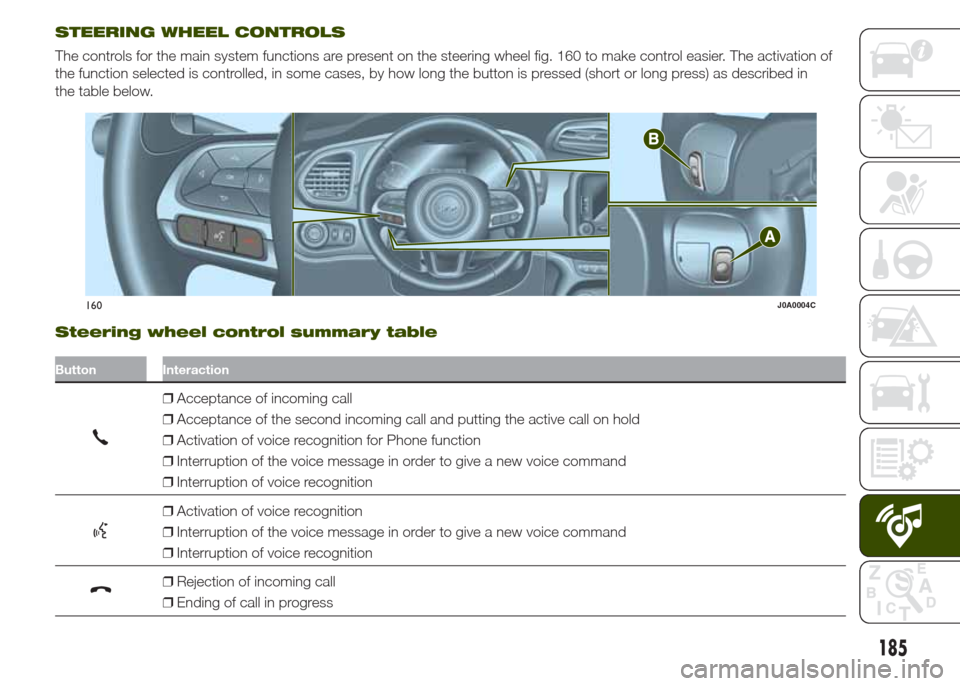
STEERING WHEEL CONTROLS
The controls for the main system functions are present on the steering wheel fig. 160 to make control easier. The activation of
the function selected is controlled, in some cases, by how long the button is pressed (short or long press) as described in
the table below.
Steering wheel control summary table
Button Interaction
❒Acceptance of incoming call
❒Acceptance of the second incoming call and putting the active call on hold
❒Activation of voice recognition for Phone function
❒Interruption of the voice message in order to give a new voice command
❒Interruption of voice recognition
❒Activation of voice recognition
❒Interruption of the voice message in order to give a new voice command
❒Interruption of voice recognition
❒Rejection of incoming call
❒Ending of call in progress
160J0A0004C
185
Page 188 of 212
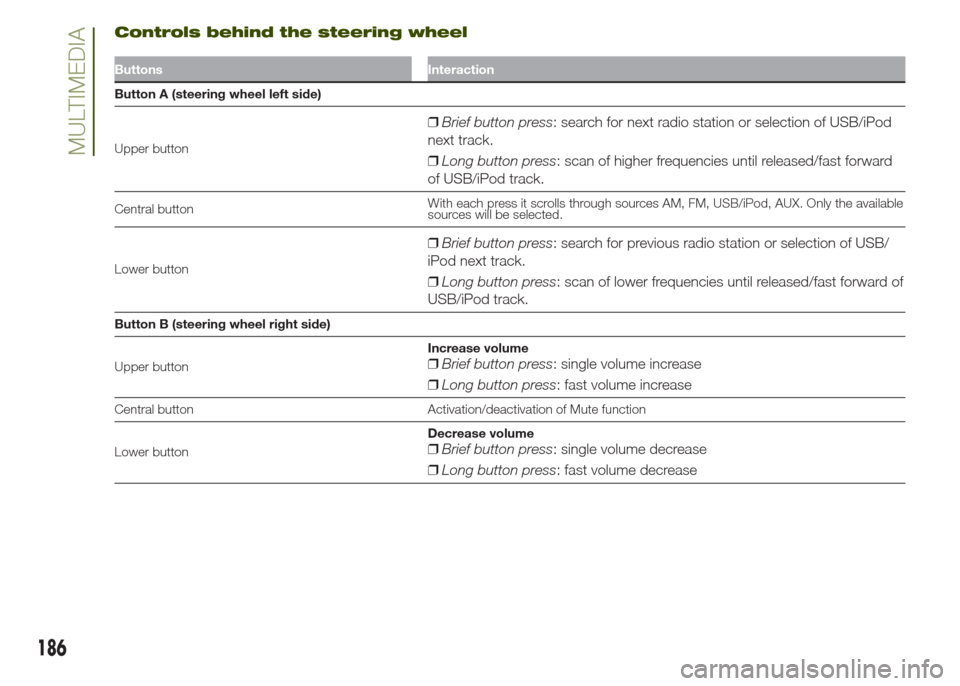
Controls behind the steering wheel
Buttons Interaction
Button A (steering wheel left side)
Upper button
❒Brief button press: search for next radio station or selection of USB/iPod
next track.
❒Long button press: scan of higher frequencies until released/fast forward
of USB/iPod track.
Central buttonWith each press it scrolls through sources AM, FM, USB/iPod, AUX. Only the available
sources will be selected.
Lower button
❒Brief button press: search for previous radio station or selection of USB/
iPod next track.
❒Long button press: scan of lower frequencies until released/fast forward of
USB/iPod track.
Button B (steering wheel right side)
Upper buttonIncrease volume
❒Brief button press: single volume increase
❒Long button press: fast volume increase
Central button Activation/deactivation of Mute function
Lower buttonDecrease volume
❒Brief button press: single volume decrease
❒Long button press: fast volume decrease
186
MULTIMEDIA
Page 189 of 212
USB/iPod/AUX SUPPORT
Versions with Uconnect 5" Radio:
the vehicle has a USB/AUX port located
on the central tunnel.
Versions with Uconnect 5" Radio
Nav: the vehicle has a USB/AUX port
located in the centre tunnel and a USB
port located inside the front armrest.
RADIO MODE
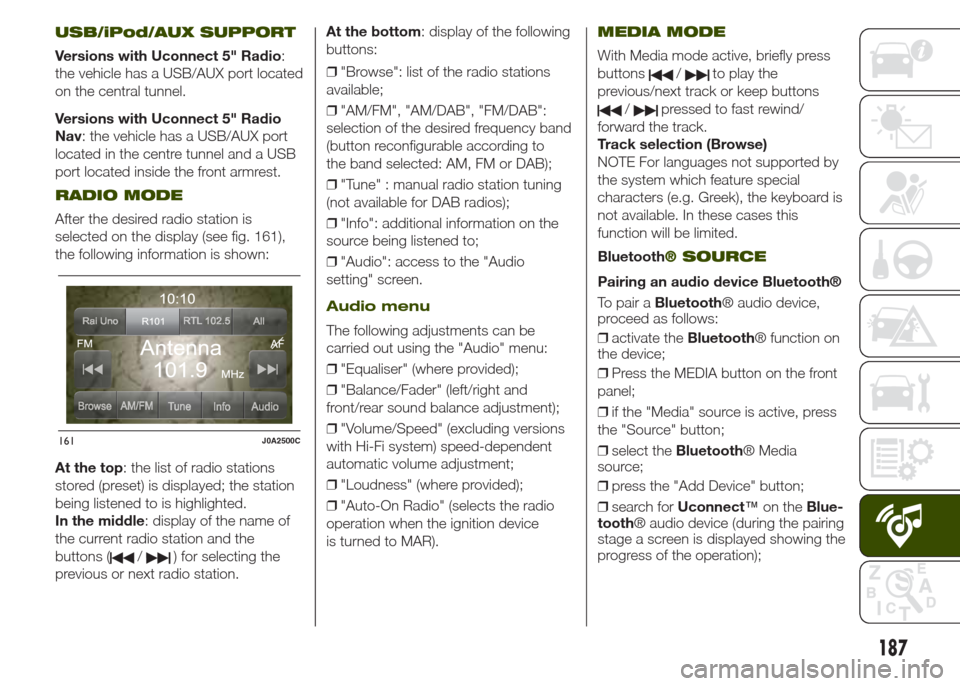
After the desired radio station is
selected on the display (see fig. 161),
the following information is shown:
At the top: the list of radio stations
stored (preset) is displayed; the station
being listened to is highlighted.
In the middle: display of the name of
the current radio station and the
buttons (
/) for selecting the
previous or next radio station.At the bottom: display of the following
buttons:
❒"Browse": list of the radio stations
available;
❒"AM/FM", "AM/DAB", "FM/DAB":
selection of the desired frequency band
(button reconfigurable according to
the band selected: AM, FM or DAB);
❒"Tune" : manual radio station tuning
(not available for DAB radios);
❒"Info": additional information on the
source being listened to;
❒"Audio": access to the "Audio
setting" screen.
Audio menu
The following adjustments can be
carried out using the "Audio" menu:
❒"Equaliser" (where provided);
❒"Balance/Fader" (left/right and
front/rear sound balance adjustment);
❒"Volume/Speed" (excluding versions
with Hi-Fi system) speed-dependent
automatic volume adjustment;
❒"Loudness" (where provided);
❒"Auto-On Radio" (selects the radio
operation when the ignition device
is turned to MAR).
MEDIA MODE
With Media mode active, briefly press
buttons
/to play the
previous/next track or keep buttons
/pressed to fast rewind/
forward the track.
Track selection (Browse)
NOTE For languages not supported by
the system which feature special
characters (e.g. Greek), the keyboard is
not available. In these cases this
function will be limited.
Bluetooth
® SOURCE
Pairing an audio device Bluetooth®
To pair aBluetooth® audio device,
proceed as follows:
❒activate theBluetooth® function on
the device;
❒Press the MEDIA button on the front
panel;
❒if the "Media" source is active, press
the "Source" button;
❒select theBluetooth® Media
source;
❒press the "Add Device" button;
❒search forUconnect™on theBlue-
tooth® audio device (during the pairing
stage a screen is displayed showing the
progress of the operation);
161J0A2500C
187
Page 190 of 212
❒when requested by the audio device,
enter the PIN code shown on the
system display or confirm on the device
the PIN displayed;
❒if the pairing procedure is completed
successfully, a screen is displayed.
Answer "Yes" to the question to pair the
Bluetooth® audio device as favourite
(the device will have priority over all
other devices that will be paired subse-
quently). If "No" is selected, the priority
is determined according to the order of
pairing. The last device connected will
have the highest priority;
❒an audio device can also be paired
by pressing the
PHONE button
on the front panel and by selecting
"Settings" or, from the "Settings" menu,
selecting "Phone/Bluetooth".
IMPORTANT If theBluetooth® pairing
between mobile phone and system is
lost, consult the mobile phone owner's
handbook.
PHONE MODE
Phone mode activation: press the
PHONE button on the front panel.
The buttons on the display can be used
to:
❒compose the phone number (using
the graphic keypad on the display);
❒display and call the contacts on the
mobile phone phonebook;❒display and call contacts from the
registers of recent calls;
❒pair up to 10 phones/audio devices
to make access and connection easier
and quicker;
❒transfer calls from the system to the
mobile phone and vice versa and
deactivate the microphone audio for
private conversations.
NOTE The mobile phone audio is
transmitted through the vehicle’s audio
system; the system automatically
mutes the system audio when the
Phone function is used.
Pairing a mobile phone
Proceed as follows:
❒activate theBluetooth® function on
the mobile phone;
❒press the
PHONE button on the
front panel;
❒if no phone is paired with the system
yet, the display shows a dedicated
screen;
❒select "Yes" to start the pairing
procedure, then search for the
Uconnect™device on the mobile
phone (if "No" is selected, the Phone
main screen is displayed);❒when prompted by the mobile
phone, use its keyboard to enter the
PIN code shown on the system display
or confirm on the mobile phone the
PIN displayed;
❒from the "Phone" screen you can
always pair a mobile phone by pressing
the "Settings" button: press the "Add
Device" button and proceed as
described above;
❒during the pairing stage a screen is
displayed showing the progress of
the operation;
❒when the pairing procedure is
completed successfully, a screen is
displayed: answer "Yes" to the question
to pair the mobile phone as favourite
(the mobile phone will have priority over
all other mobile phones that will be
paired subsequently). If no other
devices are paired, the system will
consider the first associated device as
favourite.
Making a phone call
Proceed as follows:
❒selecting the
icon (mobile
phone phonebook);
❒selecting "Recent Calls";
❒selecting the
icon (graphic
keyboard);
❒pressing the "Redial" button.
188
MULTIMEDIA