lock JEEP RENEGADE 2015 1.G Owner's Manual
[x] Cancel search | Manufacturer: JEEP, Model Year: 2015, Model line: RENEGADE, Model: JEEP RENEGADE 2015 1.GPages: 220, PDF Size: 34.11 MB
Page 71 of 220
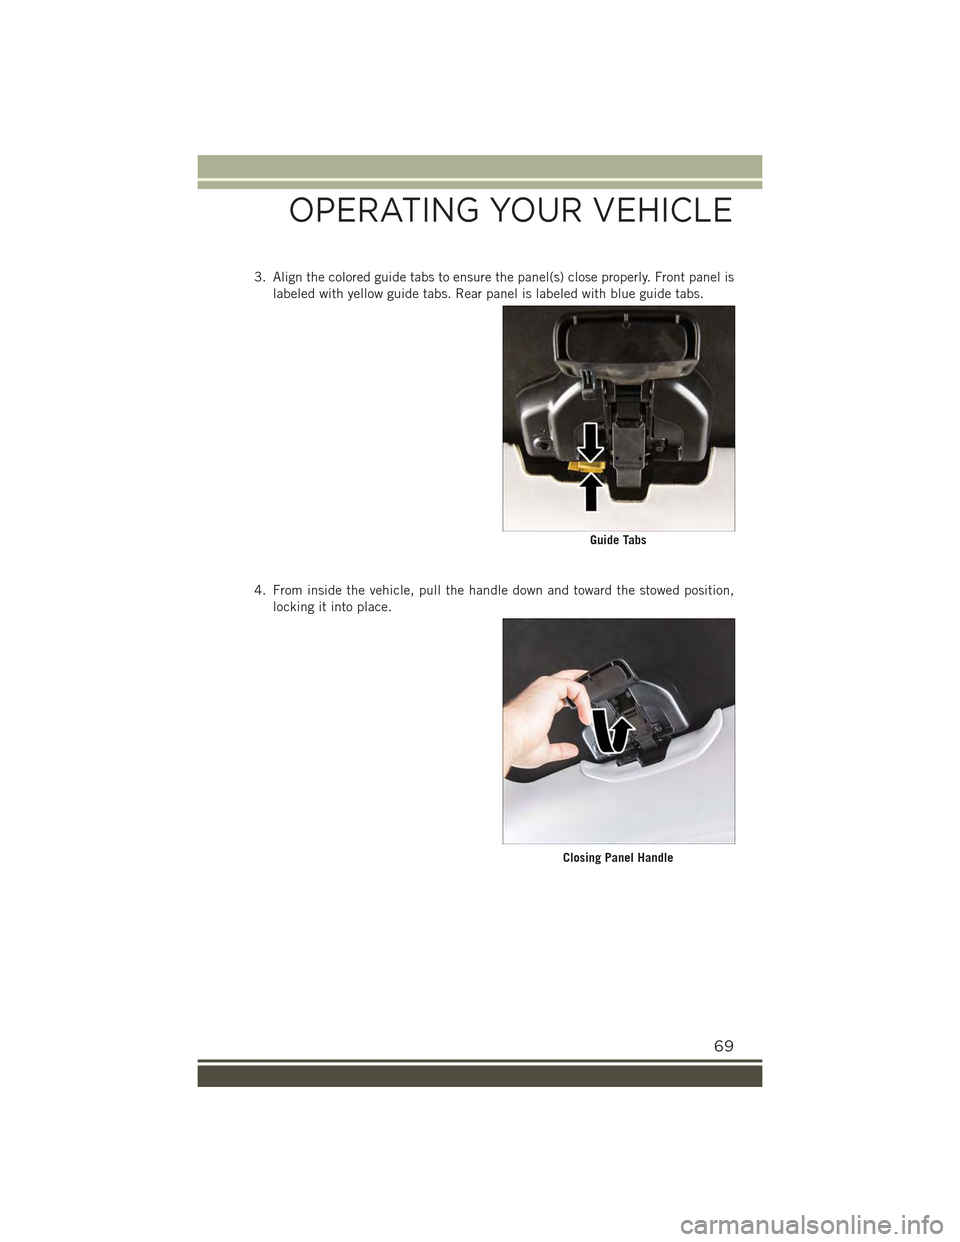
3. Align the colored guide tabs to ensure the panel(s) close properly. Front panel is
labeled with yellow guide tabs. Rear panel is labeled with blue guide tabs.
4. From inside the vehicle, pull the handle down and toward the stowed position,
locking it into place.
Guide Tabs
Closing Panel Handle
OPERATING YOUR VEHICLE
69
Page 72 of 220
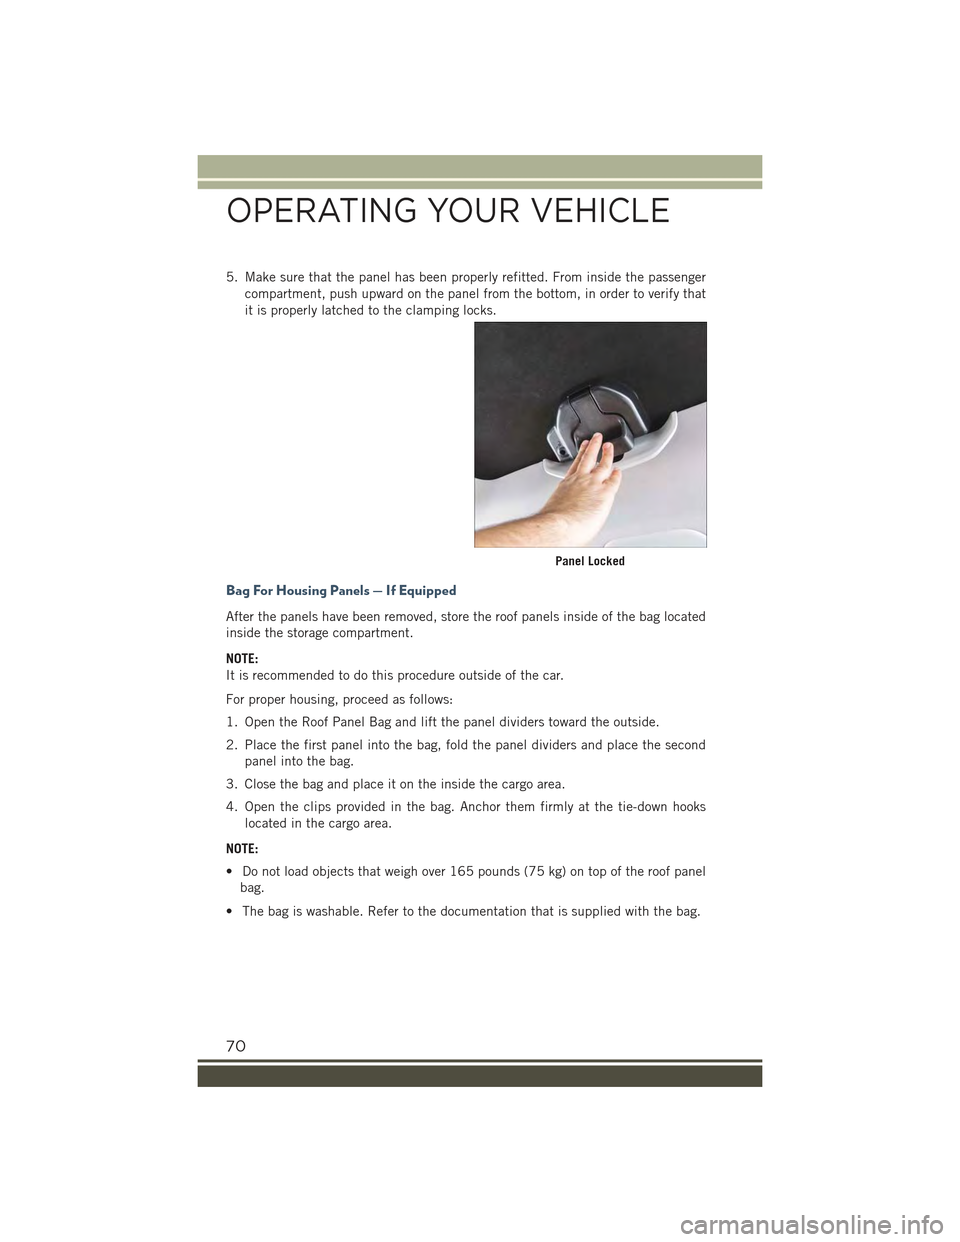
5. Make sure that the panel has been properly refitted. From inside the passenger
compartment, push upward on the panel from the bottom, in order to verify that
it is properly latched to the clamping locks.
Bag For Housing Panels — If Equipped
After the panels have been removed, store the roof panels inside of the bag located
inside the storage compartment.
NOTE:
It is recommended to do this procedure outside of the car.
For proper housing, proceed as follows:
1. Open the Roof Panel Bag and lift the panel dividers toward the outside.
2. Place the first panel into the bag, fold the panel dividers and place the second
panel into the bag.
3. Close the bag and place it on the inside the cargo area.
4. Open the clips provided in the bag. Anchor them firmly at the tie-down hooks
located in the cargo area.
NOTE:
• Do not load objects that weigh over 165 pounds (75 kg) on top of the roof panel
bag.
• The bag is washable. Refer to the documentation that is supplied with the bag.
Panel Locked
OPERATING YOUR VEHICLE
70
Page 73 of 220
Emergency Open/Close
If the Power My Sky switch fails, the retractable roof can be operated manually as
follows:
1. Remove the protective cap located on the inner lining.
2. Remove the Allen Key that is supplied in the tool bag in the cargo area.
3. Insert the Allen Key into the key hole and turn it clockwise to open the roof or
counter-clockwise to close.
CAUTION!
• When refitting panels, be careful to avoid fingers, scarves, ties and items of
clothing from getting caught under the panels themselves.
• Do not open the roof in the presence of snow or ice. There is risk of damage.
OPERATING YOUR VEHICLE
71
Page 77 of 220
Uconnect® ACCESS
Uconnect® Access — If Equipped (Available On Uconnect® 6.5AN — U.S.
Residents Only)
WARNING!
ALWAYS drive safely with your hands on the steering wheel. You have full
responsibility and assume all risks related to the use of the Uconnect®features
and applications in this vehicle. Only use Uconnect®when it is safe to do so.
Failure to do so may result in an accident involving serious injury or death.
Uconnect®Access enhances your ownership and driving experience by connecting
your vehicle with a built-in cellular connection. With Uconnect®Access, you can:
• Place a call to a local 9-1-1 Operator for emergency assistance.
• Remotely lock/unlock your doors and start your vehicle from virtually anywhere,
using the Uconnect®Access App from your smartphone. You can also do so by
logging into Mopar Owner Connect, or by calling Uconnect®Care. (Vehicle must be
within the United States and have network coverage).
• Turn your vehicle into a WiFi Hotspot and connect your devices to the internet.
• Receive text or email notifications if your vehicle's theft alarm goes off.
• Receive stolen vehicle assistance, using GPS technology to help authorities locate
your vehicle if it is stolen.
• Listen to your text messages or send free-form text messages with your voice while
keeping your hands on the wheel, using the Voice Texting feature. Requires a cell
phone that supports Bluetooth Message Access Profile (MAP).
• Search for places to eat, shop, relax and play with Yelp®, using your voice or
on-screen menu. Then navigate to them (navigation standard on Uconnect®
6.5AN).
• Get operator assistance using the ASSIST button on your Overhead Console.
Before you drive, familiarize yourself with the easy-to-use Uconnect® Access.
1. The ASSIST and 9-1-1 buttons are located in your Overhead Console. The ASSIST
button is used for contacting Roadside Assistance, Vehicle Care and Uconnect®
Care. The 9-1-1 button connects you to emergency services.
NOTE:
Vehicles sold in Canada and Mexico DO NOT have 9-1-1 Call system capabilities. 9-1-1
or other emergency line operators in Canada and Mexico may not answer or respond to
9-1-1 system calls.
2. The Uconnect®“Apps” button on the menu bar at the bottom right corner of the
radio touchscreen. This is where you can begin your registration process, manage
your Apps and purchase WiFi on demand.
ELECTRONICS
75
Page 78 of 220
3. The Uconnect®Voice Command and Uconnect®Phone buttons are located on the
left side of your steering wheel. These buttons let you use your voice to give
commands, make phone calls, send and receive text messages hands-free, enter
navigation destinations, and control your radio and media devices.
Included Trial Period For New Vehicles
Your new vehicle may come with an included trial period for use of the Uconnect®
Access Services starting at the date of vehicle purchase (date based on vehicle sales
notification from your dealer).To activate the trial, you must first register with
Uconnect® Access. After the trial period, if you wish to continue your Uconnect®
Access Services you can choose to purchase a subscription.
Features And Packages
• After the trial period, you can subscribe to continue your service by visiting the
Uconnect®Store located within the Mopar Owner Connect website
moparownerconnect.com. If you need assistance, U.S. residents can call
Uconnect®Care at 1-855-792-4241.
• For the latest information on packages and pricing information: U.S. residents
visit DriveUconnect.com.
Uconnect® Access Registration (Uconnect® 6.5AN, U.S. 48 Contiguous States,
Alaska And Hawaii)
To unlock the full potential of Uconnect®Access in your vehicle, you first need to
register with Uconnect®Access.
1. From the parked vehicle with the radio touchscreen powered on, select the
“More” button on the faceplate, then select the “Apps” button on the touch-
screen.
NOTE:
Should you require assistance anytime during the registration process, simply call
Uconnect®Care at 1-855-792-4241.
2. Press “Start” on the reminder screen or select “Uconnect Registration” under the
“All Apps” or “Favorites Apps” tab on the Apps list.
3. The Uconnect®Access Registration App will open and display step-by-step
instructions to start your registration.
4. Enter your email address into the radio touchscreen.
5. A message will display on the touchscreen indicating your email submission was
accepted. In a few minutes, you will receive an email which will allow you to
register your vehicle for Uconnect®Access. You should open this email and begin
your Uconnect®Access registration within 72 hours.
6. Check for an email from Uconnect®Access that contains your personalized
registration link. If you don't see it, check your spam or junk mail folder. Open the
email and click on the link to continue registering.
ELECTRONICS
76
Page 79 of 220
NOTE:
For security reasons, this link is valid for 72 hours from the time you’ve submitted
your email address into the radio touchscreen. If the link has expired, simply re-enter
your email address into the Uconnect®Registration App on the radio touchscreen to
receive another link. The secured registration link will take you through the
Uconnect®Access registration process step by step.
7. To unlock the full potential of Uconnect®Access in your vehicle, you will need to
create or validate an existing Mopar Owner Connect account previously (Owner
Center). Uconnect®along with Mopar Owner Connect have joined forces to create
one destination to manage all of your vehicle needs, from managing your
Uconnect®Access account, to tracking service history and finding recommended
accessories for your vehicle. If you already have a Mopar Owner Connect account,
log in to the website with your existing username/email and password. For
assistance with this web based registration process, call Uconnect®Care at
1-855-792-4241.
8. Once you are logged in to your Mopar Owner Connect account, you will create a
personal Uconnect®Security PIN. The Uconnect®Security PIN will be required
to authenticate you when accessing your account via Uconnect®Care or perform-
ing any remote services such as Remote Door Lock/Unlock, Remote Horn & Lights
or Starting and Stopping the engine.
9. If your vehicle qualifies for a trial package it will be presented. Simply agree to the
Uconnect®Terms of Service (checkbox) and then select the “Start Service”
button.
At this point your vehicle is registered with Uconnect®Access. Continue to set up Via
Mobile. Apps will be downloaded the next time you start your vehicle. If the Apps
have not appeared after 24 hours, please contact Uconnect®Care.
Download The Uconnect® Access App
The Uconnect®Access smartphone app allows you to remotely lock or unlock your
doors, start your engine (if equipped) and activate your horn and lights from virtually
anywhere. The smartphone app also features Via Mobile (if equipped) which uses
your smartphone’s data plan to access your personal Pandora®, iHeartRadio, Slacker
Radio and Aha™ by HARMAN accounts and control them using your vehicle
touchscreen.
The Uconnect®Access app is only compatible with select iPhone®and Android
smartphones. Visit UconnectPhone.com or call 1-877-855-8400 to confirm that
your smartphone is compatible with Uconnect®. Once you’ve confirmed your smart-
phone is compatible, Android and iPhone®users should visit their respective app
store and search for “Uconnect Access” to download the app.
ELECTRONICS
77
Page 86 of 220
6.Stolen Vehicle Assistance— If your vehicle is stolen, contact local law enforce-
ment immediately to file a stolen vehicle report. Once this report has been filed,
Uconnect®care can help locate your vehicle. The Uconnect®Care agent will ask
for the stolen vehicle report number issued by local law enforcement. Then, using
GPS technology and the built-in wireless connection within your vehicle, the
Uconnect®Care agent will be able to locate the stolen vehicle and work with law
enforcement to help recover it. (Vehicle must be within the United States, have
network coverage and must be registered with Uconnect®Access with an active
subscription that includes the applicable feature).
7.WiFi Hotspot— WiFi Hotspot is on-demand WiFi 3G connectivity that's built-in
and ready to go whenever you are. Once your vehicle is registered for Uconnect®
Access, you can purchase a Wifi Hotspot subscription at the Uconnect®Store.
After you've made your purchase, turn on your signal and connect your passengers
devices. It's never been easier to bring your home or office with you.
NOTE:
Your vehicle must have a working electrical system for any of the in vehicle
Uconnect®features to operate.
Uconnect® Access Remote Features
If you own a compatible iPhone®or Android®powered device, the Uconnect®Access
App allows you to remotely lock or unlock your doors, start your engine or activate
your horn and lights from virtually anywhere (Vehicle must be within the United
States and have network coverage). You can download the App from Mopar Owner
Connect or from the App Store (iPhone) or Google Play store. Visit
UconnectPhone.com to determine if your device is compatible. For Uconnect®
Phone customer support and to determine if your device is compatible.
U.S. residents - visit UconnectPhone.com or call 1-877-855-8400
Remote Start— This feature provides the ability to start the engine on your vehicle,
without the keys and from virtually any distance. You can send a request to your
vehicle in one of two ways:
1. Using the Uconnect®Access App from a compatible smartphone.
2. From the Mopar Owner Connect website.
• After 15 minutes if you have not entered your vehicle with the key, the engine
will shut off automatically.
• You can also send a command to turn-off an engine that has been remote
started.
• This remote function requires your vehicle to be equipped with a factory-
installed Remote Start system. To utilize this feature after the Uconnect®
Access App is downloaded, login with your user name and password.
ELECTRONICS
84
Page 87 of 220
NOTE:
Your four digit Uconnect®Security PIN is required to confirm the request.
• You can set-up notifications for your account to receive an email or text (SMS)
message every time a command is sent. Login to Mopar Owner Connect
(moparownerconnect.com) and click on Edit Profile to manage Uconnect®
Notifications.
Remote Door Lock/Unlock— This feature provides the ability to lock or unlock the door
on your vehicle, without the keys and from virtually any distance. You can send a
request to your vehicle in one of three ways:
1. Using the Uconnect®Access App from a compatible smartphone.
2. From the Mopar Owner Connect website.
3. By contacting the Uconnect®Care on the phone.
To use this feature after the Uconnect®Access App is downloaded, login using your
user name and password. You will need your four digit Uconnect®Security PIN to
confirm the request. Press the “closed lock” icon on your Uconnect®Access App to
lock the doors, and press the “open Lock” icon to unlock the driver’s door.
You can set-up notifications for your account to receive an email or text (SMS)
message every time a command is sent. Login to Mopar Owner Connect
(moparownerconnect.com) and click on Edit Profile to manage Uconnect®Notifica-
tions.
Remote Horn And Lights— It’s easy to locate a vehicle in a dark, crowded or noisy
parking area by activating the horn and lights. It may also help if you need to draw
attention to your vehicle for any reason. You can send a request to your vehicle in one
of three ways:
1. Using the Uconnect®Access App from a compatible smartphone.
2. From the Mopar Owner Connect website.
3. By contacting the Uconnect®Care on the phone.
To use this feature after the Uconnect®Access App is downloaded, login using your
user name and password. You will need your four digit Uconnect®Security PIN to
confirm the request. You can set-up notifications for your account to receive an email
or text (SMS) message every time a command is sent. Login to Mopar Owner Connect
(moparownerconnect.com) and click on Edit Profile to manage Uconnect®Notifica-
tions.
ELECTRONICS
85
Page 94 of 220
Clock Setting
1. Push the Menu button at the bottom of the radio, and push the Enter/Browse
button for System Settings. Next, select the Time and Format setting and then
select Set Time by pushing the Enter/Browse button.
2. Adjust the hours or minutes by turning the Tune/Scroll knob, then pushing the
Enter/Browse button to move to the next entry. You can also select 12hr or 24hr
format by turning the Tune/Scroll knob, then pushing the Enter/Browse button on
the desired selection.
3. Once the time is set push the “Back” button to exit the time screen.
Audio
• Push the AUDIO button on the radio faceplate.
The Audio Menu shows the following options for you to customize your audio settings.
Treble, Mid, Bass, Fade, Balance, Speed Adjusted Volume, Loudness
• Select the desired setting to adjust, then push the ENTER/BROWSE button. Turnthe TUNE/SCROLL knob to adjust the setting + or - 9. Push the “Back” buttonwhen done.
Radio Operation
Seek Previous/Next Buttons
• Push to seek through radio stations in AM, FM or SXM bands.
• Hold either button to bypass stations without stopping.
Store Radio Presets
• The Presets are available for all Radio Modes, and are activated by pushing any of
the six Preset buttons.
• When you are receiving a station that you wish to commit into memory, push and
hold the desired numbered button for more than two seconds, or until you hear a
confirmation beep.
• The Radio stores up to 18 presets in each of the Radio modes. Push the A-B-C
button on the faceplate to select the A, B or C preset list.
ELECTRONICS
92
Page 96 of 220
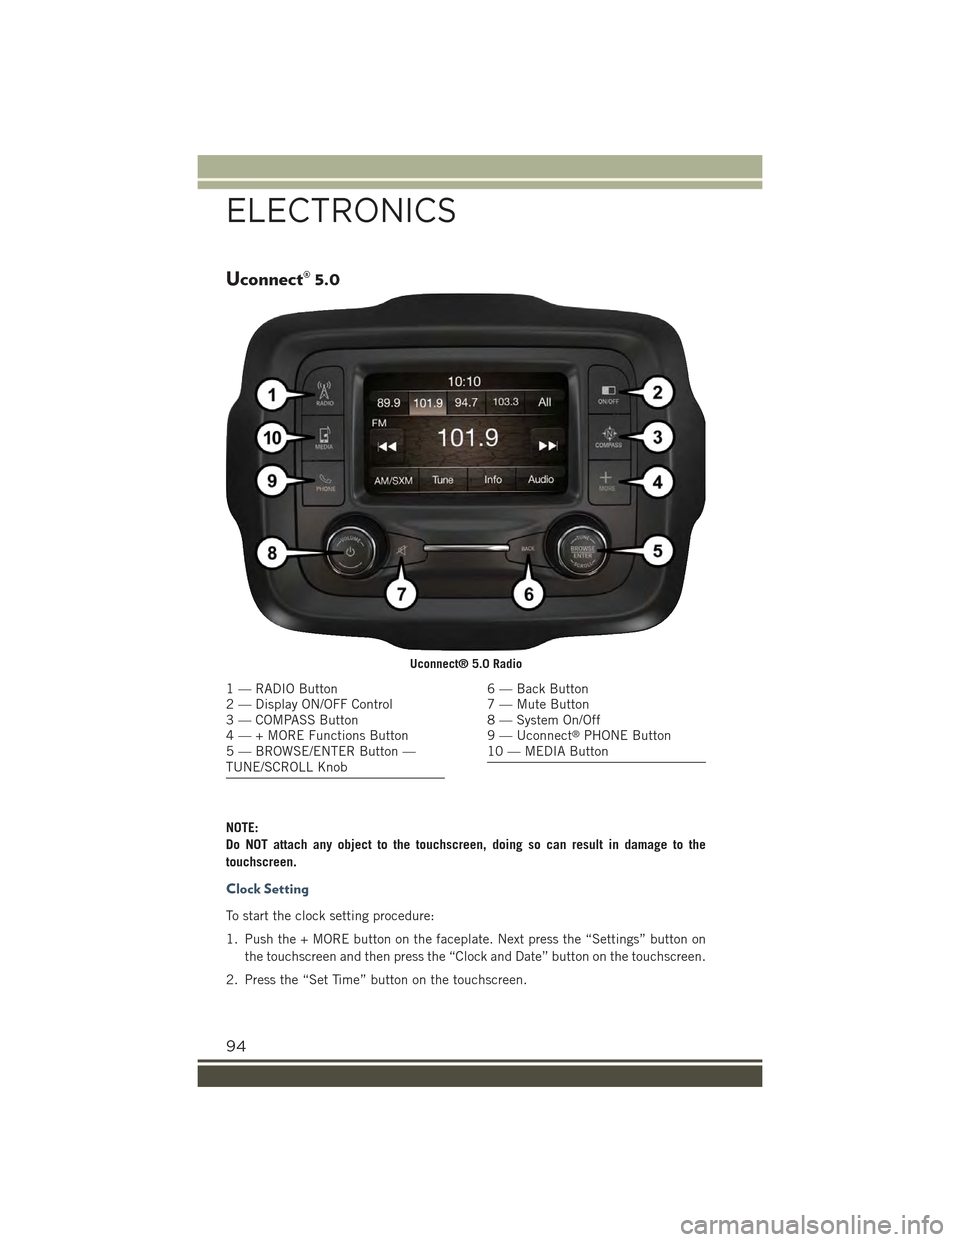
Uconnect® 5.0
NOTE:
Do NOT attach any object to the touchscreen, doing so can result in damage to the
touchscreen.
Clock Setting
To start the clock setting procedure:
1. Push the + MORE button on the faceplate. Next press the “Settings” button on
the touchscreen and then press the “Clock and Date” button on the touchscreen.
2. Press the “Set Time” button on the touchscreen.
Uconnect® 5.0 Radio
1 — RADIO Button2 — Display ON/OFF Control3 — COMPASS Button4 — + MORE Functions Button5 — BROWSE/ENTER Button —TUNE/SCROLL Knob
6 — Back Button7 — Mute Button8 — System On/Off9 — Uconnect®PHONE Button10 — MEDIA Button
ELECTRONICS
94