brake JEEP RENEGADE 2015 1.G Owner's Guide
[x] Cancel search | Manufacturer: JEEP, Model Year: 2015, Model line: RENEGADE, Model: JEEP RENEGADE 2015 1.GPages: 220, PDF Size: 34.11 MB
Page 181 of 220
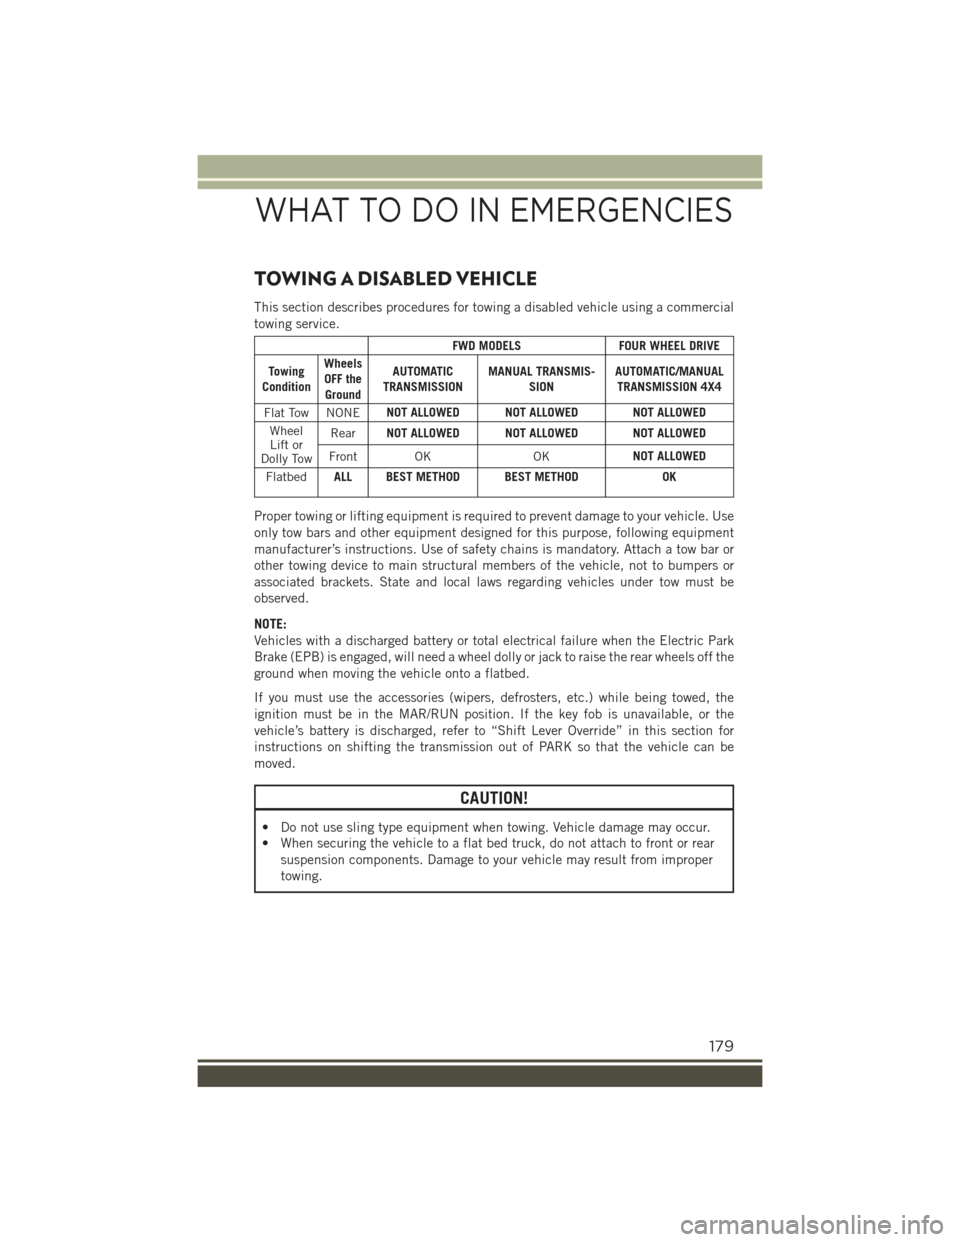
TOWING A DISABLED VEHICLE
This section describes procedures for towing a disabled vehicle using a commercial
towing service.
FWD MODELSFOUR WHEEL DRIVE
TowingCondition
WheelsOFF theGround
AUTOMATICTRANSMISSIONMANUAL TRANSMIS-SIONAUTOMATIC/MANUALTRANSMISSION 4X4
Flat Tow NONENOT ALLOWED NOT ALLOWED NOT ALLOWED
WheelLift orDolly Tow
RearNOT ALLOWED NOT ALLOWED NOT ALLOWED
Front OKOKNOT ALLOWED
FlatbedALL BEST METHOD BEST METHODOK
Proper towing or lifting equipment is required to prevent damage to your vehicle. Use
only tow bars and other equipment designed for this purpose, following equipment
manufacturer’s instructions. Use of safety chains is mandatory. Attach a tow bar or
other towing device to main structural members of the vehicle, not to bumpers or
associated brackets. State and local laws regarding vehicles under tow must be
observed.
NOTE:
Vehicles with a discharged battery or total electrical failure when the Electric Park
Brake (EPB) is engaged, will need a wheel dolly or jack to raise the rear wheels off the
ground when moving the vehicle onto a flatbed.
If you must use the accessories (wipers, defrosters, etc.) while being towed, the
ignition must be in the MAR/RUN position. If the key fob is unavailable, or the
vehicle’s battery is discharged, refer to “Shift Lever Override” in this section for
instructions on shifting the transmission out of PARK so that the vehicle can be
moved.
CAUTION!
• Do not use sling type equipment when towing. Vehicle damage may occur.
• When securing the vehicle to a flat bed truck, do not attach to front or rear
suspension components. Damage to your vehicle may result from improper
towing.
WHAT TO DO IN EMERGENCIES
179
Page 184 of 220
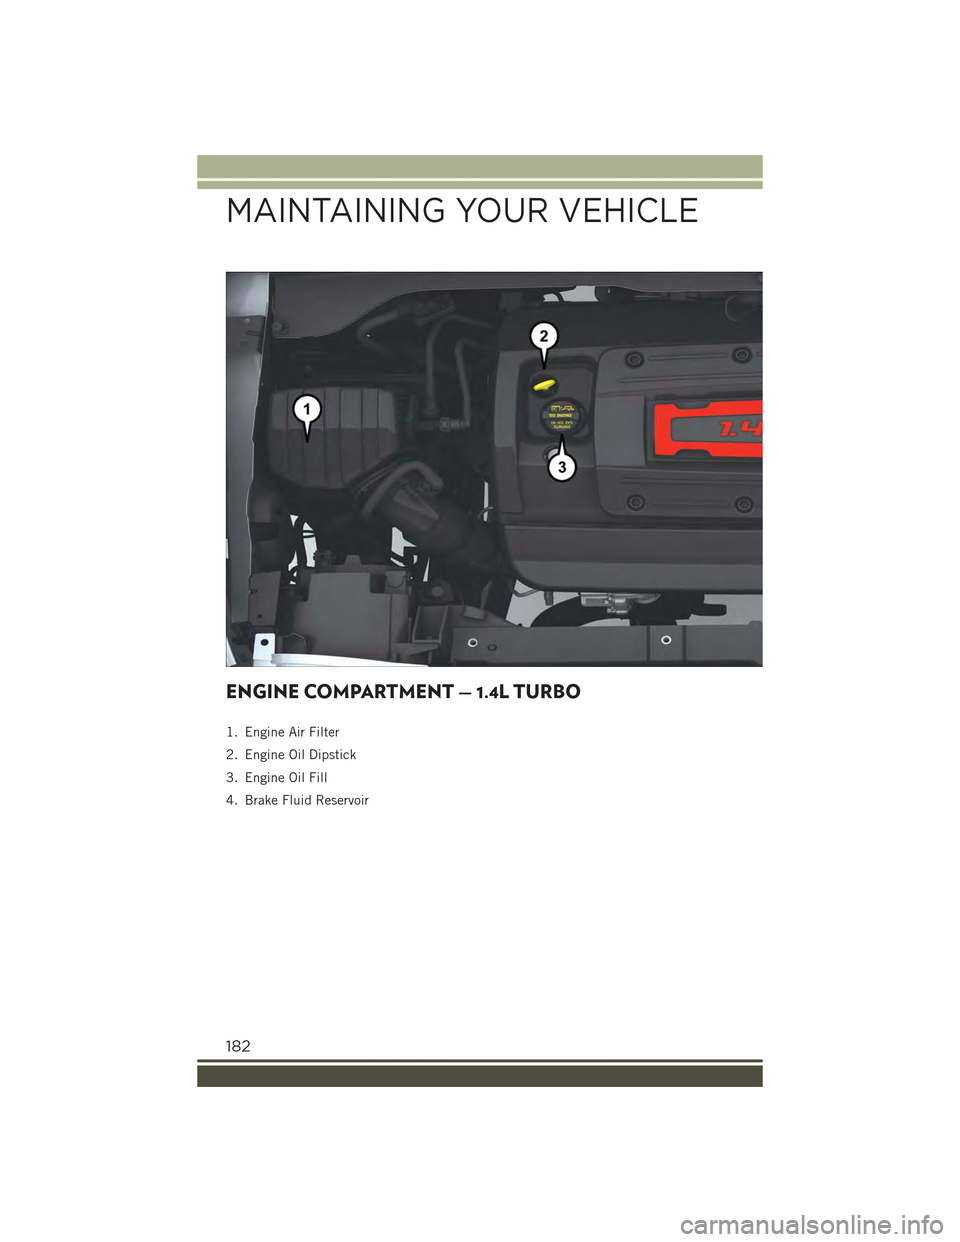
ENGINE COMPARTMENT — 1.4L TURBO
1. Engine Air Filter
2. Engine Oil Dipstick
3. Engine Oil Fill
4. Brake Fluid Reservoir
MAINTAINING YOUR VEHICLE
182
Page 186 of 220
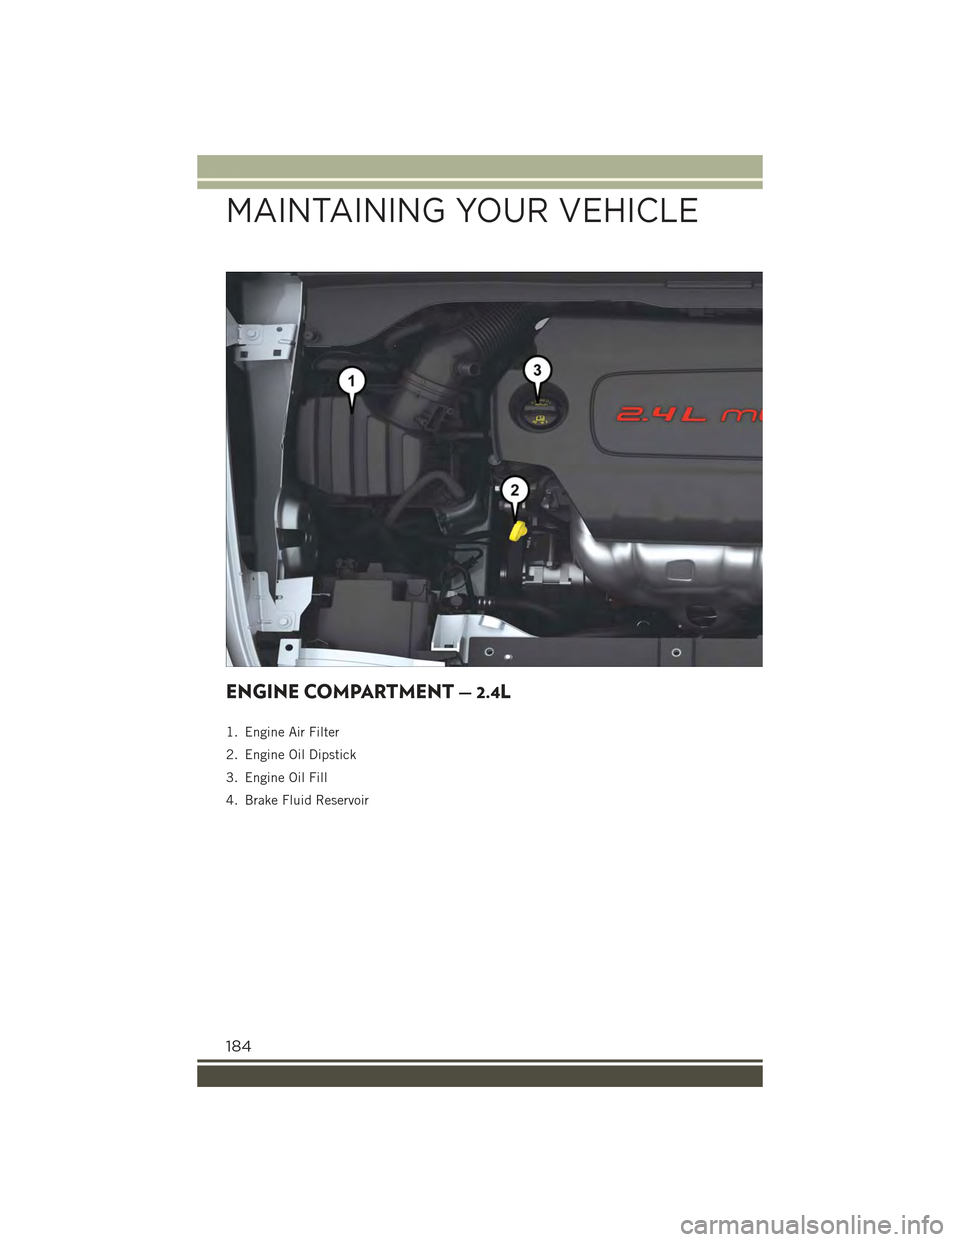
ENGINE COMPARTMENT — 2.4L
1. Engine Air Filter
2. Engine Oil Dipstick
3. Engine Oil Fill
4. Brake Fluid Reservoir
MAINTAINING YOUR VEHICLE
184
Page 189 of 220
E85 FLEXIBLE FUEL — 2.4L ENGINE ONLY
Refer to your Owner's Manual on the DVD for further details.
CAUTION!
Only vehicles with the E-85 fuel filler door label or a yellow gas cap can operate on
E-85.
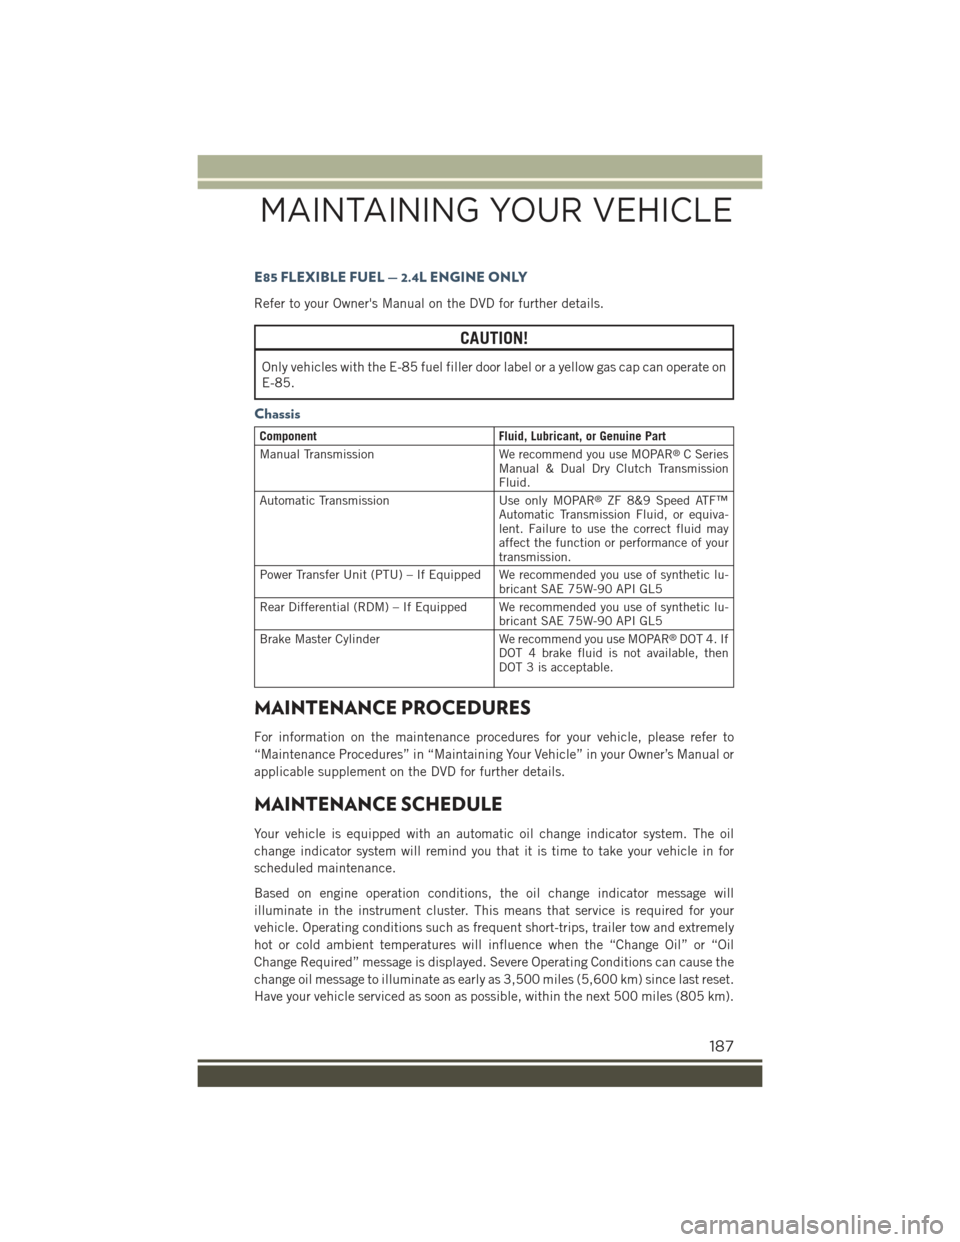
Chassis
ComponentFluid, Lubricant, or Genuine Part
Manual TransmissionWe recommend you use MOPAR®C SeriesManual & Dual Dry Clutch TransmissionFluid.
Automatic TransmissionUse only MOPAR®ZF 8&9 Speed ATF™Automatic Transmission Fluid, or equiva-lent. Failure to use the correct fluid mayaffect the function or performance of yourtransmission.
Power Transfer Unit (PTU) – If Equipped We recommended you use of synthetic lu-bricant SAE 75W-90 API GL5
Rear Differential (RDM) – If Equipped We recommended you use of synthetic lu-bricant SAE 75W-90 API GL5
Brake Master CylinderWe recommend you use MOPAR®DOT 4. IfDOT 4 brake fluid is not available, thenDOT 3 is acceptable.
MAINTENANCE PROCEDURES
For information on the maintenance procedures for your vehicle, please refer to
“Maintenance Procedures” in “Maintaining Your Vehicle” in your Owner’s Manual or
applicable supplement on the DVD for further details.
MAINTENANCE SCHEDULE
Your vehicle is equipped with an automatic oil change indicator system. The oil
change indicator system will remind you that it is time to take your vehicle in for
scheduled maintenance.
Based on engine operation conditions, the oil change indicator message will
illuminate in the instrument cluster. This means that service is required for your
vehicle. Operating conditions such as frequent short-trips, trailer tow and extremely
hot or cold ambient temperatures will influence when the “Change Oil” or “Oil
Change Required” message is displayed. Severe Operating Conditions can cause the
change oil message to illuminate as early as 3,500 miles (5,600 km) since last reset.
Have your vehicle serviced as soon as possible, within the next 500 miles (805 km).
MAINTAINING YOUR VEHICLE
187
Page 190 of 220
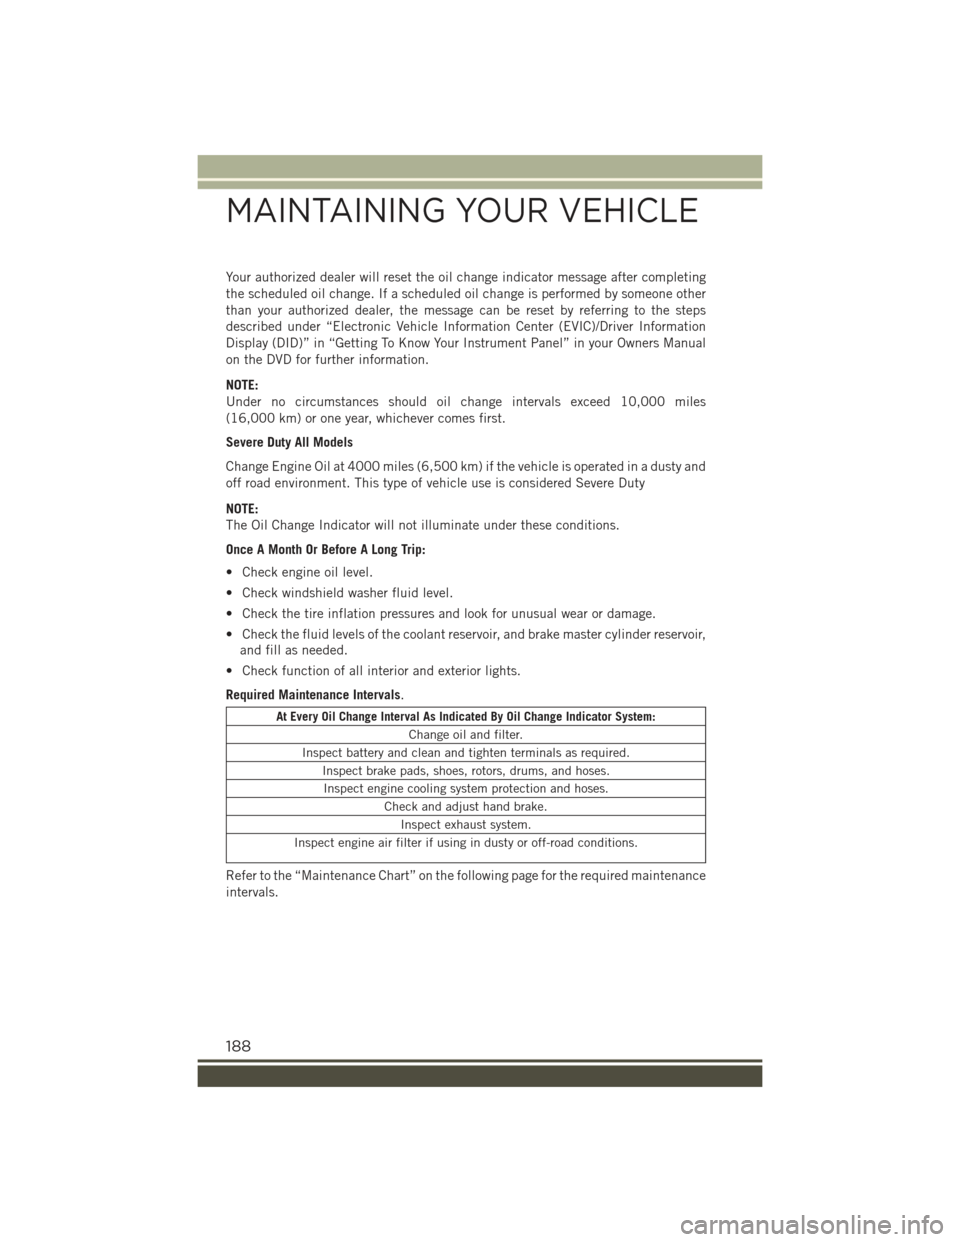
Your authorized dealer will reset the oil change indicator message after completing
the scheduled oil change. If a scheduled oil change is performed by someone other
than your authorized dealer, the message can be reset by referring to the steps
described under “Electronic Vehicle Information Center (EVIC)/Driver Information
Display (DID)” in “Getting To Know Your Instrument Panel” in your Owners Manual
on the DVD for further information.
NOTE:
Under no circumstances should oil change intervals exceed 10,000 miles
(16,000 km) or one year, whichever comes first.
Severe Duty All Models
Change Engine Oil at 4000 miles (6,500 km) if the vehicle is operated in a dusty and
off road environment. This type of vehicle use is considered Severe Duty
NOTE:
The Oil Change Indicator will not illuminate under these conditions.
Once A Month Or Before A Long Trip:
• Check engine oil level.
• Check windshield washer fluid level.
• Check the tire inflation pressures and look for unusual wear or damage.
• Check the fluid levels of the coolant reservoir, and brake master cylinder reservoir,
and fill as needed.
• Check function of all interior and exterior lights.
Required Maintenance Intervals.
At Every Oil Change Interval As Indicated By Oil Change Indicator System:
Change oil and filter.
Inspect battery and clean and tighten terminals as required.
Inspect brake pads, shoes, rotors, drums, and hoses.
Inspect engine cooling system protection and hoses.
Check and adjust hand brake.
Inspect exhaust system.
Inspect engine air filter if using in dusty or off-road conditions.
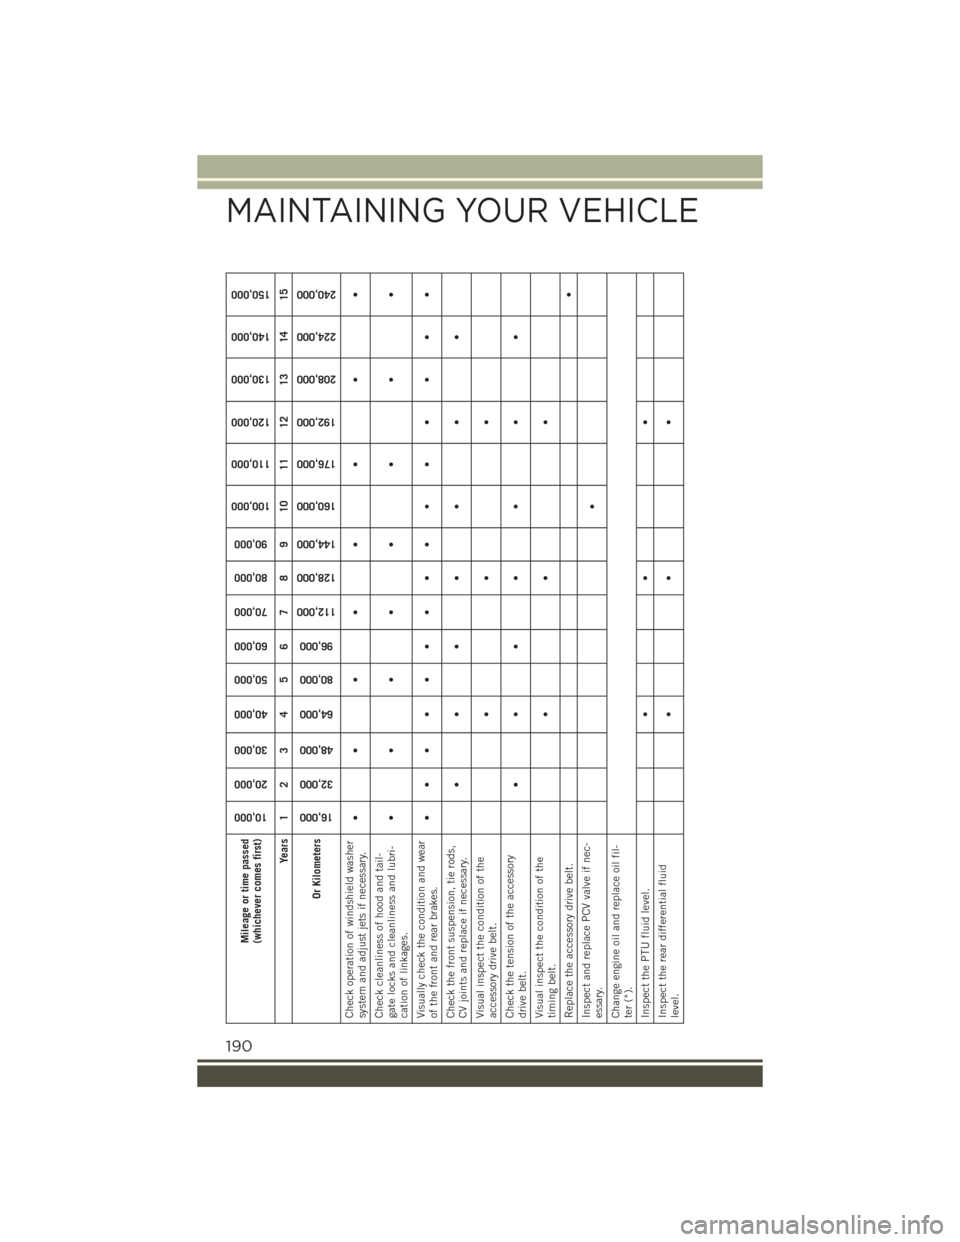
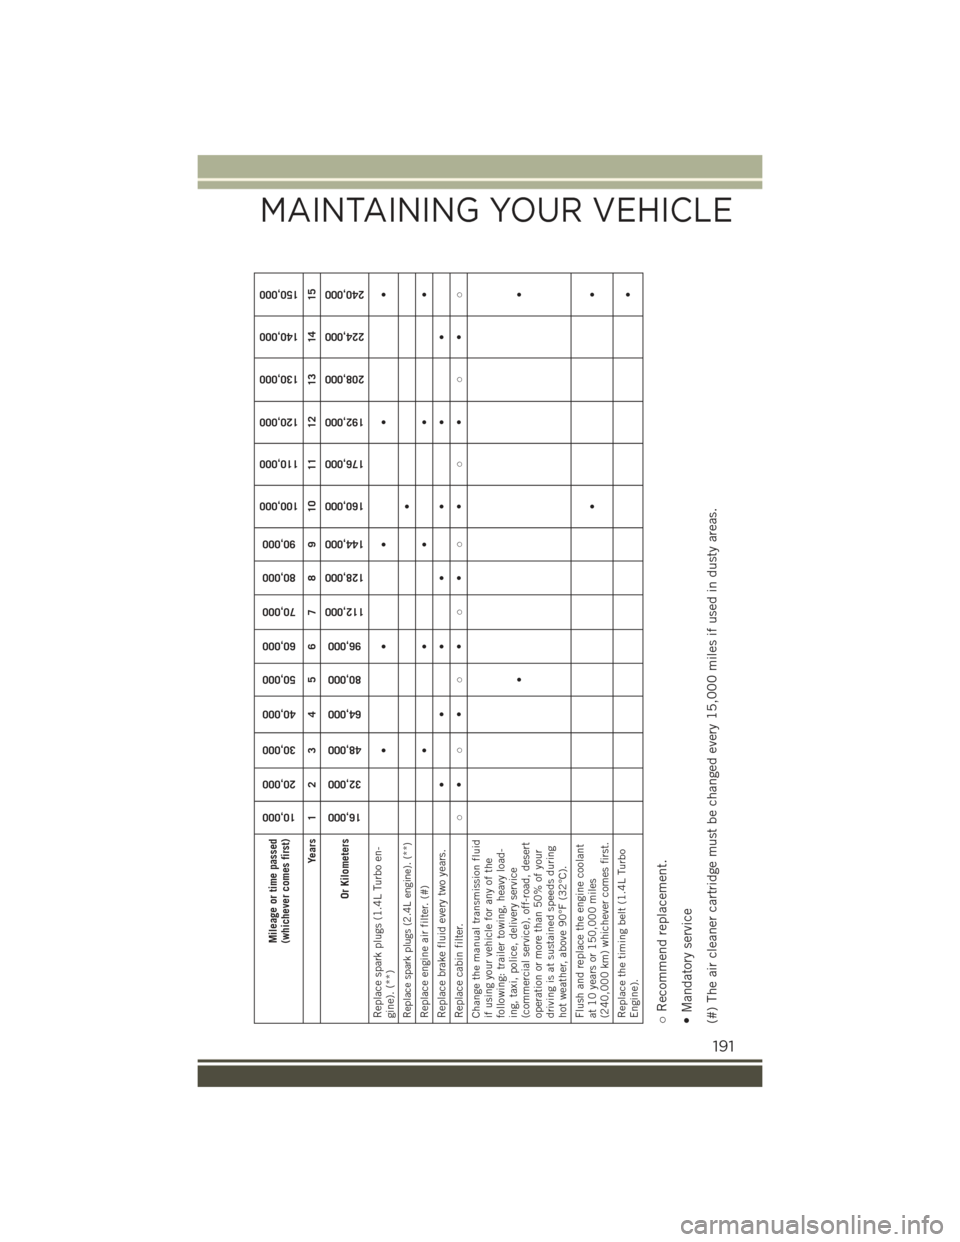
Refer to the “Maintenance Chart” on the following page for the required maintenance
intervals.
MAINTAINING YOUR VEHICLE
188
Page 191 of 220
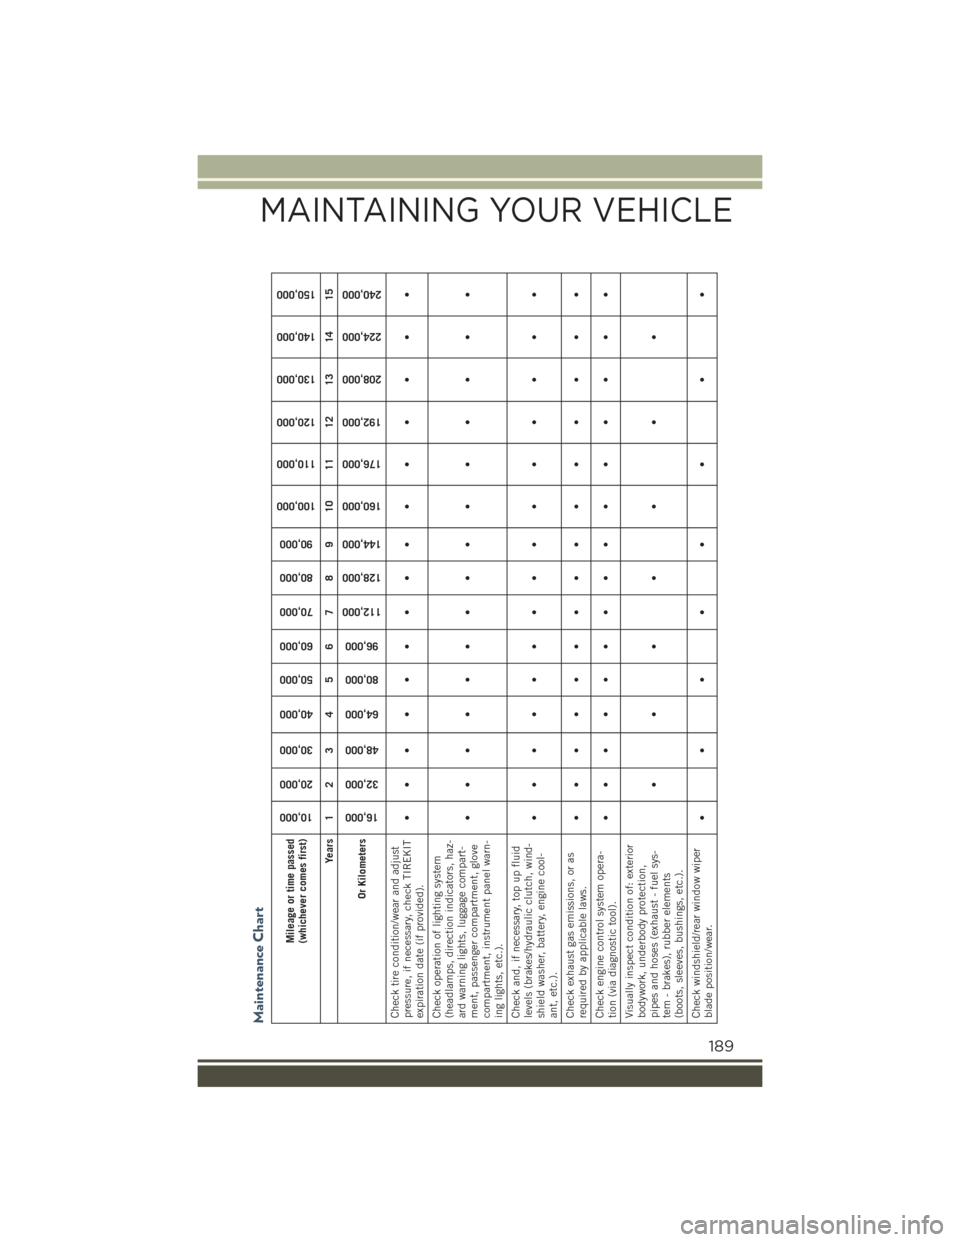
Maintenance Chart
Mileage or time passed(whichever comes first)
10,000
20,000
30,000
40,000
50,000
60,000
70,000
80,000
90,000
100,000
110,000
120,000
130,000
140,000
150,000
Years 1 2 3 4 5 6 7 8 9 10 11 12 13 14 15
Or Kilometers
16,000
32,000
48,000
64,000
80,000
96,000
112,000
128,000
144,000
160,000
176,000
192,000
208,000
224,000
240,000
Check tire condition/wear and adjustpressure, if necessary, check TIREKITexpiration date (if provided).
•• • • •• • •• • • • • • •
Check operation of lighting system(headlamps, direction indicators, haz-ard warning lights, luggage compart-ment, passenger compartment, glovecompartment, instrument panel warn-ing lights, etc.).
•• • • •• • •• • • • • • •
Check and, if necessary, top up fluidlevels (brakes/hydraulic clutch, wind-shield washer, battery, engine cool-ant, etc.).
•• • • •• • •• • • • • • •
Check exhaust gas emissions, or asrequired by applicable laws.
•• • • •• • •• • • • • • •
Check engine control system opera-tion (via diagnostic tool).
•• • • •• • •• • • • • • •
Visually inspect condition of: exteriorbodywork, underbody protection,pipes and hoses (exhaust - fuel sys-tem - brakes), rubber elements(boots, sleeves, bushings, etc.).
•••• • • •
Check windshield/rear window wiperblade position/wear.
•• ••• • • •
MAINTAINING YOUR VEHICLE
189
Page 192 of 220
Mileage or time passed(whichever comes first)
10,000
20,000
30,000
40,000
50,000
60,000
70,000
80,000
90,000
100,000
110,000
120,000
130,000
140,000
150,000
Years 1 2 3 4 5 6 7 8 9 10 11 12 13 14 15
Or Kilometers
16,000
32,000
48,000
64,000
80,000
96,000
112,000
128,000
144,000
160,000
176,000
192,000
208,000
224,000
240,000
Check operation of windshield washersystem and adjust jets if necessary.
•• ••• • • •
Check cleanliness of hood and tail-gate locks and cleanliness and lubri-cation of linkages.
•• ••• • • •
Visually check the condition and wearof the front and rear brakes.
•• • • •• • •• • • • • • •
Check the front suspension, tie rods,CV joints and replace if necessary.
•••• • • •
Visual inspect the condition of theaccessory drive belt.
•• •
Check the tension of the accessorydrive belt.
•••• • • •
Visual inspect the condition of thetiming belt.
•• •
Replace the accessory drive belt.
•
Inspect and replace PCV valve if nec-essary.
•
Change engine oil and replace oil fil-ter (*).Inspect the PTU fluid level. • • •Inspect the rear differential fluidlevel.
•• •
MAINTAINING YOUR VEHICLE
190
Page 193 of 220
Mileage or time passed(whichever comes first)
10,000
20,000
30,000
40,000
50,000
60,000
70,000
80,000
90,000
100,000
110,000
120,000
130,000
140,000
150,000
Years 1 2 3 4 5 6 7 8 9 10 11 12 13 14 15
Or Kilometers
16,000
32,000
48,000
64,000
80,000
96,000
112,000
128,000
144,000
160,000
176,000
192,000
208,000
224,000
240,000
Replace spark plugs (1.4L Turbo en-gine). (**)
••• • •
Replace spark plugs (2.4L engine). (**)
•
Replace engine air filter. (#)
•
•
•
•
•
Replace brake fluid every two years.
•
•
•
•
•
•
•
Replace cabin filter.
○
•
○
•
○
•
○
•
○
•
○
•
○
•
○
Change the manual transmission fluidif using your vehicle for any of thefollowing: trailer towing, heavy load-ing, taxi, police, delivery service(commercial service), off-road, desertoperation or more than 50% of yourdriving is at sustained speeds duringhot weather, above 90°F (32°C).
•
•
Flush and replace the engine coolantat 10 years or 150,000 miles(240,000 km) whichever comes first.
••
Replace the timing belt (1.4L TurboEngine).
•
○Recommend replacement.• Mandatory service(#) The air cleaner cartridge must be changed every 15,000 miles if used in dusty areas.
MAINTAINING YOUR VEHICLE
191
Page 197 of 220
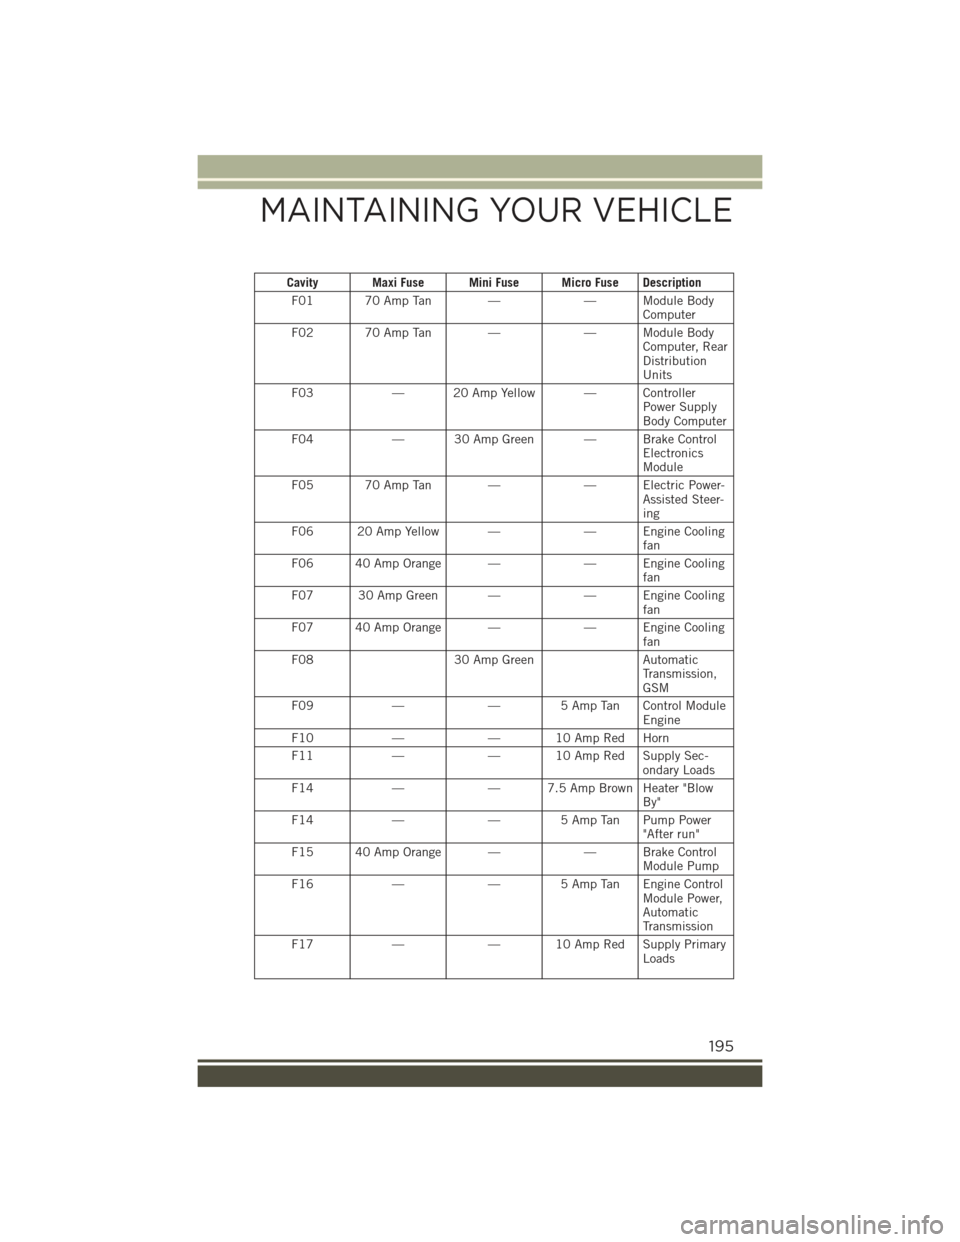
Cavity Maxi Fuse Mini Fuse Micro Fuse Description
F01 70 Amp Tan ——ModuleBodyComputer
F02 70 Amp Tan ——ModuleBodyComputer, RearDistributionUnits
F03— 20 Amp Yellow — ControllerPower SupplyBody Computer
F04— 30 Amp Green — Brake ControlElectronicsModule
F05 70 Amp Tan ——ElectricPower-Assisted Steer-ing
F06 20 Amp Yellow ——EngineCoolingfan
F06 40 Amp Orange ——EngineCoolingfan
F07 30 Amp Green ——EngineCoolingfan
F07 40 Amp Orange ——EngineCoolingfan
F0830 Amp GreenAutomaticTransmission,GSM
F09——5AmpTanControlModuleEngine
F10——10AmpRedHorn
F11——10AmpRedSupplySec-ondary Loads
F14——7.5AmpBrownHeater"BlowBy"
F14——5AmpTanPumpPower"After run"
F15 40 Amp Orange ——BrakeControlModule Pump
F16——5AmpTanEngineControlModule Power,AutomaticTransmission
F17——10AmpRedSupplyPrimaryLoads
MAINTAINING YOUR VEHICLE
195
Page 199 of 220
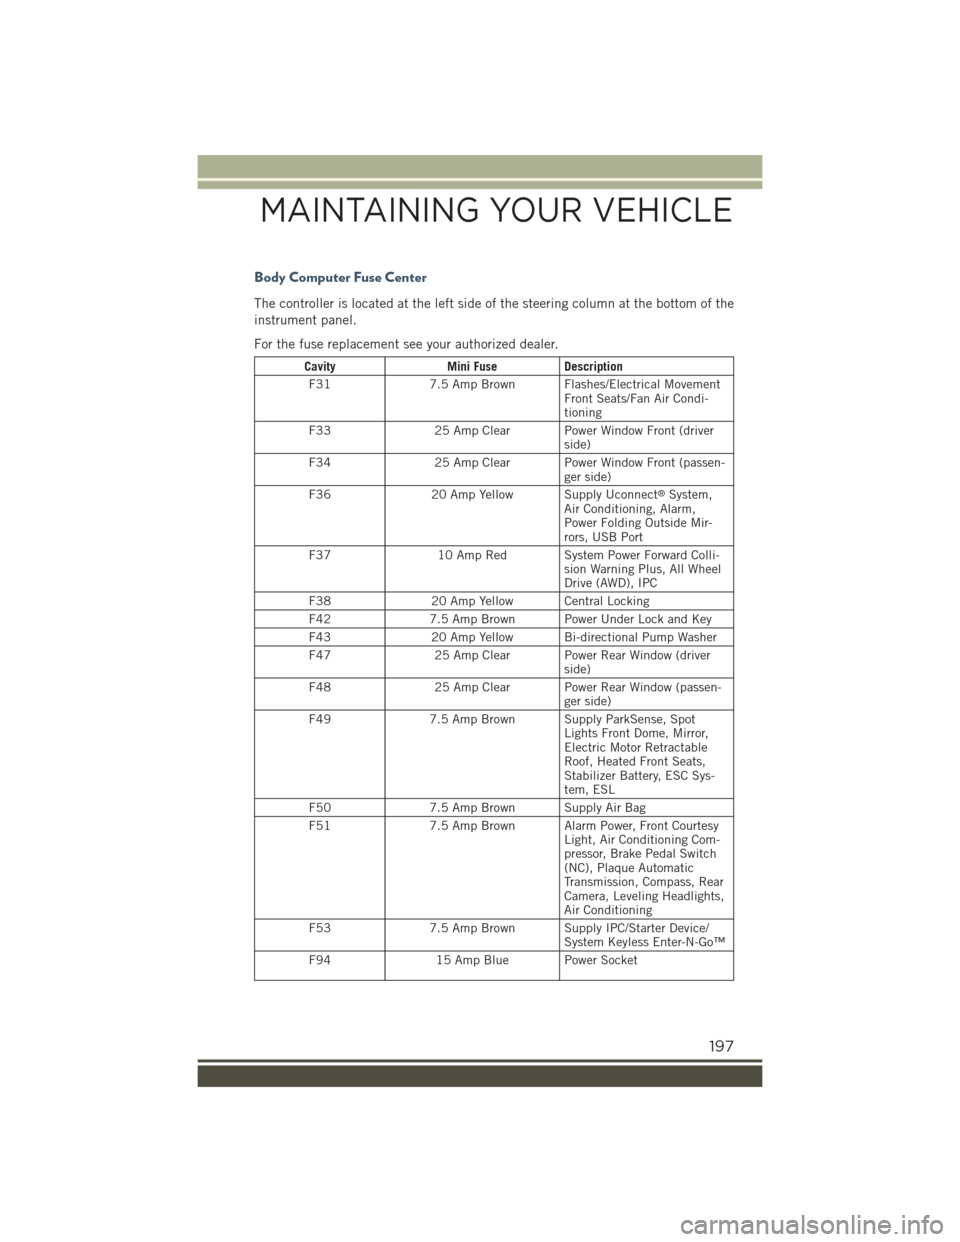
Body Computer Fuse Center
The controller is located at the left side of the steering column at the bottom of the
instrument panel.
For the fuse replacement see your authorized dealer.
CavityMini FuseDescription
F317.5 Amp Brown Flashes/Electrical MovementFront Seats/Fan Air Condi-tioning
F3325 Amp Clear Power Window Front (driverside)
F3425 Amp Clear Power Window Front (passen-ger side)
F3620 Amp Yellow Supply Uconnect®System,Air Conditioning, Alarm,Power Folding Outside Mir-rors, USB Port
F3710 Amp Red System Power Forward Colli-sion Warning Plus, All WheelDrive (AWD), IPC
F3820 Amp Yellow Central Locking
F427.5 Amp Brown Power Under Lock and Key
F4320 Amp Yellow Bi-directional Pump Washer
F4725 Amp Clear Power Rear Window (driverside)
F4825 Amp Clear Power Rear Window (passen-ger side)
F497.5 Amp Brown Supply ParkSense, SpotLights Front Dome, Mirror,Electric Motor RetractableRoof, Heated Front Seats,Stabilizer Battery, ESC Sys-tem, ESL
F507.5 Amp Brown Supply Air Bag
F517.5 Amp Brown Alarm Power, Front CourtesyLight, Air Conditioning Com-pressor, Brake Pedal Switch(NC), Plaque AutomaticTransmission, Compass, RearCamera, Leveling Headlights,Air Conditioning
F537.5 Amp Brown Supply IPC/Starter Device/System Keyless Enter-N-Go™
F9415 Amp Blue Power Socket
MAINTAINING YOUR VEHICLE
197