start stop button JEEP RENEGADE 2015 1.G User Guide
[x] Cancel search | Manufacturer: JEEP, Model Year: 2015, Model line: RENEGADE, Model: JEEP RENEGADE 2015 1.GPages: 220, PDF Size: 34.11 MB
Page 13 of 220
NOTE:
In case the ignition switch does not change with the push of a button, the RKE
transmitter (Key Fob) may have a low or dead battery. In this situation, a back up
method can be used to operate the ignition switch. Put the nose side (side opposite
of the emergency key) of the Key Fob against the ENGINE START/STOP button and
push to operate the ignition switch.
• The Ignition Node Module (IGNM) op-
erates similar to an ignition switch. It
has three operating positions, two with
detents and one that is spring-loaded.
The detent positions are STOP/OFF
and MAR/RUN. The AVV/START posi-
tion is a spring-loaded momentary con-
tact position. When released from the
AVV/START position, the switch auto-
matically returns to the MAR/RUN
position.
Locking And Unlocking The
Doors/Liftgate
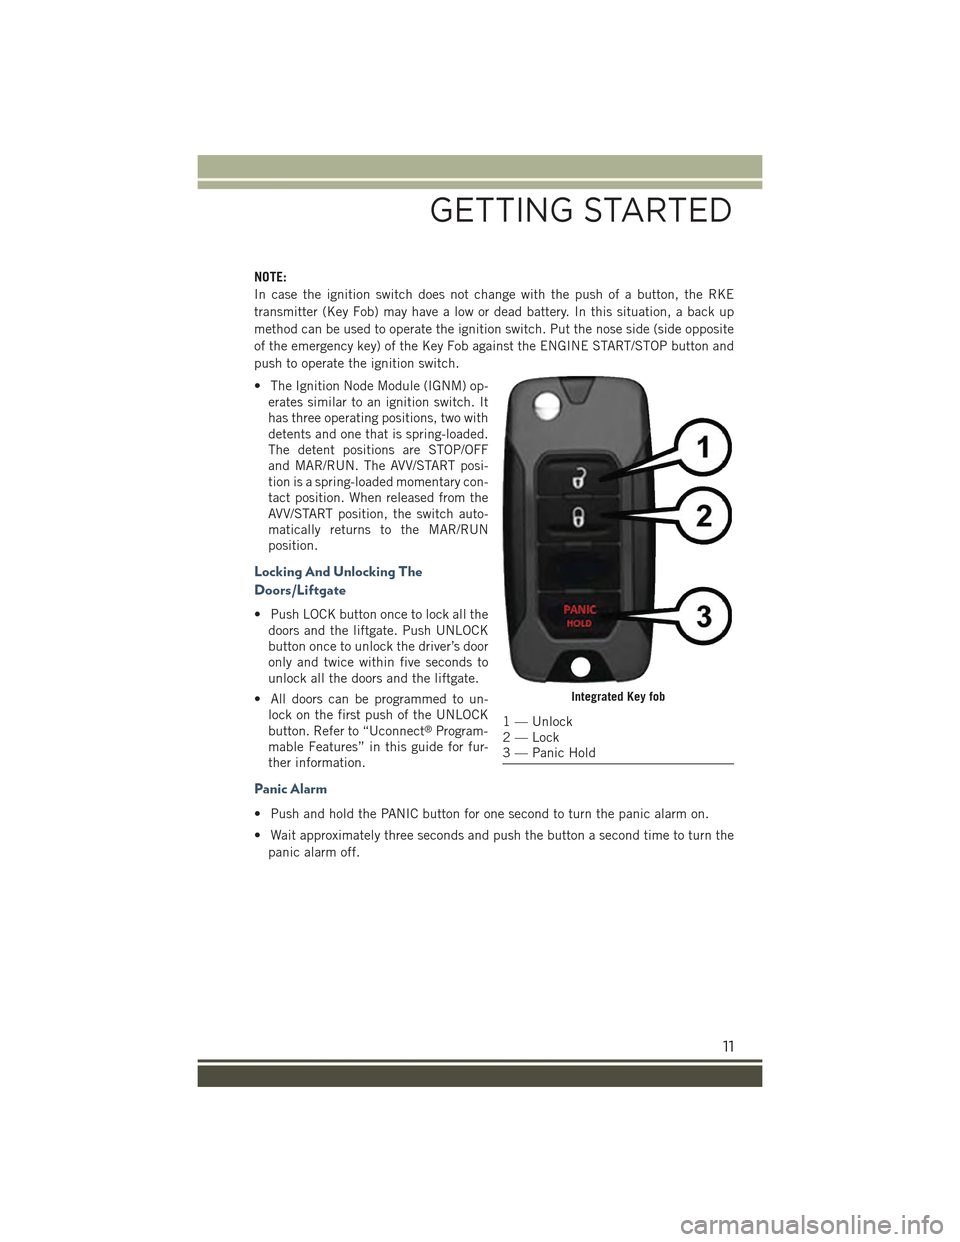
• Push LOCK button once to lock all the
doors and the liftgate. Push UNLOCK
button once to unlock the driver’s door
only and twice within five seconds to
unlock all the doors and the liftgate.
• All doors can be programmed to un-
lock on the first push of the UNLOCK
button. Refer to “Uconnect®Program-
mable Features” in this guide for fur-
ther information.
Panic Alarm
• Push and hold the PANIC button for one second to turn the panic alarm on.
• Wait approximately three seconds and push the button a second time to turn the
panic alarm off.
Integrated Key fob
1 — Unlock2 — Lock3 — Panic Hold
GETTING STARTED
11
Page 15 of 220
Remote Start Windshield Wiper De–icer Activation — If Equipped
When Remote Start is active and the outside ambient temperature is less than 41° F
(5° C), the wiper De-Icer will be enabled. On exiting Remote Start, resume the
previous operation except if the De-Icer is active; the De-Icer timer and operation will
continue.
VEHICLE SECURITY ALARM
The Vehicle Security Alarm monitors the vehicle doors for unauthorized entry and the
Keyless Enter-N-Go™ START/STOP button for unauthorized operation. While the
Vehicle Security Alarm is armed, interior switches for door locks and decklid release
are disabled. If something triggers the alarm, the Vehicle Security Alarm will provide
the following audible and visible signals: the horn will pulse, the park lamps and/or
turn signals will flash, and the Vehicle Security Light in the instrument cluster will
flash.
To A r m :
Lock the door using either the power door lock switch (one door must be open) or the
LOCK button on the Remote Keyless Entry (RKE) transmitter (doors can be open or
closed), and close all doors.
The Vehicle Security Light in the instrument cluster will flash for 16 seconds. This
shows that the Vehicle Security Alarm is arming. During this period, if a door is
opened, the ignition is cycled to MAR/RUN, or the power door locks are unlocked in
any manner, the Vehicle Security Alarm will automatically disarm.
NOTE:
• The Vehicle Security Alarm will not arm if you lock the doors with the manual door
lock plungers.
• Once armed, the Vehicle Security Alarm disables the unlock switch on the driver
door trim panel and passenger door trim panel.
To D i s a r m T h e S y s t e m :
Push the Key Fob UNLOCK button or cycle the ignition to the MAR/RUN position.
The Vehicle Security Alarm is designed to protect your vehicle. However, you can
create conditions where the Vehicle Security Alarm will give you a false alarm. If one
of the previously described arming sequences has occurred, the Vehicle Security
Alarm will arm regardless of whether you are in the vehicle or not. If you remain in the
vehicle and open a door, the alarm will sound. If this occurs, disarm the Vehicle
Security Alarm.
If the Vehicle Security Alarm is armed and the battery becomes disconnected, the
Vehicle Security Alarm will remain armed when the battery is reconnected. The
exterior lights will flash, and the horn will sound. If this occurs, disarm the Vehicle
Security Alarm.
GETTING STARTED
13
Page 16 of 220
KEYLESS ENTER-N-GO™
The Keyless Enter-N-Go™ system is an enhancement to the vehicle’s Remote
Keyless Entry (RKE) feature. This feature allows you to lock and unlock the vehicle's
door(s) and liftgate without having to push the Key Fob LOCK or UNLOCK buttons,
as well as starting and stopping the vehicle with the push of a button.
To U n l o c k F r o m T h e D r i v e r O r P a s s e n g e r S i d e :
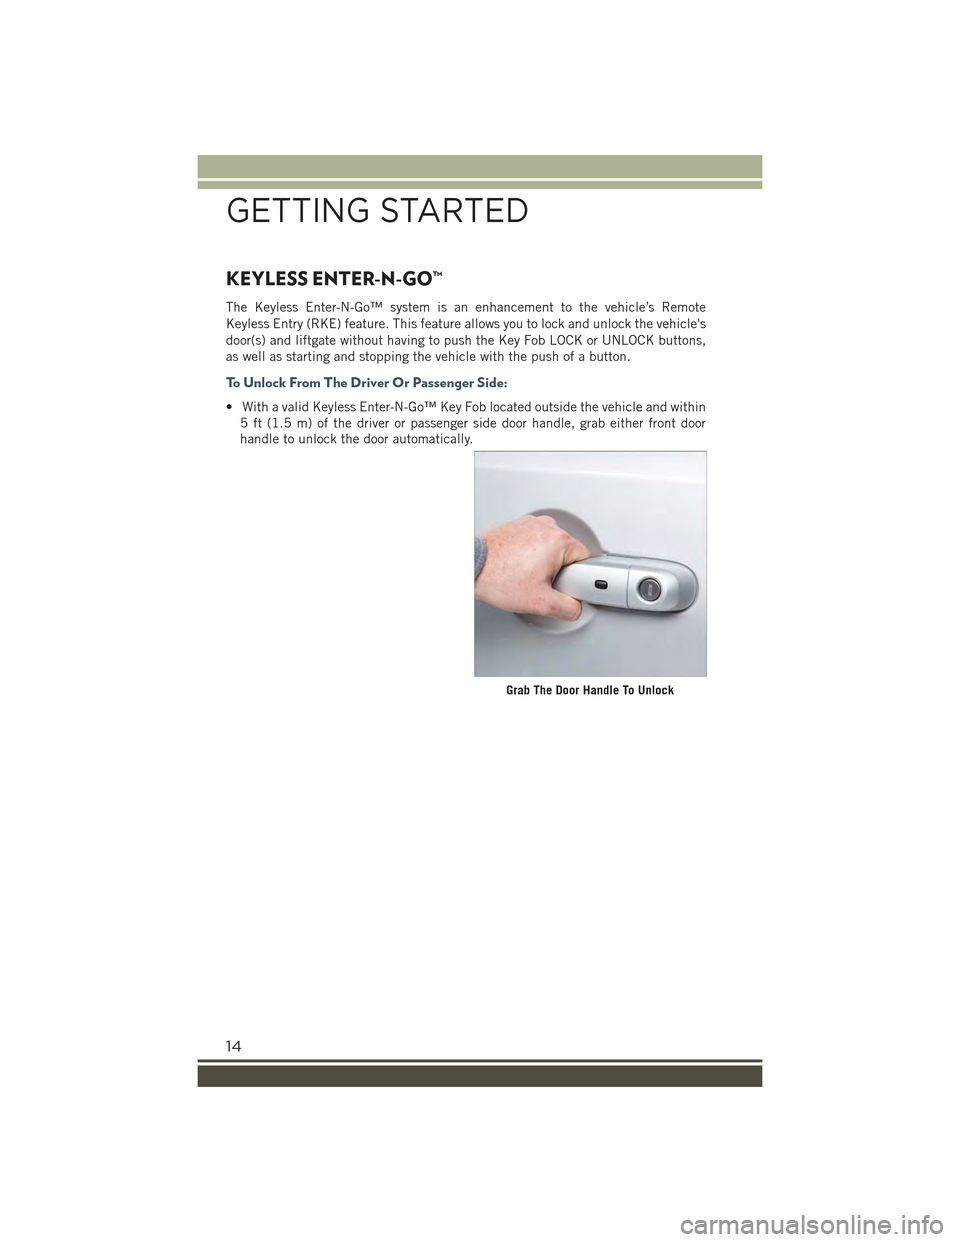
• With a valid Keyless Enter-N-Go™ Key Fob located outside the vehicle and within
5 ft (1.5 m) of the driver or passenger side door handle, grab either front door
handle to unlock the door automatically.
Grab The Door Handle To Unlock
GETTING STARTED
14
Page 18 of 220
Lock Or Unlock The Liftgate
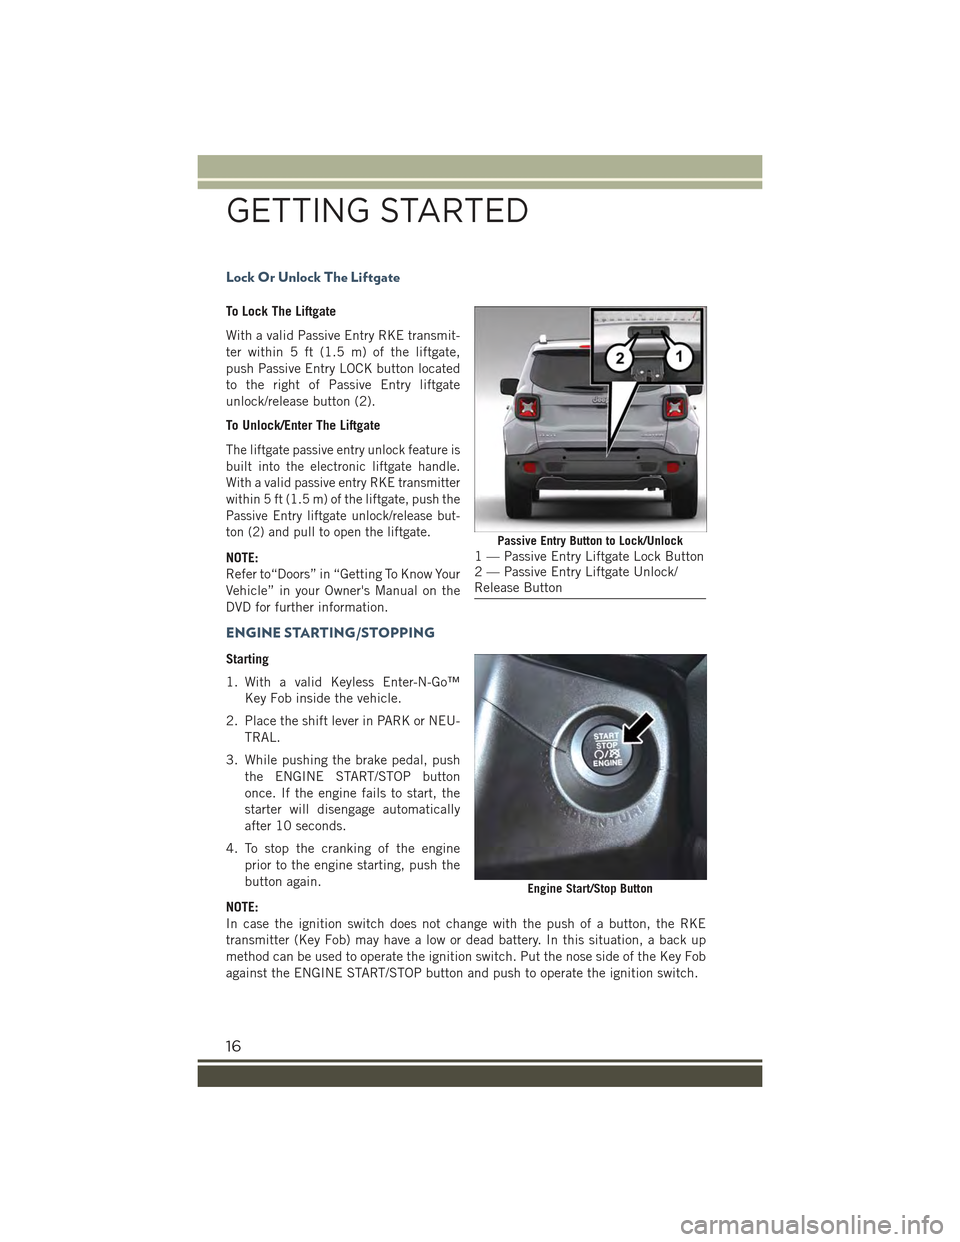
To Lock The Liftgate
With a valid Passive Entry RKE transmit-
ter within 5 ft (1.5 m) of the liftgate,
push Passive Entry LOCK button located
to the right of Passive Entry liftgate
unlock/release button (2).
To Unlock/Enter The Liftgate
The liftgate passive entry unlock feature is
built into the electronic liftgate handle.
With a valid passive entry RKE transmitter
within 5 ft (1.5 m) of the liftgate, push the
Passive Entry liftgate unlock/release but-
ton (2) and pull to open the liftgate.
NOTE:
Refer to“Doors” in “Getting To Know Your
Vehicle” in your Owner's Manual on the
DVD for further information.
ENGINE STARTING/STOPPING
Starting
1. With a valid Keyless Enter-N-Go™
Key Fob inside the vehicle.
2. Place the shift lever in PARK or NEU-
TRAL.
3. While pushing the brake pedal, push
the ENGINE START/STOP button
once. If the engine fails to start, the
starter will disengage automatically
after 10 seconds.
4. To stop the cranking of the engine
prior to the engine starting, push the
button again.
NOTE:
In case the ignition switch does not change with the push of a button, the RKE
transmitter (Key Fob) may have a low or dead battery. In this situation, a back up
method can be used to operate the ignition switch. Put the nose side of the Key Fob
against the ENGINE START/STOP button and push to operate the ignition switch.
Passive Entry Button to Lock/Unlock1 — Passive Entry Liftgate Lock Button2 — Passive Entry Liftgate Unlock/Release Button
Engine Start/Stop Button
GETTING STARTED
16
Page 19 of 220
Stopping
1. Place the shift lever in PARK.
2. Push the ENGINE START/STOP button once. The ignition switch will return to the
OFF position.
NOTE:
If the shift lever is not in PARK, the ENGINE START/STOP button must be held for two
seconds and vehicle speed must be above 5 MPH (8 km/h) before the engine will shut
off.
RUN Position With Engine Off
NOTE:
The following functions are with the driver’s foot OFF the Brake Pedal (Transmission
in PARK or NEUTRAL Position).
Starting With The Ignition Switch In The OFF Position:
1. Push the ENGINE START/STOP button once to change the ignition switch to the
RUN position.
2. Push the ENGINE START/STOP button a second time to return the ignition switch
to the OFF position.
NOTE:
If the ignition switch is left in the RUN (engine not running) position and the
transmission is in PARK, the system will automatically time out after 30 minutes of
inactivity and the ignition will switch to the OFF position.
In case the ignition switch does not change with the push of a button, the RKE
transmitter (Key Fob) may have a low or dead battery. In this situation, a back up
method can be used to operate the ignition switch. Put the nose side (side opposite
of the emergency key) of the Key Fob against the ENGINE START/STOP button and
push to operate the ignition switch.
SEAT BELT SYSTEMS
Lap/Shoulder Belts
• All seating positions in your vehicle are equipped with lap/shoulder belts.
• Be sure everyone in your vehicle is in a seat and using a seat belt properly.
• Position the lap belt so that it is snug and lies low across your hips, below your
abdomen. To remove slack in the lap belt portion, pull up on the shoulder belt. To
loosen the lap belt if it is too tight, tilt the latch plate and pull on the lap belt. A
snug seat belt reduces the risk of sliding under the seat belt in a collision.
• Position the shoulder belt across the shoulder and chest with minimal, if any slack
so that it is comfortable and not resting on your neck. The retractor will withdraw
any slack in the shoulder belt.
GETTING STARTED
17
Page 79 of 220
NOTE:
For security reasons, this link is valid for 72 hours from the time you’ve submitted
your email address into the radio touchscreen. If the link has expired, simply re-enter
your email address into the Uconnect®Registration App on the radio touchscreen to
receive another link. The secured registration link will take you through the
Uconnect®Access registration process step by step.
7. To unlock the full potential of Uconnect®Access in your vehicle, you will need to
create or validate an existing Mopar Owner Connect account previously (Owner
Center). Uconnect®along with Mopar Owner Connect have joined forces to create
one destination to manage all of your vehicle needs, from managing your
Uconnect®Access account, to tracking service history and finding recommended
accessories for your vehicle. If you already have a Mopar Owner Connect account,
log in to the website with your existing username/email and password. For
assistance with this web based registration process, call Uconnect®Care at
1-855-792-4241.
8. Once you are logged in to your Mopar Owner Connect account, you will create a
personal Uconnect®Security PIN. The Uconnect®Security PIN will be required
to authenticate you when accessing your account via Uconnect®Care or perform-
ing any remote services such as Remote Door Lock/Unlock, Remote Horn & Lights
or Starting and Stopping the engine.
9. If your vehicle qualifies for a trial package it will be presented. Simply agree to the
Uconnect®Terms of Service (checkbox) and then select the “Start Service”
button.
At this point your vehicle is registered with Uconnect®Access. Continue to set up Via
Mobile. Apps will be downloaded the next time you start your vehicle. If the Apps
have not appeared after 24 hours, please contact Uconnect®Care.
Download The Uconnect® Access App
The Uconnect®Access smartphone app allows you to remotely lock or unlock your
doors, start your engine (if equipped) and activate your horn and lights from virtually
anywhere. The smartphone app also features Via Mobile (if equipped) which uses
your smartphone’s data plan to access your personal Pandora®, iHeartRadio, Slacker
Radio and Aha™ by HARMAN accounts and control them using your vehicle
touchscreen.
The Uconnect®Access app is only compatible with select iPhone®and Android
smartphones. Visit UconnectPhone.com or call 1-877-855-8400 to confirm that
your smartphone is compatible with Uconnect®. Once you’ve confirmed your smart-
phone is compatible, Android and iPhone®users should visit their respective app
store and search for “Uconnect Access” to download the app.
ELECTRONICS
77
Page 165 of 220
• To turn the FCW system OFF, push the forward collision button once to turn the
system OFF (led turns on).
• Refer to “Electronic Speed Control ” in “Operating Your Vehicle” for further
information on Forward Collision Warning (FCW) operation and proper use.
- Liftgate Ajar Indicator — If Equipped
This indicator will illuminate when the liftgate is left ajar and not fully closed.
-OILCHANGEREQUIRED
Your vehicle is equipped with an engine oil change indicator system. The Oil Change
telltale and message (Oil Change Required) will display in the EVIC/DID display for
approximately 10 seconds, after a single chime has sounded, to indicate the next
scheduled oil change interval. The engine oil change indicator system is duty-cycle
based, which means the engine oil change interval may fluctuate dependent upon
your personal driving style.
Unless reset, this message will continue to display each time you turn the ignition
switch to the MAR/RUN position for vehicles not equipped with Keyless Enter-N-
Go™, or cycle the ignition to the ON/RUN position for vehicles equipped with Keyless
Enter-N-Go™. To turn off the message temporarily, push and release the MENU
button. To reset the oil change indicator system (after performing the scheduled
maintenance), refer to the following procedure:
Vehicles Equipped With Keyless Enter-N-Go™
1. Without pushing the brake pedal, push the ENGINE START/STOP button and
cycle the ignition to the ON/RUN position (do not start the engine).
2. Fully depress the accelerator pedal, slowly, three times within 10 seconds.
3. Without pushing the brake pedal, push the ENGINE START/STOP button once to
return the ignition to the OFF/LOCK position.
Vehicles Not Equipped With Keyless Enter-N-Go™
1. Turn the ignition switch to the MAR/RUN position (do not start the engine).
2. Fully depress the accelerator pedal, slowly, three times within 10 seconds.
3. Turn the ignition switch to the STOP/OFF position.
NOTE:
If the indicator message illuminates when you start the engine, the oil change
indicator system did not reset. If necessary, repeat these steps.
WHAT TO DO IN EMERGENCIES
163
Page 168 of 220
WARNING!
• Do not attempt to seal a tire on the side of the vehicle closest to traffic. Pull far
enough off the road to avoid the danger of being hit when using the Tire Service
Kit.
• Do not use Tire Service Kit or drive the vehicle under the following circum-
stances:
• If the puncture in the tire tread is approximately 1/4” (6 mm) or larger.
• If the tire has any sidewall damage.
• If the tire has any damage from driving with extremely low tire pressure.
• If the tire has any damage from driving on a flat tire.
• If the wheel has any damage.
• If you are unsure of the condition of the tire or the wheel.
• Keep Tire Service Kit away from open flames or heat source.
• A loose Tire Service Kit thrown forward in a collision or hard stop could
endanger the occupants of the vehicle. Always stow the Tire Service Kit in the
place provided. Failure to follow these warnings can result in injuries that are
serious or fatal to you, your passengers, and others around you.
• Take care not to allow the contents of Tire Service Kit to come in contact with
hair, eyes, or clothing. Tire Service Kit sealant is harmful if inhaled, swallowed,
or absorbed through the skin. It causes skin, eye, and respiratory irritation.
Flush immediately with plenty of water if there is any contact with eyes or skin.
Change clothing as soon as possible, if there is any contact with clothing.
• Tire Service Kit Sealant solution contains latex. In case of an allergic reaction
or rash, consult a physician immediately. Keep Tire Service Kit out of reach of
children. If swallowed, rinse mouth immediately with plenty of water and drink
plenty of water. Do not induce vomiting! Consult a physician immediately.
Insert the power plug into the vehicle power outlet socket. Start the vehicle engine.
Push the Tire Service Kit power button to the “I” position. The electric compressor
will be turned on, sealant and air will inflate the tire.
Minimum 26 psi (1.8 bar) of pressure should be reached within 20 minutes. If the
pressure has not been reached turn off and remove the Tire Service Kit, drive the
vehicle 30 feet (10 meters) back and forth, to better distribute the sealant inside the
tire.
Attach the clear flexible filling tube of the compressor directly to the tire valve and
repeat the inflation process.
When the correct pressure has been reached, start driving the vehicle to uniformly
distribute the sealant inside the tire. After 10 minutes, stop and check the tire
pressure. If the pressure is below 19 psi (1.3 bar), do not drive the vehicle, as the tire
is too damaged, contact the nearest Authorized Dealer.
WHAT TO DO IN EMERGENCIES
166