audio JEEP RENEGADE 2023 Owners Manual
[x] Cancel search | Manufacturer: JEEP, Model Year: 2023, Model line: RENEGADE, Model: JEEP RENEGADE 2023Pages: 364, PDF Size: 18.65 MB
Page 6 of 364

4
FOUR-WHEEL DRIVE .............................................. 90
Four-Wheel Drive (4WD) ...... ............................91
SELEC-TERRAIN ..... . ............................................... 92
Mode Selection Guide...... ................................92
ACTIVE GRILLE SHUTTERS — IF EQUIPPED ..... . .. 93
POWER STEERING ...... ........................................... 93
STOP/START SYSTEM ...... ..................................... 93
Autostop Mode ......
...........................................93
Possible Reasons The Engine Does Not
Autostop . ...........................................................94
To Sta
rt The Engine While In Autostop
Mode . ................................................................94
To Man
ually Turn Off The Stop/Start
System . .............................................................95
To Man
ually Turn On The Stop/Start
System . .............................................................95
Syste
m Malfunction ..... . ...................................95
CRUISE CONTROL SYSTEMS — IF EQUIPPED. ..
. .
9 5
Cruise Control ...... ............................................95
Adaptive Cruise Control (ACC) . ..
. .
. ...................97
PARKSENSE FRONT/REAR PARK ASSIST
SYSTEM — IF EQUIPPED ..... .
.............................. 105
ParkSense Sensors ...... ................................. 105
ParkSense Warning Display..... . .................... 105
ParkSense Display . ..
..
. .................................. 105
Enabling And Disabling ParkSense ..... . ........ 108
Service The ParkSense Park Assist System .. 108
C l
eaning The ParkSense System . ..
..
. ........... 108
ParkSense System Usage Precautions ..... . .. 108
Side Distance Warning (SDW) System . ..
. .
. ... 109PARKSENSE ACTIVE PARK ASSIST SYSTEM —
IF EQUIPPED ..... .
.................................................. 111
Enabling And Disabling The ParkSense
Active Park Assist System..... .
....................... 112
Parallel/Perpendicular Parking Space
Assistance Operation . .....
.............................. 113
Exiting The Parking Space ..... . ...................... 115
LANESENSE — IF EQUIPPED . ..
. .
. ....................... 117
LaneSense Operation ...... ............................. 117
Turning LaneSense On Or Off ..... . ................. 117
LaneSense Warning Message . ..
..
. ................ 117
Changing LaneSense Status ..... . .................. 121
REAR BACK UP CAMERA . ..
..
. ............................. 121
REFUELING THE VEHICLE ...... ............................ 122
VEHICLE LOADING ...... ....................................... 123
Certification Label ...... ................................... 123
TRAILER TOWING ..... . .......................................... 124
Common Towing Definitions...... ................... 124
Trailer Hitch Classification ..... . ...................... 125
Trailer Towing Weights (Maximum Trailer
Weight Ratings) . .....
....................................... 126
Trailer And Tongue Weight..... . ...................... 126
Towing Requirements . ..
..
. ............................ 126
Towing Tips ..... . .............................................. 128
RECREATIONAL TOWING . ..
..
. ............................. 129
Towing This Vehicle Behind Another
Vehicle ........................................................... 129
Recr e
ational Towing. ..
..
. ................................ 129 DRIVING TIPS .....
.
................................................. 130
On-Road Driving Tips...... ............................... 130
Off-Road Driving Tips ..... . .............................. 130
MULTIMEDIA
UCONNECT SYSTEMS ......................................... 133
CYBERSECURITY ................................................. 133
UCONNECT SETTINGS ...... ................................... 133
Customer Programmable Features ...... ...... 134
UCONNECT INTRODUCTION..... . .......................... 147
System Overview ...... .................................... 147
Drag & Drop Menu Bar . ..
..
. ........................... 149
Safety And General Information..... . ............. 149
UCONNECT MODES ..... . ....................................... 150
Steering Wheel Audio Controls .................... 150
Radi o Mode ..... . ............................................ 151
Media Mode . ..
. .
. ........................................... 162
Phone Mode ..... . ........................................... 164
ANDROID AUTO™ & APPLE CARPLAY® —
IF EQUIPPED ..... .
................................................... 174
Android Auto™ ...... ........................................ 174
Apple CarPlay® . ..
..
. ....................................... 176
Android Auto™ And Apple CarPlay® Tips
And Tricks . ..................................................... 178
Page 13 of 364
11
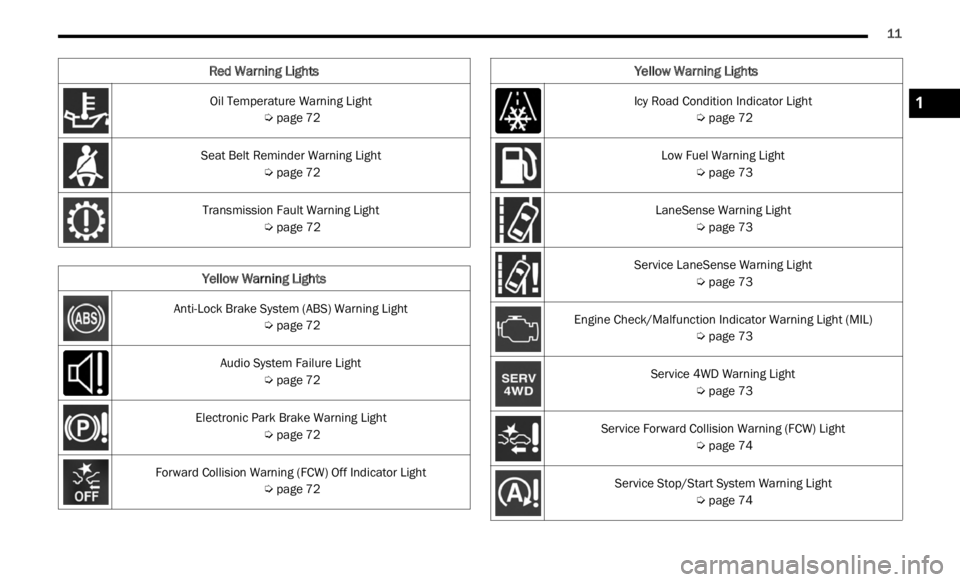
Oil Temperature Warning Light
Ú page 72
Seat Belt Reminder Warning Light Ú page 72
Transmission Fault Warning Light Ú page 72
Yellow Warning Lights
Anti-Lock Brake System (ABS) Warning Light
Ú page 72
Audio System Failure Light Ú page 72
Electronic Park Brake Warning Light Ú page 72
Forward Collision Warning (FCW) Off Indicator Light Ú page 72
Red Warning Lights
Icy Road Condition Indicator Light
Ú page 72
Low Fuel Warning Light Ú page 73
LaneSense Warning Light Ú page 73
Service LaneSense Warning Light Ú page 73
Engine Check/Malfunction Indicator Warning Light (MIL) Ú page 73
Service 4WD Warning Light Ú page 73
Service Forward Collision Warning (FCW) Light Ú page 74
Service Stop/Start System Warning Light Ú page 74
Yellow Warning Lights
1
Page 69 of 364

GETTING TO KNOW YOUR INSTRUMENT PANEL 67
Audio
Push and release the up or down arrow
button until the Audio menu title is displayed in the
instr u
ment cluster display.
Stored Messages
Push and release the up or down arrow
button until the Messages Menu Icon is highlighted
in th e
instrument cluster display. This feature
shows the number of stored warning messages.
Pushing the left
or right arrow button will
all ow
you to scroll through the stored messages.
Screen Setup
This menu item allows you to change the position
of the information on the display.
Display Gears (Vehicles With Reconfigurable
Multi-
Functional Display And Automatic
Transmission)
By selecting this item, you can select the display
mode, t
he particulars relating to the automatic
transmission, and choose between the following
options:
“Single digit”
The right side of the display will show the letter
concer n
ing the automatic transmission gear
selector (P,R,N or D) position. After approxi -
mately two seconds, the letter will be displayed
in a c
entral position.
“Full PRND”
The letters PRND will display on the right side,
the p o
sition assumed by the gear selector will
be highlighted in the display. During the opera -
tion in sequential mode (“AutoStick”), in place
of the
letter D, the gear will be will be displayed.
In The Upper Left/Top Right
The information relating to the following can be
displ a
yed:
External temperature
Ignition Button — If Equipped
Compass — If Equipped
Date (Month/Day)
Time (Hours/Minutes)
In the central area of the display, you can view all
of t
h e
information listed above as well as the
following:
Compass — If Equipped
Speed Display — If Equipped
Date (Day/Month/Year)
Time
Compass — If Equipped
Ignition Button — If Equipped
External Temp — If equipped
Menu Item
Distance Traveled A (Trip A)
Distance Traveled B (Trip B)
Restore Default Settings
Selecting this item, and you can reset and restore
t he de
fault settings.
Settings
This menu item allows you to change the settings
for the following:
Display
Units
Clock and Date
Security
Safety and Assistance
Lights
Doors and Locks
NOTE:
Some items may be displayed and managed
throug h
the Uconnect system.
Vehicles Equipped With Multi-functional Display
Reconfi
gurable:
The following menu/submenu items are available
in the
cluster display.
3
Page 74 of 364
72 GETTING TO KNOW YOUR INSTRUMENT PANEL
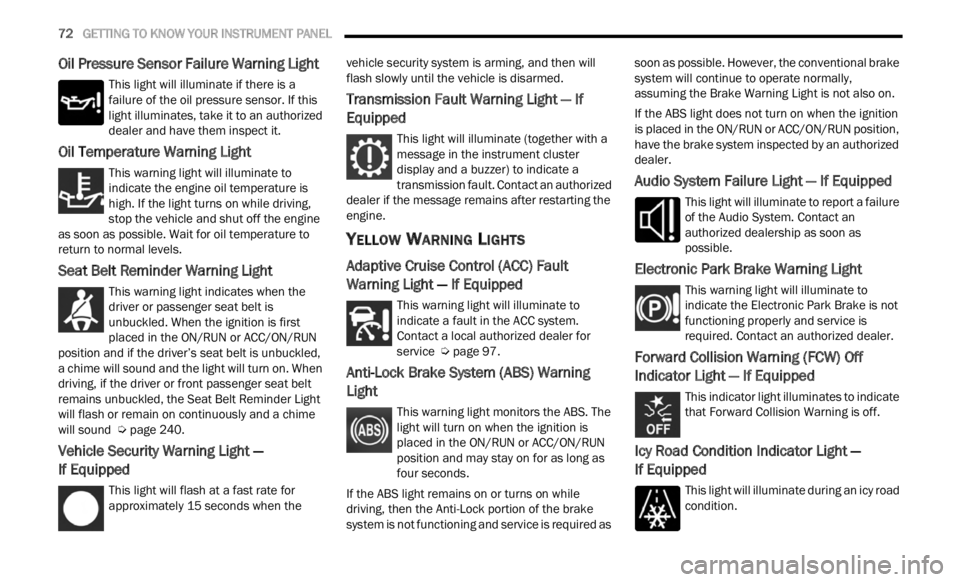
Oil Pressure Sensor Failure Warning Light
This light will illuminate if there is a
failure of the oil pressure sensor. If this
light
illuminates, take it to an authorized
dealer and have them inspect it.
Oil Temperature Warning Light
This warning light will illuminate to
indicate the engine oil temperature is
high.
If the light turns on while driving,
stop the vehicle and shut off the engine
as soon as possible. Wait for oil temperature to
return to normal levels.
Seat Belt Reminder Warning Light
This warning light indicates when the
driver or passenger seat belt is
unbuc k
led. When the ignition is first
placed in the ON/RUN or ACC/ON/RUN
position and if the driver’s seat belt is unbuckled,
a chime will sound and the light will turn on. When
driving, if the driver or front passenger seat belt
remains unbuckled, the Seat Belt Reminder Light
will flash or remain on continuously and a chime
will sound Ú page 240.
Vehicle Security Warning Light —
If Equipped
This light will flash at a fast rate for
approximately 15 seconds when the v
e h
ic
l e security system is arming, and then will
flash slowly until the vehicle is disarmed.
Transmission Fault Warning Light — If
Equipped
This light will illuminate (together with a
message in the instrument cluster
d is
p l
a
y and a buzzer) to indicate a
transmission fault. Contact an authorized
dealer if the message remains after restarting the
engine.
YELLOW WARNING LIGHTS
Adaptive Cruise Control (ACC) Fault
Warning Light — If Equipped
This warning light will illuminate to
indicate a fault in the ACC system.
C on t
a c
t
a local authorized dealer for
service Ú page 97.
Anti-Lock Brake System (ABS) Warning
Light
This warning light monitors the ABS. The
light will turn on when the ignition is
p
la
ce
d
in the ON/RUN or ACC/ON/RUN
position and may stay on for as long as
four seconds.
If the ABS light remains on or turns on while
drivin
g, then the Anti-Lock portion of the brake
system is not functioning and service is required as soon as possible. However, the conventional brake
system will continue to operate normally,
assuming the Brake Warning Light is not also on.
If the ABS light does not turn on when the ignition
is pl
a
ced in the ON/RUN or ACC/ON/RUN position,
have the brake system inspected by an authorized
dealer.
Audio System Failure Light — If Equipped
This light will illuminate to report a failure
of the Audio System. Contact an
author i
zed dealership as soon as
possible.
Electronic Park Brake Warning Light
This warning light will illuminate to
indicate the Electronic Park Brake is not
funct i
oning properly and service is
required. Contact an authorized dealer.
Forward Collision Warning (FCW) Off
Indicator Light — If Equipped
This indicator light illuminates to indicate
that Forward Collision Warning is off.
Icy Road Condition Indicator Light —
If Equipped
This light will illuminate during an icy road
condition.
Page 123 of 364
STARTING AND OPERATING 121
CHANGING LANESENSE STATUS
The LaneSense system has settings to adjust the
intensity of the torque warning and the warning
zone sensitivity (early/late) that you can configure
through the Uconnect system
Ú page 133.
NOTE:
When enabled the system operates above
37 mph (60 km/h) and below 112 mph
(180 km
/h).
Use of the turn signal suppresses the warnings.
The system will not apply torque to the steering
wheel whenever a safety system engages
(Anti-Lock Brakes, Traction Control System,
Electronic Stability Control, Forward Collision
Warning, etc.).
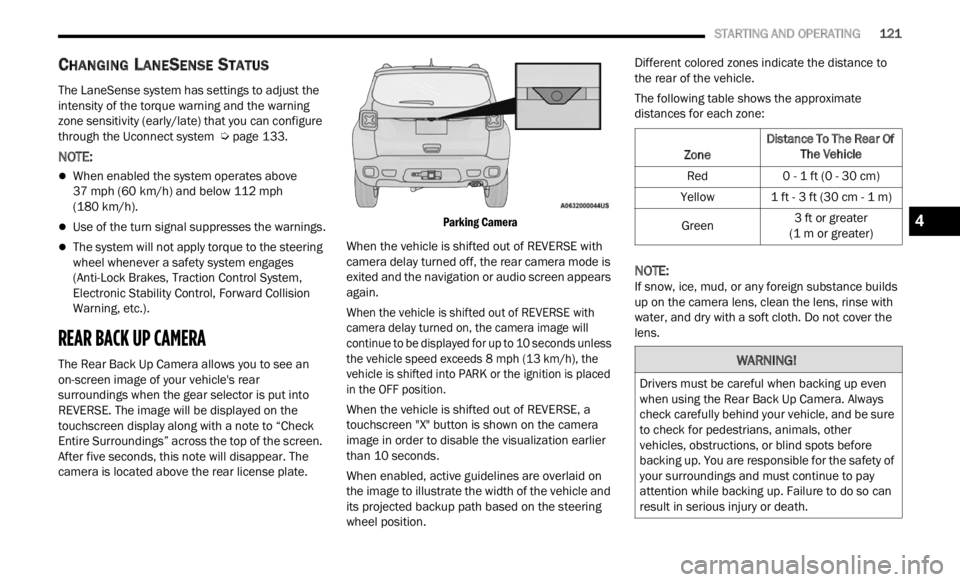
REAR BACK UP CAMERA
The Rear Back Up Camera allows you to see an
on-screen image of your vehicle's rear
surroundings when the gear selector is put into
REVERSE. The image will be displayed on the
touchscreen display along with a note to “Check
Entire Surroundings” across the top of the screen.
After five seconds, this note will disappear. The
camera is located above the rear license plate.
Parking Camera
When the vehicle is shifted out of REVERSE with
camer a
delay turned off, the rear camera mode is
exited and the navigation or audio screen appears
again.
When the vehicle is shifted out of REVERSE with
camera
delay turned on, the camera image will
continue to be displayed for up to 10 seconds unless
the vehicle speed exceeds 8 mph (13 km/h), the
vehic l
e is shifted into PARK or the ignition is placed
in the OFF position.
When the vehicle is shifted out of REVERSE, a
touchs c
reen "X" button is shown on the camera
image in order to disable the visualization earlier
than 10 seconds.
When enabled, active guidelines are overlaid on
the im
age to illustrate the width of the vehicle and
its projected backup path based on the steering
wheel position. Different colored zones indicate the distance to
the r
e
ar of the vehicle.
The following table shows the approximate
distan
ces for each zone:
NOTE:
If snow, ice, mud, or any foreign substance builds
up on t
he camera lens, clean the lens, rinse with
water, and dry with a soft cloth. Do not cover the
lens.
Zone Distance To The Rear Of
The Ve hicle
Red 0 - 1 ft (0 - 30 cm)
Yellow 1 ft - 3 ft (30 cm - 1 m)
Green 3
ft or greater
(1 m or
greater)
WARNING!
Drivers must be careful when backing up even
when using the Rear Back Up Camera. Always
check carefully behind your vehicle, and be sure
to check for pedestrians, animals, other
vehicles, obstructions, or blind spots before
backing up. You are responsible for the safety of
your surroundings and must continue to pay
attention while backing up. Failure to do so can
result in serious injury or death.
4
Page 139 of 364

MULTIMEDIA 137
Voice
Clock & Date
When the Voice button is pressed on the touchscreen, the system displays the options related to the vehicle’s Voice Recognition feature.
NOTE:
Depending on the vehicle’s options, feature settings may vary.
Setting Name Description
Voice Response Length This setting will change the response length for the Voice Recognition system.
The “
B
rief” setting provides a shortened audio description from the system.
The “Detailed” setting provides the full audio description from the system.
Show Command List This setting will allow you to turn the Command List on or off. The “Always”
settin
g will always show the Command List. The “With Help” setting will show
the Command List and provide a brief description of what the command does.
The “Never” setting will turn the Command List off.
When the Clock & Date button is pressed on the touchscreen, the system displays the different options related to the vehicle’s internal clock.
NOTE:
Depending on the vehicle’s options, feature settings may vary.
Setting Name Description
Sync Time With GPS This setting will sync the time to the GPS receiver in the system. The system
will
c
ontrol the time via the GPS location.
Time Format This setting will allow you to set the time format (AM/PM). Sync Time With GPS
m
ust
b
e off for this setting to be available. The “12 hrs” setting will set the
time to a 12-hour format. The “24 hrs” setting will set the time to a 24-hour
format.
5
Page 146 of 364

144 MULTIMEDIA
Audio
When the Audio button is pressed on the touchscreen, the system displays options related to the vehicle’s sound system. These settings can change the audio
location within the vehicle, adjust the bass or treble levels, and auto-play settings from an audio device or smartphone.
NOTE:
Depending on the vehicle’s options, feature settings may vary.
Setting Name Description
Balance/Fade This setting will adjust audio levels from specific speakers in the front/back
and l
e
ft/right of the vehicle. The Speaker icon can be moved to set audio
location.
Equalizer This setting will adjust the “Bass”, “Mid”, and “Treble” ranges of the audio.
Speed Adjusted Volume This setting will adjust audio volume as speeds increase. At a higher setting,
the vol
ume will increase more as the vehicle speeds up. The available settings
are “Off”, “1”, “2”, and “3”.
Surround Sound This setting will turn the Surround Sound system on or off.
AUX Volume Offset This setting will tune the audio levels from a device connected through the
AUX port
. The available settings are “+” and “-”.
Auto Play This setting will automatically begin playing audio from a connected device.
Loudness This setting will improve audio quality at lower volumes.
Auto-On Radio This setting will automatically turn the radio on when the vehicle is started.
The a
v
ailable settings are “Off”, “On”, and “Recall Last”. With Recall Last, the
system resumes the previous task before vehicle shut off.
Page 147 of 364

MULTIMEDIA 145
Phone/Bluetooth®
SiriusXM® Setup
When the Phone/Bluetooth® button is pressed on the touchscreen, the system displays the options related to Bluetooth® connectivity from an external audio
device or smartphone. The list of paired audio devices or smartphones can be accessed from this menu.
NOTE:
Depending on the vehicle’s options, feature settings may vary.
Setting Name Description
Phone Pop-Ups Displayed In Cluster This setting will activate phone message pop-ups in the Instrument Cluster
Displ
a
y.
Do Not Disturb This setting will open the Do Not Disturb settings menu. The settings are “Auto
R
eply
”
(both, text, call), “Auto Reply Message” (custom, default), and “Custom
Auto Reply Message” (create message).
Paired Phones This setting will show the list of paired phones.
Paired Phones And Audio Devices This setting will show the list of paired phones and audio devices.
NOTE:
A subscription to SiriusXM® Satellite Radio is required for these settings to be functional.
When the SiriusXM® Setup button is pressed on the touchscreen, the system displays options related to SiriusXM® Satellite Radio. These settings can be used
t o ski p
specific radio channels and restart favorite songs from the beginning.
NOTE:
Depending on the vehicle’s options, feature settings may vary.
Setting Name Description
Tune Start This setting will play the current song from the beginning when you tune to a
music
channel using one of the 12 presets.
5
Page 150 of 364
148 MULTIMEDIA
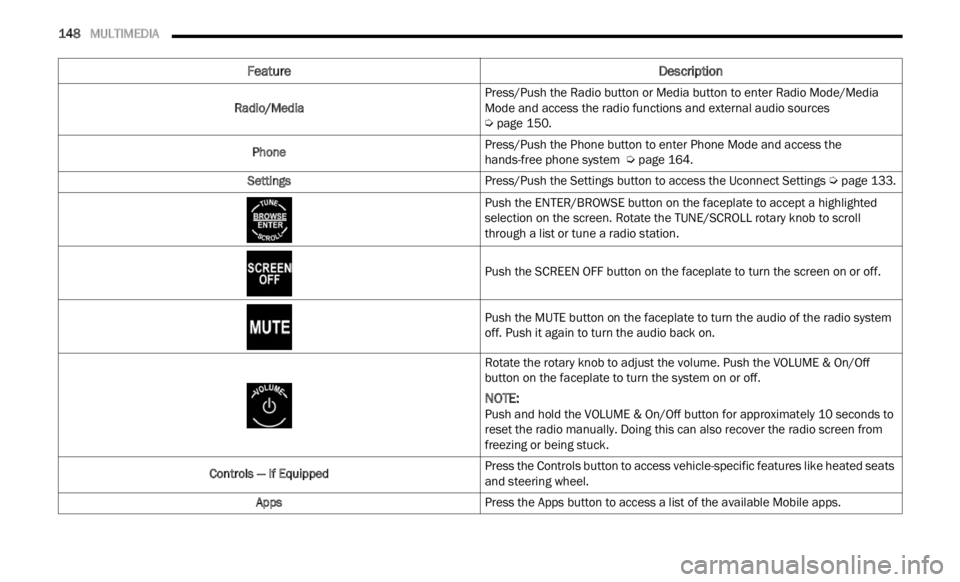
Feature Description
Radio/MediaPress/Push the Radio button or Media button to enter Radio Mode/Media
Mode a
n
d access the radio functions and external audio sources
Ú page 150.
Phone Press/Push the Phone button to enter Phone Mode and access the
h
ands-
free phone system Ú page 164.
Settings Press/Push the Settings button to access the Uconnect Settings Ú page 133.
Push the ENTER/BROWSE button on the faceplate to accept a highlighted
s elec t
ion on the screen. Rotate the TUNE/SCROLL rotary knob to scroll
through a list or tune a radio station.
Push the SCREEN OFF button on the faceplate to turn the screen on or off.
Push the MUTE button on the faceplate to turn the audio of the radio system
off. Pu
sh it again to turn the audio back on.
Rotate the rotary knob to adjust the volume. Push the VOLUME & On/Off
button
on the faceplate to turn the system on or off.
NOTE:
Push and hold the VOLUME & On/Off button for approximately 10 seconds to
reset
the radio manually. Doing this can also recover the radio screen from
freezing or being stuck.
Controls — If Equipped Press the Controls button to access vehicle-specific features like heated seats
and st
eering wheel.
Apps Press the Apps button to access a list of the available Mobile apps.
Page 152 of 364
150 MULTIMEDIA
Safe Usage Of The Uconnect System
The Uconnect system is a sophisticated elec -
tronic device. Do not let young children use the
syste m
.
Permanent hearing loss may occur if you play
your music or sound system at loud volumes.
Exercise caution when setting the volume on the
system.
Keep drinks, rain and other sources of moisture
away from the system. Besides damage to the
system, moisture can cause electric shocks as
with any electronic device.
NOTE:
Many features of this system are speed
depen d
ent. For your own safety, it is not possible to
use some of the touchscreen features while the
vehicle is in motion.
Care And Maintenance
Do not press the touchscreen with any hard or
sharp objects (pen, USB stick, jewelry, etc.),
which could scratch the surface.
Do not spray any liquid or chemicals directly on
the screen! Use a clean and dry microfiber lens
cleaning cloth in order to clean the touchscreen.
If necessary, use a lint-free cloth dampened
with a cleaning solution, such as isopropyl
alcohol or an isopropyl alcohol and water solu -tion ratio of 50:50. Be sure to follow the solvent
manuf
a
cturer's precautions and directions
Ú page 349.
UCONNECT MODES
STEERING WHEEL AUDIO CONTROLS
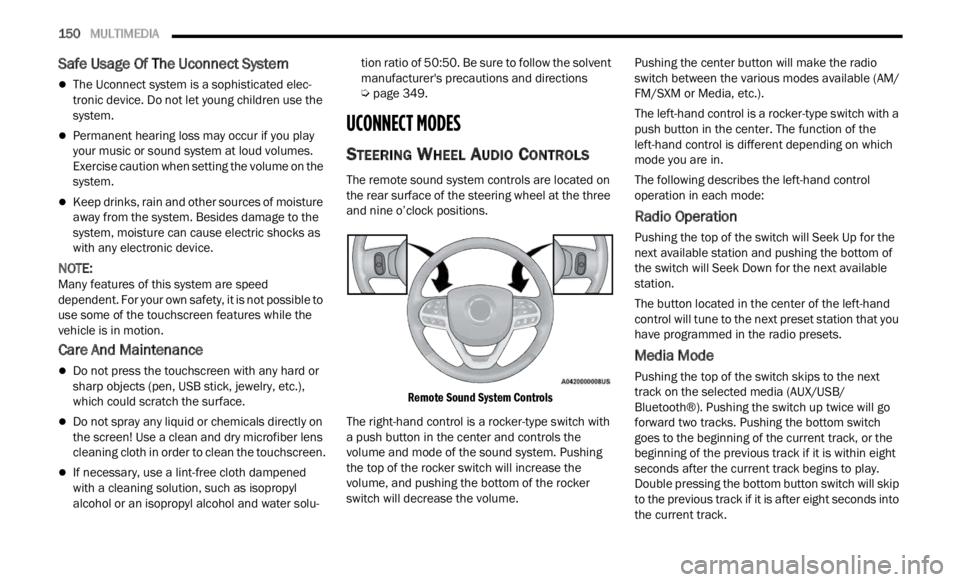
The remote sound system controls are located on
the rear surface of the steering wheel at the three
and nine o’clock positions.
Remote Sound System Controls
The right-hand control is a rocker-type switch with
a pus h
button in the center and controls the
volume and mode of the sound system. Pushing
the top of the rocker switch will increase the
volume, and pushing the bottom of the rocker
switch will decrease the volume. Pushing the center button will make the radio
switc
h
between the various modes available (AM/
FM/SXM or Media, etc.).
The left-hand control is a rocker-type switch with a
push b
utton in the center. The function of the
left-hand control is different depending on which
mode you are in.
The following describes the left-hand control
operati
on in each mode:
Radio Operation
Pushing the top of the switch will Seek Up for the
next available station and pushing the bottom of
the switch will Seek Down for the next available
station.
The button located in the center of the left-hand
control
will tune to the next preset station that you
have programmed in the radio presets.
Media Mode
Pushing the top of the switch skips to the next
track on the selected media (AUX/USB/
Bluetooth®). Pushing the switch up twice will go
forward two tracks. Pushing the bottom switch
goes to the beginning of the current track, or the
beginning of the previous track if it is within eight
seconds after the current track begins to play.
Double pressing the bottom button switch will skip
to the previous track if it is after eight seconds into
the current track.