audio JEEP RENEGADE 2023 User Guide
[x] Cancel search | Manufacturer: JEEP, Model Year: 2023, Model line: RENEGADE, Model: JEEP RENEGADE 2023Pages: 364, PDF Size: 18.65 MB
Page 153 of 364
MULTIMEDIA 151
RADIO MODE
Radio Controls
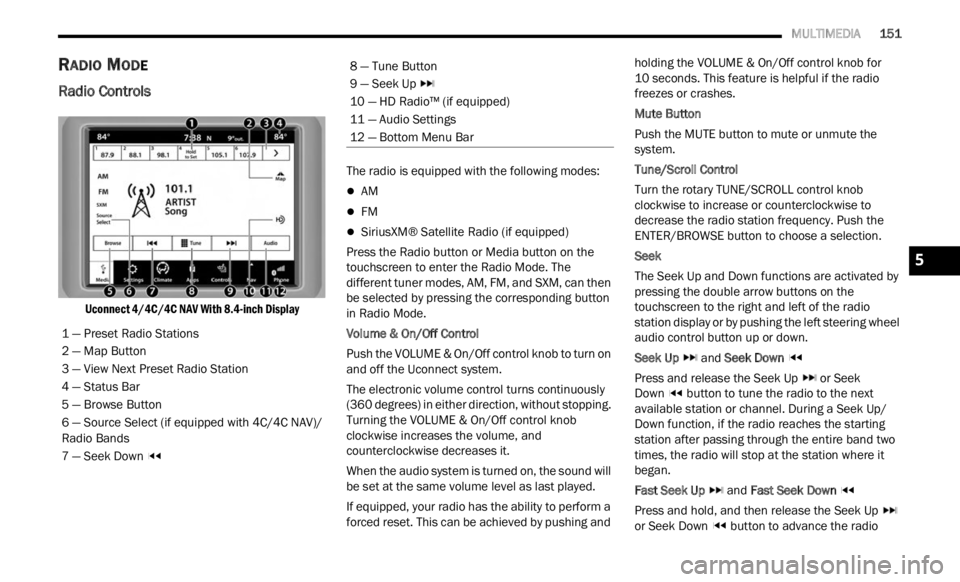
Uconnect 4/4C/4C NAV With 8.4-inch Display
The radio is equipped with the following modes:
AM
FM
SiriusXM® Satellite Radio (if equipped)
Press the Radio button or M
ed
i
a button on the
touchscreen to enter the Radio Mode. The
different tuner modes, AM, FM, and SXM, can then
be selected by pressing the corresponding button
in Radio Mode.
Volume & On/Off Control
Push the VOLUME & On/Off control knob to turn on
a nd of f
the Uconnect system.
The electronic volume control turns continuously
(360 d
egrees) in either direction, without stopping.
Turning the VOLUME & On/Off control knob
clockwise increases the volume, and
counterclockwise decreases it.
When the audio system is turned on, the sound will
be se t
at the same volume level as last played.
If equipped, your radio has the ability to perform a
forced
reset. This can be achieved by pushing and holding the VOLUME & On/Off control knob for
10 seconds. This feature is helpful if the radio
freez e
s or crashes.
Mute Button
Push the MUTE button to mute or unmute the
syste m
.
Tune/Scroll Control
Turn the rotary TUNE/SCROLL control knob
clock w
ise to increase or counterclockwise to
decrease the radio station frequency. Push the
ENTER/BROWSE button to choose a selection.
Seek
The Seek Up and Down functions are activated by
press i
ng the double arrow buttons on the
touchscreen to the right and left of the radio
station display or by pushing the left steering wheel
audio control button up or down.
Seek Up and Seek Down
Pres s
and release the Seek Up or Seek
Down button to tune the radio to the next
available station or channel. During a Seek Up/
D own f u
nction, if the radio reaches the starting
station after passing through the entire band two
times, the radio will stop at the station where it
began.
Fast Seek Up and Fast Seek Down
Pres s
and hold, and then release the Seek Up
or Seek Down button to advance the radio
1 — Preset Radio Stations
2 — Map Button
3 — View Next Preset Radio Station
4 — Status Bar
5 — Browse Button
6 — Source Select (if equipped with 4C/4C NAV)/
R
adio B
ands
7 — Seek Down
8 — Tune Button
9 — Seek Up
10 — HD Radio™ (if equipped)
11 — Audio Settings
12 — Bottom Menu Bar
5
Page 154 of 364
152 MULTIMEDIA
through the available stations or channels at a
faster rate. The radio stops at the next available
station or channel when the button on the
touchscreen is released.
NOTE:
Pressing and holding either the Seek Up or
Seek Down button will scan the different
frequency bands at a slower rate.
Direct Tune
Press the Tune button located at the bottom of the
r adio s
creen to directly tune to a desired radio
station or channel.
Press the available number button on the
touchs c
reen to begin selecting a desired station.
Once a number has been entered, any numbers
that are no longer possible (stations that cannot be
reached) will become deactivated/grayed out.
Undo
You can backspace an entry by pressing the
Back button on the touchscreen.
GO
Once the last digit of a station has been entered,
p ress
“Ok”. The Direct Tune screen will close, and
the system will automatically tune to that station.
RADIO VOICE COMMANDS
Use your voice to quickly get to the AM, FM, or
SiriusXM® Satellite Radio stations you would like to hear. (Subscription or included SiriusXM®
Satellite Radio trial required.)
Push the VR button
on the steering wheel and
wait for the beep to say a command. See the
f ollow
i
ng example:
“Tune to ninety-five-point-five FM”
“Tune to Satellite Channel Hits 1”
Did You Know: At an
y time, if you are not sure of
what to say or want to learn a Voice Command,
push the VR button and say “Help”. T
he system
provides you with a list of commands.
HD Radio™ — If Equipped
HD Radio™ technology is the digital evolution of
analog AM/FM radio. Your system has a special
receiver, which allows it to receive digital
broadcasts (where available) in addition to the
analog broadcasts. Digital broadcasts provide free,
crystal clear audio with no static or distortion.
For more information and a guide to available
station
s and programming, please visit
hdradio.com .
To begin using HD Radio™:
1. P ress the Media Button.
2. S ele
ct AM or FM tab.
3 .
Se
l
ect the HD button. When
HD Radio™ reception is enabled and a
stati on
with HD Radio™ broadcasts is playing, the
following indicators may appear on the screen:
HD Radio™ Logo: This indicator will display in
gray when a digital station is being acquired and
will appear in orange and white when digital
audio is playing. When this logo is available, you
will also see Station Call Sign (e.g. WNIC), Title
and Artist fields on screen.
Multicast Indicator (1 2 3...): These numbers will
appear if the current station has multiple digital
broadcasts. Press the Seek Up or Down button
repeatedly to access the other digital broad -
casts. The numbers that are highlighted signify
a vaila
ble digital channels where new/different
content is available. HD1 will signify the main
programming service and is available in analog
and digital broadcasts. Any additional multicast
stations (HD2–HD8) are only broadcast digi -
tally.
Album Art/Station Logo: Some HD Radio™
stations broadcast station logos and album art
associated with the song being played as part of
the HD Radio™ broadcast service. Station logo
art is stored in the radio and may take up to five
minutes to learn for each station that supports
station logo service. Album art is broadcast at
the beginning of songs. If tuning into the middle
of a song, the art may not be available.
Page 155 of 364

MULTIMEDIA 153
When HD Radio™ broadcasts are active, you can
access the following functions:
Seek Up And Down: Press to seek to the next
strong radio station. If the current station has
multiple digital broadcasts, the multicast indi -
cator numbers will display. Press “Seek” repeat -
edly to advance through all available
b roadc
asts. If you are on the last multicast
channel, press “Seek Up” to advance to the next
strong station.
Saving A Multicast Station As A Preset: When
the channel is active on-screen, press and hold
a Preset button; it will save the station to the
available slot. When recalling an HD2, HD3, etc.
memory preset, there will be a momentary mute
before the digital audio is played as the system
acquires the digital signal. If you have turned
this feature off, this will automatically turn on
HD Radio™ broadcasts and will tune to the
selected frequency. As with any saved radio
station, you will not be able to access the saved
station if your vehicle is outside the station’s
reception area.
“LIVE” Ballgame Mode Broadcasts: If a station
has a live broadcast (such as a baseball game),
“LIVE” may appear on screen beside the multi -
cast numbers. These are analog broadcasts
with d
igital components (i.e. artist, title). If HD1
is in a live broadcast mode, the HD Radio™ logo
will be gray. You will hear analog audio; the user
will still be able to tune to the multicast chan -
nels.
Reception Area:
If y ou
are listening to a multicast
(HD2, HD3, etc.) station and you are on the fringe
of the reception area, the station may mute due to
weak signal strength. If you are listening to HD1,
the system will simply switch to the analog
broadcast until the digital broadcast is available
again.
However, if you are listening to any of the possible
multi c
ast (HD2, HD3, etc.) channels, the station
will mute and stay muted unless it is able to
connect to the digital signal again. While in this
state, the text “buffering” will appear for 30 sec-
onds. If it is not able to reconnect to the digital
signal, the screen will be cleared and “HD Radio™
Signal Unavailable” will appear in artist and title
field area. Station Blending:
When
an HD1 station is received,
the system will play the analog audio broadcast
from the station for a few seconds and then, if the
receiver verifies the station is an HD Radio™
station, it will transition to play the digital audio
broadcast. Depending on the station quality, you
may hear a slight sound change when the station
transitions from analog to the digital broadcast.
The shift from analog to digital or digital back to
analog sound is known as “blending”.
Station Issues: In ord
er to provide the best
possible experience, a contact form has been
developed to report any station issues found while
listening to a station broadcasting with HD Radio™
technology. Every station is independently owned
and operated. These stations are responsible for
ensuring all audio streams and data fields are
accurate. This form can be found at https://
hdradio.com/stations/feedback/ .
5
Page 156 of 364

154 MULTIMEDIA
HD Radio™ Technology manufactured under license from iBiquity Digital Corporation. US and Foreign Patents. For patents, see http://dts.com/patents. HD
Radio™, Artist Experience, and the HD, HD Radio™, and "ARC" logos are registered trademarks or trademarks of iBiquity Digital Corporation in the United States
and/or
other countries.
Troubleshooting
Experience CauseAction
Mismatch of time alignment — a user may hear a
short period of programming replayed or an echo,
stutter, or skip. The radio station’s analog and digital volume is not
proper
l
y aligned or the station is in ballgame mode. None. It is a radio broadcast issue. The user can
contac
t the station.
Sound fades, blending in and out. Radio is shifting between analogue and digital
audio.Re
ception issue: It may clear up as the vehicle
conti n
ues to be driven. Turning off HD Radio™ can
force the radio to use analogue audio.
Audio mute condition when an HD2, HD3, etc.
multic
ast channel is playing. The radio does not have access to digital signals at
the mom
ent. This is normal behavior. Wait until the digital signal
return
s. If out of coverage area, seek a new station.
Audio mute delay when selecting an HD2, HD3, etc.
multic
ast channel preset. The digital multicast content is not available until
HD
R
ad
i
o™ broadcast can be decoded and make
the audio available. This can take up to seven
seconds. This is normal behavior. Wait until the audio is
a
va
il
a
ble again.
Text information does not match the present song
audio or
no text information shown for the present
selected frequency. Data service issue by the radio broadcaster.
Broadcaster should be notified. Use the form at
https://hdradio.com/stations/feedback/
Page 158 of 364
156 MULTIMEDIA
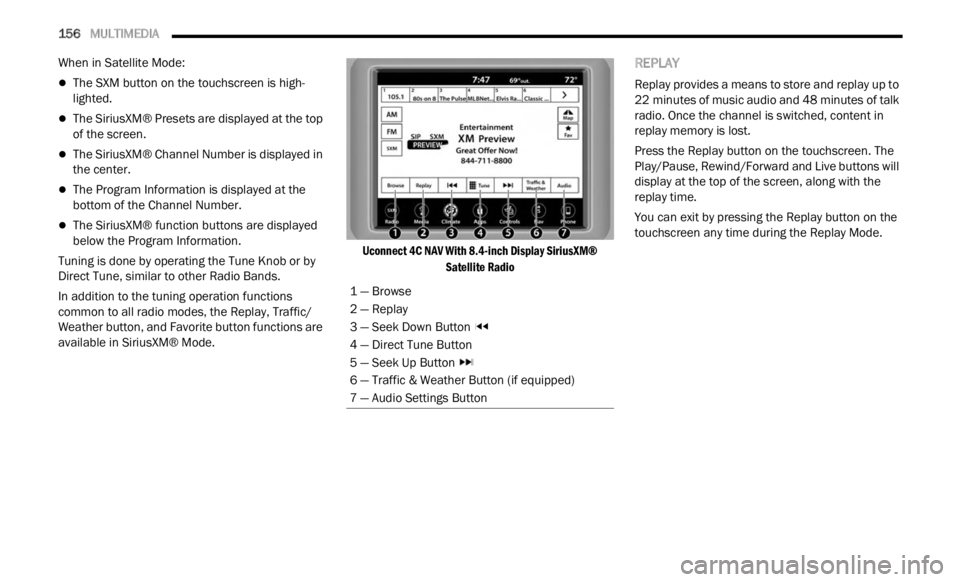
When in Satellite Mode:
The SXM button on the touchscreen is high -
lighted.
The SiriusXM® Presets are displayed at the top
of the screen.
The SiriusXM® Channel Number is displayed in
the center.
The Program Information is displayed at the
bottom of the Channel Number.
The SiriusXM® function buttons are displayed
below the Program Information.
Tuning is done by operating the Tune Knob or by
Direct
Tune, similar to other Radio Bands.
In addition to the tuning operation functions
common t
o all radio modes, the Replay, Traffic/
Weather button, and Favorite button functions are
available in SiriusXM® Mode.
Uconnect 4C NAV With 8.4-inch Display SiriusXM®
Satell
ite Radio
REPLAY
Replay provides a means to store and replay up to
22 minutes of music audio and 48 minutes of talk
r adio.
Once the channel is switched, content in
replay memory is lost.
Press the Replay button on the touchscreen. The
Play/ P
ause, Rewind/Forward and Live buttons will
display at the top of the screen, along with the
replay time.
You can exit by pressing the Replay button on the
touchsc
reen any time during the Replay Mode.
1 — Browse
2 — Replay
3 — Seek Down Button
4 — Direct Tune Button
5 — Seek Up Button
6 — Traffic & Weather Button (if equipped)
7 — Audio Settings Button
Page 162 of 364
160 MULTIMEDIA
Setting Presets
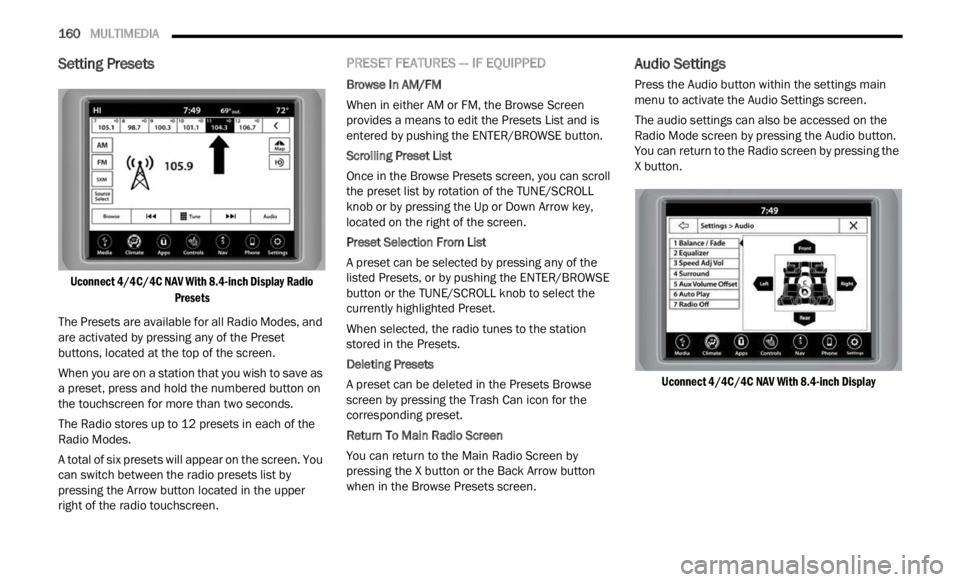
Uconnect 4/4C/4C NAV With 8.4-inch Display Radio
Presets
The Presets are available for all Radio Modes, and
are ac
tivated by pressing any of the Preset
buttons, located at the top of the screen.
When you are on a station that you wish to save as
a pre s
et, press and hold the numbered button on
the touchscreen for more than two seconds.
The Radio stores up to 12 presets in each of the
Radio M
odes.
A total of six presets will appear on the screen. You
can sw
itch between the radio presets list by
pressing the Arrow button located in the upper
right of the radio touchscreen.
PRESET FEATURES — IF EQUIPPED
Browse In AM/FM
When in either AM or FM, the Browse Screen
provid e
s a means to edit the Presets List and is
entered by pushing the ENTER/BROWSE button.
Scrolling Preset List
Once in the Browse Presets screen, you can scroll
t he pr
eset list by rotation of the TUNE/SCROLL
knob or by pressing the Up or Down Arrow key,
located on the right of the screen.
Preset Selection From List
A preset can be selected by pressing any of the
liste d
Presets, or by pushing the ENTER/BROWSE
button or the TUNE/SCROLL knob to select the
currently highlighted Preset.
When selected, the radio tunes to the station
stored
in the Presets.
Deleting Presets
A preset can be deleted in the Presets Browse
scree n
by pressing the Trash Can icon for the
corresponding preset.
Return To Main Radio Screen
You can return to the Main Radio Screen by
p ressi
ng the X button or the Back Arrow button
when in the Browse Presets screen.
Audio Settings
Press the Audio button within the settings main
menu to activate the Audio Settings screen.
The audio settings can also be accessed on the
Radio M
ode screen by pressing the Audio button.
You can return to the Radio screen by pressing the
X button.
Uconnect 4/4C/4C NAV With 8.4-inch Display
Page 163 of 364

MULTIMEDIA 161
Audio Setting Description
Balance/FadePress the Balance/Fade button on the touchscreen to balance audio between
the f
r
ont speakers or fade the audio between the rear and front speakers.
Press the Front, Rear, Left or Right buttons or press and drag the red Speaker
icon to adjust the Balance/Fade.
Equalizer Press the + or – buttons or press and drag the level bar to increase or
d
ecre
a
se each of the equalizer bands. The level value, which spans between
plus or minus nine, is displayed at the top of each of the bands.
Speed Adjusted Volume The Speed Adjusted Volume is adjusted by selecting from “Off”, “1”, “2”, or
“3”. T
his alters the automatic adjustment of the audio volume with variation
to vehicle speed. Volume increases automatically as speed increases to
compensate for normal road noise.
Surround Sound — If Equipped When Surround Sound is on, you can hear audio coming from every direction
as in
a movie theatre or home theatre system.
AUX Volume Offset The AUX Volume Offset is adjusted by pressing + and – buttons. This alters the
A
UX in
p
ut audio volume. The level value, which spans between plus or minus
three, is displayed above the adjustment bar.
Auto Play The Auto Play feature begins playing music as soon as a USB Media device is
connect
ed to one of the vehicle’s Media USB ports, when it is turned on. Press
Off to turn the setting off.
Radio Off With Door — If Equipped The Radio Off With Door feature, when activated, keeps the radio on until the
driver
or passenger door is opened or until the Radio Off Delay selected time
has expired.
5
Page 164 of 364
162 MULTIMEDIA
MEDIA MODE
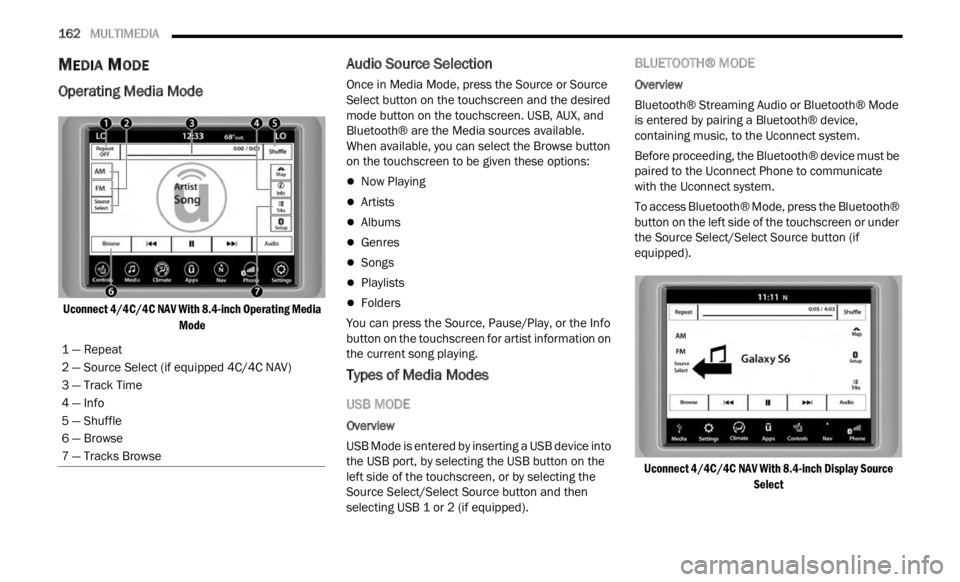
Operating Media Mode
Uconnect 4/4C/4C NAV With 8.4-inch Operating Media
Mode
Audio Source Selection
Once in Media Mode, press the Source or Source
Select button on the touchscreen and the desired
mode button on the touchscreen. USB, AUX, and
Bluetooth® are the Media sources available.
When available, you can select the Browse button
on the touchscreen to be given these options:
Now Playing
Artists
Albums
Genres
Songs
Playlists
Folders
You can press the Source, Pause/Play, or the Info
b u t
ton
on the touchscreen for artist information on
the current song playing.
Types of Media Modes
USB MODE
Overview
USB Mode is entered by inserting a USB device into
t h e
U
S
B port, by selecting the USB button on the
left side of the touchscreen, or by selecting the
Source Select/Select Source button and then
selecting USB 1 or 2 (if equipped).
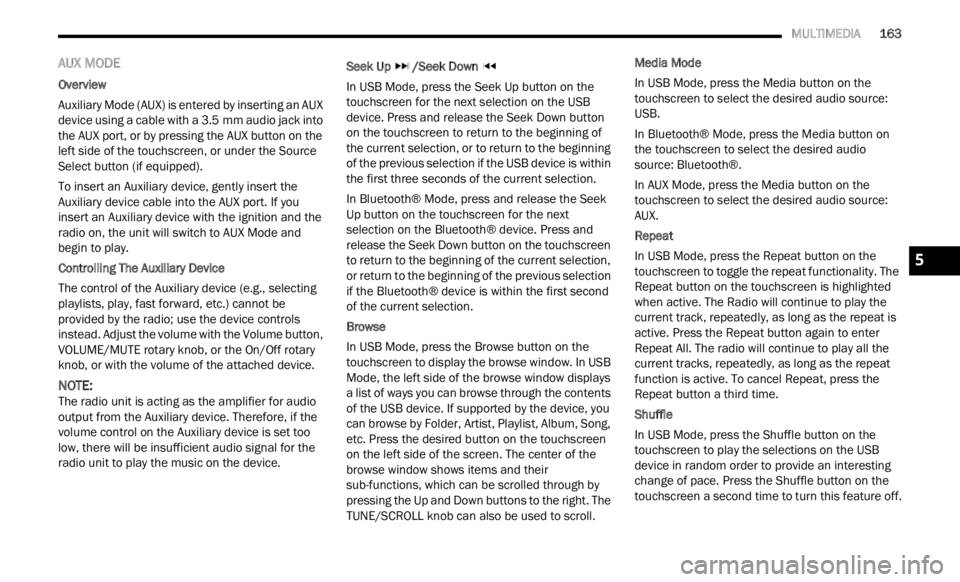
BLUETOOTH® MODE
Overview
Bluetooth® Streaming Audio or Bluetooth® Mode
is en t
ered by pairing a Bluetooth® device,
containing music, to the Uconnect system.
Before proceeding, the Bluetooth® device must be
paire d
to the Uconnect Phone to communicate
with the Uconnect system.
To access Bluetooth® Mode, press the Bluetooth®
button
on the left side of the touchscreen or under
the Source Select/Select Source button (if
equipped).
Uconnect 4/4C/4C NAV With 8.4-inch Display Source Select
1
— Repeat
2 — Source Select (if equipped 4C/4C NAV)
3 — Track Time
4 — Info
5 — Shuffle
6 — Browse
7 — Tracks Browse
Page 165 of 364
MULTIMEDIA 163
AUX MODE
Overview
Auxiliary Mode (AUX) is entered by inserting an AUX
device
using a cable with a 3.5 mm audio jack into
t h
e
A U
X port, or by pressing the AUX button on the
left side of the touchscreen, or under the Source
Select button (if equipped).
To insert an Auxiliary device, gently insert the
Auxili
ary device cable into the AUX port. If you
insert an Auxiliary device with the ignition and the
radio on, the unit will switch to AUX Mode and
begin to play.
Controlling The Auxiliary Device
The control of the Auxiliary device (e.g., selecting
p layl i
sts, play, fast forward, etc.) cannot be
provided by the radio; use the device controls
instead. Adjust the volume with the Volume button,
VOLUME/MUTE rotary knob, or the On/Off rotary
knob, or with the volume of the attached device.
NOTE:
The radio unit is acting as the amplifier for audio
output
from the Auxiliary device. Therefore, if the
volume control on the Auxiliary device is set too
low, there will be insufficient audio signal for the
radio unit to play the music on the device. Seek Up
/Seek Down
In USB Mode, press the Seek Up button on the
t ouchs c
reen for the next selection on the USB
device. Press and release the Seek Down button
on the touchscreen to return to the beginning of
the current selection, or to return to the beginning
of the previous selection if the USB device is within
the first three seconds of the current selection.
In Bluetooth® Mode, press and release the Seek
Up bu t
ton on the touchscreen for the next
selection on the Bluetooth® device. Press and
release the Seek Down button on the touchscreen
to return to the beginning of the current selection,
or return to the beginning of the previous selection
if the Bluetooth® device is within the first second
of the current selection.
Browse
In USB Mode, press the Browse button on the
touchs c
reen to display the browse window. In USB
Mode, the left side of the browse window displays
a list of ways you can browse through the contents
of the USB device. If supported by the device, you
can browse by Folder, Artist, Playlist, Album, Song,
etc. Press the desired button on the touchscreen
on the left side of the screen. The center of the
browse window shows items and their
sub-functions, which can be scrolled through by
pressing the Up and Down buttons to the right. The
TUNE/SCROLL knob can also be used to scroll. Media Mode
In USB Mode, press the Media button on the
touchs
c
reen to select the desired audio source:
USB.
In Bluetooth® Mode, press the Media button on
the t ou
chscreen to select the desired audio
source: Bluetooth®.
In AUX Mode, press the Media button on the
touchs c
reen to select the desired audio source:
AUX.
Repeat
In USB Mode, press the Repeat button on the
t ouchsc
reen to toggle the repeat functionality. The
Repeat button on the touchscreen is highlighted
when active. The Radio will continue to play the
current track, repeatedly, as long as the repeat is
active. Press the Repeat button again to enter
Repeat All. The radio will continue to play all the
current tracks, repeatedly, as long as the repeat
function is active. To cancel Repeat, press the
Repeat button a third time.
Shuffle
In USB Mode, press the Shuffle button on the
touchs c
reen to play the selections on the USB
device in random order to provide an interesting
change of pace. Press the Shuffle button on the
touchscreen a second time to turn this feature off.
5
Page 166 of 364
164 MULTIMEDIA
Audio
Audio settings can be accessed by pressing the
Audio b
utton Ú page 151.
Info
In USB Mode, press the Info button on the
t ouchs c
reen to display the current track
information. Press the Info or X button on the
touchscreen a second time to cancel this feature.
Tracks
In USB Mode, press the Tracks button on the
touchs c
reen to display a pop-up with the Song List.
The song currently playing is indicated by an arrow
and lines above and below the song title. When in
the Tracks List screen you can rotate the TUNE/
SCROLL knob to highlight a track (indicated by the
line above and below the track name) and then
push the ENTER/BROWSE knob to start playing
that track.
In Bluetooth® Mode, if the Bluetooth® device
suppor t
s this feature, press the Tracks button on
the touchscreen to display a pop-up with the Song
List. The currently playing song is indicated by a red
arrow and lines above and below the song title.
Pressing the Tracks button on the touchscreen
while
the pop-up is displayed will close the pop-up.
MEDIA VOICE COMMANDS
Uconnect offers connections via USB, Bluetooth®,
and auxiliary (AUX) ports. Voice operation is only
available for connected USB and AUX devices.
Push the VR button located on the steering
wheel. After the beep, say one of the following
c ommand
s and follow the prompts to switch your
media source or choose an artist:
“ Change source to Bluetooth®”
“Change source to AUX”
“Change source to USB”
“Play artist Beethoven”; “ Play album Greatest
Hits”; “ Play song Moonlight Sonata”; “ Play genre
Classical”
Did You Know: Press
the Browse button on the
touchscreen to see all of the music on your USB
device. Your Voice Command must match exactly
how the artist, album, song, and genre information
is displayed.
PHONE MODE
Overview
Uconnect Phone is a voice-activated, hands-free,
in-vehicle communications system. It allows you to
dial a phone number with your mobile phone. The feature supports the following:
Voice Activated Features
Hands-Free dialing via Voice (“Call John Smith
Mobile” or “Dial 248-555-1212”).
Hands-Free text-to-speech listening of your
incoming SMS messages.
Hands-Free Text Message Replying: Forward
one of 18 predefined SMS messages to
incoming calls/text messages.
Redialing last dialed numbers (“Redial”).
Calling Back the last incoming call number
(“Call Back”).
Viewing call logs on screen (“Show Incoming
Calls,” “Show Outgoing Calls,” “Show Missed
Calls,” or “Show Recent Calls”).
Searching Contacts phone number (“Search for
John Smith Mobile”).
Screen Activated Features
Dialing via Keypad using touchscreen.
Viewing and Calling contacts from Phonebooks
displayed on the touchscreen.
Setting Favorite Contact phone numbers so they
are easily accessible on the Main Phone screen.
Viewing and Calling contacts from Recent Call
logs.