run flat JEEP RENEGADE 2023 Owners Manual
[x] Cancel search | Manufacturer: JEEP, Model Year: 2023, Model line: RENEGADE, Model: JEEP RENEGADE 2023Pages: 364, PDF Size: 18.65 MB
Page 17 of 364
GETTING TO KNOW YOUR VEHICLE 15
Key Left Vehicle Feature — If Equipped
If a valid key fob is no longer detected inside the
vehicle while the vehicle’s ignition system is in the
ON/RUN or START position, the message “Key Fob
Has Left Vehicle” will be shown in the instrument
cluster display along with an interior chime. An
exterior audible and visual alert will also be
activated to warn the driver.
The vehicle’s horn will rapidly chirp three times
along
with a single flash of the vehicle’s exterior
lights.
NOTE:
The doors have to be open and then closed in
order for the vehicle to check for the presence of
a key fob; the Key Left Vehicle feature will not
activate until all of the doors are closed.
These alerts will not be activated in situations
where the vehicle’s engine is left running with
the key fob inside.
Replacing The Battery In The Key Fob
The replacement battery is one CR2032 battery.
NOTE:
Customers are recommended to use a battery
obtained from Mopar®. Aftermarket coin
battery dimensions may not meet the original
OEM coin battery dimensions.
Perchlorate Material — special handling may
apply. See www.dtsc.ca.gov/hazardouswaste/
perchlorate for further information.
Do not touch the battery terminals that are on
the back housing or the printed circuit board.
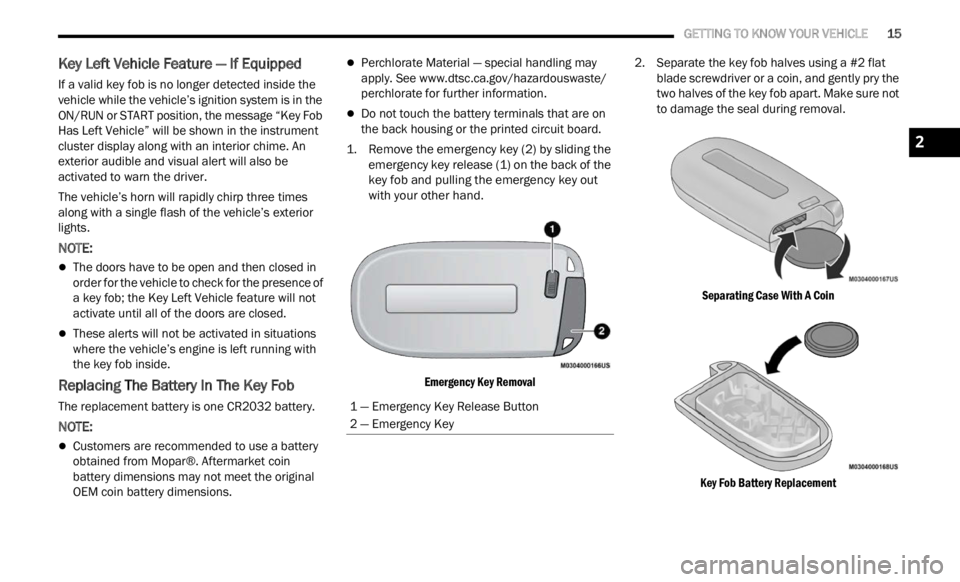
1. Remove the emergency key (2) by sliding the emerge
ncy key release (1) on the back of the
key fob and pulling the emergency key out
with your other hand.
Emergency Key Removal
2. Separate the key fob halves using a #2 flat
blad e
screwdriver or a coin, and gently pry the
two halves of the key fob apart. Make sure not
to damage the seal during removal.
Separating Case With A Coin
Key Fob Battery Replacement
1 — Emergency Key Release Button
2 — Emergency Key
2
Page 27 of 364
GETTING TO KNOW YOUR VEHICLE 25
DEAD LOCK DEVICE — IF EQUIPPED
The Dead Lock Device is a safety device that
prevents the use of the internal door handles of
the vehicle and the power door lock switch.
This device prevents the doors from opening within
the p a
ssenger compartment.
Arming The Dead Lock Device
The device works on all doors and requires two
pushes of the lock button on the key fob. For
vehicles equipped with Passive Entry, the device
will also work by pushing the lock button on the
driver’s or passenger’s side exterior door
handle.
The arming of the device is indicated by three
flashes of the turn signals.
The device does not operate if one or more
doors are not properly closed.
Disarming The Device
The device will automatically disarm by pushing
the unlock button on the key fob. For vehicles
equipped with Passive Entry, the device will also
disarm by using the driver or passenger Passive
Entry door handle to unlock and open the door.
Placing the ignition in the ON/RUN position.
CHILD LOCKS
To provide a safer environment for small children
riding in the rear seats, the rear doors are
equipped with a Child-Protection Door Lock
system.
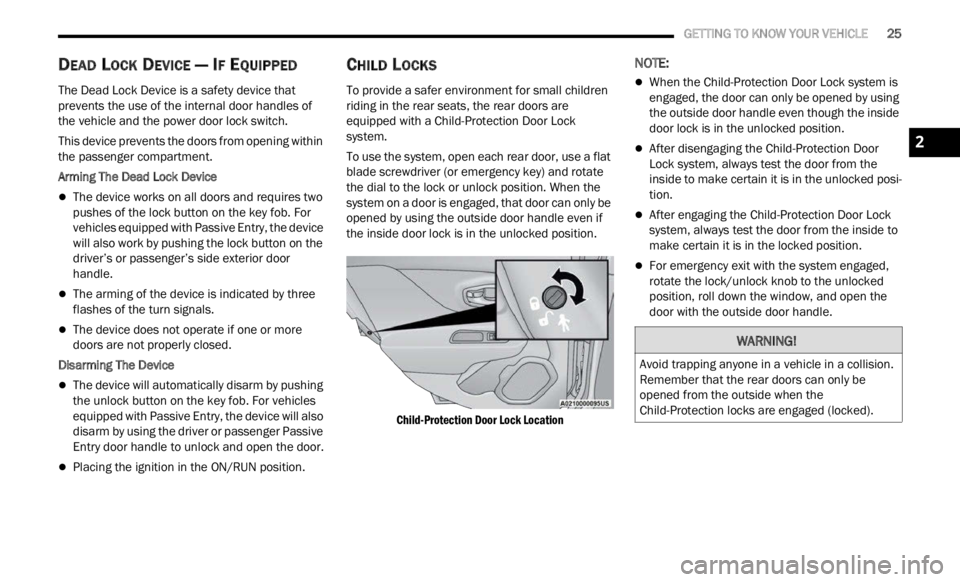
To use the system, open each rear door, use a flat
blade
screwdriver (or emergency key) and rotate
the dial to the lock or unlock position. When the
system on a door is engaged, that door can only be
opened by using the outside door handle even if
the inside door lock is in the unlocked position.
Child-Protection Door Lock Location
NOTE:
When the Child-Protection Door Lock system is
engaged, the door can only be opened by using
the outside door handle even though the inside
door lock is in the unlocked position.
After disengaging the Child-Protection Door
Lock system, always test the door from the
inside to make certain it is in the unlocked posi -
tion.
After engaging the Child-Protection Door Lock
system, always test the door from the inside to
make certain it is in the locked position.
For emergency exit with the system engaged,
rotate the lock/unlock knob to the unlocked
position, roll down the window, and open the
door with the outside door handle.
WARNING!
Avoid trapping anyone in a vehicle in a collision.
Remember that the rear doors can only be
opened from the outside when the
Child-Protection locks are engaged (locked).
2
Page 131 of 364

STARTING AND OPERATING 129
Automatic Transmission
Select the DRIVE range when towing. The
transmission controls include a drive strategy to
avoid frequent shifting when towing. However, if
frequent shifting does occur while in DRIVE, you
can use the AutoStick shift control to manually
select a lower gear.
NOTE:
Using a lower gear while operating the vehicle
under
heavy loading conditions will improve perfor -
mance and extend transmission life by reducing
e xcess
ive shifting and heat build up. This action
will also provide better engine braking.
AutoStick
When using the AutoStick shift control, select
the highest gear that allows for adequate perfor -
mance and avoids frequent downshifts. For
exampl
e, choose “5” if the desired speed can be
maintained. Choose “4” or “3” if needed to
maintain the desired speed.
To prevent excess heat generation, avoid
continuous driving at high RPM. Reduce vehicle
speed as necessary to avoid extended driving at
high RPM. Return to a higher gear or vehicle
speed when grade and road conditions allow.
Cruise Control — If Equipped
Do not use in hilly terrain or with heavy loads.
When using the Cruise Control, if you experience
speed drops greater than 10 mph (16 km/h),
d i
s e
n g
age until you can get back to cruising
speed.
Use Cruise Control in flat terrain and with light
loads to maximize fuel efficiency.
RECREATIONAL TOWING
TOWING THIS VEHICLE BEHIND
A
NOTHER VEHICLE
NOTE:
When towing your vehicle, always follow appli -
cable state and provincial laws. Contact state
a nd
p
r
ovincial Highway Safety offices for addi -
tional details.
You must ensure that the Auto Park Brake
feature is disabled before towing this vehicle, to
avoid inadvertent Electric Park Brake engage -
ment. The Auto Park Brake feature is enabled or
disab l
ed via the customer programmable
features in the Uconnect Settings.
RECREATIONAL TOWING
Models With Front-Wheel Drive (FWD)
Recreational towing is allowed ONLY if the front
w he
el
s
are OFF the ground. This may be
accomplished using a tow dolly (front wheels off
the ground) or vehicle trailer (all four wheels off the
ground). If using a tow dolly, follow this procedure:
Properly secure the dolly to the tow vehicle,
following the dolly manufacturer's instructions.
Drive the front wheels onto the tow dolly.
Apply the Electric Park Brake (EPB). Place the
transmission in PARK. Turn the engine off.
Properly secure the front wheels to the dolly,
following the dolly manufacturer's instructions.
Turn the ignition to the RUN position, but do not
start the engine.
Towing
Condit i
on Wheels
Off T h
e
Ground Front-
Wheel
D
rive
(FWD) Four-
Wheel D
rive
(4WD)
Flat Tow NONENOT
ALLOWED N
O
T
ALLOWED
Dol
ly Tow REAR
NOT
ALLOWED N
O
T
ALLOWED
FR
ONT OK NOT
ALLOWED
O n
Trailer ALLBEST
METHOD O
K
4
Page 212 of 364

210 MULTIMEDIA
Remote Horn & Lights
Description
It is easy to locate a vehicle in a dark, crowded or
noisy p
arking area by activating the horn and
lights. It may also help if you need to draw attention
to your vehicle for any reason.
If you want, you can set up push notifications every
time a
command is sent to turn on the horn and
lights.
Working Vehicle Conditions
The vehicle must in PARK or at a standstill.
The vehicle must be in an open area with cell
tower reception.
Your mobile device must have a cellular or Wi-Fi
connection.
NOTE:
The Remote Horn & Lights feature is designed to
be lou d
and get noticed. Please keep in mind the
surroundings when using this feature. You are
responsible for compliance with local laws, rules
and ordinances in the location of your vehicle
when using Remote Horn & Lights.
Assist — If Equipped
Description
Vehicles equipped with the SiriusXM Guardian™
connec t
ed services feature may contain an ASSIST
button in the vehicle. Once your SiriusXM Guardian™ connected services have been
activated, the ASSIST button can connect you
directly to the Customer Care call center (if
equipped). You will be directed to one of the
following four services:
Roadside Assistance
— If you get a flat tire or
need a tow, you’ll be connected to someone
who can help anytime.
Connected Services — Contact the SiriusXM
Guardian™ Customer Care call center to acti -
vate your services, renew after your trial has
e xpire
d, for in-vehicle support for your SiriusXM
Guardian™ connected services, or help
answering any general questions surrounding
your connected services.
Uconnect Care — In-vehicle support for all
non-connected Uconnect system features, such
as radio and Bluetooth® connections.
Vehicle Care — Total support for your vehicle.
SiriusXM Guardian™ In-Vehicle Assistance
Featu r
es — If Equipped
With SiriusXM Guardian™, your vehicle has
onboard
assistance features located on the
rearview mirror or overhead console designed to
enhance your driving experience if you should ever
need assistance or support.
How It Works
Simply push the ASSIST button in the vehicle and
y ou wi l
l be presented with your ASSIST options on the touchscreen. Make your selection by pressing
the touchscreen.
Requirements
This feature is available only on vehicles sold in
the US and Canada.
Vehicle must be properly equipped with the
SiriusXM Guardian™ connected services.
Vehicle must have an operable LTE (voice/data)
or 3G or 4G (data) network connection.
Vehicle must be registered with SiriusXM
Guardian™ and have an active subscription that
includes the applicable feature.
Vehicle must be powered in the ON/RUN or ACC
(Accessory) position with a properly functioning
electrical system.
Disclaimers
If Roadside Assistance Call is provided to your
v ehicl
e, you agree to be responsible for any
additional roadside assistance service costs that
you may incur. In order to provide SiriusXM
Guardian™ connected services to you, we may
record and monitor your conversations with
Roadside Assistance Call, Vehicle Care, Uconnect
Care, or SiriusXM Guardian™ Customer Care,
whether such conversations are initiated through
the SiriusXM Guardian™ connected services in
your vehicle, or via a landline or mobile device, and
may share information obtained through such
recording and monitoring in accordance with
Page 243 of 364

SAFETY 241
SEAT BELT SYSTEMS
Buckle up even though you are an excellent driver,
even on short trips. Someone on the road may be
a poor driver and could cause a collision that
includes you. This can happen far away from home
or on your own street.
Research has shown that seat belts save lives, and
they c
an reduce the seriousness of injuries in a
collision. Some of the worst injuries happen when
people are thrown from the vehicle. Seat belts
reduce the possibility of ejection and the risk of
injury caused by striking the inside of the vehicle.
Everyone in a motor vehicle should be belted at all
times.
Enhanced Seat Belt Use Reminder System
(BeltAlert)
Driver And Passenger BeltAlert — If Equipped
BeltAlert is a feature intended to remind the driver and outboard front seat
passenger to buckle their seat belts. The
BeltAlert feature is active whenever the
ignition switch is in the START or ON/RUN position.
Initial Indication
If the driver is unbuckled when the ignition switch
is fi r
st in the START or ON/RUN position a chime
will signal for a few seconds. If the driver or
outboard front seat passenger is unbuckled when
the ignition switch is first in the START or ON/RUN position the Seat Belt Reminder Light will turn solid
red and remain red until the seat belt is buckled.
After the driver and outboard front seat passenger
have buckled their seat belts all Seat Belt
Reminder Lights will turn off. The outboard front
passenger seat BeltAlert is not active when the
outboard front passenger seat is unoccupied. The
cluster display will inform the driver that you must
fasten the driver’s seat belt in order to release the
parking brake.
BeltAlert Warning Sequence
The BeltAlert warning sequence is activated when
t
he v e
hicle is moving above a specified vehicle
speed range and the driver or outboard front seat
passenger is unbuckled (the outboard front
passenger seat BeltAlert is not active when the
outboard front passenger seat is unoccupied). The
BeltAlert warning sequence starts by blinking the
Seat Belt Reminder Light and sounding an
intermittent chime. Once the BeltAlert warning
sequence has completed, the Seat Belt Reminder
Light will remain solid red until the driver and
outboard front seat passenger are buckled. The
BeltAlert warning sequence may repeat based on
vehicle speed until the driver and occupied
outboard front seat passenger seat belts are
buckled. The driver should instruct all occupants to
buckle their seat belts. Change Of Status
If the driver or outboard front seat passenger
unbuc
k
les their seat belt while the vehicle is
traveling, the BeltAlert warning sequence will begin
until the seat belts are buckled again.
The outboard front passenger seat BeltAlert is not
active
when the outboard front passenger seat is
unoccupied. BeltAlert may be triggered when an
animal or other items are placed on the outboard
front passenger seat or when the seat is folded flat
(if equipped). It is recommended that pets be
restrained in the rear seat (if equipped) in pet
harnesses or pet carriers that are secured by seat
belts, and cargo is properly stowed.
BeltAlert can be activated or deactivated by an
author i
zed dealer. FCA US LLC does not
recommend deactivating BeltAlert.
NOTE:
If BeltAlert has been deactivated, the Seat Belt
Remin d
er Light will turn on and remain on until the
driver and outboard front seat passenger seat
belts are buckled.
Lap/Shoulder Belts
All seating positions in your vehicle are equipped
with lap/shoulder belts.
The seat belt webbing retractor will lock only during
very s
udden stops or collisions. This feature allows
the shoulder part of the seat belt to move freely
with you under normal conditions. However, in a
6
Page 248 of 364
246 SAFETY
How To Engage The Automatic Locking Mode
1. Buckle the combination lap and shoulder
belt.
2
. Grab the shoulder portion and pull downward until
the entire seat belt is extracted.
3. Allow the seat belt to retract. As the seat belt retra
cts, you will hear a clicking sound. This
indicates the seat belt is now in the Automatic
Locking Mode.
How To Disengage The Automatic Locking Mode
Unbuckle the combination lap/shoulder belt and
allow i
t to retract completely to disengage the
Automatic Locking Mode and activate the vehicle
sensitive (emergency) locking mode.
SUPPLEMENTAL RESTRAINT SYSTEMS
(SRS)
Some of the safety features described in this
section may be standard equipment on some
models, or may be optional equipment on others. If
you are not sure, ask an authorized dealer.
The air bag system must be ready to protect you in
a colli
sion. The Occupant Restraint Controller
(ORC) monitors the internal circuits and
interconnecting wiring associated with the electrical Air Bag System Components. Your
vehicle may be equipped with the following Air Bag
System Components:
Air Bag System Components
Occupant Restraint Controller (ORC)
Air Bag Warning Light
Steering Wheel and Column
Instrument Panel
Knee Impact Bolsters
Driver and Front Passenger Air Bags
Seat Belt Buckle Switch
Supplemental Side Air Bags
Supplemental Knee Air Bags
Front and Side Impact Sensors
Seat Belt Pretensioners
Seat Track Position Sensors
Air Bag Warning Light
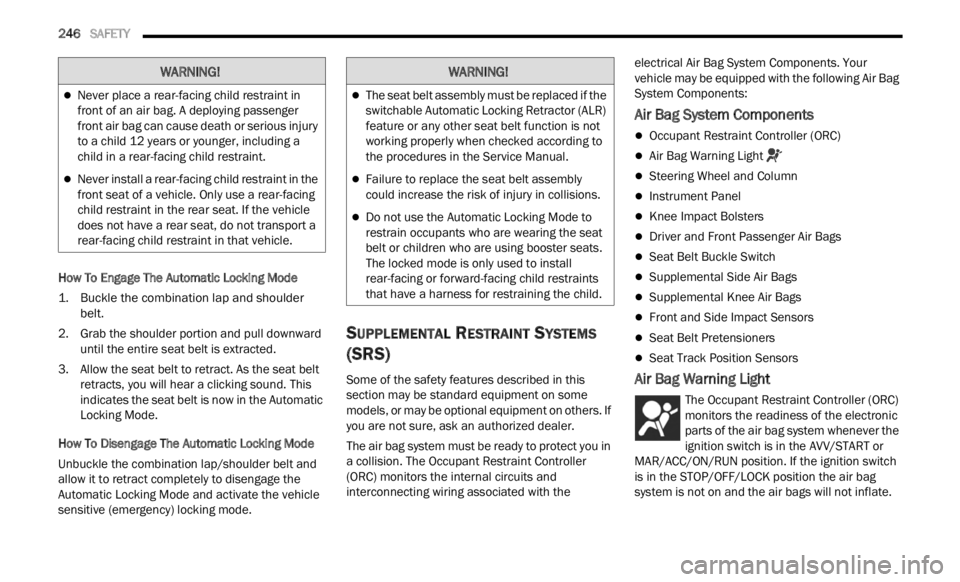
The Occupant Restraint Controller (ORC)
monitors the readiness of the electronic
parts
of the air bag system whenever the
ignition switch is in the AVV/START or
MAR/ACC/ON/RUN position. If the ignition switch
is in the STOP/OFF/LOCK position the air bag
system is not on and the air bags will not inflate.
WARNING!
Never place a rear-facing child restraint in
front of an air bag. A deploying passenger
front air bag can cause death or serious injury
to a child 12 years or younger, including a
child in a rear-facing child restraint.
Never install a rear-facing child restraint in the
front seat of a vehicle. Only use a rear-facing
child restraint in the rear seat. If the vehicle
does not have a rear seat, do not transport a
rear-facing child restraint in that vehicle.
WARNING!
The seat belt assembly must be replaced if the
switchable Automatic Locking Retractor (ALR)
feature or any other seat belt function is not
working properly when checked according to
the procedures in the Service Manual.
Failure to replace the seat belt assembly
could increase the risk of injury in collisions.
Do not use the Automatic Locking Mode to
restrain occupants who are wearing the seat
belt or children who are using booster seats.
The locked mode is only used to install
rear-facing or forward-facing child restraints
that have a harness for restraining the child.
Page 249 of 364
SAFETY 247
The ORC contains a backup power supply system
that may deploy the air bag system even if the
battery loses power or it becomes disconnected
prior to deployment.
The ORC turns on the Air Bag Warning Light in the
instru
ment panel for approximately four to eight
seconds for a self-check when the ignition switch is
in the MAR/ACC/ON/RUN position. After the
self-check, the Air Bag Warning Light will turn off. If
the ORC detects a malfunction in any part of the
system, it turns on the Air Bag Warning Light, either
momentarily or continuously. A single chime will
sound to alert you if the light comes on again after
initial startup.
The ORC also includes diagnostics that will
illum i
nate the instrument panel Air Bag Warning
Light if a malfunction is detected that could affect
the air bag system. The diagnostics also record the
nature of the malfunction. While the air bag system
is designed to be maintenance free, if any of the
following occurs, have an authorized dealer
service the air bag system immediately.
The Air Bag Warning Light does not come on
during the four to eight seconds when the igni -
tion switch is first in the MAR/ACC/ON/RUN
p osition
.
The Air Bag Warning Light remains on after the
four to eight-second interval.
The Air Bag Warning Light comes on intermit -
tently or remains on while driving.
NOTE:
If the speedometer, tachometer, or any engine
relat e
d gauges are not working, the Occupant
Restraint Controller (ORC) may also be disabled. In
this condition the air bags may not be ready to
inflate for your protection. Have an authorized
dealer service the air bag system immediately.
Redundant Air Bag Warning Light
If a fault with the Air Bag Warning Light is
detected, which could affect the
S up
p l
e
mental Restraint System (SRS),
the Redundant Air Bag Warning Light will
illuminate on the instrument panel. The
Redundant Air Bag Warning Light will stay on until
the fault is cleared. In addition, a single chime will
sound to alert you that the Redundant Air Bag
Warning Light has come on and a fault has been
detected. If the Redundant Air Bag Warning Light
comes on intermittently or remains on while driving have an authorized dealer service the vehicle
immediately
Ú page 69.
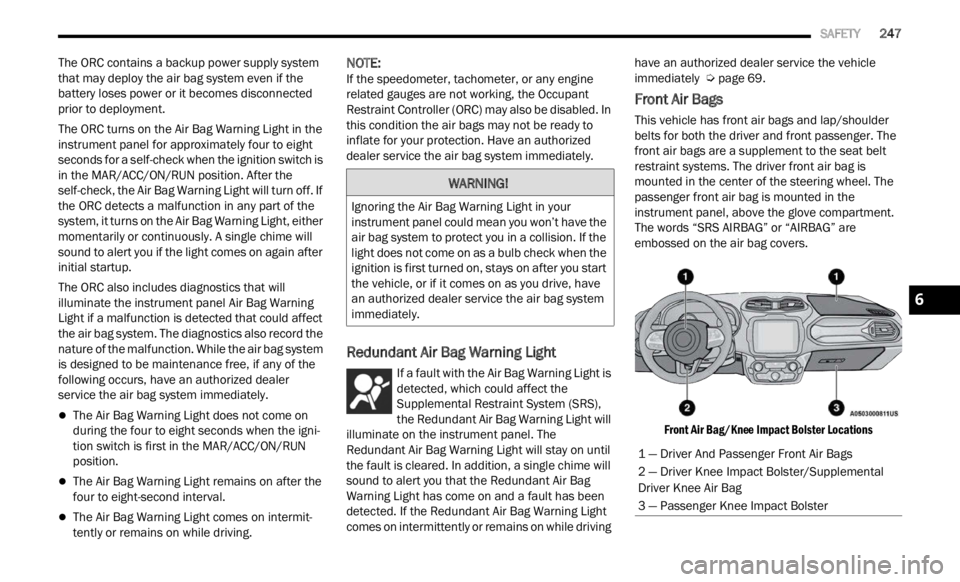
Front Air Bags
This vehicle has front air bags and lap/shoulder
belts for both the driver and front passenger. The
front air bags are a supplement to the seat belt
restraint systems. The driver front air bag is
mounted in the center of the steering wheel. The
passenger front air bag is mounted in the
instrument panel, above the glove compartment.
The words “SRS AIRBAG” or “AIRBAG” are
embossed on the air bag covers.
Front Air Bag/Knee Impact Bolster Locations
WARNING!
Ignoring the Air Bag Warning Light in your
instrument panel could mean you won’t have the
air bag system to protect you in a collision. If the
light does not come on as a bulb check when the
ignition is first turned on, stays on after you start
the vehicle, or if it comes on as you drive, have
an authorized dealer service the air bag system
immediately.
1 — Driver And Passenger Front Air Bags
2 — Driver Knee Impact Bolster/Supplemental
Driver Knee Air Bag
3 — Passenger Knee Impact Bolster
6
Page 257 of 364
SAFETY 255
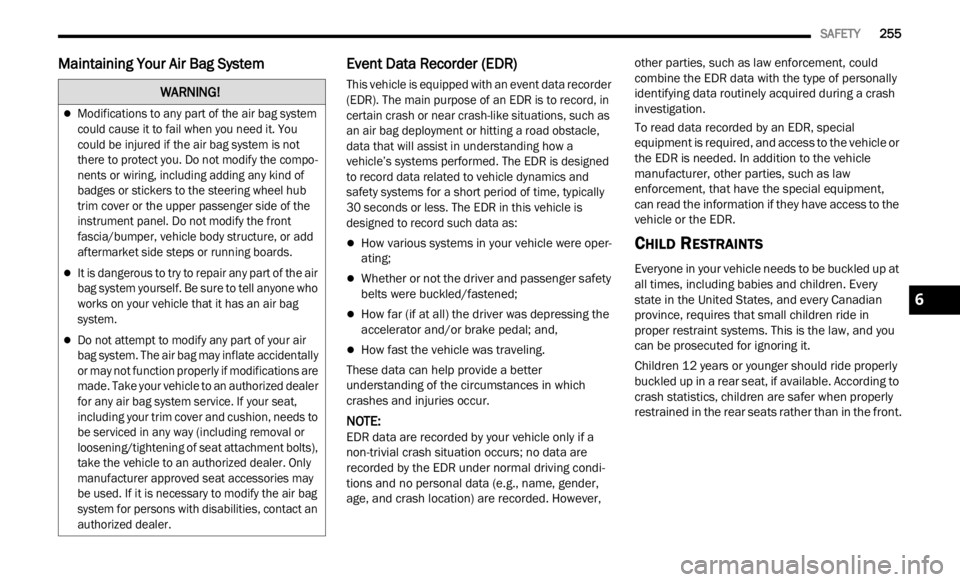
Maintaining Your Air Bag System Event Data Recorder (EDR)
This vehicle is equipped with an event data recorder
(EDR). The main purpose of an EDR is to record, in
certain crash or near crash-like situations, such as
an air bag deployment or hitting a road obstacle,
data that will assist in understanding how a
vehicle’s systems performed. The EDR is designed
to record data related to vehicle dynamics and
safety systems for a short period of time, typically
30 seconds or less. The EDR in this vehicle is
designed to record such data as:
How various systems in your vehicle were oper -
ating;
Whether or not the driver and passenger safety
belts were buckled/fastened;
How far (if at all) the driver was depressing the
accelerator and/or brake pedal; and,
How fast the vehicle was traveling.
These data can help provide a better
u n d
er
s
tanding of the circumstances in which
crashes and injuries occur.
NOTE:
EDR data are recorded by your vehicle only if a
non-tr i
vial crash situation occurs; no data are
recorded by the EDR under normal driving condi -
tions and no personal data (e.g., name, gender,
age, a
nd crash location) are recorded. However, other parties, such as law enforcement, could
combine the EDR data with the type of personally
identifying data routinely acquired during a crash
investigation.
To read data recorded by an EDR, special
equip
m
ent is required, and access to the vehicle or
the EDR is needed. In addition to the vehicle
manufacturer, other parties, such as law
enforcement, that have the special equipment,
can read the information if they have access to the
vehicle or the EDR.
CHILD RESTRAINTS
Everyone in your vehicle needs to be buckled up at
all times, including babies and children. Every
state in the United States, and every Canadian
province, requires that small children ride in
proper restraint systems. This is the law, and you
can be prosecuted for ignoring it.
Children 12 years or younger should ride properly
buckle
d up in a rear seat, if available. According to
crash statistics, children are safer when properly
restrained in the rear seats rather than in the front.
WARNING!
Modifications to any part of the air bag system
could cause it to fail when you need it. You
could be injured if the air bag system is not
there to protect you. Do not modify the compo -
nents or wiring, including adding any kind of
badges
or stickers to the steering wheel hub
trim cover or the upper passenger side of the
instrument panel. Do not modify the front
fascia/bumper, vehicle body structure, or add
aftermarket side steps or running boards.
It is dangerous to try to repair any part of the air
bag system yourself. Be sure to tell anyone who
works on your vehicle that it has an air bag
system.
Do not attempt to modify any part of your air
bag system. The air bag may inflate accidentally
or may not function properly if modifications are
made. Take your vehicle to an authorized dealer
for any air bag system service. If your seat,
including your trim cover and cushion, needs to
be serviced in any way (including removal or
loosening/tightening of seat attachment bolts),
take the vehicle to an authorized dealer. Only
manufacturer approved seat accessories may
be used. If it is necessary to modify the air bag
system for persons with disabilities, contact an
authorized dealer.
6
Page 269 of 364

SAFETY 267
PERIODIC SAFETY CHECKS YOU SHOULD
M
AKE OUTSIDE THE VEHICLE
Tires
Examine tires for excessive tread wear and uneven
wear patterns. Check for stones, nails, glass, or
other objects lodged in the tread or sidewall.
Inspect the tread for cuts and cracks. Inspect
sidewalls for cuts, cracks, and bulges. Check the
lug nuts/bolt torque for tightness. Check the tires
(including spare) for proper cold inflation pressure.
Lights
Have someone observe the operation of brake
lights and exterior lights while you work the
controls. Check turn signal and high beam
indicator lights on the instrument panel.
Door Latches
Check for proper closing, latching, and locking.
Fluid Leaks
Check area under the vehicle after overnight
parking for fuel, coolant, oil, or other fluid leaks.
Also, if gasoline fumes are detected or if fuel or
brake fluid leaks are suspected, the cause should
be located and corrected immediately.
EXHAUST GAS
The best protection against carbon monoxide entry
into the vehicle body is a properly maintained
engine exhaust system.
Whenever a change is noticed in the sound of the
exhau s
t system, when exhaust fumes can be
detected inside the vehicle, or when the underside
or rear of the vehicle is damaged, have an
authorized dealer inspect the complete exhaust system and adjacent body areas for broken,
damaged, deteriorated, or mispositioned parts.
Open seams or loose connections could permit
exhaust fumes to seep into the passenger
compartment. In addition, inspect the exhaust
system each time the vehicle is raised for
lubrication or oil change. Replace as required.
CARBON MONOXIDE WARNINGS
WARNING!
Exhaust gases can injure or kill. They contain
carbon monoxide (CO), which is colorless and
odorless. Breathing it can make you
unconscious and can eventually poison you. To
avoid breathing (CO), follow these safety tips:
Do not run the engine in a closed garage or in
confined areas any longer than needed to
move your vehicle in or out of the area.
If you are required to drive with the trunk/lift
-
gate/rear doors open, make sure that all
window s
are closed and the climate control
BLOWER switch is set at high speed. DO NOT
use the recirculation mode.
If it is necessary to sit in a parked vehicle with
the engine running, adjust your heating or
cooling controls to force outside air into the
vehicle. Set the blower at high speed.
WARNING!
Carbon monoxide (CO) in exhaust gases is
deadly. Follow the precautions below to prevent
carbon monoxide poisoning:
Do not inhale exhaust gases. They contain
carbon monoxide, a colorless and odorless gas,
which can kill. Never run the engine in a closed
area, such as a garage, and never sit in a
parked vehicle with the engine running for an
extended period. If the vehicle is stopped in an
open area with the engine running for more
than a short period, adjust the ventilation
system to force fresh, outside air into the
vehicle.
Guard against carbon monoxide with proper
maintenance. Have the exhaust system
inspected every time the vehicle is raised.
Have any abnormal conditions repaired
promptly. Until repaired, drive with all side
windows fully open.
6
Page 275 of 364
IN CASE OF EMERGENCY 273
(Continued)
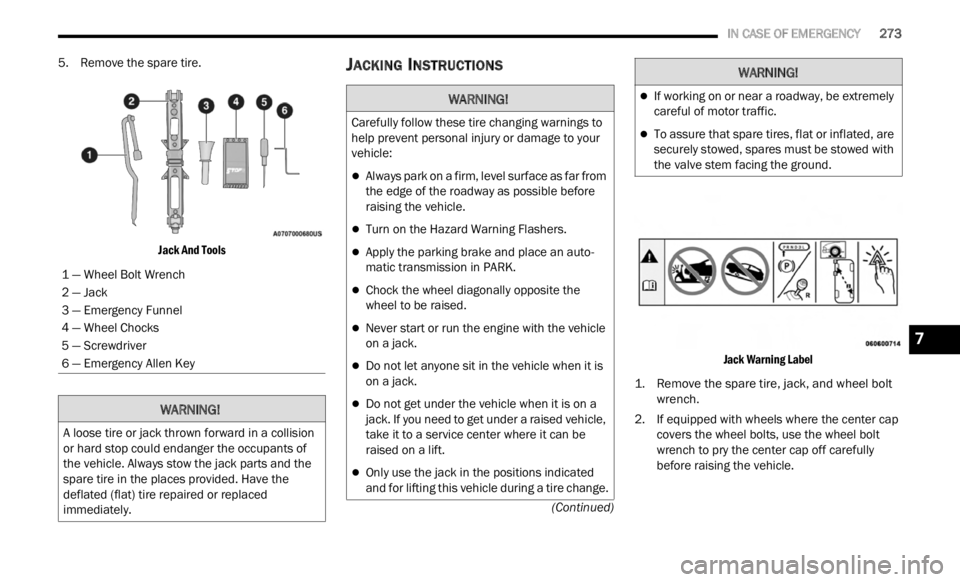
5. Remove the spare tire.
Jack And Tools
JACKING INSTRUCTIONS
Jack Warning Label
1. Remove the spare tire, jack, and wheel bolt wrench.
2
. If equipped with wheels where the center cap covers
the wheel bolts, use the wheel bolt
wrench to pry the center cap off carefully
before raising the vehicle.
1 — Wheel Bolt Wrench
2 — Jack
3 — Emergency Funnel
4 — Wheel Chocks
5 — Screwdriver
6 — Emergency Allen KeyWARNING!
A loose tire or jack thrown forward in a collision
or hard stop could endanger the occupants of
the vehicle. Always stow the jack parts and the
spare tire in the places provided. Have the
deflated (flat) tire repaired or replaced
immediately.
WARNING!
Carefully follow these tire changing warnings to
help prevent personal injury or damage to your
vehicle:
Always park on a firm, level surface as far from
the edge of the roadway as possible before
raising the vehicle.
Turn on the Hazard Warning Flashers.
Apply the parking brake and place an auto
-
matic transmission in PARK.
Chock the wheel diagonally opposite the
wheel to be raised.
Never start or run the engine with the vehicle
on a jack.
Do not let anyone sit in the vehicle when it is
on a jack.
Do not get under the vehicle when it is on a
jack. If you need to get under a raised vehicle,
take it to a service center where it can be
raised on a lift.
Only use the jack in the positions indicated
and for lifting this vehicle during a tire change.
If working on or near a roadway, be extremely
careful of motor traffic.
To assure that spare tires, flat or inflated, are
securely stowed, spares must be stowed with
the valve stem facing the ground.
WARNING!
7