window JEEP RENEGADE 2023 Owners Manual
[x] Cancel search | Manufacturer: JEEP, Model Year: 2023, Model line: RENEGADE, Model: JEEP RENEGADE 2023Pages: 364, PDF Size: 18.65 MB
Page 5 of 364
3
WINDSHIELD WIPERS AND WASHERS ............. 41
Windshield Wiper Operation ...... ......................42
Rain Sensing Wipers — If Equipped ..... . .........42
Rear Window Wiper/Washer . ..
..
. .....................43
Windshield Wiper De-Icer — If Equipped ..... . ...43
CLIMATE CONTROLS . ..
. .
. ...................................... 44
Automatic Climate Control Descriptions And
Functions ..........................................................44
Autom a
tic Temperature Control (ATC) ..... . .....47
Climate Voice Commands..... . ..........................47
Operating Tips . ..
..
. ...........................................47
INTERIOR STORAGE AND EQUIPMENT ..... . ......... 48
Storage..............................................................48
USB/A UX Control ..... . ........................................50
Power Outlets ..... . .............................................50
Power Inverter — If Equipped. ..
..
. .....................51
Cigar Lighter — If Equipped. ..
..
. ........................52
Ashtray — If Equipped ..... . ................................52
WINDOWS............................................................... 52
Power
Window Controls ...... .............................52
Automatic Window Features ..... . .....................53
Reset Auto-Up ..... . .............................................53
Window Lockout Switch . ..
..
. .............................54
Wind Buffeting ..... . ...........................................54
DUAL PANE PANORAMIC POWER SUNROOF
WITH POWER SHADE — IF EQUIPPED ..... .
.......... 54
Opening And Closing The Sunroof...... .............55
Venting Sunroof . ..
..
. ..........................................55
Opening And Closing The Power Sunshade....5 5
P inch Protect Feature . ..
. .
. ................................55
Sunroof Maintenance ..... . ................................56 HOOD ......................................................................56
To Op e
n The Hood...... ......................................56
To Close The Hood ..... . .....................................57
LIFTGATE . ................................................................ 57
U n
loc
k
/Open The Liftgate...... ..........................57
Lock/Close The Liftgate . ..
..
. .............................58
Cargo Area Features ..... . ..................................58
ROOF LUGGAGE RACK — IF EQUIPPED . ..
..
. ........61
GETTING TO KNOW YOUR
INSTRUMENT PANEL
INSTRUMENT CLUSTER .........................................62
Instrument Cluster Descriptions ...... ...............64
INSTRUMENT CLUSTER DISPLAY ..... . .................64
Instrument Cluster Display Location And
Controls.............................................................64
Oil C
hange Reset..... . ........................................65
Instrument Cluster Display Menu Items . ..
..
. ..66
TRIP COMPUTER ..... . ..............................................69
WARNING/INDICATOR LIGHTS AND
MESSAGES ......
........................................................69
Red Warning Lights ...... ....................................70
Yellow Warning Lights ..... . ................................72
Yellow Indicator Lights . ..
..
. ...............................75
Green Indicator Lights . ..
..
. ...............................76
White Indicator Lights ..... . ................................77
Blue Indicator Lights ..... . ..................................77
Gray Indicator Lights . ..
..
. ..................................77 ONBOARD DIAGNOSTIC SYSTEM (OBD II) .....
.
... 77
Onboard Diagnostic System
(OBD II) Cybersecurity ..... .
................................ 78
EMISSIONS INSPECTION AND MAINTENANCE
PROGRAMS ..... .
...................................................... 78
STARTING AND OPERATING
STARTING THE ENGINE ......................................... 80
Tip Start Feature ...... ....................................... 80
If Engine Fails To Start ..... . ..............................80
Cold Weather Operation ..... . ............................ 81
Extended Park Starting . ..
..
. ..............................81
After Starting — Warming Up The Engine ..... . . 81
Stopping The Engine . ..
..
. .................................. 81
Turbocharger “Cool Down” — If Equipped ..... . 82
ENGINE BREAK-IN RECOMMENDATIONS . ..
..
. .... 82
ELECTRIC PARK BRAKE (EPB) ...... ....................... 82
Auto Park Brake ...... ......................................... 84
SafeHold . .......................................................... 84
B r
a k
e
Service Mode..... . ................................... 84
9-SPEED AUTOMATIC TRANSMISSION . ..
..
. ........ 85
Gear Selector...... .............................................. 86
Gear Ranges ..... . ............................................... 87
Transmission Limp Home Mode . ..
..
. ............... 90
Ignition Park Interlock
(Keyless Vehicle) . .....
........................................ 90
Brake Transmission Shift Interlock (BTSI)
System . .............................................................90
Page 20 of 364

18 GETTING TO KNOW YOUR VEHICLE
For information on normal starting, see
Ú page 80.
REMOTE START — IF EQUIPPED
This system uses the key fob to start the
engine conveniently from outside the
vehic l
e while still maintaining security.
The system has a range of approximately
328 ft (100 m).
Remote Start is used to defrost windows in cold
w eathe
r, and to reach a comfortable climate in all
ambient conditions before the driver enters the
vehicle.
NOTE:
Obstructions between the vehicle and key fob may
reduc e
this range.
HOW TO USE REMOTE START
Push and release the Remote Start button on the
key fob twice within five seconds. The vehicle
doors will lock, the parking lights will flash, and the
horn will chirp twice (if programmed). Then, the
engine will start, and the vehicle will remain in the
Remote Start mode for a 15 minute cycle. Pushing
the R e
mote Start button a third time shuts the
engine off.
NOTE:
With Remote Start, the engine will only run for
15 minutes.
Remote Start can only be used twice.
If an engine fault is present or fuel level is low,
the vehicle will start and then shut down in
10 seconds.
The parking lights will turn on and remain on
during Remote Start mode.
For security, power window and power sunroof
operation (if equipped) are disabled when the
vehicle is in the Remote Start mode.
The ignition must be placed in the ON/RUN posi -
tion before the Remote Start sequence can be
repea t
ed for a third cycle.
Never leave children alone in a vehicle, or with
access to an unlocked vehicle.
Allowing children to be in a vehicle unattended
is dangerous for a number of reasons. A child
or others could be seriously or fatally injured.
Children should be warned not to touch the
parking brake, brake pedal or the gear
selector.
Do not leave the key fob in or near the vehicle,
or in a location accessible to children, and do
not leave the ignition in the ON or RUN posi -
tion. A child could operate power windows,
other c
ontrols, or move the vehicle.
Do not leave children or animals inside parked
vehicles in hot weather. Interior heat buildup
may cause serious injury or death.
CAUTION!
An unlocked vehicle is an invitation for thieves.
Always remove key fob from the vehicle and lock
all doors when leaving the vehicle unattended.
WARNING!
WARNING!
Do not start or run an engine in a closed
garage or confined area. Exhaust gas contains
Carbon Monoxide (CO) which is odorless and
colorless. Carbon Monoxide is poisonous and
can cause serious injury or death when
inhaled.
Keep key fobs away from children. Operation
of the Remote Start system, windows, door
locks or other controls could cause serious
injury or death.
Page 21 of 364
GETTING TO KNOW YOUR VEHICLE 19
(Continued)
All of the following conditions must be met before
the engine will remote start:
Gear selector in PARK
Doors closed
Hood closed
Liftgate closed
Hazard switch off
Brake switch inactive (brake pedal not pressed)
Battery at an acceptable charge level
PANIC button not pushed
System not disabled from previous Remote
Start event
Vehicle Security system indicator flashing
Ignition in OFF position
Fuel level meets minimum requirement
Vehicle Security system is not signaling an intru -
sion
Malfunction Indicator Light is not illuminated
TO EXIT REMOTE START MODE
To drive the vehicle after starting the Remote Start
system, push and release the START/STOP ignition
button while pressing the brake pedal prior to the
end of the 15 minute cycle.
The Remote Start system will turn the engine off if
t he Re
mote Start button on the key fob is pushed
again, or if the engine is allowed to run for the
entire 15 minute cycle. Once the ignition is placed
in th e
ON/RUN position, the climate controls will
resume previously set operations (temperature,
blower control, etc.).
NOTE:
The message “Remote Start Active — Push Start
Button” will show in the instrument cluster
display until you push the START/STOP ignition
button.
To avoid unintentional shutdowns, the system
will disable for two seconds after receiving a
valid Remote Start request.
REMOTE START FRONT DEFROST
A
CTIVATION — IF EQUIPPED
When Remote Start is active, and the outside
ambient temperature is 40°F (4.4°C) or below, the
system will automatically activate front defrost for
15 minutes or less. The time is dependent on the
ambie n
t temperature. Once the timer expires, the
system will automatically adjust the settings
depending on ambient conditions. See “Remote
Start Comfort Systems — If Equipped” in the next
section for detailed operation.
REMOTE START COMFORT SYSTEMS —
I
F EQUIPPED
When Remote Start is activated, the front and rear
defrost will automatically turn on in cold weather.
The heated steering wheel and driver heated seat
feature will turn on if selected in the comfort menu
screen within Uconnect Settings Ú page 133. The
vehicle will adjust the climate control settings
depen d
ing on the outside ambient temperature.
Automatic Temperature Control (ATC) —
If Equipped
The climate controls will be automatically adjusted
t o the
optimal temperature and mode settings
depending on the outside ambient temperature.
This will occur until the ignition is placed in the ON/
RUN position where the climate controls will
resume their previous settings.
WARNING!
Do not start or run an engine in a closed garage
or confined area. Exhaust gas contains Carbon
Monoxide (CO) which is odorless and colorless.
Carbon Monoxide is poisonous and can cause
serious injury or death when inhaled.
Keep key fobs away from children. Operation of
the Remote Start system, windows, door locks
or other controls could cause serious injury or
death.
WARNING!
2
Page 24 of 364
22 GETTING TO KNOW YOUR VEHICLE
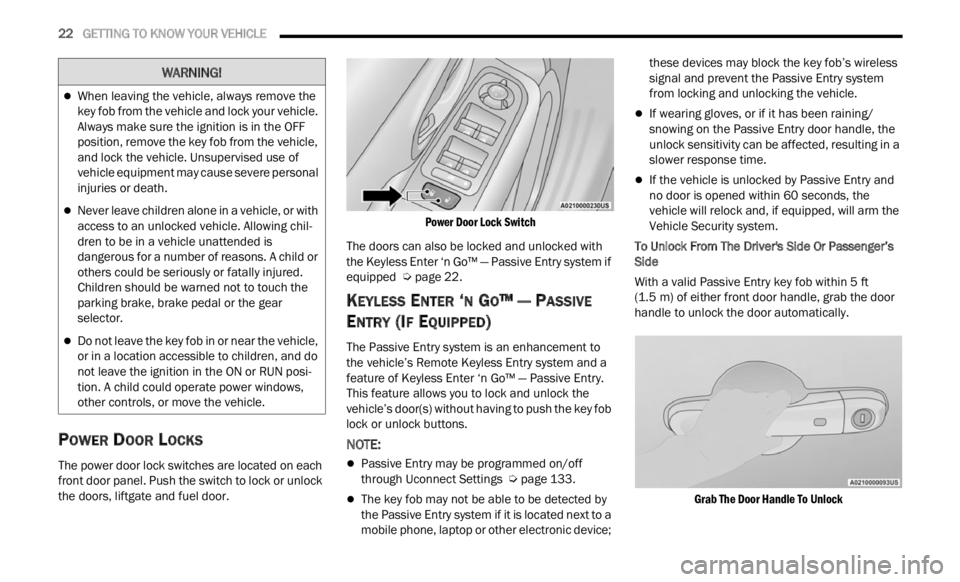
POWER DOOR LOCKS
The power door lock switches are located on each
front door panel. Push the switch to lock or unlock
the doors, liftgate and fuel door.
Power Door Lock Switch
The doors can also be locked and unlocked with
the K e
yless Enter ‘n Go™ — Passive Entry system if
equipped Ú page 22.
KEYLESS ENTER ‘N GO™ — PASSIVE
E
NTRY (IF EQUIPPED)
The Passive Entry system is an enhancement to
the vehicle’s Remote Keyless Entry system and a
feature of Keyless Enter ‘n Go™ — Passive Entry.
This feature allows you to lock and unlock the
vehicle’s door(s) without having to push the key fob
lock or unlock buttons.
NOTE:
Passive Entry may be programmed on/off
through Uconnect Settings Ú page 133.
The key fob may not be able to be detected by
the Passive Entry system if it is located next to a
mobile phone, laptop or other electronic device; these devices may block the key fob’s wireless
signal and prevent the Passive Entry system
from locking and unlocking the vehicle.
If wearing gloves, or if it has been raining/
snowing on the Passive Entry door handle, the
unlock sensitivity can be affected, resulting in a
slower response time.
If the vehicle is unlocked by Passive Entry and
no door is opened within 60 seconds, the
vehicle will relock and, if equipped, will arm the
Vehicle Security system.
To Unlock From The Driver's Side Or Passenger’s
Side
Wit
h a valid Passive Entry key fob within 5 ft
(1.5 m)
of either front door handle, grab the door
handl e
to unlock the door automatically.
Grab The Door Handle To Unlock
When leaving the vehicle, always remove the
key fob from the vehicle and lock your vehicle.
Always make sure the ignition is in the OFF
position, remove the key fob from the vehicle,
and lock the vehicle. Unsupervised use of
vehicle equipment may cause severe personal
injuries or death.
Never leave children alone in a vehicle, or with
access to an unlocked vehicle. Allowing chil -
dren to be in a vehicle unattended is
d anger
ous for a number of reasons. A child or
others could be seriously or fatally injured.
Children should be warned not to touch the
parking brake, brake pedal or the gear
selector.
Do not leave the key fob in or near the vehicle,
or in a location accessible to children, and do
not leave the ignition in the ON or RUN posi -
tion. A child could operate power windows,
other c
ontrols, or move the vehicle.
WARNING!
Page 26 of 364
24 GETTING TO KNOW YOUR VEHICLE
NOTE:
After pushing the door handle button, you must
wait two seconds before you can lock or unlock
the doors, using either Passive Entry door
handle. This is done to allow you to check if the
vehicle is locked by pulling the door handle
without the vehicle unlocking.
The Passive Entry system will not operate if the
key fob battery is depleted.
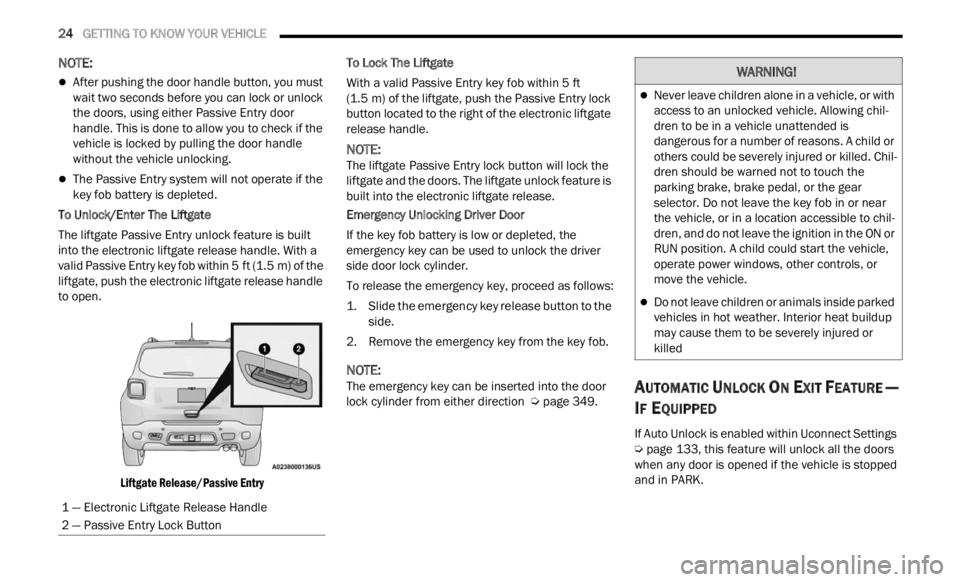
To Unlock/Enter The Liftgate
The liftgate Passive Entry unlock feature is built
into t h
e electronic liftgate release handle. With a
valid Passive Entry key fob within 5 ft (1.5 m) of the
liftga
te, push the electronic liftgate release handle
to open.
Liftgate Release/Passive Entry
To Lock The Liftgate
With a valid Passive Entry key fob within 5
ft
(1.5 m)
of the liftgate, push the Passive Entry lock
button
located to the right of the electronic liftgate
release handle.
NOTE:
The liftgate Passive Entry lock button will lock the
liftg a
te and the doors. The liftgate unlock feature is
built into the electronic liftgate release.
Emergency Unlocking Driver Door
If the key fob battery is low or depleted, the
e merge
ncy key can be used to unlock the driver
side door lock cylinder.
To release the emergency key, proceed as follows:
1. S lide the emergency key release button to the
side.
2
. Remove the emergency key from the key fob.
NOTE:
The emergency key can be inserted into the door
lock c y
linder from either direction Ú page 349.
AUTOMATIC UNLOCK ON EXIT FEATURE —
I
F EQUIPPED
If Auto Unlock is enabled within Uconnect Settings
Ú page 133, this feature will unlock all the doors
when any door is opened if the vehicle is stopped
a nd in
PARK.
1 — Electronic Liftgate Release Handle
2 — Passive Entry Lock Button
WARNING!
Never leave children alone in a vehicle, or with
access to an unlocked vehicle. Allowing chil -
dren to be in a vehicle unattended is
d anger
ous for a number of reasons. A child or
others could be severely injured or killed. Chil -
dren should be warned not to touch the
p arki
n
g brake, brake pedal, or the gear
selector. Do not leave the key fob in or near
the vehicle, or in a location accessible to chil -
dren, and do not leave the ignition in the ON or
R UN pos
ition. A child could start the vehicle,
operate power windows, other controls, or
move the vehicle.
Do not leave children or animals inside parked
vehicles in hot weather. Interior heat buildup
may cause them to be severely injured or
killed
Page 27 of 364
GETTING TO KNOW YOUR VEHICLE 25
DEAD LOCK DEVICE — IF EQUIPPED
The Dead Lock Device is a safety device that
prevents the use of the internal door handles of
the vehicle and the power door lock switch.
This device prevents the doors from opening within
the p a
ssenger compartment.
Arming The Dead Lock Device
The device works on all doors and requires two
pushes of the lock button on the key fob. For
vehicles equipped with Passive Entry, the device
will also work by pushing the lock button on the
driver’s or passenger’s side exterior door
handle.
The arming of the device is indicated by three
flashes of the turn signals.
The device does not operate if one or more
doors are not properly closed.
Disarming The Device
The device will automatically disarm by pushing
the unlock button on the key fob. For vehicles
equipped with Passive Entry, the device will also
disarm by using the driver or passenger Passive
Entry door handle to unlock and open the door.
Placing the ignition in the ON/RUN position.
CHILD LOCKS
To provide a safer environment for small children
riding in the rear seats, the rear doors are
equipped with a Child-Protection Door Lock
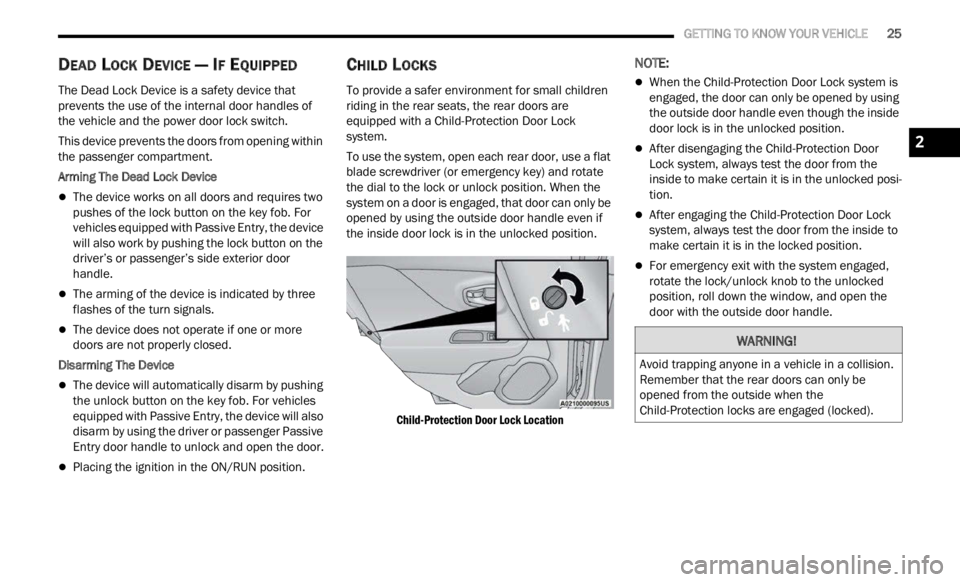
system.
To use the system, open each rear door, use a flat
blade
screwdriver (or emergency key) and rotate
the dial to the lock or unlock position. When the
system on a door is engaged, that door can only be
opened by using the outside door handle even if
the inside door lock is in the unlocked position.
Child-Protection Door Lock Location
NOTE:
When the Child-Protection Door Lock system is
engaged, the door can only be opened by using
the outside door handle even though the inside
door lock is in the unlocked position.
After disengaging the Child-Protection Door
Lock system, always test the door from the
inside to make certain it is in the unlocked posi -
tion.
After engaging the Child-Protection Door Lock
system, always test the door from the inside to
make certain it is in the locked position.
For emergency exit with the system engaged,
rotate the lock/unlock knob to the unlocked
position, roll down the window, and open the
door with the outside door handle.
WARNING!
Avoid trapping anyone in a vehicle in a collision.
Remember that the rear doors can only be
opened from the outside when the
Child-Protection locks are engaged (locked).
2
Page 36 of 364
34 GETTING TO KNOW YOUR VEHICLE
MIRRORS
INSIDE REARVIEW MIRROR
Manual Mirror — If Equipped
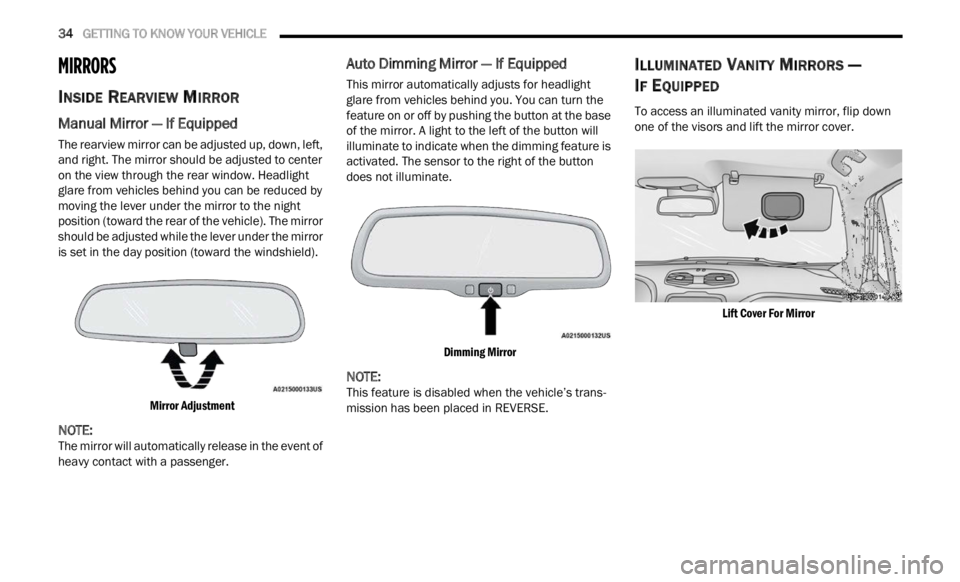
The rearview mirror can be adjusted up, down, left,
and right. The mirror should be adjusted to center
on the view through the rear window. Headlight
glare from vehicles behind you can be reduced by
moving the lever under the mirror to the night
position (toward the rear of the vehicle). The mirror
should be adjusted while the lever under the mirror
is set in the day position (toward the windshield).
Mirror Adjustment
NOTE:
The mirror will automatically release in the event of
heavy
contact with a passenger.
Auto Dimming Mirror — If Equipped
This mirror automatically adjusts for headlight
glare from vehicles behind you. You can turn the
feature on or off by pushing the button at the base
of the mirror. A light to the left of the button will
illuminate to indicate when the dimming feature is
activated. The sensor to the right of the button
does not illuminate.
Dimming Mirror
NOTE:
This feature is disabled when the vehicle’s trans -
mission has been placed in REVERSE.
ILLUMINATED VANITY MIRRORS —
I
F EQUIPPED
To access an illuminated vanity mirror, flip down
one of the visors and lift the mirror cover.
Lift Cover For Mirror
Page 37 of 364
GETTING TO KNOW YOUR VEHICLE 35
Sun Visor “Slide-On-Rod” Feature —
If Equipped
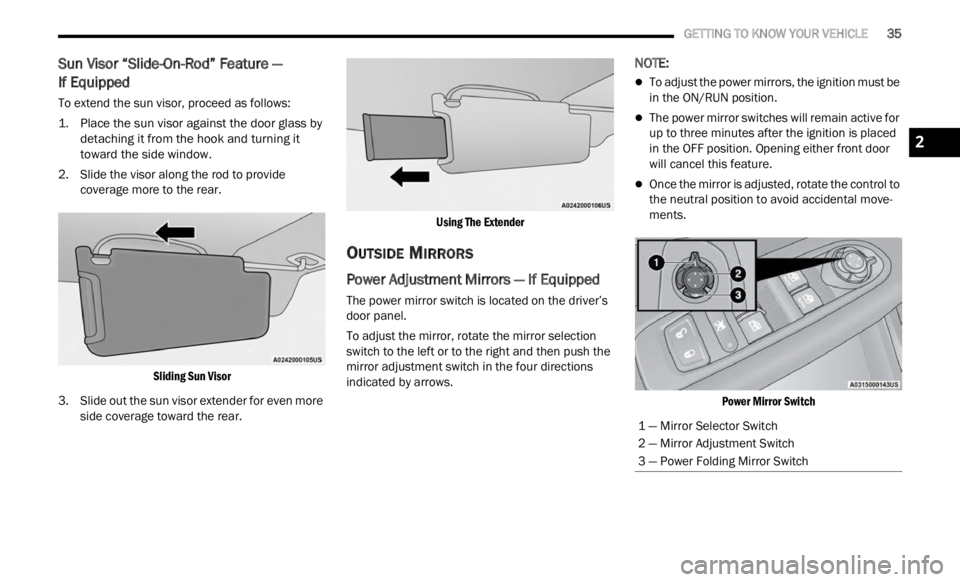
To extend the sun visor, proceed as follows:
1. P lace the sun visor against the door glass by
d e
ta
c
hing it from the hook and turning it
toward the side window.
2. Slide the visor along the rod to provide cover a
ge more to the rear.
Sliding Sun Visor
3. Slide out the sun visor extender for even more side
coverage toward the rear.
Using The Extender
OUTSIDE MIRRORS
Power Adjustment Mirrors — If Equipped
The power mirror switch is located on the driver’s
door panel.
To adjust the mirror, rotate the mirror selection
switch
to the left or to the right and then push the
mirror adjustment switch in the four directions
indicated by arrows.
NOTE:
To adjust the power mirrors, the ignition must be
in the ON/RUN position.
The power mirror switches will remain active for
up to three minutes after the ignition is placed
in the OFF position. Opening either front door
will cancel this feature.
Once the mirror is adjusted, rotate the control to
the neutral position to avoid accidental move -
ments.
Power Mirror Switch
1 — Mirror Selector Switch
2 — Mirror Adjustment Switch
3 — Power Folding Mirror Switch
2
Page 38 of 364
36 GETTING TO KNOW YOUR VEHICLE
Manual Adjustment Mirrors — If Equipped
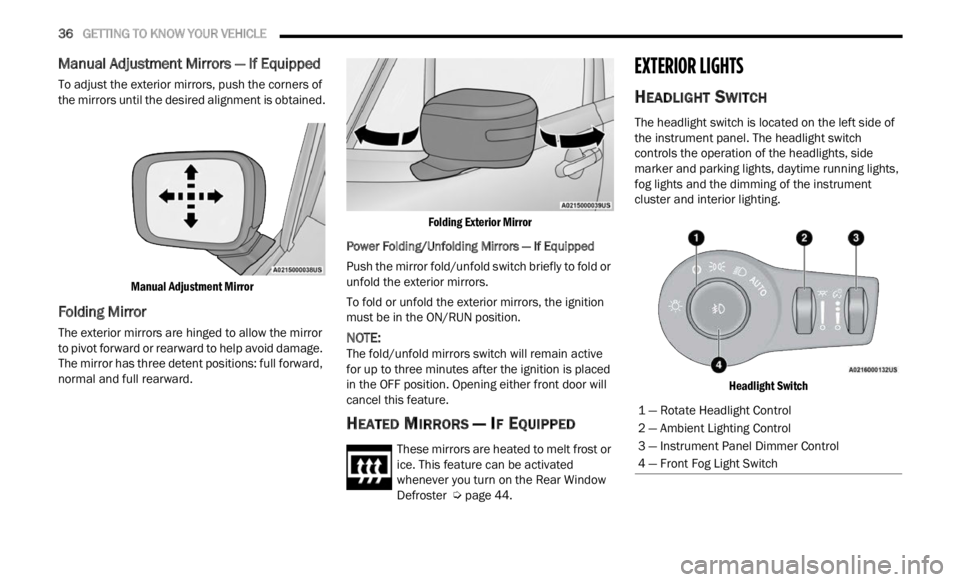
To adjust the exterior mirrors, push the corners of
the mirrors until the desired alignment is obtained.
Manual Adjustment Mirror
Folding Mirror
The exterior mirrors are hinged to allow the mirror
to pivot forward or rearward to help avoid damage.
The mirror has three detent positions: full forward,
normal and full rearward.
Folding Exterior Mirror
Power Folding/Unfolding Mirrors — If Equipped
Push the mirror fold/unfold switch briefly to fold or
unfold
the exterior mirrors.
To fold or unfold the exterior mirrors, the ignition
must b
e in the ON/RUN position.
NOTE:
The fold/unfold mirrors switch will remain active
for up
to three minutes after the ignition is placed
in the OFF position. Opening either front door will
cancel this feature.
HEATED MIRRORS — IF EQUIPPED
These mirrors are heated to melt frost or
ice. This feature can be activated
whene v
er you turn on the Rear Window
Defroster Ú page 44.
EXTERIOR LIGHTS
HEADLIGHT SWITCH
The headlight switch is located on the left side of
the instrument panel. The headlight switch
controls the operation of the headlights, side
marker and parking lights, daytime running lights,
fog lights and the dimming of the instrument
cluster and interior lighting.
Headlight Switch
1 — Rotate Headlight Control
2 — Ambient Lighting Control
3 — Instrument Panel Dimmer Control
4 — Front Fog Light Switch
Page 45 of 364

GETTING TO KNOW YOUR VEHICLE 43
suppressed until vehicle speed is greater than
3 mph (5 km/h), or the wiper switch is moved
out of a
nd back into the Intermittent wipe posi -
tion.
Transmission In NEUTRAL Position — The Rain
Sensing system will not operate if the NEUTRAL
gear is selected at speeds of 3 mph (5 km/h) or
less u
nless the wiper switch is moved or the
gear selector is moved out of NEUTRAL.
Remote Start Mode Inhibit — On vehicles
equipped with the Remote Start system, Rain
Sensing wipers are not operational when the
vehicle is in the Remote Start mode. Once the
operator is in the vehicle and has placed the
ignition switch in the ON/RUN position, Rain
Sensing wiper operation can resume, if it has
been selected, and no other inhibit conditions
(mentioned previously) exist.
REAR WINDOW WIPER/WASHER
The rear wiper/washer controls are located on the
windshield wiper/washer lever on the right side of
the steering column. The rear wiper/washer is
operated by rotating a switch, located at the
middle of the lever.
NOTE:
If the front wiper is moving and the vehicle is
shift e
d in REVERSE, the rear wiper will perform one
round up to clean the rear window. Rotate the center portion of the lever
upward to the first detent for intermittent
operat
i
on and to the second detent for
continuous rear wiper operation. If the
front wiper is set to Automatic mode (on the wiper
lever as well as enabled through Uconnect
Settings), placing the rear wiper in an intermittent
position will cause the front and rear wipers to sync
up. Turning the front wipers off will cause the rear
wipers to also stop.
To use the washer, push the lever
forward and hold while spray is desired. If
the l e
ver is pushed while the wiper is in
the off position, the wiper will operate for
several wipe cycles, then turn off.
If the lever is pushed while in the intermittent
settin
g, the wiper will turn on and operate for
several wipe cycles after the end of the lever is
released, and then resume the intermittent
interval previously selected.
NOTE:
As a protective measure, the pump will stop if the
switc h
is held for more than 30 seconds. Once the
lever is released, the pump will resume normal
operation.
WINDSHIELD WIPER DE-ICER —
I
F EQUIPPED
Your vehicle may be equipped with a Windshield
Wiper De-Icer feature that may be activated under
the following conditions:
Activation By Front Defrost — The Windshield
Wiper De-Icer will be activated automatically in
the case of a cold weather manual start with full
front defrost, and the ambient temperature is
below 40°F (4.4°C).
CAUTION!
Failure to follow these cautions can cause
damage to the heating elements:
Use care when washing the inside of the rear
window. Do not use abrasive window cleaners
on the interior surface of the window. Use a
soft cloth and a mild washing solution, wiping
parallel to the heating elements. Labels can
be peeled off after soaking with warm water.
Do not use scrapers, sharp instruments, or
abrasive window cleaners on the interior
surface of the window.
Keep all objects a safe distance from the
window.
2