Auto JEEP WAGONEER 2023 User Guide
[x] Cancel search | Manufacturer: JEEP, Model Year: 2023, Model line: WAGONEER, Model: JEEP WAGONEER 2023Pages: 396, PDF Size: 15.17 MB
Page 32 of 396
30GETTING TO KNOW YOUR VEHICLE
AUTOMATIC UNLOCK DOORS ON EXIT
The doors will unlock automatically on vehicles with power
door locks after the following sequence of actions:
1. The Automatic Unlock Doors On Exit feature is
enabled within Uconnect Settings
Ú
page 197.
2. All doors are closed.
3. The gear selector was not in PARK, then is placed in PARK.
4. Any door is opened.
AUTOMATIC DOOR LOCKS —
I
F EQUIPPED
The auto door lock feature default condition is enabled.
When enabled, the door locks will lock automatically when
the vehicle's speed exceeds 15 mph (24 km/h). The auto
door lock feature is enabled or disabled by an authorized
dealer per written request of the customer. Please see an
authorized dealer for service.
CHILD-PROTECTION DOOR LOCK
S
YSTEM — REAR DOORS
To provide a safer environment for small children riding in
the rear seats, the rear doors are equipped with a
Child-Protection Door Lock system.
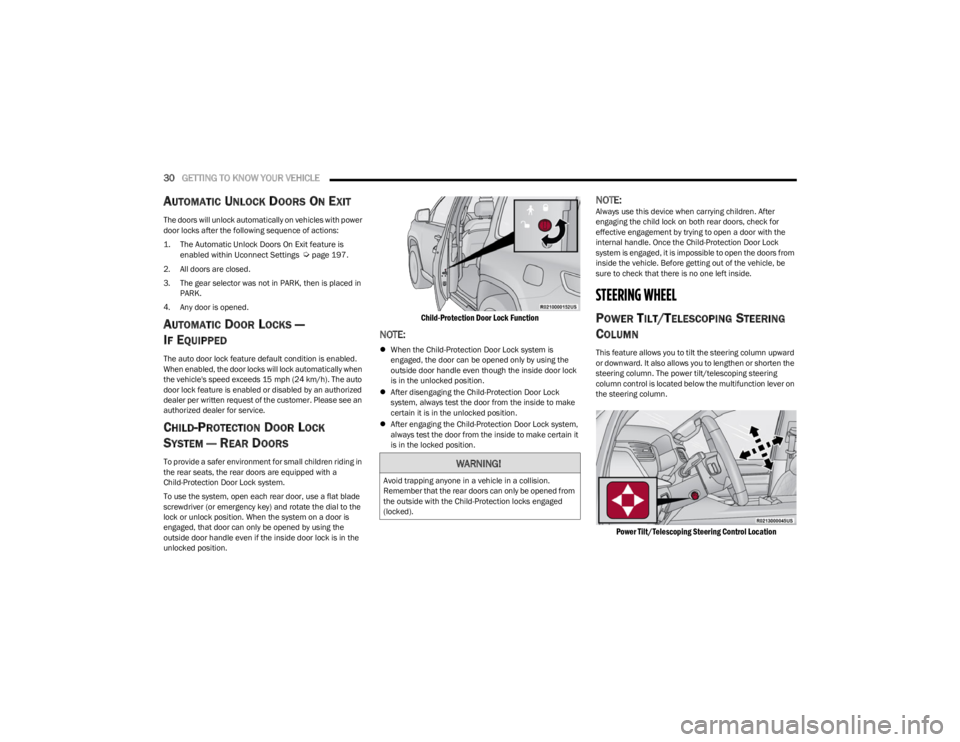
To use the system, open each rear door, use a flat blade
screwdriver (or emergency key) and rotate the dial to the
lock or unlock position. When the system on a door is
engaged, that door can only be opened by using the
outside door handle even if the inside door lock is in the
unlocked position.
Child-Protection Door Lock Function
NOTE:
When the Child-Protection Door Lock system is
engaged, the door can be opened only by using the
outside door handle even though the inside door lock
is in the unlocked position.
After disengaging the Child-Protection Door Lock
system, always test the door from the inside to make
certain it is in the unlocked position.
After engaging the Child-Protection Door Lock system,
always test the door from the inside to make certain it
is in the locked position.
NOTE:Always use this device when carrying children. After
engaging the child lock on both rear doors, check for
effective engagement by trying to open a door with the
internal handle. Once the Child-Protection Door Lock
system is engaged, it is impossible to open the doors from
inside the vehicle. Before getting out of the vehicle, be
sure to check that there is no one left inside.
STEERING WHEEL
POWER TILT/TELESCOPING STEERING
C
OLUMN
This feature allows you to tilt the steering column upward
or downward. It also allows you to lengthen or shorten the
steering column. The power tilt/telescoping steering
column control is located below the multifunction lever on
the steering column.
Power Tilt/Telescoping Steering Control Location
WARNING!
Avoid trapping anyone in a vehicle in a collision.
Remember that the rear doors can only be opened from
the outside with the Child-Protection locks engaged
(locked).
23_WS_OM_EN_USC_t.book Page 30
Page 36 of 396
34GETTING TO KNOW YOUR VEHICLE
Second Row Bench Seat — If Equipped
SECOND ROW BENCH SEAT FORWARD/REAR -
WARD ADJUSTMENT
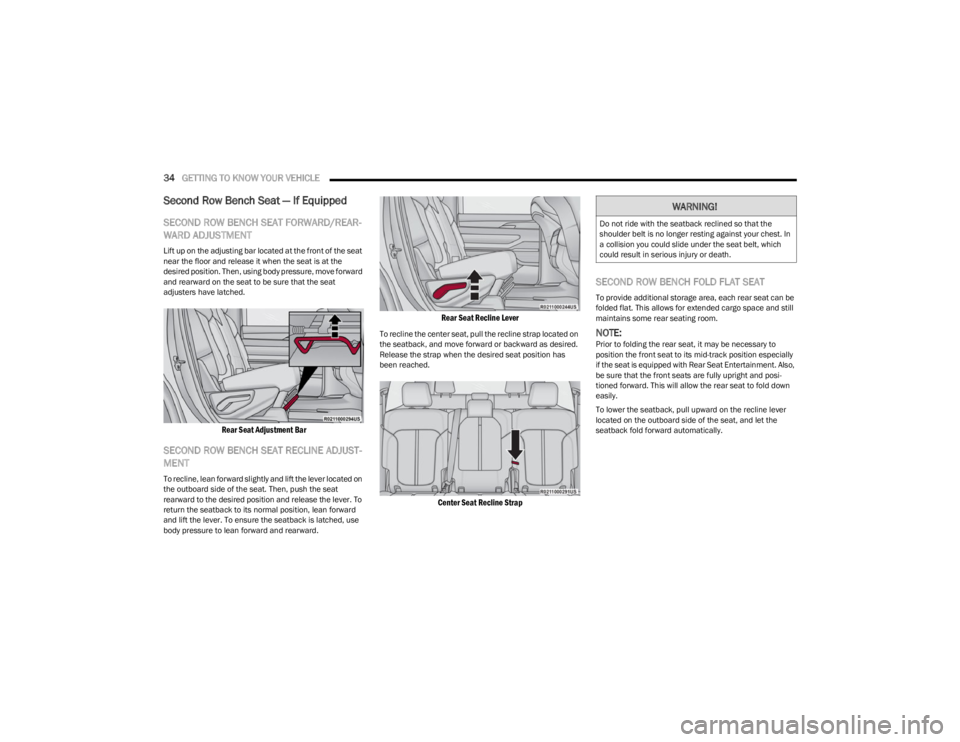
Lift up on the adjusting bar located at the front of the seat
near the floor and release it when the seat is at the
desired position. Then, using body pressure, move forward
and rearward on the seat to be sure that the seat
adjusters have latched.
Rear Seat Adjustment Bar
SECOND ROW BENCH SEAT RECLINE ADJUST -
MENT
To recline, lean forward slightly and lift the lever located on
the outboard side of the seat. Then, push the seat
rearward to the desired position and release the lever. To
return the seatback to its normal position, lean forward
and lift the lever. To ensure the seatback is latched, use
body pressure to lean forward and rearward.
Rear Seat Recline Lever
To recline the center seat, pull the recline strap located on
the seatback, and move forward or backward as desired.
Release the strap when the desired seat position has
been reached.
Center Seat Recline Strap
SECOND ROW BENCH FOLD FLAT SEAT
To provide additional storage area, each rear seat can be
folded flat. This allows for extended cargo space and still
maintains some rear seating room.
NOTE:Prior to folding the rear seat, it may be necessary to
position the front seat to its mid-track position especially
if the seat is equipped with Rear Seat Entertainment. Also,
be sure that the front seats are fully upright and posi -
tioned forward. This will allow the rear seat to fold down
easily.
To lower the seatback, pull upward on the recline lever
located on the outboard side of the seat, and let the
seatback fold forward automatically.
WARNING!
Do not ride with the seatback reclined so that the
shoulder belt is no longer resting against your chest. In
a collision you could slide under the seat belt, which
could result in serious injury or death.
23_WS_OM_EN_USC_t.book Page 34
Page 37 of 396
GETTING TO KNOW YOUR VEHICLE35
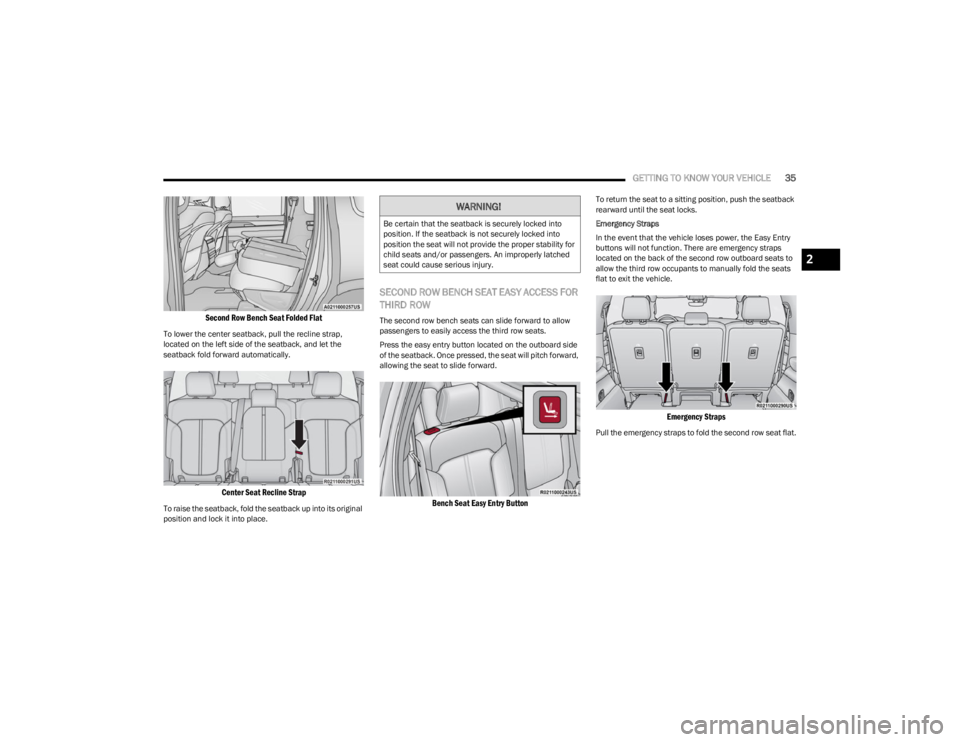
Second Row Bench Seat Folded Flat
To lower the center seatback, pull the recline strap,
located on the left side of the seatback, and let the
seatback fold forward automatically.
Center Seat Recline Strap
To raise the seatback, fold the seatback up into its original
position and lock it into place.
SECOND ROW BENCH SEAT EASY ACCESS FOR
THIRD ROW
The second row bench seats can slide forward to allow
passengers to easily access the third row seats.
Press the easy entry button located on the outboard side
of the seatback. Once pressed, the seat will pitch forward,
allowing the seat to slide forward.
Bench Seat Easy Entry Button
To return the seat to a sitting position, push the seatback
rearward until the seat locks.
Emergency Straps
In the event that the vehicle loses power, the Easy Entry
buttons will not function. There are emergency straps
located on the back of the second row outboard seats to
allow the third row occupants to manually fold the seats
flat to exit the vehicle.
Emergency Straps
Pull the emergency straps to fold the second row seat flat.
WARNING!
Be certain that the seatback is securely locked into
position. If the seatback is not securely locked into
position the seat will not provide the proper stability for
child seats and/or passengers. An improperly latched
seat could cause serious injury.
2
23_WS_OM_EN_USC_t.book Page 35
Page 38 of 396
36GETTING TO KNOW YOUR VEHICLE
Second Row Captain’s Chairs —
If Equipped
SECOND ROW CAPTAIN’S CHAIRS FORWARD/
REARWARD ADJUSTMENT
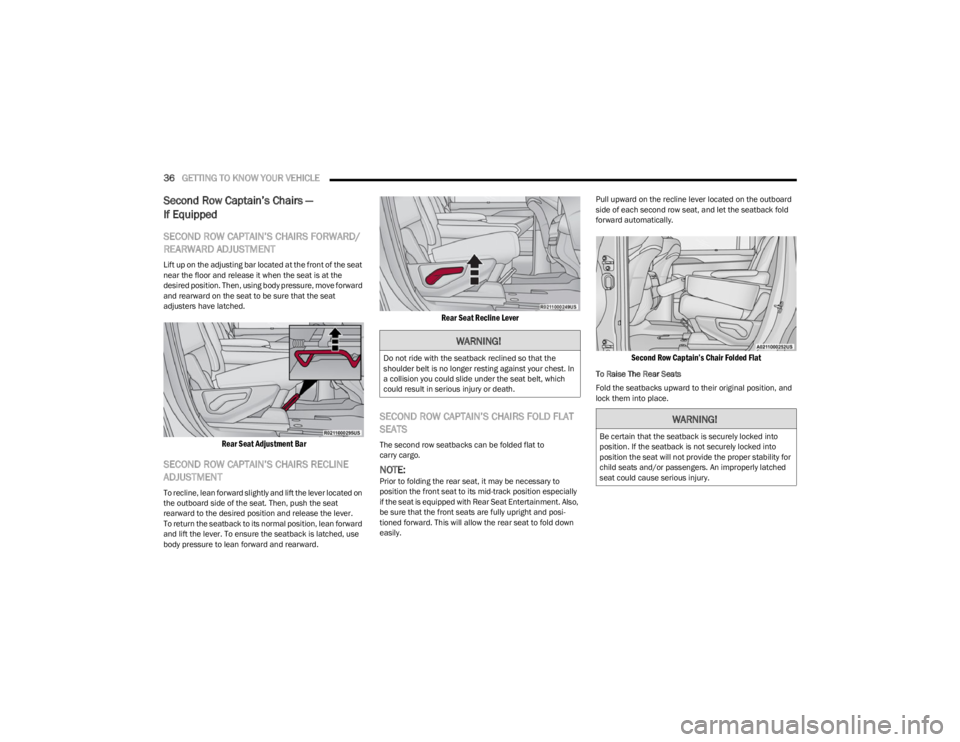
Lift up on the adjusting bar located at the front of the seat
near the floor and release it when the seat is at the
desired position. Then, using body pressure, move forward
and rearward on the seat to be sure that the seat
adjusters have latched.
Rear Seat Adjustment Bar
SECOND ROW CAPTAIN’S CHAIRS RECLINE
ADJUSTMENT
To recline, lean forward slightly and lift the lever located on
the outboard side of the seat. Then, push the seat
rearward to the desired position and release the lever.
To return the seatback to its normal position, lean forward
and lift the lever. To ensure the seatback is latched, use
body pressure to lean forward and rearward.
Rear Seat Recline Lever
SECOND ROW CAPTAIN’S CHAIRS FOLD FLAT
SEATS
The second row seatbacks can be folded flat to
carry cargo.
NOTE:Prior to folding the rear seat, it may be necessary to
position the front seat to its mid-track position especially
if the seat is equipped with Rear Seat Entertainment. Also,
be sure that the front seats are fully upright and posi -
tioned forward. This will allow the rear seat to fold down
easily. Pull upward on the recline lever located on the outboard
side of each second row seat, and let the seatback fold
forward automatically.
Second Row Captain’s Chair Folded Flat
To Raise The Rear Seats
Fold the seatbacks upward to their original position, and
lock them into place.
WARNING!
Do not ride with the seatback reclined so that the
shoulder belt is no longer resting against your chest. In
a collision you could slide under the seat belt, which
could result in serious injury or death.
WARNING!
Be certain that the seatback is securely locked into
position. If the seatback is not securely locked into
position the seat will not provide the proper stability for
child seats and/or passengers. An improperly latched
seat could cause serious injury.
23_WS_OM_EN_USC_t.book Page 36
Page 42 of 396
40GETTING TO KNOW YOUR VEHICLE
When either the (+) or the (–) switch is pushed, the Front
Comfort And Convenience Display Úpage 64 will change
to the Seat menu. The last selected seat item of lumbar
in/out, lumbar up/down, back bolster, or thigh bolster will
be retained. Select the desired adjustment type, and then
press the (+) or (–) switch to adjust.
NOTE:If the Front Comfort And Convenience Display is in the
stowed position, the Seat menu will appear in the main
Uconnect display.
Cushion Extender — If Equipped
In Grand Wagoneer models, the cushion can be extended
forward a couple inches (centimeters) to increase thigh
support. Push the cushion extender switch forward or
rearward to extend or retract the cushion. Release the
switch when the desired position has been reached.
Power Lumbar — If Equipped
The front driver and passenger seats may be equipped
with power lumbar adjustment.
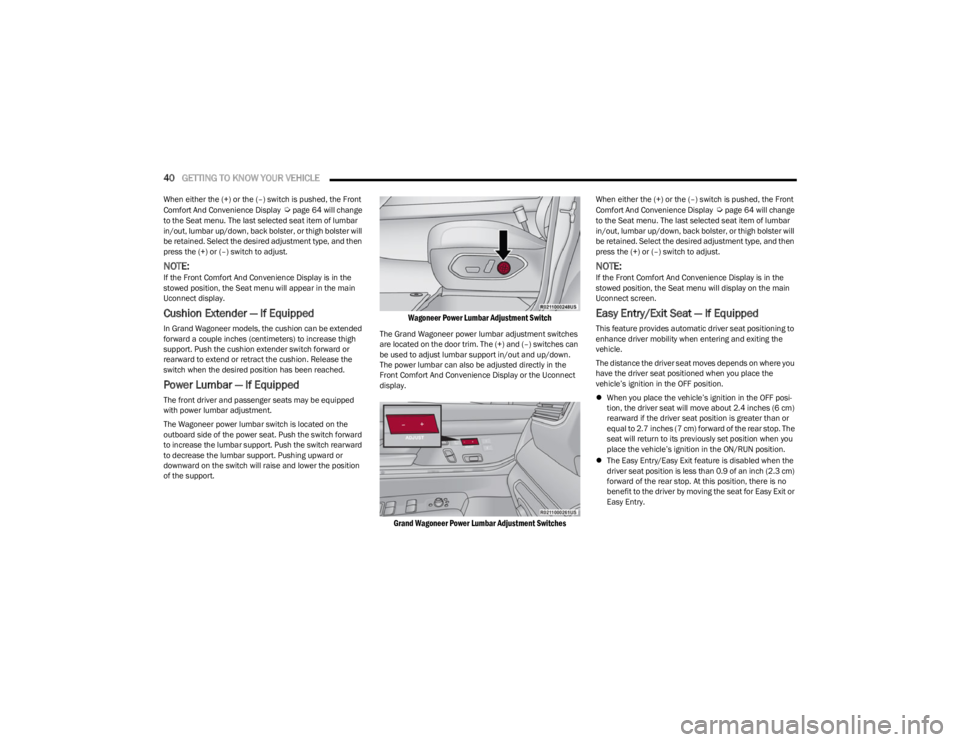
The Wagoneer power lumbar switch is located on the
outboard side of the power seat. Push the switch forward
to increase the lumbar support. Push the switch rearward
to decrease the lumbar support. Pushing upward or
downward on the switch will raise and lower the position
of the support.
Wagoneer Power Lumbar Adjustment Switch
The Grand Wagoneer power lumbar adjustment switches
are located on the door trim. The (+) and (–) switches can
be used to adjust lumbar support in/out and up/down.
The power lumbar can also be adjusted directly in the
Front Comfort And Convenience Display or the Uconnect
display.
Grand Wagoneer Power Lumbar Adjustment Switches
When either the (+) or the (–) switch is pushed, the Front
Comfort And Convenience Display Úpage 64 will change
to the Seat menu. The last selected seat item of lumbar
in/out, lumbar up/down, back bolster, or thigh bolster will
be retained. Select the desired adjustment type, and then
press the (+) or (–) switch to adjust.
NOTE:If the Front Comfort And Convenience Display is in the
stowed position, the Seat menu will display on the main
Uconnect screen.
Easy Entry/Exit Seat — If Equipped
This feature provides automatic driver seat positioning to
enhance driver mobility when entering and exiting the
vehicle.
The distance the driver seat moves depends on where you
have the driver seat positioned when you place the
vehicle’s ignition in the OFF position.
When you place the vehicle’s ignition in the OFF posi -
tion, the driver seat will move about 2.4 inches (6 cm)
rearward if the driver seat position is greater than or
equal to 2.7 inches (7 cm) forward of the rear stop. The
seat will return to its previously set position when you
place the vehicle’s ignition in the ON/RUN position.
The Easy Entry/Easy Exit feature is disabled when the
driver seat position is less than 0.9 of an inch (2.3 cm)
forward of the rear stop. At this position, there is no
benefit to the driver by moving the seat for Easy Exit or
Easy Entry.
23_WS_OM_EN_USC_t.book Page 40
Page 44 of 396
42GETTING TO KNOW YOUR VEHICLE
NOTE:The third row seat belts may interfere with the power
folding of the seat. Place the seat belt webbing behind the
stow clip before stowing or opening the seat. When the
seat is in the desired position, remove the webbing from
the stow clip so that it is ready for use. Never leave the
seat belt in the stow clip when it is used to restrain an
occupant.
NOTE:
The head restraints will lower automatically as neces -
sary when the power seat begins to move Úpage 44.
The head restraint can also be lowered manually using
the pull strap located at the back of the seat.
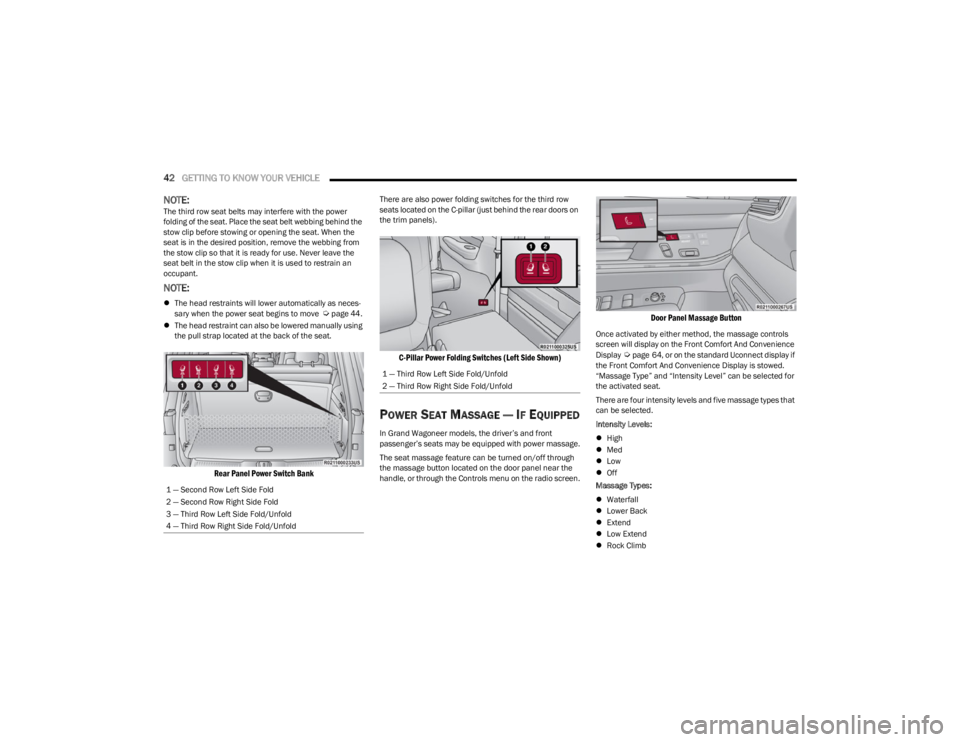
Rear Panel Power Switch Bank
There are also power folding switches for the third row
seats located on the C-pillar (just behind the rear doors on
the trim panels).
C-Pillar Power Folding Switches (Left Side Shown)
POWER SEAT MASSAGE — IF EQUIPPED
In Grand Wagoneer models, the driver’s and front
passenger’s seats may be equipped with power massage.
The seat massage feature can be turned on/off through
the massage button located on the door panel near the
handle, or through the Controls menu on the radio screen.
Door Panel Massage Button
Once activated by either method, the massage controls
screen will display on the Front Comfort And Convenience
Display
Úpage 64, or on the standard Uconnect display if
the Front Comfort And Convenience Display is stowed.
“Massage Type” and “Intensity Level” can be selected for
the activated seat.
There are four intensity levels and five massage types that
can be selected.
Intensity Levels:
High
Med
Low
Off
Massage Types:
Waterfall
Lower Back
Extend
Low Extend
Rock Climb
1 — Second Row Left Side Fold
2 — Second Row Right Side Fold
3 — Third Row Left Side Fold/Unfold
4 — Third Row Right Side Fold/Unfold
1 — Third Row Left Side Fold/Unfold
2 — Third Row Right Side Fold/Unfold
23_WS_OM_EN_USC_t.book Page 42
Page 48 of 396
46GETTING TO KNOW YOUR VEHICLE
(Continued)
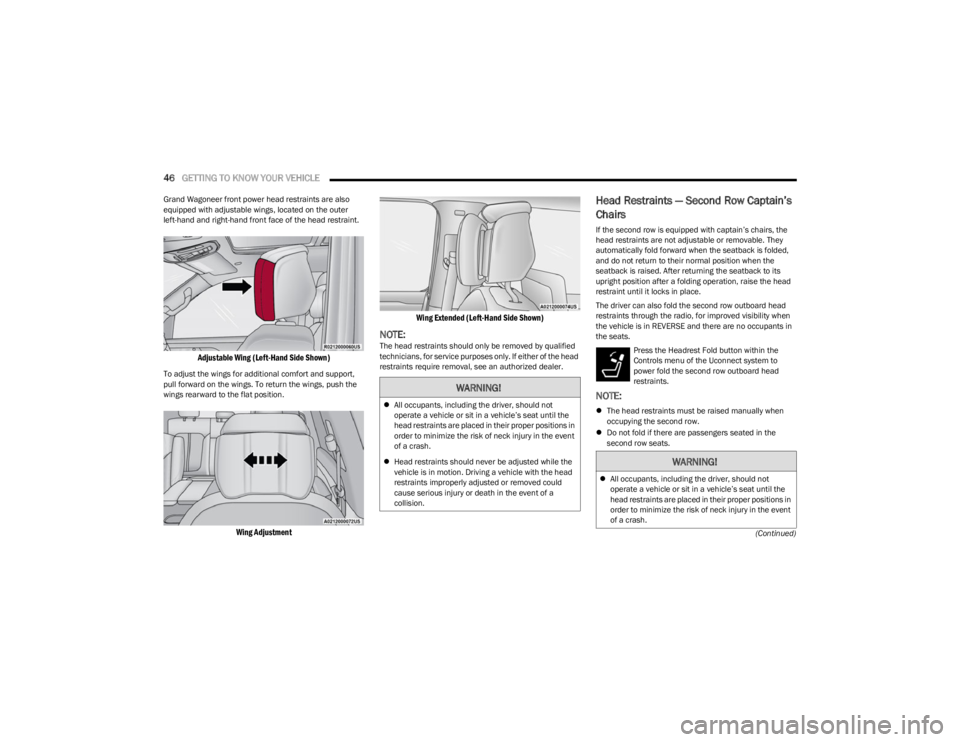
Grand Wagoneer front power head restraints are also
equipped with adjustable wings, located on the outer
left-hand and right-hand front face of the head restraint.
Adjustable Wing (Left-Hand Side Shown)
To adjust the wings for additional comfort and support,
pull forward on the wings. To return the wings, push the
wings rearward to the flat position.
Wing Adjustment
Wing Extended (Left-Hand Side Shown)
NOTE:The head restraints should only be removed by qualified
technicians, for service purposes only. If either of the head
restraints require removal, see an authorized dealer.
Head Restraints — Second Row Captain’s
Chairs
If the second row is equipped with captain’s chairs, the
head restraints are not adjustable or removable. They
automatically fold forward when the seatback is folded,
and do not return to their normal position when the
seatback is raised. After returning the seatback to its
upright position after a folding operation, raise the head
restraint until it locks in place.
The driver can also fold the second row outboard head
restraints through the radio, for improved visibility when
the vehicle is in REVERSE and there are no occupants in
the seats.
Press the Headrest Fold button within the
Controls menu of the Uconnect system to
power fold the second row outboard head
restraints.
NOTE:
The head restraints must be raised manually when
occupying the second row.
Do not fold if there are passengers seated in the
second row seats.
WARNING!
All occupants, including the driver, should not
operate a vehicle or sit in a vehicle’s seat until the
head restraints are placed in their proper positions in
order to minimize the risk of neck injury in the event
of a crash.
Head restraints should never be adjusted while the
vehicle is in motion. Driving a vehicle with the head
restraints improperly adjusted or removed could
cause serious injury or death in the event of a
collision.
WARNING!
All occupants, including the driver, should not
operate a vehicle or sit in a vehicle’s seat until the
head restraints are placed in their proper positions in
order to minimize the risk of neck injury in the event
of a crash.
23_WS_OM_EN_USC_t.book Page 46
Page 49 of 396
GETTING TO KNOW YOUR VEHICLE47
(Continued)
Head Restraints — Second Row Bench
If the second row is equipped with a bench seat, the head
restraints on the outboard seats are not adjustable or
removable. They automatically fold forward when the
seatback is folded, and do not return to their normal
position when the seatback is raised. After returning the
seatback to its upright position after a folding operation,
raise the head restraint until it locks in place.
The driver can also fold the second row outboard head
restraints through the radio, for improved visibility when
the vehicle is in REVERSE, and there are no occupants in
the seats.
Press the Headrest Fold button within the
Controls menu of the Uconnect system to
power fold the second row outboard head
restraints.
NOTE:
The head restraints must be raised manually when
occupying the second row.
Do not fold if there are passengers seated in the
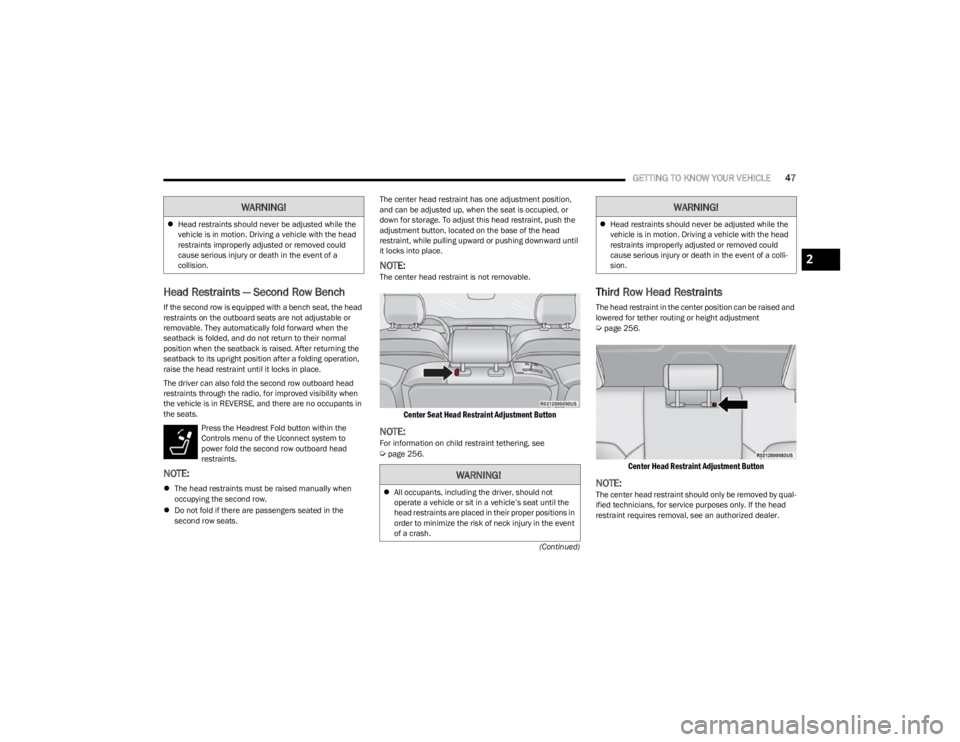
second row seats. The center head restraint has one adjustment position,
and can be adjusted up, when the seat is occupied, or
down for storage. To adjust this head restraint, push the
adjustment button, located on the base of the head
restraint, while pulling upward or pushing downward until
it locks into place.
NOTE:The center head restraint is not removable.
Center Seat Head Restraint Adjustment Button
NOTE:For information on child restraint tethering, see Úpage 256.
Third Row Head Restraints
The head restraint in the center position can be raised and
lowered for tether routing or height adjustment
Úpage 256.
Center Head Restraint Adjustment Button
NOTE:The center head restraint should only be removed by qual
-
ified technicians, for service purposes only. If the head
restraint requires removal, see an authorized dealer.
Head restraints should never be adjusted while the
vehicle is in motion. Driving a vehicle with the head
restraints improperly adjusted or removed could
cause serious injury or death in the event of a
collision.
WARNING!
WARNING!
All occupants, including the driver, should not
operate a vehicle or sit in a vehicle’s seat until the
head restraints are placed in their proper positions in
order to minimize the risk of neck injury in the event
of a crash.
Head restraints should never be adjusted while the
vehicle is in motion. Driving a vehicle with the head
restraints improperly adjusted or removed could
cause serious injury or death in the event of a colli -
sion.
WARNING!
2
23_WS_OM_EN_USC_t.book Page 47
Page 50 of 396
48GETTING TO KNOW YOUR VEHICLE
The third row outboard head restraints are not adjustable
or removable, but can be folded for improved visibility
when the vehicle is in REVERSE, and there are no
occupants in the seats.
Press the Headrest Fold button within the
Controls menu of the Uconnect system to
power fold the third row head restraints.
The head restraints will also automatically fold
when the seatbacks are folded forward using the release
handles on the backs of the seats from the cargo area.
NOTE:
The head restraints must be raised manually when
occupying the third row.
Do not fold if there are passengers seated in the third
row seats.
UCONNECT VOICE RECOGNITION
QUICK TIPS — IF EQUIPPED
INTRODUCING VOICE RECOGNITION
Start using Uconnect Voice Recognition with these helpful
quick tips. It provides the key Voice Commands and tips
you need to know to control your vehicle’s Voice
Recognition (VR) system.
BASIC VOICE COMMANDS
The following basic voice commands can be given at any
point while using your Uconnect system.
Push the VR button or say the vehicle’s Wake Up word
“Hey Uconnect”. The factory default Wake Up word is set
to “Hey Uconnect” and can be reprogrammed through the
Uconnect Settings. After the beep, say:
“Cancel ” to stop a current voice session.
“Help ” to hear a list of suggested Voice Commands.
“Repeat ” to listen to the system prompts again.
Notice the visual cues that inform you of your Voice
Recognition system’s status.
GET STARTED
The VR button is used to activate/deactivate your
Voice Recognition system. You can also use the system’s
Wake Up word to activate voice recognition. The Wake Up
word can be set through the Uconnect Settings
Úpage 197.
Helpful hints for using Voice Recognition:
Reduce background noise. Wind noise and passenger
conversations are examples of noise that may impact
recognition.
Speak clearly at a normal pace and volume while facing
straight ahead.
Each time you give a Voice Command, first push the VR
button or say the Wake Up word, wait until after the
beep, then say your Voice Command.
You can interrupt the help message or system prompts
by pushing the VR button and saying a Voice Command
from the current category.
You can also interrupt the help message or system
prompts by speaking. This feature is called “barge-in”
and can be set through the Uconnect Settings
Úpage 197.
WARNING!
All occupants, including the driver, should not
operate a vehicle or sit in a vehicle’s seat until the
head restraints are placed in their proper positions in
order to minimize the risk of neck injury in the event
of a crash.
Head restraints should never be adjusted while the
vehicle is in motion. Driving a vehicle with the head
restraints improperly adjusted or removed could
cause serious injury or death in the event of a
collision.
23_WS_OM_EN_USC_t.book Page 48
Page 52 of 396
50GETTING TO KNOW YOUR VEHICLE
MIRRORS
INSIDE REARVIEW MIRROR
Automatic Dimming Mirror — If Equipped
The mirror head can be adjusted up, down, left, and right.
The mirror should be adjusted to center on the view
through the rear window.
This mirror automatically adjusts for headlight glare from
vehicles behind you.
NOTE:The Automatic Dimming Mirror feature is disabled when
the vehicle is in REVERSE to improve the driver’s view.
You can turn the feature on or off through the Uconnect
system
Úpage 197.
Automatic Dimming Mirror
Digital Rearview Mirror — If Equipped
The Digital Rearview Mirror provides a high definition,
wide and unobstructed view of the road behind while
driving. Position the mirror in the regular Automatic Dimming
Mirror mode, then activate the Digital Rearview Mirror
mode.
To activate the Digital Rearview Mirror, pull the on/off
control lever on the bottom of the mirror rearward toward
the driver.
Digital Rearview Mirror
Push the menu button next to the on/off control/toggle to
access the following mirror options:
Brightness
Tilt
Use the left and right buttons to scroll through menu
options.
When not in use, push the on/off forward toward the
windshield to return the mirror to the regular Automatic
Dimming Mirror.
NOTE:
The Digital Rearview Mirror is not as effective during
nighttime driving in low light applications due to low
ambient light levels. In the event that it provides the
user with less than expected vision, the mirror can be
reverted to a normal reflective Automatic Dimming
Mirror by pushing the control/toggle forward in the
vehicle and putting the mirror into Automatic Dimming
Mirror mode.
When the rear window washer is activated by pushing
the windshield wiper/washer lever forward, the rear
Back Up and Digital Rearview Mirror (if equipped)
cameras are also washed. For more information, see
Úpage 64.
ILLUMINATED VANITY MIRRORS
To access an illuminated vanity mirror, flip down one of the
visors.
Lift the cover to reveal the mirror. The light will turn on
automatically.
Lift Cover On Vanity Mirror
1 — On/Off Control/Toggle
2 — Menu Button
3 — Left Scroll Button
4 — Right Scroll Button
23_WS_OM_EN_USC_t.book Page 50