driver settings JEEP WAGONEER 2023 User Guide
[x] Cancel search | Manufacturer: JEEP, Model Year: 2023, Model line: WAGONEER, Model: JEEP WAGONEER 2023Pages: 396, PDF Size: 15.17 MB
Page 35 of 396
GETTING TO KNOW YOUR VEHICLE33
LINKING AND UNLINKING THE KEY FOB
T
O MEMORY
Your key fobs can be programmed to recall one of two
saved driver’s side memory profiles.
NOTE:Before programming your key fobs you must select the
“Personal Settings Linked To Key Fob” feature through the
Uconnect Settings
Úpage 197.
To program your key fobs, perform the following:
Wagoneer
1. Place the vehicle’s ignition in the OFF position.
2. Select a desired driver’s side memory profile, 1 or 2.
3. Once the profile has been recalled, push and release the set (S) button on the memory switch.
4. Within five seconds, push and release button (1) or (2) accordingly. “Memory Profile Set” (1 or 2) will
display in the instrument cluster.
5. Push and release the lock button on the key fob within 10 seconds.
NOTE:Your key fobs can be unlinked from your driver’s side
memory settings by pushing the set (S) button, and within
10 seconds, pushing the unlock button on the key fob.
Grand Wagoneer
1. Place the vehicle’s ignition in the OFF position.
2. Recall the desired memory profile (1 or 2). 3. Press the memory button (1) or (2) (according to the
previous selection) for two seconds or more, and
release.
4. Push and hold the lock button on the key fob within 10 seconds.
NOTE:Your key fobs can be unlinked from your driver’s side
memory settings by pushing the memory button (1) or (2)
for two seconds or more and releasing, and then within 10
seconds, pushing and holding the unlock button on the
key fob.
MEMORY POSITION RECALL
NOTE:Memory Recall is available when not in PARK, if the
vehicle speed is below 5 mph (8 km/h).
To recall a memory settings using the memory
switches, push memory button (1) or (2) on the
memory switch.
To recall the driver’s side memory settings using the
key fob, push the unlock button on the key fob linked
to memory position 1 or 2.
A recall can be canceled by pushing any of the memory
buttons during a recall, or by pushing any of the seat
adjustment switches. When a recall is canceled, the seat
and power tilt/telescopic steering column will stop
moving. A delay of one second will occur before another
recall can be selected.
SEATS
Seats are a part of the Occupant Restraint system of the
vehicle.
MANUAL ADJUSTMENT (REAR SEATS)
NOTE:You may experience deformation in the seat cushion from
the seat belt buckles if the seats are left folded for an
extended period of time. This is normal and by simply
unfolding the seats to the open position, over time the
seat cushion will return to its normal shape.
WARNING!
It is dangerous to ride in a cargo area, inside or
outside of a vehicle. In a collision, people riding in
these areas are more likely to be seriously injured or
killed.
Do not allow people to ride in any area of your vehicle
that is not equipped with seats and seat belts. In a
collision, people riding in these areas are more likely
to be seriously injured or killed.
Be sure everyone in your vehicle is in a seat and
using a seat belt properly.
WARNING!
Do not pile luggage or cargo higher than the top of the
seatback. This could impair visibility or become a
dangerous projectile in a sudden stop or collision.
2
23_WS_OM_EN_USC_t.book Page 33
Page 46 of 396

44GETTING TO KNOW YOUR VEHICLE
The level of heat selected will stay on until the operator
changes it.
NOTE:The engine must be running for the heated seats to
operate.
VENTILATED SEATS — IF EQUIPPED
Located in the seat cushion and seatback are fans that
draw the air from the passenger compartment and move
air through fine perforations in the seat cover to help keep
the occupant cooler in higher ambient temperatures.
Front Ventilated Seats
The ventilated seats control buttons are
located on the sides of the radio or within the
Uconnect system. The fans operate at three
speeds: HI, MED and LO.
Press the ventilated seat button once to choose HI.
Press the ventilated seat button a second time to
choose MED.
Press the ventilated seat button a third time to choose
LO.
Press the ventilated seat button a fourth time to turn
the ventilation off.
The fans can be turned on in the seatback only, seat
cushion only, or both. Press the seat image on the
touchscreen or push the seat zone button on the side of
the radio to cycle through these seat zones. An LED will
illuminate next to the selected zone(s). If equipped with
touchscreen buttons, the selected zones will be
highlighted on the seat image.
NOTE:The engine must be running for the ventilated seats to
operate.
For information on use with the Remote Start system, see
Úpage 23.
Rear Ventilated Seats — If Equipped
The two second row outboard seats may be
equipped with ventilated seats. The rear
ventilated seat control switches are located on
the rear of the center console and allow the
rear passengers to operate the seats independently.
If equipped with a Rear Comfort And Convenience Display,
ventilated seat settings can be selected within the display
Úpage 69.
You can choose from HI, MED, LO, or OFF fan speed.
Indicator lights in each switch illuminate indicating the
level of fan speed in use.
Push the ventilated seat switch once to choose HI.
Push the ventilated seat switch a second time to
choose MED.
Push the ventilated seat switch a third time to choose
LO.
Push the ventilated seat switch a fourth time to turn
the ventilation off.
NOTE:The engine must be running for the ventilated seats to
operate.
HEAD RESTRAINTS
Head restraints are designed to reduce the risk of injury by
restricting head movement in the event of a rear impact.
Head restraints should be adjusted so that the top of the
head restraint is located above the top of your ear.
Front Head Restraints
Your vehicle is equipped with front four-way driver and
passenger head restraints.
The Wagoneer is equipped with manual four-way head
restraints, and the Grand Wagoneer is equipped with
power four-way head restraints with adjustable wings.
If your vehicle is equipped with manual front head
restraints, to raise the head restraint, push the
adjustment button, located on the left side of the head
restraint, and pull upward on the head restraint. To lower
the head restraint, push the adjustment button, and push
downward on the head restraint.
WARNING!
All occupants, including the driver, should not
operate a vehicle or sit in a vehicle’s seat until the
head restraints are placed in their proper positions in
order to minimize the risk of neck injury in the event
of a crash.
Head restraints should never be adjusted while the
vehicle is in motion. Driving a vehicle with the head
restraints improperly adjusted or removed could
cause serious injury or death in the event of a
collision.
23_WS_OM_EN_USC_t.book Page 44
Page 50 of 396
48GETTING TO KNOW YOUR VEHICLE
The third row outboard head restraints are not adjustable
or removable, but can be folded for improved visibility
when the vehicle is in REVERSE, and there are no
occupants in the seats.
Press the Headrest Fold button within the
Controls menu of the Uconnect system to
power fold the third row head restraints.
The head restraints will also automatically fold
when the seatbacks are folded forward using the release
handles on the backs of the seats from the cargo area.
NOTE:
The head restraints must be raised manually when
occupying the third row.
Do not fold if there are passengers seated in the third
row seats.
UCONNECT VOICE RECOGNITION
QUICK TIPS — IF EQUIPPED
INTRODUCING VOICE RECOGNITION
Start using Uconnect Voice Recognition with these helpful
quick tips. It provides the key Voice Commands and tips
you need to know to control your vehicle’s Voice
Recognition (VR) system.
BASIC VOICE COMMANDS
The following basic voice commands can be given at any
point while using your Uconnect system.
Push the VR button or say the vehicle’s Wake Up word
“Hey Uconnect”. The factory default Wake Up word is set
to “Hey Uconnect” and can be reprogrammed through the
Uconnect Settings. After the beep, say:
“Cancel ” to stop a current voice session.
“Help ” to hear a list of suggested Voice Commands.
“Repeat ” to listen to the system prompts again.
Notice the visual cues that inform you of your Voice
Recognition system’s status.
GET STARTED
The VR button is used to activate/deactivate your
Voice Recognition system. You can also use the system’s
Wake Up word to activate voice recognition. The Wake Up
word can be set through the Uconnect Settings
Úpage 197.
Helpful hints for using Voice Recognition:
Reduce background noise. Wind noise and passenger
conversations are examples of noise that may impact
recognition.
Speak clearly at a normal pace and volume while facing
straight ahead.
Each time you give a Voice Command, first push the VR
button or say the Wake Up word, wait until after the
beep, then say your Voice Command.
You can interrupt the help message or system prompts
by pushing the VR button and saying a Voice Command
from the current category.
You can also interrupt the help message or system
prompts by speaking. This feature is called “barge-in”
and can be set through the Uconnect Settings
Úpage 197.
WARNING!
All occupants, including the driver, should not
operate a vehicle or sit in a vehicle’s seat until the
head restraints are placed in their proper positions in
order to minimize the risk of neck injury in the event
of a crash.
Head restraints should never be adjusted while the
vehicle is in motion. Driving a vehicle with the head
restraints improperly adjusted or removed could
cause serious injury or death in the event of a
collision.
23_WS_OM_EN_USC_t.book Page 48
Page 51 of 396
GETTING TO KNOW YOUR VEHICLE49
Uconnect Voice Command Buttons
ADDITIONAL INFORMATION
© 2022 FCA US LLC. All rights reserved. Mopar and
Uconnect are registered trademarks and Mopar Owner
Connect is a trademark of FCA US LLC. SiriusXM® and all
related marks and logos are trademarks of SiriusXM®
Radio Inc.
Úpage 382.
For Uconnect system support, call 1-877-855-8400
(24 hours a day 7 days a week) or visit DriveUconnect.com
(US) or DriveUconnect.ca (Canada).
DRIVER ADJUSTABLE PEDALS
The adjustable pedals system is designed to allow a
greater range of driver comfort for steering wheel tilt and
seat position. This feature allows the brake and
accelerator pedals to move toward or away from the driver
to provide improved position with the steering wheel.
The adjustable pedal switch is located on the instrument
panel, next to the headlight switch.
Adjustable Pedals Switch
The pedals can be adjusted with the ignition in the OFF
position.
The pedals cannot be adjusted when the vehicle is in
REVERSE or when the Cruise Control system or Adap -
tive Cruise Control system is on. If there is an attempt
to adjust the pedals when the system is locked out, the
following messages will appear:
Adjustable Pedal Disabled — Cruise Control
Engaged
Adjustable Pedal Disabled — Vehicle In Reverse
NOTE:
Always adjust the pedals to a position that allows full
movement of the pedal.
Further small adjustments may be necessary to find
the best possible seat/pedal position.
For vehicles equipped with Driver Memory Settings
Úpage 31, you can use your key fob or the memory
switch on the driver’s door trim panel to return the
adjustable pedals to saved positions.
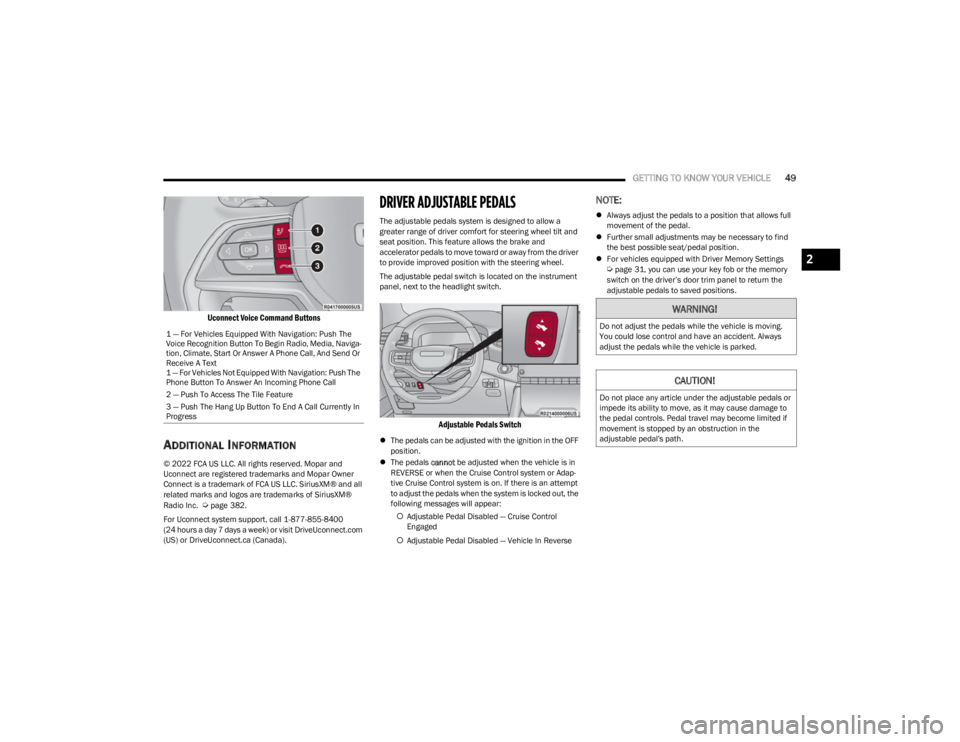
1 — For Vehicles Equipped With Navigation: Push The
Voice Recognition Button To Begin Radio, Media, Naviga -
tion, Climate, Start Or Answer A Phone Call, And Send Or
Receive A Text
1 — For Vehicles Not Equipped With Navigation: Push The
Phone Button To Answer An Incoming Phone Call
2 — Push To Access The Tile Feature
3 — Push The Hang Up Button To End A Call Currently In
Progress
WARNING!
Do not adjust the pedals while the vehicle is moving.
You could lose control and have an accident. Always
adjust the pedals while the vehicle is parked.
CAUTION!
Do not place any article under the adjustable pedals or
impede its ability to move, as it may cause damage to
the pedal controls. Pedal travel may become limited if
movement is stopped by an obstruction in the
adjustable pedal's path.
2
23_WS_OM_EN_USC_t.book Page 49
Page 54 of 396
52GETTING TO KNOW YOUR VEHICLE
POWER MIRRORS
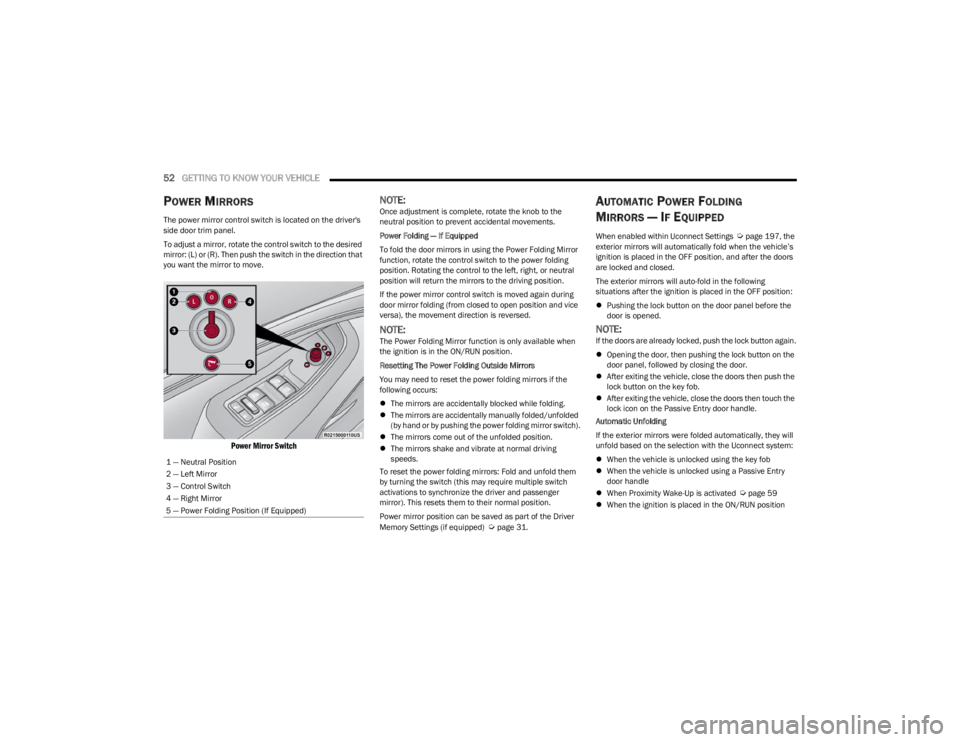
The power mirror control switch is located on the driver's
side door trim panel.
To adjust a mirror, rotate the control switch to the desired
mirror: (L) or (R). Then push the switch in the direction that
you want the mirror to move.
Power Mirror Switch
NOTE:Once adjustment is complete, rotate the knob to the
neutral position to prevent accidental movements.
Power Folding — If Equipped
To fold the door mirrors in using the Power Folding Mirror
function, rotate the control switch to the power folding
position. Rotating the control to the left, right, or neutral
position will return the mirrors to the driving position.
If the power mirror control switch is moved again during
door mirror folding (from closed to open position and vice
versa), the movement direction is reversed.
NOTE:The Power Folding Mirror function is only available when
the ignition is in the ON/RUN position.
Resetting The Power Folding Outside Mirrors
You may need to reset the power folding mirrors if the
following occurs:
The mirrors are accidentally blocked while folding.
The mirrors are accidentally manually folded/unfolded
(by hand or by pushing the power folding mirror switch).
The mirrors come out of the unfolded position.
The mirrors shake and vibrate at normal driving
speeds.
To reset the power folding mirrors: Fold and unfold them
by turning the switch (this may require multiple switch
activations to synchronize the driver and passenger
mirror). This resets them to their normal position.
Power mirror position can be saved as part of the Driver
Memory Settings (if equipped)
Úpage 31.
AUTOMATIC POWER FOLDING
M
IRRORS — IF EQUIPPED
When enabled within Uconnect Settings Úpage 197, the
exterior mirrors will automatically fold when the vehicle’s
ignition is placed in the OFF position, and after the doors
are locked and closed.
The exterior mirrors will auto-fold in the following
situations after the ignition is placed in the OFF position:
Pushing the lock button on the door panel before the
door is opened.
NOTE:If the doors are already locked, push the lock button again.
Opening the door, then pushing the lock button on the
door panel, followed by closing the door.
After exiting the vehicle, close the doors then push the
lock button on the key fob.
After exiting the vehicle, close the doors then touch the
lock icon on the Passive Entry door handle.
Automatic Unfolding
If the exterior mirrors were folded automatically, they will
unfold based on the selection with the Uconnect system:
When the vehicle is unlocked using the key fob
When the vehicle is unlocked using a Passive Entry
door handle
When Proximity Wake-Up is activated
Úpage 59
When the ignition is placed in the ON/RUN position
1 — Neutral Position
2 — Left Mirror
3 — Control Switch
4 — Right Mirror
5 — Power Folding Position (If Equipped)
23_WS_OM_EN_USC_t.book Page 52
Page 61 of 396
GETTING TO KNOW YOUR VEHICLE59
PARKING LIGHTS AND PANEL LIGHTS
To turn on the parking lights and instrument panel lights,
rotate the headlight switch clockwise. To turn off the
parking lights, rotate the headlight switch back to the O
(off) position.
NOTE:Vehicles sold in Canada are equipped with a headlight
switch with an AUTO and ON detent but without an OFF
detent. Headlights will be deactivated when the headlight
switch is placed in the parking lights position. However,
the Daytime Running Lights (DRLs) will be activated along
with the front and rear marker lights. The DRLs may be
deactivated when the parking brake is engaged.
HEADLIGHTS ON AUTOMATICALLY WITH
W
IPERS
If your vehicle is equipped with Automatic Headlights, it
also has this customer-programmable feature. When your
headlights are in the automatic mode and the engine is
running, they will automatically turn on when the wiper
system is on. This feature is programmable through the
Uconnect system
Úpage 197.
NOTE:When your headlights come on during the daytime, the
vehicle will monitor outside brightness and decide if the
instrument panel needs to be dimmed or not
Úpage 60.
HEADLIGHT ILLUMINATION ON
A
PPROACH
When enabled, the headlights, exterior door handle
pocket lights (if equipped), and interior lights will
illuminate when the unlock button on the key fob is
pushed as the operator is approaching the vehicle. This
feature can be turned on/off, and the length of time the
headlights stay on can be programmed for up to
90 seconds within Uconnect Settings
Úpage 197.
Proximity Wake-Up — If Equipped
This feature is enabled/disabled within the Uconnect
system, and is activated when the operator approaches
the driver’s door, passenger’s door, or liftgate with a valid
key fob on their person. Some exterior and interior lights
will illuminate in order to provide an increased sense of
welcome and security as the operator approaches the
vehicle in the dark. “Headlight Illumination On Approach”
must be selected and set to a time value other than zero
within Uconnect Settings for Proximity Wake-Up to
activate.
The doors may be locked or unlocked for this feature to
activate, as long as the ignition is in the OFF position, or
during a Remote Start event. It will not activate if the doors
are locked and the ignition was placed in the ON/RUN
position.
NOTE:Proximity Wake-Up may not activate under the following
conditions:
After numerous consecutive activations, in order to
conserve the vehicle’s battery
After the vehicle’s engine has been off for several days Headlight Animation — If Equipped
When “Headlight Illumination On Approach” is turned on,
and set to a time value above zero, the exterior lights
illuminate in a theatrical manner during approach to the
vehicle. This feature is activated in the following
situations:
Proximity Wake-Up (if equipped) is activated
Remote Start is activated
The unlock button on the key fob is pushed
NOTE:For Headlight Animation to activate with Remote Start or
with the push of the unlock button, “Greeting Lights” must
also be selected within the Uconnect system.
HEADLIGHT DELAY
To aid in your exit, your vehicle is equipped with a
headlight delay that will leave the headlights on for
approximately 90 seconds. This delay is initiated when the
ignition is placed in the OFF position while the headlight
switch is on, and then the headlight switch is cycled off.
Headlight delay can be canceled by either turning the
headlight switch on then off, or by placing the ignition in
the ON position.
NOTE:The headlight delay time is programmable through
Uconnect Settings Úpage 197.
LIGHTS-ON REMINDER
If the headlights or parking lights are left on after the
ignition is placed in the OFF position, a chime will sound
when the driver’s door is opened.
2
23_WS_OM_EN_USC_t.book Page 59
Page 68 of 396

66GETTING TO KNOW YOUR VEHICLE
MAX Defrost Button
Press the MAX Defrost button on the
touchscreen, or push the toggle switch on the
faceplate down, to change the current airflow
setting to Defrost mode. The indicator
illuminates when this feature is on. Performing this
function will cause the automatic climate controls to
change to manual mode.
When MAX Defrost mode is selected:
The blower speed increases to full (all LEDs on)
Air conditioning compressor is turned on (LED on)
Both driver and passenger temperature controls are
set to HI
Defrost mode is selected (LED on)
Rear defroster is turned on (LED on)
Air recirculation is turned off (LED off)
If MAX Defrost mode is turned off, the Climate Control
system will return to the previous setting.
Rear Defrost Button
Press and release the button on the
touchscreen, or push the toggle switch on the
faceplate down, to turn on the rear window
defroster and the heated outside mirrors (if
equipped). The Rear Defrost indicator illuminates when
the rear window defroster is on. The rear window defroster
automatically turns off after 10 minutes.
Driver And Passenger Temperature
Switches
These toggle switches provide the driver and passenger
with independent temperature control by pushing the
single switch upward or downward.
Instrument Panel Toggle Switches
Push upward on the driver’s or passenger’s
side toggle switch on the faceplate, or press
and slide the temperature bar towards the red
arrow button on the touchscreen for warmer
temperature settings.
Push downward the driver’s or passenger’s
side toggle switch on the faceplate, or press
and slide the temperature bar towards the blue
arrow button on the touchscreen for cooler
temperature settings.
SYNC Button
Press the SYNC button on the touchscreen to
turn the SYNC feature on/off. The SYNC
indicator illuminates when SYNC is on. SYNC is
used to synchronize the front passenger
temperature and rear passenger temperature, mode, and
blower settings with the driver temperature, mode, and
blower settings.
CAUTION!
Failure to follow these cautions can cause damage to
the heating elements:
Use care when washing the inside of the rear
window. Do not use abrasive window cleaners on the
interior surface of the window. Use a soft cloth and a
mild washing solution, wiping parallel to the heating
elements. Labels can be peeled off after soaking
with warm water.
Do not use scrapers, sharp instruments, or abrasive
window cleaners on the interior surface of the
window.
Keep all objects a safe distance from the window.
23_WS_OM_EN_USC_t.book Page 66
Page 70 of 396
68GETTING TO KNOW YOUR VEHICLE
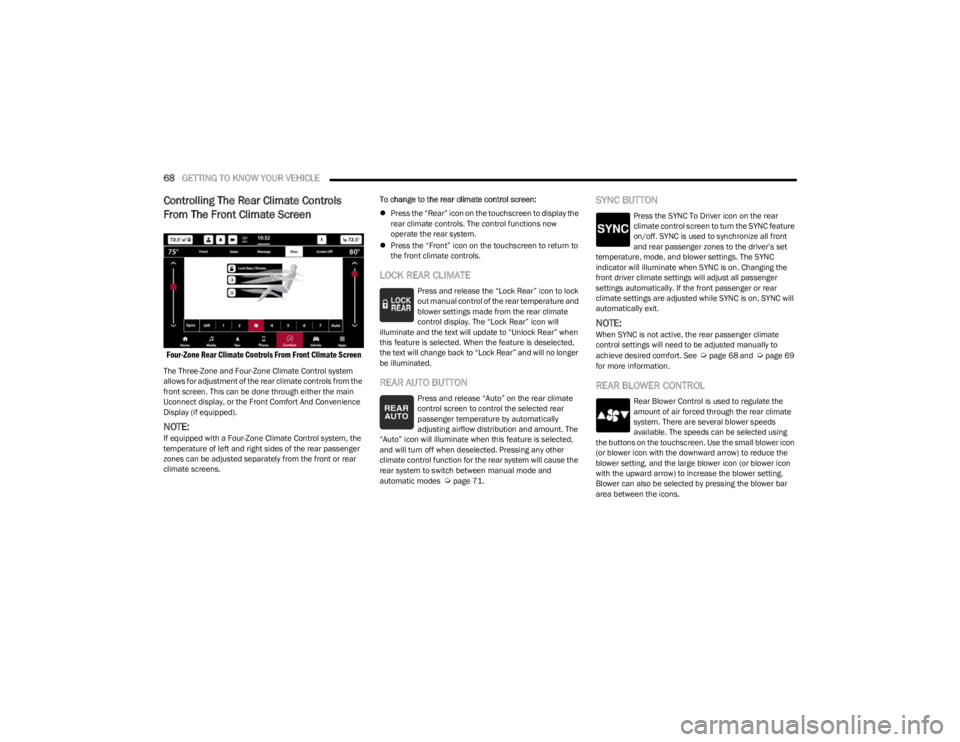
Controlling The Rear Climate Controls
From The Front Climate Screen
Four-Zone Rear Climate Controls From Front Climate Screen
The Three-Zone and Four-Zone Climate Control system
allows for adjustment of the rear climate controls from the
front screen. This can be done through either the main
Uconnect display, or the Front Comfort And Convenience
Display (if equipped).
NOTE:If equipped with a Four-Zone Climate Control system, the
temperature of left and right sides of the rear passenger
zones can be adjusted separately from the front or rear
climate screens. To change to the rear climate control screen:
Press the “Rear” icon on the touchscreen to display the
rear climate controls. The control functions now
operate the rear system.
Press the “Front” icon on the touchscreen to return to
the front climate controls.
LOCK REAR CLIMATE
Press and release the “Lock Rear” icon to lock
out manual control of the rear temperature and
blower settings made from the rear climate
control display. The “Lock Rear” icon will
illuminate and the text will update to “Unlock Rear” when
this feature is selected. When the feature is deselected,
the text will change back to “Lock Rear” and will no longer
be illuminated.
REAR AUTO BUTTON
Press and release “Auto” on the rear climate
control screen to control the selected rear
passenger temperature by automatically
adjusting airflow distribution and amount. The
“Auto” icon will illuminate when this feature is selected,
and will turn off when deselected. Pressing any other
climate control function for the rear system will cause the
rear system to switch between manual mode and
automatic modes
Úpage 71.
SYNC BUTTON
Press the SYNC To Driver icon on the rear
climate control screen to turn the SYNC feature
on/off. SYNC is used to synchronize all front
and rear passenger zones to the driver’s set
temperature, mode, and blower settings. The SYNC
indicator will illuminate when SYNC is on. Changing the
front driver climate settings will adjust all passenger
settings automatically. If the front passenger or rear
climate settings are adjusted while SYNC is on, SYNC will
automatically exit.
NOTE:When SYNC is not active, the rear passenger climate
control settings will need to be adjusted manually to
achieve desired comfort. See
Úpage 68 and Úpage 69
for more information.
REAR BLOWER CONTROL
Rear Blower Control is used to regulate the
amount of air forced through the rear climate
system. There are several blower speeds
available. The speeds can be selected using
the buttons on the touchscreen. Use the small blower icon
(or blower icon with the downward arrow) to reduce the
blower setting, and the large blower icon (or blower icon
with the upward arrow) to increase the blower setting.
Blower can also be selected by pressing the blower bar
area between the icons.
23_WS_OM_EN_USC_t.book Page 68
Page 73 of 396
GETTING TO KNOW YOUR VEHICLE71
REAR CLIMATE CONTROL OFF
To turn the rear climate controls off, push the
OFF button below the rear climate control
display, or if equipped, press and release the
OFF button on the Rear Comfort And
Convenience Display touchscreen, near the blower
buttons.
AUTOMATIC TEMPERATURE CONTROL
(ATC)
Automatic Operation
1. Push the AUTO button on the front climate control
display, and the word “AUTO” will illuminate along
with two temperatures for the driver and front
passenger. The system will then automatically
regulate the amount of airflow.
2. Adjust the temperature you would like the system to maintain, by adjusting the driver, passenger, and rear
temperatures. Once the desired temperature is
displayed, the system will achieve, and automatically
maintain, that comfort level.
3. When the system is set up for your comfort level, it is not necessary to change the settings. You will
experience the greatest efficiency by simply allowing
the system to function automatically.
NOTE:It is not necessary to move the temperature settings. The
system automatically adjusts the temperature, mode, and
fan speed to provide comfort as quickly as possible. To provide you with maximum comfort in the automatic
mode during cold start-ups, the blower fan will remain on
low until the engine warms up. The fan will engage
immediately if the Defrost mode is selected, or by
changing the front blower setting.
Manual Operation Override
This system offers a full complement of manual override
features. The AUTO symbol in the front climate control
display will no longer be illuminated when the system is
being used in the manual mode.
NOTE:The system will not automatically sense the presence of
fog, mist or ice on the windshield. Defrost mode must be
manually selected to clear the windshield and side glass.
CLIMATE VOICE RECOGNITION
Adjust vehicle temperatures hands-free and keep
everyone comfortable while you keep moving ahead (If
vehicle is equipped with climate control).
Push the VR/Phone button . After the beep, say one of
the following commands:
“Set the driver temperature to 70 degrees”
“Set the passenger temperature to 70 degrees”
Did You Know: Voice Command for Climate may only be
used to adjust the interior temperature of your vehicle.
Voice Command will not work to adjust the heated seats
or steering wheel if equipped.
OPERATING TIPS
Refer to the chart at the end of this section for suggested
control settings for various weather conditions.
Summer Operation
The engine cooling system must be protected with a
high-quality antifreeze coolant to provide proper corrosion
protection and to protect against engine overheating. OAT
coolant (conforming to MS.90032) is recommended.
Winter Operation
To ensure the best possible heater and defroster
performance, make sure the engine cooling system is
functioning properly and the proper amount, type, and
concentration of coolant is used. Use of the Air
Recirculation mode during Winter months is not
recommended, because it may cause window fogging.
Vacation/Storage
For information on maintaining the Climate Control system
when the vehicle is being stored for an extended period of
time, see
Úpage 368.
CAUTION!
Interior air enters the Rear Climate Control system
through an intake grille, located in the right side trim
panel behind the third row seats. The heater outlets are
located in the right side trim panel, just behind the rear
doors. Do not block or place objects directly in front of
the inlet grille or heater outlets. The electrical system
could overload causing damage to the blower motor.
2
23_WS_OM_EN_USC_t.book Page 71
Page 88 of 396
86GETTING TO KNOW YOUR VEHICLE
CLOSING THE HOOD
In one continuous motion, pull down on the front edge of
the hood with moderate force until the angle is below the
crossover point (where the gas props are no longer
resisting) and let the hood continue to fall closed from its
own inertia.
LIFTGATE
TO UNLOCK/OPEN THE LIFTGATE
The power liftgate may be opened by pushing the liftgate
button on the key fob, pushing the liftgate button in the
cargo area, or by pushing the electronic liftgate release
handle
Úpage 167.
Push the liftgate button on the key fob twice within five
seconds to open the power liftgate. Once the liftgate is
open, pushing the button twice within five seconds a
second time will close the liftgate.
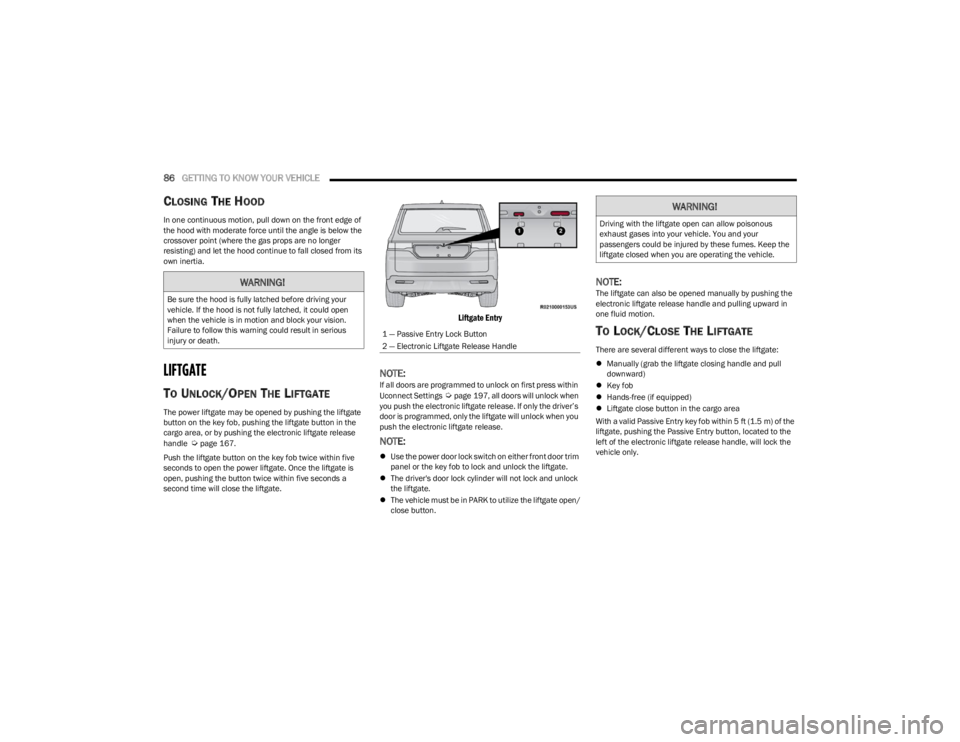
Liftgate Entry
NOTE:If all doors are programmed to unlock on first press within
Uconnect Settings Úpage 197, all doors will unlock when
you push the electronic liftgate release. If only the driver’s
door is programmed, only the liftgate will unlock when you
push the electronic liftgate release.
NOTE:
Use the power door lock switch on either front door trim
panel or the key fob to lock and unlock the liftgate.
The driver's door lock cylinder will not lock and unlock
the liftgate.
The vehicle must be in PARK to utilize the liftgate open/
close button.
NOTE:The liftgate can also be opened manually by pushing the
electronic liftgate release handle and pulling upward in
one fluid motion.
TO LOCK/CLOSE THE LIFTGATE
There are several different ways to close the liftgate:
Manually (grab the liftgate closing handle and pull
downward)
Key fob
Hands-free (if equipped)
Liftgate close button in the cargo area
With a valid Passive Entry key fob within 5 ft (1.5 m) of the liftgate, pushing the Passive Entry button, located to the
left of the electronic liftgate release handle, will lock the
vehicle only.
WARNING!
Be sure the hood is fully latched before driving your
vehicle. If the hood is not fully latched, it could open
when the vehicle is in motion and block your vision.
Failure to follow this warning could result in serious
injury or death.
1 — Passive Entry Lock Button
2 — Electronic Liftgate Release Handle
WARNING!
Driving with the liftgate open can allow poisonous
exhaust gases into your vehicle. You and your
passengers could be injured by these fumes. Keep the
liftgate closed when you are operating the vehicle.
23_WS_OM_EN_USC_t.book Page 86