start stop button JEEP WAGONEER 2023 User Guide
[x] Cancel search | Manufacturer: JEEP, Model Year: 2023, Model line: WAGONEER, Model: JEEP WAGONEER 2023Pages: 396, PDF Size: 15.17 MB
Page 122 of 396

120STARTING AND OPERATING
4. If the gear selector is not in PARK and the ENGINE
START/STOP button is pushed once with the vehicle
speed above 5 mph (8 km/h), the instrument cluster will display a ‚Äú Vehicle Not In Park ‚ÄĚ message and the
engine will remain running. Never leave a vehicle out
of the PARK position, or it could roll.
NOTE:If the gear selector is not in PARK, and the ENGINE START/
STOP button is pushed once with the vehicle speed below
5 mph (8 km/h), the engine will shut off and the ignition
will remain in the ON/RUN position. If vehicle speed drops
below 1.2 mph (1.9 km/h), the vehicle may AutoPark
√öpage 120.
ENGINE START/STOP Button Functions ‚ÄĒ With Driver‚Äôs
Foot Off The Brake Pedal (In PARK Or NEUTRAL Position)
The ENGINE START/STOP button operates similar to an
ignition switch. It has two positions: OFF, and RUN. To
change the ignition positions without starting the vehicle
and use the accessories, follow these directions:
1. Start with the ignition in the OFF position.
2. Push the ENGINE START/STOP button once to place the ignition in the ON/RUN position.
3. Push the ENGINE START/STOP button a second time to return the ignition to the OFF position.
NOTE:Only press one pedal at a time while driving the vehicle.
Torque performance of the vehicle could be reduced if
both pedals are pressed at the same time. If pressure is
detected on both pedals simultaneously, a warning
message will display in the instrument cluster
√öpage 96.
AUTOPARK
AutoPark is a supplemental feature to assist in placing the
vehicle in PARK (P) should the situations on the following
pages occur. It is a back-up system and should not be
relied upon as the primary method by which the driver
shifts the vehicle into PARK.
The conditions under which AutoPark will engage are
outlined on the following pages.
If the vehicle is not in PARK and the driver turns off the
engine, the vehicle may AutoPark.
AutoPark will engage when all of these conditions are met:
ÔĀ¨Vehicle is equipped with an 8-speed transmission
ÔĀ¨ Vehicle is not in PARK
ÔĀ¨ Vehicle speed is 1.2 mph (1.9 km/h) or less
ÔĀ¨ Ignition is switched from RUN to OFF
NOTE:For Keyless Enter ‚Äėn Go‚ĄĘ equipped vehicles, the engine
will turn off and the ignition switch will change to ON/RUN
position. After 30 minutes the ignition switches to OFF
automatically, unless the driver turns the ignition
switch OFF.
If the vehicle is not in PARK and the driver exits the vehicle
with the engine running, the vehicle may AutoPark.
AutoPark will engage when all of these conditions are met:
ÔĀ¨Vehicle is equipped with an 8-speed transmission
ÔĀ¨ Vehicle is not in PARK
ÔĀ¨ Vehicle speed is 1.2 mph (1.9 km/h) or less
ÔĀ¨ Driver‚Äôs seat belt is unbuckled
ÔĀ¨ Driver‚Äôs door is ajar
ÔĀ¨ Brake pedal is not pressed
The message “ AutoPark Engaged Shift To P Then Shift To
Gear ‚ÄĚ will display in the instrument cluster.
NOTE:In some cases the ParkSense graphic will be displayed in
the instrument cluster. In these cases, the gear selector
must be returned to ‚ÄúP‚ÄĚ to select desired gear.
If the driver shifts into PARK while moving, the vehicle may
AutoPark.
AutoPark will engage ONLY when vehicle speed is 1.2 mph
(1.9 km/h) or less.
The message ‚Äú Vehicle Speed Is Too High To Shift To P ‚ÄĚ will
be displayed in the instrument cluster if vehicle speed is
above 1.2 mph (1.9 km/h).
WARNING!
ÔĀ¨ Driver inattention could lead to failure to place the
vehicle in PARK. ALWAYS DO A VISUAL CHECK that
your vehicle is in PARK by verifying that a solid (not
blinking) ‚ÄúP‚ÄĚ is indicated in the instrument cluster
display and on the gear selector. If the "P" indicator is
blinking, your vehicle is not in PARK. As an added
precaution, always apply the parking brake when
exiting the vehicle.
ÔĀ¨ AutoPark is a supplemental feature. It is not
designed to replace the need to shift your vehicle
into PARK. It is a back up system and should not be
relied upon as the primary method by which the
driver shifts the vehicle into PARK.
23_WS_OM_EN_USC_t.book Page 120
Page 123 of 396

STARTING AND OPERATING121
4WD LOW ‚ÄĒ If Equipped
AutoPark will be disabled when operating the vehicle in
4WD LOW.
The message ‚ÄúAutoPark Disabled ‚ÄĚ will be displayed in the
instrument cluster.
Additional customer warnings will be given when both of
these conditions are met:
ÔĀ¨ Vehicle is not in PARK
ÔĀ¨ Driver‚Äôs door is ajar
The message ‚Äú AutoPark Not Engaged ‚ÄĚ will be displayed in
the instrument cluster. A warning chime will continue until
you shift the vehicle into PARK or the driver’s door is
closed.
ALWAYS DO A VISUAL CHECK
that your vehicle is in PARK
by looking for the "P" in the instrument cluster display and
on the gear selector. As an added precaution, always apply
the parking brake when exiting the vehicle.
EXTENDED PARK STARTING
NOTE:Extended Park condition occurs when the vehicle has not
been started or driven for at least 30 days.
1. Install a battery charger or jumper cables to the battery to ensure a full battery charge during the
crank cycle.
2. Press and hold the brake pedal while pushing the ENGINE START/STOP button once.
3. If the engine fails to start within 10 seconds, wait 10 to 15 seconds to allow the starter to cool, then
repeat the Extended Park Starting procedure.
4. If the engine fails to start after eight attempts, allow the starter to cool for at least 10 minutes, then repeat
the Extended Park Starting procedure.
IF ENGINE FAILS TO START
If the engine fails to start after you have followed the
‚ÄúNormal Starting‚ÄĚ procedure and has not experienced an
extended park condition as defined previously, it may be
flooded. Push the accelerator pedal all the way to the floor
and hold it there while the engine is cranking. This should
clear any excess fuel in case the engine is flooded.
The starter motor will engage automatically, run for
10 seconds, and then disengage. Once this occurs, release the accelerator pedal and the
brake pedal, wait 10 to 15 seconds, then repeat the
‚ÄúNormal Starting‚ÄĚ procedure.
WARNING!
If vehicle speed is above 1.2 mph (1.9 km/h), the
transmission will default to NEUTRAL until the vehicle
speed drops below 1.2 mph (1.9 km/h). A vehicle left in
the NEUTRAL position can roll. As an added precaution,
always apply the parking brake when exiting the vehicle.
CAUTION!
To prevent damage to the starter, do not crank
continuously for more than 10 seconds at a time.
Wait 10 to 15 seconds before trying again.
WARNING!
ÔĀ¨ Never pour fuel or other flammable liquid into the
throttle body air inlet opening in an attempt to start
the vehicle. This could result in flash fire causing
serious personal injury.
ÔĀ¨ Do not attempt to push or tow your vehicle to get it
started. Vehicles equipped with an automatic trans -
mission cannot be started this way. Unburned fuel
could enter the catalytic converter and once the
engine has started, ignite and damage the converter
and vehicle.
ÔĀ¨ If the vehicle has a discharged battery, booster
cables may be used to obtain a start from a booster
battery or the battery in another vehicle. This type of
start can be dangerous if done improperly
√öpage 301.
CAUTION!
To prevent damage to the starter, do not continuously
crank the engine for more than 10 seconds at a time.
Wait 10 to 15 seconds before trying again.
4
23_WS_OM_EN_USC_t.book Page 121
Page 126 of 396
124STARTING AND OPERATING
If exceptional circumstances should make it necessary to
engage the parking brake while the vehicle is in motion,
maintain upward pressure on the EPB switch for as long as
engagement is desired. The Brake Warning Light will
illuminate, and a continuous chime will sound. The rear
stop lamps will also be illuminated automatically while the
vehicle remains in motion.
To disengage the parking brake while the vehicle is in
motion, release the switch. If the vehicle is brought to a
complete stop using the parking brake, when the vehicle
reaches approximately 3 mph (5 km/h), the parking brake
will remain engaged. In the unlikely event of a malfunction of the EPB system, a
yellow EPB Warning Light will illuminate. This may be
accompanied by the Brake Warning Light flashing. In this
event, urgent service of the EPB system is required. Do not
rely on the parking brake to hold the vehicle stationary.
Auto Park Brake
The EPB can be programmed to be applied automatically
whenever the vehicle is at a standstill and the
transmission is placed in PARK. Auto Park Brake is
enabled and disabled by customer selection through the
customer programmable features section of the Uconnect
Settings
√öpage 211.
Any single Auto Park Brake application can be bypassed by
pushing the EPB switch to the release position while the
transmission is placed in PARK.
SafeHold
SafeHold is a safety feature of the EPB system that will
engage the parking brake automatically if the vehicle is
left unsecured while the ignition is in ON/RUN.
The parking brake will automatically engage if all of the
following conditions are met:
ÔĀ¨ The vehicle is at a standstill.
ÔĀ¨ There is no attempt to press the brake pedal or accel -
erator pedal.
ÔĀ¨ The seat belt is unbuckled.
ÔĀ¨ The driver‚Äôs door is open. SafeHold can be temporarily bypassed by pushing the EPB
switch while the driver’s door is open. Once manually
bypassed, SafeHold will be enabled again once the vehicle
reaches 12 mph (20 km/h) or the ignition is turned to the
OFF position and back to ON again.
Auto Hold ‚ÄĒ If Equipped
Auto Hold is a comfort feature that allows the driver to
remove their foot from the brake pedal once the vehicle
has come to a stop. The vehicle must be held at a
standstill for a predetermined amount of time by hydraulic
braking. The EPB will then engage and continue to hold
the vehicle at a stop until the driver applies the accelerator
pedal. Auto Hold can be activated or deactivated by
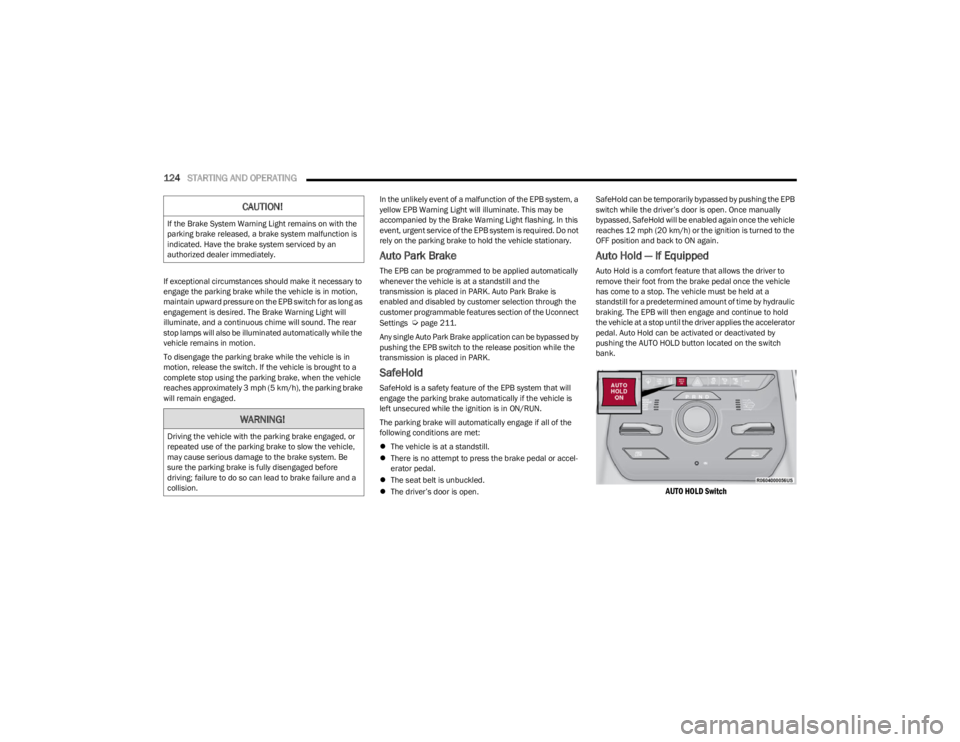
pushing the AUTO HOLD button located on the switch
bank.
AUTO HOLD Switch
CAUTION!
If the Brake System Warning Light remains on with the
parking brake released, a brake system malfunction is
indicated. Have the brake system serviced by an
authorized dealer immediately.
WARNING!
Driving the vehicle with the parking brake engaged, or
repeated use of the parking brake to slow the vehicle,
may cause serious damage to the brake system. Be
sure the parking brake is fully disengaged before
driving; failure to do so can lead to brake failure and a
collision.
23_WS_OM_EN_USC_t.book Page 124
Page 132 of 396

130STARTING AND OPERATING
QUADRA-TRAC II OPERATING
I
NSTRUCTIONS/PRECAUTIONS ‚ÄĒ
I
F EQUIPPED
The Quadra-Trac II transfer case is fully automatic in the
normal driving 4WD HI mode. The Quadra-Trac II transfer
case provides three positions:
ÔĀ¨ 4WD HI
ÔĀ¨ N (Neutral)
ÔĀ¨ 4WD LOW
When additional traction is required, the 4WD LOW
position can be used for increased torque at the wheels.
Driving in the 4WD LOW position on dry, hard-surfaced
roads may cause increased tire wear and damage to
driveline components.
When operating your vehicle in 4WD LOW, the engine
speed is approximately three times that of the 4WD HI
position at a given road speed. Take care not to overspeed
the engine and do not exceed 25 mph (40 km/h).
Proper operation of four-wheel drive vehicles depends on
tires of equal size, type, and circumference on each wheel.
Any difference will adversely affect shifting and cause
damage to the transfer case.
Because four-wheel drive provides improved traction,
there is a tendency to exceed safe turning and stopping
speeds. Do not go faster than road conditions permit.
SHIFT POSITIONS
For additional information on the appropriate use of each
four-wheel drive system mode position, see the following
information:
4WD HI
This range is the default operating mode for daily use.
N (NEUTRAL)
This range disengages the driveline from the powertrain. It
is used for towing your vehicle behind another vehicle
√öpage 190.
4WD LOW
This range is for low speed four-wheel drive. It provides an
additional gear reduction which allows for increased
torque to be delivered to both the front and rear wheels
while providing maximum pulling power for loose, slippery
road surfaces. Do not exceed 25 mph (40 km/h).
SHIFTING PROCEDURES
4WD HI To 4WD LOW
With the vehicle at speeds of 0 to 3 mph (0 to 5 km/h), the
ignition switch in the ON position or the engine running,
shift the transmission into NEUTRAL (N), and push and
hold the 4WD LOW button once on the transfer case
switch until the 4WD LOW indicator light begins to flash in
the instrument cluster.
WARNING!
You or others could be injured or killed if you leave the
vehicle unattended with the transfer case in the N
(Neutral) position without first fully engaging the
parking brake. The transfer case N (Neutral) position
disengages both the front and rear drive shafts from
the powertrain and will allow the vehicle to roll, even if
the transmission is in PARK. The parking brake should
always be applied when the driver is not in the vehicle.
23_WS_OM_EN_USC_t.book Page 130
Page 133 of 396
STARTING AND OPERATING131
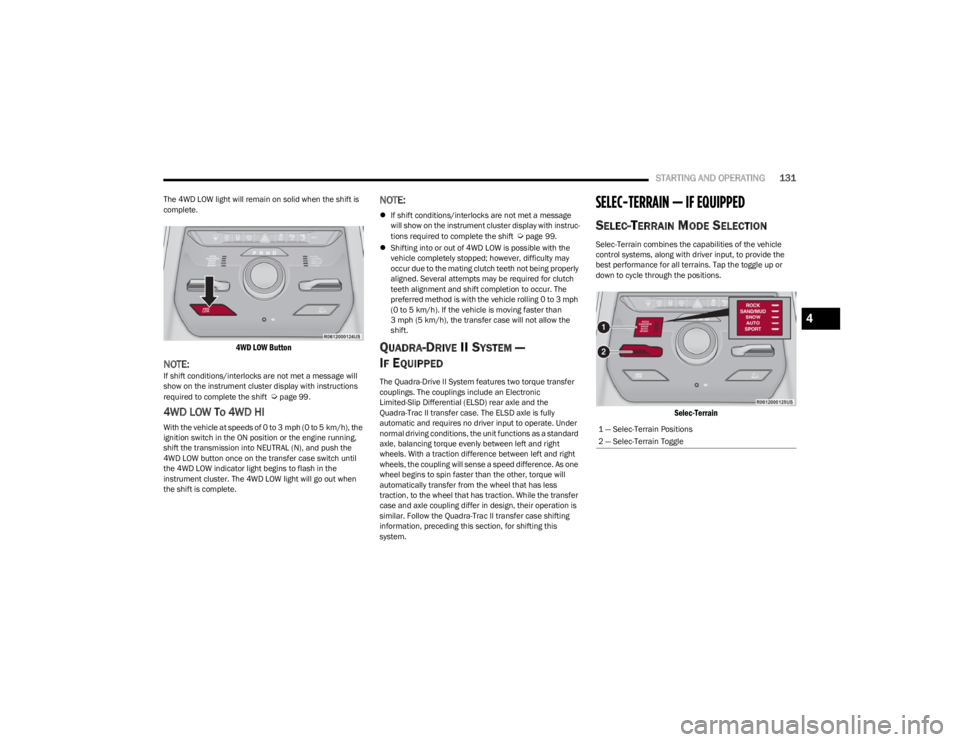
The 4WD LOW light will remain on solid when the shift is
complete.
4WD LOW Button
NOTE:If shift conditions/interlocks are not met a message will
show on the instrument cluster display with instructions
required to complete the shift
√öpage 99.
4WD LOW To 4WD HI
With the vehicle at speeds of 0 to 3 mph (0 to 5 km/h), the
ignition switch in the ON position or the engine running,
shift the transmission into NEUTRAL (N), and push the
4WD LOW button once on the transfer case switch until
the 4WD LOW indicator light begins to flash in the
instrument cluster. The 4WD LOW light will go out when
the shift is complete.
NOTE:
ÔĀ¨If shift conditions/interlocks are not met a message
will show on the instrument cluster display with instruc -
tions required to complete the shift
√öpage 99.
ÔĀ¨ Shifting into or out of 4WD LOW is possible with the
vehicle completely stopped; however, difficulty may
occur due to the mating clutch teeth not being properly
aligned. Several attempts may be required for clutch
teeth alignment and shift completion to occur. The
preferred method is with the vehicle rolling 0 to 3 mph
(0 to 5 km/h). If the vehicle is moving faster than
3 mph (5 km/h), the transfer case will not allow the
shift.
QUADRA-DRIVE II SYSTEM ‚ÄĒ
I
F EQUIPPED
The Quadra-Drive II System features two torque transfer
couplings. The couplings include an Electronic
Limited-Slip Differential (ELSD) rear axle and the
Quadra-Trac II transfer case. The ELSD axle is fully
automatic and requires no driver input to operate. Under
normal driving conditions, the unit functions as a standard
axle, balancing torque evenly between left and right
wheels. With a traction difference between left and right
wheels, the coupling will sense a speed difference. As one
wheel begins to spin faster than the other, torque will
automatically transfer from the wheel that has less
traction, to the wheel that has traction. While the transfer
case and axle coupling differ in design, their operation is
similar. Follow the Quadra-Trac II transfer case shifting
information, preceding this section, for shifting this
system.
SELEC-TERRAIN ‚ÄĒ IF EQUIPPED
SELEC-TERRAIN MODE SELECTION
Selec-Terrain combines the capabilities of the vehicle
control systems, along with driver input, to provide the
best performance for all terrains. Tap the toggle up or
down to cycle through the positions.
Selec-Terrain
1 ‚ÄĒ Selec-Terrain Positions
2 ‚ÄĒ Selec-Terrain Toggle
4
23_WS_OM_EN_USC_t.book Page 131
Page 141 of 396
STARTING AND OPERATING139
(Continued)
USING CRUISE CONTROL ON HILLS
The transmission may downshift on hills to maintain the
vehicle set speed.
The Cruise Control system maintains speed up and down
hills. A slight speed change on moderate hills is normal.
On steep hills, a greater speed loss or gain may occur so it
may be preferable to drive without Cruise Control.
To Resume Speed
To resume a previously set speed, push the RES button
and release. Resume can be used at any speed above
20 mph (32 km/h).
To Deactivate
A tap on the brake pedal, pushing the CANC button, or
normal brake pressure while slowing the vehicle will
deactivate the Cruise Control system without erasing the
set speed from memory. The following conditions will also deactivate the Cruise
Control without erasing the set speed from memory:
ÔĀ¨
Vehicle parking brake is applied
ÔĀ¨ Stability event occurs
ÔĀ¨ Gear selector is moved out of DRIVE
ÔĀ¨ Engine overspeed occurs
Pushing the on/off button or placing the ignition in the OFF
position, will also erase the set speed from memory.
ADAPTIVE CRUISE CONTROL (ACC)
Adaptive Cruise Control (ACC) increases the driving
convenience provided by Cruise Control while traveling on
highways and major roadways. However, it is not a safety
system and not designed to prevent collisions. The Cruise
Control function performs differently
√öpage 138.
ACC will allow you to keep Cruise Control engaged in light
to moderate traffic conditions without the constant need
to reset your Cruise Control. ACC utilizes a radar sensor
and a forward facing camera designed to detect a vehicle
directly ahead of you.
NOTE:
ÔĀ¨ If the ACC sensor detects a vehicle ahead, ACC will
apply limited braking or acceleration (not to exceed the
original set speed) automatically to maintain a preset
following distance, while matching the speed of the
vehicle ahead. ÔĀ¨
Any chassis/suspension or tire size modifications to
the vehicle will affect the performance of the Adaptive
Cruise Control and Forward Collision Warning system.
ÔĀ¨ In vehicles NOT equipped with the Active Driving Assist
system, Fixed Speed Cruise Control (ACC not enabled)
will not detect vehicles directly ahead of you. Always be
aware of the feature selected
√öpage 382.
WARNING!
Cruise Control can be dangerous where the system
cannot maintain a constant speed. Your vehicle could
go too fast for the conditions, and you could lose control
and have an accident. Do not use Cruise Control in
heavy traffic or on roads that are winding, icy,
snow-covered or slippery.
WARNING!
ÔĀ¨ Adaptive Cruise Control (ACC) is a convenience
system. It is not a substitute for active driver involve -
ment. It is always the driver’s responsibility to be
attentive of road, traffic, and weather conditions,
vehicle speed, distance to the vehicle ahead and,
most importantly, brake operation to ensure safe
operation of the vehicle under all road conditions.
Your complete attention is always required while
driving to maintain safe control of your vehicle.
Failure to follow these warnings can result in a colli -
sion and death or serious personal injury.
ÔĀ¨ The ACC system:
Ôā° Does not react to pedestrians, oncoming vehi -
cles, and stationary objects (e.g., a stopped
vehicle in a traffic jam or a disabled vehicle).
Ôā° Cannot take street, traffic, and weather condi -
tions into account, and may be limited upon
adverse sight distance conditions.
4
23_WS_OM_EN_USC_t.book Page 139
Page 142 of 396
140STARTING AND OPERATING
Adaptive Cruise Control (ACC) Operation
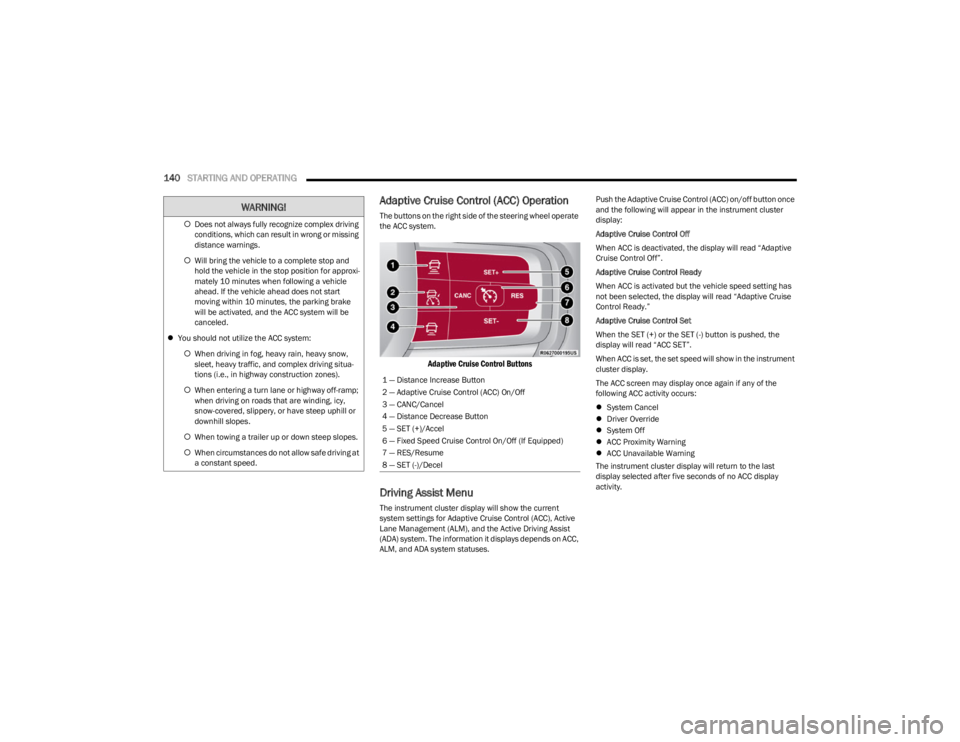
The buttons on the right side of the steering wheel operate
the ACC system.
Adaptive Cruise Control Buttons
Driving Assist Menu
The instrument cluster display will show the current
system settings for Adaptive Cruise Control (ACC), Active
Lane Management (ALM), and the Active Driving Assist
(ADA) system. The information it displays depends on ACC,
ALM, and ADA system statuses. Push the Adaptive Cruise Control (ACC) on/off button once
and the following will appear in the instrument cluster
display:
Adaptive Cruise Control Off
When ACC is deactivated, the display will read “Adaptive
Cruise Control Off‚ÄĚ.
Adaptive Cruise Control Ready
When ACC is activated but the vehicle speed setting has
not been selected, the display will read “Adaptive Cruise
Control Ready.‚ÄĚ
Adaptive Cruise Control Set
When the SET (+) or the SET (-) button is pushed, the
display will read ‚ÄúACC SET‚ÄĚ.
When ACC is set, the set speed will show in the instrument
cluster display.
The ACC screen may display once again if any of the
following ACC activity occurs:
ÔĀ¨
System Cancel
ÔĀ¨ Driver Override
ÔĀ¨ System Off
ÔĀ¨ ACC Proximity Warning
ÔĀ¨ ACC Unavailable Warning
The instrument cluster display will return to the last
display selected after five seconds of no ACC display
activity.
Ôā°
Does not always fully recognize complex driving
conditions, which can result in wrong or missing
distance warnings.
Ôā° Will bring the vehicle to a complete stop and
hold the vehicle in the stop position for approxi -
mately 10 minutes when following a vehicle
ahead. If the vehicle ahead does not start
moving within 10 minutes, the parking brake
will be activated, and the ACC system will be
canceled.
ÔĀ¨ You should not utilize the ACC system:
Ôā° When driving in fog, heavy rain, heavy snow,
sleet, heavy traffic, and complex driving situa-
tions (i.e., in highway construction zones).
Ôā° When entering a turn lane or highway off-ramp;
when driving on roads that are winding, icy,
snow-covered, slippery, or have steep uphill or
downhill slopes.
Ôā° When towing a trailer up or down steep slopes.
Ôā° When circumstances do not allow safe driving at
a constant speed.
WARNING!
1 ‚ÄĒ Distance Increase Button
2 ‚ÄĒ Adaptive Cruise Control (ACC) On/Off
3 ‚ÄĒ CANC/Cancel
4 ‚ÄĒ Distance Decrease Button
5 ‚ÄĒ SET (+)/Accel
6 ‚ÄĒ Fixed Speed Cruise Control On/Off (If Equipped)
7 ‚ÄĒ RES/Resume
8 ‚ÄĒ SET (-)/Decel
23_WS_OM_EN_USC_t.book Page 140
Page 144 of 396

142STARTING AND OPERATING
ÔĀ¨The Electronic Stability Control/Traction Control
System (ESC/TCS) activates
ÔĀ¨ The vehicle parking brake is applied
ÔĀ¨ The Trailer Sway Control (TSC) activates
ÔĀ¨ The driver switches ESC to Full Off mode
ÔĀ¨ The braking temperature exceeds normal range (over -
heated)
The following conditions will only cancel the ACC system:
ÔĀ¨ Driver seat belt is unbuckled at low speeds
ÔĀ¨ Driver door is opened at low speeds
To Turn Off
The system will turn off and erase the set speed in
memory if:
ÔĀ¨The Adaptive Cruise Control (ACC) on/off button is
pushed
ÔĀ¨ The Fixed Speed Cruise Control (if equipped) on/off
button is pushed
ÔĀ¨ The ignition is placed in the OFF position
ÔĀ¨ 4WD Low is engaged
To Resume
If there is a set speed in memory, push the RES (resume)
button and remove your foot from the accelerator pedal.
The instrument cluster display will show the last set
speed.
Resume can be used at any speed above 20 mph
(32 km/h) when only Fixed Speed Cruise Control is
being used.
Resume can be used at any speed above 0 mph (0 km/h)
when ACC is active.
NOTE:
ÔĀ¨While in ACC mode, when the vehicle comes to a
complete stop longer than two seconds, the driver will
either have to push the RES (resume) button or press
the accelerator pedal to reengage the ACC system.
ÔĀ¨ ACC cannot be resumed if there is a stationary vehicle
in front of your vehicle in close proximity.
To Vary The Speed Setting
To Increase Or Decrease The Set Speed
After setting a speed, you can increase the set speed by
pushing the SET (+) button, or decrease speed by pushing
the SET (-) button.
U.S. Speed (mph)
ÔĀ¨ Pushing the SET (+), or SET (-) button once will result in
a 1 mph speed adjustment. Each subsequent tap of
the button results in an adjustment of 1 mph.
ÔĀ¨ If the button is continually pushed, the set speed will
continue to adjust in 5 mph increments until the button
is released. The new set speed is reflected in the instru -
ment cluster display. Metric Speed (km/h)
ÔĀ¨
Pushing the SET (+), or SET (-) button once will result in
a 1 km/h speed adjustment. Each subsequent tap of
the button results in an adjustment of 1 km/h.
ÔĀ¨ If the button is continually pushed, the set speed will
continue to adjust in 10 km/h increments until the
button is released. The new set speed is reflected in
the instrument cluster display.
NOTE:When you override and push the SET (+) button or SET (-)
button, the new set speed will be the current speed of the
vehicle.
When ACC Is Active
ÔĀ¨ When you use the SET (-) button to decelerate, if the
engine’s braking power does not slow the vehicle suffi -
ciently to reach the set speed, the brake system will
automatically slow the vehicle.
ÔĀ¨ The ACC system decelerates the vehicle to a full stop
when following the vehicle in front. If your vehicle
follows the vehicle in front to a standstill, after two
seconds the driver will either have to push the RES
(resume) button, or apply the accelerator pedal to reen -
gage the ACC to the existing set speed.
ÔĀ¨ The ACC system maintains set speed when driving
uphill and downhill. However, a slight speed change on
moderate hills is normal. In addition, downshifting may
occur while climbing uphill or descending downhill. This
is normal operation and necessary to maintain set
speed. When driving uphill and downhill, the ACC
system will cancel if the braking temperature exceeds
normal range (overheated).
WARNING!
The Resume function should only be used if traffic and
road conditions permit. Resuming a set speed that is
too high or too low for prevailing traffic and road
conditions could cause the vehicle to accelerate or
decelerate too sharply for safe operation. Failure to
follow these warnings can result in a collision and death
or serious personal injury.
23_WS_OM_EN_USC_t.book Page 142
Page 145 of 396
STARTING AND OPERATING143
Setting The Following Distance In ACC
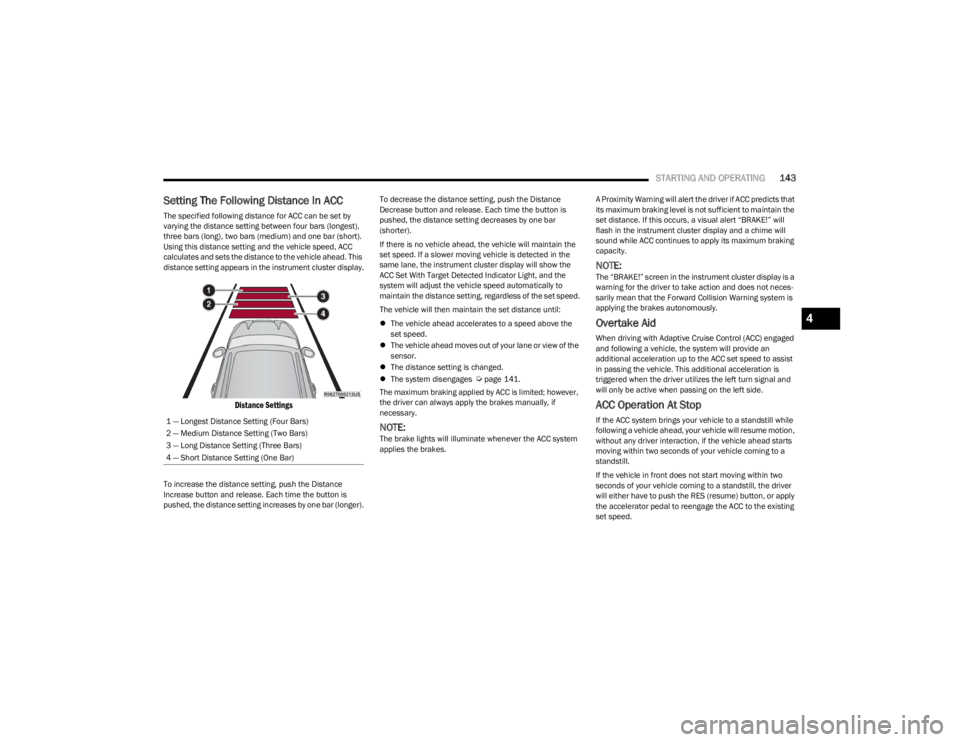
The specified following distance for ACC can be set by
varying the distance setting between four bars (longest),
three bars (long), two bars (medium) and one bar (short).
Using this distance setting and the vehicle speed, ACC
calculates and sets the distance to the vehicle ahead. This
distance setting appears in the instrument cluster display.
Distance Settings
To increase the distance setting, push the Distance
Increase button and release. Each time the button is
pushed, the distance setting increases by one bar (longer). To decrease the distance setting, push the Distance
Decrease button and release. Each time the button is
pushed, the distance setting decreases by one bar
(shorter).
If there is no vehicle ahead, the vehicle will maintain the
set speed. If a slower moving vehicle is detected in the
same lane, the instrument cluster display will show the
ACC Set With Target Detected Indicator Light, and the
system will adjust the vehicle speed automatically to
maintain the distance setting, regardless of the set speed.
The vehicle will then maintain the set distance until:
ÔĀ¨
The vehicle ahead accelerates to a speed above the
set speed.
ÔĀ¨ The vehicle ahead moves out of your lane or view of the
sensor.
ÔĀ¨ The distance setting is changed.
ÔĀ¨ The system disengages
√öpage 141.
The maximum braking applied by ACC is limited; however,
the driver can always apply the brakes manually, if
necessary.
NOTE:The brake lights will illuminate whenever the ACC system
applies the brakes. A Proximity Warning will alert the driver if ACC predicts that
its maximum braking level is not sufficient to maintain the
set distance. If this occurs, a visual alert ‚ÄúBRAKE!‚ÄĚ will
flash in the instrument cluster display and a chime will
sound while ACC continues to apply its maximum braking
capacity.
NOTE:The ‚ÄúBRAKE!‚ÄĚ screen in the instrument cluster display is a
warning for the driver to take action and does not neces
-
sarily mean that the Forward Collision Warning system is
applying the brakes autonomously.
Overtake Aid
When driving with Adaptive Cruise Control (ACC) engaged
and following a vehicle, the system will provide an
additional acceleration up to the ACC set speed to assist
in passing the vehicle. This additional acceleration is
triggered when the driver utilizes the left turn signal and
will only be active when passing on the left side.
ACC Operation At Stop
If the ACC system brings your vehicle to a standstill while
following a vehicle ahead, your vehicle will resume motion,
without any driver interaction, if the vehicle ahead starts
moving within two seconds of your vehicle coming to a
standstill.
If the vehicle in front does not start moving within two
seconds of your vehicle coming to a standstill, the driver
will either have to push the RES (resume) button, or apply
the accelerator pedal to reengage the ACC to the existing
set speed.
1 ‚ÄĒ Longest Distance Setting (Four Bars)
2 ‚ÄĒ Medium Distance Setting (Two Bars)
3 ‚ÄĒ Long Distance Setting (Three Bars)
4 ‚ÄĒ Short Distance Setting (One Bar)
4
23_WS_OM_EN_USC_t.book Page 143
Page 151 of 396
STARTING AND OPERATING149
(Continued)
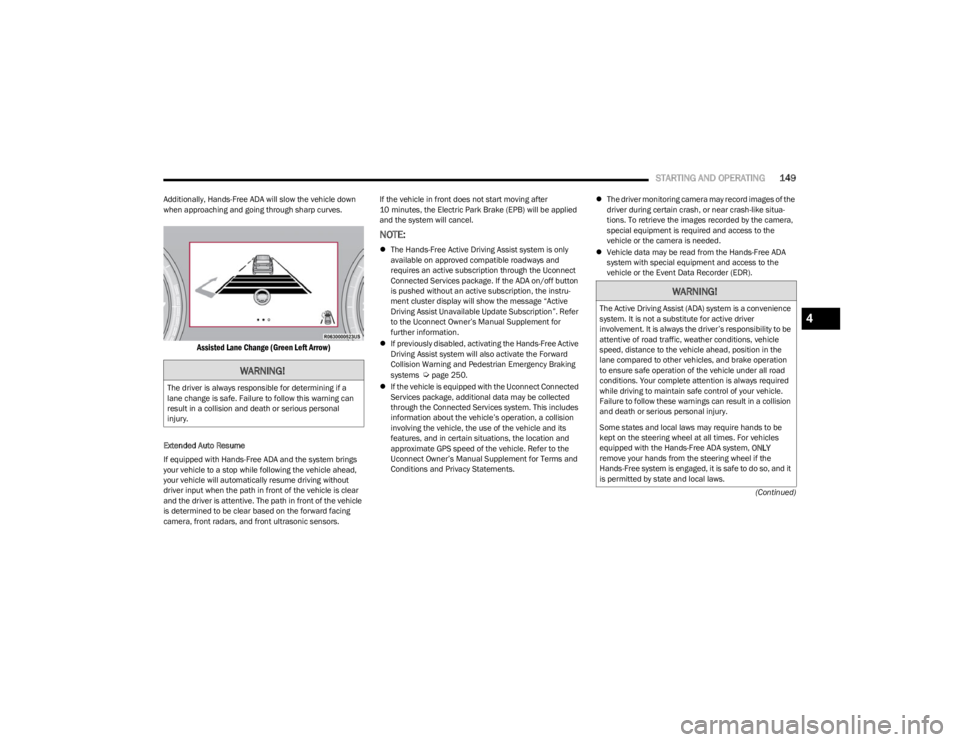
Additionally, Hands-Free ADA will slow the vehicle down
when approaching and going through sharp curves.
Assisted Lane Change (Green Left Arrow)
Extended Auto Resume
If equipped with Hands-Free ADA and the system brings
your vehicle to a stop while following the vehicle ahead,
your vehicle will automatically resume driving without
driver input when the path in front of the vehicle is clear
and the driver is attentive. The path in front of the vehicle
is determined to be clear based on the forward facing
camera, front radars, and front ultrasonic sensors. If the vehicle in front does not start moving after
10 minutes, the Electric Park Brake (EPB) will be applied
and the system will cancel.
NOTE:
ÔĀ¨
The Hands-Free Active Driving Assist system is only
available on approved compatible roadways and
requires an active subscription through the Uconnect
Connected Services package. If the ADA on/off button
is pushed without an active subscription, the instru -
ment cluster display will show the message “Active
Driving Assist Unavailable Update Subscription‚ÄĚ. Refer
to the Uconnect Owner’s Manual Supplement for
further information.
ÔĀ¨ If previously disabled, activating the Hands-Free Active
Driving Assist system will also activate the Forward
Collision Warning and Pedestrian Emergency Braking
systems
√öpage 250.
ÔĀ¨ If the vehicle is equipped with the Uconnect Connected
Services package, additional data may be collected
through the Connected Services system. This includes
information about the vehicle’s operation, a collision
involving the vehicle, the use of the vehicle and its
features, and in certain situations, the location and
approximate GPS speed of the vehicle. Refer to the
Uconnect Owner’s Manual Supplement for Terms and
Conditions and Privacy Statements. ÔĀ¨
The driver monitoring camera may record images of the
driver during certain crash, or near crash-like situa -
tions. To retrieve the images recorded by the camera,
special equipment is required and access to the
vehicle or the camera is needed.
ÔĀ¨ Vehicle data may be read from the Hands-Free ADA
system with special equipment and access to the
vehicle or the Event Data Recorder (EDR).WARNING!
The driver is always responsible for determining if a
lane change is safe. Failure to follow this warning can
result in a collision and death or serious personal
injury.
WARNING!
The Active Driving Assist (ADA) system is a convenience
system. It is not a substitute for active driver
involvement. It is always the driver’s responsibility to be
attentive of road traffic, weather conditions, vehicle
speed, distance to the vehicle ahead, position in the
lane compared to other vehicles, and brake operation
to ensure safe operation of the vehicle under all road
conditions. Your complete attention is always required
while driving to maintain safe control of your vehicle.
Failure to follow these warnings can result in a collision
and death or serious personal injury.
Some states and local laws may require hands to be
kept on the steering wheel at all times. For vehicles
equipped with the Hands-Free ADA system, ONLY
remove your hands from the steering wheel if the
Hands-Free system is engaged, it is safe to do so, and it
is permitted by state and local laws.4
23_WS_OM_EN_USC_t.book Page 149