climate control JEEP WAGONEER 2023 Owners Manual
[x] Cancel search | Manufacturer: JEEP, Model Year: 2023, Model line: WAGONEER, Model: JEEP WAGONEER 2023Pages: 396, PDF Size: 15.17 MB
Page 5 of 396

3
EXTERIOR LIGHTS ..............................................................57Headlight Switch ........................................................ 57
Multifunction Lever ..................................................... 58
Daytime Running Lights (DRLs) ................................. 58
High/Low Beam Switch .............................................. 58
Automatic High Beams — If Equipped ....................... 58
Flash-To-Pass ............................................................ 58
Automatic Headlights ................................................ 58
Parking Lights And Panel Lights................................. 59
Headlights On Automatically With Wipers ................. 59
Headlight Illumination On Approach .......................... 59
Headlight Delay ........................................................... 59
Lights-On Reminder .................................................... 59
Fog Lights .................................................................... 60
Turn Signals................................................................. 60
Lane Change Assist — If Equipped............................. 60
Battery Saver ............................................................... 60
INTERIOR LIGHTS ...............................................................60 Courtesy Lights............................................................ 60
Illuminated Entry — If Equipped ................................. 62
WINDSHIELD WIPERS AND WASHERS ........................... 62 Windshield Wiper Operation....................................... 62
Rain Sensing Wipers — If Equipped .......................... 63
Rear Wiper And Washer ............................................ 64
Windshield Wiper De-Icer — If Equipped ................... 64
CLIMATE CONTROLS ..........................................................64 Automatic Climate Control Descriptions And
Functions ..................................................................... 64
Automatic Temperature Control (ATC) ....................... 71
Climate Voice Recognition.......................................... 71
Operating Tips ............................................................ 71 INTERIOR STORAGE AND EQUIPMENT ............................ 73
Storage ......................................................................... 73
Center Console Cooler —
If Equipped ................................................................... 75
Center Console Safe — If Equipped ............................ 75
Sun Screens — If Equipped ......................................... 76
USB/AUX Control ......................................................... 76
Electrical Power Outlets ..............................................79
Power Inverter ............................................................. 80
Wireless Charging Pad — If Equipped......................... 81
WINDOWS .......................................................................... 82 Power Window Controls............................................... 82
Wind Buffeting ............................................................ 83
Radio Signal Devices On Windshield —
If Equipped ................................................................... 83
POWER SUNROOF — IF EQUIPPED................................... 83 Tri-Pane Power Sunroof............................................... 83
HOOD.................................................................................... 85 Opening The Hood .......................................................85
Closing The Hood ......................................................... 86
LIFTGATE .............................................................................. 86 To Unlock/Open The Liftgate ......................................86
To Lock/Close The Liftgate ......................................... 86
Adjustable Power Liftgate Height ............................... 87
Hands-Free Liftgate .................................................... 87
Cargo Area Features ................................................... 89
ROOF LUGGAGE RACK — IF EQUIPPED ........................... 91 Installing The Crossbars ..............................................91
Removing The Crossbars ............................................ 95GETTING TO KNOW YOUR
INSTRUMENT PANEL
BASE INSTRUMENT CLUSTER .......................................... 96 Instrument Cluster Descriptions ................................ 97
PREMIUM INSTRUMENT CLUSTER .................................. 98 Instrument Cluster Descriptions ................................ 99
INSTRUMENT CLUSTER DISPLAY ..................................... 99 Location And Controls ................................................. 99
Engine Oil Life Reset ................................................ 101
Display And Messages .............................................. 102Instrument Cluster Display Menu Items ................. 104Head Up Display (HUD) — If Equipped ..................... 106
Battery Saver On/Battery Saver Mode
Message — Electrical Load Reduction
Actions (If Equipped) ................................................ 107
WARNING LIGHTS AND MESSAGES ..............................108 Red Warning Lights ................................................... 109
Yellow Warning Lights ............................................... 111Yellow Indicator Lights .............................................. 114Green Indicator Lights............................................... 115White Indicator Lights ............................................... 116Blue Indicator Lights ................................................. 117
Gray Indicator Lights ................................................. 117
ONBOARD DIAGNOSTIC SYSTEM — OBD II ................... 117 Onboard Diagnostic System
(OBD II) Cybersecurity ............................................... 118
EMISSIONS INSPECTION AND MAINTENANCE
PROGRAMS ......................................................................118
23_WS_OM_EN_USC_t.book Page 3
Page 7 of 396

5
SURROUND VIEW CAMERA SYSTEM —
IF EQUIPPED ..................................................................... 175Zoom View ................................................................. 176
REFUELING THE VEHICLE .............................................. 177
VEHICLE LOADING ........................................................ 178 Gross Vehicle Weight Rating (GVWR) ..................... 178
Payload ...................................................................... 178
Gross Axle Weight Rating (GAWR)............................ 178
Tire Size ..................................................................... 178Rim Size ..................................................................... 178Inflation Pressure ...................................................... 178Curb Weight ............................................................... 178
Loading ...................................................................... 178
TRAILER TOWING............................................................. 178 Common Towing Definitions .................................... 179
Trailer Hitch Classification........................................ 182Trailer Towing Weights (Maximum Trailer
Weight Ratings) ......................................................... 182
Trailer Hitch Receiver Cover Removal —
If Equipped ................................................................ 184
Trailer And Tongue Weight ...................................... 185
Towing Requirements .............................................. 185
Towing Tips ............................................................... 189
RECREATIONAL TOWING (BEHIND MOTORHOME) ..... 190 Towing This Vehicle Behind Another Vehicle .......... 190
Recreational Towing — Two-Wheel
Drive Models ............................................................. 190Recreational Towing — Quadra-Trac I
(Single-Speed Transfer Case) Four-Wheel
Drive Models ............................................................. 191Recreational Towing — Quadra–Trac II/
Quadra–Drive II Four-Wheel Drive Models .............. 191
DRIVING TIPS ................................................................... 193 On-Road Driving Tips ................................................ 193Off-Road Driving Tips ................................................ 193MULTIMEDIA
UCONNECT SYSTEMS ..................................................... 196
CYBERSECURITY ............................................................. 196
UCONNECT SETTINGS ..................................................... 197 Customer Programmable Features ......................... 197
STEERING WHEEL AUDIO CONTROLS .......................... 221 Radio Operation ........................................................ 221Media Mode .............................................................. 221
PASSENGER SCREEN — IF EQUIPPED .......................... 221 Passenger Screen Permissions ............................... 222
Home Screen ............................................................ 222
Audio And Video ........................................................ 223Rear Seat Entertainment with Amazon Fire TV
Built-in — If Equipped................................................ 224
HDMI Projecting ........................................................ 225Device Manager........................................................ 225Navigation ................................................................. 226Camera ...................................................................... 226
3RD PARTY APPS — IF EQUIPPED ................................ 226
REAR SEAT ENTERTAINMENT (RSE) WITH
AMAZON FIRE TV BUILT-IN — IF EQUIPPED.................. 228 Overview .................................................................... 228
Getting Started.......................................................... 228
Accessing Rear Seat Entertainment with
Fire TV built-in from the Front Radio Screen........... 228
Accessing Rear Seat Entertainment with
Fire TV built-in from the Rear Screens .................... 229
Accessing Rear Seat Entertainment with
Fire TV built-in from the Passenger Screen —
If Equipped ................................................................ 229 First Time Starting Up
(Using the Rear Screens) .......................................... 229
Alexa Voice Control.................................................... 230
Listen Via Vehicle Speakers ..................................... 230
Quick Menu................................................................ 230
Parental Controls (Using the Rear Screens) ............ 230
Voice Remote with Alexa Pairing
(Using the Rear Screens) .......................................... 230
Media Sources Input (Using the Front Radio
and Rear Screens)..................................................... 230
Voice Remote with Alexa........................................... 231
Replacing the Voice Remote with
Alexa Batteries........................................................... 231
Rear Seat Entertainment with Fire TV Built-In
streaming (Using the Front Radio and
Rear Screens) ............................................................ 232Fire TV Apps/Games
(Using the Rear Screens) .......................................... 233
Are We There Yet? ..................................................... 233Using The Video USB Port ......................................... 233
Play Video Games...................................................... 233Headphones Operation ............................................. 233
Rear Climate Controls ............................................... 234Legal & Compliance .................................................. 235
OFF-ROAD PAGES — IF EQUIPPED .................................236 Off-Road Pages Status Bar ....................................... 236Vehicle Dynamics ...................................................... 236Accessory Gauges ..................................................... 237Pitch & Roll ................................................................ 237
Selec-Terrain — If Equipped ...................................... 237Suspension — If Equipped ........................................ 238
RADIO OPERATION AND MOBILE PHONES ..................238 Regulatory And Safety Information .......................... 238
23_WS_OM_EN_USC_t.book Page 5
Page 23 of 396
GETTING TO KNOW YOUR VEHICLE21
(Continued)
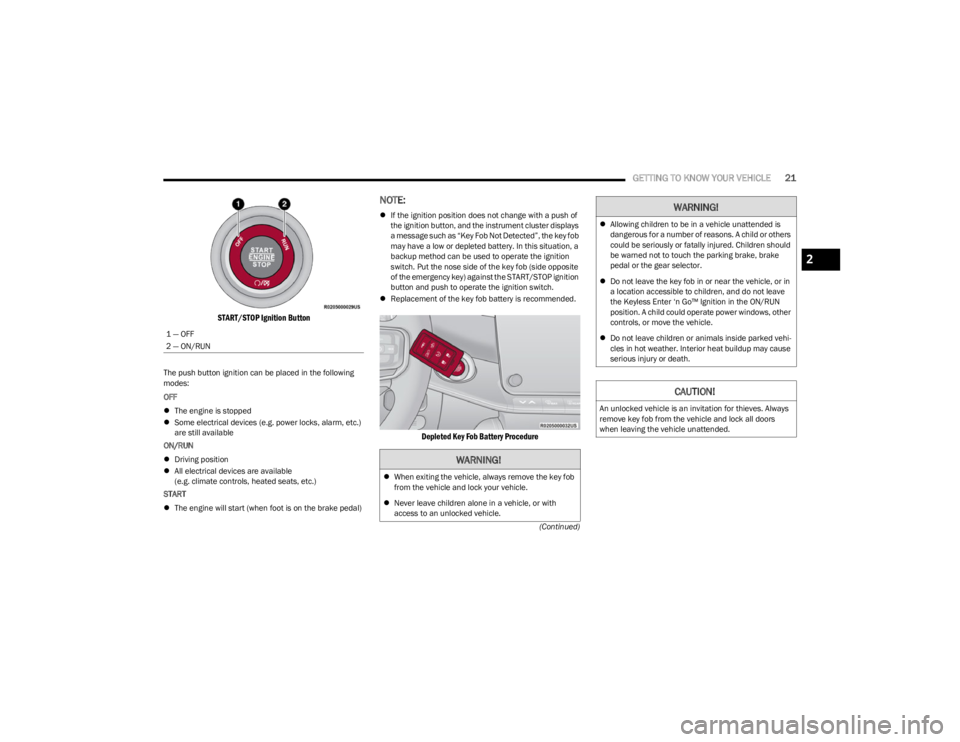
START/STOP Ignition Button
The push button ignition can be placed in the following
modes:
OFF
The engine is stopped
Some electrical devices (e.g. power locks, alarm, etc.)
are still available
ON/RUN
Driving position
All electrical devices are available
(e.g. climate controls, heated seats, etc.)
START
The engine will start (when foot is on the brake pedal)
NOTE:
If the ignition position does not change with a push of
the ignition button, and the instrument cluster displays
a message such as “Key Fob Not Detected”, the key fob
may have a low or depleted battery. In this situation, a
backup method can be used to operate the ignition
switch. Put the nose side of the key fob (side opposite
of the emergency key) against the START/STOP ignition
button and push to operate the ignition switch.
Replacement of the key fob battery is recommended.
Depleted Key Fob Battery Procedure
1 — OFF
2 — ON/RUN
WARNING!
When exiting the vehicle, always remove the key fob
from the vehicle and lock your vehicle.
Never leave children alone in a vehicle, or with
access to an unlocked vehicle.
Allowing children to be in a vehicle unattended is
dangerous for a number of reasons. A child or others
could be seriously or fatally injured. Children should
be warned not to touch the parking brake, brake
pedal or the gear selector.
Do not leave the key fob in or near the vehicle, or in
a location accessible to children, and do not leave
the Keyless Enter ‘n Go™ Ignition in the ON/RUN
position. A child could operate power windows, other
controls, or move the vehicle.
Do not leave children or animals inside parked vehi -
cles in hot weather. Interior heat buildup may cause
serious injury or death.
CAUTION!
An unlocked vehicle is an invitation for thieves. Always
remove key fob from the vehicle and lock all doors
when leaving the vehicle unattended.
WARNING!
2
23_WS_OM_EN_USC_t.book Page 21
Page 24 of 396
22GETTING TO KNOW YOUR VEHICLE
NOTE:
The key fob may not be detected by the vehicle Keyless
Enter ‘n Go™ system if it is located next to a mobile
phone, laptop or other electronic device; these devices
may block the key fob’s wireless signal and prevent the
Keyless Enter ‘n Go™ system from starting the vehicle.
For more information on the engine starting procedure,
see
Úpage 119.
When opening the driver's door and the ignition is in
the ON/RUN position (engine not running), a chime will
sound to remind you to place the ignition in the OFF
position. In addition to the chime, the message “Igni-
tion ON” will display in the cluster.
REMOTE START
This system uses the key fob to start the engine
conveniently from outside the vehicle while still
maintaining security. The system has a range
of approximately 328 ft (100 m).
Remote Start is used to defrost windows in cold weather,
and to reach a comfortable climate in all ambient
conditions before the driver enters the vehicle.
NOTE:Obstructions between the vehicle and key fob may reduce
this range Úpage 382.
HOW TO USE REMOTE START
Push and release the Remote Start button on the key fob
twice within five seconds. The vehicle doors will lock, the
parking lights will flash, and the horn will chirp twice (if
programmed). Then, the engine will start, and the vehicle
will remain in the Remote Start mode for a 15 minute
cycle. Pushing the Remote Start button a third time shuts
the engine off.
NOTE:
With Remote Start, the engine will only run for
15 minutes.
Remote Start can only be used twice.
If an engine fault is present or fuel level is low, the
vehicle will start and then shut down in 10 seconds.
The parking lights will turn on and remain on during
Remote Start mode.
Headlight animation (if equipped) will occur when
Remote Start is activated, if “Headlight Illumination On
Approach” is enabled within Uconnect Settings.
For security, power window and power sunroof opera -
tion (if equipped) are disabled when the vehicle is in
the Remote Start mode.
The ignition must be placed in the ON/RUN position
before the Remote Start sequence can be repeated for
a third cycle.
All of the following conditions must be met before the
engine will remote start:
Gear selector in PARK
Doors closed
Hood closed
Liftgate closed
Hazard switch off
Brake switch inactive (brake pedal not pressed)
Battery at an acceptable charge level
System not disabled from previous Remote Start event
Vehicle Security Light flashing
Ignition in OFF position
Panic button is not pushed
Fuel level meets minimum requirement
Vehicle Security system is not signaling an intrusion
Malfunction Indicator Light (MIL) is not illuminated
WARNING!
Do not start or run an engine in a closed garage or
confined area. Exhaust gas contains carbon
monoxide which is odorless and colorless. Carbon
monoxide is poisonous and can cause serious injury
or death when inhaled.
Keep key fobs away from children. Operation of the
Remote Start system, windows, door locks or other
controls could cause serious injury or death.
23_WS_OM_EN_USC_t.book Page 22
Page 25 of 396
GETTING TO KNOW YOUR VEHICLE23
TO EXIT REMOTE START MODE
To drive the vehicle after starting the Remote Start
system, either push and release the unlock button on the
key fob to unlock the doors, or unlock the vehicle using
Keyless Enter ‘n Go™ — Passive Entry via the door
handles, and disarm the Vehicle Security system
(if equipped). Then, prior to the end of the 15 minute
cycle, push and release the START/STOP ignition button.
The Remote Start system will turn the engine off if the
Remote Start button on the key fob is pushed again, or if
the engine is allowed to run for the entire 15 minute cycle.
Once the ignition is placed in the ON/RUN position, the
climate controls will resume previously set operations
(temperature, blower control, etc.).
NOTE:
To avoid unintentional shutdowns, the system will
disable for two seconds after receiving a valid Remote
Start request.
For vehicles equipped with the Keyless Enter ‘n Go™ —
Passive Entry feature, the message “Remote Start
Active — Push Start Button” will display in the instru -
ment cluster display until you push the START/STOP
ignition button.
REMOTE START FRONT DEFROST
A
CTIVATION — IF EQUIPPED
When Remote Start is active, and the outside ambient
temperature is 40°F (4.5°C) or below, the system will
automatically activate front defrost for 15 minutes or less.
The time is dependent on the ambient temperature. Once
the timer expires, the system will automatically adjust the
settings depending on ambient conditions. See “Remote
Start Comfort Systems — If Equipped” in the next section
for detailed operation.
REMOTE START COMFORT SYSTEMS —
I
F EQUIPPED
When Remote Start is activated, the front and rear defrost
will automatically turn on in cold weather. The heated
steering wheel and driver heated seat feature will turn on
if selected in the Comfort menu within Uconnect Settings
Úpage 197. In warm weather, the driver vented seat
feature will automatically turn on when Remote Start is
activated, if programmed in the Comfort menu. The
vehicle will adjust the climate control settings depending
on the outside ambient temperature. Automatic Temperature Control (ATC) — If Equipped
The climate controls will automatically adjust to the
optimal temperature and mode settings depending on the
outside ambient temperature. This will occur until the
ignition is placed in the ON/RUN position where the
climate controls will resume their previous settings.
For more information on ATC and climate control settings,
see
Úpage 64.
NOTE:These features will stay on through the duration of Remote
Start until the ignition is placed in the ON/RUN position.
The climate control setting will change, and exit automatic
operation, if manually adjusted by the driver while the
vehicle is in Remote Start mode. This includes the OFF
button on the climate controls, which will turn the system
off.
REMOTE START WINDSHIELD WIPER
D
E-ICER ACTIVATION — IF EQUIPPED
When Remote Start is active and the outside ambient
temperature is less than 33°F (0.6°C), the Windshield
Wiper De-Icer will activate. Exiting Remote Start will
resume its previous operation. If the Windshield Wiper
De-Icer was active, the timer and operation will continue.
WARNING!
Do not start or run an engine in a closed garage or
confined area. Exhaust gas contains carbon
monoxide which is odorless and colorless. Carbon
monoxide is poisonous and can cause serious injury
or death when inhaled.
Keep key fobs away from children. Operation of the
Remote Start system, windows, door locks or other
controls could cause serious injury or death.
2
23_WS_OM_EN_USC_t.book Page 23
Page 33 of 396
GETTING TO KNOW YOUR VEHICLE31
Use the four-way control to adjust the steering column.
NOTE:For vehicles equipped with Driver Memory Settings, use
the key fob or the memory switch on the driver's door trim
panel to return the tilt/telescopic steering column to
saved positions
Úpage 31.
HEATED STEERING WHEEL
The steering wheel contains a heating element
that helps warm your hands in cold weather.
The heated steering wheel has three
temperature settings. Once the heated
steering wheel has been turned on, it will stay on until the
operator turns it off. The heated steering wheel may not
turn on when it is already warm. The heated steering wheel control button is located on the
left side of the radio screen or within the Uconnect system.
You can gain access to the control button on the top left
side of the screen by tapping the temperature controls,
which will provide a quick drop-down menu containing the
controls, or through the controls screen of the
touchscreen. If your vehicle is not equipped with the
button on the side of the radio, you can also access the
control button through the climate screen.
Press the heated steering wheel button once to turn
the HI setting on.
Press the heated steering wheel button a second time
to turn the MED setting on.
Press the heated steering wheel button a third time to
turn the LO setting on.
Press the heated steering wheel button a fourth time to
turn the heating elements off.NOTE:The engine must be running for the heated steering wheel
to operate.
For information on use with the Remote Start system, see
Úpage 23.
DRIVER AND PASSENGER MEMORY
SETTINGS — IF EQUIPPED
This feature allows the driver, and if equipped, also the
front passenger to save up to two different memory
profiles for easy recall through a memory switch. Each
memory profile saves desired position settings for the
following features:
Driver’s Side
Seat position
Easy entry/exit seat (if equipped)
Side mirrors
Power tilt and telescopic steering column (if equipped)
Power adjustable pedals (if equipped)
A set of desired radio station presets
WARNING!
Do not adjust the steering column while driving.
Adjusting the steering column while driving or driving
with the steering column unlocked, could cause the
driver to lose control of the vehicle. Failure to follow this
warning may result in serious injury or death.
WARNING!
Persons who are unable to feel pain to the skin
because of advanced age, chronic illness, diabetes,
spinal cord injury, medication, alcohol use, exhaus -
tion, or other physical conditions must exercise care
when using the steering wheel heater. It may cause
burns even at low temperatures, especially if used
for long periods.
Do not place anything on the steering wheel that
insulates against heat, such as a blanket or steering
wheel covers of any type and material. This may
cause the steering wheel heater to overheat.
2
23_WS_OM_EN_USC_t.book Page 31
Page 45 of 396
GETTING TO KNOW YOUR VEHICLE43
(Continued)
The massage type and intensity level status will be
synchronized between the main Uconnect display and the
Front Comfort and Convenience Display.
The selected settings will save in the system’s memory
when turned off, and will resume the next time the system
is turned on.
NOTE:
For vehicles equipped with a selectable back/cushion
feature for massage seats, the massage feature can
be deselected for either the seatback or seat cushion.
If both options are deselected, massage will turn off.
The engine must be running for the power seatback
massage to operate.
The massage feature will turn off after 20 minutes of
use. However, if the massage type or intensity level is
changed, the timer then resets.
HEATED SEATS — IF EQUIPPED
Front Heated Seats
The front heated seats control buttons are
located on the sides of the radio or within the
Uconnect system. You can access the controls
through the Climate screen.
Press the heated seat button once to turn the HI setting
on.
Press the heated seat button a second time to turn the
MED setting on.
Press the heated seat button a third time to turn the
LO setting on.
Press the heated seat button a fourth time to turn the
heating elements off.
The heating elements can be turned on in the seatback
only, seat cushion only, or both. Press the seat image on
the touchscreen or push the seat zone button on the side
of the radio to cycle through these seat zones. An LED will
illuminate next to the selected zone(s). If equipped with
touchscreen buttons, the selected zones will be
highlighted on the seat image.
NOTE:
Once a heat setting is selected, heat will be felt within
two to five minutes.
The engine must be running for the heated seats to
operate.
The level of heat selected will stay on until the operator
changes it.
For information on use with the Remote Start system, see
Úpage 23.
Rear Heated Seats — If Equipped
The two second row outboard seats may be
equipped with heated seats. There are two
heated seat switches that allow the rear
passengers to operate the seats
independently. The heated seat switches for each heater
are located on the rear of the center console.
If equipped with a Rear Comfort And Convenience Display,
heated seat settings can be selected within the display
Úpage 69.
You can choose from HI, MED, LO, or OFF heat settings.
Indicator lights in each switch illuminate indicating the
level of heat in use.
Push the heated seat switch once to turn the HI setting
on.
Push the heated seat switch a second time to turn the
MED setting on.
Push the heated seat switch a third time to turn the
LO setting on.
Push the heated seat switch a fourth time to turn the
heating elements off.WARNING!
Persons who are unable to feel pain to the skin
because of advanced age, chronic illness, diabetes,
spinal cord injury, medication, alcohol use, exhaus -
tion or other physical condition must exercise care
when using the seat heater. It may cause burns even
at low temperatures, especially if used for long
periods of time.
Do not place anything on the seat or seatback that
insulates against heat, such as a blanket or cushion.
This may cause the seat heater to overheat. Sitting in
a seat that has been overheated could cause serious
burns due to the increased surface temperature of
the seat.
WARNING!
2
23_WS_OM_EN_USC_t.book Page 43
Page 51 of 396
GETTING TO KNOW YOUR VEHICLE49
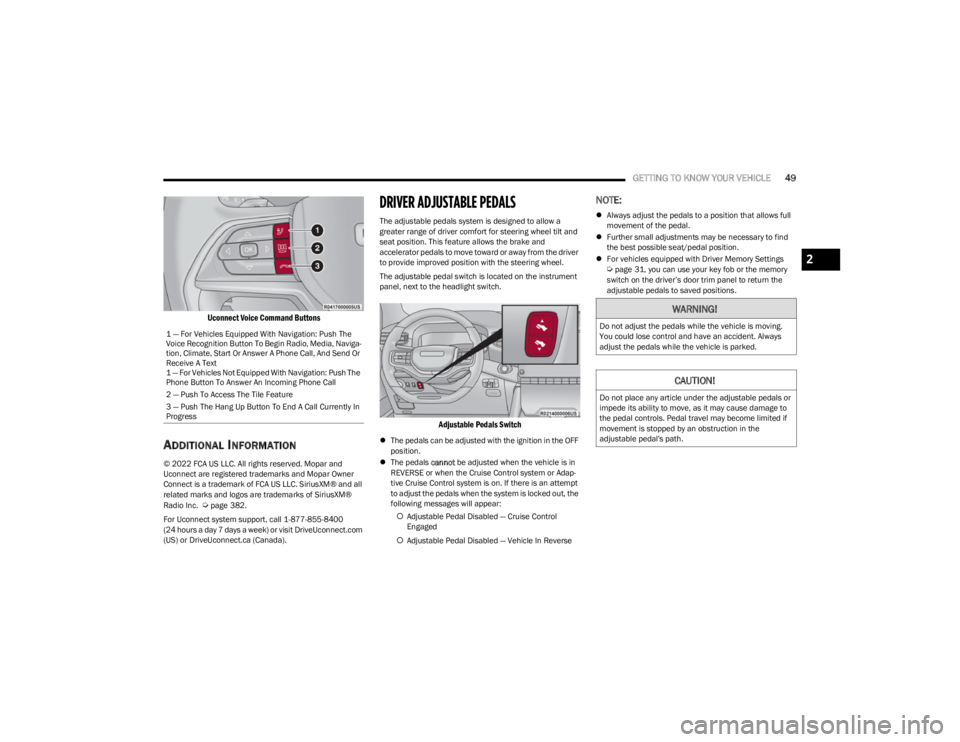
Uconnect Voice Command Buttons
ADDITIONAL INFORMATION
© 2022 FCA US LLC. All rights reserved. Mopar and
Uconnect are registered trademarks and Mopar Owner
Connect is a trademark of FCA US LLC. SiriusXM® and all
related marks and logos are trademarks of SiriusXM®
Radio Inc.
Úpage 382.
For Uconnect system support, call 1-877-855-8400
(24 hours a day 7 days a week) or visit DriveUconnect.com
(US) or DriveUconnect.ca (Canada).
DRIVER ADJUSTABLE PEDALS
The adjustable pedals system is designed to allow a
greater range of driver comfort for steering wheel tilt and
seat position. This feature allows the brake and
accelerator pedals to move toward or away from the driver
to provide improved position with the steering wheel.
The adjustable pedal switch is located on the instrument
panel, next to the headlight switch.
Adjustable Pedals Switch
The pedals can be adjusted with the ignition in the OFF
position.
The pedals cannot be adjusted when the vehicle is in
REVERSE or when the Cruise Control system or Adap -
tive Cruise Control system is on. If there is an attempt
to adjust the pedals when the system is locked out, the
following messages will appear:
Adjustable Pedal Disabled — Cruise Control
Engaged
Adjustable Pedal Disabled — Vehicle In Reverse
NOTE:
Always adjust the pedals to a position that allows full
movement of the pedal.
Further small adjustments may be necessary to find
the best possible seat/pedal position.
For vehicles equipped with Driver Memory Settings
Úpage 31, you can use your key fob or the memory
switch on the driver’s door trim panel to return the
adjustable pedals to saved positions.
1 — For Vehicles Equipped With Navigation: Push The
Voice Recognition Button To Begin Radio, Media, Naviga -
tion, Climate, Start Or Answer A Phone Call, And Send Or
Receive A Text
1 — For Vehicles Not Equipped With Navigation: Push The
Phone Button To Answer An Incoming Phone Call
2 — Push To Access The Tile Feature
3 — Push The Hang Up Button To End A Call Currently In
Progress
WARNING!
Do not adjust the pedals while the vehicle is moving.
You could lose control and have an accident. Always
adjust the pedals while the vehicle is parked.
CAUTION!
Do not place any article under the adjustable pedals or
impede its ability to move, as it may cause damage to
the pedal controls. Pedal travel may become limited if
movement is stopped by an obstruction in the
adjustable pedal's path.
2
23_WS_OM_EN_USC_t.book Page 49
Page 66 of 396
64GETTING TO KNOW YOUR VEHICLE
REAR WIPER AND WASHER
The rear wiper/washer is operated by rotating a switch,
located at the middle of the lever.
Rotate the center portion of the lever upward to
the first detent for intermittent operation and to
the second detent for continuous rear wiper
operation.
Rear Window Washer Operation Pushing the windshield wiper lever forward
activates the rear window washer. If the lever is
pushed while on the intermittent setting, the
wipers will turn on and operate for several wipe
cycles after the lever is released, and then resume the
intermittent interval previously selected. If the lever is
pushed while the wipers are in the off position, the wipers
will operate several wipe cycles, then turn off.
NOTE:When the rear window washer is activated, the rear Back
Up camera and Digital Rearview Mirror (if equipped)
cameras are also washed.
WINDSHIELD WIPER DE-ICER —
I
F EQUIPPED
Your vehicle may be equipped with a Windshield Wiper
De-Icer feature that may be activated under the following
conditions:
Activation By Front Defrost — The Windshield Wiper
De-Icer shall be activated automatically in the case of
a cold weather manual start with full front defrost, and
when the ambient temperature is below 33°F (0.6°C).
Activation By Rear Defrost — The Windshield Wiper
De-Icer shall be activated automatically when the rear
defrost is turned on and when the ambient tempera -
ture is below 33°F (0.6°C).
Activation By Remote Start Operation — When Remote
Start is active and the outside ambient temperature is
less than 33°F (0.6°C), the Windshield Wiper De-Icer
will activate. Exiting Remote Start will resume its
previous operation. If the Windshield Wiper De-Icer was
active, the timer and operation will continue.
CLIMATE CONTROLS
The Climate Control system allows you to regulate the
temperature, air flow, and direction of air circulating
throughout the vehicle. The controls are located on the
touchscreen and on the instrument panel below the radio.
AUTOMATIC CLIMATE CONTROL
D
ESCRIPTIONS AND FUNCTIONS
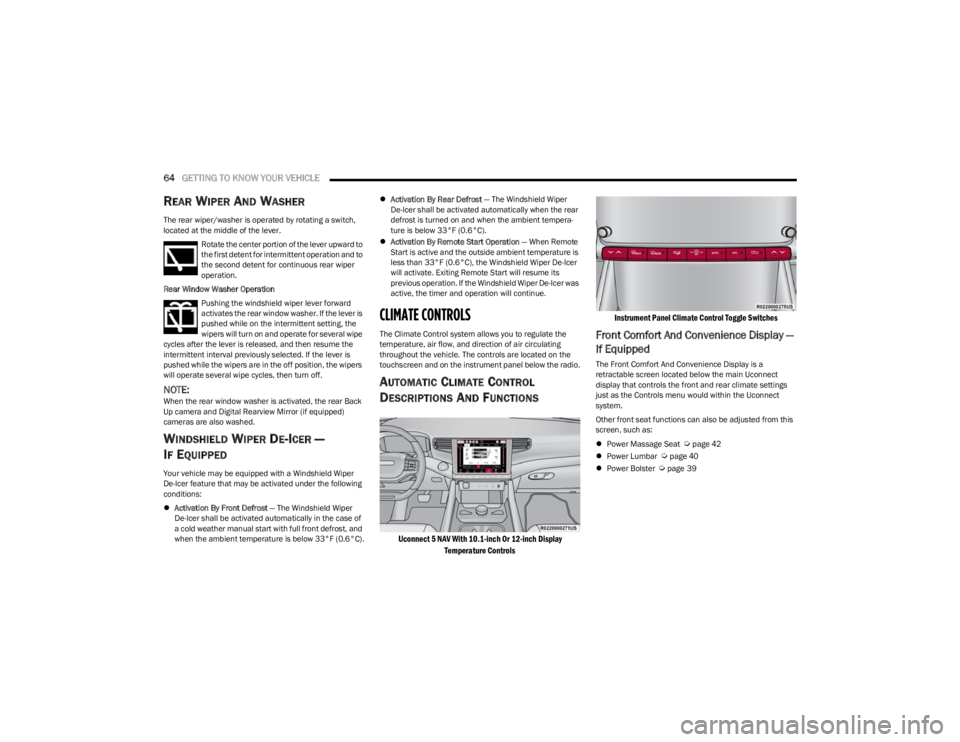
Uconnect 5 NAV With 10.1-inch Or 12-inch Display
Temperature Controls Instrument Panel Climate Control Toggle Switches
Front Comfort And Convenience Display —
If Equipped
The Front Comfort And Convenience Display is a
retractable screen located below the main Uconnect
display that controls the front and rear climate settings
just as the Controls menu would within the Uconnect
system.
Other front seat functions can also be adjusted from this
screen, such as:
Power Massage Seat
Úpage 42
Power Lumbar Úpage 40
Power Bolster Úpage 39
23_WS_OM_EN_USC_t.book Page 64
Page 68 of 396

66GETTING TO KNOW YOUR VEHICLE
MAX Defrost Button
Press the MAX Defrost button on the
touchscreen, or push the toggle switch on the
faceplate down, to change the current airflow
setting to Defrost mode. The indicator
illuminates when this feature is on. Performing this
function will cause the automatic climate controls to
change to manual mode.
When MAX Defrost mode is selected:
The blower speed increases to full (all LEDs on)
Air conditioning compressor is turned on (LED on)
Both driver and passenger temperature controls are
set to HI
Defrost mode is selected (LED on)
Rear defroster is turned on (LED on)
Air recirculation is turned off (LED off)
If MAX Defrost mode is turned off, the Climate Control
system will return to the previous setting.
Rear Defrost Button
Press and release the button on the
touchscreen, or push the toggle switch on the
faceplate down, to turn on the rear window
defroster and the heated outside mirrors (if
equipped). The Rear Defrost indicator illuminates when
the rear window defroster is on. The rear window defroster
automatically turns off after 10 minutes.
Driver And Passenger Temperature
Switches
These toggle switches provide the driver and passenger
with independent temperature control by pushing the
single switch upward or downward.
Instrument Panel Toggle Switches
Push upward on the driver’s or passenger’s
side toggle switch on the faceplate, or press
and slide the temperature bar towards the red
arrow button on the touchscreen for warmer
temperature settings.
Push downward the driver’s or passenger’s
side toggle switch on the faceplate, or press
and slide the temperature bar towards the blue
arrow button on the touchscreen for cooler
temperature settings.
SYNC Button
Press the SYNC button on the touchscreen to
turn the SYNC feature on/off. The SYNC
indicator illuminates when SYNC is on. SYNC is
used to synchronize the front passenger
temperature and rear passenger temperature, mode, and
blower settings with the driver temperature, mode, and
blower settings.
CAUTION!
Failure to follow these cautions can cause damage to
the heating elements:
Use care when washing the inside of the rear
window. Do not use abrasive window cleaners on the
interior surface of the window. Use a soft cloth and a
mild washing solution, wiping parallel to the heating
elements. Labels can be peeled off after soaking
with warm water.
Do not use scrapers, sharp instruments, or abrasive
window cleaners on the interior surface of the
window.
Keep all objects a safe distance from the window.
23_WS_OM_EN_USC_t.book Page 66