start stop button JEEP WAGONEER 2023 Owner's Manual
[x] Cancel search | Manufacturer: JEEP, Model Year: 2023, Model line: WAGONEER, Model: JEEP WAGONEER 2023Pages: 396, PDF Size: 15.17 MB
Page 153 of 396
STARTING AND OPERATING151
ļ¬Driver has hands on steering wheel and is paying atten -
tion to the road
ļ¬ If equipped with the Hands-Free system, vehicle is
driving on an approved roadway
ļ¬ If equipped with the Hands-Free system, a subscription
is active and the vehicle is receiving a clear cellular
signal
NOTE:
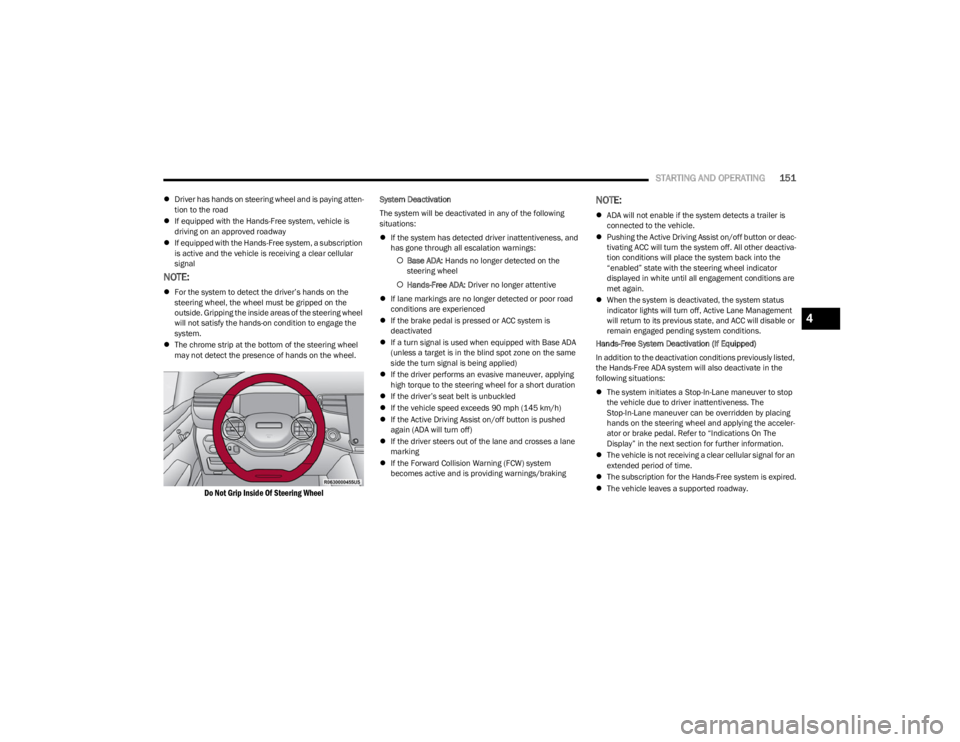
ļ¬For the system to detect the driverās hands on the
steering wheel, the wheel must be gripped on the
outside. Gripping the inside areas of the steering wheel
will not satisfy the hands-on condition to engage the
system.
ļ¬ The chrome strip at the bottom of the steering wheel
may not detect the presence of hands on the wheel.
Do Not Grip Inside Of Steering Wheel
System Deactivation
The system will be deactivated in any of the following
situations:
ļ¬If the system has detected driver inattentiveness, and
has gone through all escalation warnings:
ļ” Base ADA: Hands no longer detected on the
steering wheel
ļ” Hands-Free ADA: Driver no longer attentive
ļ¬ If lane markings are no longer detected or poor road
conditions are experienced
ļ¬ If the brake pedal is pressed or ACC system is
deactivated
ļ¬ If a turn signal is used when equipped with Base ADA
(unless a target is in the blind spot zone on the same
side the turn signal is being applied)
ļ¬ If the driver performs an evasive maneuver, applying
high torque to the steering wheel for a short duration
ļ¬ If the driverās seat belt is unbuckled
ļ¬ If the vehicle speed exceeds 90 mph (145 km/h)
ļ¬ If the Active Driving Assist on/off button is pushed
again (ADA will turn off)
ļ¬ If the driver steers out of the lane and crosses a lane
marking
ļ¬ If the Forward Collision Warning (FCW) system
becomes active and is providing warnings/brakingNOTE:
ļ¬ADA will not enable if the system detects a trailer is
connected to the vehicle.
ļ¬ Pushing the Active Driving Assist on/off button or deac -
tivating ACC will turn the system off. All other deactiva -
tion conditions will place the system back into the
āenabledā state with the steering wheel indicator
displayed in white until all engagement conditions are
met again.
ļ¬ When the system is deactivated, the system status
indicator lights will turn off, Active Lane Management
will return to its previous state, and ACC will disable or
remain engaged pending system conditions.
Hands-Free System Deactivation (If Equipped)
In addition to the deactivation conditions previously listed,
the Hands-Free ADA system will also deactivate in the
following situations:
ļ¬ The system initiates a Stop-In-Lane maneuver to stop
the vehicle due to driver inattentiveness. The
Stop-In-Lane maneuver can be overridden by placing
hands on the steering wheel and applying the acceler -
ator or brake pedal. Refer to āIndications On The
Displayā in the next section for further information.
ļ¬ The vehicle is not receiving a clear cellular signal for an
extended period of time.
ļ¬ The subscription for the Hands-Free system is expired.
ļ¬ The vehicle leaves a supported roadway.
4
23_WS_OM_EN_USC_t.book Page 151
Page 164 of 396

162STARTING AND OPERATING
When pushed, the LED on the ParkSense Active Park
Assist switch will blink momentarily. If any of the previously
described conditions are not present, then the LED will
turn off.
If the vehicle is in any other gear than DRIVE, and an
objected is detected in the vehicleās path, the system will
default to Parallel Park Exit. A prompt will appear in the
Uconnect display, and the driver will need to select āYesā
or āNoā for a Parallel Park Exit maneuver. Any other
conditions will result in a default to a Parallel Parking
maneuver.
PARKSENSE AUTOMATED PARKING ā
I
F EQUIPPED
Parallel/Perpendicular Parking Space
Assistance Operation
When the ParkSense Active Park Assist system is enabled,
the driver must press āParkā on the Uconnect display, and
the system will begin searching for valid parallel and
perpendicular parking spaces.
NOTE:
ļ¬ The driver needs to make sure that the selected
parking space for the maneuver remains free and clear
of any obstructions (e.g. pedestrians, bicycles, etc.).
ļ¬ The driver is responsible to ensure that the selected
parking space is suitable for the maneuver and free/
clear of anything that may be overhanging or
protruding into the parking space (e.g., ladders,
tailgates, etc. from surrounding objects/vehicles). ļ¬
When searching for a parking space, the driver should
drive as parallel or perpendicular (depending on the
type of maneuver) to other vehicles as possible.
ļ¬ While the vehicle is in DRIVE, there will be a full screen
image in the Uconnect display. If the driver shifts to
REVERSE while searching for a parking space, a
camera image will appear in the Uconnect display with
a āShift To Driveā message.
Both types of valid spaces (parallel and perpendicular) will
be displayed in the Uconnect display as they are found.
The available spaces will update in real time.
When valid parking spaces have been found, the driver
will be prompted to stop the vehicle.
Select A Space
The driver can then select a parking space by pressing the
desired space on the Uconnect display.
NOTE:If a space selection is attempted before the vehicle is
stopped, a warning screen will appear in the Uconnect
display with instructions to stop the vehicle to make a
selection. If the driver selects a perpendicular parking space, the
system will prompt the driver to choose a Forward or
Reverse parking method.
Choose Perpendicular Parking Method
NOTE:You can press the āBackā button on the display to return
to the parking space selection screen and select a
different space.
Once the parallel or perpendicular parking maneuver
selection has been made, a message will appear in the
display with instructions to hold down the brake pedal and
Active Park Assist switch. Both of these conditions must
be met in order to begin the parking maneuver. The
message also instructs the driver to push and hold the
Active Park Assist switch for the entire maneuver.
NOTE:When the Active Park Assist switch is held down, the turn
signal for the side of the vehicle where the selected
parking space is located will turn on automatically.
23_WS_OM_EN_USC_t.book Page 162
Page 173 of 396
STARTING AND OPERATING171
NOTE:If snow, ice, mud, or any foreign substance builds up on
the camera lens, clean the lens, rinse with water, and dry
with a soft cloth. Do not cover the lens. Rear Camera Washer
When the rear window washer is activated by pushing the
windshield wiper/washer lever forward, the rear Back Up
and digital rearview mirror (if equipped) cameras are also
washed. For more information, see
Ćpage 64.
ZOOM VIEW
When the Rear View Camera image is being
displayed, and the vehicle speed is below
8 mph (13 km/h) while in any gear selector
position, Zoom View is available. By pressing
the āmagnifying glassā icon in the upper left of the display
screen, the image will zoom in to four times the standard
view. Pressing the icon a second time will return the view
to the standard Back Up Camera display.
When Zoom View is selected while the vehicle is in
REVERSE, then shifted to DRIVE, the camera delay view
will display the standard Back Up Camera view. If the
vehicle is then returned to REVERSE gear from DRIVE, the
Zoom View selection will automatically resume.
Shifting to NEUTRAL from any gear will maintain the
selected view (Zoom or Standard) as long as the vehicle
speed is below 8 mph (13 km/h).
If the vehicle is in PARK, Zoom View is available until the
gear selector is placed in DRIVE or REVERSE and speeds
are at or above 8 mph (13 km/h).
NOTE:
ļ¬ If the vehicle is in DRIVE, NEUTRAL, or REVERSE, and
speed is greater than or equal to 8 mph (13 km/h),
Zoom View is unavailable and the icon will appear gray.
ļ¬ While in Zoom View, the guidelines will not be visible.
VIEWING AT SPEED
When the vehicle is in PARK, NEUTRAL or
DRIVE, the Rear View Camera can be activated
with the Back Up Camera button in the Controls
menu. This feature allows the customer to
monitor the area directly behind the vehicle (or trailer, if
equipped) for up to 10 seconds while driving. If the vehicle
speed remains below 8 mph (13 km/h), the Rear View
Camera image will be displayed continuously until
deactivated via the touchscreen X button.
FAMCAM SYSTEM ā IF EQUIPPED
The FamCam system consists of an interior monitoring
camera mounted on the headliner that allows the driver to
view cargo/passengers in the rear interior of the vehicle
through the Uconnect screen.
To activate the feature, press the FamCam
button in the Controls tab of the Vehicle menu.
The FamCam feature can also be accessed
from the App Drawer, or the status bar at the
top of the Uconnect display.
WARNING!
Drivers must be careful when backing up even when
using the ParkView Rear Back Up Camera. Always
check carefully behind your vehicle, and be sure to
check for pedestrians, animals, other vehicles,
obstructions, or blind spots before backing up. You are
responsible for the safety of your surroundings and
must continue to pay attention while backing up.
Failure to do so can result in serious injury or death.
CAUTION!
ļ¬To avoid vehicle damage, ParkView should only be
used as a parking aid. The ParkView camera is
unable to view every obstacle or object in your drive
path.
ļ¬ To avoid vehicle damage, the vehicle must be driven
slowly when using ParkView to be able to stop in time
when an obstacle is seen. It is recommended that
the driver look frequently over his/her shoulder when
using ParkView.
4
23_WS_OM_EN_USC_t.book Page 171
Page 178 of 396
176STARTING AND OPERATING
Top View Plus Front View
The Front View will show you what is
immediately in front of the vehicle and is
always paired with the Top View of the vehicle.
Front Cross Path View Pressing the Front Cross Path button will give
the driver a wider angle view of the front
camera system. The Top View will be disabled
when this is selected.
Back Up Camera View Pressing the Back Up Camera button will
provide a full screen rear view with Zoom View.
NOTE:If the Rear View Camera view was selected through the
Surround View Camera menu, exiting out of the Rear View
screen will return to the Surround View Camera menu. If
the Back Up Camera was manually activated through the
Controls menu of the Uconnect system, exiting out of the
display screen will return to the Controls menu.
Deactivation
The system can be deactivated under the following
conditions:
ļ¬The speed of the vehicle is greater than 8 mph
(13 km/h).
ļ¬ The vehicle is shifted into PARK. ļ¬
The vehicle is in any gear other than REVERSE and the
touchscreen X button is pressed.
ļ¬ The camera delay system is turned off manually
through Uconnect Settings
Ćpage 197.
Camera Washers
When the rear window washer is activated, the rear Back
Up and digital rearview mirror (if equipped) cameras are
also washed
Ćpage 64.
When the front window washer is activated, the front
cameras will also be washed
Ćpage 63.
NOTE:
ļ¬ If snow, ice, mud, or any foreign substance builds up on
the camera lenses, clean the lenses, rinse with water,
and dry with a soft cloth. Do not cover the lenses.
ļ¬ If a malfunction with the system has occurred, see an
authorized dealer.ZOOM VIEW
When the Rear View Camera image is being displayed, and
the vehicle speed is below 8 mph (13 km/h) while in any
gear selector position, Zoom View is available. By pressing the āmagnifying glassā icon in the
upper left of the display screen, the image will
zoom in to two times the standard view.
Pressing the icon a second time will return the
view to the standard Back Up Camera display.
When Zoom View is selected while the vehicle
is in
REVERSE, then shifted to DRIVE, the camera delay view
will display the standard Back Up Camera view. If the
vehicle is then returned to REVERSE gear from DRIVE,
the Zoom View selection will automatically resume.
Shifting to NEUTRAL from any gear will maintain the
selected view (Zoom or Standard) as long as the vehicle
is below 8 mph (13 km/h).
WARNING!
Drivers must be careful when backing up even when
using the Surround View Camera. Always check
carefully behind your vehicle, and be sure to check for
pedestrians, animals, other vehicles, obstructions, or
blind spots before backing up. You are responsible for
the safety of your surroundings and must continue to
pay attention while backing up. Failure to do so can
result in serious injury or death.
CAUTION!
ļ¬To avoid vehicle damage, Surround View should only
be used as a parking aid. The Surround View camera
is unable to view every obstacle or object in your
drive path.
ļ¬ To avoid vehicle damage, the vehicle must be driven
slowly when using Surround View to be able to stop
in time when an obstacle is seen. It is recommended
that the driver look frequently over his/her shoulder
when using Surround View.
23_WS_OM_EN_USC_t.book Page 176
Page 194 of 396
192STARTING AND OPERATING
Use the following procedure to prepare your vehicle for
recreational towing:
1. Bring the vehicle to a complete stop on level ground,
with the engine running.
2. Press and hold the brake pedal.
3. Shift the transmission into NEUTRAL.
4. If vehicle is equipped with Quadra-Lift air suspension, ensure the vehicle is set to Normal Ride Height.
NOTE:
ļ”Steps 1 through 4 are requirements that must be
met before pushing the N (Neutral) button, and
must continue to be met until the shift has been
completed. If any of these requirements are not
met before pushing the N (Neutral) button or are
no longer met during the shift, then the N (Neutral)
indicator light will flash continuously until all
requirements are met or until the N (Neutral)
button is released.
ļ” The ignition must be in the ON/RUN position for a
shift to take place and for the position indicator
lights to be operable. If the ignition is not in the
ON/RUN position, the shift will not take place and
no position indicator lights will be on or flashing.
ļ” A flashing N (Neutral) position indicator light indi-
cates that shift requirements have not been met. ļ”
If the vehicle is equipped with Quadra-Lift air
suspension, the engine should be started and left
running for a minimum of 60 seconds (with all the
doors closed) at least once every 24 hours. This
process allows the air suspension to adjust the
vehicleās ride height to compensate for tempera -
ture effects.
ļ” Engaging/disengaging of the Electric Park Brake
requires the ignition to be in the ON/RUN position.
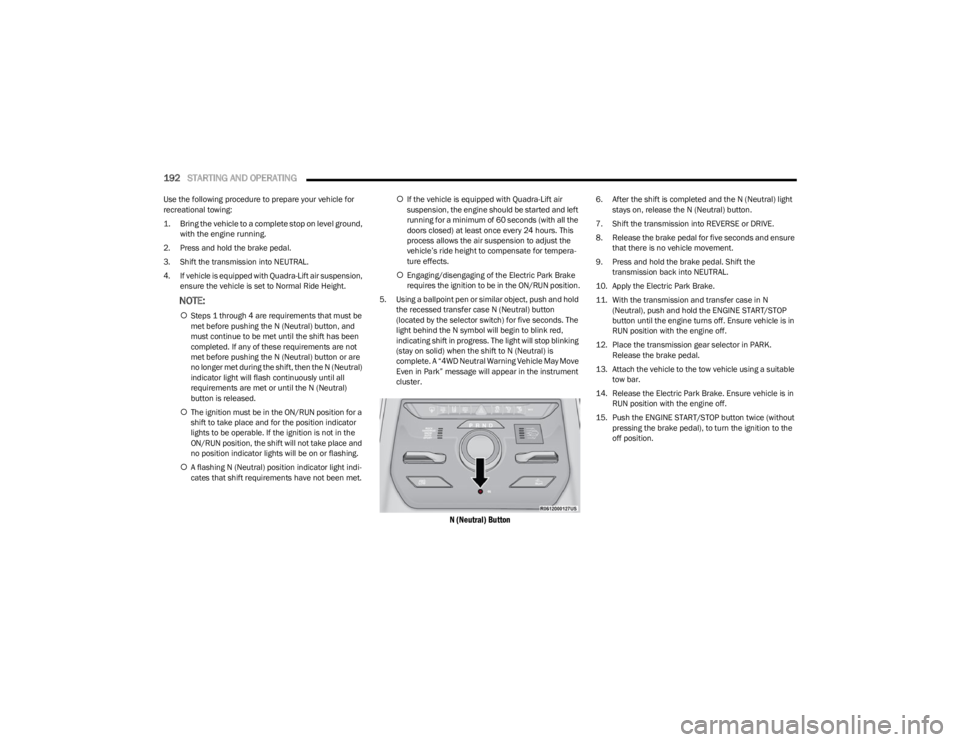
5. Using a ballpoint pen or similar object, push and hold the recessed transfer case N (Neutral) button
(located by the selector switch) for five seconds. The
light behind the N symbol will begin to blink red,
indicating shift in progress. The light will stop blinking
(stay on solid) when the shift to N (Neutral) is
complete. A ā4WD Neutral Warning Vehicle May Move
Even in Parkā message will appear in the instrument
cluster.
N (Neutral) Button
6. After the shift is completed and the N (Neutral) light stays on, release the N (Neutral) button.
7. Shift the transmission into REVERSE or DRIVE.
8. Release the brake pedal for five seconds and ensure that there is no vehicle movement.
9. Press and hold the brake pedal. Shift the transmission back into NEUTRAL.
10. Apply the Electric Park Brake.
11. With the transmission and transfer case in N (Neutral), push and hold the ENGINE START/STOP
button until the engine turns off. Ensure vehicle is in
RUN position with the engine off.
12. Place the transmission gear selector in PARK. Release the brake pedal.
13. Attach the vehicle to the tow vehicle using a suitable tow bar.
14. Release the Electric Park Brake. Ensure vehicle is in RUN position with the engine off.
15. Push the ENGINE START/STOP button twice (without pressing the brake pedal), to turn the ignition to the
off position.
23_WS_OM_EN_USC_t.book Page 192
Page 195 of 396
STARTING AND OPERATING193
Shifting Out Of N (Neutral)
Use the following procedure to prepare your vehicle for
normal usage:
1. Bring the vehicle to a complete stop, leaving it
connected to the tow vehicle.
2. Apply the Electric Park Brake.
3. Start the engine.
NOTE:
ļ” Steps 1 through 5 are requirements that must be
met before pushing the N (Neutral) button, and
must continue to be met until the shift has been
completed. If any of these requirements are not
met before pushing the N (Neutral) button or are
no longer met during the shift, the N (Neutral) indi -
cator light will flash continuously until all require -
ments are met or until the N (Neutral) button is
released.
ļ” The ignition must be in the ON/RUN position for a
shift to take place and for the position indicator
lights to be operable. If the ignition is not in the
ON/RUN position, the shift will not take place and
no position indicator lights will be on or flashing.
ļ” A flashing N (Neutral) position indicator light indi-
cates that shift requirements have not been met.
4. Press and hold the brake pedal.
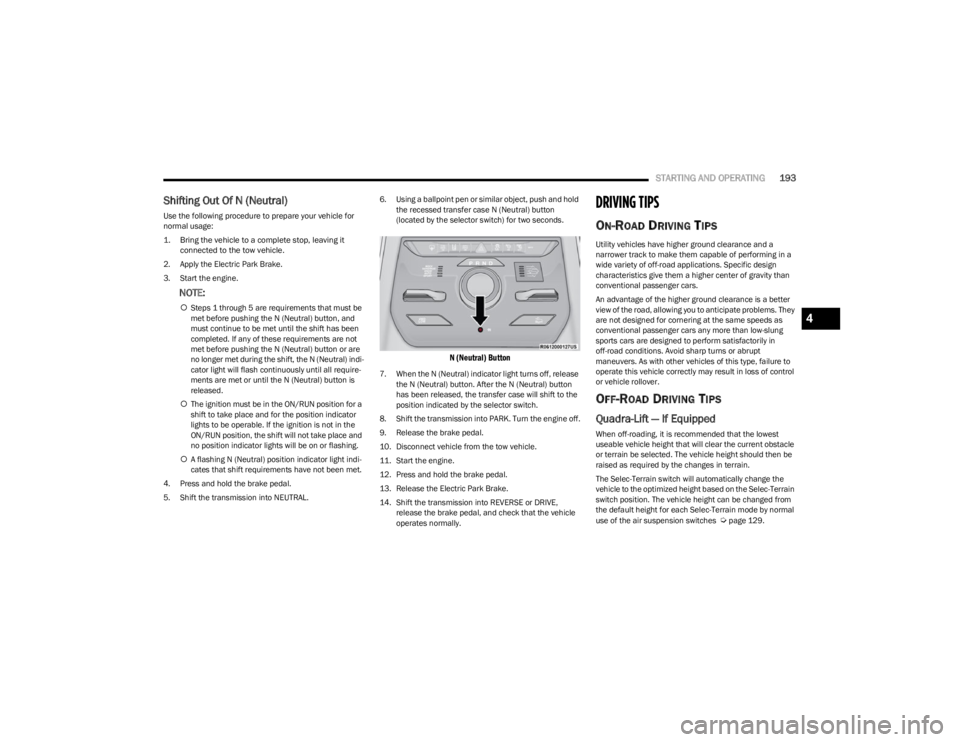
5. Shift the transmission into NEUTRAL. 6. Using a ballpoint pen or similar object, push and hold
the recessed transfer case N (Neutral) button
(located by the selector switch) for two seconds.
N (Neutral) Button
7. When the N (Neutral) indicator light turns off, release the N (Neutral) button. After the N (Neutral) button
has been released, the transfer case will shift to the
position indicated by the selector switch.
8. Shift the transmission into PARK. Turn the engine off.
9. Release the brake pedal.
10. Disconnect vehicle from the tow vehicle.
11. Start the engine.
12. Press and hold the brake pedal.
13. Release the Electric Park Brake.
14. Shift the transmission into REVERSE or DRIVE, release the brake pedal, and check that the vehicle
operates normally.
DRIVING TIPS
ON-ROAD DRIVING TIPS
Utility vehicles have higher ground clearance and a
narrower track to make them capable of performing in a
wide variety of off-road applications. Specific design
characteristics give them a higher center of gravity than
conventional passenger cars.
An advantage of the higher ground clearance is a better
view of the road, allowing you to anticipate problems. They
are not designed for cornering at the same speeds as
conventional passenger cars any more than low-slung
sports cars are designed to perform satisfactorily in
off-road conditions. Avoid sharp turns or abrupt
maneuvers. As with other vehicles of this type, failure to
operate this vehicle correctly may result in loss of control
or vehicle rollover.
OFF-ROAD DRIVING TIPS
Quadra-Lift ā If Equipped
When off-roading, it is recommended that the lowest
useable vehicle height that will clear the current obstacle
or terrain be selected. The vehicle height should then be
raised as required by the changes in terrain.
The Selec-Terrain switch will automatically change the
vehicle to the optimized height based on the Selec-Terrain
switch position. The vehicle height can be changed from
the default height for each Selec-Terrain mode by normal
use of the air suspension switches
Ćpage 129.
4
23_WS_OM_EN_USC_t.book Page 193
Page 254 of 396
252SAFETY
Pedestrian Emergency Braking (PEB)
PEB is a subsystem of the Forward Collision Warning
(FCW) system which provides the driver with audible
warnings and visual warnings, in the instrument cluster
display. It may apply limited automatic braking when it
detects a potential frontal collision with a pedestrian/
cyclist.
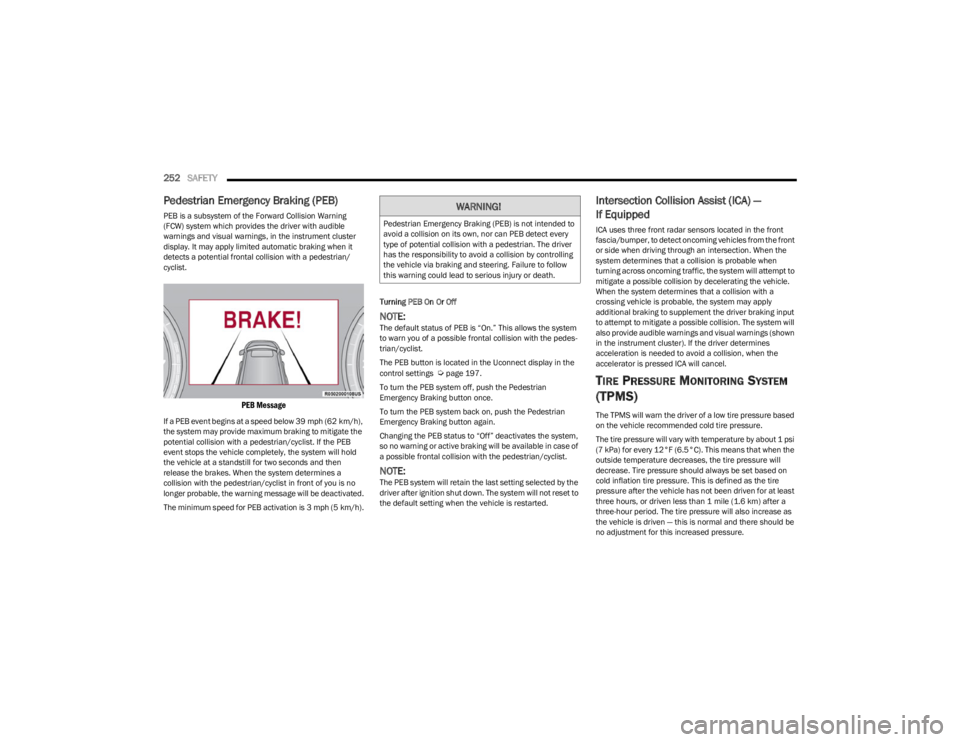
PEB Message
If a PEB event begins at a speed below 39 mph (62 km/h),
the system may provide maximum braking to mitigate the
potential collision with a pedestrian/cyclist. If the PEB
event stops the vehicle completely, the system will hold
the vehicle at a standstill for two seconds and then
release the brakes. When the system determines a
collision with the pedestrian/cyclist in front of you is no
longer probable, the warning message will be deactivated.
The minimum speed for PEB activation is 3 mph (5 km/h). Turning PEB On Or Off
NOTE:The default status of PEB is āOn.ā This allows the system
to warn you of a possible frontal collision with the pedes
-
trian/cyclist.
The PEB button is located in the Uconnect display in the
control settings
Ćpage 197.
To turn the PEB system off, push the Pedestrian
Emergency Braking button once.
To turn the PEB system back on, push the Pedestrian
Emergency Braking button again.
Changing the PEB status to āOffā deactivates the system,
so no warning or active braking will be available in case of
a possible frontal collision with the pedestrian/cyclist.
NOTE:The PEB system will retain the last setting selected by the
driver after ignition shut down. The system will not reset to
the default setting when the vehicle is restarted.
Intersection Collision Assist (ICA) ā
If Equipped
ICA uses three front radar sensors located in the front
fascia/bumper, to detect oncoming vehicles from the front
or side when driving through an intersection. When the
system determines that a collision is probable when
turning across oncoming traffic, the system will attempt to
mitigate a possible collision by decelerating the vehicle.
When the system determines that a collision with a
crossing vehicle is probable, the system may apply
additional braking to supplement the driver braking input
to attempt to mitigate a possible collision. The system will
also provide audible warnings and visual warnings (shown
in the instrument cluster). If the driver determines
acceleration is needed to avoid a collision, when the
accelerator is pressed ICA will cancel.
TIRE PRESSURE MONITORING SYSTEM
(TPMS)
The TPMS will warn the driver of a low tire pressure based
on the vehicle recommended cold tire pressure.
The tire pressure will vary with temperature by about 1 psi
(7 kPa) for every 12Ā°F (6.5Ā°C). This means that when the
outside temperature decreases, the tire pressure will
decrease. Tire pressure should always be set based on
cold inflation tire pressure. This is defined as the tire
pressure after the vehicle has not been driven for at least
three hours, or driven less than 1 mile (1.6 km) after a
three-hour period. The tire pressure will also increase as
the vehicle is driven ā this is normal and there should be
no adjustment for this increased pressure.
WARNING!
Pedestrian Emergency Braking (PEB) is not intended to
avoid a collision on its own, nor can PEB detect every
type of potential collision with a pedestrian. The driver
has the responsibility to avoid a collision by controlling
the vehicle via braking and steering. Failure to follow
this warning could lead to serious injury or death.
23_WS_OM_EN_USC_t.book Page 252