Auto lock JEEP WAGONEER 2023 Owner's Manual
[x] Cancel search | Manufacturer: JEEP, Model Year: 2023, Model line: WAGONEER, Model: JEEP WAGONEER 2023Pages: 396, PDF Size: 15.17 MB
Page 64 of 396
62GETTING TO KNOW YOUR VEHICLE
Multicolor Ambient Lighting — If Equipped
The color of certain ambient lighting inside of the vehicle
can be selected within the Apps menu on the radio screen,
or within Uconnect Settings
Úpage 197. Brightness is
adjusted using the ambient light dimmer control on the
headlight switch.
Five colors can be selected for the following two zones
inside of the vehicle:
Zone 1:
Instrument panel decorative ambient lights
Door panel decorative ambient lights
Zone 2:
Front seat footwell areas below the instrument
panel
Lighting below the second row seats
Map pocket lighting on all four door panels
These areas can be set to different colors, or if the SYNC
button is selected within the settings menu, all colored
lights will be set to the same color automatically.
NOTE:All other ambient lighting inside of the vehicle will remain
white, and the ambient light dimmer control switch will
adjust all ambient lighting at the same time.
ILLUMINATED ENTRY — IF EQUIPPED
The Illuminated Entry feature allows you to activate the
low beam, parking lights, and side marker lights for 25
seconds when the vehicle is unlocked (through the key fob
or the Passive Entry door handles [if equipped]). This feature can be activated or deactivated through the
Uconnect Settings
Úpage 197.
NOTE:
When a door is open with the feature active, the activa -
tion of the lights is extended for five seconds.
The feature is disabled when the vehicle is locked or
when the ignition is placed in the ON/RUN position.
WINDSHIELD WIPERS AND WASHERS
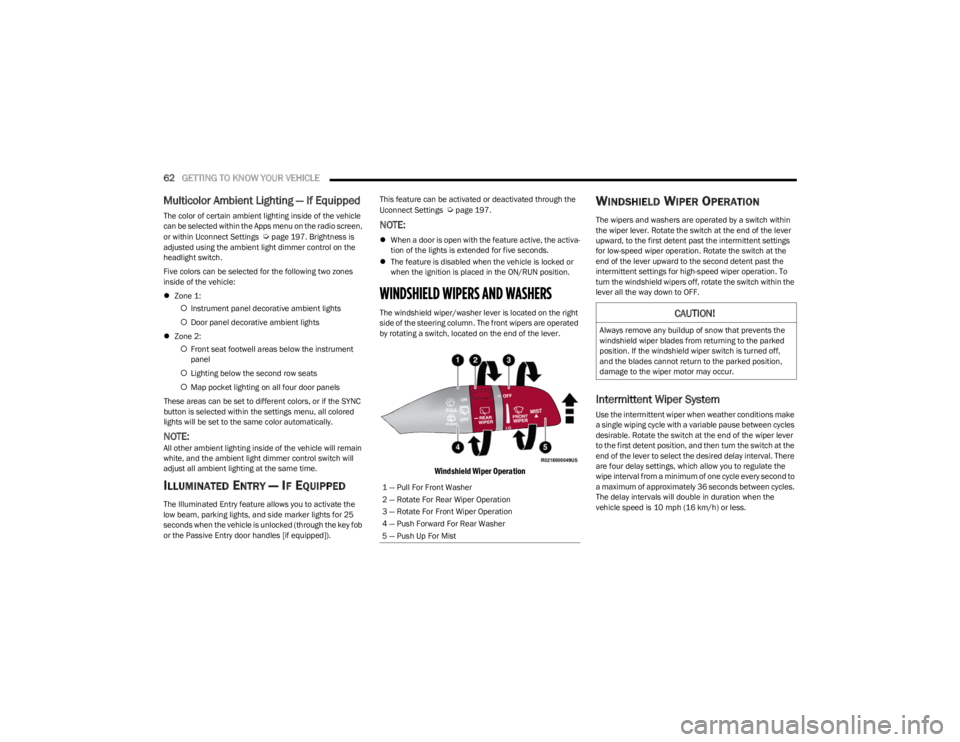
The windshield wiper/washer lever is located on the right
side of the steering column. The front wipers are operated
by rotating a switch, located on the end of the lever.
Windshield Wiper Operation
WINDSHIELD WIPER OPERATION
The wipers and washers are operated by a switch within
the wiper lever. Rotate the switch at the end of the lever
upward, to the first detent past the intermittent settings
for low-speed wiper operation. Rotate the switch at the
end of the lever upward to the second detent past the
intermittent settings for high-speed wiper operation. To
turn the windshield wipers off, rotate the switch within the
lever all the way down to OFF.
Intermittent Wiper System
Use the intermittent wiper when weather conditions make
a single wiping cycle with a variable pause between cycles
desirable. Rotate the switch at the end of the wiper lever
to the first detent position, and then turn the switch at the
end of the lever to select the desired delay interval. There
are four delay settings, which allow you to regulate the
wipe interval from a minimum of one cycle every second to
a maximum of approximately 36 seconds between cycles.
The delay intervals will double in duration when the
vehicle speed is 10 mph (16 km/h) or less.
1 — Pull For Front Washer
2 — Rotate For Rear Wiper Operation
3 — Rotate For Front Wiper Operation
4 — Push Forward For Rear Washer
5 — Push Up For Mist
CAUTION!
Always remove any buildup of snow that prevents the
windshield wiper blades from returning to the parked
position. If the windshield wiper switch is turned off,
and the blades cannot return to the parked position,
damage to the wiper motor may occur.
23_WS_OM_EN_USC_t.book Page 62
Page 70 of 396
68GETTING TO KNOW YOUR VEHICLE
Controlling The Rear Climate Controls
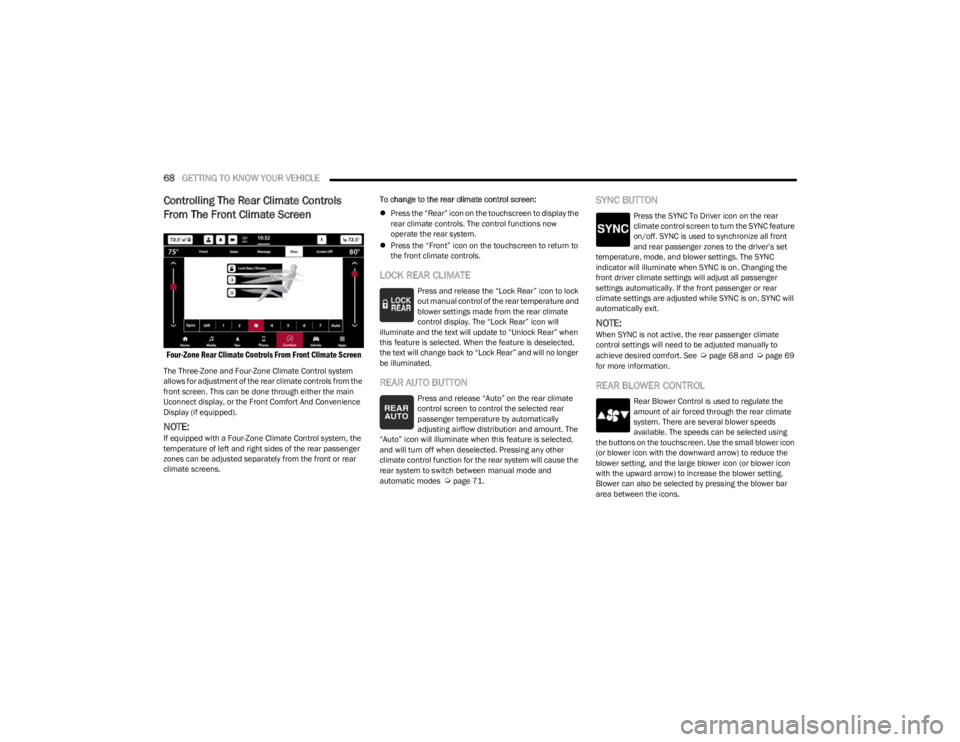
From The Front Climate Screen
Four-Zone Rear Climate Controls From Front Climate Screen
The Three-Zone and Four-Zone Climate Control system
allows for adjustment of the rear climate controls from the
front screen. This can be done through either the main
Uconnect display, or the Front Comfort And Convenience
Display (if equipped).
NOTE:If equipped with a Four-Zone Climate Control system, the
temperature of left and right sides of the rear passenger
zones can be adjusted separately from the front or rear
climate screens. To change to the rear climate control screen:
Press the “Rear” icon on the touchscreen to display the
rear climate controls. The control functions now
operate the rear system.
Press the “Front” icon on the touchscreen to return to
the front climate controls.
LOCK REAR CLIMATE
Press and release the “Lock Rear” icon to lock
out manual control of the rear temperature and
blower settings made from the rear climate
control display. The “Lock Rear” icon will
illuminate and the text will update to “Unlock Rear” when
this feature is selected. When the feature is deselected,
the text will change back to “Lock Rear” and will no longer
be illuminated.
REAR AUTO BUTTON
Press and release “Auto” on the rear climate
control screen to control the selected rear
passenger temperature by automatically
adjusting airflow distribution and amount. The
“Auto” icon will illuminate when this feature is selected,
and will turn off when deselected. Pressing any other
climate control function for the rear system will cause the
rear system to switch between manual mode and
automatic modes
Úpage 71.
SYNC BUTTON
Press the SYNC To Driver icon on the rear
climate control screen to turn the SYNC feature
on/off. SYNC is used to synchronize all front
and rear passenger zones to the driver’s set
temperature, mode, and blower settings. The SYNC
indicator will illuminate when SYNC is on. Changing the
front driver climate settings will adjust all passenger
settings automatically. If the front passenger or rear
climate settings are adjusted while SYNC is on, SYNC will
automatically exit.
NOTE:When SYNC is not active, the rear passenger climate
control settings will need to be adjusted manually to
achieve desired comfort. See
Úpage 68 and Úpage 69
for more information.
REAR BLOWER CONTROL
Rear Blower Control is used to regulate the
amount of air forced through the rear climate
system. There are several blower speeds
available. The speeds can be selected using
the buttons on the touchscreen. Use the small blower icon
(or blower icon with the downward arrow) to reduce the
blower setting, and the large blower icon (or blower icon
with the upward arrow) to increase the blower setting.
Blower can also be selected by pressing the blower bar
area between the icons.
23_WS_OM_EN_USC_t.book Page 68
Page 72 of 396
70GETTING TO KNOW YOUR VEHICLE
AUTO BUTTON
Push the AUTO button below the rear climate
control display, or if equipped, press and
release the AUTO button on the Rear Comfort
And Convenience Display touchscreen to
control the rear passenger area’s temperature by
automatically adjusting distribution and amount of airflow.
Performing this function will cause the system to switch
between manual mode and automatic modes
Úpage 71.
REAR TEMPERATURE CONTROL
Push the Up or Down buttons near the rear climate control
display, or if equipped, press the Up or Down arrow
buttons on the Rear Comfort And Convenience Display
touchscreen to control the rear passenger’s temperature.
NOTE:If equipped with a Four-Zone ATC system, the left and right
sides of the rear passenger zones can be adjusted sepa -
rately.
Push the Up arrow hard button, or press and
release, or slide the temperature bar on the
touchscreen towards the red arrow button on
the touchscreen for warmer temperature
settings.
Push the Down arrow hard button, or press and
release, or slide the temperature bar on the
touchscreen towards the blue arrow button on
the touchscreen for cooler temperature
settings.
REAR BLOWER CONTROL
Blower Control is used to regulate the amount
of air forced through the Climate Control
system. There are several blower speeds
available. The speeds can be selected using
the blower control buttons near the rear climate control
display, or if equipped, on the Rear Comfort And
Convenience Display touchscreen.
Use the blower button with the down arrow, or small
blower icon on the touchscreen to reduce the blower
setting. Use the blower button with the up arrow, or the
large blower icon on the touchscreen to increase the
blower setting.
NOTE:Blower speed can also be selected by pressing the
numbered blower speed on the touchscreen bar area
between the blower icons.
REAR MODE CONTROL
Pushing the Mode button below the rear
climate control display, located on the rear of
the center console, will cycle through the three
rear mode control options for airflow
distribution. These options are: Face, Face/Feet, and
Feet.
Mode Control From The Rear Comfort And Convenience
Display
If equipped with the Rear Comfort And Convenience
display, two airflow distribution modes can be selected
on/off from the display by individually by pressing the icons on the touchscreen for up to three combinations of
airflow. The icons on the screen will illuminate when
selected, and turn off when deselected.
The two airflow modes are:
NOTE:If Auto is selected, these icons will no longer be available
and the current mode selection will be overwritten.
REAR CLIMATE LOCK
When the rear climate controls are locked from
the front climate controls, “Unlock Rear” will
illuminate on the rear climate screen. No
adjustments to the rear climate system can be
made from the rear climate controls while the system is
locked.
When the controls are then unlocked from the front
climate controls, the text on the rear screen will update to
“Lock Rear”, and no longer be illuminated. Temperature,
blower speed, and mode settings can now be made from
the rear climate controls.
Face (panel outlets)
Feet (floor outlets)
23_WS_OM_EN_USC_t.book Page 70
Page 73 of 396
GETTING TO KNOW YOUR VEHICLE71
REAR CLIMATE CONTROL OFF
To turn the rear climate controls off, push the
OFF button below the rear climate control
display, or if equipped, press and release the
OFF button on the Rear Comfort And
Convenience Display touchscreen, near the blower
buttons.
AUTOMATIC TEMPERATURE CONTROL
(ATC)
Automatic Operation
1. Push the AUTO button on the front climate control
display, and the word “AUTO” will illuminate along
with two temperatures for the driver and front
passenger. The system will then automatically
regulate the amount of airflow.
2. Adjust the temperature you would like the system to maintain, by adjusting the driver, passenger, and rear
temperatures. Once the desired temperature is
displayed, the system will achieve, and automatically
maintain, that comfort level.
3. When the system is set up for your comfort level, it is not necessary to change the settings. You will
experience the greatest efficiency by simply allowing
the system to function automatically.
NOTE:It is not necessary to move the temperature settings. The
system automatically adjusts the temperature, mode, and
fan speed to provide comfort as quickly as possible. To provide you with maximum comfort in the automatic
mode during cold start-ups, the blower fan will remain on
low until the engine warms up. The fan will engage
immediately if the Defrost mode is selected, or by
changing the front blower setting.
Manual Operation Override
This system offers a full complement of manual override
features. The AUTO symbol in the front climate control
display will no longer be illuminated when the system is
being used in the manual mode.
NOTE:The system will not automatically sense the presence of
fog, mist or ice on the windshield. Defrost mode must be
manually selected to clear the windshield and side glass.
CLIMATE VOICE RECOGNITION
Adjust vehicle temperatures hands-free and keep
everyone comfortable while you keep moving ahead (If
vehicle is equipped with climate control).
Push the VR/Phone button . After the beep, say one of
the following commands:
“Set the driver temperature to 70 degrees”
“Set the passenger temperature to 70 degrees”
Did You Know: Voice Command for Climate may only be
used to adjust the interior temperature of your vehicle.
Voice Command will not work to adjust the heated seats
or steering wheel if equipped.
OPERATING TIPS
Refer to the chart at the end of this section for suggested
control settings for various weather conditions.
Summer Operation
The engine cooling system must be protected with a
high-quality antifreeze coolant to provide proper corrosion
protection and to protect against engine overheating. OAT
coolant (conforming to MS.90032) is recommended.
Winter Operation
To ensure the best possible heater and defroster
performance, make sure the engine cooling system is
functioning properly and the proper amount, type, and
concentration of coolant is used. Use of the Air
Recirculation mode during Winter months is not
recommended, because it may cause window fogging.
Vacation/Storage
For information on maintaining the Climate Control system
when the vehicle is being stored for an extended period of
time, see
Úpage 368.
CAUTION!
Interior air enters the Rear Climate Control system
through an intake grille, located in the right side trim
panel behind the third row seats. The heater outlets are
located in the right side trim panel, just behind the rear
doors. Do not block or place objects directly in front of
the inlet grille or heater outlets. The electrical system
could overload causing damage to the blower motor.
2
23_WS_OM_EN_USC_t.book Page 71
Page 78 of 396
76GETTING TO KNOW YOUR VEHICLE
The keypad will then turn red again, and return to the
locked mode when the safe lid is closed.
NOTE:The keypad will flash red if an incorrect lock code is
entered. If the incorrect code is entered ten times in a row,
the user will be locked out from further attempts for
approximately 30 minutes.
To revert the safe back to the unlocked mode:
1. Enter the programmed 6-digit code.
2. Press and hold the Door Open button for two
seconds. The keypad will flash red and change to
pink.
3. Enter the 6-digit code and press the Door Open button. The keypad will flash white.
Once this procedure is completed, the safe will no longer
lock when the lid is closed.
Lock Code Override
If you forget the 6-digit code, there is a way to override the
code, using the emergency key stored inside your key fob:
1. Remove the emergency key from the key fob
Ú
page 18.
2. Use the emergency key to open the safe door.
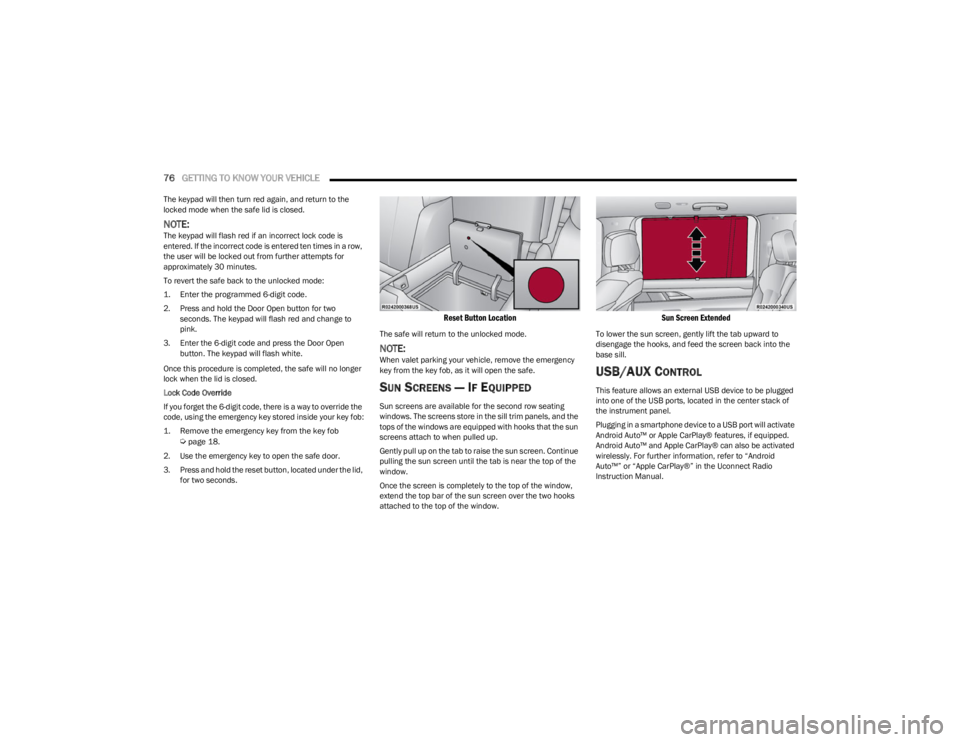
3. Press and hold the reset button, located under the lid, for two seconds.
Reset Button Location
The safe will return to the unlocked mode.
NOTE:When valet parking your vehicle, remove the emergency
key from the key fob, as it will open the safe.
SUN SCREENS — IF EQUIPPED
Sun screens are available for the second row seating
windows. The screens store in the sill trim panels, and the
tops of the windows are equipped with hooks that the sun
screens attach to when pulled up.
Gently pull up on the tab to raise the sun screen. Continue
pulling the sun screen until the tab is near the top of the
window.
Once the screen is completely to the top of the window,
extend the top bar of the sun screen over the two hooks
attached to the top of the window.
Sun Screen Extended
To lower the sun screen, gently lift the tab upward to
disengage the hooks, and feed the screen back into the
base sill.
USB/AUX CONTROL
This feature allows an external USB device to be plugged
into one of the USB ports, located in the center stack of
the instrument panel.
Plugging in a smartphone device to a USB port will activate
Android Auto™ or Apple CarPlay® features, if equipped.
Android Auto™ and Apple CarPlay® can also be activated
wirelessly. For further information, refer to “Android
Auto™” or “Apple CarPlay®” in the Uconnect Radio
Instruction Manual.
23_WS_OM_EN_USC_t.book Page 76
Page 86 of 396
84GETTING TO KNOW YOUR VEHICLE
Opening And Closing The Sunroof
The sunroof has two programmed automatic stops for the
sunroof open position: a comfort stop position and a full
open position. The comfort stop position will minimize
wind buffeting in the interior. Express Open/Close
To open the sunroof, push OPEN on the sunroof switch
and release it within one-half second. The sunroof will
open to the comfort stop position and stop automatically.
Push and release OPEN again to continue to the full open
position.
To close the sunroof, push CLOSE on the sunroof switch
and release it within one-half second. The sunroof will
close automatically from any position.
During Express Open or Express Close operation, any
other actuation of the sunroof switch will stop the sunroof.
Manual Open/Close
To open the sunroof, push and hold OPEN on the sunroof
switch. The sunroof will open to the comfort stop position,
then automatically stop. Release the switch then push and
hold again to continue to the full open position.
To close the sunroof, push and hold CLOSE on the sunroof
switch.
Any release of the switch during open or close operation
will stop the sunroof movement in a partially open
position.
Express Venting The Sunroof
To vent the sunroof, push TILT on the vent switch and
release within one half second. The sunroof will open to
the vent position regardless of its initial position. During
Express Vent operation, any other actuation of the switch
will stop the sunroof.
NOTE:If the sunshade is in the closed position when Express/
Manual Open or Vent operation is initiated, the sunshade
will automatically open to the half open position prior to
the sunroof opening.
Opening And Closing The Power Sunshade
The sunshade has two programmed open positions: half
open and full open positions. When operating the
sunshade from the closed position, the sunshade will
always stop at the half open position regardless of express
or manual open operation. The switch must be pushed
again to continue on to full open position.
If the sunroof is open or vented, the sunshade cannot be
closed beyond the half open position. Pushing the
sunshade close switch when the sunroof is open/vented
and the sunshade is at half open position will first
automatically close the sunroof prior to the sunshade
closing.
Express Open/Close
To open the sunshade, push OPEN on the sunshade
switch and release it within one-half second, the
sunshade will open to the half open position and stop
automatically. Push and release OPEN again to continue
to open the sunshade to the full open position.
To close the sunshade, push CLOSE on the sunshade
switch and release it within one-half second.
During Express Open or Express Close operation, any
other actuation of the sunroof switches will stop the
sunshade in a partially open position.
WARNING!
Never leave children unattended in a vehicle, or with
access to an unlocked vehicle. Never leave the key
fob in or near the vehicle, or in a location accessible
to children. Do not leave the Keyless Enter ‘n Go™
Ignition in the ON/RUN position. Occupants, particu -
larly unattended children, can become entrapped by
the power sunroof while operating the power sunroof
switch. Such entrapment may result in serious injury
or death.
In a collision, there is a greater risk of being thrown
from a vehicle with an open sunroof. You could also
be seriously injured or killed. Always fasten your seat
belt properly and make sure all passengers are also
properly secured.
Do not allow small children to operate the sunroof.
Never allow your fingers, other body parts, or any
object, to project through the sunroof opening. Injury
may result.
23_WS_OM_EN_USC_t.book Page 84
Page 121 of 396
119
STARTING AND OPERATING
STARTING THE ENGINE
Before starting your vehicle, adjust your seat, adjust the inside
and outside mirrors, fasten your seat belt, and if present,
instruct all other occupants to buckle their seat belts.
AUTOMATIC TRANSMISSION
The gear selector must be in the NEUTRAL (N) or PARK (P)
position before you can start the engine. Apply the brakes
before shifting into any driving gear.
KEYLESS ENTER ‘N GO™ — IGNITION
This feature allows the driver to operate the ignition
switch with the push of a button, as long as the Remote
Start/Keyless Enter ‘n Go™ key fob is in the passenger
compartment.
NORMAL STARTING
To Turn On The Engine Using The ENGINE START/STOP
Button
1. The transmission must be in PARK (P).
2. Press and hold the brake pedal while pushing the ENGINE START/STOP button once.
3. The system takes over and attempts to start the vehicle. If the vehicle fails to start, the starter will
disengage automatically after 10 seconds.
4. If you wish to stop the cranking of the engine prior to the engine starting, push the ENGINE START/STOP
button again.
To Turn Off The Engine Using The ENGINE START/STOP
Button
1. Place the gear selector in PARK, then push and release the ENGINE START/STOP button.
2. The ignition will return to the OFF position.
3. If the gear selector is not in PARK, the ENGINE START/STOP button must be held for two seconds or
three short pushes in a row with the vehicle speed
above 5 mph (8 km/h) before the engine will shut off.
The ignition will remain in the ON/RUN position until
the gear selector is in PARK and the button is pushed
twice to the OFF position.
WARNING!
Before exiting a vehicle, always come to a complete
stop, then shift the automatic transmission into PARK
and apply the parking brake.
Always make sure the keyless ignition node is in the
OFF position, key fob is removed from the vehicle and
vehicle is locked.
Never leave children alone in a vehicle, or with access
to an unlocked vehicle. Leaving children in a vehicle
unattended is dangerous for a number of reasons. A
child or others could be seriously or fatally injured.
Children should be warned not to touch the parking
brake, brake pedal or the gear selector.
Do not leave the key fob in or near the vehicle, or in a
location accessible to children, and do not leave the
ignition of a vehicle equipped with Keyless
Enter ‘n Go™ in the ON/RUN position. A child could
operate power windows, other controls, or move the
vehicle.
Do not leave children or animals inside parked vehi -
cles in hot weather. Interior heat build-up may cause
serious injury or death.
CAUTION!
Damage to the transmission may occur if the following
precautions are not observed:
Do not shift from REVERSE (R), PARK, or NEUTRAL
into any forward gear when the engine is above idle
speed.
Shift into PARK only after the vehicle has come to a
complete stop.
Shift into or out of REVERSE only after the vehicle has
come to a complete stop and the engine is at idle
speed.
Before shifting into any gear, make sure your foot is
firmly on the brake pedal.4
23_WS_OM_EN_USC_t.book Page 119
Page 124 of 396
122STARTING AND OPERATING
COLD WEATHER OPERATION
(B
ELOW –22°F OR −30°C)
To ensure reliable starting at these temperatures, use of
an externally powered electric engine block heater
(available from an authorized dealer) is recommended.
AFTER STARTING
The idle speed is controlled automatically, and it will
decrease as the engine warms up.
TURBOCHARGER “COOL DOWN” —
3.0L E
NGINE ONLY
The 3.0L engine is equipped with an after-run pump to
cool the turbocharger after the engine is shut off.
Depending on the type of driving and the amount of cargo,
the pump will run for up to 20 minutes after the engine
has been shut off to circulate coolant through the
turbocharger. Although the pump is rubber-mounted for
quiet operation, it is normal to hear it running during this
time.
ENGINE BLOCK HEATER — IF EQUIPPED
The engine block heater warms the engine, and permits
quicker starts in cold weather. Connect the cord to a
standard 110-115 Volt AC electrical outlet with a
grounded, three-wire extension cord.
The engine block heater must be plugged in at least one
hour to have an adequate warming effect on the engine. The engine block heater cord is coiled and strapped right
behind the engine air cleaner filter assembly from the
manufacturer.
ENGINE BREAK-IN RECOMMENDATIONS
An initial break-in period is recommended for the
powertrain (engine, transmission, axle, etc.) in your
vehicle. Adhering to the following guidelines will contribute
to improved longevity, fuel economy, and performance.
Drive moderately during the first 100 miles (160 km).
After that, for the first 500 miles (800 km), avoid long
periods at constant speed. Varying speed, engine RPM,
and throttle position is desirable.
Avoid high performance, severe off-road, and towing for
the first 500 miles (800 km).
NOTE:A new engine may consume some oil during its first few
thousand miles (km) of operation. This should be
considered a normal part of the break-in and not inter -
preted as a problem. For engines not equipped with an oil
level sensor, please check your oil level frequently during
the break-in period. Add manufacturer-approved oil as
required
Úpage 376.
PARKING BRAKE
ELECTRIC PARK BRAKE (EPB)
Your vehicle is equipped with an EPB that offers simple
operation, and some additional features that make the
parking brake more convenient and useful.
The parking brake is primarily intended to prevent the
vehicle from rolling while parked. Before leaving the
vehicle, make sure that the parking brake is applied. Also,
be certain to leave the transmission in PARK.
You can engage the parking brake in two ways:
Manually, by applying the EPB switch.
Automatically, by enabling the Auto Park Brake feature
in the customer programmable features section of the
Uconnect settings.
WARNING!
Remember to disconnect the engine block heater cord
before driving. Damage to the 110-115 Volt electrical
cord could cause electrocution.
CAUTION!
Never use Non-Detergent Oil or Straight Mineral Oil in
the engine or damage may result. ONLY USE OILS THAT
ARE API APPROVED
Úpage 376.
23_WS_OM_EN_USC_t.book Page 122
Page 125 of 396
STARTING AND OPERATING123
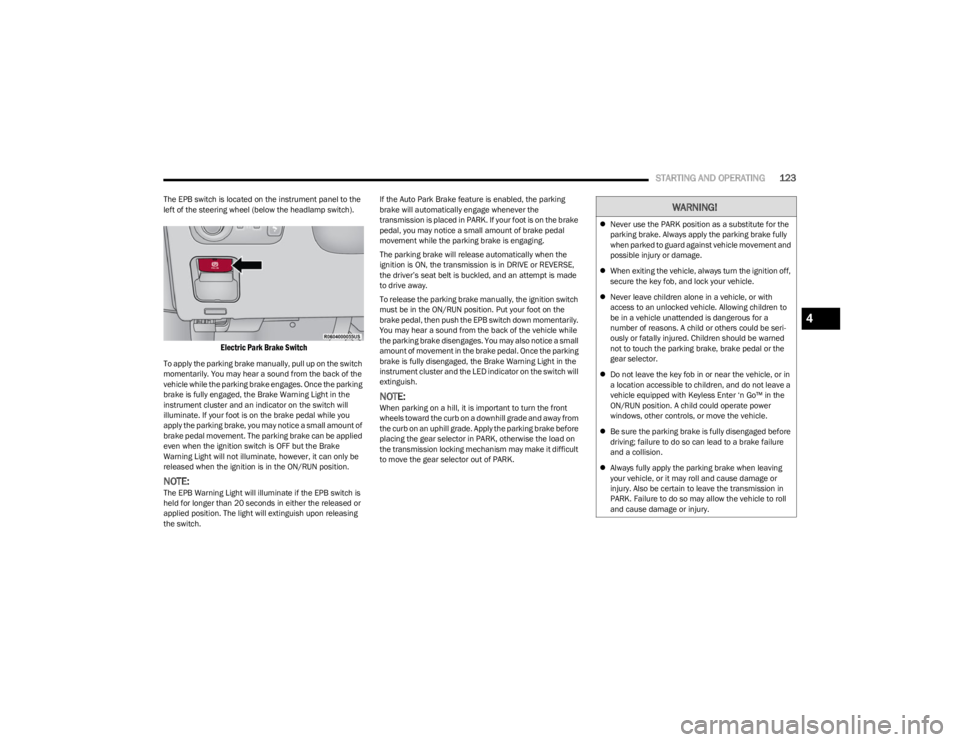
The EPB switch is located on the instrument panel to the
left of the steering wheel (below the headlamp switch).
Electric Park Brake Switch
To apply the parking brake manually, pull up on the switch
momentarily. You may hear a sound from the back of the
vehicle while the parking brake engages. Once the parking
brake is fully engaged, the Brake Warning Light in the
instrument cluster and an indicator on the switch will
illuminate. If your foot is on the brake pedal while you
apply the parking brake, you may notice a small amount of
brake pedal movement. The parking brake can be applied
even when the ignition switch is OFF but the Brake
Warning Light will not illuminate, however, it can only be
released when the ignition is in the ON/RUN position.
NOTE:The EPB Warning Light will illuminate if the EPB switch is
held for longer than 20 seconds in either the released or
applied position. The light will extinguish upon releasing
the switch. If the Auto Park Brake feature is enabled, the parking
brake will automatically engage whenever the
transmission is placed in PARK. If your foot is on the brake
pedal, you may notice a small amount of brake pedal
movement while the parking brake is engaging.
The parking brake will release automatically when the
ignition is ON, the transmission is in DRIVE or REVERSE,
the driver’s seat belt is buckled, and an attempt is made
to drive away.
To release the parking brake manually, the ignition switch
must be in the ON/RUN position. Put your foot on the
brake pedal, then push the EPB switch down momentarily.
You may hear a sound from the back of the vehicle while
the parking brake disengages. You may also notice a small
amount of movement in the brake pedal. Once the parking
brake is fully disengaged, the Brake Warning Light in the
instrument cluster and the LED indicator on the switch will
extinguish.
NOTE:When parking on a hill, it is important to turn the front
wheels toward the curb on a downhill grade and away from
the curb on an uphill grade. Apply the parking brake before
placing the gear selector in PARK, otherwise the load on
the transmission locking mechanism may make it difficult
to move the gear selector out of PARK.
WARNING!
Never use the PARK position as a substitute for the
parking brake. Always apply the parking brake fully
when parked to guard against vehicle movement and
possible injury or damage.
When exiting the vehicle, always turn the ignition off,
secure the key fob, and lock your vehicle.
Never leave children alone in a vehicle, or with
access to an unlocked vehicle. Allowing children to
be in a vehicle unattended is dangerous for a
number of reasons. A child or others could be seri -
ously or fatally injured. Children should be warned
not to touch the parking brake, brake pedal or the
gear selector.
Do not leave the key fob in or near the vehicle, or in
a location accessible to children, and do not leave a
vehicle equipped with Keyless Enter ‘n Go™ in the
ON/RUN position. A child could operate power
windows, other controls, or move the vehicle.
Be sure the parking brake is fully disengaged before
driving; failure to do so can lead to a brake failure
and a collision.
Always fully apply the parking brake when leaving
your vehicle, or it may roll and cause damage or
injury. Also be certain to leave the transmission in
PARK. Failure to do so may allow the vehicle to roll
and cause damage or injury.
4
23_WS_OM_EN_USC_t.book Page 123
Page 128 of 396
126STARTING AND OPERATING
IGNITION PARK INTERLOCK
This vehicle is equipped with an Ignition Park Interlock
which requires the transmission to be in PARK (P) before
the ignition can be turned to the OFF position. This helps
the driver avoid inadvertently leaving the vehicle without
placing the transmission in PARK. This system also locks
the transmission in PARK whenever the ignition is in the
OFF position.
NOTE:The transmission is NOT locked in PARK when the ignition
is in the ON/RUN position (even though the engine will be
off). Ensure that the transmission is in PARK, and the
ignition is OFF (not in ON/RUN position) before exiting the
vehicle.
BRAKE/TRANSMISSION SHIFT
I
NTERLOCK (BTSI) SYSTEM
This vehicle is equipped with a BTSI system that holds the
transmission gear selector in PARK unless the brakes are
applied. To shift the transmission out of PARK, the engine
must be running and the brake pedal must be pressed.
The brake pedal must also be pressed to shift from
NEUTRAL into DRIVE or REVERSE when the vehicle is
stopped or moving at low speeds.
8-SPEED AUTOMATIC TRANSMISSION
The transmission is controlled using a rotary electronic
gear selector located on the center console. The
transmission gear range (PRND) is displayed both above
the gear selector and in the instrument cluster. To select
a gear range, simply rotate the gear selector. You must
press the brake pedal to shift the transmission out of
PARK (or NEUTRAL, when the vehicle is stopped or moving
at low speeds). To shift past multiple gear ranges at once
(such as PARK to DRIVE), simply rotate the gear selector
to the appropriate detent. Select the DRIVE range for
normal driving.
NOTE:In the event of a mismatch between the gear selector
position and the actual transmission gear (for example,
driver selects PARK while driving), the position indicator
will blink continuously until the selector is returned to the
proper position, or the requested shift can be completed.
Unintended movement of a vehicle could injure
those in or near the vehicle. As with all vehicles, you
should never exit a vehicle while the engine is
running. Before exiting a vehicle, always come to a
complete stop, then apply the parking brake, shift
the transmission into PARK, and turn the ignition
OFF. When the ignition is in the OFF position, the
transmission is locked in PARK, securing the vehicle
against unwanted movement.
When exiting the vehicle, always make sure the igni -
tion is in the OFF position, remove the key fob from
the vehicle, and lock the vehicle.
Never leave children alone in a vehicle, or with
access to an unlocked vehicle. Allowing children to
be in a vehicle unattended is dangerous for a
number of reasons. A child or others could be seri -
ously or fatally injured. Children should be warned
not to touch the parking brake, brake pedal or the
transmission gear selector.
Do not leave the key fob in or near the vehicle (or in
a location accessible to children), and do not leave
the ignition in the ON/RUN position. A child could
operate power windows, other controls, or move the
vehicle.
WARNING!CAUTION!
Damage to the transmission may occur if the following
precautions are not observed:
Shift into or out of PARK or REVERSE (R) only after
the vehicle has come to a complete stop.
Do not shift between PARK, REVERSE, NEUTRAL, or
DRIVE (D) when the engine is above idle speed.
Before shifting into any gear, make sure your foot is
firmly pressing the brake pedal.
23_WS_OM_EN_USC_t.book Page 126