ECO mode JEEP WAGONEER 2023 Owner's Manual
[x] Cancel search | Manufacturer: JEEP, Model Year: 2023, Model line: WAGONEER, Model: JEEP WAGONEER 2023Pages: 396, PDF Size: 15.17 MB
Page 73 of 396
GETTING TO KNOW YOUR VEHICLE71
REAR CLIMATE CONTROL OFF
To turn the rear climate controls off, push the
OFF button below the rear climate control
display, or if equipped, press and release the
OFF button on the Rear Comfort And
Convenience Display touchscreen, near the blower
buttons.
AUTOMATIC TEMPERATURE CONTROL
(ATC)
Automatic Operation
1. Push the AUTO button on the front climate control
display, and the word “AUTO” will illuminate along
with two temperatures for the driver and front
passenger. The system will then automatically
regulate the amount of airflow.
2. Adjust the temperature you would like the system to maintain, by adjusting the driver, passenger, and rear
temperatures. Once the desired temperature is
displayed, the system will achieve, and automatically
maintain, that comfort level.
3. When the system is set up for your comfort level, it is not necessary to change the settings. You will
experience the greatest efficiency by simply allowing
the system to function automatically.
NOTE:It is not necessary to move the temperature settings. The
system automatically adjusts the temperature, mode, and
fan speed to provide comfort as quickly as possible. To provide you with maximum comfort in the automatic
mode during cold start-ups, the blower fan will remain on
low until the engine warms up. The fan will engage
immediately if the Defrost mode is selected, or by
changing the front blower setting.
Manual Operation Override
This system offers a full complement of manual override
features. The AUTO symbol in the front climate control
display will no longer be illuminated when the system is
being used in the manual mode.
NOTE:The system will not automatically sense the presence of
fog, mist or ice on the windshield. Defrost mode must be
manually selected to clear the windshield and side glass.
CLIMATE VOICE RECOGNITION
Adjust vehicle temperatures hands-free and keep
everyone comfortable while you keep moving ahead (If
vehicle is equipped with climate control).
Push the VR/Phone button . After the beep, say one of
the following commands:
“Set the driver temperature to 70 degrees”
“Set the passenger temperature to 70 degrees”
Did You Know: Voice Command for Climate may only be
used to adjust the interior temperature of your vehicle.
Voice Command will not work to adjust the heated seats
or steering wheel if equipped.
OPERATING TIPS
Refer to the chart at the end of this section for suggested
control settings for various weather conditions.
Summer Operation
The engine cooling system must be protected with a
high-quality antifreeze coolant to provide proper corrosion
protection and to protect against engine overheating. OAT
coolant (conforming to MS.90032) is recommended.
Winter Operation
To ensure the best possible heater and defroster
performance, make sure the engine cooling system is
functioning properly and the proper amount, type, and
concentration of coolant is used. Use of the Air
Recirculation mode during Winter months is not
recommended, because it may cause window fogging.
Vacation/Storage
For information on maintaining the Climate Control system
when the vehicle is being stored for an extended period of
time, see
Úpage 368.
CAUTION!
Interior air enters the Rear Climate Control system
through an intake grille, located in the right side trim
panel behind the third row seats. The heater outlets are
located in the right side trim panel, just behind the rear
doors. Do not block or place objects directly in front of
the inlet grille or heater outlets. The electrical system
could overload causing damage to the blower motor.
2
23_WS_OM_EN_USC_t.book Page 71
Page 77 of 396
GETTING TO KNOW YOUR VEHICLE75
CENTER CONSOLE COOLER —
I
F EQUIPPED
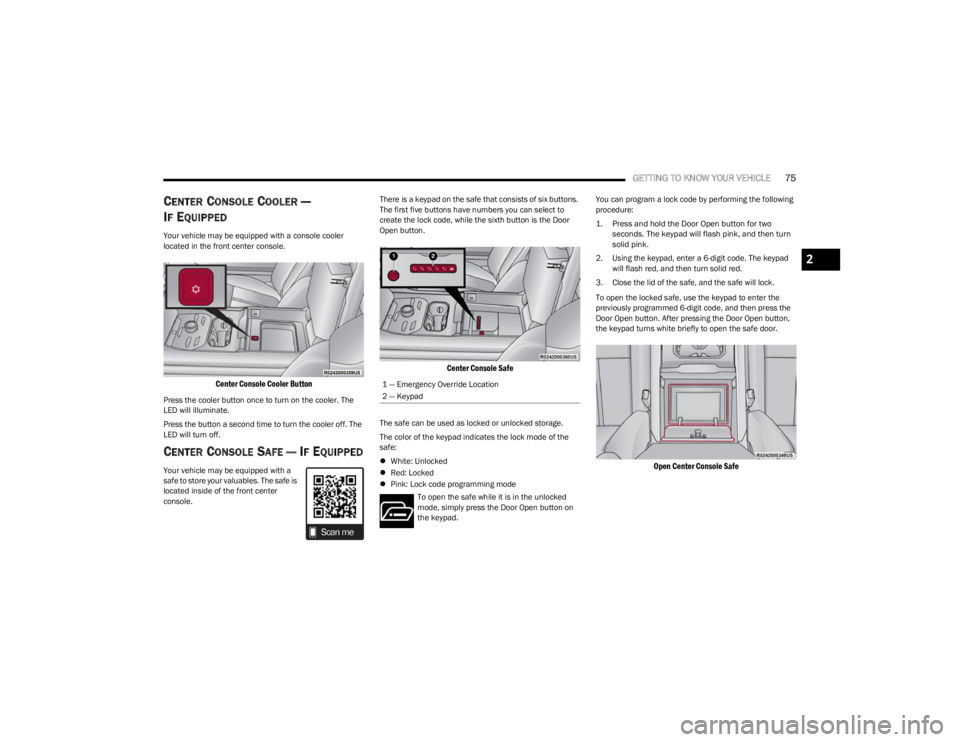
Your vehicle may be equipped with a console cooler
located in the front center console.
Center Console Cooler Button
Press the cooler button once to turn on the cooler. The
LED will illuminate.
Press the button a second time to turn the cooler off. The
LED will turn off.
CENTER CONSOLE SAFE — IF EQUIPPED
Your vehicle may be equipped with a
safe to store your valuables. The safe is
located inside of the front center
console. There is a keypad on the safe that consists of six buttons.
The first five buttons have numbers you can select to
create the lock code, while the sixth button is the Door
Open button.
Center Console Safe
The safe can be used as locked or unlocked storage.
The color of the keypad indicates the lock mode of the
safe:
White: Unlocked
Red: Locked
Pink: Lock code programming mode
To open the safe while it is in the unlocked
mode, simply press the Door Open button on
the keypad. You can program a lock code by performing the following
procedure:
1. Press and hold the Door Open button for two
seconds. The keypad will flash pink, and then turn
solid pink.
2. Using the keypad, enter a 6-digit code. The keypad will flash red, and then turn solid red.
3. Close the lid of the safe, and the safe will lock.
To open the locked safe, use the keypad to enter the
previously programmed 6-digit code, and then press the
Door Open button. After pressing the Door Open button,
the keypad turns white briefly to open the safe door.
Open Center Console Safe
1 — Emergency Override Location
2 — Keypad
2
23_WS_OM_EN_USC_t.book Page 75
Page 78 of 396
76GETTING TO KNOW YOUR VEHICLE
The keypad will then turn red again, and return to the
locked mode when the safe lid is closed.
NOTE:The keypad will flash red if an incorrect lock code is
entered. If the incorrect code is entered ten times in a row,
the user will be locked out from further attempts for
approximately 30 minutes.
To revert the safe back to the unlocked mode:
1. Enter the programmed 6-digit code.
2. Press and hold the Door Open button for two
seconds. The keypad will flash red and change to
pink.
3. Enter the 6-digit code and press the Door Open button. The keypad will flash white.
Once this procedure is completed, the safe will no longer
lock when the lid is closed.
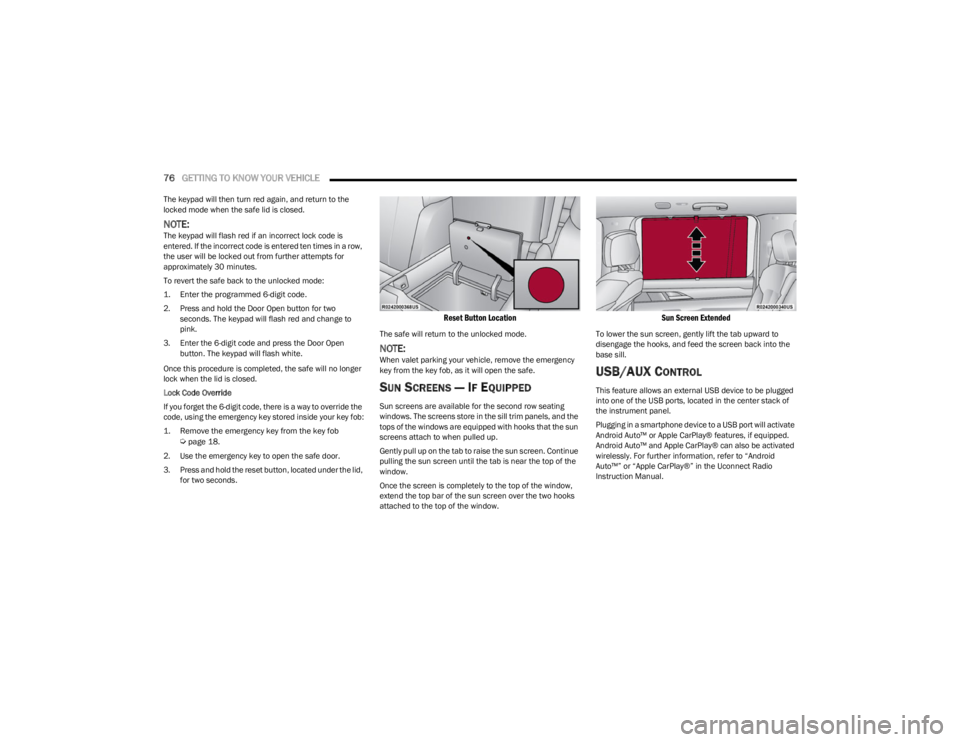
Lock Code Override
If you forget the 6-digit code, there is a way to override the
code, using the emergency key stored inside your key fob:
1. Remove the emergency key from the key fob
Ú
page 18.
2. Use the emergency key to open the safe door.
3. Press and hold the reset button, located under the lid, for two seconds.
Reset Button Location
The safe will return to the unlocked mode.
NOTE:When valet parking your vehicle, remove the emergency
key from the key fob, as it will open the safe.
SUN SCREENS — IF EQUIPPED
Sun screens are available for the second row seating
windows. The screens store in the sill trim panels, and the
tops of the windows are equipped with hooks that the sun
screens attach to when pulled up.
Gently pull up on the tab to raise the sun screen. Continue
pulling the sun screen until the tab is near the top of the
window.
Once the screen is completely to the top of the window,
extend the top bar of the sun screen over the two hooks
attached to the top of the window.
Sun Screen Extended
To lower the sun screen, gently lift the tab upward to
disengage the hooks, and feed the screen back into the
base sill.
USB/AUX CONTROL
This feature allows an external USB device to be plugged
into one of the USB ports, located in the center stack of
the instrument panel.
Plugging in a smartphone device to a USB port will activate
Android Auto™ or Apple CarPlay® features, if equipped.
Android Auto™ and Apple CarPlay® can also be activated
wirelessly. For further information, refer to “Android
Auto™” or “Apple CarPlay®” in the Uconnect Radio
Instruction Manual.
23_WS_OM_EN_USC_t.book Page 76
Page 88 of 396
86GETTING TO KNOW YOUR VEHICLE
CLOSING THE HOOD
In one continuous motion, pull down on the front edge of
the hood with moderate force until the angle is below the
crossover point (where the gas props are no longer
resisting) and let the hood continue to fall closed from its
own inertia.
LIFTGATE
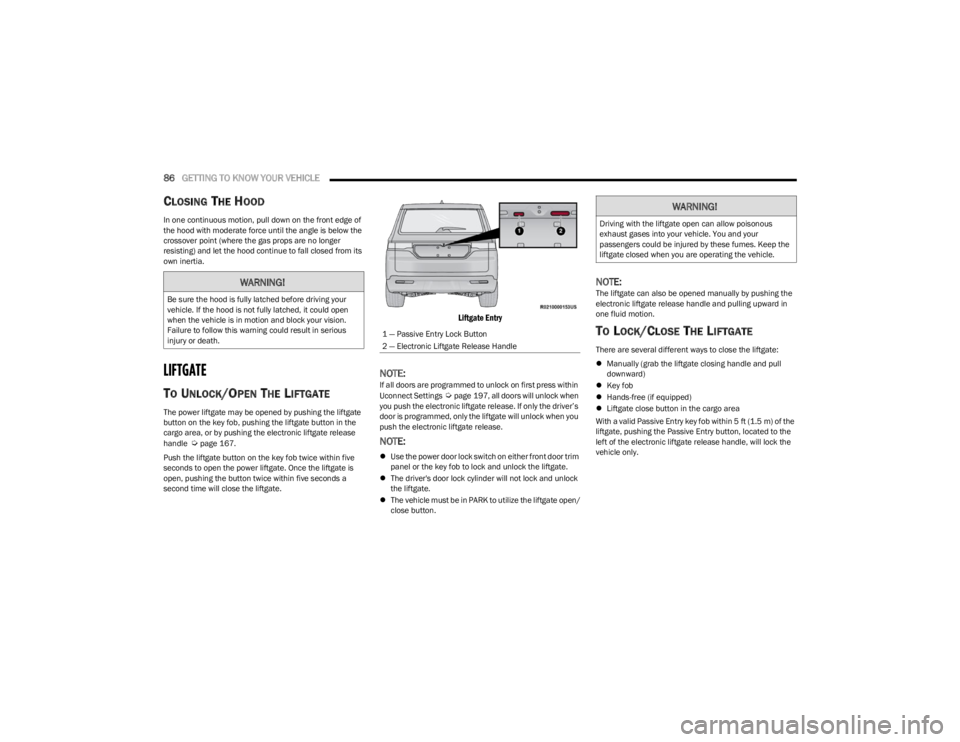
TO UNLOCK/OPEN THE LIFTGATE
The power liftgate may be opened by pushing the liftgate
button on the key fob, pushing the liftgate button in the
cargo area, or by pushing the electronic liftgate release
handle
Úpage 167.
Push the liftgate button on the key fob twice within five
seconds to open the power liftgate. Once the liftgate is
open, pushing the button twice within five seconds a
second time will close the liftgate.
Liftgate Entry
NOTE:If all doors are programmed to unlock on first press within
Uconnect Settings Úpage 197, all doors will unlock when
you push the electronic liftgate release. If only the driver’s
door is programmed, only the liftgate will unlock when you
push the electronic liftgate release.
NOTE:
Use the power door lock switch on either front door trim
panel or the key fob to lock and unlock the liftgate.
The driver's door lock cylinder will not lock and unlock
the liftgate.
The vehicle must be in PARK to utilize the liftgate open/
close button.
NOTE:The liftgate can also be opened manually by pushing the
electronic liftgate release handle and pulling upward in
one fluid motion.
TO LOCK/CLOSE THE LIFTGATE
There are several different ways to close the liftgate:
Manually (grab the liftgate closing handle and pull
downward)
Key fob
Hands-free (if equipped)
Liftgate close button in the cargo area
With a valid Passive Entry key fob within 5 ft (1.5 m) of the liftgate, pushing the Passive Entry button, located to the
left of the electronic liftgate release handle, will lock the
vehicle only.
WARNING!
Be sure the hood is fully latched before driving your
vehicle. If the hood is not fully latched, it could open
when the vehicle is in motion and block your vision.
Failure to follow this warning could result in serious
injury or death.
1 — Passive Entry Lock Button
2 — Electronic Liftgate Release Handle
WARNING!
Driving with the liftgate open can allow poisonous
exhaust gases into your vehicle. You and your
passengers could be injured by these fumes. Keep the
liftgate closed when you are operating the vehicle.
23_WS_OM_EN_USC_t.book Page 86
Page 90 of 396
88GETTING TO KNOW YOUR VEHICLE
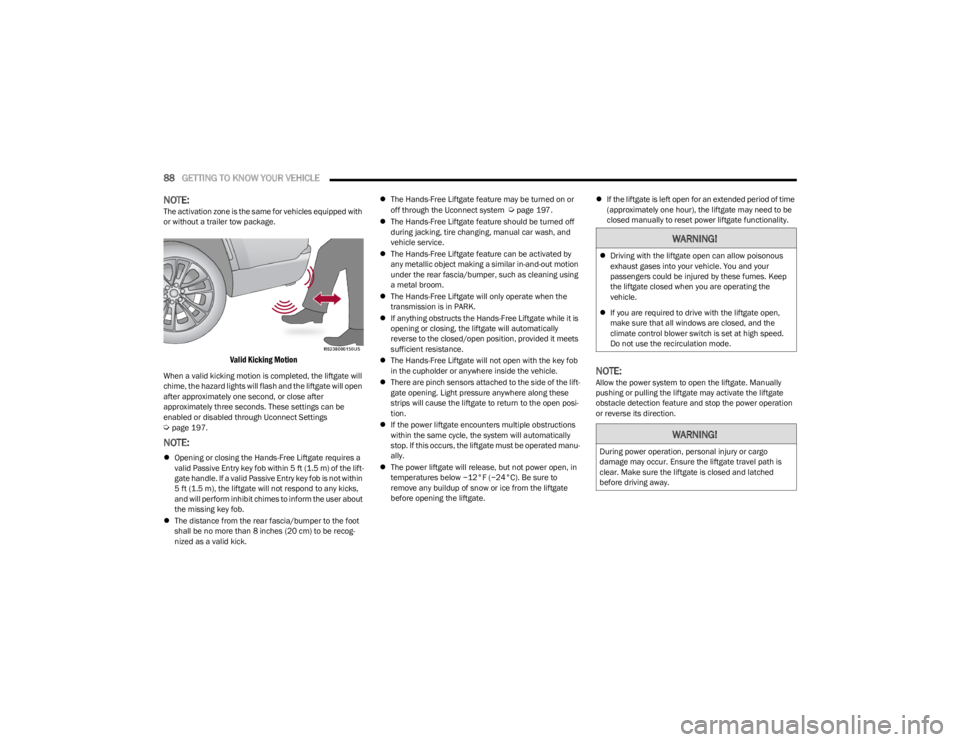
NOTE:The activation zone is the same for vehicles equipped with
or without a trailer tow package.
Valid Kicking Motion
When a valid kicking motion is completed, the liftgate will
chime, the hazard lights will flash and the liftgate will open
after approximately one second, or close after
approximately three seconds. These settings can be
enabled or disabled through Uconnect Settings
Úpage 197.
NOTE:
Opening or closing the Hands-Free Liftgate requires a
valid Passive Entry key fob within 5 ft (1.5 m) of the lift -
gate handle. If a valid Passive Entry key fob is not within
5 ft (1.5 m), the liftgate will not respond to any kicks,
and will perform inhibit chimes to inform the user about
the missing key fob.
The distance from the rear fascia/bumper to the foot
shall be no more than 8 inches (20 cm) to be recog -
nized as a valid kick.
The Hands-Free Liftgate feature may be turned on or
off through the Uconnect system
Úpage 197.
The Hands-Free Liftgate feature should be turned off
during jacking, tire changing, manual car wash, and
vehicle service.
The Hands-Free Liftgate feature can be activated by
any metallic object making a similar in-and-out motion
under the rear fascia/bumper, such as cleaning using
a metal broom.
The Hands-Free Liftgate will only operate when the
transmission is in PARK.
If anything obstructs the Hands-Free Liftgate while it is
opening or closing, the liftgate will automatically
reverse to the closed/open position, provided it meets
sufficient resistance.
The Hands-Free Liftgate will not open with the key fob
in the cupholder or anywhere inside the vehicle.
There are pinch sensors attached to the side of the lift -
gate opening. Light pressure anywhere along these
strips will cause the liftgate to return to the open posi -
tion.
If the power liftgate encounters multiple obstructions
within the same cycle, the system will automatically
stop. If this occurs, the liftgate must be operated manu -
ally.
The power liftgate will release, but not power open, in
temperatures below −12°F (−24°C). Be sure to
remove any buildup of snow or ice from the liftgate
before opening the liftgate.
If the liftgate is left open for an extended period of time
(approximately one hour), the liftgate may need to be
closed manually to reset power liftgate functionality.
NOTE:Allow the power system to open the liftgate. Manually
pushing or pulling the liftgate may activate the liftgate
obstacle detection feature and stop the power operation
or reverse its direction.
WARNING!
Driving with the liftgate open can allow poisonous
exhaust gases into your vehicle. You and your
passengers could be injured by these fumes. Keep
the liftgate closed when you are operating the
vehicle.
If you are required to drive with the liftgate open,
make sure that all windows are closed, and the
climate control blower switch is set at high speed.
Do not use the recirculation mode.
WARNING!
During power operation, personal injury or cargo
damage may occur. Ensure the liftgate travel path is
clear. Make sure the liftgate is closed and latched
before driving away.
23_WS_OM_EN_USC_t.book Page 88
Page 101 of 396
GETTING TO KNOW YOUR INSTRUMENT PANEL99
INSTRUMENT CLUSTER DESCRIPTIONS
1. Speedometer
Indicates vehicle speed.
2. Temperature Gauge The temperature gauge shows engine coolant
temperature. Any reading within the normal range
indicates that the engine cooling system is oper -
ating satisfactorily.
The pointer will likely indicate a higher tempera -
ture when driving in hot weather, up mountain
grades, or when towing a trailer. It should not be
allowed to exceed the upper limits of the normal
operating range. 3. Tachometer
Indicates the engine speed in revolutions per
minute (RPM x 1000).
4. Fuel Gauge The pointer shows the level of fuel in the fuel tank
when the Keyless Push Button Ignition is in the
ON/RUN position.
The fuel pump symbol points to the
side of the vehicle where the fuel door
is located.
NOTE:The Instrument Cluster Warning Indicators will illuminate
briefly for a bulb check when the ignition is first cycled.
INSTRUMENT CLUSTER DISPLAY
Depending on your vehicles trim level, features and
options may vary.
Your vehicle is equipped with an instrument cluster
display, which offers useful information to the driver. With
the ignition in the OFF mode, opening/closing of a door will
activate the display for viewing, and display the total miles,
or kilometers, in the odometer. Your instrument cluster
display is designed to display important information about
your vehicle’s systems and features. Using a driver interactive display located on the
instrument panel, your instrument cluster display can
show how systems are working and give you warnings
when they are not. The steering wheel mounted controls
allow you to scroll through the main menus and
submenus. You can access the specific information you
want and make selections and adjustments.
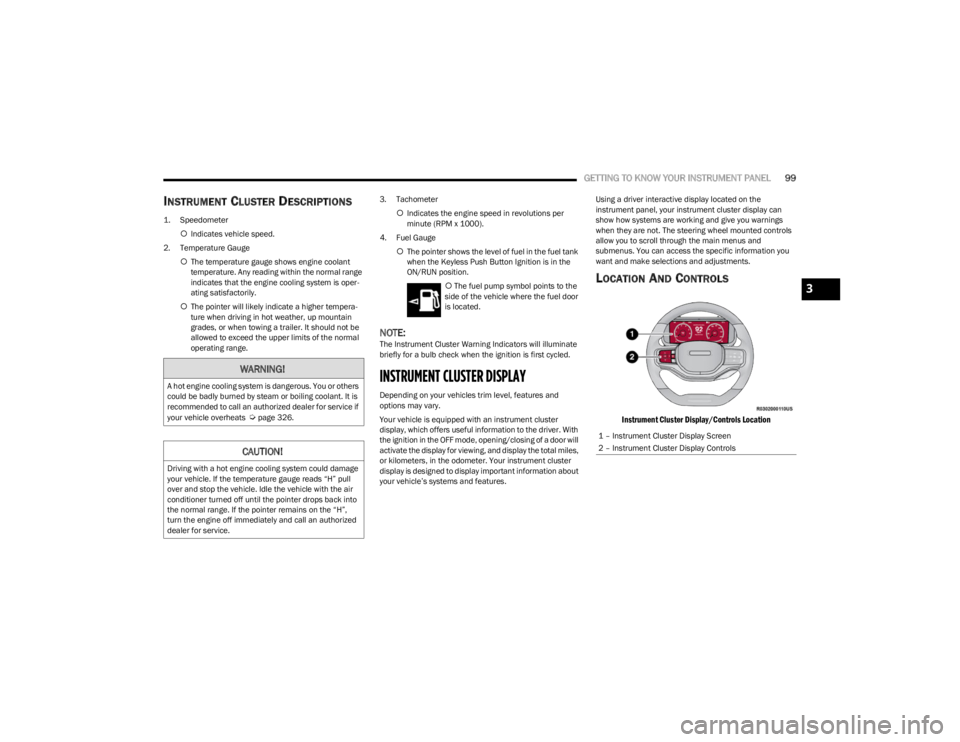
LOCATION AND CONTROLS
Instrument Cluster Display/Controls Location
WARNING!
A hot engine cooling system is dangerous. You or others
could be badly burned by steam or boiling coolant. It is
recommended to call an authorized dealer for service if
your vehicle overheats
Úpage 326.
CAUTION!
Driving with a hot engine cooling system could damage
your vehicle. If the temperature gauge reads “H” pull
over and stop the vehicle. Idle the vehicle with the air
conditioner turned off until the pointer drops back into
the normal range. If the pointer remains on the “H”,
turn the engine off immediately and call an authorized
dealer for service.
1 – Instrument Cluster Display Screen
2 – Instrument Cluster Display Controls
3
23_WS_OM_EN_USC_t.book Page 99
Page 102 of 396
100GETTING TO KNOW YOUR INSTRUMENT PANEL
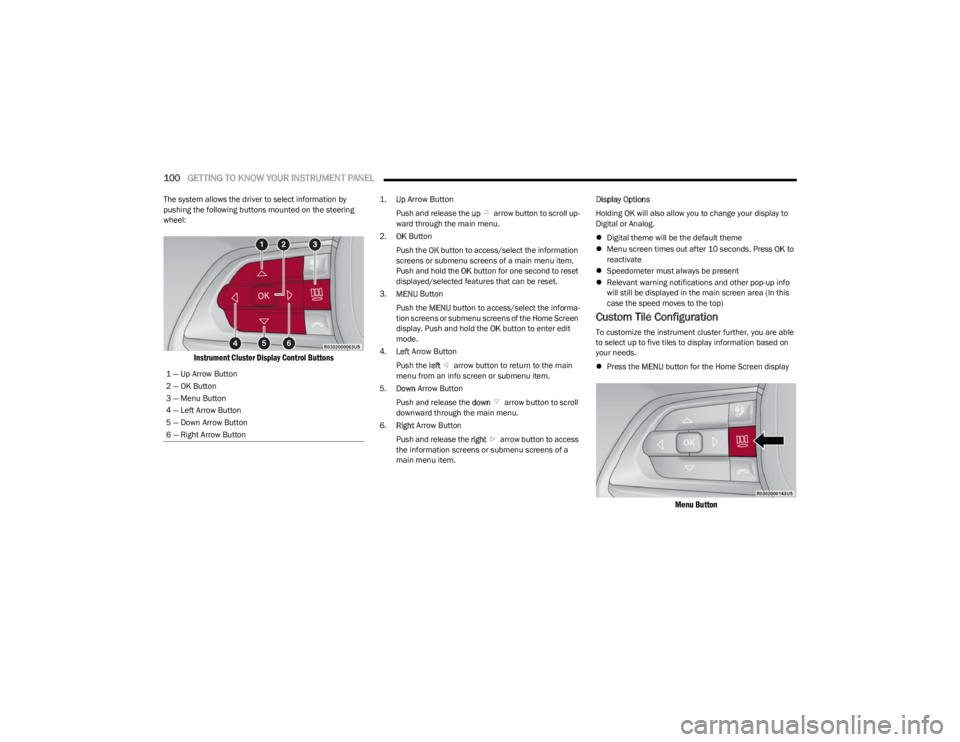
The system allows the driver to select information by
pushing the following buttons mounted on the steering
wheel:
Instrument Cluster Display Control Buttons
1.
Up
Arrow Button
Push and release the up arrow button to scroll up -
ward through the main menu.
2. OK Button
Push the OK button to access/select the information
screens or submenu screens of a main menu item.
Push and hold the OK button for one second to reset
displayed/selected features that can be reset.
3. MENU Button
Push the MENU button to access/select the informa -
tion screens or submenu screens of the Home Screen
display. Push and hold the OK button to enter edit
mode.
4. Left Arrow Button
Push the left arrow button to return to the main
menu from an info screen or submenu item.
5. Down Arrow Button
Push and release the down arrow button to scroll
downward through the main menu.
6. Right Arrow Button
Push and release the right arrow button to access
the information screens or submenu screens of a
main menu item. Display Options
Holding
OK will also allow you to change your display to
Digital or Analog.
Digital theme will be the default theme
Menu screen times out after 10 seconds. Press OK to
reactivate
Speedometer must always be present
Relevant warning notifications and other pop-up info
will still be displayed in the main screen area (In this
case the speed moves to the top)
Custom Tile Configuration
To customize the instrument cluster further, you are able
to select up to five tiles to display information based on
your needs.
Press the MENU button for the Home Screen display
Menu Button
1 — Up Arrow Button
2 — OK Button
3 — Menu Button
4 — Left Arrow Button
5 — Down Arrow Button
6 — Right Arrow Button
23_WS_OM_EN_USC_t.book Page 100
Page 116 of 396
114GETTING TO KNOW YOUR INSTRUMENT PANEL
Tire Pressure Monitoring System (TPMS)
Warning Light
The warning light switches on and a message is
displayed to indicate that the tire pressure is
lower than the recommended value and/or
that slow pressure loss is occurring. In these
cases, optimal tire duration and fuel consumption may not
be guaranteed.
Should one or more tires be in the condition mentioned
previously, the display will show the indications
corresponding to each tire.
Each tire, including the spare (if provided), should be
checked monthly when cold and inflated to the inflation
pressure recommended by the vehicle manufacturer on
the vehicle placard or tire inflation pressure label. If your
vehicle has tires of a different size than the size indicated
on the vehicle placard or tire inflation pressure label, you
should determine the proper tire inflation pressure for
those tires. As an added safety feature, your vehicle has been
equipped with a TPMS that illuminates a low tire pressure
telltale when one or more of your tires is significantly
underinflated. Accordingly, when the low tire pressure
telltale illuminates, you should stop and check your tires
as soon as possible, and inflate them to the proper
pressure. Driving on a significantly underinflated tire
causes the tire to overheat and can lead to tire failure.
Underinflation also reduces fuel efficiency and tire tread
life, and may affect the vehicle’s handling and stopping
ability.
Please note that the TPMS is not a substitute for proper
tire maintenance, and it is the driver’s responsibility to
maintain correct tire pressure, even if underinflation has
not reached the level to trigger illumination of the TPMS
low tire pressure telltale.
Your vehicle has also been equipped with a TPMS
malfunction indicator to indicate when the system is not
operating properly. The TPMS malfunction indicator is
combined with the low tire pressure telltale. When the
system detects a malfunction, the telltale will flash for
approximately one minute and then remain continuously
illuminated. This sequence will continue upon subsequent
vehicle start-ups as long as the malfunction exists. When
the malfunction indicator is illuminated, the system may
not be able to detect or signal low tire pressure as
intended. TPMS malfunctions may occur for a variety of
reasons, including the installation of replacement or
alternate tires or wheels on the vehicle that prevent the
TPMS from functioning properly. Always check the TPMS
malfunction telltale after replacing one or more tires or
wheels on your vehicle to ensure that the replacement or
alternate tires and wheels allow the TPMS to continue to
function properly
Úpage 252.
Towing Hook Breakdown Warning Light —
If Equipped
This light illuminates when there is a failure
with the tow hook. Contact an authorized
dealer for service.
YELLOW INDICATOR LIGHTS
4WD Low Indicator Light — If Equipped
This light alerts the driver that the vehicle is in
the 4WD Low mode. The front and rear
driveshafts are mechanically locked together
forcing the front and rear wheels to rotate at
the same speed. Low range provides a greater gear
reduction ratio to provide increased torque at the wheels
Úpage 129.
CAUTION!
Do not continue driving with one or more flat tires as
handling may be compromised. Stop the vehicle,
avoiding sharp braking and steering. If a tire puncture
occurs, repair immediately using the dedicated tire
repair kit and contact an authorized dealer as soon as
possible.
CAUTION!
The TPMS has been optimized for the original
equipment tires and wheels. TPMS pressures and
warning have been established for the tire size
equipped on your vehicle. Undesirable system
operation or sensor damage may result when using
replacement equipment that is not of the same size,
type, and/or style. Aftermarket wheels can cause
sensor damage. Using aftermarket tire sealants may
cause the Tire Pressure Monitoring System (TPMS)
sensor to become inoperable. After using an
aftermarket tire sealant it is recommended that you
take your vehicle to an authorized dealer to have your
sensor function checked.
23_WS_OM_EN_USC_t.book Page 114
Page 124 of 396
122STARTING AND OPERATING
COLD WEATHER OPERATION
(B
ELOW –22°F OR −30°C)
To ensure reliable starting at these temperatures, use of
an externally powered electric engine block heater
(available from an authorized dealer) is recommended.
AFTER STARTING
The idle speed is controlled automatically, and it will
decrease as the engine warms up.
TURBOCHARGER “COOL DOWN” —
3.0L E
NGINE ONLY
The 3.0L engine is equipped with an after-run pump to
cool the turbocharger after the engine is shut off.
Depending on the type of driving and the amount of cargo,
the pump will run for up to 20 minutes after the engine
has been shut off to circulate coolant through the
turbocharger. Although the pump is rubber-mounted for
quiet operation, it is normal to hear it running during this
time.
ENGINE BLOCK HEATER — IF EQUIPPED
The engine block heater warms the engine, and permits
quicker starts in cold weather. Connect the cord to a
standard 110-115 Volt AC electrical outlet with a
grounded, three-wire extension cord.
The engine block heater must be plugged in at least one
hour to have an adequate warming effect on the engine. The engine block heater cord is coiled and strapped right
behind the engine air cleaner filter assembly from the
manufacturer.
ENGINE BREAK-IN RECOMMENDATIONS
An initial break-in period is recommended for the
powertrain (engine, transmission, axle, etc.) in your
vehicle. Adhering to the following guidelines will contribute
to improved longevity, fuel economy, and performance.
Drive moderately during the first 100 miles (160 km).
After that, for the first 500 miles (800 km), avoid long
periods at constant speed. Varying speed, engine RPM,
and throttle position is desirable.
Avoid high performance, severe off-road, and towing for
the first 500 miles (800 km).
NOTE:A new engine may consume some oil during its first few
thousand miles (km) of operation. This should be
considered a normal part of the break-in and not inter -
preted as a problem. For engines not equipped with an oil
level sensor, please check your oil level frequently during
the break-in period. Add manufacturer-approved oil as
required
Úpage 376.
PARKING BRAKE
ELECTRIC PARK BRAKE (EPB)
Your vehicle is equipped with an EPB that offers simple
operation, and some additional features that make the
parking brake more convenient and useful.
The parking brake is primarily intended to prevent the
vehicle from rolling while parked. Before leaving the
vehicle, make sure that the parking brake is applied. Also,
be certain to leave the transmission in PARK.
You can engage the parking brake in two ways:
Manually, by applying the EPB switch.
Automatically, by enabling the Auto Park Brake feature
in the customer programmable features section of the
Uconnect settings.
WARNING!
Remember to disconnect the engine block heater cord
before driving. Damage to the 110-115 Volt electrical
cord could cause electrocution.
CAUTION!
Never use Non-Detergent Oil or Straight Mineral Oil in
the engine or damage may result. ONLY USE OILS THAT
ARE API APPROVED
Úpage 376.
23_WS_OM_EN_USC_t.book Page 122
Page 127 of 396
STARTING AND OPERATING125
(Continued)
The following conditions must be met for Auto Hold to
activate:
Driver’s door is closed
Driver's seat belt is fastened
Vehicle is at a standstill
Forward gear is selected
ACC is not engaged
EPB is not applied
ParkSense Active Park Assist System auto parking
maneuver is not activated
Brake Maintenance Mode
We recommend having your brakes serviced by an
authorized dealer. You should only make repairs for which
you have the knowledge and the right equipment. You
should only enter Brake Maintenance mode during brake
service.
When servicing your rear brakes, it may be necessary for
you or your technician to push the rear piston into the rear
caliper bore. With the EPB system, this can only be done
after retracting the EPB actuator. Fortunately, actuator
retraction can be done easily by entering the Brake
Maintenance mode through the Uconnect Settings in your
vehicle. This menu-based system will guide you through
the steps necessary to retract the EPB actuator in order to
perform rear brake service. Maintenance mode has requirements that must be met in
order to be activated:
The vehicle must be at a standstill.
The parking brake must be unapplied.
The transmission must be in PARK or NEUTRAL.
While in Maintenance mode, the EPB Warning Light will
flash continuously while the ignition is ON.
When brake service work is complete, the following steps
must be followed to reset the parking brake system to
normal operation:
Ensure the vehicle is at a standstill.
Press the brake pedal with moderate force.
Apply the EPB switch.
AUTOMATIC TRANSMISSION
You must press and hold the brake pedal while shifting out
of PARK.
WARNING!
You can be badly injured working on or around a motor
vehicle. Do only that service work for which you have
the knowledge and the right equipment. If you have any
doubt about your ability to perform a service job, take
your vehicle to a competent mechanic.
WARNING!
Never use the PARK (P) position as a substitute for
the parking brake. Always apply the parking brake
fully when exiting the vehicle to guard against vehicle
movement and possible injury or damage.
Your vehicle could move and injure you and others if
it is not in PARK. Check by trying to move the trans -
mission gear selector out of PARK with the brake
pedal released. Make sure the transmission is in
PARK before exiting the vehicle.
The transmission may not engage PARK if the vehicle
is moving. Always bring the vehicle to a complete
stop before shifting to PARK, and verify that the
transmission gear position indicator solidly indicates
PARK without blinking. Ensure that the vehicle is
completely stopped, and the PARK position is prop -
erly indicated, before exiting the vehicle.
It is dangerous to shift out of PARK or NEUTRAL (N) if
the engine speed is higher than idle speed. If your
foot is not firmly pressing the brake pedal, the
vehicle could accelerate quickly forward or in
reverse. You could lose control of the vehicle and hit
someone or something. Only shift into gear when the
engine is idling normally and your foot is firmly
pressing the brake pedal.
4
23_WS_OM_EN_USC_t.book Page 125